Text fields can display text and let users edit or input new text. However if you need to display large amounts of text, a text field can be too limiting. To overcome the limited size of a text field, you can use a text view instead. A text view is essentially a larger version of a text field that can display large amounts of text or allow users to edit and input large amounts of text.
Since not all data is text, you can use an image view to display graphic images. Image views can display graphics for purely decorative purposes or to provide additional information to the user, such as changing images based on what the user is doing. Both text views and image views let you display information of any size on an iOS user interface.
Using Image Views
At the simplest level, an image view can display a graphic image such as a .jpg or .png image. However, an image view can also allow interaction so it can respond to touch or gestures from the user. This lets an image view double as both a way to display graphic images and a way to recognize touch input from the user.
- 1.
Create a new iOS project using the Single View App template (see Chapter 1) and name this new project ImageViewApp. This creates a single view for the user interface.
- 2.
Click the Main.storyboard file in the Navigator pane. Xcode displays the single view.
- 3.
Click the Library icon to open the Object Library window.
- 4.
Drag and drop an image view anywhere on the view. At this point, the image view is empty so we need to put something in to display it. Find a .jpg or .png image stored on your Macintosh. You can also find and download plenty of free images from www.pexels.com , free-images.com , or www.nasa.gov .
- 5.Drag and drop a .jpg or .png image from the Finder window to the Navigator pane as shown in Figure 9-1.
 Figure 9-1
Dragging and dropping an image to an Xcode project
- 6.
Release the left mouse button when a horizontal line appears in the Navigator pane. Xcode displays a dialog to complete the process of copying a graphic image into your Xcode project.
- 7.Select the “Copy items if needed” check box as shown in Figure 9-2.
 Figure 9-2
Storing a graphic image in an Xcode project
- 8.
Click the Finish button. Xcode displays the name of your graphic file in the Navigator pane.
- 9.
Click the graphic image name in the Navigator pane. The middle Xcode pane displays the contents of your graphic image.
- 10.
Click the image view object to select it.
- 11.
Choose View ➤ Inspectors ➤ Show Attributes Inspector, or click the Attributes Inspector icon in the upper right corner of the Xcode window.
- 12.Click in the Image popup menu and choose the name of your graphic image such as spaceshuttle.jpg as shown in Figure 9-3. Xcode displays your graphic image inside the image view.
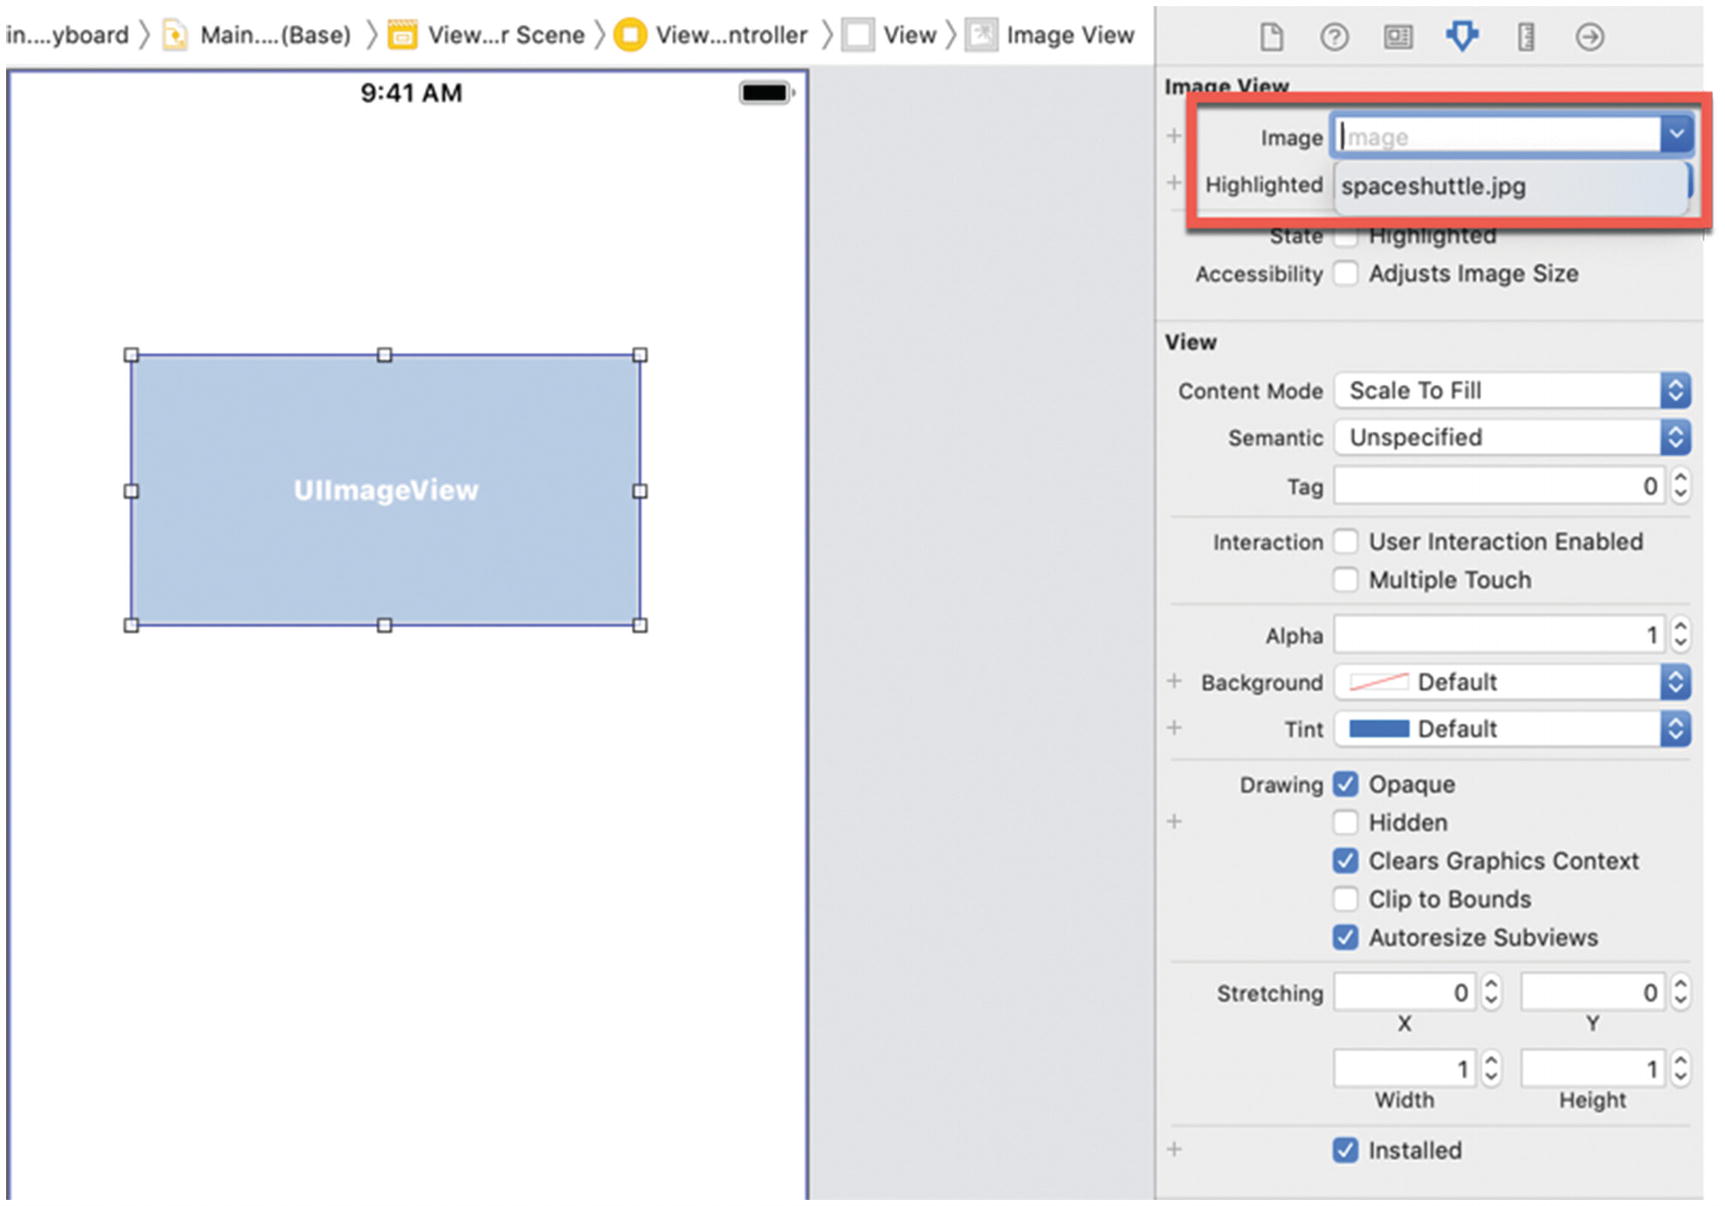 Figure 9-3
Selecting a graphic image to display in an image view
Scale to Fill – Alters the size of an image to fill the image view no matter what the height or width of the image view may be. This could create skewered images if an image view is too high or wide.
- Aspect Fit – Fits an image within the width and height of the image view while retaining the aspect ratio of the original image’s height and width. This means the image may not completely fill the height or width of the image view as shown in Figure 9-4.
 Figure 9-4
Aspect Fit may leave empty space inside the image view
Aspect Fill – Expands an image to fill the width or height of an image view. This means the image may extend over the width or height of the image view.
Redraw – Stretches the image to fill the width and height of the image view.
Center – Displays the image center within the image view. If the image is larger than the image view, then the rest of the image appears outside of the image view.
Top – Displays the image top within the image view. If the image is larger than the image view, then the rest of the image appears outside of the image view.
Bottom – Displays the image bottom within the image view. If the image is larger than the image view, then the rest of the image appears outside of the image view.
Left – Displays the image left center within the image view. If the image is larger than the image view, then the rest of the image appears outside of the image view.
Right – Displays the image right center within the image view. If the image is larger than the image view, then the rest of the image appears outside of the image view.
Top Left – Displays the top left of the image within the image view. If the image is larger than the image view, then the rest of the image appears outside of the image view.
Top Right – Displays the top right of the image within the image view. If the image is larger than the image view, then the rest of the image appears outside of the image view.
Bottom Left – Displays the bottom left of the image within the image view. If the image is larger than the image view, then the rest of the image appears outside of the image view.
Bottom Right – Displays the bottom right of the image within the image view. If the image is larger than the image view, then the rest of the image appears outside of the image view.
Making the Image View Interactive
Select the User Interaction Enabled check box.
Set the .isUserInteractionEnabled property to true using Swift code.

Allowing an image view to respond to touch gestures
- 1.
Click the Main.storyboard file in the Navigator pane of the ImageViewApp project.
- 2.
Choose View ➤ Assistant Editor ➤ Show Assistant Editor, or click the Assistant Editor icon. Xcode displays the Main.storyboard and ViewController.swift file side by side.
- 3.
Move the mouse pointer over the image view, hold down the Control key, and Ctrl-drag from the image view to the ViewController.swift file underneath the “class ViewController” line.
- 4.
Release the Control key and the left mouse button. A popup window appears.
- 5.
Click in the Name text field, type imageView, and click the Connect button. Xcode creates an IBOutlet variable as follows:
@IBOutlet var imageView: UIImageView!
- 6.
Choose View ➤ Standard Editor ➤ Show Standard Editor, or click the Standard Editor icon.
- 7.
Click the ViewController.swift file in the Navigator pane.
- 8.
Add the following line to the viewDidLoad method:
imageView.isUserInteractionEnabled = true
- 9.Type the following underneath the viewDidLoad method:override func touchesBegan(_ touches: Set<UITouch>, with event: UIEvent?) {let touch = touches.firstif touch?.view == imageView {print ("Touched")} else {print ("Nothing ")}}
The preceding touchesBegan method runs any time the user taps the screen. (In the Simulator, clicking the mouse mimics a finger tap.) The if-else statement checks to see if the user tapped the image view. If so, then it prints “Touched”. If the user tapped away from the image view, then it prints “Nothing”.
The entire ViewController.swift file should look like this:import UIKitclass ViewController: UIViewController {@IBOutlet var imageView: UIImageView!override func viewDidLoad() {super.viewDidLoad()imageView.isUserInteractionEnabled = true// Do any additional setup after loading the view, typically from a nib.}override func touchesBegan(_ touches: Set<UITouch>, with event: UIEvent?) {let touch = touches.firstif touch?.view == imageView {print ("Touched")} else {print ("Nothing ")}}} - 10.
Click the Run button or choose Product ➤ Run. The Simulator screen appears.
- 11.
Click the graphic image you stored in the image view. Notice that the Debug Area at the bottom of the Xcode window displays “Touched” each time you click the image view.
- 12.
Click anywhere else on the Simulator screen away from the image view. Notice that the Debug Area at the bottom of the Xcode window displays “Nothing” each time you click away from the image view.
- 13.
Choose Simulator ➤ Quit Simulator to return to Xcode.
Using a Text View
A text view acts just like a text field. The big difference is that a text view can be much larger and acts more like a miniature word processor that allows the user to move the cursor around and view or edit large amounts of text. Since a text view can both display text and allow the user to input text, the first property to modify is whether you want a text view to be editable or not.
Select the Editable check box in the Attributes Inspector (selected by default) as shown in Figure 9-6.
- Set the text view’s .editable property to true using Swift code.
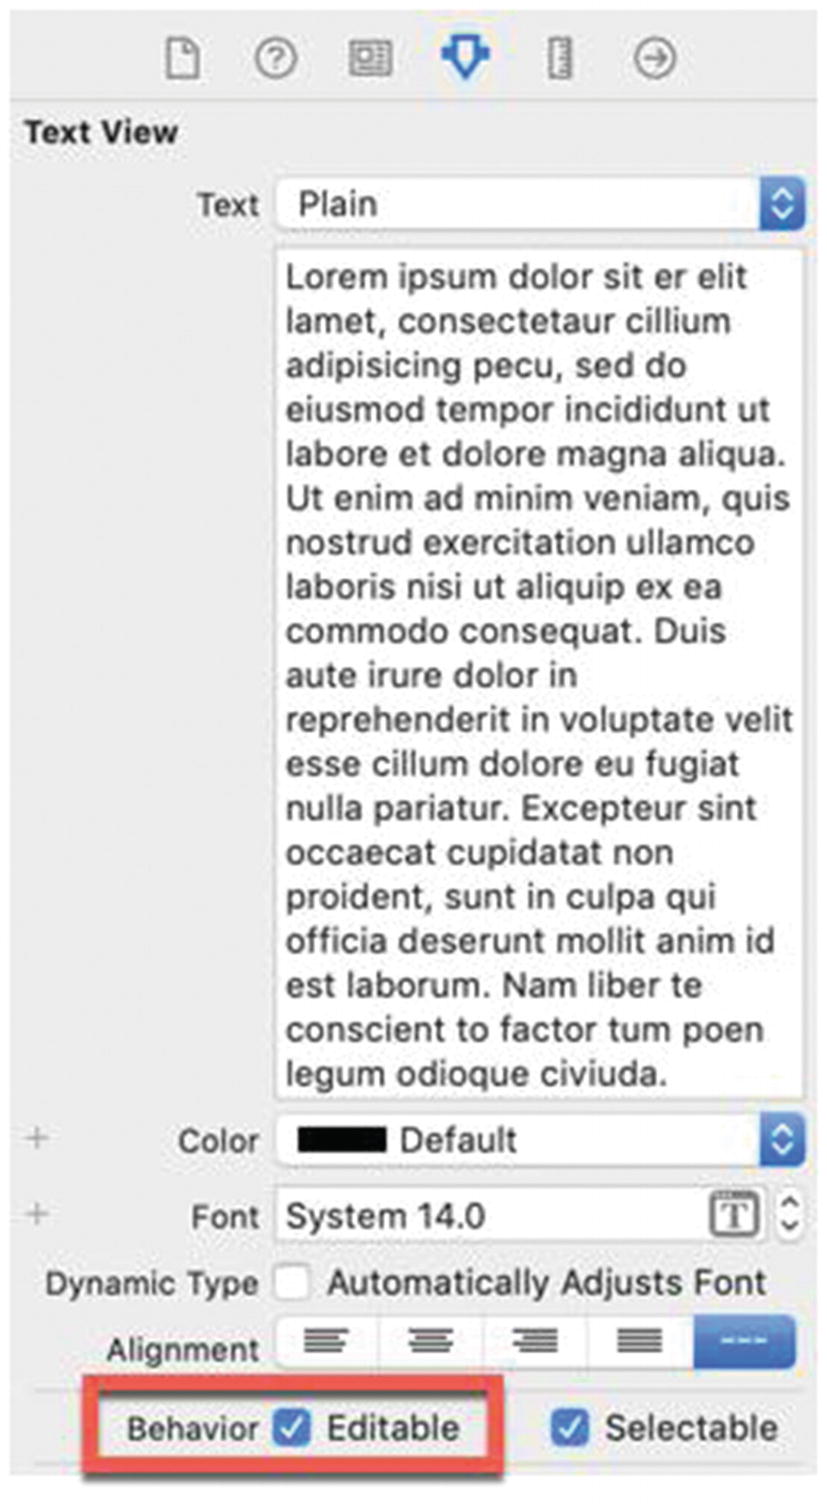 Figure 9-6
Making a text view editable
- 1.
Create a new iOS project using the Single View App template (see Chapter 1) and name this new project TextViewApp. This creates a single view for the user interface.
- 2.
Click the Main.storyboard file in the Navigator pane. Xcode displays the single view.
- 3.
Click the Library icon to open the Object Library window.
- 4.
Drag and drop a text view and a button near the top of the view.
- 5.
Choose Editor ➤ Resolve Auto Layout Issues ➤ Reset to Suggested Constraints at the bottom half of the submenu. This adds constraints to both the text view and the button.
- 6.
Choose View ➤ Assistant Editor ➤ Show Assistant Editor, or click the Assistant Editor icon. Xcode displays the Main.storyboard and ViewController.swift file side by side.
- 7.
Move the mouse pointer over the text view, hold down the Control key, and Ctrl-drag from the text view to the ViewController.swift file underneath the “class ViewController” line.
- 8.
Release the Control key and the left mouse button. A popup window appears.
- 9.
Click in the Name text field, type textView, and click the Connect button. Xcode creates an IBOutlet variable as follows:
@IBOutlet var textView: UITextView!
- 10.
Move the mouse pointer over the button, hold down the Control key, and Ctrl-drag from the button to the ViewController.swift file underneath the IBOutlet line.
- 11.
Release the Control key and the left mouse button. A popup window appears.
- 12.
Click in the Name text field, type buttonObject, and click the Connect button. Xcode creates an IBOutlet variable as follows:
@IBOutlet var buttonObject: UIButton!
- 13.
Move the mouse pointer over the button, hold down the Control key, and Ctrl-drag just above the last curly bracket at the bottom of the ViewController.swift file.
- 14.
Release the Control key and the left mouse button. A popup window appears.
- 15.Click in the Name text field, type buttonTapped, click in the Type popup menu and choose UIButton, and click the Connect button. Xcode creates an IBAction method as follows:@IBAction func buttonTapped(_ sender: UIButton) {}
- 16.Edit the buttonTapped IBAction method as follows:@IBAction func buttonTapped(_ sender: UIButton) {if textView.isEditable == true {textView.isEditable = false} else {textView.isEditable = true}}
Note
When assigning a value to a variable, you use a single (=) equal sign, but when comparing two values, you use a double equal sign (==).
- 17.
Click the Run button or choose Product ➤ Run. The Simulator window appears.
- 18.
Click in the text view. Press the BACKSPACE and DELETE keys to delete text.
- 19.
Click the button. This runs the Swift code in the buttonTapped IBAction method, which makes the text view non-editable.
- 20.
Click in the text view. Notice that you cannot edit the text in the text view anymore.
- 21.
Repeat steps 18–20 to see how you can switch the text view from being editable to not being editable.
- 22.
Chose Simulator ➤ Quit Simulator to return to Xcode.
Changing Text Appearance in a Text View
.text – Defines the actual text that appears in the text view
.backgroundColor – Defines the background of the text view
.textColor – Defines the color of the text
.font – Defines the font and font size of text
- 1.
Choose View ➤ Standard Editor ➤ Show Standard Editor, or click the Standard Editor icon in the upper right corner of the Xcode window.
- 2.
Click the ViewController.swift file in the Navigator pane. Xcode displays the ViewController.swift file.
- 3.Modify the buttonTapped IBAction method as follows:@IBAction func buttonTapped(_ sender: UIButton) {if textView.isEditable == true {textView.isEditable = falsetextView.backgroundColor = UIColor.yellowtextView.textColor = UIColor.bluetextView.font = UIFont(name: "Courier", size: 24)} else {textView.isEditable = truetextView.backgroundColor = UIColor.bluetextView.textColor = UIColor.whitetextView.font = UIFont(name: "Ariel", size: 10)}}
- 4.
Click the Run button or choose Product ➤ Run. The Simulator window appears.
- 5.
Click the button. Notice how the text changes appearance in the text view with a yellow background and blue text color.
- 6.
Click the button again. Notice that now the text appears with a blue background and a white text color along with a smaller font size.
- 7.
Choose Simulator ➤ Quit Simulator to return to Xcode.
Creating Clickable Text in a Text View
If you type in an iOS app like Notes or Messages, you may notice that if you type a phone number, web site URL, or date, that text gets highlighted so you can tap on it to take action. For example, if you type a phone number in the Notes app, that phone number text appears highlighted. If you tap this highlighted text, then an iPhone can call this phone number.
.address – Detects street addresses
.calendarEvent – Detects times and dates
.flightNumber – Detects airline flight numbers
.link – Detects URLs
.lookupSuggestion – Detects words or phrases such as restaurant names, movie titles, celebrity names, etc.
.phoneNumber – Detects phone numbers

Defining clickable text in the Data Detectors category of the Attributes Inspector pane
- 1.
Make sure the TextViewApp project is loaded in Xcode.
- 2.
Click the ViewController.swift file in the Navigator pane to edit the ViewController.swift file.
- 3.Edit the viewDidLoad method as follows:override func viewDidLoad() {super.viewDidLoad()textView.dataDetectorTypes = UIDataDetectorTypes.linktextView.isEditable = falsetextView.isSelectable = truetextView.text = "This is an example of clickable text www.yahoo.com"// Do any additional setup after loading the view, typically from a nib.}The entire ViewController.swift file should look like this:import UIKitclass ViewController: UIViewController {@IBOutlet var textView: UITextView!@IBOutlet var buttonObject: UIButton!override func viewDidLoad() {super.viewDidLoad()textView.dataDetectorTypes = UIDataDetectorTypes.linktextView.isEditable = falsetextView.isSelectable = truetextView.text = "This is an example of clickable text www.yahoo.com"// Do any additional setup after loading the view, typically from a nib.}@IBAction func buttonTapped(_ sender: UIButton) {if textView.isEditable == true {textView.isEditable = falsetextView.backgroundColor = UIColor.yellowtextView.textColor = UIColor.bluetextView.font = UIFont(name: "Courier", size: 24)} else {textView.isEditable = truetextView.backgroundColor = UIColor.bluetextView.textColor = UIColor.whitetextView.font = UIFont(name: "Ariel", size: 10)}}}
- 4.
Click the Run button or chose Product ➤ Run. The Simulator window appears. Notice that the URL www.yahoo.com appears highlighted as a blue hyperlink.
- 5.
Click the www.yahoo.com hyperlink . The Simulator displays the Safari browser and the www.yahoo.com web site, which is exactly what would happen if this app were running on a real iPhone or iPad.
- 6.
Choose Simulator ➤ Quit Simulator to return to Xcode.
Displaying the Virtual Keyboard with a Text View
For users to type in the text view, you need to display (and hide) the virtual keyboard. When the user taps in the text view to edit its contents, the virtual keyboard should appear, moving the text view up if necessary. When the user is done editing text in a text view, then the virtual keyboard needs to go away.
First, you need to define the View Controller to be notified of two events: keyboardWillShowNotification and keyboardWillHideNotification. Second, you need to create a keyboardWillShow and keyboardWillHide function to show the virtual keyboard (and move the view up) and hide the virtual keyboard when it’s no longer needed. Finally, you need to dismiss the virtual keyboard if the user taps away from the text view.
- 1.
Click the Main.storyboard file in the Navigator pane of the TextViewApp project.
- 2.
Click the Library icon to display the Object Library.
- 3.
Drag and drop a text view near the bottom of the user interface.
- 4.
Choose Editor ➤ Resolve Auto Layout Issues ➤ Reset to Suggested Constraints on the top half of the submenu. This will add constraints to the new text view on the user interface.
- 5.Add the following to the viewDidLoad method :NotificationCenter.default.addObserver(self, selector: #selector(keyboardWillShow), name: UIResponder.keyboardWillShowNotification, object: nil)NotificationCenter.default.addObserver(self, selector: #selector(keyboardWillHide), name: UIResponder.keyboardWillHideNotification, object: nil)let tap: UITapGestureRecognizer = UITapGestureRecognizer(target: self, action: #selector(self.dismissKeyboard))view.addGestureRecognizer(tap)
- 6.Add the following code above the buttonTapped IBAction method as follows:@objc func dismissKeyboard() {view.endEditing(true)}@objc func keyboardWillShow(notification: NSNotification) {if let keyboardSize = (notification.userInfo?[UIResponder.keyboardFrameEndUserInfoKey] as? NSValue)?.cgRectValue {if self.view.frame.origin.y == 0 {self.view.frame.origin.y -= keyboardSize.height}}}@objc func keyboardWillHide(notification: NSNotification) {if ((notification.userInfo?[UIResponder.keyboardFrameEndUserInfoKey] as? NSValue)?.cgRectValue) != nil {if self.view.frame.origin.y != 0 {self.view.frame.origin.y = 0}}}The entire ViewController.swift file should look like this:import UIKitclass ViewController: UIViewController {@IBOutlet var textView: UITextView!@IBOutlet var buttonObject: UIButton!override func viewDidLoad() {super.viewDidLoad()textView.dataDetectorTypes = UIDataDetectorTypes.linktextView.isEditable = falsetextView.isSelectable = truetextView.text = "This is an example of clickable text www.yahoo.com"NotificationCenter.default.addObserver(self, selector: #selector(keyboardWillShow), name: UIResponder.keyboardWillShowNotification, object: nil)NotificationCenter.default.addObserver(self, selector: #selector(keyboardWillHide), name: UIResponder.keyboardWillHideNotification, object: nil)let tap: UITapGestureRecognizer = UITapGestureRecognizer(target: self, action: #selector(self.dismissKeyboard))view.addGestureRecognizer(tap)// Do any additional setup after loading the view, typically from a nib.}@objc func dismissKeyboard() {view.endEditing(true)}@objc func keyboardWillShow(notification: NSNotification) {if let keyboardSize = (notification.userInfo?[UIResponder.keyboardFrameEndUserInfoKey] as? NSValue)?.cgRectValue {if self.view.frame.origin.y == 0 {self.view.frame.origin.y -= keyboardSize.height}}}@objc func keyboardWillHide(notification: NSNotification) {if ((notification.userInfo?[UIResponder.keyboardFrameEndUserInfoKey] as? NSValue)?.cgRectValue) != nil {if self.view.frame.origin.y != 0 {self.view.frame.origin.y = 0}}}@IBAction func buttonTapped(_ sender: UIButton) {if textView.isEditable == true {textView.isEditable = falsetextView.backgroundColor = UIColor.yellowtextView.textColor = UIColor.bluetextView.font = UIFont(name: "Courier", size: 24)} else {textView.isEditable = truetextView.backgroundColor = UIColor.bluetextView.textColor = UIColor.whitetextView.font = UIFont(name: "Ariel", size: 10)}}}
- 7.
Click the Run button or choose Product ➤ Run. The Simulator screen appears.
- 8.
Click in the bottom text view. (If the virtual keyboard does not appear, press Command + K or choose Hardware ➤ Keyboard ➤ Toggle Virtual Keyboard.)
- 9.
Add and delete text inside the text view using the virtual keyboard.
- 10.
Click anywhere but inside a text view. The virtual keyboard disappears.
- 11.
Chose Simulator ➤ Quit Simulator to return to Xcode.
Summary
Image views and text views let your app display data on the user interface. An image view displays information visually as images. These images can be static and serve purely decorative purposes or display useful information such as a chart. Image views can also be interactive that can respond to taps.
Text views can both display text and allow the user to edit and input text. A text view behaves much like a text field except it can display large amounts of text at once, much like a miniature word processor. You can modify the appearance of text but any changes affect all text in a text view.
If you make a text view non-editable, then you can also create clickable text where the text view can recognize common types of words and phrases such as telephone numbers, street addresses, URLs, and calendar events such as dates and times.
Text views can simply display information to the user or they can allow input. Image views can display visual data or allow interaction so your app can respond if the user taps on the image view. By using both text views and image views, you have another way to display data, allow input, and accept interaction from the user.