Now for the exciting part. We get to take all that fairly dry stuff about OpenGL function calls from Chapter 6 and turn it into a game about blowing stuff up!
This chapter guides you through an iterative game design. We will start with our humble game template and add bits and pieces to it until our game is finished.
Our first version of the game is going to look the simplest. It is intended to demonstrate how to draw lines and effectively "sketch" with OpenGL. The biggest thing we are going to do in this chapter is to build the actual game mechanics. We will define how all the objects interact and how we control them. Then, when we build the other versions in the next chapter, we can just alter the way the interface is being displayed, without needing to change the underlying game code.
Before we jump into the code, we need to start where every good game should start: with a game design.
I've decided that we should re-create a classic arcade game—one that I spent countless hours of my early youth playing on the Atari 2600. I am speaking, of course, of Asteroids. Now, our game is not going to be exactly like Asteroids—it's more like a homage to Asteroids. We will call it Space Rocks!.
Here are our development specifications:
Our spaceship can be rotated right and left relative to its current heading. This is done with interface buttons.
Our spaceship can apply thrust to move it in its current heading. This will be done via interface buttons.
Our spaceship will drift at whatever speed and heading it has.
Our spaceship can fire missiles via an interface button.
If an asteroid hits our ship, then game over.
The asteroids have some drift speed and rotational speed.
If a missile hits an asteroid, then that asteroid gets smashed.
A smashed asteroid will break into smaller asteroid fragments, which will have their own drift speed and rotation.
If a missile hits an asteroid fragment, it is destroyed.
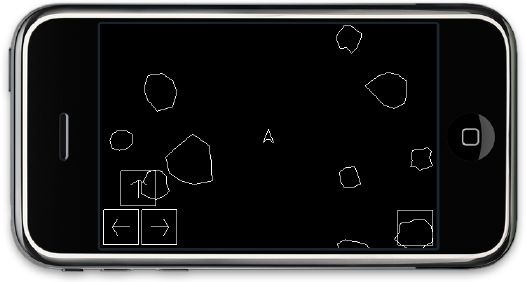
We'll go through a few different looks for the game, as shown in Figure 7-1. The first one will be the retro, replicating the look and feel of the very old arcade games. Then we will move into a textured mode, where the objects will get a bit of an upgrade and have some nicer textures applied to them. Finally, we will develop a 2.5D mode, where the objects will all be 3D models but will still be limited to the 2D game-play world. We'll create the retro version in this chapter, and the other two versions in the next chapter.

Figure 7.1. Our three visual styles. A is a retro line-drawn look, B is a simply 2D sprite style, and C uses 3D models and lighting.
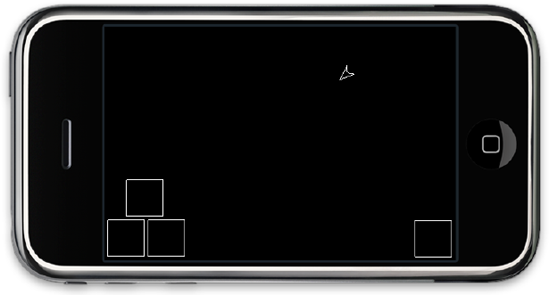
Now that we have a game idea, a nice title, and some requirements, let's define our interface. I find the classic ways are still the best, so I will break out my trusty Dungeons & Dragons mapmaking graph paper, and impart upon it some very artistic sketches, as shown in Figure 7-2.

Figure 7.2. Space Rocks! interface design. All the objects that will be in our scene are shown here.
As you can see in the figure, we have some rocks, a few buttons, and a spaceship. The only things missing from our lovely sketch are the missiles that we will fire to smash the rocks.
Where do we start?
Luckily, we have this handy game template. Let's start there.
Our template already has the main view set up. We don't need to rebuild that, although it's oriented in portrait mode, and our game is going to be in landscape orientation, so we will need to sort that out. We already have a scene controller, so that is where all of our game control code will go. We have an input controller, so it should be responsible for handling the button inputs. And we have a nice generic scene object and a mesh object that we can use to start making our game pieces.
What don't we have? Well, I can see right now that we are going to need some way to figure out if a rock has hit the ship or if a missile has hit a rock. We will do this by setting up a collision-detection system (later in the chapter).
OK, it's time to start modifying our template and turning it into a game. The first thing we should do is to rotate the interface into landscape mode. No, wait.
Actually, the very first thing we should do is to make a copy of the game template, and then rename our new application to Space Rocks!. I always forget to do this. Then I get a few hours into developing the game and realize that I have been saving over my template. So, I have to go into Time Machine and restore the template, and then change the name of the app I'm working on. Let's save ourselves that hassle and rename the template before doing any work.
Changing the name of an app has traditionally been an arduous and nearly impossible task. Luckily, the last few versions of Xcode have addressed this, and it is very easy now.
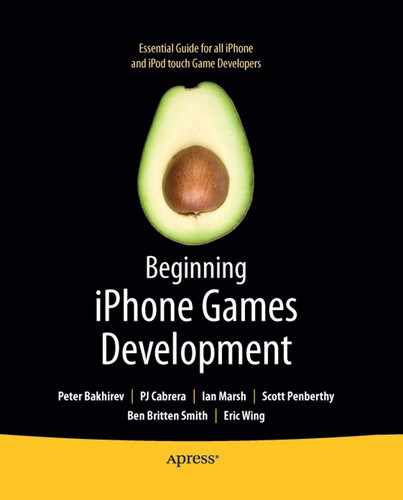
Open your copy of the game template, open the Targets group, select the game template target, and choose File
Now that the renaming is taken care of, we can actually start.
We need our OpenGL view to be in landscape mode. The simplest way to do this is to use the built-in viewController functionality to spin our view for us. However, when using OpenGL, Apple recommends that for the best performance, we should instead rotate our projection matrix. Much like the other aspects of Core Animation and the UIKit, the simplest way is usually not the best way in terms of performance. But in this case, it is almost just as easy.
In our EAGLView, we are setting up our view in the appropriately named method: setupView. It might be handy to be able to pick which kind of view we would like, so instead of overwriting the setupView method, we will rename it to setupViewPortrait, and we will add a new method called setupViewLandscape.
- (void)setupViewLandscape
{
    // set up matrices and transforms for OpenGL ES
    glViewport(0, 0, backingWidth, backingHeight);
    glMatrixMode(GL_PROJECTION);
    glLoadIdentity();
    glRotatef(-90.0f, 0.0f, 0.0f, 1.0f);
    // set up the viewport so that it is analogous to the screen pixels
    glOrthof(-backingHeight/2.0, backingHeight/2.0, -backingWidth/2.0, backingWidth/2.0, −1.0f, 1.0f);

    glMatrixMode(GL_MODELVIEW);

    // clear the view with black
    glClearColor(0.0f, 0.0f, 0.0f, 1.0f);
}
What are we doing here? Remember that we will perform all the rotation of the interface inside our OpenGL view, so we will define the viewport exactly the same as if we were going to be displaying in portrait mode. Then we switch into projection mode so that we are talking to the projection matrix.
The next command is glLoadIdentity(). As noted in Chapter 6, this is a simple function that just clears out whatever matrix transforms might be stored and effectively gives you a clean slate. We do this here just in case this method is ever called a second time, or if it is called after we have applied some other transforms to the projection matrix.
Next, we have a standard rotate function call, rotating 90 degrees in reverse around the z axis. This will make it so that "up" is the right edge of the phone, and it will be oriented correctly when the home button is on the right.
With our glOrtho call, we are doing something a bit differently than previously in the template.
glOrthof(-backingHeight/2.0, backingHeight/2.0, -backingWidth/2.0, backingWidth/2.0, −1.0f, 1.0f);
Since we get to arbitrarily define the view space with our glOrtho call, we are going to keep the origin at the center of the screen. However, unlike in the template code where we defined the view to be 2 units wide and 3 units high, in this case, we will make our viewing area more analogous to the pixels on the screen. So our coordinate system will be 480 pixels wide and 320 pixels tall. The lower-left corner will be at location (-240,-160) and the upper right will be at (240,160).
The last difference is that we are going to set our background to black—after all, this is a space game.
- (void)layoutSubviews
{
.
.
[self setupViewLandscape]; // used to be setupView
}We are going to be using setupViewLandscape for Space Rocks!, so be sure to change the call in layoutSubviews to our new method.
If you build and run the project right now, you will notice that it seems like it is totally black. Where did our square go? It is still there, but it is very small. You might be able to see a single pixel being rendered in the center of the screen. Remember we just changed our view settings from 2 by 3 to 480 by 320. Our square is only a single pixel big now, and it happens to actually be between pixels. If it is rotated, you won't be able to see it at all.
Go into your scene controller and set the scale of our single scene object to something like 100 in both x and y, as follows:
-(void)loadScene
{
.
.
//Add a single scene object just for testing
BBSceneObject * object = [[BBSceneObject alloc] init];
object.xScale = 100.0;
object.yScale = 100.0;
.
.
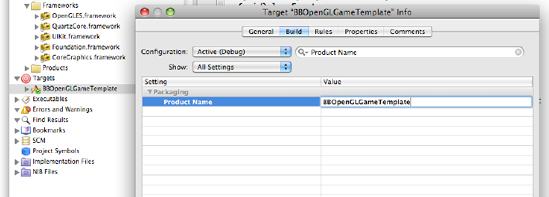
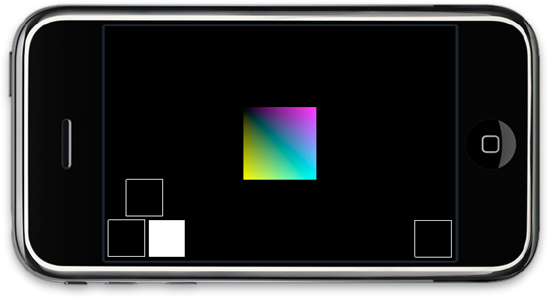
}Now you will be able to see the square (and spin it!), as shown in Figure 7-4.
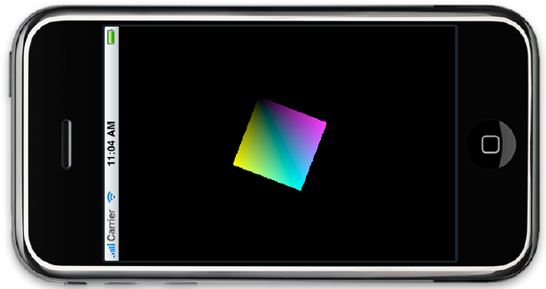
The next thing to do is to get rid of the pesky status bar. To do this, you just need to add a new entry into your info.plist document. Open the info.plist (if you are following along with the provided projects, it is called BBOpenGLGameTemplate-Info.plist).
Select any current entry, and a little + icon will show up at the end of the line. Click that, and you will get a new blank entry. Select "Status bar is initially hidden." Then once that is locked in, be sure to check the check box, as shown in Figure 7-5. And that's it!
In the scene object of our template project, we are defining our translation, scale, and rotation with a swath of CGFloat settings.
CGFloat x,y,z;
CGFloat xRotation,yRotation,zRotation;
CGFloat xScale,yScale,zScale;
However, in most any OpenGL program, you will want to be passing these variables around quite a bit. It would be handy to have a nice type definition that would hold three values, like a CGPoint, but with z. So, we are going to define our own 3D point type.
Make a new, empty header file, call it BBPoint.h, and define our point:
// A 3D point
typedef struct {
    CGFloat            x, y, z;
} BBPoint;

 typedef BBPoint* BBPointPtr;

static inline BBPoint BBPointMake(CGFloat x, CGFloat y, CGFloat z)
{
    return (BBPoint) {x, y, z};
}
If you are new to Objective-C or the C family of languages, this might look a bit odd. First, we are defining a C structure that contains our point information. A struct is like the predecessor to object—just a holder for some other variables.
Next, we are defining a static inline function. This is a way to make a function easily accessible by any object anytime—well, any object that includes this file. This particular method is just a handy way to make a new BBPoint struct.
We will be adding some more inline functions to this file later. For now, this is enough to get started.
In our original game template, we stored the transforms in nine variables, like xRotation, yRotation, and zRotation. Now we will just have three BBPoint structs to hold that information: translation, rotation, and scale.
Now we need to update our BBSceneObject files. Let's start with BBSceneObject.h:
@interface BBSceneObject : NSObject {
    // transform values
     BBPoint translation; // add in BBPoints
    BBPoint rotation; // take out x,y,z etc..
    BBPoint scale;
  .
  .
}
@property (assign) BBPoint translation;
@property (assign) BBPoint rotation;
@property (assign) BBPoint scale;
Then we move to the BBSceneObject.m file. First, we will change the properties at the top and the init method.
@synthesize translation,rotation,scale;

- (id) init
{
self = [super init];
if (self != nil) {
translation = BBPointMake(0.0, 0.0, 0.0);
rotation = BBPointMake(0.0, 0.0, 0.0);
scale = BBPointMake(1.0, 1.0, 1.0);
}
return self;
}Next, change the render method:
// called once every frame
-(void)render
{
    .
    .
    .
    glTranslatef(translation.x, translation.y, translation.z);
    // rotate
    glRotatef(rotation.x, 1.0f, 0.0f, 0.0f);
    glRotatef(rotation.y, 0.0f, 1.0f, 0.0f);
    glRotatef(rotation.z, 0.0f, 0.0f, 1.0f);
    //scale
    glScalef(scale.x, scale.y, scale.z);
    .
    .
}
Finally, we want the scene object to be our root object, so we don't want it to rotate our objects on a tap anymore. For now, we will just clear out the update method so our subclasses can override it.
-(void)update
{
    // subclasses can override this for their own purposes
}
That is going to make things much simpler.
OK, enough fiddling about. Let's render something!
Next, we want to add buttons to our interface so that our players can control the action.
You have two options for adding buttons: You can use UIKit buttons and simply lay them over your OpenGL view, or you can draw your own buttons. Using UIKit buttons works fine and is probably the easiest way to add buttons to your game. However, if you are trying to achieve the best performance possible, you should avoid putting a UIView on top of your OpenGL view. This is especially true if you want to use the controls in the game.
In other words, you might have a view that slides over your main game view to change some preferences, or something similar. In that case, you can simply use UIKit views. They will impact your OpenGL rendering performance, but with the game in the background, this is OK. However, for game controls that are always visible and in constant use during the game, I highly recommend that you draw your own buttons.
Because our controls are right on the main game screen, we want to draw our own. We will make them scene objects and add them to the rendering pipeline.
This is a good solution for rendering, but it is a slight conundrum in regard to good design. In theory, our input controller object should own and control the buttons, since they are inputs. It doesn't make much design sense to have the scene controller own the button objects. This means that we will need to separate our rendering pipeline into two sections: the main scene and the interface objects. It turns out that this is going to be very helpful to us down the road (good design always is), so we will pursue this design decision.
Before we can think about where to load the buttons and where to store them, we need a button object. We will subclass the scene object, and make a new class called BBButton.
@interface BBButton : BBSceneObject {
    BOOL pressed;
    id target;
    SEL buttonDownAction;
    SEL buttonUpAction;
    CGRect screenRect;
}

@property (assign) id target;
@property (assign) SEL buttonDownAction;
@property (assign) SEL buttonUpAction;
Since it is a scene object, it will inherit all the positioning and rotating and rendering methods, so we don't need to worry about those just yet. We do need at least two states: pressed and not pressed. A BOOL will do nicely for that.
We will model our buttons roughly on the UIKit buttons, in that we will have a target object and a couple action selectors.
Finally, we will need to do hit testing. We will cache a screen rectangle, so we will be able to see whether our touches have hit our button.
In our implementation file, we will want to override the awake method and the update method.
In the awake method, we will define our mesh:
-(void)awake
{
    pressed = NO;
    mesh = [[BBMesh alloc] initWithVertexes:BBSquareOutlineVertexes
 vertexCount:BBSquareOutlineVertexesCount
                         vertexStride:BBSquareVertexStride
renderStyle:BBSquareOutlineRenderStyle];
mesh.colors = BBSquareOutlineColorValues;
mesh.colorStride = BBSquareColorStride;
}Mostly, we just pass a few static array variables into the mesh. Where do all those come from? Before I get into that, let me digress for a moment and talk about all the ways you can use your vertex data.
OpenGL does not provide any built-in mechanism for storing your vertex data. Ultimately, your vertex data will be quite complex, even with the simplest of models. There are literally dozens of decent open file formats that you can choose for your data, each with its own advantages and disadvantages.
The sample code has the vertex data simply spliced right into it as static variables. The only advantage to this method is that the vertexes are right there, and you can see them and easily edit them. This is nice when you are just starting with OpenGL, but I would suggest that as a long-term solution, it is not so good.
All the 3D modeling tools that I am aware of will export the models into a flat, text-based, human-readable file format. I suggest that you start with that file, and write a quick parser to load the vertex data from the file into the mesh. Then, as your 3D modeling needs progress, you can switch to more complicated file formats. I could go on for the rest of the chapter talking about the various formats and why you might want to use them or avoid them, but I would rather talk about how to use the vertex data once you have it in your program.
As I mentioned, for the sample code, we are going to just jam the vertex data directly into the file as a static variable declaration, like so:
#pragma mark square

static NSInteger BBSquareVertexStride = 2;
static NSInteger BBSquareColorStride = 4;
static GLenum BBSquareOutlineRenderStyle = GL_LINE_LOOP;
static NSInteger BBSquareOutlineVertexesCount = 4;
static CGFloat BBSquareOutlineVertexes[8] = {−0.5f, −0.5f, 0.5f, −0.5f, 0.5f,   0.5f, −0.5f,  0.5f};

static CGFloat BBSquareOutlineColorValues[16] = {1.0,1.0,1.0,1.0, 1.0,1.0,1.0,1.0, 1.0,1.0,1.0,1.0, 1.0,1.0,1.0,1.0};

static GLenum BBSquareFillRenderStyle = GL_TRIANGLE_STRIP;

static NSInteger BBSquareFillVertexesCount = 4;
static CGFloat BBSquareFillVertexes[8] = {−0.5,−0.5, 0.5,−0.5, −0.5,0.5, 0.5,0.5};
So what do we have here? We are actually specifying two sets of vertexes and colors: one for an outlined rendering and one for a filled rendering. We are going to use the outline for the unpressed state of the button, and then use the filled version for when the button is pressed. We talked about the various rendering styles in Chapter 6, which are shown again in Figure 7-6.
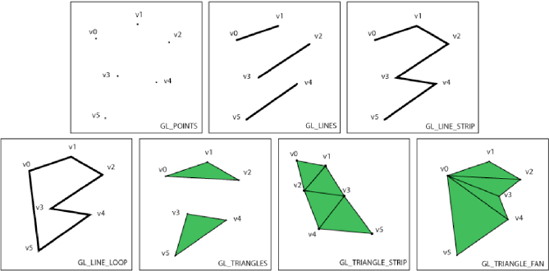
We will use GL_LINE_LOOP to draw the unfilled button and GL_TRIANGLE_STRIP to draw the filled one.
I know what you're thinking: "Hey, the vertex information for the outlined vertexes and the fill vertexes are the exact same thing, only in a slightly different order!" You are exactly right. There is actually a way that we can reuse the vertexes in one array by specifying only the indexes of the vertexes we want to use. We'll take a look at that approach in the next chapter. For now, we will just repeat ourselves a bit.
Let's take a closer look at these vertexes, and talk a bit about how to build a good set of vertex data.
First, notice that even though we have changed our screen coordinates to be 480 by 320, we are still defining a square that is only a single pixel wide. Why is that? It is really mostly personal preference, but if you do any amount of 3D work, you will find that building your models in some sort of uniform unit scale is very useful. In the case of this simple button, we are making it a single pixel wide so that we can easily scale it to whatever size we want. So, for example, if we want to make our button 50 pixels wide, we just set the x scale to 50.
The other very important thing—probably more important than using a unit scale—is to consistently register your models. By register, I mean that you should always build them so that either the center is at 0,0,0 or a corner is at 0,0,0 (see Figure 7-7). And if you use a corner, it should always be the same corner for all your objects.
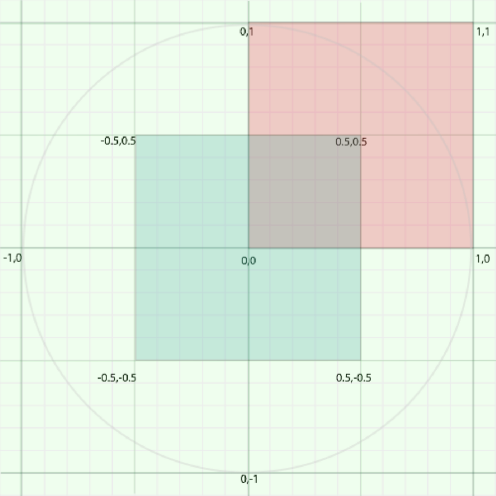
Figure 7.7. The middle square and the circle are center-registered, and the square in the upper right is corner-registered.
If you don't do this, then all your code to manipulate your models will become very inconsistent, and you will be constantly shifting things around to keep everything lined up. The other reason to register all your models is because it allows for very easy reuse. Simply reset the translation, scale, and rotation and redraw the object.
I generally center-register everything, and try to keep things in nice easy units.
We have been getting off track a bit, so let's get back to the button code. We have defined our button mesh, and now we just need to instantiate a few of them and see how they look.
We decided earlier that the input controller would own the buttons, so we will need somewhere to store them.
Now we are going to jump to our BBInputViewController object. First, add a mutable array instance variable called interfaceObjects to the BBInputViewController.h file. Next, we will build a new method called loadInterface in the BBInputViewController.m file:
-(void)loadInterface
{
  // lazy init
    if (interfaceObjects == nil) interfaceObjects = [[NSMutableArray alloc] init];

    // right arrow button
    BBButton * rightButton = [[BBButton alloc] init];
    rightButton.scale = BBPointMake(50.0, 50.0, 1.0);
    rightButton.translation = BBPointMake(−155.0, −130.0, 0.0);
    rightButton.active = YES;
    [rightButton awake];
    [interfaceObjects addObject:rightButton];
    [rightButton release];

    // left arrow
    BBButton * leftButton = [[BBButton alloc] init];
    leftButton.scale = BBPointMake(50.0, 50.0, 1.0);
    leftButton.translation = BBPointMake(−210.0, −130.0, 0.0);
    leftButton.active = YES;
    [leftButton awake];
    [interfaceObjects addObject:leftButton];
    [leftButton release];

    // forward button
    BBButton * forwardButton = [[BBButton alloc] init];
    forwardButton.scale = BBPointMake(50.0, 50.0, 1.0);
    forwardButton.translation = BBPointMake(−185.0, −75.0, 0.0);
    forwardButton.active = YES;
    [forwardButton awake];
    [interfaceObjects addObject:forwardButton];
    [forwardButton release];

    // fire button
    BBButton * fireButton = [[BBButton alloc] init];
    fireButton.scale = BBPointMake(50.0, 50.0, 1.0);
    fireButton.translation = BBPointMake(210.0, −130.0, 0.0);
    fireButton.active = YES;
    [fireButton awake];
    [interfaceObjects addObject:fireButton];
    [fireButton release];
}
A few more little methods, and we can finally see what our buttons look like. In the input controller, add two more methods, one to update our buttons and one to render them:
-(void)updateInterface
{
    [interfaceObjects makeObjectsPerformSelector:@selector(update)];
}

-(void)renderInterface
{
    // simply call 'render' on all our scene objects
    [interfaceObjects makeObjectsPerformSelector:@selector(render)];
}
Now all we need to do is insert the update and render methods into the rendering pipeline in our scene controller object:
- (void)updateModel
{
    // simply call 'update' on all our scene objects
     [inputController updateInterface]; //<-- add this new line
    [sceneObjects makeObjectsPerformSelector:@selector(update)];
    // be sure to clear the events
    [inputController clearEvents];
}

- (void)renderScene
{
    // turn OpenGL 'on' for this frame
    [openGLView beginDraw];
    // simply call 'render' on all our scene objects
    [sceneObjects makeObjectsPerformSelector:@selector(render)];
    // draw the interface on top of everything
     [inputController renderInterface]; // <-- also a new line
    // finalize this frame
    [openGLView finishDraw];
}
We want the buttons to update before the other objects so that our scene objects will be able to catch input events as quickly as possible. When we render, we want to render the interface last, so that it lies over the top of all of our other rendering.
Build and run! Wait...nothing. Oh, right! We will need to call our new loadInterface method from somewhere. Probably at the end of the loadScene method in the BBSceneController.m file is the best place:
-(void)loadScene
{
    .
    .
    [inputController loadInterface];
}
Now build and run the game.
Excellent! We have buttons. Your app should look like Figure 7-8. Our buttons don't do anything yet, so it is a very bad game so far.

Now that we can draw our buttons, we need to detect if there are touches in our rectangle. In order to do this, we need to know what our on screen coordinates are. How can we do that? We will have to find our bounds in our OpenGL coordinates, and then convert them to screen coordinates.
Let's start with our own coordinates. The object that keeps track of our vertex data is the BBMesh object, so we should add this new code to the BBMesh.m file:
+(CGRect)meshBounds:(BBMesh*)mesh scale:(BBPoint)scale
{
    if (mesh == nil) return CGRectZero;
    // need to run through my vertexes and find my extremes
    if (mesh.vertexCount < 2) return CGRectZero;
    CGFloat xMin,yMin,xMax,yMax;
    xMin = xMax = mesh.vertexes[0];
    yMin = yMax = mesh.vertexes[1];
    NSInteger index;
    for (index = 0; index < mesh.vertexCount; index++) {
        NSInteger position = index * mesh.vertexStride;
        if (xMin > mesh.vertexes[position] * scale.x) xMin = mesh.vertexes[position] * scale.x;
        if (xMax < mesh.vertexes[position] * scale.x) xMax = mesh.vertexes[position] * scale.x;
        if (yMin > mesh.vertexes[position + 1] * scale.y) yMin = mesh.vertexes[position + 1] * scale.y;
        if (yMax < mesh.vertexes[position + 1] * scale.y) yMax = mesh.vertexes[position + 1] * scale.y;
    }
CGRect meshBounds = CGRectMake(xMin, yMin, xMax - xMin, yMax - yMin);
if (CGRectGetWidth(meshBounds) < 1.0) meshBounds.size.width = 1.0;
if (CGRectGetHeight(meshBounds) < 1.0) meshBounds.size.height = 1.0;
return meshBounds;
}This simply runs through the vertexes and finds the extremes. We use the scale to scale the mesh up to our current size. Note that this method will work with 3D objects, but it will return only the 2D bounding box. The bounding box is the smallest box that will enclose all the points in our mesh.
The meshBounds method is not terribly slow, but we don't want to be calling it every time we need the bounds, so let's keep a cached copy of that in our BBSceneObject:
@interface BBSceneObject : NSObject {
    .
    .
    CGRect meshBounds;
    .
    .
}

@property (assign) CGRect meshBounds;
In the implementation file (don't forget to add a @synthesize meshBounds), we want to add a line to the init method:
meshBounds = CGRectZero;
This is just to make sure that our mesh bounds are initialized. Then override the synthesized accessor for meshBounds:
-(CGRect) meshBounds
{
    if (CGRectEqualToRect(meshBounds, CGRectZero)) {
        meshBounds = [BBMesh meshBounds:mesh scale:scale];
    }
    return meshBounds;
}
We check to see if our current meshBounds are zero; if so, we run our bounds utility, and then save that for later. If our meshBounds are already defined, then this returns them directly. This is a good way to do a lazy initialization of meshBounds. Not all scene objects will need to ever define the mesh bounds, so we will save them from running that code.
All that code was in the scene object, so our button object will inherit all this functionality.
Once we have the mesh bounds, we are going to need a way to convert them to screen bounds.
In our BBInputViewController.m file, we will add another handy utility method:
-(CGRect)screenRectFromMeshRect:(CGRect)rect atPoint:(CGPoint)meshCenter
{
    // find the point on the screen that is the center of the rectangle
    // and use that to build a screen-space rectangle
CGPoint screenCenter = CGPointZero;
CGPoint rectOrigin = CGPointZero;
// since our view is rotated, then our x and y are flipped
screenCenter.x = meshCenter.y + 160.0; // need to shift it over
screenCenter.y = meshCenter.x + 240.0; // need to shift it up
rectOrigin.x = screenCenter.x - (CGRectGetHeight(rect)/2.0); // height and width
rectOrigin.y = screenCenter.y - (CGRectGetWidth(rect)/2.0); // are flipped
return CGRectMake(rectOrigin.x, rectOrigin.y, CGRectGetHeight(rect), CGRectGetWidth(rect));
}We call this method with our mesh bounds and a center point. Since our OpenGL coordinates are the same scale as our screen coordinates, all we need to do is some simple shifting to get a screen rectangle.
Let's go back to our BBButton object. We have all the pieces of the puzzle now. First, we store the screenRect at the end of the awake method:
-(void)awake
{
    .
    .
    screenRect = [[BBSceneController sharedSceneController].inputController
                                screenRectFromMeshRect:self.meshBounds
                                atPoint:CGPointMake(translation.x, translation.y)];
}
We will need some method to deal with the touch events from the input controller:
-(void)handleTouches
{
    NSSet * touches = [[BBSceneController sharedSceneController].inputController touchEvents];
   // if there are no touches then return early
    if ([touches count] == 0) return;

    BOOL pointInBounds = NO;
    for (UITouch * touch in [touches allObjects]) {
        CGPoint touchPoint = [touch locationInView:[touch view]];
        if (CGRectContainsPoint(screenRect, touchPoint)) {
            pointInBounds = YES;
            if (touch.phase == UITouchPhaseBegan) [self touchDown];
        }
    }
    if (!pointInBounds) [self touchUp];
}
Since we are effectively polling the touch events from the input controller, we need to deal with them slightly differently than we would in a standard UIView touch event type setting. For any give frame, we will get all the events that occurred during that frame. If there are no events during that frame, then we return early, since there will be no state change.
Next, we set up the flag pointInBounds and set it to NO. Then we use our screenRect to check if any of the touch events occurred inside our bounds. If we get a touch began event that occurs inside our bounds, we call touch down.
If we get to the end of the method and have not found any points inside our screenRect, we know that we need to toggle to the touch up position.
-(void)touchUp
{
    if (!pressed) return; // we were already up
    pressed = NO;
     [self setNotPressedVertexes];
    [target performSelector:buttonUpAction];
}

-(void)touchDown
{
    if (pressed) return; // we were already down
    pressed = YES;
     [self setPressedVertexes];
    [target performSelector:buttonDownAction];
}
Our touchUp and touchDown methods will change our vertexes so that we render the proper state. These methods also allow for the parent object to specify the methods to be called when the events happen. This is crucial for reuse.
In the case of our simple buttons, we are calling the setPressedVertexes and setNotPressedVertexes methods:
-(void)setPressedVertexes
{
    mesh.vertexes = BBSquareFillVertexes;
    mesh.renderStyle = BBSquareFillRenderStyle;
    mesh.vertexCount = BBSquareFillVertexesCount;
    mesh.colors = BBSquareOutlineColorValues;
}

-(void)setNotPressedVertexes
{
    mesh.vertexes = BBSquareOutlineVertexes;
    mesh.renderStyle = BBSquareOutlineRenderStyle;
    mesh.vertexCount = BBSquareOutlineVertexesCount;
    mesh.colors = BBSquareOutlineColorValues;
}
Recall that early on, we had the two different sets of information: one for the GL_LINE_LOOP rendering style and one for the GL_TRIANGLE_STRIP style. Our normal state for the button is to be not pressed, and that is using the outline values, which will render the buttons as a line loop. The pressed vertexes will render with the fill values, which use the triangle strip to render a filled square.
The last thing we need in our BBButton is to override the update method, which gets called every frame. We handle any touch events, and then call our super:
// called once every frame
-(void)update
{
    // first, check to see if there is a touch that is hitting our bounds
    [self handleTouches];
    [super update];
}
At the moment, the [super update] calls an empty method, but we will be filling that in later, so don't forget to add it in here.
If you build now, you should be able to tap your buttons and have them light up (see Figure 7-9). You may notice that you can't press two buttons at once. We need to tell the EAGLView that we want it to be multitouch-enabled. This is a single line, and it goes into the initWithFrame: method in the EAGLView:
self.multipleTouchEnabled = YES;
Anywhere is fine, but I usually put it at the end of the if block.
Now when you build and run the program, you should be able to press the fire button at the same time as one of the movement buttons.
Great! Now our buttons are working, but they aren't calling any methods yet. For this, we will revisit the input controller. We are bouncing back and forth quite a bit here, and there will be quite a bit of this until we get our main game functioning, so bear with me.
We will need somewhere to store our button state so that any scene objects that are interested can find it. We will add a few instance variables to our BBInputViewController.
@interface BBInputViewController : UIViewController {
    NSMutableSet* touchEvents;
    NSMutableArray * interfaceObjects;

     CGFloat forwardMagnitude; // <-- add some new state variables
    CGFloat rightMagnitude;
    CGFloat leftMagnitude;
    BOOL fireMissile;
 }
We will make them properties too, just to make it easier for external objects to access them.
In the input controller implementation, we need to add a bunch of very simple methods. These will be the action methods that are called by the buttons:
#pragma mark Input Registers

-(void)fireButtonDown { self.fireMissile = YES; }

-(void)fireButtonUp { }

-(void)leftButtonDown {    self.leftMagnitude = 1.0; }

-(void)leftButtonUp { self.leftMagnitude = 0.0;    }

-(void)rightButtonDown { self.rightMagnitude = 1.0;    }

-(void)rightButtonUp {    self.rightMagnitude = 0.0; }

-(void)forwardButtonDown {  self.forwardMagnitude = 1.0;    }

-(void)forwardButtonUp {  self.forwardMagnitude = 0.0;    }
The last thing we need to do here is connect our buttons to our actions.
// right arrow button
    BBButton * rightButton = [[BBButton alloc] init];
    rightButton.scale = BBPointMake(50.0, 50.0, 1.0);
    rightButton.translation = BBPointMake(−155.0, −130.0, 0.0);
    // add some new lines to connect our buttons to actions
     rightButton.target = self;
    rightButton.buttonDownAction = @selector(rightButtonDown);
    rightButton.buttonUpAction = @selector(rightButtonUp);

      rightButton.active = YES;
    [rightButton awake];
    [interfaceObjects addObject:rightButton];
    [rightButton release];
I am showing only the first button here, but I am sure that you can figure out the rest.
If we are going to be smashing rocks in space, we will need a spaceship. But first, we need to stop and think for a moment. If we have a look at our scene object and also have a look at our requirements, we might notice that we are lacking the ability to provide one fundamental mechanic to our game: movement. Don't get me wrong—we know that we can spin the square, and it will be quite easy to add movement to a child of the scene object. However, we have three things that will need to be moving: our ship, the rocks, and the missiles.
Wouldn't it be nice if we needed to implement movement only once, and all those objects that need to move would just get it for free? Yes, it would. So let's do that now.
We will make an abstract child class of the scene object called BBMobileObject:
@interface BBMobileObject : BBSceneObject {
    BBPoint speed;
    BBPoint rotationalSpeed;
}

@property (assign) BBPoint speed;
@property (assign) BBPoint rotationalSpeed;
We could also add scale speed, but I don't think we need that just yet.
Inside our object, we have a single overridden update method:
-(void)update
{
    translation.x += speed.x;
    translation.y += speed.y;
    translation.z += speed.z;

    rotation.x += rotationalSpeed.x;
    rotation.y += rotationalSpeed.y;
    rotation.z += rotationalSpeed.z;
    [super update];
}
That was easy! Now, if we set a speed vector and a rotation vector, our object will automatically move and spin. With just a bit of up-front work, we have given ourselves the gift of motion to be used on all our other scene objects.
Great! Can we finally build a spaceship? Yes! Off to the drawing board (literally).
We will need a new object. We'll call it BBSpaceShip. It will need to be a child of the BBMobileObject so that we can move it easily. And it will have one thing it can do other than move: fire missiles.
@interface BBSpaceShip : BBMobileObject {

}

-(void)fireMissile;

@end
And that's all there is to creating our BBSpaceShip object.
We need to design our spaceship model now. I prefer the old ways, with a pencil and graph paper (see Figure 7-10), but that's just me.
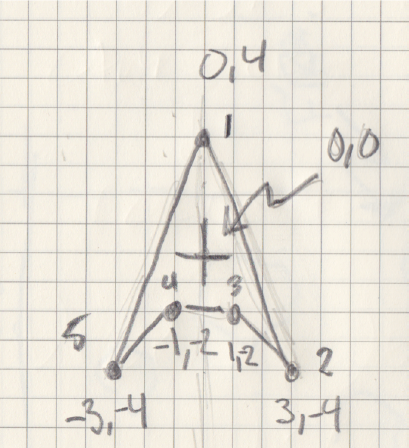
Once we have a nice design, we will convert it into vertex arrays.
#pragma mark Space Ship

static NSInteger BBSpaceShipVertexStride = 2;
static NSInteger BBSpaceShipColorStride = 4;

static NSInteger BBSpaceShipOutlineVertexesCount = 5;
static CGFloat BBSpaceShipOutlineVertexes[10] = {0.0, 4.0,    3.0, −4.0, 1.0, −2.0,   −1.0, −2.0, −3.0, −4.0};

static CGFloat BBSpaceShipColorValues[20] = {1.0,1.0,1.0,1.0, 1.0,1.0,1.0,1.0, 1.0,1.0,1.0,1.0, 1.0,1.0,1.0,1.0, 1.0,1.0,1.0,1.0};
For now, we will make everything white, for that nice retro beam-trace look. We put our vertex data at the top of our implementation file, and override the standard awake and update methods. We will even stub out a fire method that we will fill in later when we have some missiles to fire.
@implementation BBSpaceShip
// called once when the object is first created.
-(void)awake
{
    mesh = [[BBMesh alloc] initWithVertexes:BBSpaceShipOutlineVertexes
                         vertexCount:BBSpaceShipOutlineVertexesCount
                        vertexStride:BBSpaceShipVertexStride
                            renderStyle:GL_LINE_LOOP];
    mesh.colors = BBSpaceShipColorValues;
    mesh.colorStride = BBSpaceShipColorStride;
}

-(void)update
{
    [super update];
    CGFloat rightTurn = [[BBSceneController sharedSceneController].inputController rightMagnitude];
    CGFloat leftTurn = [[BBSceneController sharedSceneController].inputController leftMagnitude];

    rotation.z += ((rightTurn * −1.0) + leftTurn) * TURN_SPEED_FACTOR;

    if ([[BBSceneController sharedSceneController].inputController fireMissile]) [self fireMissile];


    CGFloat forwardMag = [[BBSceneController sharedSceneController].inputController forwardMagnitude] * THRUST_SPEED_FACTOR;
    if (forwardMag <= 0.0001) return; // we are not moving so return early

    CGFloat radians = rotation.z/BBRADIANS_TO_DEGREES;
    // now we need to do the thrusters
    // figure out the components of the speed
    speed.x += sinf(radians) * -forwardMag;
    speed.y += cosf(radians) * forwardMag;
}

-(void)fireMissile
{
    // shoot!
    [[BBSceneController sharedSceneController].inputController setFireMissile:NO];
}
Our awake method is simple, with just the standard mesh initialization. The update method is far more interesting.
We call the super update method so that we get all the benefits of the mobile object.
Next, we check the input controller for the right and left turn magnitudes, and apply them to our rotation. We multiply the turn magnitude by a constant multiplier, and we do the same with the forward magnitude. Those constants, like TURN_SPEED_FACTOR, will go in a new file called BBConfiguration.h. This new header file will be a handy place to store any constants that we might want to tweak later.
Then we check to see if we are shooting, and we call the appropriate method. For now, we don't have any missiles, but we do know that we want to fire only a single missile every time the button gets hit, so we will need to toggle the missile launch flag back to NO.
Lastly, we will use some basic trigonometry to figure out what our heading is in terms of x and y, and add that thrust to our speed vector.
We're finished with the spaceship. Now all we need to do is add it to our scene.
Back in our BBSceneController, in the loadScene method, we should remove the lines that add the spinny square to our game, since we don't need that behavior anymore. Instead, add an instance of the spaceship.
// this is where we initialize all our scene objects
-(void)loadScene
{
    // this is where we store all our objects
    sceneObjects = [[NSMutableArray alloc] init];

    BBSpaceShip * ship = [[BBSpaceShip alloc] init];
    ship.scale = BBPointMake(2.5, 2.5, 1.0);
     [self addObjectToScene:ship];
    [ship release];

    [inputController loadInterface];
}
We are calling a new method here: addObjectToScene.
Why don't we just add the spaceship object to the sceneObjects array directly? The big reason is that we are iterating across that array during the update phase of the game loop. During that phase, objects may want to add new objects or remove objects from the scene. For instance, if the spaceship wants to fire a missile, it will need to add an object to the scene. Similarly, if a missile smashes a rock, it will want to remove itself and the rock from the scene.
Since we are iterating across the sceneObjects array, we can't add or remove objects from that array. If we change the underlying array while iterating across it, we can cause a crash. So, we don't want to do that. Similarly, if we need to remove objects from the scene, we can't do that directly.
We will need to add in a few more NSMutableArrays to our BBSceneController: one called objectsToAdd and one called objectsToRemove.
// we don't actually add the object directly to the scene.
// this can get called anytime during the game loop, so we want to
// queue up any objects that need adding and add them at the start of
// the next game loop
-(void)addObjectToScene:(BBSceneObject*)sceneObject
{
    // lazy init
    if (objectsToAdd == nil) objectsToAdd = [[NSMutableArray alloc] init];
    // activate and wake up our object
    sceneObject.active = YES;
    [sceneObject awake];
    [objectsToAdd addObject:sceneObject];
}

// similar to adding objects, we cannot just remove objects from
// the scene at any time; we want to queue them for removal
// and purge them at the end of the game loop
-(void)removeObjectFromScene:(BBSceneObject*)sceneObject
{
    if (objectsToRemove == nil) objectsToRemove = [[NSMutableArray alloc] init];
    [objectsToRemove addObject:sceneObject];
}
Now that we have these two new methods, we need to alter our game loop so that we can add in the new objects at the beginning of the loop and remove any objects after.
- (void)gameLoop
{
    // we use our own autorelease pool so that we can control
   // when garbage gets collected
    NSAutoreleasePool * apool = [[NSAutoreleasePool alloc] init];

    // add any queued scene objects
    if ([objectsToAdd count] > 0) {
        [sceneObjects addObjectsFromArray:objectsToAdd];
        [objectsToAdd removeAllObjects];
    }

    // update our model
    [self updateModel];
    // send our objects to the renderer
    [self renderScene];

     // remove any objects that need removal
    if ([objectsToRemove count] > 0) {
        [sceneObjects removeObjectsInArray:objectsToRemove];
        [objectsToRemove removeAllObjects];
    }

    [apool release];
 }
We have not only added two new phases to the game loop, but we also added an autorelease pool. It is good practice to use autorelease pools whenever you are trying to maintain the highest performance. Using a pool allows you to specify the time you want any autoreleased objects to be collected. If you don't specify your own pool, then objects are put into the big application-wide pool. The application-wide pool empties whenever it gets full, which might be right in the middle of a very high-performance part of your app. By defining our own pool, any transitory objects that might be defined in the game loop will be released at a good time for us.
OK, now back to the ship! If you build and run it, you should be able to not only see your ship, but also fly it around the screen (See Figure 7-11). However, you'll notice one problem very quickly: You can fly off the screen and never come back. Since this is a retro remake, we should make it so that if you fly off the left side of the screen, you fly back in from the right.
We want any object that flies off the screen to come back in the other side, so it would make sense to add this functionality to the mobile object, since any moving object will be a child.
Let's add a single method to our BBMobileObject:
-(void)checkArenaBounds

{
    if (translation.x > (240.0 + CGRectGetWidth(self.meshBounds)/2.0)) translation.x -= 480.0 + CGRectGetWidth(self.meshBounds);
    if (translation.x < (-240.0 - CGRectGetWidth(self.meshBounds)/2.0)) translation.x += 480.0 + CGRectGetWidth(self.meshBounds);

    if (translation.y > (160.0 + CGRectGetHeight(self.meshBounds)/2.0)) translation.y -= 320.0 + CGRectGetHeight(self.meshBounds);
    if (translation.y < (-160.0 - CGRectGetHeight(self.meshBounds)/2.0)) translation.y += 320.0 + CGRectGetHeight(self.meshBounds);
}
It may look complicated, but it is very simple. If our object is fully off the screen in any direction, we simply move it to the other side of the screen.
We call this from the update method in the BBMobileObject:
-(void)update
{
    .
    .
    [self checkArenaBounds];
    [super update];
}
And that's it. Now any object that inherits from the mobile object will not only get the benefits of motion, but will also be automatically transported from one side of the screen to the other if it goes out of bounds.
We have a spaceship. Now let's make some rocks.
For our rocks, we will make a new class of scene objects called BBRock, and it will be very similar to the process we took to make the spaceship and the buttons. But this time, we will make a randomly generated mesh, so that each space rock will be unique.
We will start with an ideal rock, which is a circle; in other words, every vertex is 1 unit from 0,0. However, if we modulate that radius by a small random amount for every vertex, we will get a mangled circle, and that looks kind of like a nice space rock. You can see how this will work in Figure 7-12.
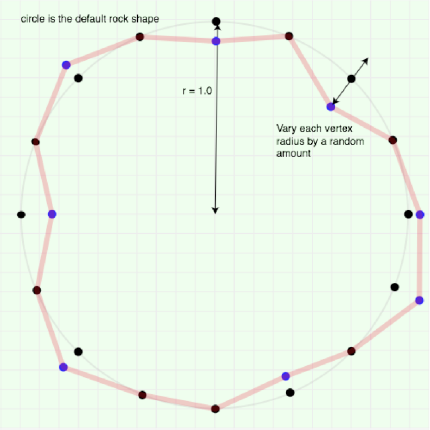
Figure 7.12. Our randomization of a circle to get a space rock. All we need to do is vary the radius of each vertex by a small random amount.
For this, we will need something that will generate random numbers. We will define a few macros:
#define RANDOM_SEED() srandom(time(NULL))
#define RANDOM_INT(__MIN__, __MAX__) ((__MIN__) + random() % ((__MAX__+1) - (__MIN__)))
Let's put them in our BBConfiguration.h file. The first macro is just a quick way to seed the random number generator. The second one is a bit more complicated, but basically just returns a random integer between MAX and MIN.
Now let's make our new BBRock object. It will also be a subclass of the mobile object.
@interface BBRock : BBMobileObject {
    CGFloat * verts;
    CGFloat * colors;
 }
Since we are going to be generating our vertexes, as opposed to just using static arrays, we will need some place to store them, hence the CGFloat pointers.
As with the other scene objects, we will have a few static variables in our implementation file:
#pragma mark Rocks mesh
// the rocks are going to be randomly generated
// so we just need some basic info about them
static NSInteger BBRockVertexStride = 2;
static NSInteger BBRockColorStride = 4;
static NSInteger BBRockOutlineVertexesCount = 16;
Now the big, scary awake method. Let's take this in pieces.
-(void)awake
{
    // pick a random number of vertexes, more than 8, less than the max count
    NSInteger myVertexCount = RANDOM_INT(8,BBRockOutlineVertexesCount);

    // malloc some memory for our vertexes and colors
    verts = (CGFloat *) malloc(myVertexCount * BBRockVertexStride * sizeof(CGFloat));
    colors = (CGFloat *) malloc(myVertexCount * BBRockColorStride * sizeof(CGFloat));

    // we need to use radians for our angle since we will
   // be using the trig functions
    CGFloat radians = 0.0;
    CGFloat radianIncrement = (2.0 * 3.14159) / (CGFloat)myVertexCount;
In this first part, we are just doing some setup. We get a random vertex count, allocate some memory for our vertexes, and finally set up our angle counter and angle step.
// generate the vertexes
    NSInteger vertexIndex = 0;
    for (vertexIndex = 0; vertexIndex < myVertexCount; vertexIndex++) {
        NSInteger position = vertexIndex * BBRockVertexStride;
        // random radial adjustment
        CGFloat radiusAdjust = 0.25 - (RANDOM_INT(1,100)/100.0 * 0.5);
        // calculate the point on the circle, but vary the radius
        verts[position] = cosf(radians) * (1.0 + radiusAdjust);
    verts[position + 1] = sinf(radians) * (1.0 + radiusAdjust);
// move on to the next angle
radians += radianIncrement;
}This part is the most interesting. If we simply multiplied the cosine and sine functions by 1.0, we would get a circle with radius 1.0. Instead, we are adjusting the radius by +/- 0.25. This way, we retain the roughly circular shape, but get a nice randomization.
// now the colors, just make it white for now, all 1's
    for (vertexIndex = 0; vertexIndex < myVertexCount * BBRockColorStride; vertexIndex++) {
        colors[vertexIndex] = 1.0;
    }

    // now alloc our mesh with our random verts
    mesh = [[BBMesh alloc] initWithVertexes:verts
                                vertexCount:myVertexCount
                                vertexStride:BBRockVertexStride
                                 renderStyle:GL_LINE_LOOP];

    mesh.colors = colors;
    mesh.colorStride = BBRockColorStride;

}
This last bit is just finishing up. For now, all our colors will be white. We do a standard mesh initialization, but with our freshly minted vertexes, and we are ready to go. Since the only thing rocks do is drift about, and we get all that functionality from the superclass, we are basically finished here.
However, it might be nice to have a quick and easy way to get a single randomized rock. We can do this with a class method (or two).
+(BBRock*)randomRock
{
    return [BBRock randomRockWithScale:NSMakeRange(15, 20)];
}

+(BBRock*)randomRockWithScale:(NSRange)scaleRange
{
    BBRock * rock = [[BBRock alloc] init];
    CGFloat scale = RANDOM_INT(scaleRange.location,NSMaxRange(scaleRange));
    rock.scale = BBPointMake(scale, scale, 1.0);
    CGFloat x = RANDOM_INT(100,230);
    NSInteger flipX = RANDOM_INT(1,10);
    if (flipX <= 5) x *= −1.0;
    CGFloat y = RANDOM_INT(0,320) - 160;
    rock.translation = BBPointMake(x, y, 0.0);
    // the rocks will be moving either up or down in the y axis
    CGFloat speed = RANDOM_INT(1,100)/100.0;
    NSInteger flipY = RANDOM_INT(1,10);
    if (flipY <= 5) speed *= −1.0;
    rock.speed = BBPointMake(0.0, speed, 0.0);

    CGFloat rotSpeed = RANDOM_INT(1,100)/200.0;
    NSInteger flipRot = RANDOM_INT(1,10);
    if (flipRot <= 5) rotSpeed *= −1.0;
rock.rotationalSpeed = BBPointMake(0.0, 0.0, rotSpeed);
return [rock autorelease];
}Our random rock generator picks a scale between the specified scale range, picks a random x position either above 100 or below −100, and a random y position. It also adds a random speed and spin to our rock. And since we inherit from BBMobileObject, our rocks will never drift off the screen (well, not without coming back in on the other side).
To see how the rocks look, we need to add them to our loadScene in the scene controller. We will actually make a method call for this:
// generate a bunch of random rocks and add them to the scene
-(void)generateRocks
{
    NSInteger rockCount = 10;
    NSInteger index;
    for (index = 0; index < rockCount; index ++) {
         [self addObjectToScene:[BBRock randomRock]];
    }
}
Now we add that to our loadScene, and we might as well seed the random number here, too, since we call it only once.
// this is where we initialize all our scene objects
-(void)loadScene
{
RANDOM_SEED();
.
.
[self generateRocks];
[inputController loadInterface];
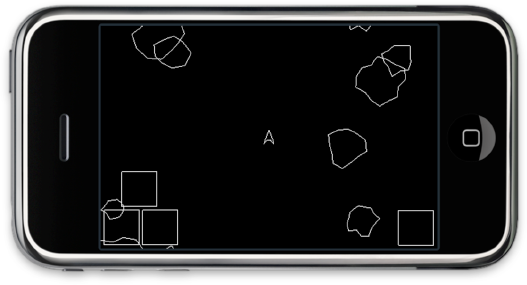
}If you build and run it (see Figure 7-13), you will see our rocks drifting around either side of the screen, and you can fly around using our controls. Now we need to be able to smash stuff. We need weapons!
You may have noticed a pattern here. For our missiles, we need to add a new scene object, so we will make a new subclass of the mobile object and call it BBMissile:
@interface BBMissile : BBMobileObject {

}

@end
Our missiles will be pretty simple; they don't need anything extra. They do, however, need a model. Let's just make them very skinny triangles:
#pragma mark Missile mesh

static NSInteger BBMissileVertexStride = 2;
static NSInteger BBMissileColorStride = 4;

static NSInteger BBMissileOutlineVertexesCount = 3;
static CGFloat BBMissileOutlineVertexes[6] =
{-0.2, 0.0,  0.2,0.0,  0.0, 2.0};

static CGFloat BBMissileColorValues[12] =
{1.0,1.0,1.0,1.0, 1.0,1.0,1.0,1.0, 1.0,1.0,1.0,1.0};
Add a standard awake method referencing our vertex data:
-(void)awake
{
    mesh = [[BBMesh alloc] initWithVertexes:BBMissileOutlineVertexes
                        vertexCount:BBMissileOutlineVertexesCount
                        vertexStride:BBMissileVertexStride
                        renderStyle:GL_TRIANGLES];
    mesh.colors = BBMissileColorValues;
    mesh.colorStride = BBMissileColorStride;
}Now we need some way to generate missiles. For that, we go back to our stubbed out fireMissile method in the BBSpaceShip object:
-(void)fireMissile
{
    // need to spawn a missile
    BBMissile * missile = [[BBMissile alloc] init];
    missile.scale = BBPointMake(5.0, 5.0, 1.0);
    // we need to position it at the tip of our ship
    CGFloat radians = rotation.z/BBRADIANS_TO_DEGREES;
    CGFloat speedX = -sinf(radians) * 3.0;
    CGFloat speedY = cosf(radians) * 3.0;

    missile.speed = BBPointMake(speedX, speedY, 0.0);
missile.translation = BBPointMake(translation.x + missile.speed.x * 3.0, translation.y + missile.speed.y * 3.0, 0.0);
missile.rotation = BBPointMake(0.0, 0.0, self.rotation.z);
[[BBSceneController sharedSceneController] addObjectToScene:missile];
[missile release];
[[BBSceneController sharedSceneController].inputController setFireMissile:NO];
}Here, we are doing some pretty standard stuff. We allocate a missile object. We then get the angle of our current heading in radians. This way, we can build a speed vector that is going in the right direction. It turns out the direction of the speed vector is also the direction we want to translate the missile from our center point to make it look like it is coming out of the tip of our ship. Lastly, we set the missile rotation to be the same as our current heading.
Once our missile is ready, we want to add it to our scene, so we call addObjectToScene on the BBSceneController. This will queue up this missile to be added to the scene at the start of the next game loop.
If you build and run the game now, you can fire missiles to your heart's content! The problem is that after a very short while, the missiles start to clutter the screen (see Figure 7-14).
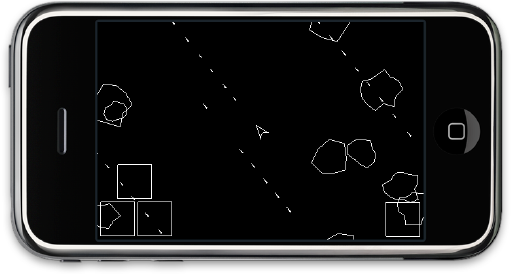
Once we have added a way for the objects to interact, many of these missiles will be used up when they smash the rocks. Ultimately though, we probably need to change it so that they reach only as far as the edge of the screen.
You may recall that back into our mobile object, we added a method called checkArenaBounds, which handles keeping all our objects on the screen. In order to fix the missile issue, all we need to do is override that method in our BBMissile class, and we will be good to go!
-(void)checkArenaBounds
{
    BOOL outOfArena = NO;
    if (translation.x > (240.0 + CGRectGetWidth(self.meshBounds)/2.0)) outOfArena = YES;
    if (translation.x < (-240.0 - CGRectGetWidth(self.meshBounds)/2.0)) outOfArena = YES;

    if (translation.y > (160.0 + CGRectGetHeight(self.meshBounds)/2.0)) outOfArena = YES;
    if (translation.y < (-160.0 - CGRectGetHeight(self.meshBounds)/2.0)) outOfArena = YES;

    if (outOfArena) {
        [[BBSceneController sharedSceneController] removeObjectFromScene:self];
    }
}
This looks very similar to the checkArenaBounds that is in the BBMobileObject class. We are doing basically the same thing, except in this case, if we find ourselves outside the screen bounds, we need to remove ourselves from the scene. This is easily accomplished by calling the scene controller method removeObjectFromScene. This will queue up the missile for removal at the end of this game loop.
Our buttons are very bland squares. Since this is the retro version, we want to stick to the retro look, but it would be nice if the buttons had some sort of marking on them. But we just need to change the nonpressed look of the buttons, since when they are pressed, not only is your finger in the way of seeing them, but they already fill with white, which is fine.
For our nicer buttons, we will make a new subclass for the type of button we want, called BBArrowButton:
@interface BBArrowButton : BBButton {

}
We will keep it very simple. We just want a button with an arrow on it.
#pragma mark arrow button mesh
static NSInteger BBArrowButtonOutlineVertexesCount = 14;
static CGFloat BBArrowButtonOutlineVertexes[28] = {-0.25, 0.0, 0.25, 0.0,
0.25, 0.0, 0.1, 0.25,0.25, 0.0, 0.1,−0.25, −0.5,−0.5,−0.5, 0.5, −0.5, 0.5,
0.5, 0.5, 0.5, 0.5, 0.5,−0.5, 0.5,−0.5,−0.5,−0.5};
static GLenum BBArrowButtonOutlineRenderStyle = GL_LINES;
static CGFloat BBArrowButtonOutlineColorValues[56] =
{1.0,1.0,1.0,1.0, 1.0,1.0,1.0,1.0, 1.0,1.0,1.0,1.0, 1.0,1.0,1.0,1.0,
1.0,1.0,1.0,1.0, 1.0,1.0,1.0,1.0, 1.0,1.0,1.0,1.0, 1.0,1.0,1.0,1.0,
1.0,1.0,1.0,1.0, 1.0,1.0,1.0,1.0, 1.0,1.0,1.0,1.0, 1.0,1.0,1.0,1.0,
1.0,1.0,1.0,1.0, 1.0,1.0,1.0,1.0};


@implementation BBArrowButton
-(void)setNotPressedVertexes
{
mesh.vertexes = BBArrowButtonOutlineVertexes;
mesh.renderStyle = BBArrowButtonOutlineRenderStyle;
mesh.vertexCount = BBArrowButtonOutlineVertexesCount;
mesh.colors = BBArrowButtonOutlineColorValues;
}Our new button is mostly just new vertexes. The only code we are running is to override the setNotPressedVertexes method, so that when the button is in the up position, it displays our new look. In case you can't render vertexes in your head, this will be an arrow pointing to the right.
Now, in the input controller, where we instantiate our buttons, just change the class from BBButton to BBArrowButton. Oh, and unless you want all your buttons to point to the right, don't forget to rotate them as well.
-(void)loadInterface
{
    .
    .
    // right arrow button
    BBArrowButton * rightButton = [[BBArrowButton alloc] init];
    .
    .
    // left arrow
    BBArrowButton * leftButton = [[BBArrowButton alloc] init];
    leftButton.rotation = BBPointMake(0.0, 0.0, 180.0);
    .
    .
    // forward button
    BBArrowButton * forwardButton = [[BBArrowButton alloc] init];
    forwardButton.rotation = BBPointMake(0.0, 0.0, 90.0);
    .
    .
}
If you build and run this, you can fly around with the arrow buttons, fire missiles, and watch the rocks drift by (see Figure 7-15).
Now all we need to do is add object interaction so that our missiles can smash rocks and rocks can smash the spaceship. In order for our objects to interact, we need collision detection.
You may be tired of reading this, but like many subtopics of OpenGL game design, collision detection is it's own huge area of content. Again, I could write whole chapters on this subject alone. Here, I am going to skim the surface to give you just enough understanding of the issues involved to implement your own simple collision-detection system.
In a well-designed OpenGL game, the part of the game loop that takes the most time is the actual rendering. However, when you start to add dozens and dozens of objects to your scene, the collision-detection code can quickly take over your processor, and is often the cause of slowdown and poor performance. Without this subsystem, however, you have no game, because your objects cannot interact. Therefore, it is vitally important that you design the collision system to be efficient.
The next hurdle is that most OpenGL games are in 3D, so you have the added dimension that makes fast and efficient collision detection an order of magnitude more difficult. Space Rocks! is all in 2D, but I am also going to cover some techniques that apply to 3D as well.
We are going to start with some broad concepts, and then narrow the focus to our specific game domain.
We will begin with the most basic question, because we need to define exactly what a collision is in order to design a system to find collisions.
Simply put, a collision is when two objects touch each other. A more precise definition is that in any given frame of the game, if two object meshes overlap after they have been updated, that is a collision.
OK, now you know what a collision is. But how do you figure out if two object meshes overlap?
The simplest way is to test all of the primitive structures of one mesh and see if any of them intersect the primitives of another mesh. By primitives, I mean the triangles or lines that make up the mesh.
In our case, a missile is composed of triangle primitives, and rocks are made of line primitives. And they are both made of vertexes. In order to see if we have a collision, we need to check all the line segments in the rock mesh to see if they intersect with the triangles of the missile mesh.
Now let's do some quick estimation. If we have 20 rocks on the screen, which all have roughly 16 line segments, and we need to check them against a single missile, that is 320 possible line-triangle intersections we need to perform. But we can fire 5, 10, or even 15 missiles into the scene, so we are looking at possibly 4800 checks in a single frame. Now what if we smashed all of the rocks at once, and they have all broken into 3 smaller rocks? This gives us 60 rocks to check against, say, 15 missiles. That tops out at nearly 15,000 line-triangle intersection checks! This would bring our iPhone CPU to its knees. We need to find a better way.
There are many collision-detection methods we could use. Figure 7-16 shows just a few of the easier ones.
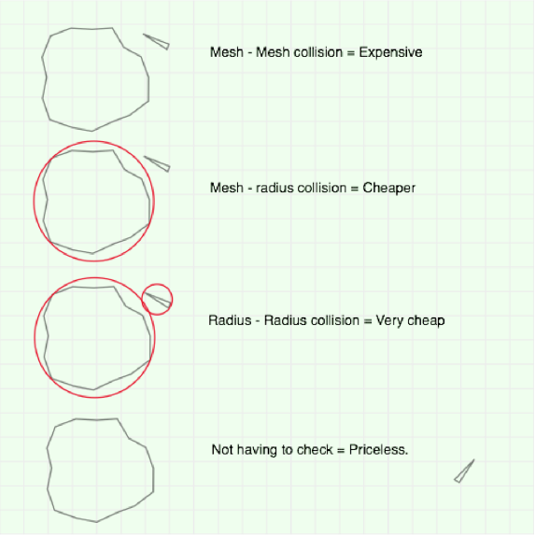
If we pretend that each rock is really a circle, then we just need to do a single radius-triangle check to see if the missile has collided with the rock. If it has collided, we could do a more complicated mesh-to-mesh collision check.
Along those same lines, if we pretend that both objects are like circles, then our initial check becomes even cheaper.
Even better, we can figure out a clever way to tell if the objects are not even close enough to each other to even check. This idea of not checking is the best and most widely used approach to collision detection. It can get kind of complicated, so we won't implement it in Space Rocks!. However, it is very important to at least understand the theory behind this approach, so we will go over the simplest version. Then we will take one step back and implement the "very cheap" method illustrated in Figure 7-16.
So, how do you check something without checking it? There are dozens of ways to go about this, but it all boils down to a simple idea: dividing your scene into regions and assigning each object to a region, and then just checking collisions between objects in that specific region. This way, you are only checking objects that are close to each other. There is a small up-front cost of sorting the objects into their regions, but the savings are huge.
Let's take a look at a simple version of this regioning scheme. Figure 7-17 shows our scene sliced up into 24 regions.
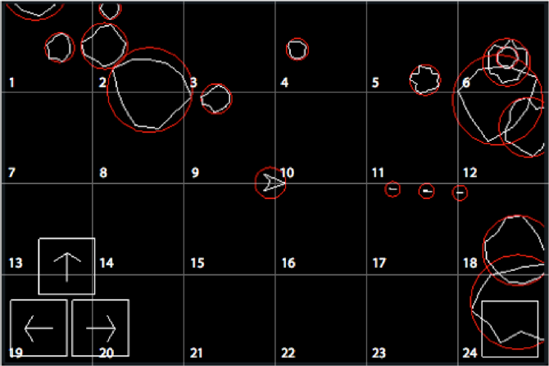
First, we need to make an array of 24 buckets. Then we go through all our objects and put them into the buckets based on where they are in the scene. In some cases, this is easy, such as for the single rock that is fully inside bucket 4. Other objects span multiple regions, so they must be put into multiple buckets (like our spaceship, which is in four regions).
In order to quickly sort the objects, we can define a simple hashing formula. It could be anything that is quick to calculate. In our case, we might use the radius and center of each object to figure out the minimum and maximum points, and then sort the objects based on in which bins those points reside. Once we have sorted all our objects into buckets, we simply find the objects that we care about—in this case. the ship and the missiles—and see if they collide with any objects in their buckets.
In our example in Figure 7-17, we need to check our ship against the two rocks in bucket 9, the rightmost missile against the rocks in bucket 18, and the leftmost missile against the rocks in bucket 11. If were we doing a straight radius check against all the objects, we have 4 colliders (the ship and 3 missiles) and 14 collidees (the rocks). The result is 56 checks. But using our bucket method, we have 18 checks to get everything into the buckets, and then 6 checks to find the collisions. That is roughly half as many checks as required the previous method. A 50% reduction is good, but our scene is also very simple.
If we go back to our worst-case scenario of 15 missiles and 60 rocks (plus the ship!), we are looking at about 1000 checks if we don't segment our space into regions. For our worst-case scenario, let's pretend that each missile is in a different region with 5 rocks (which would be pretty unlikely). We have an up-front cost of 76 objects to put into the buckets, and then 75 checks for collisions. The result is 150 total checks, which is 15% of the checks required for the nonsegmented algorithm—a huge savings.
You can see how this segmenting approach is very efficient for large and complicated scenes. And this method is only the simplest of the segmenting schemes. The next most complicated methods involve binary search trees, where the 3D space is cut in half, those halves are cut in half, and so forth. The collision-detection segmenting algorithms only get more complex from there.
For our game, we are going to do a simple radius-to-radius brute-force check, with a secondary mesh check. This will be adequate for our game needs. Where do we begin?
In all but the most expensive version of collision checking, you do not check collisions against the actual vertexes of the object, but instead against some approximation of that object. In our case, we are using a circle to approximate a rock—well, actually a sphere.
This secondary object is not our mesh, but it is a simpler approximation. We will need a new object to hold this simpler model, and we will call it a collider. (It is often referred to as a collision mesh, but I like to call them colliders, since referring to the collision mesh and the render mesh can get confusing.)
You can use anything as a collider, but there are a few tried-and-true shapes that make the calculations fast and easy:
Spheres are the cheapest to check against. You just need to do a single distance check against the radius. If you are within the radius of the sphere, you collide.
Boxes are slightly more complicated, but similarly easy to calculate. An axis-aligned bounding box (also known as an AABB) is the simplest of the boxes. Being axis-aligned means that all of the box's faces are parallel to the main x, y, and z axes. Since two opposing faces of the box define a range for a single axis, it takes only three simple range checks to see if a point lies within the box. For instance, the top and bottom of the box define the maximum and minimum y values. If the y value of the point you are checking is not within that range, then it is not in the box. If it is within the range, then check the x axis, and so on.
Problems arise when your model objects are not the right shape to be well approximated by a sphere or a box. In order to solve this problem, you segment your model into smaller boxes or spheres. You can chop up your model into smaller and smaller bits until the approximation is close enough for the game mechanic you care about.
For instance, the iPhone game Snow Dude has a fairly complex 2D character (see Figure 7-18). The single circle is a bad approximation, but would work well for a first-pass collision test. The bounding box is a bit better, and depending on what you are colliding with, it might be enough. If you want finer-grained collisions, you will need to segment the character into a compound collider, using a series of boxes or circles, or a mix of both.
Naturally, the more segments of the collider you have, the more expensive it is to check against. You will need to balance the complexity of your collider with you required performance and game needs. It is important to make the collider system that you use as simple and fast as possible for your game. Don't use complex compound colliders or expensive collision schemes if you don't need them.
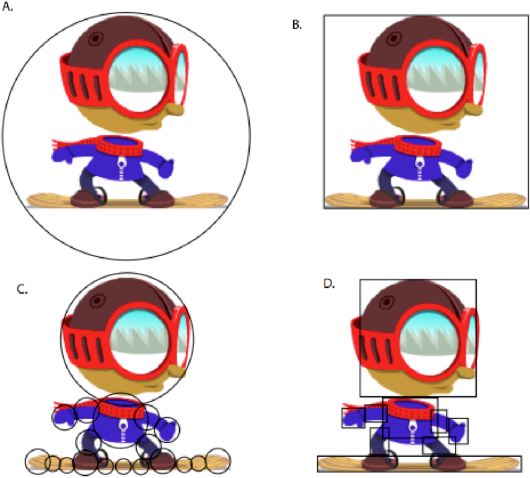
Figure 7.18. The main character from the iPhone game Snow Dude showing various ways of representing a collider. A shows a simple radius collider. B shows an axis-aligned bounding box (commonly referred to as an AABB). C and D show compound colliders.
In the actual Snow Dude game, players are actually concerned only with avoiding obstacles with their snowboard. For its collision detection, we were able to get away with a very simple collider that was just two small bounding boxes at the edges of the snowboard (see Figure 7-19).

For our first pass in our game, we will start out with simple spherical colliders. Most of our objects will be fine approximated as circles. If we find a collision in the first pass, we will refine our collision test with a more detailed check.
For our needs, we will define two things: the radius that we are going to be checking against and the center of our collider sphere.
The center of the sphere is going to be the centroid of your model. The centroid is basically the average of all the vertexes. If your vertexes are fairly evenly spaced throughout the model, then the centroid is very close to the center of gravity. In some cases, as with our spaceship model, the centroid will be biased to the side with the most vertexes. That is fine. We are using the radius and centroid as a first pass, so the most important thing is that it fully covers our model.
In our mesh object, we will add the centroid and the radius as properties:
@interface BBMesh : NSObject {
    .
    .
    .

    BBPoint centroid;
    CGFloat radius;
}

.
.
.
@property (assign) BBPoint centroid;
@property (assign) CGFloat radius;
Then, inside the object, we will build two new methods: calculateCentroid and calculateRadius. calculateCentroid simply adds up all the vertex points, and then divides by the total:
-(BBPoint)calculateCentroid
{
    CGFloat xTotal = 0;
    CGFloat yTotal = 0;
    CGFloat zTotal = 0;
    NSInteger index;
    // step through each vertex and add them all up
    for (index = 0; index < vertexCount; index++) {
        NSInteger position = index * vertexStride;
        xTotal += vertexes[position];
        yTotal += vertexes[position + 1];
        if (vertexStride > 2) zTotal += vertexes[position + 2];
    }
// now average each total over the number of vertexes
return BBPointMake(xTotal/(CGFloat)vertexCount, yTotal/(CGFloat)vertexCount, zTotal/(CGFloat)vertexCount);
}The calculateRadius method requires the centroid in order to work properly, so be sure to call calculateCentroid first. We will build this method so that it works on both 3D models as well as 2D models.
-(CGFloat)calculateRadius
{
    CGFloat rad = 0.0;
    NSInteger index;
   // simply iterate across al vertexes, and find the maximum radius
   // from the centroid
    for (index = 0; index < vertexCount; index++) {
        NSInteger position = index * vertexStride;
        BBPoint vert;
        if (vertexStride > 2) {
            vert = BBPointMake(vertexes[position], vertexes[position + 1], vertexes[position + 2]);
        } else {
            vert = BBPointMake(vertexes[position], vertexes[position + 1], 0.0);
        }
        CGFloat thisRadius = BBPointDistance(centroid, vert);
        if (rad < thisRadius) rad = thisRadius;
    }
    return rad;
}
Finding the radius is also quite easy. We just need to find the smallest circle that will encompass all of our vertexes. We will just check every vertex, and the furthest one out will become the radius. We need to be able to calculate the distance between two points in order to check the radius. This is a fairly common requirement, so we will add a new inline function called BBPointDistance() to the BBPoint.h file:
static inline float BBPointDistance(BBPoint p1, BBPoint p2)
{
    return sqrt(((p1.x - p2.x) * (p1.x - p2.x)) +
              ((p1.y - p2.y)  * (p1.y - p2.y)) +
              ((p1.z - p2.z) * (p1.z - p2.z)));
}
The final touch in our BBMesh object is to add these two lines to the init method:
self.centroid = [self calculateCentroid];
        self.radius = [self calculateRadius];
Now our mesh will automatically calculate its own centroid and radius when it is initialized.
Earlier, we talked about how we want to keep the number of collision checks to a bare minimum. Along these lines, we can save a whole bunch of collision checks if we limit the types of objects that we are checking. Let's define three types of scene objects with respect to collisions:
A collider is an object that we need to check against all the collidee objects. These include missiles and the spaceship.
A collidee is an object that can be hit, but does not check to see if it is hitting anything. This includes all the rocks.
Noncolliders are things that don't collide, like the buttons.
With these objects in mind, we will embark upon our journey of building a simple collision-detection system. We already have part of the information that we need: the centroid and radius of our meshes. However, when checking for collisions, we will need to take that centroid and move it to wherever the object happens to be at the time, and scale the radius to whatever scale the object has at the time.
As noted, we need to define a collider object for our system. This object is similar to a standard scene object, except instead of carrying around a model that has been scaled and transformed to the correct position each frame, it will carry around our collision mesh (which, in this case, is a simple circle).
The idea is to create a "shadow" object that is similar in some way to our rendered object and has the same position, scale, and rotation. This is a powerful concept, and you will use it quite often if you build many 3D games. However, there is a small issue. We now have two sets of information that need to be translated, scaled, and rotated in the same way. We want to keep our calculations to a minimum, so it would make sense to do this calculation only once. How do we get OpenGL to apply a transform to our non-OpenGL object?
In our code at the moment, all of our translating, rotating, and scaling is happening in the render method. This doesn't really make too much sense, since we should be rendering in the render method, and doing all that other stuff in the update method. By moving that stuff into update, we could apply our transformations to any shadow objects that need it, like the collider.
When you call methods like glTranslate and glRotate, OpenGL is simply building a matrix behind the scenes. OpenGL then uses this matrix and multiplies it by all your vertexes to get the actual points in space that it will use to render your object.
As noted in Chapter 6, technically, a matrix is an abstract mathematical concept, and there are many types. However, in terms of OpenGL, we are talking specifically about a single kind of matrix: a four-by-four transform matrix. Matrixes in OpenGL are generally represented visually like this:
m[0]  m[4]  m[ 8]  m[12]
   m[1]  m[5]  m[ 9]  m[13]
   m[2]  m[6]  m[10]  m[14]
   m[3]  m[7]  m[11]  m[15]
Note that this convention is slightly different from the usual programmer convention of having the first four indexes along the top row. Matrixes are usually shown this way because mathematicians like them this way. If you have learned how to manipulate matrixes by hand, you will also appreciate them being laid out in this way.
For our purposes, we don't really care about the layout. A four-by-four matrix is just a list of 16 numbers:
CGFloat * matrix = (CGFloat *) malloc(16 * sizeof(CGFloat));
These 16 numbers are what you need to define the position, scale, and rotation of a model.
Basically, you generate a matrix with your position, scale, and rotation, then multiply all your vertexes by that matrix to get new points in space that have been transformed by that matrix.
OK, but how do we make these matrixes? Fortunately, OpenGL makes them for us. We just need to save them.
We will add a matrix property to our top-level BBSceneObject. Then we will be kind of clever, and move all the matrix-manipulation methods into the update method:
-(void)update
{
    glPushMatrix();
    glLoadIdentity();

    // move to my position
    glTranslatef(translation.x, translation.y, translation.z);

    // rotate
    glRotatef(rotation.x, 1.0f, 0.0f, 0.0f);
    glRotatef(rotation.y, 0.0f, 1.0f, 0.0f);
    glRotatef(rotation.z, 0.0f, 0.0f, 1.0f);

    //scale
    glScalef(scale.x, scale.y, scale.z);
    // save the matrix transform
    glGetFloatv(GL_MODELVIEW_MATRIX, matrix);
    //restore the matrix
    glPopMatrix();
}
This looks a great deal like our old render method. What we are doing here is simply using OpenGL to build a matrix for us. glPushMatrix() saves whatever matrix OpenGL is currently holding. Then we call glLoadIdentity(), which gives us a clean slate. After that, we simply make our translations, rotations, and scale calls, just as before. The big difference is that at the end of that, we make this call:
glGetFloatv(GL_MODELVIEW_MATRIX, matrix);
This asks OpenGL to take the matrix we just built and put it into our local matrix array. Then we call popMatrix, and OpenGL is restored to whatever state it was in before it got to our method.
Once we have our own transform matrix, our render method becomes very simple:
-(void)render
{
    if (!mesh || !active) return; // if we do not have a mesh, no need to render
    // clear the matrix
    glPushMatrix();
    glLoadIdentity();
    // set our transform
    glMultMatrixf(matrix);
    [mesh render];
    glPopMatrix();
}
We are simply handing our matrix back to OpenGL to use when our mesh renders. The glMultMatrixf() method tells OpenGL to apply that matrix to the current state. This is the equivalent of calling all of the individual glTranslate, glRotate, and glScale methods. Now we have our own transform matrix in a place that is easy to get to, and we can move on to building our collider object.
Our new collider object is going to be pretty simple. It will need to be the transformed version of the centroid and radius from our mesh, so we want to hold on to the transformedCentroid, the transformedRadius, and whether we are a collider or a collidee.
@interface BBCollider : BBSceneObject {
    BBPoint transformedCentroid;
    BOOL checkForCollision;
    CGFloat maxRadius;
}

@property (assign) BOOL checkForCollision;
@property (assign) CGFloat maxRadius;
checkForCollision will tell any objects that will be handling this one whether it is a collider or a collidee. (Colliders check; collidees don't.)
The maxRadius is a version of the transformed radius. Since our object can be scaled asymmetrically, we will need to scale based on the largest scale axis, so it is more than just the transformed radius.
Here, we are making the collider a subclass of BBSceneObject. This is not strictly necessary, but it makes it so that we can render the collidees and see what is going on. If you are following along in the code sample, you will notice that there are some scene object method overrides to render the colliders. By now, you should be familiar with the scene object render code, so I won't go over it again for the collider.
In our collider implementation, we will define an updateCollider method that takes a sceneObject. Our collider will use that scene object to generate its own dimensions and get ready to check for collisions.
-(void)updateCollider:(BBSceneObject*)sceneObject
{
    if (sceneObject == nil) return;
    transformedCentroid = BBPointMatrixMultiply([sceneObject mesh].centroid , [sceneObject matrix]);
    maxRadius = sceneObject.scale.x;
    if (maxRadius < sceneObject.scale.y)     maxRadius = sceneObject.scale.y;
    if ((maxRadius < sceneObject.scale.z) && ([sceneObject mesh].vertexStride > 2))
maxRadius = sceneObject.scale.z;
    maxRadius *= [sceneObject mesh].radius;

    // scene object iVars
    translation = transformedCentroid;
    scale = BBPointMake([sceneObject mesh].radius * sceneObject.scale.x, [sceneObject mesh].radius * sceneObject.scale.y,0.0);
}
First, we get the transformed centroid. Then we find the maximum radius. But wait, how did we transform that point?
We grabbed the transform matrix (the one we coded in the previous section), and then multiplied it with a point, which gives us a new point. How do you multiply a point by a matrix? In our BBPoint.h file, we will need to add another inline function:
static inline BBPoint BBPointMatrixMultiply(BBPoint p, CGFloat* m)
{
    CGFloat x = (p.x*m[0]) + (p.y*m[4]) + (p.z*m[8]) + m[12];
    CGFloat y = (p.x*m[1]) + (p.y*m[5]) + (p.z*m[9]) + m[13];
    CGFloat z = (p.x*m[2]) + (p.y*m[6]) + (p.z*m[10]) + m[14];

    return (BBPoint) {x, y, z};
}
That is how you multiply a matrix with a point and get a new point. If you understand the math behind matrixes, then this makes sense to you already. If not, then just trust me that this works.
For the collider, the last thing we need is a way to check its position and radius against another collider to see if we hit.
-(BOOL)doesCollideWithCollider:(BBCollider*)aCollider
{
    // just need to check the distance between our two points and
    // our radius
    CGFloat collisionDistance = self.maxRadius + aCollider.maxRadius;
    CGFloat objectDistance = BBPointDistance(self.translation, aCollider.translation);
    if (objectDistance < collisionDistance) return YES;
    return NO;
}
Now we have these collider objects, but where do they fit into the code? We actually need yet another object. We also will need a new phase for our game loop.
We will use a collision controller object to check the colliders with the collidees and act accordingly. In order to do this, we need three sets of information at our disposal:
All the scene objects
All the scene objects in the current frame that are colliders
All the scene objects in the current frame that are collidees
With that in mind, let's start to make our collision controller:
@interface BBCollisionController : BBSceneObject {
    NSArray * sceneObjects;
    NSMutableArray * allColliders;
    NSMutableArray * collidersToCheck;
}
Again, we are making this a scene object so that we can render the colliders. This is handy, but not strictly necessary.
We have our three arrays: sceneObjects contains—you guessed it—the scene objects, allColliders contains any object that has an attached collider, and collidersToCheck contains any object that has an attached collider whose checkForCollision is set to YES. Well, they will contain this information once we write the code to generate the arrays:
-(void)handleCollisions
{
    // two types of colliders
    // ones that need to be checked for collision and ones that do not
    if (allColliders == nil) allColliders = [[NSMutableArray alloc] init];
    [allColliders removeAllObjects];
    if (collidersToCheck == nil) collidersToCheck = [[NSMutableArray alloc] init];
    [collidersToCheck removeAllObjects];

    // first build our separate arrays
  for (BBSceneObject * obj in sceneObjects) {
         if (obj.collider != nil){
            [allColliders addObject:obj];
            if (obj.collider.checkForCollision) [collidersToCheck addObject:obj];
        }
    }

    // now check to see if anything is hitting anything else
    for (BBSceneObject * colliderObject in collidersToCheck) {
        for (BBSceneObject * collideeObject in allColliders) {
            if (colliderObject == collideeObject) continue;
            if ([colliderObject.collider doesCollideWithCollider:collideeObject.collider]) {
                if ([colliderObject respondsToSelector:@selector(didCollideWith:)]) [colliderObject didCollideWith:collideeObject];
            }
        }
    }
}
This method is basically the entirety of the collision controller. First, we clear out any old objects from our last frame. Next, we go through all the scene objects and load any with an attached collider into our allColliders. Then we do a second check to see if any of them need to be checked.
Once we have our arrays, we can do the actual checking. We go through our (hopefully) smaller collidersToCheck array (our colliders) and check them against the allColliders array (the collidees). If they do hit, then we see if they implement the didCollideWith: method, and if so, we send them that message. When we run this, any objects that collide will get notified, and they will need to handle the collision.
We have a few more things to do before we can turn on our collision system. We need to hook it up in the scene controller, add the colliders to the scene objects, and implement some didCollideWith: methods in the scene objects that will be colliding.
First, let's look at the BBSceneController. We will need to add a collision controller instance variable:
@interface BBSceneController : NSObject {
    .
    .
    BBCollisionController * collisionController;
    .
    .
}
There is no need to make it a property, because it should be used only from within the scene controller.
In our loadScene method in the BBSceneController, we will instantiate our new controller instance variable:
// this is where we initialize all our scene objects
-(void)loadScene
{
    .
    .
    collisionController = [[BBCollisionController alloc] init];
    collisionController.sceneObjects = sceneObjects;
    if (DEBUG_DRAW_COLLIDERS)    [self addObjectToScene:collisionController];
    .
    .
}
We need to add the collision controller to our scene objects only if we are debugging and want to draw the collider objects (see Figure 7-20). DEBUG_DRAW_COLLIDERS is another configuration constant that is defined in the BBConfiguration.h file. This way, we can turn the collider rendering on and off as needed.
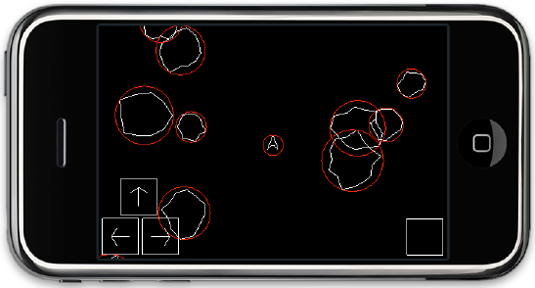
Next, we will need to add a phase to our game loop:
- (void)gameLoop
{
    .
    .
    // update our model
    [self updateModel];
    // deal with collisions
    [collisionController handleCollisions]; //<-- add in collisions

    // send our objects to the renderer
    [self renderScene];
    .
    .
}
We put it immediately after we update and before we render. This way, our collisions are handled immediately after the objects have updated their positions.
If you build and run the code now, it should work fine, but there are no collider objects being instantiated yet.
Let's look at the top-level BBSceneObject.
@interface BBSceneObject : NSObject {
    // transform values
    .
    .
    BBCollider * collider;
}
.
.
@property (retain) BBCollider * collider;
. .
We add a collider instance variable and make it a property. In our update method, we just need to add a single line, at the end of the method:
// called once every frame
-(void)update
{
.
.
if (collider != nil) [collider updateCollider:self];
}We call the updateCollider method, and pass in ourselves. This will keep the collider object up to date with our scene object's transform matrix.
We still haven't instantiated any colliders. This should happen only in the objects that we want to be able to hit or be hit—rocks, missiles, and ships. We are going to be making a lot of colliders, so it will be handy to create a factory class method to generate them for us:
+(BBCollider*)collider
{
    BBCollider * collider = [[BBCollider alloc] init];
    if (DEBUG_DRAW_COLLIDERS) {
        collider.active = YES;
        [collider awake];
    }
    collider.checkForCollision = NO;
    return [collider autorelease];
}
This will be in the collider implementation file. It just provides a handy way to allocate colliders. And it gives us a central place to deal with the rendering debug code. Don't forget that DEBUG_DRAW_COLLIDERS is defined in the BBConfiguration.h file, so be sure to include that file.
Where do we instantiate these colliders? The same place we build our meshes, in the scene object awake method. Let's look at BBSpaceShip.
-(void)awake
{
    .
    .
    .
    self.collider = [BBCollider collider];
    [self.collider setCheckForCollision:YES];
}
In these two lines, we grab a new collider from the factory method, and then set our checkForCollision to YES.
We also need to implement the didCollideWith: method in the BBSpaceShip class.
- (void)didCollideWith:(BBSceneObject*)sceneObject;
{
// if we did not hit a rock, then get out early
if (![sceneObject isKindOfClass:[BBRock class]]) return;
// we did hit a rock! smash it!
[(BBRock*)sceneObject smash];
// now destroy ourself
[[BBSceneController sharedSceneController] removeObjectFromScene:self];
}For now, we don't care if we shoot ourselves. We only care if we hit a rock. We tell the rock to smash itself, and then we tell the scene controller to remove us from the scene (which would be the end of that game).
We'll do the same thing in our BBMissile class: add the two lines to the awake method and add a didCollideWith: method that is exactly like the one in the spaceship object.
Our rocks are collidees, so they are just a bit different. We just need to add the collider to the awake method in the BBRock class, but we don't need to set checkForCollision to YES.
-(void)awake
{
    .
    .
    self.collider = [BBCollider collider];
}
Since we want the rocks to just be collidees, and not colliders, we do not need to implement didCollideWith:. But we do need to add the smash method that we called in the ship and missile classes when we hit the rocks.
What does smash do? Well, according to our specifications, a hit rock will turn into three smaller rock fragments, and if they are hit, they are gone. We will need to introduce a smash counter to our rock objects to keep track of whether they are original rocks or they have been hit once.
-(void)smash
{
    smashCount++;
    // queue myself for removal
    [[BBSceneController sharedSceneController] removeObjectFromScene:self];

    // if we have already been smashed once, then that is it
    if (smashCount >= 2) return;

    // need to break ourself apart
    NSInteger smallRockScale = scale.x / 3.0;

    BBRock * newRock = [[BBRock alloc] init];
    newRock.scale = BBPointMake(smallRockScale, smallRockScale, 1.0);
    // now we need to position it
    BBPoint position = BBPointMake(0.0, 0.5, 0.0);
    newRock.translation = BBPointMatrixMultiply(position , matrix);
    newRock.speed = BBPointMake(speed.x + (position.x * SMASH_SPEED_FACTOR), speed.y + (position.y * SMASH_SPEED_FACTOR), 0.0);
    newRock.rotationalSpeed = rotationalSpeed;
    newRock.smashCount = smashCount;
[[BBSceneController sharedSceneController] addObjectToScene:newRock];
[newRock release];
newRock = [[BBRock alloc] init];
newRock.scale = BBPointMake(smallRockScale, smallRockScale, 1.0);
// now we need to position it
position = BBPointMake(0.35, −0.35, 0.0);
newRock.translation = BBPointMatrixMultiply(position , matrix);
newRock.speed = BBPointMake(speed.x + (position.x * SMASH_SPEED_FACTOR), speed.y + (position.y * SMASH_SPEED_FACTOR), 0.0);
newRock.rotationalSpeed = rotationalSpeed;
newRock.smashCount = smashCount;
[[BBSceneController sharedSceneController] addObjectToScene:newRock];
[newRock release];
newRock = [[BBRock alloc] init];
newRock.scale = BBPointMake(smallRockScale, smallRockScale, 1.0);
// now we need to position it
position = BBPointMake(−0.35, −0.35, 0.0);
newRock.translation = BBPointMatrixMultiply(position , matrix);
newRock.speed = BBPointMake(speed.x + (position.x * SMASH_SPEED_FACTOR), speed.y + (position.y * SMASH_SPEED_FACTOR), 0.0);
newRock.rotationalSpeed = rotationalSpeed;
newRock.smashCount = smashCount;
[[BBSceneController sharedSceneController] addObjectToScene:newRock];
[newRock release];
}Although this is a big, ugly method, all it does is queue the rock for removal from the scene, and queue up three new, smaller rocks to be added to the scene (see Figure 7-21).
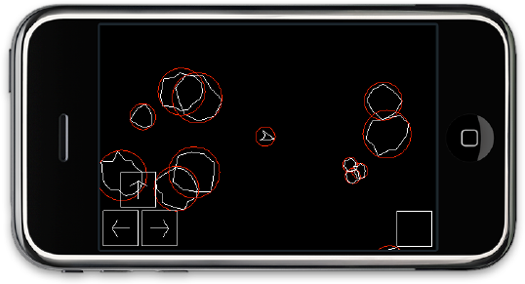
Our game play is basically done. We have satisfied all of our requirements, but there is a small but frustrating problem with our game. Our collision checking is very fast, but it's not very accurate. The way that the rocks and ship are shaped causes false positives during the collision checking.
Figure 7-22 shows an example. The ship and rock are not actually colliding, but the radiuses of the collision mesh circles will generate a positive collision. How do we deal with that?
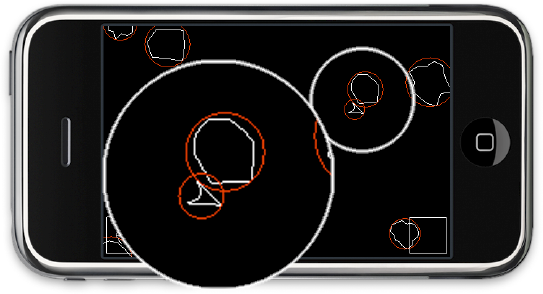
Figure 7.22. Our ship and the rock are not actually colliding, but our simple collision-detection system will flag this as a collision, and our ship will be destroyed. This is very frustrating, and we need to fix it.
We need to define a secondary collision check that we call only after we have had one of these general collisions. In this case, we will do a fairly simple secondary check and see if any of the spaceship's vertexes are within the collision circle of the rock. It is still not perfect, and will return some false positives. However, collision checking is always a balance between a perfect collision check, which is expensive, and an approximate check, which is fast. This secondary check will make the missiles and ship behave more appropriately, and it is good enough for the purposes of our game.
In our BBCollider object, we are going to define another method called doesCollideWithMesh:
-(BOOL)doesCollideWithMesh:(BBSceneObject*)sceneObject
{
    NSInteger index;
    // step through each vertex of the scene object
    // transform it into real space coordinates
    // and check it against our radius
    for (index = 0; index < sceneObject.mesh.vertexCount; index++) {
        NSInteger position = index * sceneObject.mesh.vertexStride;
        BBPoint vert;
        if (sceneObject.mesh.vertexStride > 2) {
            vert = BBPointMake(sceneObject.mesh.vertexes[position], sceneObject.mesh.vertexes[position + 1], sceneObject.mesh.vertexes[position + 2]);
        } else {
            vert = BBPointMake(sceneObject.mesh.vertexes[position], sceneObject.mesh.vertexes[position + 1], 0.0);
        }
vert = BBPointMatrixMultiply(vert , [sceneObject matrix]);
CGFloat distance = BBPointDistance(self.translation, vert);
if (distance < self.maxRadius) return YES;
}
return NO;
}We grab every vertex in the mesh, transform it by the scene object's matrix transform to get the spatial location of the vertex, and then check it against the radius of the collider. If the vertex lies within the radius, then we call it a hit.
Great! We have this new secondary checking system. But how do we use it?
Both our BBMissile and our BBSpaceShip have a didCollideWith: method. In this method, we will call this secondary check just to make sure we hit the rock.
In the BBSpaceShip.m file, our revisions look like this:
- (void)didCollideWith:(BBSceneObject*)sceneObject;
{
    // if we did not hit a rock, then get out early
    if (![sceneObject isKindOfClass:[BBRock class]]) return;
    // OK, we really want to make sure that we were hit,
    // so we are going to do a secondary check to make sure one of our vertexes is inside the
    // collision radius of the rock
    if (![sceneObject.collider doesCollideWithMesh:self]) return;

    // we did hit a rock! smash it!
    [(BBRock*)sceneObject smash];
    // now destroy ourself
    [[BBSceneController sharedSceneController] removeObjectFromScene:self];
}
After we make sure that it is a rock we are hitting, we call the new secondary doesCollideWithMesh: method. If that does not return a positive, then we return from the method early. If it does return a positive, we go ahead and deal with the collision as before.
Similarly, we need to add the exact same check to our BBMissile object.
If you build and run the game now, you should be able to fly around, smash rocks, and get smashed in return. Our game is lacking nice user interface options, like restarting after you die, so it could still use some extra work.
We have done quite a bit in this chapter:
We took our very simple game template, which was little more than a wrapper for an OpenGL view initialization, and added a simple system for making scene objects.
We added those objects to the scene to be rendered every frame.
We built some simple touch interface items to get input from the player.
We built a rough collision-detection system that allowed our objects to interact.
This is a whole lot to take in, so let's review the process at a high level. Revisiting a diagram presented in Chapter 6 (see Figure 7-23), we can see our basic template design. Let's consider what we have added to the various steps. It hasn't changed much at all. We have just fleshed out our game using the same basic structure.
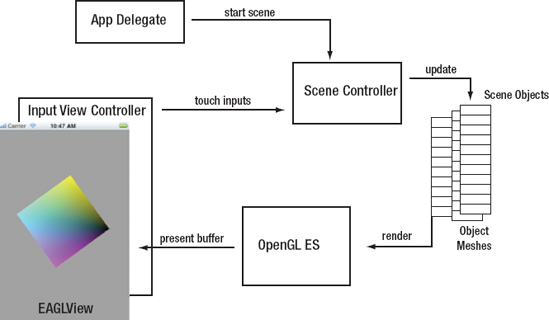
Now, when the app delegate starts the scene, the scene controller adds a spaceship and some rocks to the scene. It also tells the input view controller to set up the GUI elements.
Then, in every frame of the game loop, the scene controller tells the spaceship and the rocks, and any other objects, to update themselves. During the update phase, each object can ask to see if the input view controller has any touches that they might be interested in, and can act accordingly. The input view controller also stores the various movement state variables that the spaceship object can access to decide where it is flying and how fast.
After the update loop, the collision controller checks to see if there are any objects that are hitting each other. If there are, it tells them to handle those events.
The next step in the game loop is to tell every visible object in the scene to render itself into the OpenGL engine.
Finally, we tell OpenGL that we are finished sending it objects to render, and it presents the finished image to the user.
In the next chapter, we will iterate this process two more times. We will add two more different rendering styles to Space Rocks!, and even look at some new features, like particle effects.