Chapter 10 got a little heavy, but as I promised at the end of that chapter, things will lighten up in this chapter. We now get to apply 3D effects to our audio! No longer will we be making just a simple noise. We will be applying rich characteristics to the sounds that better represent the entities in your game.
To access 3D effects, we will be using OpenAL exclusively (as I noted in Chapter 10, I'm taking a mostly OpenAL-centric approach to my coverage of audio for iPhone games). This is not to say you couldn't implement 3D effects yourself without OpenAL, but OpenAL has already done a lot of the heavy lifting for you. OpenAL supports multiple properties to represent your sounds in 3D space. These are things like position, direction (or orientation), and velocity. In addition, OpenAL supports several distance-attenuation models.
We are going to walk through the complete feature list of 3D effects OpenAL provides out of the box, and apply them to Space Rocks! So without further ado, let's get started.
OpenAL is designed around three fundamental object types (see Figure 11-1). You have already been introduced to the first two in the previous chapter.
The first object type is the buffer. As you have already seen, you give OpenAL buffers linear PCM data that contains your sounds. You can have a lot of different buffers, each to hold a different sound.
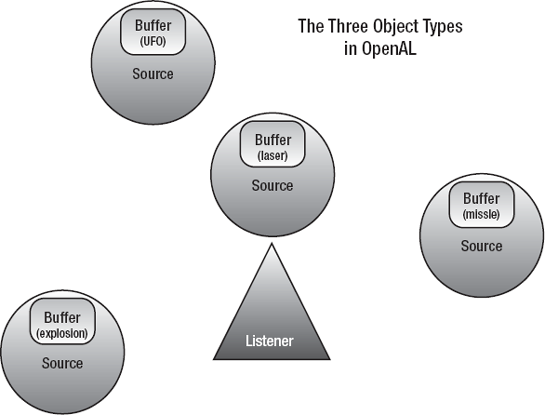
Figure 11.1. An abstract representation of Space Rocks! composed of the three object types in OpenAL: sources, buffers, and listeners. Imagine your ship is the listener. The sources around the ship map to game entity positions. Each playing source has a buffer attached to it which contains a particular sound effect.
The second object type is the source. As you have seen, sources emit sound. You attach a specific buffer to a source so it emits the sound that you want. But there is more to them than that. Sources represent objects in 3D space, so they have a position value, a velocity value and other properties. You can think of a source as your noisemaking game entities. In fact, we already did this in the previous chapter by giving each BBSceneObject, such as our projectile weapons, its own EWSoundSourceObject that ultimately holds an OpenAL source when it is playing sounds. But we didn't apply any 3D properties to the sources. We will correct that omission in this chapter.
The third object type is the listener. Succinctly, you can think of the listener as "you" or "your head and ears." In OpenAL, the sources emit sounds, but for things like position to make any sense, they must be relative to something. Something must be able to hear the sounds. So the listener object is that something. Like sources, the listener also has 3D properties, such as position, velocity, and orientation. For example, in a game, if we place the listener in the center of a room facing north, and we place a radio (source) on the west wall of the room, it will sound like the radio is on your left. In the real world, assuming you have two speakers, left and right, OpenAL will render that sound so it comes out of only your left speaker. Similarly, in Figure 11-1, the source with the explosion sound that is to the left of the listener will come out on the left speaker.
Every OpenAL context provides exactly one listener. So, even though it was not mentioned, you have already implicitly created a listener in the previous chapter. You may think of the OpenAL context as holding all the listener's state, such as position and velocity values. While you have many buffers and sources, you can have only one active listener at a time, as you can have only one current context.
OpenAL provides a set of generic APIs to access properties of each of the three types. You've already been exposed to the API for sources. To reiterate, with sources, we have the generic family of functions to set a property on the source:
void alSourcef(ALuint source_id, ALenum parameter, ALfloat value );
void alSource3f(ALuint source_id, ALenum parameter, ALfloat value1, ALfloat value2, ALfloat value3);
void alSourcefv(ALuint source_id, ALenum parameter, const ALfloat* values);
void alSourcei(ALuint source_id, ALenum parameter, ALint value);
void alSource3i(ALuint source_id, ALenum parameter, ALint value1, ALint value2, ALint
     value3);
void alSourceiv(ALuint source_id, ALenum parameter, const ALint* values);
The parameter is an OpenAL constant that represents a specific property you want to set, such as AL_BUFFER and AL_LOOPING (introduced in Chapter 10). There are multiple versions of the function because each is for a different type. As in OpenGL, f stands for float, v stands for array (or vector), 3 means three values, and i means integer.
For brevity, here is a condensed notation for the preceding set of functions:
alSource{f, 3f, fv, i, 3i, iv}(ALuint source_id, ALenum parameter, ...)This notation will let me introduce similar sets of functions without needing to use up so much space.
To get property values, we have the generic family of functions:
alGetSource{f, 3f, fv, i, 3i, iv}(ALuint source_id, ALenum parameter, ...)Similarly, for the listener, we have a parallel set of functions. Notice there is no ID value passed in, because the listener is implicitly inferred from the current active context.
alListener{f, 3f, fv, i, 3i, iv}(ALenum parameter, ...)
alGetListener{f, 3f, fv, i, 3i, iv}(ALenum parameter, ...)
Buffers also have these functions:
alBuffer{f, 3f, fv, i, 3i, iv}(ALuint buffer_id, ALenum parameter, ...)
alGetBuffer{f, 3f, fv, i, 3i, iv}(ALuint buffer_id, ALenum parameter, ...)
For generic things that don't apply to our three object types, but globally to the OpenAL system as a whole, OpenAL also offers the following generic functions:
void alGetBooleanv(ALenum parameter, ALboolean* data);
void alGetIntegerv(ALenum parameter, ALint* data);
void alGetFloatv(ALenum parameter, ALfloat* data);
void alGetDoublev(ALenum parameter, ALdouble* data);
ALboolean alGetBoolean(ALenum parameter);
ALint alGetInteger(ALenum parameter);
ALfloat alGetFloat(ALenum parameter);
ALdouble alGetDouble(ALenum parameter);
One example for these is to set and get values for the Doppler effect provided by OpenAL. We will talk about the Doppler effect later in the chapter.
There are two important restrictions you need to be aware of if you want to use spatialized sound in OpenAL:
You must use monaural (single-channel) buffers if you want them to be spatialized. If you provide a stereo sample, OpenAL will not spatialize it.
You must have more than one speaker on your equipment if you want to actually hear positional sound. On the current models of the iPhone, your applications emit through only a single speaker when using the built-in speakers, so you will not be able to hear anything different with respect to the position property (not counting distance attenuation). On an iPhone or iPod touch, you should plug in headphones or external speakers if you want to fully hear all the effects OpenAL is applying.
OpenAL insulates you from the user's actual output equipment and configuration.[23] For example, you may have 2 speakers, but your friend has 7.1 speakers (as in a surround-sound setup). OpenAL doesn't give you access to this information. In the world of OpenAL, you are not supposed to care. The fundamental idea is that OpenAL and the underlying sound system are supposed to know how to spatialize sound correctly for your specific equipment.
So let's go back to our room example. You are still standing in the center of the room facing north with a radio on the wall directly west of you. You turn 90 degrees to the right. It is OpenAL's job to figure out that the noise should be heard coming from directly behind you, and then work with the underlying sound system to generate the noise to come out the right way for your equipment. Hypothetically in the ideal situation, on the system with 7.1 speakers (with a back-speaker configuration), the sound will come out of the back speaker.
Not all OpenAL implementations and underlying sound systems are able to support advanced speaker configurations. But as an end user of OpenAL, there is not much you can do about it, as the API isn't designed to give you direct access to control the individual speakers.
The strategy for this chapter is to introduce each piece of functionality one at a time and keep building on top of the prior example until we have a full-featured game. But before we can start adding any properties, we need to do a bit of setup work to integrate a listener into Space Rocks! But don't worry, this will be easy. It is almost going to mirror how we handled source objects.
We will start by creating a new class to encapsulate the listener. We currently have a EWSoundSourceObject to encapsulate source objects. Let's create a new class called EWSoundListenerObject to complement it.
Do you remember that we made EWSoundSourceObject a subclass of EWSoundState? The reason is now revealed. There are some properties, such as gain level, that are common between sources and listeners. Why not share those commonalities by sharing a common parent class? So we will also make our EWSoundListenerObject a subclass of EWSoundState.
You might be thinking that we should do something extra because multiple sources are allowed, but there is only one listener per context. For simplicity, we are not going to worry about this issue. We will know to create only one instance of the listener in Space Rocks![24]
We will continue extending our code using the project SpaceRocksSoundResourceManager2 from the end of the previous chapter as our starting position. The completed project for this next part of the example for implementing the listener is named SpaceRocksOpenAL3D_0_Listener.
Let's create the class. In EWSoundListenerObject.h, make EWSoundListenerObject a subclass of EWSoundState:
@interface EWSoundListenerObject : EWSoundState
{
}

@end
As with our EWSoundSourceObject from the previous chapter, we will expect to have two methods defined: update and applyState. The update method just calls applyState. This is also a good time to remind you that our EWSoundState parent class has the property gainLevel, which we implemented in EWSoundSourceObject. The OpenAL listener also supports the gain property (which is why we put it in the parent class), so let's take this opportunity to implement it in EWSoundListenerObject.m. The code is an almost identical mirror of EWSoundSourceObject. The only difference is that we need to use the AL_GAIN parameter, rather than alSourcef, to set the gain level on the listener.
- (void) applyState
{
    [super applyState];
    if([[OpenALSoundController sharedSoundController] inInterruption])
    {
        return;
    }
    alListenerf(AL_GAIN, gainLevel);
}

- (void) update
{
    [super update];
    [self applyState];
}
And that's all we need for the basic infrastructure for the listener. But first, we want to integrate the use of our new listener class.
We now come to a design decision point in our game. Who or what is going to be our listener in the game? Perhaps a clearer and more pointed version of this question is this: Where in the game world is our listener going to be located?
I think the most natural thing to do is to make our spaceship the listener, as in Figure 11-1. That means we put our "head and ears" where the spaceship is in the game. Thus, when the spaceship moves or turns, we move the listener with it. But we could make other choices. We could decide the listener is always in the dead center of the screen and never moves. This might actually seem very natural to the player. Or we could get creative and put the listener on the UFO or an asteroid. We could even make the listener a game selectable option, so it can be moved around. However, for this example, we will make the spaceship the listener, as it is easiest to conceptualize.
Now that we have chosen our designated listener, we need to integrate the code. If you recall, we gave every BBSceneObject an instance of EWSoundSourceObject. Well, let's follow that analogy and also add a EWSoundListenerObject to the BBSpaceShip class.
First, we add the new instance variable/property to the class in BBSpaceShip.h. Then we make sure to allocate a new instance of it at the end of BBSpaceShip.m's awake method.
soundListenerObject = [[EWSoundListenerObject alloc] init];
Don't forget to release it in the dealloc method.
[soundListenerObject release];
Finally, add the following line to the end of BBSpaceShip.m's update method. This will make sure the changes are applied at during every update loop.
[self.soundListenerObject update];
That's all there is to it. We have integrated the listener into Space Rocks!.
You may be wondering what the gain level does for the listener. You might think of it as the master volume control for OpenAL. By default, the listener gain is set to 1.0. If you changed it to 0.5, everything you hear will have its volumes cut by half. If you set it to 0.0, you will hear nothing. If you would like to experiment, try adding something like the following line right after you allocate the soundListenerObject at the end of the awake method:
soundListenerObject.gainLevel = 0.5;
We will not utilize our gainLevel property in Space Rocks!. For an example of the listener gain used as a master volume control, see the BasicOpenALStreaming example in the next chapter.
Now we are ready to add our very first 3D property: position. Both sources and the listener have position properties, so we need to implement them in both of our classes. We will continue from the project SpaceRocksOpenAL3D_0_Listener. The completed project for this example is named SpaceRocksOpenAL3D_1_Position. The end result for the example is illustrated in Figure11-2.
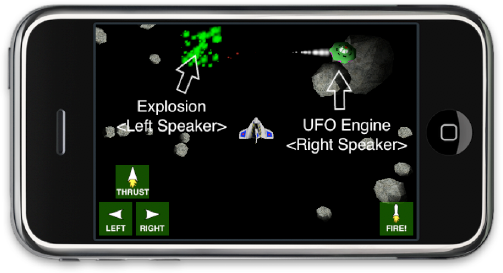
Figure 11.2. With our spaceship as the listener, once we add positions to our sounds, the explosion should come from the front-left speaker, and the UFO sound should come from the front-right speaker, assuming some kind of surround-sound setup.
Let's start in the parent class, EWSoundState. We will add a new instance variable to hold position values. We will use BBPoint, since it is perfect for this job—having x, y, and z coordinates works just as well for OpenAL as it does for OpenGL. Our class interface now looks like this:
#import <Foundation/Foundation.h>
#import <OpenAL/al.h>
#import "BBPoint.h"

@interface EWSoundState : NSObject
{
    ALfloat gainLevel;
BBPoint objectPosition; } @property(nonatomic, assign) ALfloat gainLevel; @property(nonatomic, assign) BBPoint objectPosition; // virtual functions which should be overridden by subclasses - (void) applyState; - (void) update; @end
Just to be explicit, we can initialize the value in the init method (though this is not really required):
- (id) init
{
    self = [super init];
    if(nil != self)
    {
        gainLevel = 1.0f;
        objectPosition = BBPointMake(0.0, 0.0, 0.0);
    }
    return self;
}
Now that we have a position value in the parent class, we need to make our subclasses utilize it so they can set the OpenAL positions for their sources and listener. In EWSoundSourceObject.m, add the following line to applyState, immediately after the line setting AL_GAIN, AL_LOOPING, and AL_PITCH:
alSource3f(sourceID, AL_POSITION, objectPosition.x, objectPosition.y, objectPosition.z);
Note
You may have noticed I am accessing the instance variables directly instead of using the accessors, which is inconsistent with the other lines in this method. It is an optimization ploy. We are going to add a lot of these lines, and they are going to be called frequently, so we might need to save on the number of objc_msgSend method calls being invoked. If I were to go back and be consistent, I would remove the accessors from the other lines in this method. But I like showing this discrepancy because people new to Objective-C often forget that there is a subtle difference between using an accessor via dot notation and manipulating an instance variable directly.
Similarly, in EWSoundListenerObject.m, add this line in applyState after AL_GAIN is set:
alListener3f(AL_POSITION, objectPosition.x, objectPosition.y, objectPosition.z);
Since applyState is called on every game loop pass (frame), this causes the OpenAL positions to be set every pass.
Now we need to make sure objectPosition values stay in tandem with the actual scene objects they represent. So first, let's make sure the source positions stay in sync.
Let's go to BBSceneObject's update method. You might remember that we already added a line at the end of the update method to invoke the soundSourceObject's update method, which would in turn call its applyState and set our existing properties, such as gainLevel and audioLooping. Immediately before that line, we need to set the soundSourceObject's position value so applyState can set the correct value. To do this, we can just copy the BBSceneObject's translation value to our soundSourceObject's value. It turns out that our coordinate system for BBSceneObjects is the same as the coordinate system for OpenAL. (This should be no surprise, as the BBSceneObject coordinate system was designed to work with OpenGL's coordinate system, and OpenGL and OpenAL are designed to use the same coordinate systems.)
The last two lines in BBSceneObject's update method should look like these:
self.soundSourceObject.objectPosition = translation;
[self.soundSourceObject update];
Now let's update the listener position. To do that, we go to BBSpaceShip.m and modify the update method so the last two lines look like these:
self.soundListenerObject.objectPosition = translation;
[self.soundListenerObject update];
There is also a bug fix we need to apply. A little higher in the method, there is an early return statement in an if clause as an optimization. This will avoid updating our soundListenerObject if the method returns early, so we need to change this so it doesn't return early. We will just comment out the line. And to avoid any precision errors later in the code, let's explicitly set forwardMag to 0, since the threshold check considers small values to be 0.
if (forwardMag <= 0.0001)
{
    if(YES == isThrusting)
    {
        [self.soundSourceObject stopSound];
    }
    isThrusting = NO;
//  return; // we are not moving so return early
    forwardMag = 0.0;
}There is one more thing we need to do, which is simple, but a little tedious. We currently have a corner-case bug where our source and listener classes do not have the correct position value on the initial creation. Right now, our code depends on the update loop to synchronize our sound objects with the actual values from the BBSceneObject. So it is possible for an object to start playing sound in the wrong position, and it won't be corrected until the update loop is reached.
The easiest place to fix this is in the awake method. And the best place to do this is in the BBSceneObject's awake method so all the subclasses inherit the behavior. But there is a slight problem with that because not all the BBSceneObject subclasses call [super awake]. So, we need to refactor and fix all the code in the project to call [super awake] and implement BBSceneObject's awake method to be as follows:
-(void)awake
{
    soundSourceObject.objectPosition = translation;
}
Note
All the refactoring and implementation is already done in SpaceRocksOpenAL 3D_1_Position. Because there are a considerable number of line changes, and they have more to do with design implementation than audio, I encourage you to use this project instead of trying to reimplement all this yourself.
Finally, we need to handle the same corner case for the listener, so at the end of the BBSpaceShip's awake method, directly after we allocate the new object, we need to copy the position:
soundListenerObject          = [[EWSoundListenerObject alloc] init];
soundListenerObject.objectPosition = translation;
You now have enough code to actually try it. If you do, you might hear positional audio (provided you have headphones or external speakers). Wait for the UFO to come in. The engine noise should pan from your left speaker to the right speaker as it moves across the screen (see Figure 11-2).
But more likely, you will have a very hard time hearing the UFO. At best, the noise is generally really quiet when it first comes in, then gets louder as the UFO moves to the center, and then gets quiets as it moves away. This is because OpenAL has its distance attenuation feature enabled by default. Because we won't talk about distance attenuation until later in the chapter, let's just disable this feature for now.
OpenAL provides a simple function to change the distance attenuation model, called alDistanceModel(ALenum distance_model). The distance attenuation models are covered in detail later in this chapter. For the curious, the default model is AL_INVERSE_DISTANCE_CLAMPED. To disable it, we just need to set the value to AL_NONE:
alDistanceModel(AL_NONE);
Let's create a setter and getter in our OpenALSoundController class:
- (void) setDistanceModel:(ALenum)distance_model
{
    alDistanceModel(distance_model);
}

- (ALenum) distanceModel
{
    ALint distance_model;
    distance_model = alGetInteger(AL_DISTANCE_MODEL);
    return (ALenum)distance_model;
}
Notice that there is no direct function to query the distance model. Instead, we use the generic alGet* functions to retrieve the value.
And let's make BBSceneController the controller of the distance model. In BBSceneController's init method, we invoke our newly implemented setDistanceModel to turn off distance attenuation:
- (id) init
{
    self = [super init];
    if(nil != self)
    {
        [[OpenALSoundController sharedSoundController] setSoundCallbackDelegate:self];
        [self invokeLoadResources];
        [[OpenALSoundController sharedSoundController] setDistanceModel:AL_NONE];
    }
    return self;
}
That's all you need if you have a properly working implementation of OpenAL.
Unfortunately, as of iPhone OS 3.1.2, it seems that setting the distance model to AL_NONE fails to disable distance attenuation.[25] So here, I'll show you another way to disable distance attenuation. Those not affected by the bug may want to read this section anyway, because it introduces another OpenAL source property called the rolloff factor.
The rolloff factor controls how quickly a sound attenuates as it gets farther away if you are using distance attenuation. Since this is a source property, you may set different rolloff factors on different sources. The OpenAL spec also says if you want to disable attenuation on a per-source basis, you can set the source's rolloff factor to 0.0. We will exploit this behavior to disable attenuation for our entire game, by setting the rolloff factors to 0.0 on all our sources.
Since this is just a source property, we are going to add a new instance variable to EWSoundSourceObject.h:
ALfloat rolloffFactor;
Declare a property for it for later convenience:
@property(nonatomic, assign) ALfloat rolloffFactor;
Don't forget to synthesize it.
In EWSoundSourceObject.m's init method, we set the default value to 0.0:
rolloffFactor = 0.0; // 0.0 disables attenuation
And in applyState, we make sure to set the source property:
alSourcef(sourceID, AL_ROLLOFF_FACTOR, rolloffFactor);
Now if you run the program, the positional audio should work without any attenuation being applied.[26] Whew!
The listener orientation represents the direction your "head and ears" are facing. Are you looking to the left? Are you looking right? Now remember that this is 3D space, so you might ask, "Is your head upside down"?
What do I mean by that last question? In the last example, our spaceship is looking toward the top of the screen. When the UFO first appears, it is on the left side of the screen and moves across to the right side. So we hear noise that originally starts by coming from the left speaker, and then moves to the right speaker as it crosses the field. But what if we turned our head 180 degrees to the left (more precisely, counterclockwise around the z axis), so we are looking toward the bottom of the screen? Now the sound of the UFO should start coming from the right speaker when it first appears and move to the left speaker as it crosses the field.
Now, let's reset. We are looking toward the top of the screen again. Let's imagine ourselves in the scene instead of a spaceship. Now do a headstand or bend forward and put your head between your legs so you are looking behind you (more precisely, spin 180 degrees around the x axis). You are facing the same direction as when we turned 180 degrees to the left, but the difference is that your head is now upside down. In this case, when the UFO comes, you hear it from your left ear instead of your right ear.
The point of the example was to illustrate that two vectors are needed to represent orientation. You need a direction, or at, vector that represents your line of sight, and an up vector to represent which way is up. As you can see from the two cases, even though both have the ship looking at the same direction, their orientation also makes a huge difference for determining which side the sound is on.
To properly set the two vectors in Space Rocks!, we need to examine our existing coordinate system. Next, we will review some math to help you understand and implement this correctly. Feel free to skip ahead if you know this already.
First, let's focus on determining the up vector. OpenGL and OpenAL use a right-handed coordinate system. In layman's terms, all this means is which way the z axis points if you have an x axis and a y axis. If you take your right hand, extend your thumb and index finger so it looks like a cocked gun, and then extend your middle finger so it is perpendicular to both your index finger and thumb, these fingers represent the axes you see in a right-handed coordinate system (see Figure 11-3). This is the right-hand rule.
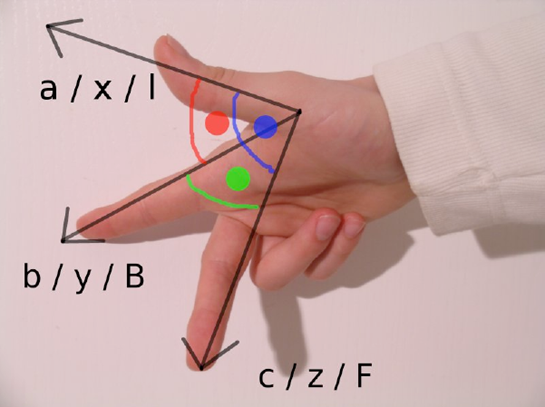
Figure 11.3. The right-hand rule using three fingers to represent the x, y, and z axes. Picture by Abdull from Wikimedia Commons under the Creative Commons Attribution ShareAlike 3.0 License (http://commons.wikimedia.org/wiki/File:Rechte-hand-regel.jpg)
Once you have your fingers in the correct position, the trick is to orient your hand so the axes line up with what you are trying to compare against. In Space Rocks!, if we spend a little time looking at the position values for all the objects, we see that x increases toward the right of the screen, and y increases toward the top of the screen. I like to point my middle finger to the right (x axis) and my thumb up (y axis), so that my index finger is pointing toward me. My index finger is pointing in the direction of the up vector, which is coming through the screen toward my body. Even though my hand is contorted, I like this convention because the common base case is to have the game-space axes match the computer-screen axes, where the x axis goes to the right and the y axis to goes up. This results in a gun-pointing-at-myself (shooting myself) position, which is something I could always easily remember for some strange reason.
If you got all that, then you can just move on to the next segment. But if you need more clarification, there is a variation of the right-hand rule for rotation called the right-hand grip rule that can be used as a substitute. Extend your palm with your thumb pointed up, as if to shake someone's hand, and then curl your fingers (see Figure 11-4). Your curled fingers point to the rotation direction. Your thumb is the vector.
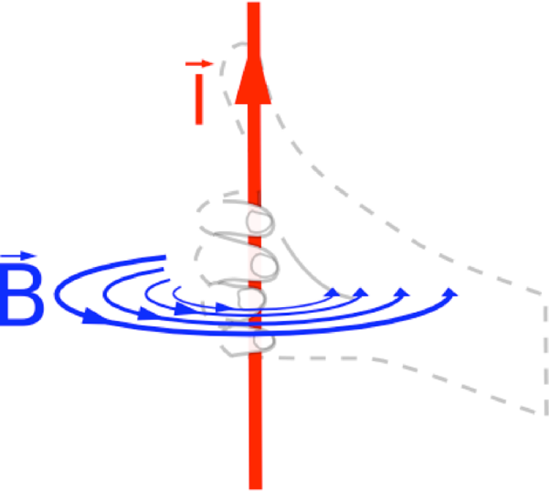
Figure 11.4. The right-hand grip rule. Curl your fingers around the axis of rotation, and the thumb points in the direction of the up vector. This is often used in physics to find the direction of electric current (I) in a magnetic field (B), but we can also use it for audio purposes. Image from Wikimedia Commons under Public Domain (http://commons.wikimedia.org/wiki/File:Right_hand_rule.png)
In physics, this would be used for torque and force, or magnetic fields and electric currents. In OpenGL, we often use it to figure out which way the normal vectors point when drawing a triangle. For OpenAL, we can also use it to find our up vector.
If we look at how we rotate the ship in the code, we find that the rotation.z instance variable in BBSceneObject contains an angle in degrees. The value increases as we turn counterclockwise in the game. Match your curled fingers to your screen so they go counterclockwise with the ship, and you'll see that your thumb points at you.
So we have systematically determined that our z axis points toward us when looking at the iPhone/iPod touch screen. Since we see the top of our spaceship (instead of the bottom), we know our ship's up orientation is aligned with the z axis. Since we also know our ship moves only in the x-y plane (because we have a 2D game), we can conclude that our listener's up vector needs to be <0.0, 0.0, 1.0>.
This section's title may sound scary, especially if you hated high school math. But my intention is not to do a math lesson, but determine how to compute our listener's at vector. So I am going to zoom through this section and focus on just getting what we need.
Our problem is that we need to map our spaceship's BBSceneObject rotation.z value to the OpenAL listener coordinate system. Even though we know we are in a right-handed coordinate system, we have two obstacles:
We have only an angle in degrees, and not a vector, so we need to convert.
We need to determine where the origin of the rotation starts.
Let's start with the first problem.
First, I'm going to ask you to remember the unit circle, which is a way of converting angles to x and y coordinates (see Figure 11-5). This is exactly what we need to convert our rotation angle to a vector.

Figure 11.5. Unit circle with angles. By Gustavb from Wikimedia Commons under the Creative Commons License (http://commons.wikimedia.org/wiki/File:Unit_circle_angles.svg)
The unit circle can be more generally expressed in terms of cosine and sine of an angle (see Figure 11-6).
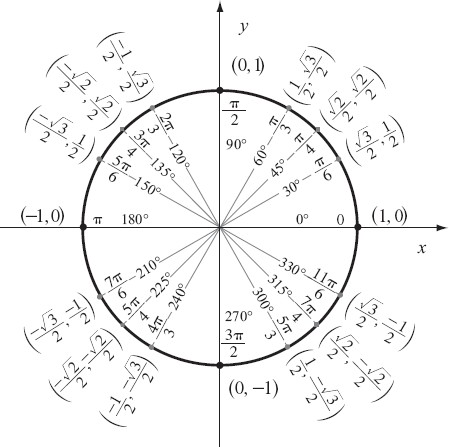
Figure 11.6. Unit circle with cosine and sine. By Gustavb from Wikimedia Commons under the Creative Commons Attribution ShareAlike 3.0 License (http://commons.wikimedia.org/wiki/File:Unit_circle.svg)
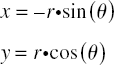
This leads us directly into polar-to-rectangular coordinate conversions. You can convert the angles to x and y values by these simple formulas:
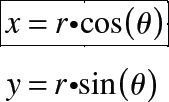
Radius (r) is always 1 in the unit circle. Since we just need a direction vector, we are free to set r=1 to drop r out of the equation.
There, that wasn't so painful, right?
So all we need to do is drop in our angle (don't forget to convert from degrees to radians if you are using C math library functions), and we have our vector—well, almost. The second problem still needs to be solved.
The other problem is that our spaceship's starting orientation is different from the unit circle. Notice that when we start our game, for angle = 0, the ship is pointing toward the top of the screen (along the y axis). But the unit circle for angle = 0 points along the x axis (refer to Figure 11-6).
This means our spaceship is turned, or phase-shifted, by 90 degrees compared to the unit circle. So if we just plug into the above equations, our results will be wrong.
If you look at the x and y values around the unit circle in Figure 11-6, you'll notice that their magnitudes repeat around the circle, and it is only the positive and negative signs that change. I point this out to also remind you that cosine and sine are periodic (repeating) functions. (You can think of waveforms, too.) In fact, you can express sine in terms of cosine or vice versa, because they are essentially the same function, just shifted (based on the angle parameter).
This means that we can just look up a table of trigonometric identities (or derive it, if you really want to) to figure out what it means to phase-shift cosine and sine by 90 degrees to handle the fact that our spaceship starting orientation points along the y axis. This reveals the following useful identities:
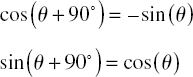
Substituting the identities into our original polar-to-rectangular conversion formulas, our equations change to the following:
You can now breathe a big sigh of relief. Despite all those fancy math terms, we are left with two simple equations that we can drop directly into our source code.
Now we finally get to code. We are going to make the listener orientation match the spaceship orientation. So when the spaceship turns, the listener orientation will turn with it. For demonstration purposes, we will implement this, but you will need to decide whether it makes sense for your own game.
Note
I personally find the setup described here a little disorienting, because I tend to think of the orientation of the iPhone/iPod touch as the listener orientation and not the ship itself. If we used the accelerometer to rotate the ship so the ship always points up relative to the Earth and the device itself is rotated, I would be more onboard with the idea. But unfortunately, adding accelerometer support to Space Rocks! is a side quest too complicated for us to embark on given our time and space constraints for this book. So for demonstration purposes, ship orientation will have to do.
We will continue from the SpaceRocksOpenAL3D_1_Position project. The completed project for this example is named SpaceRocksOpenAL3D_2_Orientation.
In EWSoundListenerObject, we will add two BBPoint instance variables to represent our at and up vectors. OpenAL actually wants a six-element array, but I prefer to use two BBPoint values for our class.
Create an init method in EWSoundListenerObject.m so we can initialize the vectors with legal default values:
- (id) init
{
    self = [super init];
    if(nil != self)
    {
        atOrientation = BBPointMake(0.0f, 1.0f, 0.0f); // looking along Y
        upOrientation = BBPointMake(0.0f, 0.0f, 1.0f); // Z is up
    }
    return self;
}
Note that the up vector will never change, since we are in a 2D game and the up direction for the ship never changes.
In the applyState method, we set the value in OpenAL. Place it directly after the line where we set the AL_POSITION:
ALfloat orientation_array[6] = {
    atOrientation.x, atOrientation.y, atOrientation.z,
    upOrientation.x, upOrientation.y, upOrientation.z
};
alListenerfv(AL_ORIENTATION, orientation_array);
As I said, OpenAL wants a six-element array to set the listener orientation, so we must stuff our values in an array to hand it off.
Finally, to synchronize our listener value with BBSpaceShip's, in BBSpaceShip.m's awake method, we add the following two lines to the very end of the method utilizing the equations presented in the previous section:
CGFloat radians = rotation.z/BBRADIANS_TO_DEGREES;
self.soundListenerObject.atOrientation = BBPointMake(-sinf(radians), cosf(radians), 0.0);
And in the update method, we can add the following line at the end of the method immediately before we call update on the soundListenerObject. The value of radians was already computed earlier in the same method.
self.soundListenerObject.atOrientation = BBPointMake(-sinf(radians), cosf(radians), 0.0);
Now run the program and try rotating your ship into different positions to see how it affects from which speaker sound emits. For fun, try re-creating the scenario in Figure 11-3.
While listeners have the property called orientation, sources have a similar property called direction. Direction is used in conjunction with another property called cones. Used together, these properties will allow you to constrain a sound to a particular direction. As an example, think of a person speaking into a megaphone/bullhorn. Anyone in front of the person speaking will hear what the person says. But anyone behind the person speaking will hear a greatly reduced sound, if anything at all.
In OpenAL, source direction has only one vector, unlike listener orientation, which has two vectors. OpenAL assumes that the sound emission is symmetric around the direction vector. So in our megaphone example, if the person speaking were to rotate the megaphone 180 degrees around the shaft axis (without changing the direction in which he was speaking), the sound emitted would be no different, even though the megaphone is upside down.
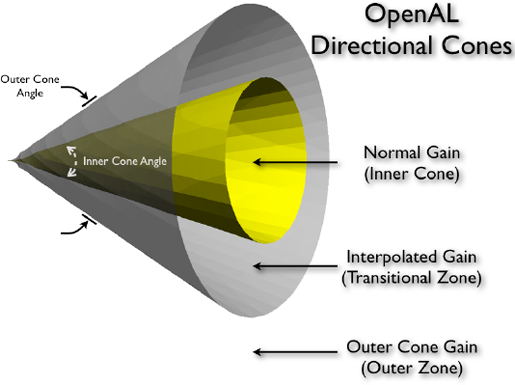
Now hold on. Things might get a little tricky here. OpenAL provides not one, but two cones to play with per source: an inner cone and an outer cone. The inner cone is probably what you were thinking of when I first said cones. Any listener within this cone will play at its normal volume level.
In our megaphone example, if you (the listener) are standing directly in front of the person speaking into the megaphone (you are in the inner cone), you will hear the person speaking at his normal volume level. So think of an unpowered, nonamplified, acoustical bullhorn. OpenAL doesn't amplify sound.[27] Therefore, "full blast" is just normal sound.
The other important point is that OpenAL defines an outer cone. If the listener is outside both the inner and outer cone, the volume will play at a special gain level you can set, called the AL_CONE_OUTER_GAIN.
This leaves the area between the inner cone and the outer cone, which is called the transitional zone. When a listener is inside this zone, the volume is interpolated between the inner cone gain level and the outer cone gain level.
Stare at the illustration in Figure 11-7 to try to make sense of what I just said. You may want to reread the above paragraphs a few times to see how that information matches with the diagram.
Continuing with our megaphone example, let's say you are standing directly behind the person with the megaphone and define this as part of the outer zone. Let's say the outer cone gain level is 0. This means you can't hear anything the person is saying. But if we say the outer cone gain level is 0.5, this means you hear the person at half volume. (You might conceptualize this as the ambient background sound.)
Finally, let's say you are standing next to the person speaking and define this as part of the transitional zone. The volume you hear will be somewhere between normal (full blast), and the outer cone gain level. So, for simplicity, we might say if the outer cone gain level is 0, and the normal gain is 1, you might hear the volume at 0.5 (though the actual value would be determined by the actual cone sizes you set).
Now that you have an understanding of OpenAL directional cones for sources, we should have an example of how to use them. For demonstration purposes, we will utilize the fact that the UFO spins. We will apply a directional cone to the UFO engine hum. When the inner cone is facing the spaceship, you will hear normal volume. As the inner cone spins away, you will hear the volume level decay. And, of course, it will spin back and the volume will increase again.
Note
Cones seem to be a rather unused feature of OpenAL. I have to admit I had a hard time coming up with an example for Space Rocks! One of the more intuitive ideas I came up with was a cone-shaped tractor beam. When you are inside the tractor beam, you hear a louder noise than when you are outside the beam. But you need both a source and a listener to get involved to hear the difference, so I would need to have the UFO hit the spaceship with a tractor beam. Given the lack of time, lack of art assets to visualize this through OpenGL, and the lack of engine support for beam weapons, not to mention the complexity of explaining this, I have opted to do a much simpler example.
Now it's time to implement source direction and cones in Space Rocks! We continue from SpaceRocksOpenAL3D_2_Orientation. The finished project for this example is named SpaceRocksOpenAL3D_3_DirectionCones.
In EWSoundSourceObject.h, we add the following instance variables:
BBPoint atDirection;
ALfloat coneInnerAngle;
ALfloat coneOuterAngle;
ALfloat coneOuterGain;
Also declare properties for these so we can access them outside the class later. Don't forget to synthesize them in the implementation.
@property(nonatomic, assign) ALfloat coneInnerAngle;
@property(nonatomic, assign) ALfloat coneOuterAngle;
@property(nonatomic, assign) ALfloat coneOuterGain;
In EWSoundSourceObject.m's init method, let's set the values to the same values that OpenAL uses as the default. Note that if you want direction disabled, you set the vector to <0, 0, 0>. If you don't want either of the cones, you set the angle to 360.0, which means the sound goes in all directions. By default, OpenAL sets the outer cone gain to 0, so we will do the same.
- (id) init
{
    self = [super init];
    if(nil != self)
    {
        audioLooping = AL_FALSE;
        pitchShift = 1.0f;
        rolloffFactor = 0.0; // 0.0 disables attenuation
        atDirection = BBPointMake(0.0, 0.0, 0.0);
        coneInnerAngle = 360.0;
        coneOuterAngle = 360.0;
        coneOuterGain = 0.0;
    }
    return self;
}
And in EWSoundSourceObject.m's applyState method, we set the source properties.
alSource3f(sourceID, AL_DIRECTION, atDirection.x, atDirection.y, atDirection.z);
alSourcef(sourceID, AL_CONE_INNER_ANGLE, coneInnerAngle);
alSourcef(sourceID, AL_CONE_OUTER_ANGLE, coneOuterAngle);
alSourcef(sourceID, AL_CONE_OUTER_GAIN, coneOuterGain);
We need to remember to keep the soundSourceObject's direction in sync with the BBSceneObject's rotation.z value. So we add the following two lines to BBSceneObject.m's awake and update methods, directly after where we synchronized the object positions:
CGFloat angle_in_radians = rotation.z/BBRADIANS_TO_DEGREES;
soundSourceObject.atDirection = BBPointMake(-sinf(angle_in_radians), cosf(angle_in_radians), 0.0);
Now let's actually use a directional cone. In BBUFO.m, we'll set some cone properties. In the awake method, immediately before the playSound: invocation, we can try these values:
self.soundSourceObject.coneInnerAngle = 90.0;
self.soundSourceObject.coneOuterAngle = 270.0;
self.soundSourceObject.coneOuterGain = 0.5;
At this point, try running the program and experience the noise change for yourself. When the UFO inner cone (90 degrees wide) is directed at the spaceship, you hear the loudest sound. When both the cones are directed away from the spaceship, you hear the least gain. If you want something really explicit, you can set the coneOuterGain value to 0, and experience the UFO noise turning off completely when it is facing away from the spaceship.
But now I'm going to advocate leaving the coneOuterGain value at 0.5, and then doing a cheap, but interesting trick.
In BBSceneController.m's addUFO method, let's increase the rotationalSpeed of the UFO dramatically:
ufo.rotationalSpeed = BBPointMake(0.0, 0.0, 1000.0);
Now when you run the program, you will hear a pronounced oscillation in the sound effect because the UFO is spinning so fast. I think this is a neat little effect that goes well with our UFO, so I'm going to leave the fast spin rate set for the rest of the examples.
OpenAL also supports a velocity vector property. This is used in conjunction with the Doppler effect feature of OpenAL.
What is the Doppler effect? The classic example of the Doppler effect is a siren on an emergency vehicle. As the vehicle approaches you at high speed, you hear a higher-frequency noise than when the vehicle passes you and goes away, which is a lower-frequency noise. Applying this metaphor to the spaceship and UFO in our game, we get Figure 11-8 and Figure 11-9 to help visualize this effect.
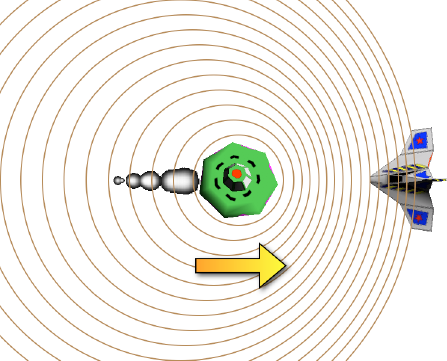
Figure 11.8. As the UFO approaches the spaceship, the spaceship hears a higher-frequency noise. The circles representing sound wave crests bunch up near the spaceship. The distance between each circular wave (wavelength) is shorter. Shorter wavelengths mean you hear a higher frequency.
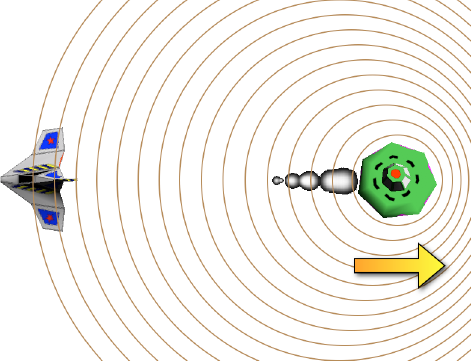
Figure 11.9. As the UFO moves away from the spaceship, the spaceship hears a lower-frequency noise. The circles representing sound wave crests are spaced further apart around the spaceship as the UFO moves away. The distance between each circular wave (wavelength) is longer. Longer wavelengths mean you hear a lower frequency.
To use the Doppler effect in OpenAL, we need several things. First and foremost, the listener and the sound source need velocities. This brings up a subtle point. We have already been moving the positions of the objects in our game. So, does OpenAL automatically infer the velocities based on the changes in position? The answer is no. OpenAL requires you to explicitly set velocities as a separate property from position. But this is generally a good thing. Otherwise, you would need to work around corner cases such as when an object first materializes into the game, because the initial velocity is undefined. Another corner case to consider is if an object has a teleportation feature where it can instantly change to a new position. In this case, it may not make sense to have a pitch shift in frequency, which might imply extremely fast speed instead of teleportation.
An interesting side effect of setting the velocity properties separately from position is that you aren't obligated to portray realism. For example, perhaps for artistic reasons like a dream sequence or alternate reality, you decide you want to do the opposite of a real Doppler effect. When objects move toward the listener, maybe you decide you want a lower frequency instead of a higher one. Since OpenAL has separate properties for position and velocity, you can easily achieve this.
In addition to requiring velocities, OpenAL also provides two global scaling factors to let you manipulate how strong the Doppler effect is in your program:
AL_DOPPLER_FACTORis a simple scaling multiplier that makes the effect more exaggerated or muted.AL_SPEED_OF_SOUNDindicates how fast sound travels in the units that you have been passing to OpenAL. For example, if your velocity units have all been in meters per second, then settingAL_SPEED_OF_SOUNDto343(the default) might be a reasonable value.[28] But if your velocity units are in feet per second instead of meters per second,AL_SPEED_OF_SOUNDshould be1125.
So without further ado, the formula OpenAL uses to compute the pitch shift is as follows:
The formula solves for the shifted frequency, which is what you hear play through your speakers.
For you astute, mathematically inclined people out there, I need to clarify what velocitylistener and velocitysource really are, because the equation is slightly inaccurate for the sake of being more aesthetically pleasing. The velocities in this equation are not true vectors. Instead, each velocity is just a scalar (a simple float value). The values are the projection of each velocity projected onto the source-to-listener vector. What does this mean?
Imagine the UFO and the spaceship moving across the screen from left to right, parallel with each other, never getting closer to or farther from one another. No matter how fast they are moving, the pitch due to the Doppler effect will never change, because the Doppler effect happens only when the objects get closer or farther apart. So, we care only about the part of the velocity that travels along an imaginary line that connects the UFO and spaceship, which is the source-to-listener vector. The good news is that OpenAL automatically extracts the projected scalars from regular velocity vectors you provide, so you really don't need to worry about this detail. But the formula as a whole is presented to allow you to understand how changing all the factors impacts the results, because you will most likely be tweaking multiple values.
You may be wondering why you will be tweaking values, when OpenAL provides things that imply precision, such as precise-sounding factors like the speed of sound and unit systems like meters per second. In practice, more often than not, you will be filling these numbers in the equation by trial and error and experimentation, rather than mathematical rigor. Most game worlds are exaggerated and do not perfectly reflect reality. Frequently, distances are shorter and speeds are greater in game worlds to make things more exciting. Usually, this means needing to tweak things until they sound right.
Once again, it is example time. We will continue from the previous project, SpaceRocksOpenAL3D_3_DirectionCones. The finished project for this example is named SpaceRocksOpenAL3D_4_VelocityDoppler.
In EWSoundState.h, add a new instance variable for objectVelocity for the velocity vector:
BBPoint objectVelocity;
Initialize it in EWSoundState.m's init method after objectPosition is initialized:
objectVelocity = BBPointMake(0.0, 0.0, 0.0);
In EWSoundSourceObject.m, apply it OpenAL in applyState after the lines following the directional cones we added in the previous section:
alSource3f(sourceID, AL_VELOCITY, objectVelocity.x, objectVelocity.y, objectVelocity.z);
In EWSoundListenerObject.m, do the same for the listener in applyState after the AL_ORIENTATION line:
alListener3f(AL_VELOCITY, objectVelocity.x, objectVelocity.y, objectVelocity.z);
OK, one minor surprise. The speed property is not in BBSceneObject, but in the subclass BBMobileObject. So, in BBMobileObject.m, synchronize the source velocities with the scene object, in its awake method, which must be created:
- (void) awake
{
[super awake];
soundSourceObject.objectVelocity = speed;
}You may be wondering how I know that the speed vector used by the Space Rocks! game engine is going to map directly to OpenAL's notion of velocity without some scaling factor. The truth is that I don't know. But I thought I would try this first, and then tweak the Doppler factor and speed of sound values as appropriate.
In OpenALSoundController.m, we will implement accessors for these two parameters:
- (void) setDopplerFactor:(ALfloat)doppler_factor
{
    alDopplerFactor(doppler_factor);
}

- (ALfloat) dopplerFactor
{
    return alGetFloat(AL_DOPPLER_FACTOR);
}

- (void) setSpeedOfSound:(ALfloat)speed_of_sound
{
    alSpeedOfSound(speed_of_sound);
}

- (ALfloat) speedOfSound
{
        return alGetFloat(AL_SPEED_OF_SOUND);
}
In OpenALSoundController.h, declare the interfaces or properties so they can be used publicly without warnings. No synthesize is necessary, since we explicitly implemented them.
@property(nonatomic, assign) ALfloat dopplerFactor;
@property(nonatomic, assign) ALfloat speedOfSound;
Finally, let's use our accessors in BBSceneController.m's init method after setDistanceModel. To start with, we will set the Doppler factor to 1.0 and the speed of sound to 343.3, which are the OpenAL defaults:
[[OpenALSoundController sharedSoundController] setDopplerFactor:1.0];
[[OpenALSoundController sharedSoundController] setSpeedOfSound:343.3];
As it turns out, I like how all our default values work for this instructional example. I think these values are strong enough that you can easily notice the Doppler effect being applied, but not too strong that everything becomes incomprehensible. But I encourage you to play with these parameters to see how they manipulate the effect.
I saved this effect for last because I wanted to make sure you could clearly hear all the effects we applied in the prior steps.
Distance attenuation is simply making sounds become more silent as they move farther away. It is a big-sounding phrase for a very simple concept.
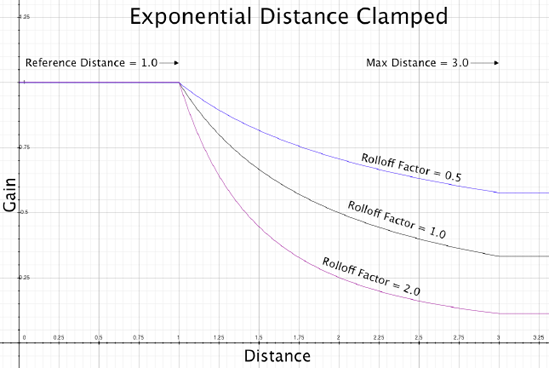
OpenAL provides six different built-in attenuation models that you can pick from to make distance attenuation seem more realistic or more artistic. The models are inverse, linear, exponential, and clamped versions of the aforementioned three models. (The default is Inverse Distance Clamped.) Clamped versions are the same as the nonclamped versions, except that for distances less than the reference distance, the gain is set (clamped) to 1. In addition, clamped versions also clamp distances to the maximum distance value if the distance exceeds that value.
The formulas and graphs are shown in the following sections. In all formulas, x represents the distance between the source and listener, and x≥0. Also note that OpenAL implementations are free to clamp gain values if the result exceeds hardware capabilities.
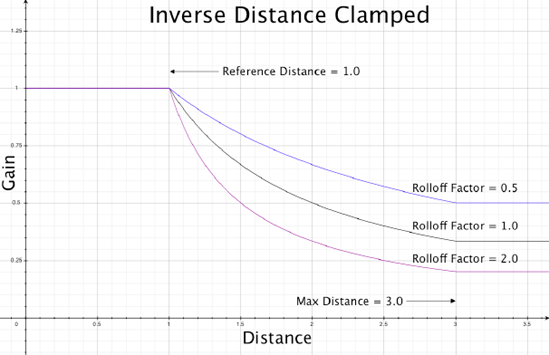
In the Inverse Distance model (see Figure 11-10), the gain decays quickly and then starts to level off as the distance gets greater. Smaller rolloff factors will reduce how quickly the gain drops. Reference distance shifts the curve to the right so that gain equals 1 at the reference distance. Note that even though the equation and graph allows gains greater than 1, OpenAL is free to clamp the maximum value at 1.

The Inverse Distance Clamped model (see Figure 11-11) behaves like the nonclamped model, except that gain greater than 1 is explicitly clamped. Also, there is a maximum distance parameter that prevents the gain from decaying any more beyond the designated distance.

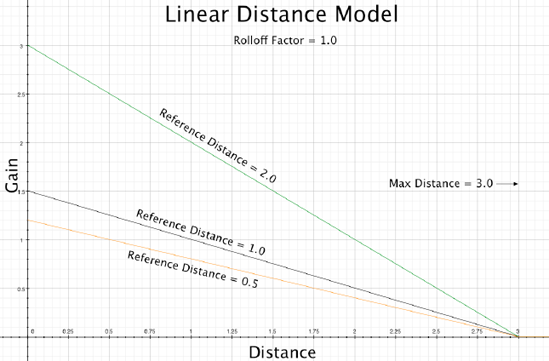
The Linear Distance model (see Figure 11-12) makes the gain decay in a linear (straight-line) fashion. The reference distance value shifts the line so that the gain is 1 at the reference distance. Remember that OpenAL is free to clamp gain values greater than 1, even though the equation and graph allow for larger values.

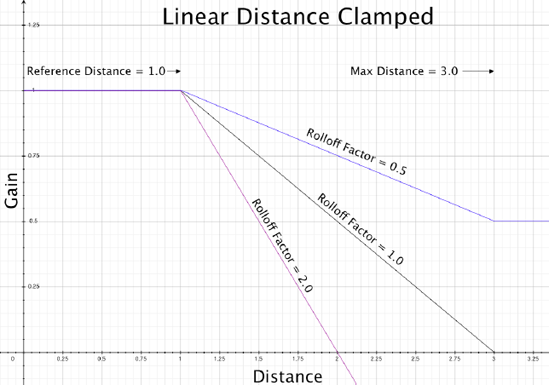
The Linear Distance Clamped model (see Figure 11-13) explicitly clamps gains greater than 1 to 1. From the graph, it is also more apparent that the reference distance is the trigger point for where the gain starts to decay. Comparing Figures 11-12 and 11-13, you can also see both the reference distance and the rolloff factor contribute to the slope of the line.

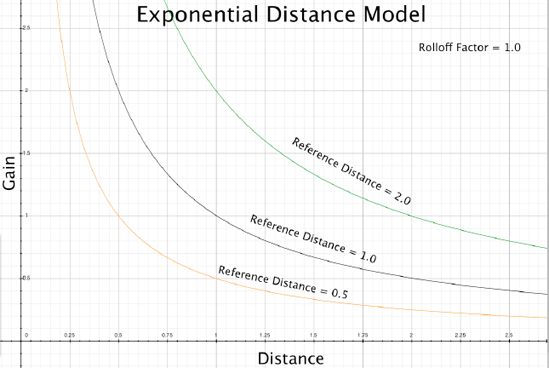
You can tell that Exponential Distance model (see Figure 11-14) gets its name from the equation where there is an exponential value there. The curve exponentially drops based on the size of the rolloff factor. The reference distance shifts the curve so the gain is 1 where the reference distance is. Remember that OpenAL is free to clamp gain values greater than 1.

Like all the other clamped models, the Exponential Distance Clamped model (see Figure 11-15) explicitly clamps gains greater than 1 to 1. Gain decay stops when the maximum distance is reached. The rolloff factor affects the slope.

So you might be asking, "Why do we need all these parameters?" and "What do they all mean?"
To answer the first question, the OpenAL 1.1 Specification and Reference gives an example of a jet and a clock. Imagine they are in the same location. The jet is obviously going to be louder than the clock, and the rate of volume decay over distance is going to be slower than the clock.
To compound matters, in your application, you are dealing with recorded PCM samples that are probably normalized. The volume levels of these recordings aren't going to reflect the power you hear in the real world. (Graphics people might think of this as a high dynamic range problem.)
As for what the parameters mean, the maximum distance is probably the most self-explanatory. Particularly for the clamped models, this value just specifies that you want to stop attenuating after you reach the maximum distance.
The rolloff factor basically specifies how fast the sound should decay. In the jet versus clock example, you probably want the jet sound to decay more slowly than the clock.
Reference distance is a difficult one to explain. The OpenAL Programmer's Guide defines it as "the distance under which the volume for the source would normally drop by half (before being influenced by the rolloff factor or AL_MAX_DISTANCE." However, I am not convinced this is an accurate description, or even useful.
The reference distance parameter has confused other people as well. The best explanation I've seen comes from Daniel Peacock. As I mentioned in Chapter 10, he is the current maintainer of the Creative Labs implementation of OpenAL. He is also one of the key authorities and guardians of OpenAL. He was kind enough to give me permission to quote a response he once gave on the OpenAL mailing list.
This is a confusing parameter—particularly because it has different behavior based on the distance model you select. In the ***_CLAMPED distance models, the distance between the source and the listener is always clamped between the AL_REFERENCE_DISTANCE and the AL_MAX_DISTANCE (i.e. the source can be no nearer than AL_REFERENCE_DISTANCE, and no further than AL_MAX_DISTANCE). The distance models without clamping do not impose any limits.
After clamping the source-listener distance (if appropriate) ... the AL_REFERENCE_DISTANCE term is plugged into the appropriate attenuation model and is used to calculate the source gain as attenuated by distance.
The AL_REFERENCE_DISTANCE term in all the distance models is a way to indicate how loud a sound really is. Assuming that all the samples in the game are going to be (roughly) normalized, and they all have the same AL_REFERENCE_DISTANCE they would all attenuate over distance at the same rate and sound at the same level. This is clearly wrong if one of the samples is an explosion and one is a footstep. The explosion should be audible a long way off (so it might have a reference distance of 50) whereas the footsteps are much quieter and should not be audible from far away (so they might have a reference distance of 1 or 2).
Now you might wonder how to pick a distance model. Typically, the Inverse or Inverse Clamped model is considered the most realistic of the group (not to imply it is actually realistic). It might be a prime choice for a first-person shooter game. Linear is considered the least realistic. I think linear might work well for a game like Space Rocks!. However, for our example, we will pick Inverse Clamped.
Another thing to notice is that the Inverse and Exponential models don't decay completely to 0. Consider a first-person shooter game in a large world. This means very distance objects may still make noise you can hear, which you may not expect. OpenAL doesn't support culling of any kind, so it is up to you to figure out how you want to handle really distant sounds and manually implement it.
You are encouraged to use the example project to play with the other models and parameters. The graphs and equations should help you pick a model and decide what to try to plug in for the values.
Time to add distance attenuation to Space Rocks!. Again, by now you pretty much know the drill. We will continue from the previous project, SpaceRocksOpenAL3D_4_VelocityDoppler. The finished project for this example is named SpaceRocksOpenAL3D_5_DistanceAttenuation.
First, EWSoundSourceObject must support properties for rolloffFactor, referenceDistance, and maxDistance. We already added rolloffFactor from our earlier work-around to disable attenuation at the beginning of the chapter, so we are already partway there. So first, add the remaining two instance variables and properties to EWSoundSourceObject.h and remember to synthesize them in the implementation.
ALfloat rolloffFactor;
                ALfloat referenceDistance;
                ALfloat maxDistance;


@property(nonatomic, assign) ALfloat rolloffFactor;
@property(nonatomic, assign) ALfloat referenceDistance;
@property(nonatomic, assign) ALfloat maxDistance;
In EWSoundSourceObject.m, Initialize the defaults to match the OpenAL defaults in the init method:
rolloffFactor = 1.0; // 0.0 disables attenuation
referenceDistance = 1.0;
maxDistance = FLT_MAX;
Set the properties in applyState:
alSourcef(sourceID, AL_ROLLOFF_FACTOR, rolloffFactor);
alSourcef(sourceID, AL_REFERENCE_DISTANCE, referenceDistance);
alSourcef(sourceID, AL_MAX_DISTANCE, maxDistance);
In BBSceneController.m, change the distance model in init from AL_NONE to something else. For our example, we will use AL_INVERSE_DISTANCE_CLAMPED.
[[OpenALSoundController sharedSoundController]
setDistanceModel:AL_INVERSE_DISTANCE_CLAMPED];
Now it's time to actually set our three properties for our specific game needs. First, in BBSceneObject's init method, set the maxDistance immediately after we create the soundSourceObject:
soundSourceObject.maxDistance = 600.0;
The maximum size of our game field is approximately 600 units wide. It is unchanging, so we just hard-code this value here.
Finally, we need to go through every BBSceneObject subclass we have (for every object we care about) and set the rolloffFactor and referenceDistance properties to something that will work well with our attenuation model. The following are the values I picked. I encourage you to play with them and try other models.
UFO: Attenuates, but a little more constant/consistent than other objects.
self.soundSourceObject.rolloffFactor = 0.5;
self.soundSourceObject.referenceDistance = 300.0;
Rocks (asteroids): More attenuation than the UFO for depth (distance) perspective, but still loud enough to hear reasonably well from far away.
self.soundSourceObject.rolloffFactor = 1.0;
self.soundSourceObject.referenceDistance = 100.0;
Spaceship laser (missile): Wimpy laser sound attenuates quickly.
self.soundSourceObject.rolloffFactor = 5.0;
self.soundSourceObject.referenceDistance = 50.0;
UFO missile: Not as wimpy as the spaceship laser/missile, but does attenuate quickly. Notice as the missile gets close to your ship, it gets noticeably loud, which may be a good property to have for the player.
self.soundSourceObject.rolloffFactor = 3.0;
self.soundSourceObject.referenceDistance = 100.0;
PREPARING YOUR SOUND SAMPLES
There are a lot of things to consider when creating and editing your sound files for your game—too many to cover here. But to give you an idea, you might want to think about things like prenormalizing/balancing your sounds so volume levels for different samples overpower others. You might also want to think about and test how a sample will sound when looped if you need to deal with sounds that repeat.
As an example, for this book, I took some care in preparing the missile sample used in our game. Both the UFO and UFO missile are prime subjects for showing off our 3D effects, because they make long-duration noises and move gradually across the screen. Therefore, I wanted to put a little more effort into creating these effects. But usually, missile recordings already attenuate, because most test firings watch the missile from a stationary fixed point from which the missile moves away at a high speed. For our example, I wanted fairly constant burn amplitude so I could let OpenAL be the main driver of any attenuation you hear and avoid getting a double attenuation effect.
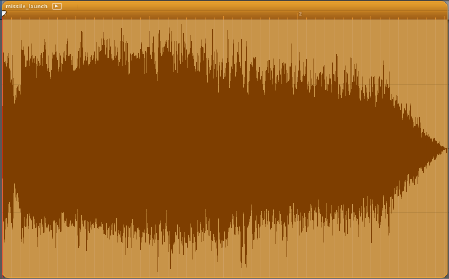
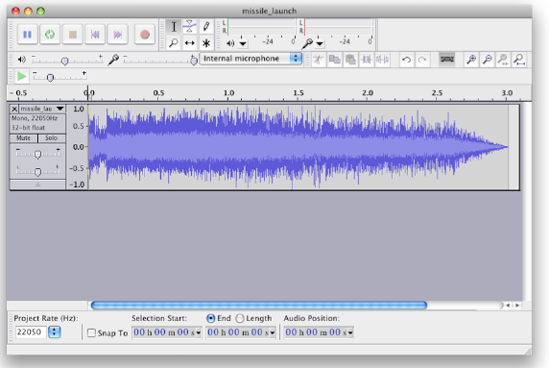
Figure 11-16 shows my modified missile launch waveform in GarageBand. The original waveform's amplitude dropped off toward zero much more quickly than what's pictured here. I modified the sample to try to keep it roughly constant, so any attenuation you hear in the game will be due to OpenAL's distance attenuation feature and not the original audio sample. As you can see, the waveform is mostly consistent (a little attenuation, but not too bad). There is a quick drop off at the end, just so it didn't end too abruptly. (Imagine the missile running out of fuel, I suppose.)
On a related subject, you might be wondering about the tools that are available for editing audio files. I will suggest two:
GarageBand by Apple (shown in Figure 11-16) ships as part of iLife with every new Mac. Assuming you are using a Mac, it should already be installed on your computer. GarageBand has a lot of features that go beyond just PCM files, which also means there tends to be more of a learning curve.
Audacity (shown in Figure 11-17), containing the same missile waveform as in the GarageBand screenshot) is an open source (and free) cross-platform sound application for recording and editing sounds. I like using Audacity for a lot of simpler things. I also like using Audacity because I can run it on other platforms, which is convenient for cross-platform development. Check out Audacity at
http://audacity.sourceforge.net.
The final OpenAL property still to introduce is AL_SOURCE_RELATIVE. This property, when set to AL_TRUE, indicates that the position, velocity, direction, and cone properties of a source are to be interpreted relative to the listener position. By default, this is set to AL_FALSE.
Since it is easier to deal with absolute (nonrelative) values for our Space Rocks! engine, we haven't cared about changing the AL_SOURCE_RELATIVE property. However, this property can be exploited to accomplish something else that can be useful. We can abuse this property to effectively disable 3D effects on a per-source basis.
Now that we've added so much infrastructure into our engine, if we encounter a case where we don't want 3D effects applied on a single particular instance, we might have a mess trying to refactor the code to handle this case, particularly since many of these effects involve changes to both the source and listener.[29] But I will show you how to use the AL_SOURCE_RELATIVE property to accomplish this without too much pain. There is a certain irony about ending the chapter by disabling all the work we've done throughout this chapter, but que sera, sera.
The basic idea is simple. We enable the AL_SOURCE_RELATIVE property on the source that we want to not be spatialized, and then set all the source properties to values that make it appear that the source is moving in lockstep with the listener. This will give the illusion that 3D effects are off for the source. For example, with position, we set the position to <0, 0, 0>, which means it is at the same exact position of the listener. The code for this version is in SpaceRocksOpenAL3D_6_SourceRelative.
So let's begin undoing.
First, we add two new Boolean properties to EWSoundSourceObject. One is generically for AL_SOURCE_RELATIVE, just in case you want to use this property for its actual intended purpose. The other is explicitly for disabling 3D effects. In EWSoundSourceObject.h, add the instance variables and properties:
ALboolean sourceRelative;
BOOL positionalDisabled;
@property(nonatomic, assign, getter=isSourceRelative) ALboolean sourceRelative;
@property(nonatomic, assign, getter=isPositionalDisabled) BOOL positionalDisabled;
In EWSoundSourceObject.m, synthesize the properties, and in the init method, initialize these to false.
Next, the heart of this technique is just restructuring the applyState method in EWSoundSourceObject.m to check if the positionalDisabled flag is set, and setting different values if it is. The new code looks like this:
- (void) applyState
{
    ALenum al_error;

    [super applyState];
    if(NO == self.hasSourceID)
    {
        return;
    }
    if([[OpenALSoundController sharedSoundController] inInterruption])
    {
        return;
    }
    alSourcef(self.sourceID, AL_GAIN, self.gainLevel);
    alSourcei(self.sourceID, AL_LOOPING, self.audioLooping);
    alSourcef(self.sourceID, AL_PITCH, self.pitchShift);

    if(YES == positionalDisabled)
    {
        // Disable positional sound

        // set to relative positioning so we can set everything to 0
        alSourcei(sourceID, AL_SOURCE_RELATIVE, AL_TRUE);
        // 0 to disable attenuation
        alSourcef(sourceID, AL_ROLLOFF_FACTOR, 0.0);
        // doesn't matter
        alSourcef(sourceID, AL_REFERENCE_DISTANCE, referenceDistance);
        // doesn't matter
        alSourcef(sourceID, AL_MAX_DISTANCE, maxDistance);

        alSource3f(sourceID, AL_POSITION, 0.0, 0.0, 0.0);
        alSource3f(sourceID, AL_DIRECTION, 0.0, 0.0, 0.0);
        alSourcef(sourceID, AL_CONE_INNER_ANGLE, 360.0);
        alSourcef(sourceID, AL_CONE_OUTER_ANGLE, 360.0);
        alSourcef(sourceID, AL_CONE_OUTER_GAIN, 0.0);
        alSource3f(sourceID, AL_VELOCITY, 0.0, 0.0, 0.0);
    }
    else
    {
        // set to relative positioning so we can set everything to 0
        alSourcei(sourceID, AL_SOURCE_RELATIVE, sourceRelative);
        alSourcef(sourceID, AL_ROLLOFF_FACTOR, rolloffFactor);
        alSourcef(sourceID, AL_REFERENCE_DISTANCE, referenceDistance);
        alSourcef(sourceID, AL_MAX_DISTANCE, maxDistance);

        alSource3f(sourceID, AL_POSITION,
            objectPosition.x, objectPosition.y, objectPosition.z);
        alSource3f(sourceID, AL_DIRECTION,
            atDirection.x, atDirection.y, atDirection.z);
        alSourcef(sourceID, AL_CONE_INNER_ANGLE, coneInnerAngle);
        alSourcef(sourceID, AL_CONE_OUTER_ANGLE, coneOuterAngle);
        alSourcef(sourceID, AL_CONE_OUTER_GAIN, coneOuterGain);
        alSource3f(sourceID, AL_VELOCITY, objectVelocity.x, objectVelocity.y, objectVelocity.z);
    }
}
Finally, for our new property setters, we should explicitly implement them, instead of relying on synthesize, because we need to call applyState to make sure the change takes effect immediately.
- (void) setSourceRelative:(ALboolean)source_relative
{
    sourceRelative = source_relative;
    [self applyState];
}

- (void) setPositionalDisabled:(BOOL)positional_disabled
{
    positionalDisabled = positional_disabled;
    [self applyState];
}
And that's all there is to it. It's far easier to destroy than create, right?
In the code example, I do not go as far as to explicitly disable 3D for any specific objects (because we will continue building upon this code base in the next chapter, and I didn't want to deal with the forking situation). But I encourage you to play with it. I left a commented-out line in BBUFO.m's awake method:
// self.soundSourceObject.positionalDisabled = YES;
Congratulations! You are among the few elite that have seen and worked with all the official 3D features of OpenAL. Now it's just a matter of tweaking all those little parameters for your game. For additional reference, I highly recommend a great Apple developer example for Mac OS X that is included with Xcode called OpenALExample (once upon a time found in file:///Developer/Examples/CoreAudio/Services/OpenALExample, though with newer releases of Xcode, you may have to download it directly from Apple at http://developer.apple.com/Mac/library/samplecode/OpenALExample/index.html). It provides a Cocoa and OpenGL GUI to access all the properties we've talked about, so you can see how changing a value affects the outcome (see Figure 11-18). If you don't normally work on a Mac, but want to experiment with all the OpenAL properties, I highly recommend borrowing some time on a Mac and playing with this example.
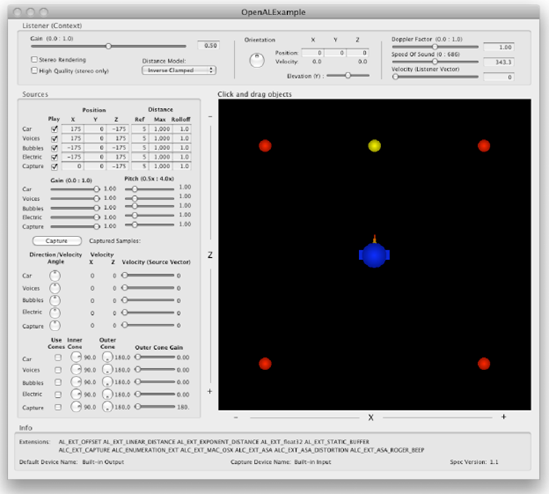
Figure 11.18. Apple's example project for OpenAL on Mac OS X, named OpenALExample, provides a nice user interface to manipulate all the different features and properties of OpenAL to see how they work and they affect things.
The next chapter discusses a topic that is mostly orthogonal to this chapter. However, the examples in the next chapter will build on the examples from this chapter and attempt to bring it all together. So get ready for the grand finale of the audio section.
[23] There is a feature called device enumeration, but all you have are the names of devices, which could be anything.
[24] If we did want to handle this complexity, we might keep the OpenAL context associated with the listener as an instance variable in our listener class and check to see if our context is the current context before we try anything. Or we could go the other way and assume there is always only one context and make the class a singleton.
[25] Apple's desktop implementation does work correctly. Interestingly, this is the only significant behavioral difference I've noticed between Apple's Mac and iPhone implementations of OpenAL (excluding capture, which is discussed in Chapter 12).
[26] I think I found another bug in the Apple implementation. Setting the Linear Distance model seems to ignore my rolloff factor = 0 disabling attempts.
[27] The spec says implementations are free to amplify if you set the gain beyond 1.0, but the spec also says implementations are allowed to cap at 1.0 if they choose. This is to avoid clipping distortion.
[28] 343 meters per second is the speed of sound in dry air.
[29] You could make the sample stereo, but that has its own drawbacks.