You have already been introduced to the iPhone and iPhone gaming, and have seen an overview of its development environment. But what is iPhone development like? How complicated is it to learn Objective-C? How easy to use are the tools mentioned in the previous chapter? How do you get started making an iPhone game? This chapter begins the journey to answer these questions.
This chapter introduces you to the Cocoa Touch app environment, Objective-C, and UIKit framework. You will learn how to use the iPhone SDK's one-two-punch IDE and GUI design tool: Xcode and Interface Builder. We will build a simple iPhone game using Xcode, Interface Builder, and Cocoa Touch. Along the way, you will become acquainted with the essential APIs and get some important iPhone game design tips.
The Cocoa Touch app environment that powers the iPhone provides various C libraries, Objective-C frameworks, and associated design patterns that dictate how apps for the iPhone are built. This section introduces the iPhone app development environment. If you are already familiar with programming Cocoa Touch apps, feel free to skip to the next section.
The Cocoa Touch environment is composed of a number of Objective-C frameworks and C libraries that give the developer access to the iPhone's UI; technology such as geolocation through the GPS and compass; and input devices such as the touchscreen, accelerometer, and camera. Two frameworks are central to this environment:
Foundation framework: Defines common classes such as
NSObjectandNSStringthat are used throughout Cocoa Touch.UIKit framework: Provides classes for the creation of iPhone screens with buttons, labels, text fields, sliders, tables of data, and other UI components. Besides UI components, UIKit defines Objective-C classes that encapsulate app object properties and methods, and prototypes that define various app, view, and input events.
UIKit also dictates how developers should use these classes and prototypes by dividing functionality along the recommended guidelines of time-tested object-oriented programming (OOP) constructs, such as the Model-View-Controller (MVC) and Delegate design patterns. We will be discussing these classes, prototypes, and design patterns in the remainder of the chapter. But before we begin discussing UIKit, you need to get up to speed on Objective-C.
Objective-C is an OO language invented in early 1980s by Brad Cox. Objective-C is a superset of the C language, and was invented independently of, but around the same time as, the more popular C++ language. Brad Cox's goal when he invented Objective-C was to bring the syntax and OO nature of the Smalltalk language to his C programming environment. He wanted to program in a Smalltalk-like environment and language. But as a C programmer of many years, he had developed and depended on a lot of C code he didn't want to rewrite. So he invented Objective-C to bridge the two languages together.
To properly understand and use Objective-C, you must know and have some experience with C programming, especially pointers and memory management. It also will help if you are familiar with OOP concepts such as classes, class instances (also called objects), inheritance, encapsulation, and polymorphism. If you already know Java, C#, or C++, it will be easier to learn Objective-C. Objective-C has different syntax for calling methods, and a few differences in how it treats null objects, undeclared methods, and memory management.
The first thing you will likely notice when looking at the Objective-C code of an iPhone project is that most code files end in .m (sometimes also .mm, which is used when you want to mix C++ and Objective-C). The .m stands for module. Like C and C++, Objective-C uses header files that end in .h. Header files are used for declaring types and method signatures.
Let's look at a short example of Objective-C code. Listing 3-1 shows a sample header file, named SampleClass.h.
Example 3.1. Sample header file (SampleClass.h)
#import <Foundation/Foundation.h>
@interface SampleClass : NSObject
{
    float floatMember;
}
+ (void)classMethod; + (int)classMethodWithParameter:(int)intParam; - (void)instanceMethod; - (float)instanceMethodWithParam1:(float)floatParam andParam2:(int)intParam; @end
The first line of code in Listing 3-1 is a framework import statement. In this case, we are importing a header file for a framework. #import works like the C and C++ #include statement. Objective-C uses #import instead of #include for various reasons, but one of them is that framework header files are stored in a separate place than standard C and C++ include files. One other difference is that #import reads the header file only once.
In the code in Listing 3-1, we import the Foundation framework. The significance of this is that the Foundation framework is the framework on which all other Objective-C frameworks are based. It's called Foundation because it's the foundation of all the other Objective-C frameworks.
The Foundation framework defines a few basic classes, which you will use very frequently in your iPhone programming. These classes represent typical data in an app, such as numbers, strings, arrays, sets, and implementations of many other computer science and OO concepts.
The following is the second line of code in Listing 3-1:
@interface SampleClass : NSObject
This is the start of a class interface declaration. Class declarations begin with @interface and end with @end.
The class being declared is called SampleClass. Unlike in Java and C#, the name of the class doesn't need to match the name of the file, but it is good practice to give them the same name. It simply makes it easier to find the right code.
In the class interface declaration, the class name is followed by a colon, then the name of the class from which the class being defined is derived. In this case, SampleClass is derived from NSObject. NSObject is the most important class in the Cocoa Touch environment. It is the class from which every class in Cocoa Touch is derived.
After the @interface line, we have three lines of code, which only make sense together:
{
float floatMember;
}The squiggly symbols are known as curly brackets, used in C and similar languages to group code together. In this case, we are declaring the list of instance variables for class SampleClass. In C++, these are called member variables. In Java, they are known as attributes. There is only one instance variable in this code. It is of type float, and its name is floatMember.
The next four lines of code consist of some method declarations:
+ (void)classMethod;
+ (int)classMethodWithParameter:(int)intParam;
- (void)instanceMethod;
- (float)instanceMethodWithParam1:(float)floatParam andParam2:(int)intParam;

@end
These look almost like method declarations in C and similar languages, except they don't have a list of parameters enclosed in parentheses, and they have plus and minus signs in front. The method declarations with the plus sign are class methods; the minus sign denotes instance methods. And there are methods with parameters, but they're declared differently than in C and similar languages.
In Objective-C, method parameters are denoted by a colon character before the parameter location in the method name, followed by the type and name of the parameter. So the class method classMethodWithParameter: has a parameter of type int called intParam. The instance method instanceMethodWithParam1:andParam2: has one parameter of type float called floatParam and a second parameter of type int called intParam.
Now the interface declaration of SampleClass ends, and we tell the compiler this by putting the @end symbol in the code. Typically, this goes at the end of the file.
With the interface declaration finished, we now move to the implementation of SampleClass, shown in Listing 3-2.
Example 3.2. Sample implementation file (SampleClass.m)
#import "SampleClass.h"

@implementation SampleClass

static int intMember;

+ (void)classMethod
{
    NSLog(@"inside classMethod");
}
- (void)instanceMethod
{
    NSLog(@"inside instanceMethod");
}

+ (int)classMethodWithParameter:(int)intParam
{
    intMember = intParam;
    return intParam;
}
- (float)instanceMethodWithParam1:(float)floatParam andParam2:(int)intParam
{
    floatMember = floatParam;
    intMember = intParam;
    return floatParam * intParam;
}

@end
The first line of code in Listing 3-2 imports the SampleClass.h file. This lets us work with the SampleClass interface in the implementation file. This step should be familiar to C and C++ developers, as it is analogous to using #include to include a header file for a C++ class or a C module.
The next line of code starts the implementation block of SampleClass:
@implementation SampleClass
Similar to an @interface block, implementation starts with the @implementation symbol, followed by the name of the class, and ends with @end. In the implementation block of a class, you define the methods declared in the interface. The interface has only the name and parameters for the methods of the class. The implementation has the actual code for those methods, and for any other internal methods needed to complete the implementation of the class.
The next line of code immediately after the @implementation symbol, there is the definition of a static int module variable named intMember:
static int intMember;
This is going to be used in the code as if it were a class variable, because Objective-C doesn't have class variables. It's just a regular C module scope variable.
And now we come to the first of the method definitions:
+ (void)classMethod
{
    NSLog(@"inside classMethod");
}
The first method defined is a class method named classMethod, which does not take any parameters and does not return a value. It looks almost like a C method definition, except for the plus sign at the beginning of the line and the lack of parentheses for parameters.
Like any method definition in C and similar languages, the method body is contained inside a pair of curly brackets. This method makes a call to a C function called NSLog, which is provided by the Foundation framework. NSLog writes to the console log, and is useful when debugging. NSLog takes an Objective-C string object as its parameter. As you can see in the code, Objective-C string constants begin with the @ symbol. This is to differentiate them from C strings, which are a different beast. Objective-C strings are objects of Objective-C class NSString, whereas C strings are simply arrays of characters.
The next method definition is an instance method called instanceMethod:
- (void)instanceMethod
{
    NSLog(@"inside instanceMethod");
}
You can identify it's an instance method by the minus sign at the beginning of the line. Like the class method defined before it, it calls NSLog and passes a string object as a parameter to NSLog.
The next method definition is a class method named classMethodWithParameter:.
+ (int)classMethodWithParameter:(int)intParam
{
    intMember = intParam;
    return intParam;
}
The method takes one parameter, an integer named intParam, and returns an integer. In the method body, the value of intParam is assigned to the pseudo class variable intMember, and then it returns the value of intParam. Except for the first line of the method definition, this is pure C code.
The next method definition is an instance method named instanceMethodWithParam1:andParam2:.
- (float)instanceMethodWithParam1:(float)floatParam andParam2:(int)intParam
{
    floatMember = floatParam;
    intMember = intParam;
    return floatParam * intParam;
}

@end
This method takes two parameters and returns a float. The first parameter is a float named floatParam. The second method is an int named intParam. The code assigns floatParam to the instance variable floatMember, and also assigns intParam to intMember. Then it multiplies floatParam by intParam and returns the result.
With the last method definition, the implementation block ends with the @end symbol and the end of the file SampleClass.m.
So to recap, you learned how to declare the interface and define the implementation of Objective-C classes. You also learned how to declare method signatures in the interface, and how to define the code in these methods. Then you learned how to use method parameters in Objective-C. In the next few sections, you will learn how to use the SampleClass.
Now let's look at how to allocate and initialize an instance, how to call class methods and instance methods, and how to call methods with parameters. Listing 3-3 shows the sample code that accomplishes this.
Example 3.3. The following Objective-C code shows how classes are allocated and initialized and how different kinds of methods are called and parameters are passed
SampleClass *instance;

instance = [[SampleClass alloc] init];
[SampleClass classMethod];
[instance instanceMethod];
int result1 = [SampleClass classMethodWithParameter: 5];
float result2 = [instance instanceMethodWithParam1: 5.0 andParam2: 2];

[instance release];
The first line of code in Listing 3-3 declares a variable named instance, of type pointer to an object of a class type SampleClass. This syntax should be very familiar to C and C++ programmers, and other than the pointer symbol (the *), this code should also look familiar to C# and Java developers.
Now let's move on to the next line.
instance = [[SampleClass alloc] init];
If you have any knowledge of computer languages, you should be able to determine that the beginning of this line is storing something in the variable instance. But what is that to the right of the equal sign? What is that mess of brackets? This is certainly strange, because square brackets are usually employed in C and similar languages in the declaration of arrays and in the addressing of elements in arrays. But this looks different. In Objective-C, brackets are used to make method calls. This is to differentiate the Objective-C method calls from C function calls.
The method call always has two parts: the first part is an instance variable or a class name, and the second part is a method name and any parameters.
The brackets are nested, meaning that one pair of brackets is inside another. They kind of look like parentheses in a long math operation. In school, we learned that we should start with the stuff in the inner pair of parentheses and work our way out. In Objective-C, you use the same approach: inner brackets first.
The inner pair of brackets contains the code SampleClass alloc. Whenever you see a class name as the first part of the method call, you know that it is a call to a class method. In this case, we are calling the alloc method of class SampleClass.
But wait a minute! In the interface declaration of SampleClass, there is no method called alloc. That is correct. alloc is a method of class NSObject. Since everything derives from NSObject, all classes have a method called alloc. The alloc method creates an instance of a class and returns a pointer to this instance.
Because our brackets are nested, the result of [SampleClass alloc] is used as the first part of the second pair of brackets. So the instance returned by [SampleClass alloc] is used to make a call to an instance method named init. SampleClass does not declare a method named init. Once again, we are dealing with a method defined in the NSObject class—in this case, an instance method of NSObject called init.
The init method is used to initialize the instance variables of a class to a default, or initial, value. Classes typically override the init method when they have a lot of instance variables that must be initialized to safe and sensible default values. Besides overriding init, classes also define several init methods with one or more parameters, to set the initial values of several instance variables with a single method call.
The next four lines of code should be straightforward.
[SampleClass classMethod];
[instance instanceMethod];
int result1 = [SampleClass classMethodWithParameter: 5];
float result2 = [instance instanceMethodWithParam1: 5.0 andParam2: 2];
[instance release];
The first is a class method call to classMethod, which takes no parameters. Next is an instance call to instanceMethod, which also takes no parameters. Following that is a class call to a method named classMethodWithParameter:, which takes an integer parameter. In this case, we are passing the integer 2 into this method. This method returns an integer value, which we store in an int variable named result1. And finally, we have a call to an instance method named instanceMethodWithParam1:andParam2:, which takes a float parameter and an int parameter. We pass to this method the float 5.0 and the integer 2. This method returns a float value, which we store in float variable result2.
The last method call in Listing 3-3, [instance release], is an instance method call to another method inherited from class NSObject. The method release should be called whenever you are finished with an object instance you have created yourself with alloc. In this case, we allocated the instance, and we are finished using it, so it is released.
Memory management in Objective-C is different than in C and similar languages. In C and C++, you allocate memory with malloc or new, keep it in a pointer, pass it around to other code as needed, and free/delete it when you're finished. In C# and Java and some scripting languages, you only allocate objects; the language runtimes take care of freeing objects when there are no more references to them.
In Objective-C, release is not the same as free in C. Calling release decrements an internal reference counter inside the object. The memory held by an object is invalidated by the Objective-C runtime when this internal reference counter reaches 0.
When you first allocate an Objective-C object with alloc, its reference count is set to 1. You need to manage the reference counting yourself as you code, and remember to call release at the appropriate times, or the object will become a memory leak. When creating a class instance for a short time as in the example in Listing 3-3, it's simple to remember to release the object when you are finished. But when you have objects that stick around for a long time and get used by different sections of your code at different times, it can get quite complicated.
NSObject has another method called clone, which makes a new object that is a copy of another. The clone has its own reference counter and it is set to 1, regardless of the reference count of the original object from which the clone was made. As with any other kind of Objective-C object, you should call release on any clones once you are finished with them.
There are situations in Cocoa Touch programming when you don't allocate the objects yourself. The Cocoa Touch frameworks have a lot of convenient methods that allocate objects and return them to you. These objects are held in what is called an autorelease pool. If you are going to hold on to an object returned by these Cocoa Touch frameworks, Cocoa Touch might autorelease it and invalidate it before you are finished with it, leading to a crash. In situations like this, you need to increment the reference count of that object so that it is not invalidated. This is called retaining the object. It is done by calling a method named retain on the object. The method retain is another NSObject instance method, which every Objective-C class inherits. When you retain an object, you still must remember to call release on the object when you are finished with it, allowing the Cocoa Touch framework to autorelease and invalidate the object. Otherwise, you will have a memory leak.
You can use this automatic cleanup of objects in your own code by creating your own autorelease pool. An autorelease pool lets you control the release of objects in memory in an organized, reliable manner. To create an autorelease pool, you allocate an instance of the class NSAutoreleasePool and initialize it. Because NSAutoreleasePool instances are like any other Objective-C instance, when you are finished with the instance, you must release it. Listing 3-4 shows an example of creating and releasing an autorelease pool.
Example 3.4. Creating and releasing an autorelease pool
NSAutoreleasePool * pool = [[NSAutoreleasePool alloc] init];
// other code here
[pool release];
You place objects in an autorelease pool by calling the autorelease method on the object. The method autorelease is another NSObject instance method. Calling autorelease on an object places the object in the most recently created autorelease pool. When the autorelease pool is released, all objects that were added to it are released.
So now that you've learned some Objective-C syntax and learned some things about how Objective-C and Cocoa Touch memory management works, you're ready to dive into the details of the Cocoa Touch environment and the UIKit framework.
Note
To learn more about Objective-C syntax and memory management, see Learn Objective-C on the Mac by Mark Dalrymple and Scott Knaster (Apress, 2009). Apple also provides Objective-C tutorials on the iPhone Dev Center at http://developer.apple.com/iphone.
The UIKit framework is mainly used for the creation of the app's screens. The UIKit framework defines Objective-C classes for the various components that make up an iPhone app. UIKit has classes for the iPhone screen, views, scroll views, tables, table cells, text labels, buttons, images, and many kinds of controls that let developers create beautiful-looking iPhone apps.
An app's screens are created by laying out instances of UIKit classes, either programmatically using code or graphically through the Interface Builder design tool. The iPhone and iPod touch have a screen that is 320 pixels wide and 480 pixels tall when the device is held upright, in what is known as portrait orientation. Your job as a game developer is to fill that screen with exciting animations and other graphics to entertain the player. When programming with UIKit, you do this by placing graphic objects in a UIView.
A UIView is a container object. This means it can contain buttons, icons, labels, text fields, and any sort of UI components. You can even position UIView instances inside another UIView. In this chapter, we will mostly concern ourselves with placing image views inside a UIView and making them move according to a game's logic. Image views are a type of UIView that holds images.
A UIView is an Objective-C class representing a region of graphical real estate. A UIView has several properties, such as its position, size, background color, visibility, and whether it responds to touch events. Learning about these UIView properties is useful, not only because you use the UIView in iPhone programming, but also because all the other iPhone components derive from UIView. Buttons, labels, text fields, text views, and tables all are a kind of UIView. This means they also have all of these properties, and they behave the same way in regard to setting these properties.
A UIView's screen position and size are expressed through a property called frame. The frame property is a C structure of type CGRect. This structure represents the specific properties of a rectangle. CGRect is used throughout iPhone UI development to specify the size and position of UI elements such as labels, buttons, and text fields.
The CGRect structure is made up of two elements:
Origin: This first element is a C structure of type
CGPoint. It holds the x and y coordinates of the rectangle's top-left corner.Size: This element is another C structure, of type
CGSize. It holds the rectangle's width and height.
Figure 3-1 illustrates the concept of a UIView's frame. The dot at the upper-left corner of the iPhone's screen corresponds to position 0,0. The x axis extends from this corner toward the right side of the screen, such that an x value of 319 is at the right edge of the screen. The y axis extends toward the bottom of the screen, such that a y value of 479 is at the bottom of the screen. This means the dot at the bottom-right corner of the screen is at position 319,479. The view, represented by the rectangle in Figure 3-1, has its upperleft corner positioned at coordinates 100,100—that is, 100 pixels to the right of the top-left corner and 100 pixels from the top of the screen. This is its frame's origin. The view rectangle has a width of 100 pixels and a height of 40 pixels. This is its frame's size.
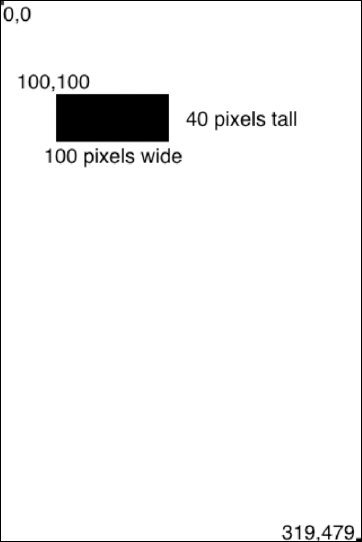
The following code fragment creates a view with the position and size illustrated in Figure 3-1:
CGRect newframe;
newFrame.origin = CGPointMake(100,100);
newFrame.size = CGSizeMake(100,40);
UIView *myView = [[UIView alloc] initWithFrame:newFrame];
Note
You may notice that CGRect, CGPoint, and CGSize all start with the letters CG. They are C structures, rather than Objective-C classes. The CG stands for Core Graphics. Core Graphics, also known as Quartz 2D, is a low-level C library used internally by UIKit to draw lines, curves, gradients, and images. We will study Quartz 2D in more depth in the next chapter.
The x/y elements of the CGPoint structure and the height/width elements of the CGSize structure are C float values. That means that you can use a decimal number, such as 100.25, for any of the view's position coordinates or for the view's given width or height.
The iPhone screen is really made of 320 by 480 physical pixels, so how come you can specify fractions of a pixel? The iPhone and iPod touch are capable of what is called subpixel rendering. When given a position or size with a decimal number, it renders the graphic by interpolating between adjacent pixels, giving the appearance that the graphic was drawn partway between pixels.
Two other UIView properties are background color and alpha. Alpha (also known as opacity) is the opposite of transparency. The property is an unsigned float. It accepts values between 0.0 (no opacity) and 1.0 (fully opaque, or not transparent). Half transparency has an alpha value of 0.5. Any values higher than 1.0 are interpreted as meaning the same as 1.0.
When you set the alpha property of a view, all elements positioned within that view will be affected by the setting. So, if you have a button and a label inside the view, and you set the view's alpha property to partly transparent, these elements also will show as partly transparent.
Background color is a property of type UIColor. UIColor is an Objective-C class that is part of the UIKit framework. UIColor has a few color constants set for commonly used colors. You can use one of the built-in color constants for ease of programming of simple color choices. The following line of code sets the background color of a view to red:
myView.backgroundColor = [UIColor redColor];
Or you can assign a color with specific intensities of red, green, blue, and alpha.
myView.backgroundColor = [UIColor colorWithRed:1.0 green:0.5 blue:1.0 alpha:1.0];
For games, most of the time you will want your view to be totally transparent—to be seen through. You don't want the view to obscure what's behind it in any way. You can accomplish this in two ways:
Set the alpha value of the
backgroundColorproperty to 0.Use a convenient color constant called
clearColor, like this:myView.backgroundColor = [UIColor clearColor];
Another property of UIView is center, which lets you specify the coordinates for the center of the view. When you set the center property, the view uses the size element of the frame property to reset the frame's origin element.
myView.center = CGPointMake(15,25);
There are many other properties of UIView that can be useful in games programming, as you will see as we work through examples.
Now let's create our first game. Talking about stuff only gets you so far.
We'll now build a game in which a ball bounces around the screen, making colored bricks disappear when the ball hits them. We'll begin with a quick introduction to creating a new Xcode project and using Interface Builder. If you're familiar with how to use Xcode and Interface Builder, you may want to skip directly to the "Snazzy Graphics Make the Grade" section.
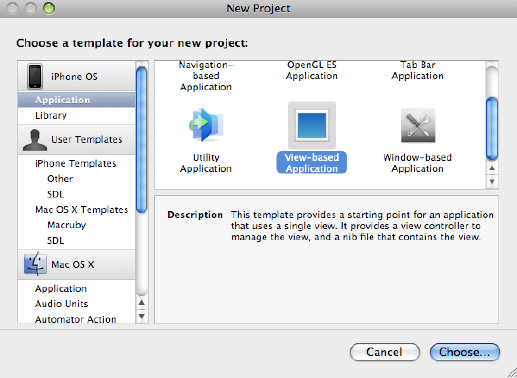
To create an iPhone game with UIKit, we'll start with a new View-based Application project in Xcode. Start Xcode and choose File
In the next step, Xcode will prompt you for a name for your project and where to save it. We are making a brick-breaking game, so enter the name IVBricker and save it where you prefer (I saved the project in my user's Desktop folder). Xcode creates a folder named IVBricker where you specified, and then creates the project, as shown in Figure 3-3.
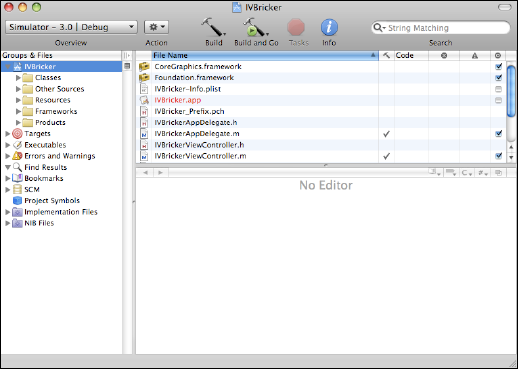
Once the project is loaded into Xcode, you see a panel named Groups & Files to the left, below the toolbar. The icon named IVBricker, highlighted in Figure 3-3, represents your project. When this icon is selected, the top-right panel, which is called the detail panel, shows all the files and frameworks that are used to create your application. Below the IVBricker icon in the left panel, you see the following folder icons:
Classes and Other Sources: These groups contain the source code for your application. The Classes group is the only group in the default set that corresponds to a folder on disk. In this case, it has a matching folder named
Classesinside the project's folder on the Desktop. Most of an app's source code will be located in this group.Resources: This group contains data files that your application needs to run, such as images, sounds, and so on. When Xcode builds your app, it bundles these data files along with your compiled code. You will drop data files into this group as you add new resources to your app. Besides data files, I also like to move my Interface Builder files to this group, for consistency.
Frameworks: This group contains references to the different Cocoa Touch frameworks used by your code. The default frameworks specified by Xcode when it generated the project are fine for the sample projects in this chapter.
Products: This group contains a reference to the built application bundle. This app bundle is what you will submit to the App Store when your app is ready to distribute.
These are the five standard groups of files that make up all newly created Xcode app projects. When you select one of these groups, only the files that belong within that group are shown in the detail panel. While these groups have folder icons, they don't necessarily correspond to folders on disk. They are aids provided by Xcode to help organize your files by function.
Now that we have looked at the organization of our project in Xcode, let's examine the UI of our new view-based application.
Select the Resources group in Xcode, and you will see three files there: IVBricker-Info.plist, MainWindow.xib, and IVBrickerViewController.xib. The two files that end in .xib are Interface Builder files.
Interface Builder is the iPhone SDK's GUI design tool. For games made with UIKit, you only need to know a few basic facts about Interface Builder. We'll start by taking a look at the main window file.
Select the file MainWindow.xib in Xcode and double-click it to open it in Interface Builder. The Interface Builder window offers three views, selectable from the View Mode icons on the upper left: an icon view mode, a list view mode that shows the component name and its type (see Figure 3-4), and a hierarchical view mode.
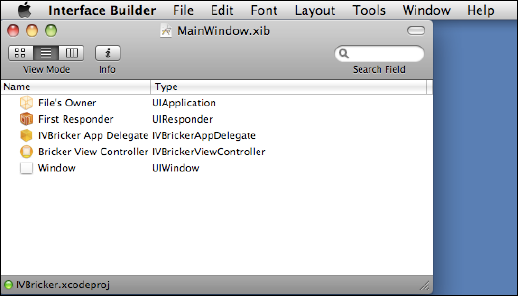
When an iPhone app starts, Cocoa Touch looks in the app's Info.plist for a property called Main nib file base name and loads the file specified there. In an app created from Xcode templates, this property is hard-coded to the app's MainWindow.xib file. Upon loading the MainWindow.xib, it starts processing the components and properties set in the file, as follows:
File's Owner: Every Interface Builder file has a File's Owner component. The first thing Cocoa Touch does when loading an Interface Builder file is create an object of the type specified in the File's Owner. In the case of MainWindow, the File's Owner object is of type
UIApplication. This is an important UIKit class, which starts setting up the Cocoa Touch environment for your app, and delivers events between the operating system and the rest of your application. This is the first UIKit object instantiated by an iPhone app.Application Delegate: Every
UIApplicationinstance needs an Application Delegate object, or else the app does nothing. Cocoa Touch loads MainWindow and creates an instance of the type specified in the application delegate. Once Cocoa Touch has finished loading MainWindow and processing all components and properties specified in the file, Cocoa Touch calls the application delegate to let the app know it has fully launched. Without an application delegate, this call wouldn't be delivered, and the app's components would just sit idle. The application delegate's job is to receive messages for the application's life-cycle events. We will discuss these application delegate messages in detail later in this chapter.Window: After the Application Delegate object, Cocoa Touch loads the Window component. In Cocoa Touch, the Window component holds the several different views that make up an app. This Window component is our app's main
UIWindowinstance.View Controller: The View Controller object represents the controller of the main view in the app. In this example, our main view controller is called
Bricker View Controllerand it is of typeIVBrickerViewController. View controller classes respond to Cocoa Touch events that let the controller know the status of the view, such as whether the view has been loaded or whether Cocoa Touch will unload the view to reclaim memory. We will extend this class to respond to multitouch, accelerometer, and other type of events for this chapter's sample game.
So to recap, at application startup, Cocoa Touch loads the MainWindow.xib file and processes it. During processing of the .xib file, Cocoa Touch creates the UIApplication instance, the app delegate, the main window, the main view, and the view's view controller. Then it connects them together through the various components' properties. Once this is done, Cocoa Touch notifies the application delegate that the application has finished launching.
We are finished examining the MainWindow file for now, so close that file and return to Xcode.
In your Xcode project, double-click the IVBrickerViewController.xib file in the Resources group. This will open the file in Interface Builder, as shown in Figure 3-5.
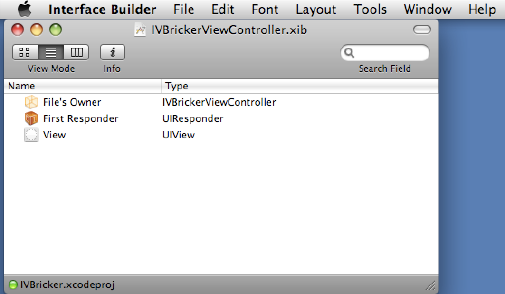
The IVBrickerViewController.xib file shows the Cocoa Touch components that make up the view controller for the app's main view. There is the view itself, represented by the component called View. And then there is IVBrickerViewController.xib File's Owner, which is an object of type IVBrickerViewController. You will note that this is the same type as the view controller in MainWindow.xib. This is no coincidence—they are the same object.
The View component in this Interface Builder file is where we will be placing the different UI components, such as text labels, that make up our main game screen.
Double-click the View component in Interface Builder to open a window with the visual layout of the view. Right now, it's empty and has a dark-gray background.
Bring up the Inspector window by pressing

Figure 3.6. The Inspector window (the one on the right) lets you change properties in your UI components. The View window (in the middle) is where you will place UI components.
The Inspector window has four tabs along the top. The first tab from the left is called the Attributes tab, and it lets you modify various properties in the app's UI components.
Let's change the Background property to set our view's background color to some other color. Make sure the Attributes tab in the Inspector window is selected, and then click the color swatch of the Background property to open a color picker. Set the view's background color to black. Close the color picker once you've changed the color.
Let's add other components to our view. Open the component library by pressing
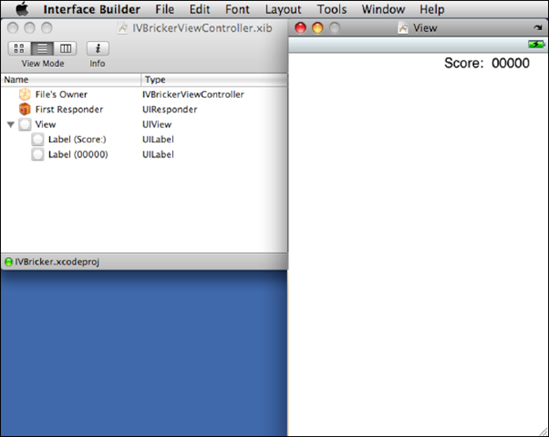
We will drag two labels to our view, to display the current score for our game in progress. Select Label from the component types shown in the Library window, and drag this to the View window. Place it close to the top and right border.
Note
As you move UI components within the View window, keep an eye out for the blue dashed-line hint from Interface Builder. These dashed blue lines, which appear and disappear as you move components around the view, are hints to help you position components at a good distance from the borders of the view and from other components. They're there to help you; use them in your own designs.
With the new label selected, look for the Text property in the Inspector's Attributes tab. This property currently has a value of Label. Change the Text property of this label to five zeros: 00000. This label will display the value of the score as it changes in our game.
The Font Size property has a check box called Adjust to Fit, which is currently selected. Deselect it to make the score display with a fixed font size. This will make the label truncate our five zeros, because it is not big enough to display the whole string. Change the Inspector to the third tab, the one with the ruler icon. This is the Size tab. Change the W (Width) property to 50. Our label is now 50 pixels wide and displays our string of zeros comfortably. Now change the X and Y properties to 275 and 10, respectively. Also, to the left of the coordinates there is a grid of points. Make sure the center dot is selected, so that a small red cross is centered on the grid. Throughout this chapter, the x and y coordinates represent the center of the component.
Drag a new label just to the left of the score label. Change the Text property to say Score:. Also, deselect the Font Size property's Adjust to Fit check box. Then switch to the Size tab. Change the W (Width) property to 50, and the X and Y properties to 216 and 10, respectively. Don't forget to select the center dot in the grid to the left if it's not already selected, or the position of the label won't be correct for these numbers.
Now our view has a score label and is starting to look more like a game in progress. Figure 3-7 shows the positioning of our labels.
Now that we have added these labels, what's next? The score label with the zeros is going to be where the code displays the game's score. In our game code, every time the score changes, we will need to update the value displayed in the score label. To update the score label from our game code, we first need to add a property to the view controller. We will name this new property scoreLabel. After adding the property to the view controller, we will make a connection between the view controller's scoreLabel property and the score label component in Interface Builder.
Before continuing, save your changes to IVBrickerViewController.xib in Interface Builder.
Return to your Xcode project and select the Classes group in the project tree. In the detail panel at the top right, select the file IVBrickerViewController.h. The contents of the file will appear in the editor panel, below the detail panel.
Listing 3-5 shows the code for IVBrickerViewController.h. The lines of code in bold are the code that declares our scoreLabel instance variable (also called an ivar) and its matching property, and another instance variable for holding the score. Add these lines to your file and save the changes.
Example 3.5. The new code for IVBrickerViewController.h, which declares the scoreLabel instance variable and the property of the same name, as well as an integer instance variable called score.
#import <UIKit/UIKit.h>

@interface IVBrickerViewController : UIViewController {
    UILabel *scoreLabel;
    int score;
}

@property (nonatomic, retain) IBOutlet UILabel *scoreLabel;
@end
Next, let's make the appropriate changes to IVBrickerViewController.m. Open this file in the editor panel, and add the code in bold from Listing 3-6.
Example 3.6. The new code for IVBrickerViewController.m synthesizes the scoreLabel property and releases it in the dealloc method.
#import "IVBrickerViewController.h" @implementation IVBrickerViewController@synthesize scoreLabel;- (void)dealloc {[scoreLabel release];[super dealloc]; }
I like to move the dealloc method definition from the end of the file to just after the last @synthesize statement. As you add @synthesize statements for your properties, you usually need to add matching release statements in the dealloc method. Moving the dealloc close to the @synthesize statements means less scrolling around as you code, and it also helps if you need a reminder to add the necessary release statements for the class's properties to the dealloc method definition.
Now that this code has been added to the class, we can connect the property to the label component in Interface Builder. Make sure you have saved your changes to IVBrickerViewController.h and IVBrickerViewController.m before continuing.
Switch back to Interface Builder and IVBrickerViewController.xib. Right-click the File's Owner. This will bring up a window that lists the File's Owner Outlets and Referencing Outlets. You will see scoreLabel listed first among the Outlets. Click and hold on the unfilled circle to the right of scoreLabel and drag to the Label (00000) component, as shown in Figure 3-8.
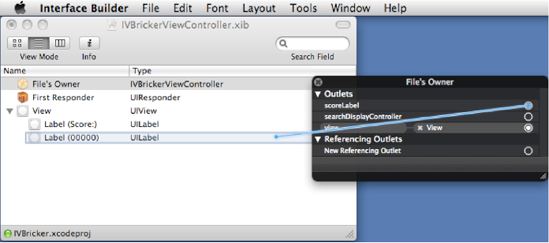
Figure 3.8. Making a connection from the scoreLabel property to the Label component in Interface Builder that will display the score in the view
Note
Another way to connect the property to the label is to select the File's Owner, and switch tabs in the Inspector window to the second tab from the left, which is the Connections tab. Drag from the scoreLabel's hollow circle to the corresponding label component.
Now that the connection is made, we can easily update the score label in our game with code like this in our view controller:
scoreLabel.text = [NSString stringWithFormat:@"%05d", score];
With the basic setup out of the way, you are now ready to learn about using UIKit specifically for making iPhone games.
Note
If you would like to learn more about Cocoa Touch, Xcode, and Interface Builder, check out Beginning iPhone 3 Development, by Dave Mark and Jeff LaMarche (Apress, 2009).
For the brick-breaking game we're building, we need a ball to bounce around the screen. So to begin implementing this game, let's add a ball to our sample project.
Note
If you skipped here because you already know Objective-C and how to use Xcode and Interface Builder, you can load the example project IVBricker first stage from the source code download. That will let you proceed where the previous section left off.
In the source code download for this chapter, there is a folder named IVBricker finished version. In there, you will find a file named ball.png. Copy this file to your own project folder. Just copying the file to the project folder is not enough, though. Next, drag the file from the project folder to the Resources group in Xcode. When you build your project, Xcode will copy all the files in this group into your app.
With the file copied to the project Resources group, we can now add it to our view. Return to Interface Builder and the IVBrickerViewController.xib file. The View window should be open from when we added the two labels to the view. Open the Interface Builder Library window if it isn't open already (press
Image views are UIKit components of type UIImageView. They are used to display images. The iPhone SDK supports JPG, GIF, PNG, TIFF, BMP, ICO (Windows icon), and CUR (Windows cursor) files, and XBM file formats. Objects of the UIImageView class have various properties, such as height, width, x and y coordinates within the parent view, image transparency, image stretching ratios, background color, and so on.
Drag an image view from the Library window to the View window. With the new image view selected in the View window, look in the Attributes tab of the Inspector window for a property called Image. In the drop-down list, you should see ball.png. Choose this as the image, and the image view will change to show the ball graphic, as shown in Figure 3-9.
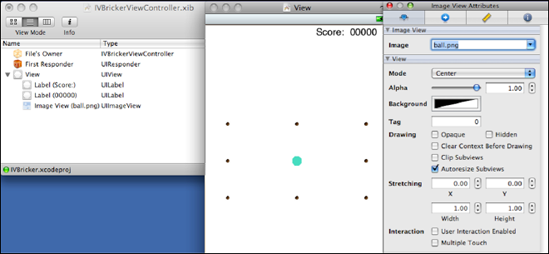
Figure 3.9. The image view is now displaying the ball graphic. We need to resize the Image View component to make it better fit the dimensions of the ball.
Now select the Size tab in the Inspector window, set the width and height of the image view to 16 by 16 pixels, and X and Y to 159 and 239, respectively. This places the ball in the middle of the view. (Don't forget the center dot on the position grid needs to be selected to have the red cross displayed; otherwise, the ball will not be positioned correctly.)
Save your work and return to Xcode. Build and run your project. When the app launches in the simulator, you should see the black background, the red ball, and the score displayed, but they all just sit there. Let's make the ball do something.
To access the ball programmatically in our game code, we need to add it as a property in the view controller, in the same fashion that we added scoreLabel to the view controller earlier. In Xcode, open the file IVBrickerViewController.h and add the code in bold in Listing 3-7, which declares the ball instance variable and the property of the same name.
Example 3.7. The new code for IVBrickerViewController.h, which declares the ball ivar and the property of the same name.
#import <UIKit/UIKit.h>

@interface IVBrickerViewController : UIViewController {
    UILabel *scoreLabel;
    int score;

    UIImageView *ball;
}

@property (nonatomic, retain) IBOutlet UILabel *scoreLabel;

@property (nonatomic, retain) IBOutlet UIImageView *ball;

@end
Next, let's change the file IVBrickerViewController.m. Open this file in the editor panel, and add the code in bold from Listing 3-8, which synthesizes the ball property and releases it in the dealloc method.
Example 3.8. The new code for IVBrickerViewController.m synthesizes the ball property and releases it in the dealloc method.
#import "IVBrickerViewController.h" @implementation IVBrickerViewController @synthesize scoreLabel;@synthesize ball;- (void)dealloc { [scoreLabel release];[ball release];[super dealloc]; }
Once you have added the new code to IVBrickerViewController.h and IVBrickerViewController.m, you need to connect the image view in Interface Builder to the properties in the view controller. The steps to follow are the same as connecting the score label with the scoreLabel property (described earlier in the "Connecting a Property with a Component" section). After the ball property is connected to the ball image view, we can start making the ball do something on the screen.
To create the illusion of motion on a screen, movies and TV use still frames presented in quick succession, one after the other, within a short lapse of time. This is the origin of the term frames per second used in video performance. In games programming, the display logic is ideally performed at least 30 times per second, to give the illusion of smoothly moving images on the screen.
On the iPhone, a class called NSTimer, provided by Foundation framework, lets you schedule a method to be called repeatedly, several times per second. We will now write a method to modify the ball's position over time, to make it bounce around the screen, using NSTimer.
Note
There is a new way to create a timer in iPhone SDK 3.1, called CADisplayLink, which is more appropriate for games. CADisplayLink synchronizes with the iPhone display, which is guaranteed to refresh 60 times per second. We will continue this game example using NSTimer, but switch the code to use CADisplayLink at the end of the chapter.
Go back to Xcode and open IVBrickerViewController.h in the editor panel. Add the code in bold in Listing 3-9.
Example 3.9. Add the ivar ballMovement to the view controller's interface.
@interface IVBrickerViewController : UIViewController {
        UILabel *scoreLabel;
        int score;

        UIImageView *ball;

        CGPoint ballMovement;
}

@property (nonatomic, retain) IBOutlet UILabel *scoreLabel;

@property (nonatomic, retain) IBOutlet UIImageView *ball;

- (void)initializeTimer;

- (void)animateBall:(NSTimer *)theTimer;

@end
This code adds another instance variable to the view controller, called ballMovement, which holds the number of pixels that the ball will move per frame. CGPoint is a C structure provided by the Core Graphics framework. It has X and Y attributes, which let us specify different rates of movement vertically and horizontally. We also declare the signature for the methods initializeTimer and animateBall:.
Next, open the file IVBrickerViewController.m. Remove the comments around the viewDidLoad method, and then apply the changes shown in bold in Listing 3-10. Note the code for the methods initializeTimer and animateBall:.
Example 3.10. Here are the implementations of the viewDidLoad, initializeTimer, and animateBall: methods in the view controller.
- (void)viewDidLoad {
    [super viewDidLoad];

    ballMovement = CGPointMake(4,4);

    [self initializeTimer];
}

- (void)initializeTimer {
    float theInterval = 1.0/30.0;
    [NSTimer scheduledTimerWithTimeInterval:theInterval target:self
        selector:@selector(animateBall:) userInfo:nil repeats:YES];
}

- (void)animateBall:(NSTimer *)theTimer {
    ball.center = CGPointMake(ball.center.x+ballMovement.x,
        ball.center.y+ballMovement.y);

    if(ball.center.x > 300 || ball.center.x < 20)
        ballMovement.x = -ballMovement.x;
    if(ball.center.y > 440 || ball.center.y < 40)
ballMovement.y = -ballMovement.y;}This implements the viewDidLoad, initializeTimer, and animateBall: methods in the view controller. viewDidLoad sets an initial value to the ballMovement instance variable, of 4 pixels vertically by 4 pixels horizontally. Next, it calls the initializeTimer method. The initializeTimer method creates an NSTimer instance, initializing it to call the animateBall: method 30 times per second.
The animateBall: method begins by taking the ball center coordinates and adjusting it by the values of the corresponding ballMovement coordinates. This effectively moves the ball by 4 pixels vertically and horizontally every frame. The remaining lines of code in animateBall: check whether the ball has reached any of the four edges of the screen. If it has, the code reverses the direction of ball movement by changing the value of the coordinate from 4 to −4 and vice versa. For example, if the ball is moving left to right and it reaches the right edge, the ball "bounces" off the edge and starts moving to the left.
You may notice the current code within animateBall: does not make use of the NSTimer object that is passed in as a parameter. This object will come in handy later on in the chapter. For example, we will add code to stop the timer when the player loses a life and when the game is over.
Save your work. Now build and run the project, and behold the greatness of iPhone animated 2D graphics on the simulator.
Now that we have some motion going on, let's add some user interaction.
Note
In this simple example, I am putting game state and game logic code in the view controller. When designing large games with a lot of enemies, obstacles, and many other game elements to keep track of, it is more organized to create several classes to contain a model of what is happening on the screen and to separate the game logic code from game model code. The view controller's job then becomes simpler, as it just needs to send input events to the game logic and update the view according to the game model. Separating model code, view code, and controller code is called the Model-View-Controller design pattern.
The iPhone platform provides very advanced input technologies for games. Besides just touching the screen, the iPhone can track multiple touches separately, allowing for the creation of complex UIs with multiple touch areas on the screen at once. All devices in the iPhone platform family have an accelerometer built in, allowing applications to track movement, which can make for a very interesting gaming experience.
Now let's add a paddle to our fledgling game, and experiment with adding input handling to our code. Look in the source code download for this chapter, in the folder named IVBricker finished version, for a file called paddle.png. Copy it to your project folder, and add this to your project's Resources group in the same manner as you did with the ball.png file.
Next, load IVBrickerViewController.xib in Interface Builder (if it isn't open already) and add an image view from the Cocoa Touch component library. Specify the paddle.png as the image you want to use for the new image view. Set the width and height of the paddle image view as 60 and 16, respectively, and the x and y coordinates as 159 and 399, respectively. Don't forget the center dot on the position grid needs to be selected to have the red cross displayed, so the paddle will be positioned correctly.
Now return to Xcode. We'll add another instance variable and property to the view controller, to let us control the paddle from our code. Let's give the instance variable and property the more than appropriate names of paddle. Listing 3-11 shows the code changes to the view controller's interface in bold.
Example 3.11. Adding an ivar and property called paddle to the view controller's interface.
#import <UIKit/UIKit.h>

@interface IVBrickerViewController : UIViewController {
    UILabel *scoreLabel;
    int score;

    UIImageView *ball;

    CGPoint ballMovement;

    UIImageView *paddle;
}

@property (nonatomic, retain) IBOutlet UILabel *scoreLabel;

@property (nonatomic, retain) IBOutlet UIImageView *ball;

@property (nonatomic, retain) IBOutlet UIImageView *paddle;

- (void)initializeTimer;

- (void)animateBall:(NSTimer *)theTimer;

@end
Listing 3-12 shows the changes to the view controller's implementation in bold.
Example 3.12. Synthesizing and releasing paddle in the view controller's implementation.
#import "IVBrickerViewController.h"

@implementation IVBrickerViewController

@synthesize scoreLabel;

@synthesize ball;

@synthesize paddle;

- (void)dealloc {
    [scoreLabel release];

    [ball release];
[paddle release];
[super dealloc];
}Now that these changes have been made in the code, go back to Interface Builder and connect the paddle property to the paddle image view. Once that is done, we can use code to move the paddle on the screen.
Let's add accelerometer control to the code to see how that works. In Listing 3-13, you can see the code to enable this support in our example project. Add the code in bold to the IVBrickerViewController.m file.
Example 3.13. The code in bold adds accelerometer support to the view controller.
- (void) accelerometer:(UIAccelerometer *)accelerometerdidAccelerate:(UIAcceleration *)accel{float newX = paddle.center.x + (accel.x * 12);if(newX > 30 && newX < 290)paddle.center = CGPointMake( newX, paddle.center.y );}- (void)viewDidLoad { [super viewDidLoad];UIAccelerometer *theAccel = [UIAccelerometer sharedAccelerometer];theAccel.updateInterval = 1.0f / 30.0f;theAccel.delegate = self;ballMovement = CGPointMake(4,4);
The first method in Listing 3-13 takes the accelerometer reading for left to right movement, multiplies it by 12, and adds this to the current location of the paddle. The paddle location is updated only if the paddle is not moving past the right or left edge of the view.
The next section of new code is within the viewDidLoad method, and it configures the accelerometer to take readings 30 times per second. It also sets up the view controller as the accelerometer delegate. This means that the accelerometer will call the method named accelerometer:didAccelerate: defined at the beginning of the listing.
If you were to build this code, you would find that there is a compiler warning in the line of code that sets the accelerometer delegate. The code compiles and runs properly, but I find compiler warnings annoying. To get rid of that warning, open IVBrickerViewController.h and change this line:
@interface IVBrickerViewController : UIViewController {to read like this instead:
@interface IVBrickerViewController : UIViewController
<UIAccelerometerDelegate>
{
Note
If you were to run this latest version of the example project in the simulator, you would find it does nothing. This is because the simulator doesn't support accelerometer readings. You will need to set up the project to run on your device to test this code. This requires signing up as a registered iPhone developer. You can find how to do this at the Apple iPhone Developer Connection site (http://developer.apple.com/iphone).
To play the game, hold your device upright, and tilt it left or right to move the paddle. The more you tilt the device, the faster the paddle moves.
Once you run this code on your development device, you will find that the paddle moves, but the ball does not reverse direction when it collides with the paddle. Bear with me—we will fix this in the next section.
You will also perhaps not be too thrilled with using the accelerometer with this type of game. It's not very precise, and moving fast requires tilting the device fast, which makes keeping your eye on the ball a difficult task. But the purpose of this example was to show you how to set up the accelerometer. This game will actually use the touchscreen for input. So, remove the accelerometer code we just added from the project, and let's see how to add touch support next.
The view created by the Xcode template is already enabled for touch support when the project was created. All we need to add to the view code are the methods to process touch events. These methods are called touchesBegan:withEvent:, touchesMoved:withEvent:, and touchesEnded:withEvent:. Cocoa Touch calls these methods when the user touches a component that is touch-enabled, such as our view.
Before we begin adding these methods, we need to add an instance variable to our view controller to track how the users drag their finger on the screen. Listing 3-14 shows the code to be added to the header file. Add the line of code in bold to IVBrickerViewController.h.
Example 3.14. Adding touchOffset to the view controller's header file.
#import <UIKit/UIKit.h>

@interface IVBrickerViewController : UIViewController {
    UILabel *scoreLabel;
    int score;

    UIImageView *ball;

    CGPoint ballMovement;

    UIImageView *paddle;
    float touchOffset;
}
I'll explain the use of touchOffset in context in a second.
Now that we have modified the header file, we can add the touch event handling code to the view controller implementation, as shown in Listing 3-15.
Example 3.15. Implementing touch handling in the view controller.
- (void)touchesBegan:(NSSet *)touches withEvent:(UIEvent *)event {UITouch *touch = [[event allTouches] anyObject];touchOffset = paddle.center.x -[touch locationInView:touch.view].x;}- (void)touchesMoved:(NSSet *)touches withEvent:(UIEvent *)event {UITouch *touch = [[event allTouches] anyObject];float distanceMoved =([touch locationInView:touch.view].x + touchOffset) -paddle.center.x;float newX = paddle.center.x + distanceMoved;if (newX > 30 && newX < 290)paddle.center = CGPointMake( newX, paddle.center.y );if (newX > 290)paddle.center = CGPointMake( 290, paddle.center.y );if (newX < 30)paddle.center = CGPointMake( 30, paddle.center.y );}
The first method in Listing 3-15, touchesBegan:withEvent:, is called when the user touches the screen. This code stores in the touchOffset instance variable the distance in horizontal pixels between the user's touch of the screen and the paddle's center position. This tells us where the user first touched the screen to begin moving the paddle.
The second method, touchesMoved:withEvent:, is called when the user drags a finger following a touchesBegan:withEvent:. This code takes the touchOffset value that was stored by the first method, adds it to the horizontal position of the current touchesMoved event, and then subtracts the paddle's center position. This effectively lets us track the finger's movement left to right relative to the initial touch event. Next, we apply this horizontal distance to the paddle's position. This code makes for very smooth movement of the paddle.
Run this latest version of the code. You'll see that it is possible to move the paddle from one edge of the screen to the other very quickly, without taking your eyes off the ball. It's a marked improvement over the accelerometer version.
So far in our game, the ball just keeps moving right through the paddle as if it were not there. The reason is simple: the ball doesn't know about the paddle. The animation code for the paddle checks only for the edge of the view. So let's add more code to make the animateBall: method check the paddle's position and act properly when the ball touches the paddle. Add the code in bold in Listing 3-16 to IVBrickerViewController.m.
Example 3.16. Adding collision-detection code between paddle and ball in the animateBall: method
- (void)animateBall:(NSTimer *)theTimer {
    ball.center = CGPointMake(ball.center.x+ballMovement.x,
        ball.center.y+ballMovement.y);

    BOOL paddleCollision = ball.center.y >= paddle.center.y - 16 &&
        ball.center.y <= paddle.center.y + 16 &&
        ball.center.x > paddle.center.x - 32 &&
        ball.center.x < paddle.center.x + 32;

    if(paddleCollision) {
        ballMovement.y = -ballMovement.y;

        if (ball.center.y >= paddle.center.y - 16 && ballMovement.y < 0) {
            ball.center = CGPointMake(ball.center.x, paddle.center.y - 16);
        } else if (ball.center.y <= paddle.center.y + 16 && ballMovement.y > 0) {
            ball.center = CGPointMake(ball.center.x, paddle.center.y + 16);
        } else if (ball.center.x >= paddle.center.x - 32 && ballMovement.x < 0) {
            ball.center = CGPointMake(paddle.center.x - 32, ball.center.y);
        } else if (ball.center.x <= paddle.center.x + 32 && ballMovement.x > 0) {
            ball.center = CGPointMake(paddle.center.x + 32, ball.center.y);
        }
}

if(ball.center.x > 310 || ball.center.x < 16)
    ballMovement.x = -ballMovement.x;
if(ball.center.y > 444 || ball.center.y < 32)
    ballMovement.y = -ballMovement.y;
}
The code in Listing 3-16 checks whether the ball has touched the paddle, and makes the ball bounce away in the opposite direction. Because the ball moves 4 pixels at a time in any direction, there is code, from line 13 to line 21 of the listing, to check that the ball has not gotten stuck inside the paddle.
With these latest changes, our program is now fully interactive, but it's still missing something. It's a graphics demo, not a game. We need to add more code to make this example into a game.
Besides animation and interaction, a game consists of a goal or goals the player must achieve. We need a set of failure conditions, which eventually lead to the game being over for the player, and a set of winning conditions, which eventually lead to the completion of the game's goals.
The only failure condition in a typical brick-breaking game is missing the ball and letting it reach the bottom edge of the screen. When the ball reaches the bottom of the screen, the game logic stops the ball and informs the player he lost. Then it resets the ball to the center of the screen and starts the ball moving again.
Games typically give the player a set number of lives at the beginning of a game session. In our brick-breaking game, the code must subtract one of these lives every time the ball reaches the bottom of the screen. Once the player has run out of lives, the game is over.
To implement the logic to count and display the number of lives, we need to add an instance variable to hold the current amount of lives, an integer we will simply call lives, and a property of type UILabel for displaying this value. We also need another UILabel property, to display the "Game Over" message and any other messages for the user. We will code this first, and deal with points and winning conditions in a later section. Listing 3-17 shows the class interface changes needed to begin implementing these game-play improvements. Add the code in bold to the file IVBrickerViewController.h.
Example 3.17. The view controller header file changes for adding support for game lives and user messages to our example program
UIImageView *paddle;
    float touchOffset;

    int lives;
    UILabel *livesLabel;
    UILabel *messageLabel;

    BOOL isPlaying;
    NSTimer *theTimer;
}

@property (nonatomic, retain) IBOutlet UILabel *scoreLabel;

@property (nonatomic, retain) IBOutlet UIImageView *ball;

@property (nonatomic, retain) IBOutlet UIImageView *paddle;

@property (nonatomic, retain) IBOutlet UILabel *livesLabel;
@property (nonatomic, retain) IBOutlet UILabel *messageLabel;

- (void)startPlaying;
- (void)pauseGame;
The code in Listing 3-17 adds four instance variables to the view controller. I've already discussed the meaning of lives and the two labels. isPlaying will be used in the touch event handling to determine if the game play is paused. Another instance variable is added for the timer instance.
At the end of the listing are two new properties for the labels. We have also added declarations for two methods, named startPlaying, and pauseGame, which will be used to clean up and organize some of the code that's starting to clutter the method viewDidLoad.
Now that we've changed the view controller interface, let's change the view controller implementation. Open IVBrickerViewController.m and modify the code as shown in bold in Listing 3-18.
Example 3.18. Modify IVBrickerViewController.m to match these changes in the code.
@synthesize paddle;@synthesize livesLabel;@synthesize messageLabel;- (void)dealloc { [scoreLabel release]; [ball release]; [paddle release];[livesLabel release];[messageLabel release];[super dealloc]; }
As in our previous changes to the code, we synthesize the properties from the header file, and we release them in the dealloc method. These synthesized properties can now be used in Interface Builder to connect the UI components to the code.
Open the IVBrickerViewController.xib file in Interface Builder to add these new labels to the UI. Drag each label from the Library window to the view, and configure them as follows:
Place a label against the top and left borders. On the Attributes tab in the Inspector, set the Text property to Lives:. Deselect the Font Size attribute's option Adjust to Fit. On the Size tab, change the X and Y attributes to 45 and 10, respectively. Then change the width to 44.
Position another label to the right of the Lives: label. On the Attributes tab, set the Text property to 3. Deselect the Font Size attribute's option Adjust to Fit. On the Size tab, change the X and Y attributes to 83 and 10, respectively. Then change the width to 20.
Postion a third label just above the paddle. On the Attributes tab, set the Text property to Game Over. Set the Alignment property to Centered (the middle button next to Layout, just below the Line Breaks selector). Deselect the Font Size attribute's option Adjust to Fit. Click the Font property (where it currently says "Helvetica, 17.0") to open a font picker window. Select English for Collections, Helvetica for Family, Oblique for Typeface, and 36 for Size. Close the font picker. On the Size tab, change the X and Y attributes to 159 and 353, respectively. Then change the width to 310 and the height to 43.
Once these three labels are placed and sized, connect them to the properties in the view controller. Right-click the File's Owner to open the Outlets and Referencing Outlets window. Make a connection from the livesLabel property to the component named Label (3), and then make a connection from the messageLabel property to the component named Label (Game Over). Figure 3-10 shows the three labels and their relative positions.
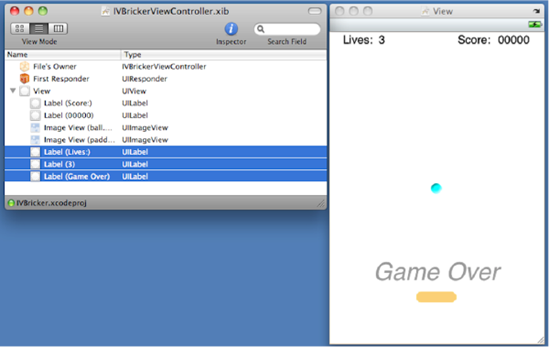
Figure 3.10. The three new labels in the view: a placeholder for the text "Lives:", one to display the number of lives the player has, and another for user messages like "Game Over"
Now that we've made changes to the view controller class and to the UI, let's make the other changes to the implementation, to start bringing the game to life. The changes are extensive, so I've broken them up into two listings. Listing 3-19 shows the changes (in bold) to the first half of the IVBrickerViewController.m file.
Example 3.19. Changes to the viewDidLoad method in IVBrickerViewController.m
- (void)viewDidLoad {
    [super viewDidLoad];

    [self startPlaying];
}

- (void)startPlaying {
    if (!lives) {
        lives = 3;
        score = 0;
    }
    scoreLabel.text = [NSString stringWithFormat:@"%05d", score];
    livesLabel.text = [NSString stringWithFormat:@"%d", lives];

    ball.center = CGPointMake(159, 239);
    ballMovement = CGPointMake(4,4);
    // choose whether the ball moves left to right or right to left
    if (arc4random() % 100 < 50)
        ballMovement.x = -ballMovement.x;
messageLabel.hidden = YES;isPlaying = YES;[self initializeTimer];}- (void)pauseGame {[theTimer invalidate];theTimer = nil;}- (void)initializeTimer { if (theTimer == nil) { float theInterval = 1.0f/30.0f;// I've renamed animateBall: to gameLogictheTimer = [NSTimer scheduledTimerWithTimeInterval:theInterval target:selfselector:@selector(gameLogic) userInfo:nil repeats:YES];}}
The first major change from the earlier versions is in the viewDidLoad method. Previously, most of the initialization code was in this method. We've refactored it into a new method called startPlaying. The rationale for this is that the initialization code needs to be called from more than one place now. The game-play initialization code needs to be called when any of the following happen:
When the player first starts the app
When play is restarted after the player loses one life
When starting a new game after losing three lives
It is better to factor out the initialization code into a method that can be called from several places, rather than copy and paste this code into several places. When you copy and paste code, you increase the chances of bugs happening every time you need to change the copied code.
The startPlaying method starts by resetting the number of player lives to 3, and it resets the score to 0 if the number of lives has reached 0. Then it updates the score and lives labels on screen. As in earlier versions of the initialization code, it sets the ballMovement instance variable to 4 pixels vertically and horizontally, and positions the ball in the center of the screen. As an extra twist, the code picks a number randomly and decides whether the ball will move left to right or right to left when animation starts.
The initialization code then hides the message label and sets the isPlaying flag to YES. Finally, we initialize the NSTimer instance by calling initializeTimer. Note that the animateBall: method has been renamed to gameLogic, as explained after the next listing.
Listing 3-20 contains the rest of the changes to the view controller implementation.
Example 3.20. The remaining changes to IVBrickerViewController.m
- (void)touchesBegan:(NSSet *)touches withEvent:(UIEvent *)event {
    if (isPlaying) {
        UITouch *touch = [[event allTouches] anyObject];
        touchOffset = paddle.center.x -
            [touch locationInView:touch.view].x;
    } else {
        [self startPlaying];
    }
}

- (void)touchesMoved:(NSSet *)touches withEvent:(UIEvent *)event {
    if (isPlaying) {
        UITouch *touch = [[event allTouches] anyObject];
        float distanceMoved =
            ([touch locationInView:touch.view].x + touchOffset) -
                paddle.center.x;
        float newX = paddle.center.x + distanceMoved;
        if (newX > 30 && newX < 290)
            paddle.center = CGPointMake( newX, paddle.center.y );
    }
}

// I've renamed animateBall: to gameLogic
- (void)gameLogic {
    ball.center = CGPointMake(ball.center.x+ballMovement.x,
        ball.center.y+ballMovement.y);

    BOOL paddleCollision = ball.center.y >= paddle.center.y - 16 &&
        ball.center.y <= paddle.center.y + 16 &&
        ball.center.x > paddle.center.x - 32 &&
        ball.center.x < paddle.center.x + 32;

    if(paddleCollision)
        ballMovement.y = -ballMovement.y;

    if (ball.center.x > 310 || ball.center.x < 16)
        ballMovement.x = -ballMovement.x;

    if (ball.center.y < 32)

        ballMovement.y = -ballMovement.y;

    if (ball.center.y > 444) {
        [self pauseGame];
        isPlaying = NO;
        lives--;
        livesLabel.text = [NSString stringWithFormat:@"%d", lives];

        if (!lives) {
            messageLabel.text = @"Game Over";
        } else {
            messageLabel.text = @"Ball Out of Bounds";
        }
        messageLabel.hidden = NO;
    }
}
The touch event handling code in Listing 3-20 checks the isPlaying flag to determine whether the ball is in play. When isPlaying is set to YES, the touch event handling code performs the same steps as before. When isPlaying is set to NO, the touchesBegan event handling restarts game play. In contrast, the touchesMoved event handling ignores the touch event when isPlaying is set to NO.
As noted earlier, another change made in the code is the renaming of the method animateBall: to gameLogic. This method now does a few more things than just animate the ball. The ball now bounces back only when it touches the paddle or when it touches the top, right, or left border of the screen. When the ball reaches the bottom of the screen, the code stops the game by invalidating the game logic timer in the pauseGame method, sets the isPlaying flag to NO, decrements the lives counter, and displays the number of lives left. It also checks whether the player has any lives left and displays a "Game Over" message if not. Otherwise, it tells the player the ball is out of bounds. The game continues once the user taps the screen.
Now that we have finished adding the code to handle failure conditions, let's discuss what we need to do to implement winning conditions.
In a brick-breaking game, you earn points by bouncing the ball against colored bricks of different colors. Typically, each different color earns you different points. You also get bonus points for bouncing the ball on more than one brick in a row—the more bricks in a row, the higher the bonus. You win by removing all the colored bricks before running out of lives.
Right now, our game example lacks all of these winning conditions. First, we will need to add a grid of bricks to our screen. We will use a different image view object for each brick. Next, we need to add code to the game logic, to detect when the ball bounces off one of these bricks, and it needs to increment our score appropriately.
Let's look first at an efficient way to display a grid of image views.
So far in our sample program, we've added image views to our view by dragging components in Interface Builder. This is convenient in that it saves us from typing a lot of boilerplate code. But if your game were made of hundreds of different images, it would be quite impractical to add them all to the view in Interface Builder. You would need to carefully place the image views, and make connections to your properties in your code so that you could manipulate the image views as needed in your game.
Creating and manipulating UIImage and UIImageView in code is another way to load and display images in an iPhone application. We've been using UIImage and UIImageView in this chapter all along, but not in pure code. We had the help of Interface Builder.
A UIImage instance is a representation of image data loaded from files in a variety of image formats. You typically create a UIImage instance by loading a file from the iPhone's flash disk or downloading it from a URL. The code in Listing 3-21 shows how to load an image from your application bundle.
Example 3.21. Loading an image from the application bundle
UIImage* myImageObj;
NSString* imagePath = [[NSBundle mainBundle]
    pathForResource:@"myImage" ofType:@"png"];

// load it like this
myImageObj = [[UIImage alloc] initWithContentsOfFile:imagePath];
// or like this
myImageObj = [UIImage imageNamed:imagePath];
Note
Whether you use [[UIImage alloc] initWithContentsOfFile:] or [UIImage imageNamed:] is up to you, but be aware that [UIImage imageNamed:] tends to retain images longer than necessary sometimes. I'll demonstrate how to code and document a UIImage cache with a loadImage: method in the "Managing Memory with a Custom Image Loader" section later in this chapter. This cache will provide a method to release the images if memory use becomes an issue.
A UIImage instance is immutable, meaning the object does not have methods for changing the image properties, such as height, width, opacity, and so on; you can only get the image's properties. The object also does not provide direct access to the image data. This means you cannot draw on a UIImage object and change any of its pixels. (The iPhone does support drawing onto a view's graphics context and turning this drawing into a UIImage object. You can use other APIs for drawing, which we will examine in the next chapter.)
The image object itself is not displayable. To display an image, you create an instance of the UIImageView class, initializing it with an instance of UIImage. Once your UIImageView object is created, you can add it to a view to display it. Listing 3-22 shows how to initialize a UIImageView instance with an instance of UIImage and add it to a view (named mainView in the example).
Example 3.22. Initializing an image view with a previously loaded image object, then adding it to a view
UIImageView* myImgView = [[UIImageView alloc]
    initWithImage:myImageObj];
[mainView addSubview:myImgView];
While this example stores the image view instance in a variable, you can store the object anywhere, such as in an array, set, or any other collection objects available in Cocoa.
A downside to creating image views programmatically is that you can manipulate these image views only in code. You lose all the visual design comforts of Interface Builder. But with the lack of comfort comes an increase in flexibility. Along with being able to have as many image views as memory allows, you can change the properties of your image views, including their size, position, transparency, and visibility (whether it is hidden or shown). These properties are the same as the attributes shown in Interface Builder.
Now that we have learned a little about how to create image views through code, we can start putting together the different parts we need to finish our sample game.
First, we need to store our rows of bricks. To do that, we need to know how many bricks to allocate. For this example, we will use bricks of the same width as the paddle: 64 pixels. The iPhone screen is 320 pixels wide, which means we can fit five bricks side to side across the screen. The bricks are about three times as tall as the paddle image. We can fit four rows of bricks on screen, if we place our bricks just a little below where the score and lives counter are displayed, and extend downward toward the center of the screen just above where the ball is displayed when the game begins.
To store our grid of bricks, we'll use a C array to keep things simple. We need to allocate a 5-by-4 array of pointers to image views. By now, you should know the drill: open IVBrickerViewController.h and copy the code in bold in Listing 3-23.
Example 3.23. Allocating an array of pointers to image view objects in image view.
UILabel *messageLabel;

    BOOL isPlaying;
    NSTimer *theTimer;

#define BRICKS_WIDTH 5
#define BRICKS_HEIGHT 4
    UIImageView *bricks[BRICKS_WIDTH][BRICKS_HEIGHT];
    NSString *brickTypes[4];
}

@property (nonatomic, retain) IBOutlet UILabel *scoreLabel;
@property (nonatomic, retain) IBOutlet UIImageView *ball;
@property (nonatomic, retain) IBOutlet UIImageView *paddle;
@property (nonatomic, retain) IBOutlet UILabel *livesLabel;
@property (nonatomic, retain) IBOutlet UILabel *messageLabel;

- (void)initializeTimer;
- (void)pauseGame;
- (void)startPlaying;

- (void)initializeBricks;

@end
The code in Listing 3-23 declares two constants, BRICK_WIDTH and BRICKS_HEIGHT, and then declares an array of pointers to image views using these constants to specify the array's size. The code proceeds to declare an array of strings to hold the file names of the brick images. The code changes end with the declaration of a method named initializeBricks.
For this example, I have created brick images in four different colors. You can find these in the code download, in the IVBricker finished version folder, as the files named bricktype1.png through bricktype4.png.
Once we have declared our array of bricks, we need to fill it with image view instances. This is accomplished by looping through the bricks array and selecting a different image name from the brickTypes list as we instantiate each image view. Besides instantiating the image view and assigning it to the array, we need to assign each image view a position on screen and add it to the main view. As you've done for the previous updates, open IVBrickerViewController.m and copy the code in bold shown in Listing 3-24.
Example 3.24. Filling the bricks image view array when the view first loads
- (void)viewDidLoad {
    [super viewDidLoad];

    [self initializeBricks];

    [self startPlaying];
}

- (void)initializeBricks
{
    brickTypes[0] = @"bricktype1.png";
    brickTypes[1] = @"bricktype2.png";
    brickTypes[2] = @"bricktype3.png";
    brickTypes[3] = @"bricktype4.png";

    int count = 0;
    for (int y = 0; y < BRICKS_HEIGHT; y++)
    {
        for (int x = 0; x < BRICKS_WIDTH; x++)
        {
            UIImage *image = [UIImage imageNamed:
                brickTypes[count++ % 4]];
            bricks[x][y] = [[[UIImageView alloc] initWithImage:image]
                autorelease];
            CGRect newFrame = bricks[x][y].frame;
            newFrame.origin = CGPointMake(x * 64, (y * 40) + 100);
            bricks[x][y].frame = newFrame;
            [self.view addSubview:bricks[x][y]];
        }
    }
}

- (void)startPlaying {
In the code in Listing 3-24, we call a new method named initialzeBricks from the viewDidLoad method. Then in the initializeBricks method, we assign a different file name to each element of the brickTypes array.
The rest of the code in Listing 3-24 loops through our 5-by-4 grid of bricks, and then allocates an image view and assigns one of the four different color brick images to the image view. Then it computes a position on screen in pixels, based on the position of the image view in the grid. The calculation stems from the fact the brick images are sized 64 by 40 pixels. The code multiplies the x grid coordinate by 64 and multiplies the y grid coordinate by 40, to arrive at their pixel positions. We add an extra 100 pixels to the vertical position, to place the first row of bricks below the Score and Lives labels and provide some room for the ball to bounce between the labels and the first row of bricks.
Figure 3-11 shows the game displaying the grid of bricks.
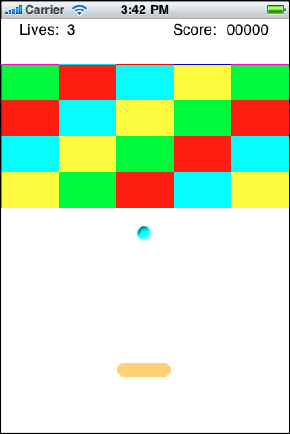
So now the game has a grid of bricks, a ball and a paddle, but if you run it, you will see that there is still no way of earning points and winning the game. We need to add code to the gameLogic: method to handle scoring and game-winning conditions. The code needs to do the following:
Detect when the ball collides with one of the bricks.
Bounce the ball in the opposite direction it was heading before the collision.
Add points to the score.
Remove the brick from the grid.
Once all the bricks have been removed, stop the
gameLogic:timer and display a message to the player indicating she has won the game.
As explained earlier in the chapter, the frame property of a view holds the coordinates and size of the rectangular area occupied by that view. Core Graphics provides the function CGRectIntersectsRect to help us detect whether one view's frame overlaps another view's frame. We will use this function to detect when the ball has collided with a brick.
Once we have detected a collision with a brick, we need to remove the brick from the view. Rather than just remove it, it looks nicer to make the brick fade out over time, such as half a second. We can do this by decreasing the brick's alpha property by 0.1 each time we run through the collision detection code. Therefore, when checking for a collision, the code should ignore bricks that don't have an alpha of 1.0, since the ball has already hit these bricks in previous frames.
Besides having the bricks fade out when hit, the ball also needs to bounce away from the side of the brick it hit. If the ball is moving down vertically and it hits the top of the brick, the ball should react by moving up vertically in subsequent frames.
Let's look at the code to detect collisions. Listing 3-25 shows the changes to the gameLogic: method and other functions added to support these changes. The code in bold shows the modifications to be made to IVBrickerViewController.m.
Example 3.25. This listing shows the code added to gameLogic: to detect when bricks are hit.
- (void)gameLogic:(NSTimer *) theTimer {
        ball.center = CGPointMake(ball.center.x+ballMovement.x,
                ball.center.y+ballMovement.y);

        BOOL paddleCollision = ball.center.y >= paddle.center.y - 16 &&
        ball.center.y <= paddle.center.y + 16 &&
        ball.center.x > paddle.center.x - 32 &&
        ball.center.x < paddle.center.x + 32;

    if(paddleCollision)
        ballMovement.y = -ballMovement.y;

    BOOL there_are_solid_bricks = NO;

    for (int y = 0; y < BRICKS_HEIGHT; y++)
    {
        for (int x = 0; x < BRICKS_WIDTH; x++)
        {
            if (1.0 == bricks[x][y].alpha)
            {
                there_are_solid_bricks = YES;
                if ( CGRectIntersectsRect(ball.frame, bricks[x][y].frame) )
                {
                    [self processCollision:bricks[x][y]];
}}else{if (bricks[x][y].alpha > 0)bricks[x][y].alpha -= 0.1;}}}if (!there_are_solid_bricks) {[theTimer invalidate];isPlaying = NO;lives = 0;messageLabel.text = @"You Win!";messageLabel.hidden = NO;}if (ball.center.x > 310 || ball.center.x < 16) ballMovement.x = -ballMovement.x; if (ball.center.y < 32) ballMovement.y = -ballMovement.y; if (ball.center.y > 444) { [theTimer invalidate]; isPlaying = NO; lives--; livesLabel.text = [NSString stringWithFormat:@"%d", lives]; if (!lives) { messageLabel.text = @"Game Over"; } else { messageLabel.text = @"Ball Out of Bounds"; } messageLabel.hidden = NO; } }- (void)processCollision:(UIImageView *)brick{score += 10;scoreLabel.text = [NSString stringWithFormat:@"%d", score];if (ballMovement.x > 0 && brick.frame.origin.x - ball.center.x <= 4)ballMovement.x = -ballMovement.x;else if (ballMovement.x < 0 && ball.center.x - (brick.frame.origin.x +brick.frame.size.width) <= 4)ballMovement.x = -ballMovement.x;if (ballMovement.y > 0 && brick.frame.origin.y - ball.center.y <= 4)ballMovement.y = -ballMovement.y;else if (ballMovement.y < 0 && ball.center.y - (brick.frame.origin.y +brick.frame.size.height) <= 4)ballMovement.y = -ballMovement.y;
brick.alpha -= 0.1;}
The code changes start by declaring a variable to determine whether if there are any solid bricks left on the screen. This variable, named there_are_solid_bricks, is initially set to NO. As the code loops over each of the bricks in the grid, it checks whether the brick is solid. If the code finds a nonsolid brick, it decreases the brick's alpha property once per frame until it is totally transparent.
Once we find a solid brick, we set there_are_solid_bricks to YES. This variable essentially lets the code determine if the player has won the game. The player wins when there are no solid bricks left.
When the code finds a solid brick, it also checks whether the ball has hit a brick, by using the Core Graphics function CGRectIntersectsRect to determine if any part of the ball is within the brick's area. If there is a collision, the code calls the method processCollision, passing in the brick object as a parameter.
The processCollision method increases the score by ten points and displays the new score. It also checks which side of the brick the ball hit, and bounces the ball in the appropriate direction. And last but not least, it decreases the brick's alpha property, to mark the brick as nonsolid.
Earlier in the chapter, I mentioned that iPhone SDK 3.1 added the CADisplayLink class, a new way of scheduling a method to be called periodically. It is similar to NSTimer, but runs more precisely. It is synchronized to the iPhone's screen logic, which refreshes itself 60 times per second. Listings 3-26 and 3-27 show the modifications needed to change the game logic code to use CADisplayLink.
Example 3.26. This listing shows the changes that need to be made to IVBrickerViewController.h
#import <UIKit/UIKit.h>#import <QuartzCore/CADisplayLink.h>@interface IVBrickerViewController : UIViewController { UILabel *scoreLabel; int score; UIImageView *ball; CGPoint ballMovement; UIImageView *paddle; float touchOffset; int lives; UILabel *livesLabel; UILabel *messageLabel; BOOL isPlaying;CADisplayLink *theTimer;
#define BRICKS_WIDTH 5
#define BRICKS_HEIGHT 4
Example 3.27. This listing shows the changes that need to be made to IVBrickerViewController.m
- (void)pauseGame {
    [theTimer invalidate];
    theTimer = nil;
}

- (void)initializeTimer {
    if (theTimer == nil) {
        theTimer = [CADisplayLink displayLinkWithTarget:self
            selector:@selector(gameLogic)];
        theTimer.frameInterval = 2;
        [theTimer addToRunLoop: [NSRunLoop currentRunLoop]
            forMode: NSDefaultRunLoopMode];
    }
}
Listing 3-26 changes the instance variable named theTimer to the correct type, from NSTimer to CADisplayLink. Llisting 3-27 shows the changes in the way theTimer is initialized. The NSTimer initializer took as one of its parameters a time interval between calls to the game logic. CADisplayLink defaults to running at 60 frames per second, and doesn't need this time interval to be set. But our game logic is meant to run at 30 frames per second, so we set the CADisplayLink property named frameInterval to a value of 2. This tells CADisplayLink to run every other frame, effectively making the game logic run at 30 times per second.
CADisplayLink also differs from NSTimer in that NSTimer takes another parameter to set whether the timer repeats. CADisplayLink is set to repeat until it is invalidated. Another difference is that the display link needs to be added to a run loop, a Cocoa Touch construct for handling system events. NSTimer started running as soon as it was initialized.
Before using this version of IVBricker, you need to include in your project the Quartz Core framework. To add it to your project, right-click the Frameworks group in the Groups and Files panel and select Add
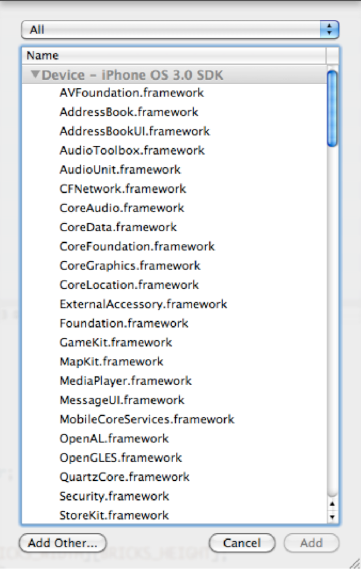
We now have all the code for a complete game. It handles scoring, losing the game, and winning the game. But there are still some things to cover that are very important in iPhone programming. The rest of the chapter is focused on these important topics in iPhone game development.
In the next section, we tackle what to do in your game when players lock their iPhone, or are interrupted by a phone call or text message. Sometimes they need to quit your app temporarily, but they'll be back later. How do you handle that kind of thing?
After that, we cover some tips and tricks in the area of memory handling involving images.
And last but not least, we will look at different ways of implementing animated image views.
Earlier in this chapter, I alluded to the fact that a Cocoa Touch application is made up of several objects. When we created our sample game, we based it on a template that comes with Xcode, the View-based Application template. This template has a MainWindow.xib file, which is automatically loaded and processed by Cocoa Touch at application startup. By loading and processing MainWindow.xib, Cocoa Touch creates the main UIWindow instance, the IVBrickerViewController and its view with the paddle and ball image views, the UIApplication instance, and the IVBrickerAppDelegate instance.
Once these instances are created, Cocoa Touch is able to start our application code rolling by sending messages to methods in the application delegate and in the view controller. In the code template we used to begin coding our game, the app begins its life cycle with a call to the method applicationDidFinishLaunching: in the app delegate. In this method, we assign the IVBrickerViewController's view to the UIWindow instance and make the window visible. Then Cocoa Touch proceeds to message the viewDidLoad method in IVBrickerViewController, where the code creates the grid of bricks, initializes score and lives counters, and starts the timer to animate the ball and process the game logic.
Besides messaging these two methods in the app delegate and the view controller, there are many more messages that UIKit sends the application delegate during the lifetime of an app. These messages can be classified as low memory warnings, user interruption warnings, messages to allow resuming from interruptions, and application termination messages.
The UIApplicationDelegate class defines a method called applicationWillTerminate:, which is typically called when users quit your application through the iPhone's home button, or when they quit your game to answer a phone call, respond to a text message, or respond to any other kind of notification from the operating system. You can use this delegate method to save your game's state, to allow the user to resume your game at a later time.
You don't need to worry about closing windows, deallocating views, or releasing memory in the applicationWillTerminate: method. iPhone OS cleans up after your application shortly after this method is called. You should close any open files and release database handles, though. SQLite databases can become corrupt if they are not closed properly.
You'll learn more about saving the game state in the "Saving and Loading Game State" section later in this chapter. The important thing to keep in mind is that you have at most two to three seconds to do what you need to save your game's current state. You should save your game state as quickly and efficiently as possible, or else the operating system will kill your app before it's finished saving all the data, leading to data corruption.
The app delegate also defines a method called applicationWillResignActive:, which is called when the user is interrupted, such as when the user receives a phone call or text, or when the device is locked. The applicationWillResignActive: message allows you to pause your game while the user decides whether to answer that call or reply to the text message. You should invalidate any timers, effectively pausing your game. You should also use this method to save the user's progress in your game.
If the user decides to close the notification message without answering the phone call or replying to the text message, Cocoa Touch resumes the game by calling the method applicationDidBecomeActive:. Use this method to initialize any timers in your game that were invalidated in the applicationWillResignActive: method.
Listing 3-28 shows sample implementations of applicationWillResignActive: and applicationDidBecomeActive: for our IVBricker game. These methods go in the IVBrickerAppDelegate.m file.
Example 3.28. These are example implementations of the methods applicationWillResignActive: and applicationDidBecomeActive:
- (void)applicationWillResignActive:(UIApplication *)application
{
    [viewController pauseGame];
    [viewController saveGameState];
}

- (void)applicationDidBecomeActive:(UIApplication *)application
{
    [viewController loadGameState];
    [viewController startPlaying];
}
In Listing 3-28, when the game is interrupted by a phone call or when the phone is locked and the applicationWillResignActive: method is called, the code pauses the game and saves the game state. When the app is ready to resume after an interruption, and the applicationDidBecomeActive: method is called, the code reloads the game state and continues the game.
One thing to keep in mind when developing for iPhone is that your game's available RAM is limited. Typically, iPhone OS uses about 40MB of RAM. This leaves you with less than 24MB of RAM available when running your game on an iPhone 2G or 3G. The situation with iPod touch models is a bit better. Because the iPod touch doesn't need to receive phone calls or text messages, the operating system uses less RAM than on an iPhone. You have about 32MB of RAM available when running your game on an iPod touch.
The important thing to remember is that your game will be forcibly shut down by the operating system if it uses too much of the available RAM. If the operating system kills your app, it's too late to start worrying about why it happened. It is likely you have a memory leak somewhere, and you will need to spend some time debugging the problem. Cocoa Touch does try to help, though. There is a message received by the app delegate that lets you try to free up memory before it's too late. The message calls a method named applicationDidReceiveMemoryWarning:. You should use the applicationDidReceiveMemoryWarning: method to release any cached data your application may hold in the app delegate.
For example, if your game uses data from a web service, you can cache that data the first time you retrieve it from the web service. Subsequent uses of the web service data can access the cache, rather than hitting the web service every time. The app delegate is an ideal place to hold this data, and the applicationDidReceiveMemoryWarning: method should release this cache when memory is low. If your app needs the web service data again, it can reload it from the web service and cache it until memory is low again.
View controllers also receive a similar message, with call to the method named viewDidUnload. Over the course of a game, you are likely to load several views, one for each screen in your game. As you navigate from one screen to the other, it is likely the other screens don't need to take up RAM while they are not visible. Cocoa Touch calls the viewDidUnload method after a view is removed from the screen. If your view allocates any objects in memory, it should release them in the viewDidUnload method.
In Listing 3-28, you saw code for pausing the game when the iPhone gets an interrupting notification or when it is locked, and code for resuming the game. This code also called the saveGameState and loadGameState methods in the view controller. This section will examine these methods and explain one technique for saving and loading game state with the Cocoa Touch frameworks.
Cocoa Touch provides the class NSUserDefaults for saving data and looking it up at a later time. You obtain an instance to the default data store with the NSUserDefaults class method standardUserDefaults. Then you use this instance with methods like setObject:forKey:, setInteger:forKey:, and setDouble:forKey:, to assign each piece of data you want to save a key and a value. Later on, you use the key to read the data, using the default data store instance with a method such objectForKey:, stringForKey:, integerForKey:, or doubleForKey:. Listing 3-29 shows an implementation of the methods saveGameState and loadGameState using NSUserDefaults.
Example 3.29. Implementing saveGameState and loadGameState using NSUserDefaults
NSString *kLivesKey = @"IVBrickerLives";
NSString *kScoreKey = @"IVBrickerScore";

- (void)saveGameState {
    [[NSUserDefaults standardUserDefaults] setInteger:lives forKey:kLivesKey];
    [[NSUserDefaults standardUserDefaults] setInteger:score forKey:kScoreKey];
}

- (void)loadGameState {
    lives = [[NSUserDefaults standardUserDefaults] integerForKey:kLivesKey];
    livesLabel.text = [NSString stringWithFormat:@"%d", lives];
score = [[NSUserDefaults standardUserDefaults] integerForKey:kScoreKey];
scoreLabel.text = [NSString stringWithFormat:@"%d", score];
}Besides using saveGameState and loadGameState in the app delegate app termination, inactivate and reactivate notification methods, you should save game state when the user loses or wins a game. Just insert a call to saveGameState in the gameLogic method in the code sections for winning or losing. Listing 3-30 has the necessary changes to the code in bold.
Example 3.30. The changes to the game logic code.
if (!there_are_solid_bricks) {
    [self pauseGame];
    isPlaying = NO;
    lives = 0;
    [self saveGameState];

    messageLabel.text = @"You Win!";
    messageLabel.hidden = NO;
}

if (ball.center.x > 310 || ball.center.x < 16)
    ballMovement.x = -ballMovement.x;
if (ball.center.y < 32)
    ballMovement.y = -ballMovement.y;

if (ball.center.y > 444) {

    [self pauseGame];
    isPlaying = NO;
    lives--;
    livesLabel.text = [NSString stringWithFormat:@"%d", lives];

    if (!lives) {
        [self saveGameState];
        messageLabel.text = @"Game Over";
    } else {
        messageLabel.text = @"Ball Out of Bounds";
The viewDidLoad method should also be changed to load the game state at game launch time. Listing 3-31 shows the changes to the viewDidLoad method in bold.
Example 3.31. The changes made to the viewDidLoad method to load the game state at game launch.
- (void)viewDidLoad {
    [super viewDidLoad];

    [self loadGameState];

    [self initializeBricks];

    [self startPlaying];
}
By including the code in Listing 3-31, the game state gets loaded from previous runs of the app.
When designing your game, you should determine what kind of state it makes sense to save in your game when the user is interrupted. In this chapter's trivial game example, we save the score and the number of lives, by way of example. We could also save the ball position and the current alpha value of the bricks.
A more complex arcade game with multiple levels would also save the current game level. In a real-time combat strategy game, you could choose to save the state of each game unit at different checkpoints in the current mission. The point is to try as much as possible to allow the player to resume play without needing to start the game or the current level from the beginning.
When we're dealing with development of a game, it is likely loading too many images or other resources is causing the memory problem. There are ways to architect your image loading so that you can release memory taken up by your images. Listings 3-32 and 3-33 show a simple implementation of a caching image loader you can use in your apps.
Example 3.32. The interface to the custom image loader, named ImageCache.h
#import <Foundation/Foundation.h>

@interface ImageCache : NSObject {
}

+ (UIImage*)loadImage:(NSString*)imageName;
+ (void)releaseCache;

@end
Example 3.33. The implementation to the custom image loader, named ImageCache.m
#import "ImageCache.h"

@implementation ImageCache

static NSMutableDictionary *dict;

+ (UIImage*)loadImage:(NSString*)imageName
{
    if (!dict) dict = [[NSMutableDictionary dictionary] retain];

    UIImage* image = [dict objectForKey:imageName];
    if (!image)
    {
        NSString* imagePath = [[NSBundle mainBundle]
                                                pathForResource:imageName
                                                ofType:nil];
        image = [UIImage imageWithContentsOfFile:imagePath];
        if (image)
        {
            [dict setObject:image forKey:imageName];
}
}
return image;
}
+ (void)releaseCache {
if (dict) {
[dict removeAllObjects];
}
}
@endTo use the caching image loader, call the loadImage: class method of the ImageCache class, passing in the image file name as a parameter. To release all the images held in the cache, call the releaseCache class method.
This basic code gets the job done, but it is an all-or-nothing approach. You cache every image, and when the operating system complains memory is low, you unload every image from the cache. You could easily modify this code to let you keep several different caches rather than one universal cache. That way, you could use a different cache for each view in your app, and unload images only from views that are no longer on screen.
In the previous sections of this chapter, you learned how to create a basic game using UIView, UIImage, UIImageView, and NSTimer. The image views used in previous sections were static. They changed position and transparency depending on events processed by the game logic, but the UIImage instance displayed by any particular UIImageView was always the same throughout the game.
But there are many types of games in which you need to display different images several times per second. For example, if the game features a robot walking and jumping around the screen, the game needs to display a different image of the robot as it takes each step or as it jumps.
In this section, we will examine different techniques to display a sequence of images several times per second, using UIImageView.
The first technique available to do animation with image views is actually built in to the UIImageView class. Image views have a property called animationImages. This property is an NSArray of UIImage instances. You can create an array of images, each image a different frame of your animation, and assign the array to this property. Then you use the image view's animationDuration property to set how long the animation will last. The animationDuration property accepts fractions of a second.
To play the animation once and stop immediately after the last frame is displayed, you can set the image view property animationRepeatCount to 1. The default value of this property is 0, which makes the animation repeat indefinitely. You can also call the method stopAnimating at any time to stop the animation, regardless of the animationRepeatCount or animationDuration.
One important point to remember is that the animation doesn't start immediately once the animationImages property is set; you must call the image view method startAnimating to display the animation. Once you call the startAnimating method, Cocoa Touch will automatically display a different image in the animationImages array every 1/30 second, until the time interval set in animationDuration property or until you call the stopAnimating method, whichever happens first.
Listing 3-34 demonstrates how to use UIImageView animations.
Example 3.34. Using image view animations
NSMutableArray *images = [NSMutableArray alloc] initWithCapacity: 30];

// load the images into the array
for (int i = 1; i <= 30; i++) {
    NSString *imageName = [NSString stringWithFormat: @"animation1_f%0d.png", i ];
    UIImage *image = [ImageCache loadImage: imageName ];
    [images addObject: image];
}

// set the animations property on the image view
imageView.animationImages = images;
[images release];

imageView.animationDuration = 1;
imageView.animationRepeatCount = 1;
[imageView startAnimating];
The code in Listing 3-34 assumes that a variable named imageView holds a UIImageView instance and that it has been set up properly to display somewhere on the screen. The code creates an array of UIImage instances by loading 30 different images, named animation1_f01.png through animation1_f30.png.
The code proceeds to set the animationImages property of the image view. The animationImages property holds its own copy of the array, meaning our array is no longer needed, so we release it immediately. The code sets the animationDuration and animationRepeatCount properties and starts the animation with a call to the startAnimating method.
One limitation of using this animation technique built in to UIImageView is that Cocoa Touch changes the image displayed only every 1/30 second, and you cannot change this rate. You will need to use another technique if you want your animation to run faster or slower than 30 frames per second. Another limitation is that it is not very precise. Cocoa Touch doesn't guarantee that it will start animating immediately or that each image change will happen at precise 1/30-second intervals. Cocoa Touch does the best it can to run the animation, but there can be slight delays of a few fractions of a second.
Another animation technique available with UIKit is setting up an NSTimer to change the image property several times per second. One benefit of using this technique is that runs more precisely, and you're not limited to animation intervals 1/30 second. Listings 3-35 and 3-36 show the interface and the implementation of a class that derives from UIImageView and overrides the startAnimation and stopAnimation methods to use NSTimer.
Example 3.35. The interface of a class derived from UIImageView that uses NSTimer to improve the precision of animations
#import <UIKit/UIKit.h>

@interface BetterAnimations : UIImageView {
    int _frameCounter;
    int _repeatCounter;
    NSTimeInterval _animationInterval;
    NSTimeInterval _timeElapsed;
    NSTimer *_theTimer;
}

@property (nonatomic, readwrite) NSTimeInterval animationInterval;

@end
Example 3.36. The implementation of a class derived from UIImageView that uses NSTimer to improve the precision of animations
#import "BetterAnimations.h"

@implementation BetterAnimations

@synthesize animationInterval = _animationInterval;

- (BetterAnimations*)init {
    if (self = [super init]) {
        _animationInterval = 1.0 / 30.0;
        _frameCounter = 0;
        _repeatCounter = 0;
        _timeElapsed = 0;
        _theTimer = nil;
    }
    return self;
}

- (void)setAnimationInterval:(NSTimeInterval)newValue {
    if ( (1.0 / 15.0) < newValue) {
        _animationInterval = 1.0 / 15.0;
    } else if ( (1.0 / 60.0) > newValue) {
        _animationInterval = 1.0 / 60.0;
    } else {
        _animationInterval = newValue;
    }
}

- (void)stopAnimating {
    if (_theTimer) {
[_theTimer invalidate];
_theTimer = nil;
}
}
- (void)startAnimating {
if (self.animationDuration > 0 && self.animationImages &&
[self.animationImages count] > 0) {
_frameCounter = 0;
_repeatCounter = 0;
_timeElapsed = 0;
_theTimer = [NSTimer timerWithTimeInterval:_animationInterval
target:self
selector:@selector(changeAnimationImage)
userInfo:nil
repeats:(self.animationRepeatCount > 0)];
}
}
- (void)changeAnimationImage {
self.image = [self.animationImages objectAtIndex:frameCounter++];
_timeElapsed += _animationInterval;
if ( (_timeElapsed >= self.animationDuration ||
_frameCounter >= self.animationImages.length) &&
(0 < self.animationRepeatCount &&
_repeatCounter <= self.animationRepeatCount) ) {
_repeatCounter++;
_frameCounter = 0;
}
if (_repeatCounter >= self.animationRepeatCount) {
[self stopAnimating];
}
}
@endThe class in Listing 3-36 can be used exactly like UIImageView, but animations run more precisely by virtue of using NSTimer. It also adds a new property named animationInterval, which lets you specify the time between image changes. It defaults to 1/30 second, but can be changed to any fraction of a second less than 1/60 second and up to 1/15 second. Any values less than 1/60 get rounded up to 1/60; values greater than 1/15 get rounded down to 1/15.
A third animation technique is using CADisplayLink. As you learned earlier, CADisplayLink runs very precisely at 60 times per second, thanks to being triggered by the iPhone's display circuits. This solution also derives from UIImageView, which means you use it in the same way as you would use the UIImageView animation feature. This solution defaults to running at 60 frames per second, rather than UIImageView's 30 frames per second. Listings 3-37 and 3-38 show the interface and implementation of this class.
Example 3.37. The interface of a class derived from UIImageView that uses CADisplayLink to improve the precision of animations
#import <UIKit/UIKit.h>
#import <QuartzCore/CADisplayLink.h>

@interface MoreBetterAnimations : UIImageView {
    int _frameCounter;
    int _repeatCounter;
    NSTimeInterval _timeElapsed;
    CADisplayLink *_displayLink;
}

@property (nonatomic, readwrite) NSInteger frameInterval;

@end
Example 3.38. The implementation of a class derived from UIImageView that uses CADisplayLink to improve the precision of animations
#import "MoreBetterAnimations.h"

@implementation MoreBetterAnimations

@synthesize frameInterval;

- (MoreBetterAnimations *)init {
    if (self = [super init]) {
        _frameCounter = 0;
        _repeatCounter = 0;
        _timeElapsed = 0;
        _displayLink= [CADisplayLink displayLinkWithTarget:self
                selector:@selector(changeAnimationImage) ];
    }
    return self;
}

- (NSInteger)frameInterval {
    if (!_displayLink) {
        _displayLink= [CADisplayLink displayLinkWithTarget:self
                selector:@selector(changeAnimationImage) ];
    }
    return _displayLink.frameInterval;
}

- (void)setFrameInterval:(NSInteger)newValue {
    if (!_displayLink) {
        _displayLink= [CADisplayLink displayLinkWithTarget:self
                selector:@selector(changeAnimationImage) ];
    }
    if ( 1 > newValue) {
        _displayLink.frameInterval = 1;
    } else if ( 4 < newValue) {
        _displayLink.frameInterval = 4;
    } else {
        _displayLink.frameInterval= newValue;
    }
}
- (void)stopAnimating {
if (_displayLink) {
[_displayLink invalidate];
_displayLink= nil;
}
}
- (void)startAnimating {
if (self.animationDuration > 0 && self.animationImages &&
[self.animationImages count] > 0) {
_frameCounter = 0;
_repeatCounter = 0;
_timeElapsed = 0;
if (!_displayLink) {
_displayLink= [CADisplayLink displayLinkWithTarget:self
selector:@selector(changeAnimationImage) ];
}
[_displayLink addToRunLoop: [NSRunLoop currentRunLoop]
forMode: NSDefaultRunLoopMode];
}
}
- (void)changeAnimationImage {
self.image = [self.animationImages objectAtIndex:frameCounter++];
_timeElapsed += _displayLink.duration;
if ( (_timeElapsed >= self.animationDuration ||
_frameCounter >= self.animationImages.length) &&
(0 < self.animationRepeatCount &&
_repeatCounter <= self.animationRepeatCount) ) {
_repeatCounter++;
_frameCounter = 0;
}
if (_repeatCounter >= self.animationRepeatCount) {
[self stopAnimating];
}
}
@endYou use this code in a manner similar to the BetterAnimations class shown in the previous section. But instead of setting an animationInterval property that takes fractions of a second between frames, this one uses a property called frameInterval, which takes an integer between 1 and 4. This property tells the CADisplayLink at what ratio of 60 frames per second to display the animation. The frameInterval property defaults to 1, which means 60 frames per second. A frameInterval of 2 means the animation will display at 60/2, or 30 frames per second, and so on for the other values.
To use the MoreBetterAnimations class, you will need to add the Quartz Core framework to your project, as we did when we switched IVBricker from NSTimer to CADisplayLink (see Figure 3-12).
This chapter lays the foundation for what is to follow in this book. In this chapter, you learned the basics of Objective-C programming. You learned a little about how to use Xcode to make an iPhone view with labels and other UI components. And you learned how to make a basic game using UIKit and other Cocoa Touch technologies like NSTimer.
The chapter also introduced you to some of the different application life-cycle notifications Cocoa Touch sends to applications as they launch, load views, unload views, terminate, and get interrupted by other device functions. You learned how to save game state to allow the player to terminate your game and resume playing at a later time. The chapter concluded by examining image caching and animation techniques.
The sample project called IVBricker final version contains all the game code in this chapter, all the way to the section on saving game state and use of the image cache. Take a look at that project to see how it all comes together.
With the knowledge gained in this chapter, you should be able to get started programming basic iPhone games. These skills will help you apply the contents in the rest of this book for more advanced game-programming technologies.