So far, we have looked at very simple 2D rendering. While this is fine for our game's retro version, you generally will want your graphics to look a bit cooler than just white lines.
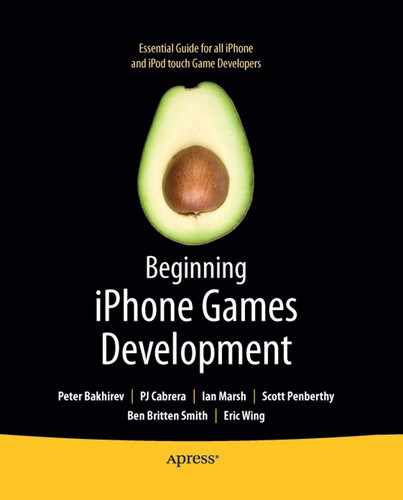
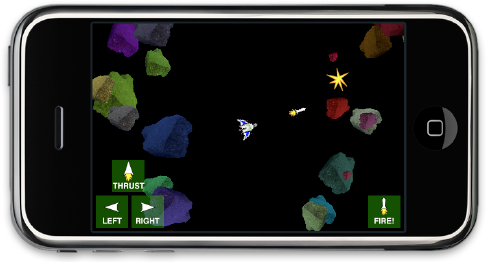
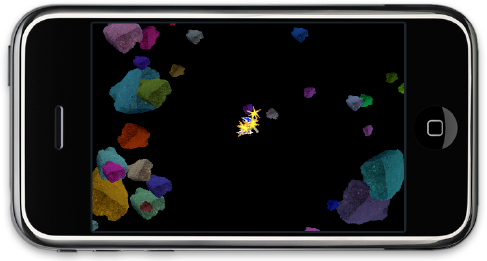
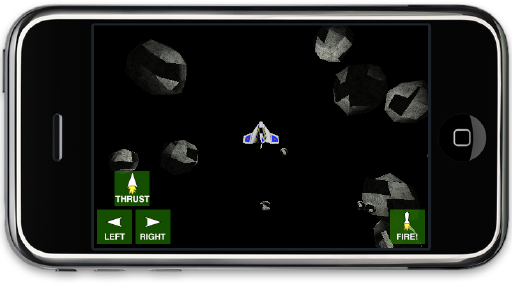
In this chapter, we are going to first upgrade our rendering to be able to handle textures, and take a look at a 2D game that is based entirely on simple textured quads. After that, we will delve into the third dimension. We will look at how to build 3D models, and light them and texture them. Finally we will dip briefly into a bit more advanced code with a simple particle system. Figure 8-1 gives you a preview of both versions.
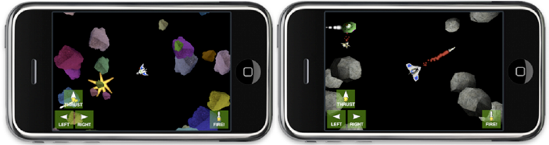
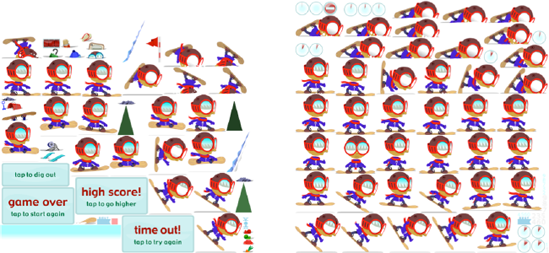
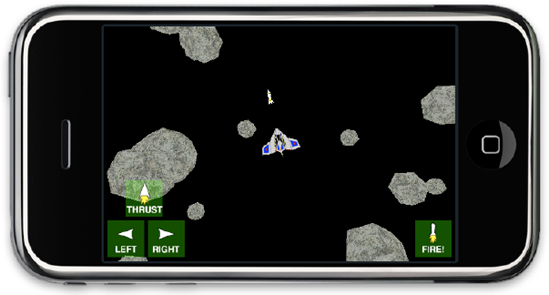
Figure 8.1. On the left, our 2D simple texture game; on the right, our 3D model based game with some simple particle systems
We will build on the code we finished in the previous chapter, creating a textured version called SpaceRocksTextured. The only real difference between Space Rocks! and SpaceRocksTextured is that instead of white outlines, we will be rendering actual images into the 3D OpenGL space.
To get started, make a copy of your Space Rocks! project and rename it SpaceRocksTextured. If you want to follow along instead of building from your earlier projects, I've supplied it as a sample code project for this chapter.
In the previous chapters, I have tried to include every line of code and comment on even the most mundane commands. From here on out, I am going to presume that you can follow along, and I won't point out every @property declaration and dealloc method.
A texture is just a fancy name for an image. Once we take that image and apply it to a polygon, then we generally refer to it as a texture (see Figure 8-2). Images are generally known as materials before they become loaded into the rendering engine, and then textures after they have been loaded.
In the vast majority of cases, you will want to use textures in your OpenGL applications. Because of this, OpenGL has been designed to be incredibly efficient at drawing textures into polygons—not just flat polygons like the one in Figure 8-2, but polygons that have been turned every which way in 3D space. In fact, OpenGL is so fast at pushing texture pixels that it is almost always quicker to use OpenGL to do 2D drawing than any other option on the iPhone. (Of course, this is why we are even bothering to talk about OpenGL—if it were not the fastest way to get graphics onto the screen, we wouldn't care so much, now would we?)
However, the downside to this great speed is added complexity. Using a UIImageView, we can load and display an image on screen in just a few simple UIKit calls. In OpenGL, it is much more complicated.
But don't fret! We'll cover it all here, and once you have come to understand how to load and use textures in OpenGL, you'll wonder why you ever did it any other way!
In order to render an image into an on-screen texture, we need to get it into the rendering pipeline somehow. I think that this calls for a new singleton controller object. We should call it BBMaterialController. Open the BBMaterialController files and let's have a look.
@interface BBMaterialController : NSObject {
        NSMutableDictionary * materialLibrary;
}
We want to have a place to store our materials so that we can reference them later. We will use a dictionary so we can use readable strings as keys to pull out our materials.
We are going to need a way to get an image that is in our bundle and put it into a format that OpenGL can deal with, and then assign it a texture ID. This will be the heart of the material controller, and it is a very big and ugly method, so let's take it one piece at a time. This is in the BBMaterialControler.m file.
// does the heavy lifting for getting a named image into a texture
// that is loaded into OpenGL; it is roughly based on Apple's Sample Code
-(CGSize)loadTextureImage:(NSString*)imageName materialKey:(NSString*)materialKey
{

        CGContextRef spriteContext; //context ref for the UIImage
        GLubyte *spriteData; // a temporary buffer to hold our image data
        size_t width, height;
        GLuint textureID; // the ultimate ID for this texture
Here, we will take a UIImage that we load from the bundle, and then draw it into a CGContextRef. This will change the UIImage into an uncompressed 32-bit RGBA block of raw data. This is what OpenGL wants. Well, actually this is one of a handful of ways you can format texture data, but it is the simplest, and we'll stick to the simplest for now.
Next, we will get the image:
// grab the image off the file system, jam it into a CGImageRef
        UIImage*        uiImage = [[UIImage alloc] initWithContentsOfFile:[[NSBundle
mainBundle] pathForResource:imageName ofType:nil]];
        CGImageRef spriteImage = [uiImage CGImage];
mainBundle] pathForResource:imageName ofType:nil]];
CGImageRef spriteImage = [uiImage CGImage];We are using initWithContentsOfFile here, instead of the much simpler imageNamed: method. This is because imageNamed: does some automatic caching of the image data, which we don't want. We are going to have two copies of this image in memory for a little while already, and if we are loading a lot of textures, we want to be able to control just how much image data is in memory at any given time. This way, we can explicitly release the UIImage when we are finished with it.
So far, we have loaded the UIImage from the file system and then grabbed the CGImageRef that points to that raw data. Now, let's find out about its size:
width = CGImageGetWidth(spriteImage);
height = CGImageGetHeight(spriteImage);

CGSize imageSize = CGSizeMake(width, height);

if (spriteImage) {
        // allocated memory needed for the bitmap context
        spriteData = (GLubyte *) malloc(width * height * 4);
We find the height and width of the image, and we make a memory buffer that is big enough to hold 32 bits per pixel—1 byte for each color and 1 byte for alpha.
It is important to note that all textures must have dimensions that are a power of 2 and can be no bigger than 1024 on a side. What does that mean? Your image can have a dimension of 2, 4, 8, 16, 32, 64, 128, 256, 512, or 1024—and that's it. Your images do not need to be square, however; for example, you can have a texture that is 8 by 512 or 128 by 256. We are going to make sure that our images are the correct dimensions, but if you plan on being able to load in any old image, you need to check to make sure your images meet this requirement.
Let's continue with the crux of this method:
// create a context that is the right size and format spriteContext = CGBitmapContextCreate(spriteData, width, height, 8, width * 4,CGImageGetColorSpace(spriteImage), kCGImageAlphaPremultipliedLast); // draw our image into the context CGContextDrawImage(spriteContext,CGRectMake(0.0, 0.0, (CGFloat)width, (CGFloat)height), cgImage); // get rid of the context, it has served its purpose CGContextRelease(spriteContext);
We make a context that is the correct format for OpenGL, and then we draw our image into that context. This guarantees that no matter what kind of image we had before, we now have an uncompressed RGBA image, and it is in our imageData variable. Once we have done that, we can get rid of the context, since we only needed it to draw the data into our imageData memory buffer.
Now we get to the OpenGL-specific part of this method:
// use OpenGL ES to generate a name for the texture
glGenTextures(1, &textureID);
// bind the texture name
glBindTexture(GL_TEXTURE_2D, textureID);
First, we call glGenTextures, which simply asks OpenGL to make room for another texture and tell us what ID that texture will have. Then we call glBindTexture, which basically tells OpenGL to make that texture ID the active texture. Any texture-specific calls we make now will apply to that texture ID.
// push the image data into the OpenGL video memory glTexImage2D(GL_TEXTURE_2D, 0, GL_RGBA, width, height, 0, GL_RGBA, GL_UNSIGNED_BYTE,imageData); // release the image data free(imageData);
By calling glTexImage2D, we are effectively handing that image data over to OpenGL. We need to tell OpenGL the size, format, and data type for the image data so it can handle it properly. After that call, OpenGL now "owns" that data, so we should get rid of our copy.
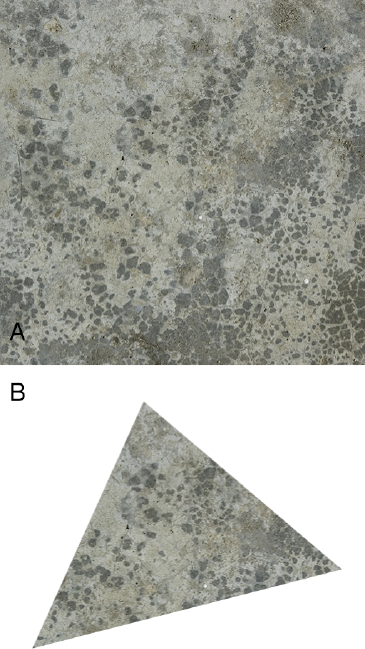
// set the texture parameters
glTexParameteri(GL_TEXTURE_2D, GL_TEXTURE_MIN_FILTER, GL_LINEAR);
glTexParameteri(GL_TEXTURE_2D, GL_TEXTURE_MAG_FILTER, GL_NEAREST);
These two lines tell OpenGL how to handle pixels in this texture when they do not match up exactly. Since you can scale, rotate, and transform your surfaces in so many ways, OpenGL needs to know how to deal with translating your texture onto that surface. Almost never will the surface be a nice multiple of the pixel size of your image, so OpenGL will need to smush the colors somehow to make the texture fit.
Passing in GL_LINEAR will do a weighed blend of the surrounding colors, and is probably what you are generally used to seeing if you have ever scaled an image down in any image editor. GL_NEAREST just takes the nearest color and replicates that. GL_NEAREST is much faster than GL_LINEAR. If you are trying to fill a huge amount of polygons on screen, you may find that it is necessary to switch to GL_NEAREST to get the performance you want. Figure 8-3 shows examples of both filters.
Note
I tend to think of GL_LINEAR as a blurring filter and GL_NEAREST as a sharper filter. I generally set my maximum filter to nearest, so that my objects still look sharp at large sizes, but I'll use linear for smaller sizes, so that the various features can blend together.
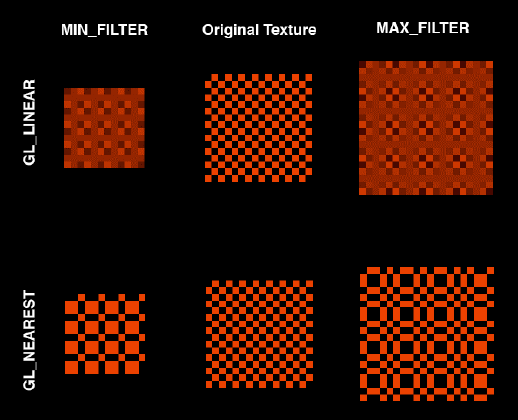
Figure 8.3. Texture minimum and maximum filters. Here is a very hard-to-scale texture, which has been scaled to the least flattering sizes to show how the filters behave.
Finally, we will make sure that 2D textures are enabled and set up a blending function.
// enable use of the texture
        glEnable(GL_TEXTURE_2D);
        // set a blending function to use
        glBlendFunc(GL_ONE, GL_ONE_MINUS_SRC_ALPHA);
        // enable blending
        glEnable(GL_BLEND);
} else {
        NSLog(@"no texture");
        return CGSizeZero;
}
The blending function tells OpenGL how to handle semitransparent textures. In this case, we are telling it to allow the textures behind to show through the transparent pixels based on the alpha value, which is pretty standard.
And here's the final stretch:
[uiImage release];

        if (materialLibrary == nil) materialLibrary = [[NSMutableDictionary alloc] init];

        // now put the texture ID into the library
        [materialLibrary setObject:[NSNumber numberWithUnsignedInt:textureID]
forKey:materialKey];
        return imageSize;
}
We release our UIImage and get back all that memory. Then we store the texture ID as an NSNumber in our material library, keyed to our material key.
Well, this method is mildly disappointing, since all it really does is push bytes around the system. How do we use these newly loaded textures?
Just as we do for everything else in OpenGL, we need to tell the renderer when we are going to be using a certain texture and make sure that texturing is enabled. This is known as binding a texture.
We will add a simple method to our material controller to bind textures. This is also in the BBMaterialController.m file.
// grabs the openGL texture ID from the library and calls the openGL bind texture method
-(void)bindMaterial:(NSString*)materialKey
{
        NSNumber * numberObj = [materialLibrary objectForKey:materialKey];
        if (numberObj == nil) return;
        GLuint textureID = [numberObj unsignedIntValue];

        glEnable(GL_TEXTURE_2D);
        glBindTexture(GL_TEXTURE_2D, textureID);
}
This is a very simple method. We grab the stored ID with our material key, and we just tell OpenGL, "Hey, bind this ID!" Until we bind a new texture, whenever we draw a triangle that requires texturing, this is the texture that will be used. It is important to note that binding textures can be expensive, so group all your objects that use the same textures together when rendering, if possible.
Then to render, we will need to do something like this:
-(void)render
{
        glVertexPointer(vertexSize, GL_FLOAT, 0, vertexes);
        glEnableClientState(GL_VERTEX_ARRAY);
        glColorPointer(colorSize, GL_FLOAT, 0, colors);
        glEnableClientState(GL_COLOR_ARRAY);

        if (materialKey != nil) {
[[BBMaterialController sharedMaterialController] bindMaterial:materialKey]; glEnableClientState(GL_TEXTURE_COORD_ARRAY); glTexCoordPointer(2, GL_FLOAT, 0, uvCoordinates); } //render glDrawArrays(renderStyle, 0, vertexCount); }
What are GL_TEXTURE_COORD_ARRAY and uvCoordinates? They are how we map the texture images onto surfaces, with a new set of numbers—fun, right?
And that's it! Now you can texture all your polygons.
In the previous chapters, we talked about the various rendering styles that we have available to us on the iPhone. There were a handful of points and lines, and then a few based on triangles: GL_TRIANGLES, GL_TRIANGLE_STRIP, and GL_TRIANGLE_FAN.
In order to draw a texture, we need to have some place to put it. In the case of OpenGL ES on the iPhone, this will always be a triangle of some sort. Don't feel slighted, however. Even though the more powerful versions of OpenGL allow you to draw quads and arbitrary polygons, almost everyone just uses triangles anyway. It turns out that if you make all you models from a single type of primitive, you can really optimize your pipeline.
Now we have these triangles that need to be filled in, and we have these rectangular images in our texture memory. How do we get the two to play nice together?
Well, we need a new set of numbers. We need to be able to map a vertex in space to a vertex on the texture. Generally, on images, we would use x to define how far across some point is from the corner and y to tell us how far up from the corner. That might get just a bit confusing, since we are already using an x and a y to define the vertex positions in our model. Instead, let's call the ones on a texture U and V (in the olden days these were sometimes referred to as S and T as well).
UV coordinates are pretty straightforward. There are just a few things to keep in mind about them:
Normalization: UVs should generally be normalized between 0.0 and 1.0. So the UV1 in Figure 8-4 might be something like 0.3, 0.8 if the lower-left corner is 0,0. This UV coordinate maps to the V1 vertex. You will notice that the mapped texture on the right of Figure 8-4 is a warped version of the texture. OpenGL is very good at squishing your textures to fit into whatever triangles you give it.
Order: When texturing your models, the order in which you send your vertexes is important. This becomes very relevant when you deal with lighting and back-face culling. For now, just keep in mind that you need to be careful when specifying vertexes to make sure they are in the correct order.
Range: If you pass in a UV that is less than 0 or greater than 1, strange things will happen. If you pass a UV point that is not in the range of 0 to 1, OpenGL checks to see what you have set for the texture wrapping mode. For now, just be sure to send UVs between 0 and 1.
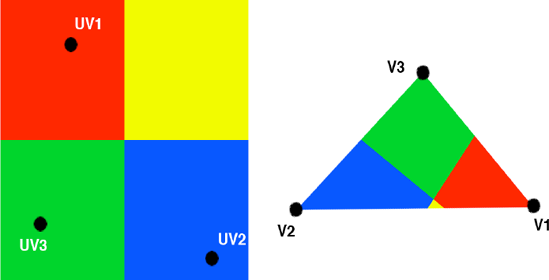
Figure 8.4. UV coordinates map a texture from a square image to a polygon. Each UV vertex maps to a single xyz vertex in the model.
Having the UVs be normalized between 0.0 and 1.0 can make figuring out your UVs a bit tedious, but it is super handy when you want to make your textures half the size or twice the size. This is known as the level of detail (LOD), and you can actually give OpenGL multiple copies of each of your textures to use at various sizes. For example, if your textured surface is very close, you might use the 1024-by-1024 texture, because you want to be able to see every little detail. On the other hand, if the surface is really far away, then go ahead and use that 32-by-32 version, because you can barely see it anyway. Providing multiple LODs is known as mipmapping.
Wait! Just a few pages ago, I said that we cannot render quads, only triangles. What am I talking about?
Well, a textured quad is just a common concept in 2D (and even 3D) game design. In our case, a textured quad is really a textured pair of triangles (see Figure 8-5), but that doesn't roll trippingly off the tongue as well as "textured quad."
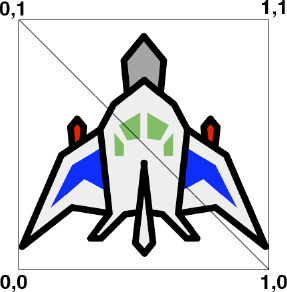
Textured quads are a great way to get your 2D images to the screen very fast. When doing a lot of 2D work, you can use textured quads for everything. This makes texture handling very simple, since every object has the same vertexes. For example, the images in Figure 8-6 have different textures, but they have the same vertexes as our ship quad.
Each object had a very simple model, consisting of just four vertexes that form a square, like our button objects. Then all we need to do is specify four UV coordinates—one for each vertex—and a scale and a position, and we have our object. We need only four vertexes because we are going to be drawing the quads as a GL_TRIANGLE_STRIP, just as we drew the buttons in the previous chapter.
For our new textured Space Rocks! version, we will need a new mesh subclass, which we'll call BBTexturedQuad:
@interface BBTexturedQuad : BBMesh {
        GLfloat * uvCoordinates;
        NSString * materialKey;
}
This is just like our old mesh, but with a place to store the UV coordinates and a handle to a material key.
static CGFloat BBTexturedQuadVertexes[8] = {−0.5,−0.5, 0.5,−0.5, −0.5,0.5, 0.5,0.5};
static CGFloat BBTexturedQuadColorValues[16] = {1.0,1.0,1.0,1.0, 1.0,1.0,1.0,1.0,
1.0,1.0,1.0,1.0, 1.0,1.0,1.0,1.0};

@implementation BBTexturedQuad

@synthesize uvCoordinates,materialKey;

- (id) init
{
        self = [super initWithVertexes:BBTexturedQuadVertexes
                                   vertexCount:4
                                      vertexSize:2
           renderStyle:GL_TRIANGLE_STRIP];
        if (self != nil) {
                // 4 vertexes
                uvCoordinates = (CGFloat *) malloc(8 * sizeof(CGFloat));
                colors = BBTexturedQuadColorValues;
                colorSize = 4;
        }
        return self;
}
Again, this is like our other mesh, but we are hard-coding our vertexes as a square centered on 0,0.
We will use this render method to override the simpler mesh rendering and add in our texture coordinates. These are the new lines of code:
[[BBMaterialController sharedMaterialController] bindMaterial:materialKey];

glEnableClientState(GL_TEXTURE_COORD_ARRAY);
glTexCoordPointer(2, GL_FLOAT, 0, uvCoordinates);
We call to the material controller to bind our material. Then we make sure that texture arrays are enabled, similar to how we enabled colors and vertex arrays to be able to draw lines. Finally, we pass in our UV coordinates.
There is one small step missing here. We don't have a good way to specify our UV coordinates. We could simply make a static uvCoordinates array that specifies the UVs as I have shown in the figures.
static CGFloat BBTexturedQuadUVs[8] = {0.0,0.0, 1.0,0.0, 0.0,1.0, 1.0,1.0};Then we just set our UVs for every textured quad to those values and have a separate image for each object. This is actually how many 2D games are built. However, we are in a bit of a special situation on the iPhone. We need to be very careful of things that will crush our performance. And material changes are expensive. That's where the texture atlas comes in.
Every time we bind a new material, OpenGL must move a bunch of memory around so that it can get ready to paint the new pixels all over the next bunch of surfaces. This is absolutely unavoidable, and it is not a very fast operation. We want to do this as few times as possible.
Even in our simple game, if we used a single image for each item, we would have about 20 material changes for every frame drawn. This isn't too terrible, and we could probably get away with it in our sample game. However, in real life, you will probably have dozens, if not hundreds, of small textures you want to render at one time. That many material changes will bring OpenGL to its knees.
How do we avoid this crushing cost? We combine a whole bunch of little textures into one big texture and use the UV coordinates to render just the bit that we want. This big sheet of smaller images is known as a sprite sheet or a texture atlas (see Figure 8-7).
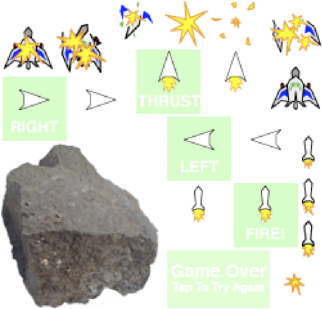
Figure 8.7. A single 256-by-256 atlas contains all the individual textures that we need for SpaceRocksTextured
Of course, as you would expect, this extra added goodness comes at the price of a bit of added complexity. We have this single atlas image, but we need to know where every individual image starts and ends. This means we will need some sort of metadata file alongside our actual atlas image.
Earlier, we talked about the minimum and maximum filters (MIN_FILTER and MAX_FILTER). Keep in mind that those filters will bleed out of your UV quad by a pixel or so, looking for extra pixel information to properly filter your textures. This is usually a great thing, but with atlases, it will cause problems. The filter algorithm will grab pixels from the image next to the one you are trying to display, and you will get strange artifacting. To avoid this problem, you need to guarantee that there is a minimum of 2 pixels between each image in the atlas.
Note
For this example, I generated the atlas and the metadata from another program that I wrote for this very function. You don't need to do anything so complicated. Typically, simple texture atlases will contain many images of a similar size, arranged in a grid. In this way, you can define a simple rule for finding the UV coordinates of any given "cell" in the texture atlas. Since this example has a lot of images that are dissimilar in size, I used a program to pack the atlases for me.
Figure 8-8 shows three packed texture atlases that we used for the Snow Dude game mentioned in the previous chapter. If we had used individual images for each sprite, then Snow Dude's performance would have been terrible.
Warning
If you are mipmapping your atlases, make sure to arrange your images so that there is at least a 2-pixel gap between them.
For SpaceRocksTextured, I have generated an atlas and a .plist file that contains the information we need for each image.
<plist version="1.0">
<array>
        <dict>
                <key>height</key>
                <real>128</real>
                <key>name</key>
                <string>rockTexture</string>
                <key>width</key>
                <real>128</real>
                <key>xLocation</key>
                <real>1</real>
                <key>yLocation</key>
<real>127</real>
</dict>
<dict>
<key>height</key>
.
.
.
</array>
</plist>The property list is just an array of items that have the name of the texture, the height and width of the texture, and the position of the lower-left corner.
In our BBMaterialController, we will need a few new methods to deal with our atlas:
-(void)loadAtlasData:(NSString*)atlasName
{
        NSAutoreleasePool * apool = [[NSAutoreleasePool alloc] init];
        if (quadLibrary == nil) quadLibrary = [[NSMutableDictionary alloc] init];

        CGSize atlasSize = [self loadTextureImage:[atlasName
stringByAppendingPathExtension:@"png"] materialKey:atlasName];

        NSArray * itemData = [NSArray arrayWithContentsOfFile:[[NSBundle mainBundle]
pathForResource:atlasName ofType:@"plist"]];
We are going to use the atlas name (SpaceRocksAtlas) as the material key, as well as the name of the PNG image and the .plist file (SpaceRocksAtlas.png and SpaceRocksAtlas.plist). We first load the image using our loadTextureImage: method.
Now we step through our atlas metadata one record at a time and build a new quad for each texture.
for (NSDictionary * record in itemData) {
                BBTexturedQuad * quad = [self texturedQuadFromAtlasRecord:record
atlasSize:atlasSize materialKey:atlasName];
                [quadLibrary setObject:quad forKey:[record objectForKey:@"name"]];
        }
        [apool release];
}
Similar to how we handled the materials, we are going to preload all the quads and store them in a quad library to be easily retrieved by name. This central storage is very handy. This way, your objects need to know only what their texture key is, and they can use that to retrieve their quad data.
Now let's have a look at our texturedQuadFromAtlasRecord: method:
-(BBTexturedQuad*)texturedQuadFromAtlasRecord:(NSDictionary*)record
                                                        atlasSize:(CGSize)atlasSize
                                                    materialKey:(NSString*)key;
{
        BBTexturedQuad * quad = [[BBTexturedQuad alloc] init];

        GLfloat xLocation = [[record objectForKey:@"xLocation"] floatValue];
        GLfloat yLocation = [[record objectForKey:@"yLocation"] floatValue];
GLfloat width = [[record objectForKey:@"width"] floatValue];
GLfloat height = [[record objectForKey:@"height"] floatValue];
// find the normalized texture coordinates
GLfloat uMin = xLocation/atlasSize.width;
GLfloat vMin = yLocation/atlasSize.height;
GLfloat uMax = (xLocation + width)/atlasSize.width;
GLfloat vMax = (yLocation + height)/atlasSize.height;We grab all the information we need from the .plist record, and use it to build our UV minimum and maximum. Note this is all based on texture size. This is handy, because we can use the same metadata for all our texture sizes.
quad.uvCoordinates[0] = uMin;
        quad.uvCoordinates[1] = vMax;

        quad.uvCoordinates[2] = uMax;
        quad.uvCoordinates[3] = vMax;

        quad.uvCoordinates[4] = uMin;
        quad.uvCoordinates[5] = vMin;

        quad.uvCoordinates[6] = uMax;
        quad.uvCoordinates[7] = vMin;
        quad.materialKey = key;

        return [quad autorelease];
}
Lastly, we set the UV coordinates in our textured quad. Astute readers will notice that these are in a strange order. Our first pair, which should map to the lower-left corner of our quad, is actually the upper-left corner. This is because of the way that Core Graphics renders images into contexts. All of our textures are flipped upside down. However, we can rectify this by modifying the order in which we map our UVs. This is much simpler and faster than trying to flip the image upright as we load it.
The other odd thing that we are doing here is preloading everything. Every third line in the Apple documentation suggests that you lazy-load all your resources, building them only at the time you need them. This is great advice, as long as you're not trying to maximize performance. We want to do all of this heavy loading before the game starts, so that we don't have major slowdowns while we load textures.
With that in mind, we should add two more things to our material controller:
- (id) init
{
        self = [super init];
        if (self != nil) {
                [self loadAtlasData:@"SpaceRocksAtlas"];
        }
        return self;
}
Now, as soon as anyone asks for the material controller, it will load our atlas, and all the quads will be ready.
The last thing we need is a handy way to get our newly built quads out to the objects that need them.
-(BBTexturedQuad*)quadFromAtlasKey:(NSString*)atlasKey
{
        return [quadLibrary objectForKey:atlasKey];
}
Now we are ready to change over our objects to the new universe of textures.
We have created a very simple mechanism for getting a prebuilt textured quad. All we need to do is go through each of our scene objects and change their mesh over from the old static retro style to the new textured quads.
We will start with our spaceship:
// called once when the object is first created
-(void)awake
{
   // old
        //        mesh = [[BBMesh alloc] initWithVertexes:BBSpaceShipOutlineVertexes
        //                               vertexCount:BBSpaceShipOutlineVertexesCount
        //                                 vertexSize:BBSpaceShipVertexSize
        //                               renderStyle:GL_LINE_LOOP];
        //        mesh.colors = BBSpaceShipColorValues;
        //        mesh.colorSize = BBSpaceShipColorSize;

        // new hotness: mesh uses prebuilt textured quad
        self.mesh = [[BBMaterialController sharedMaterialController]

quadFromAtlasKey:@"ship"];
        self.scale = BBPointMake(40, 40, 1.0);

        self.collider = [BBCollider collider];
        [self.collider setCheckForCollision:YES];
}
I left in the old code just for comparison.
By standardizing on quads and adding a bit of boilerplate quad-building code in our material controller, building new objects is much simpler. If your game is primarily 2D, this is most definitely one of the quickest and simplest ways to handle your art assets and get them onto the screen. Snow Dude uses textured quads exclusively.
Quads are super handy for 2D game objects, but they are even handier for user interface items. Even in a 3D game, your buttons, scores, and heads-up displays will generally be 2D, so why not use quads?
Our retro buttons need to be spruced up a bit, so let's make a new button subclass, called BBTexturedButton.
@implementation BBTexturedButton

- (id) initWithUpKey:(NSString*)upKey downKey:(NSString*)downKey
{
        self = [super init];
        if (self != nil) {
                upQuad = [[BBMaterialController sharedMaterialController]
quadFromAtlasKey:upKey];
                downQuad = [[BBMaterialController sharedMaterialController]
quadFromAtlasKey:downKey];
                [upQuad retain];
                [downQuad retain];
        }
        return self;
}
First, since using the named images from the atlas makes things so much simpler, let's make an init method that builds the up state quad and the down state quad.
// called once when the object is first created
-(void)awake
{
        [self setNotPressedVertexes];
        screenRect = [[BBSceneController sharedSceneController].inputController
                                          screenRectFromMeshRect:self.meshBounds
                                          atPoint:CGPointMake(translation.x,
                                          translation.y)];
}
Our awake method is quick and simple. We just set our default state to up, and then build our screen rectangle so we can properly handle touch events.
Then we override the setPressed and setNotPressed methods, and we are finished!
-(void)setPressedVertexes
{
        self.mesh = downQuad;
}

-(void)setNotPressedVertexes
{
        self.mesh = upQuad;
}
Since we are a Button subclass, we inherit all the touch handling code functionality, making this object very simple.
Now to take advantage of this new class, all we need to do is go into the input controller and change the object type for all our buttons.
Here is the old code:
// right arrow button
        BBArrowButton * rightButton = [[BBArrowButton alloc] init];
        rightButton.scale = BBPointMake(50.0, 50.0, 1.0);
        rightButton.translation = BBPointMake(−155.0, −130.0, 0.0);
        .
        .
And here is the new code:
// right arrow button
        BBTexturedButton * rightButton = [[BBTexturedButton alloc] initWithUpKey:
@"rightUp" downKey:@"rightDown"];
        rightButton.scale = BBPointMake(50.0, 50.0, 1.0);
        rightButton.translation = BBPointMake(−155.0, −130.0, 0.0);
        .
        .
Everything else stays the same—same location, same scale, and same callbacks.
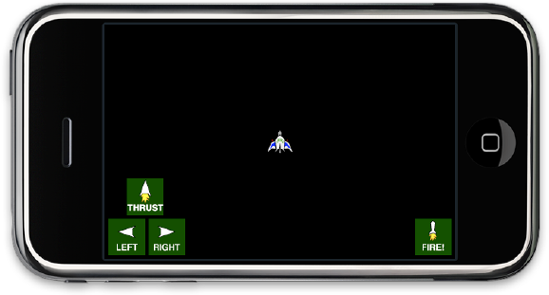
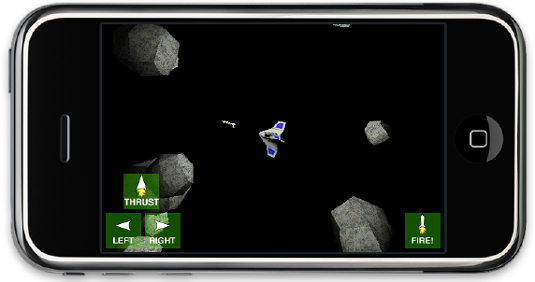
If you build and run the game now, you should see our new ship in all its 2D textured glory, and some nicer buttons (see Figure 8-9).
Even though we are now using textured quads, we still have this array of color information that we are passing in. How does this affect our textures?
Astute readers will have noticed that we made white the default color for our quad. This keeps the quad looking just as it does in the atlas. If we want to tint our quad a different color, all we need to do is change the color values that we are passing in, and OpenGL will happily render a purple ship, a red ship, or whatever. This is very handy if you want to reuse some graphics for different sides of a conflict in your game. For instance, if you have a tank model, you can tint it red for one side and blue for the other, thus saving yourself from needing two sets of different colored textures in your atlas.
We are now going to make our rocks more interesting. Let's go into the BBRock object and update it to use the new textured quads. While we are there, we will add some random color tint to each new rock.
-(void)awake
{
        // new quad for our mesh
   self.mesh = [[BBMaterialController sharedMaterialController] quadFromAtlasKey:
@"rockTexture"];

        // malloc some memory for our vertexes and colors
        verts = (CGFloat *) malloc(4 * BBRockVertexSize * sizeof(CGFloat));
        colors = (CGFloat *) malloc(4 * BBRockColorSize * sizeof(CGFloat));

   // pick some random values between 0.0 and 1.0
        CGFloat r = (CGFloat)RANDOM_INT(1,100)/100.0;
        CGFloat g = (CGFloat)RANDOM_INT(1,100)/100.0;
        CGFloat b = (CGFloat)RANDOM_INT(1,100)/100.0;

        NSInteger vertexIndex = 0;
        for (vertexIndex = 0; vertexIndex < 16; vertexIndex += 4) {
                colors[vertexIndex] = r;
                colors[vertexIndex + 1] = g;
                colors[vertexIndex + 2] = b;
                colors[vertexIndex + 3] = 1.0;
        }

        self.collider = [BBCollider collider];
}
The next thing we need to do is actually use these colors in our render method.
// called once every frame
-(void)render
{
    mesh.colors = colors; // set my colors into the mesh for rendering
    mesh.colorSize = 4;
    [super render];
}
Here, we are just jumping in right before our super's render method is called and setting our custom colors. You might think that it would be better to set the colors once in the awake method. However, we are actually sharing the mesh with all the other textured quads. This means that we need to set our colors every frame.
We need to make one more adjustment here. In the previous version, our rocks had a rough radius of 1 unit. Our rocks here are about half that size, since our quads are 1 unit on a side. We will want to make our textured rocks slightly bigger to compensate.
+(BBRock*)randomRock
{
    return [BBRock randomRockWithScale:NSMakeRange(35, 55)];
}
We make the space rocks just over twice as big as their retro predecessors.
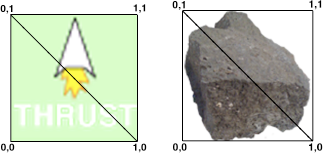
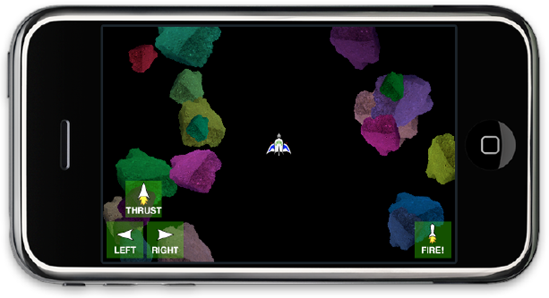
Now when you build and run the game, you get a Technicolor storm of rocks, all textured to look like a bad photo of a rock I have in my backyard (Figure 8-10).
Note
I am mixing my art styles here. Generally, I would stick with either graphic art style or photographic style, but I wanted to have an example of both. So that is why the rocks are a bit odd-looking.
I have been using the term textured quad quite a bit in the previous sections. Another term that you will come across quite frequently means basically the same thing: sprite. When we start to talk about animating quads, we generally refer to them as sprites or sprite animations.
Now that we have this easy way to swap graphics in and out, we can start to think about how to add some life to our game using some simple animations. In the Space Rocks! atlas, I have included three very simple and quick animations:
A three-frame animation for the missile
A three-frame animation for an explosion
A four-frame animation for the ship exploding
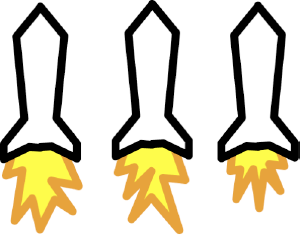
Sprite animation is just like most any other animation. We have a different image for each frame we want to show. If we show enough images fast enough, then it looks like actual motion. Figure 8-11 shows the images for our missile animation. We will loop these three frames over and over to give the illusion that there is a thrust exhaust coming from the missiles.
Luckily, doing animations is pretty easy. We will just subclass our new textured quad and make a new class called BBAnimatedtQuad.
@interface BBAnimatedQuad : BBTexturedQuad {
        NSMutableArray * frameQuads;
        CGFloat speed;
        NSTimeInterval elapsedTime;
        BOOL loops;
        BOOL didFinish;
}
Our new animated quad needs a few instance variables to keep track of which frame we are on and whether this animation loops indefinitely or it is finished.
- (id) init
{
        self = [super init];
        if (self != nil) {
                self.speed = 12; // 12 fps
                self.loops = NO;
                self.didFinish = NO;
                elapsedTime = 0.0;
        }
        return self;
}
We just set a few defaults in this simple init method.
We will also need to store our frames, provide a simple way to add frames to our animation, and provide a way to set the current frame to be displayed.
-(void)addFrame:(BBTexturedQuad*)aQuad
{
        if (frameQuads == nil) frameQuads = [[NSMutableArray alloc] init];
        [frameQuads addObject:aQuad];
}

-(void)setFrame:(BBTexturedQuad*)quad
{
        self.uvCoordinates = quad.uvCoordinates;
        self.materialKey = quad.materialKey;
}
Then we need a mechanism to switch between the frames.
-(void)updateAnimation
{
        elapsedTime += 1.0/60.0;
        NSInteger frame = (int)(elapsedTime/(1.0/speed));
        if (loops) frame = frame % [frameQuads count];
        if (frame >= [frameQuads count]) {
                didFinish = YES;
                return;
        }
        [self setFrame:[frameQuads objectAtIndex:frame]];
}
All the other code in the object is pretty straightforward, but here we are doing something a bit different. If we play back our animations at the same rate that the game is running (in this case, about 60 fps), our three or four frames will play back too fast to even notice. So, instead, we give each animation its own frame rate. This is great, except now we need to have some idea of how much time has passed between each frame. There are a few ways to do this.
The simplest way to get the timing information would be to just divide the frame rate by some integer, and have a counter that counts how many times we run the update method; then, every sixth one, we change the frame. In the case of SpaceRocksTextured, this approach would probably be fine. We aren't going to be pushing the OpenGL rendering engine very hard, so we should stay pretty close to the 60 fps mark at all times. However, in most gaming situations (and later when we move to 3D models), this is not the case, and the frame rate can jump all over the place. In this case, we need to introduce a new concept: the delta time.
So far, Space Rocks! runs right at the maximum frame rate of 60 fps (at least on my 3G test phone). Everything that governs movement in the game is based on that frame rate. For instance, a new missile has a speed of 3.0 because that speed looks good at 60 fps.
However, in a more typical game, you would want to push the rendering capabilities of the iPhone much harder, and so your frame rate will tend to fluctuate (sometimes quite radically), based on how many objects are on screen, whether you are firing missiles, and so on.
The problem is that our missiles, which move at 3 pixels per frame, will slow down and speed up depending on how fast we can render a single frame of our game. This is not usually what you want. What we want is our speed in terms of seconds. In the case of our missiles, we want it to move 180 pixels per second (3 times 60 frames).
We could just increment the position once a second, but that would be unbearably choppy. To keep the movement smooth, we need to update the position every frame, but only as much as we need to total an average of 180 pixels per second.
The way to do this is to introduce a new state variable known as the deltaTime. This is the actual amount of time that the last frame took to render. We then use that to calculate the speed of our objects in the current frame.
But before we can look at calculating our speed with this new deltaTime, we need to figure out how to find it in the first place. The best place to measure the time between frames is right at the beginning of the game loop in our BBSceneController.m file.
- (void)gameLoop
{
        // we use our own autorelease pool so that we can control when garbage gets
collected
        NSAutoreleasePool * apool = [[NSAutoreleasePool alloc] init];

         thisFrameStartTime = [levelStartDate timeIntervalSinceNow];
        deltaTime =  lastFrameStartTime - thisFrameStartTime;
        lastFrameStartTime = thisFrameStartTime;
        .
        .
        .
We have three new instance variables: levelStartDate, lastFrameStartTime, and thisFrameStartTime. levelStartDate is an NSDate, and we will reset that to now at the beginning of every scene.
// makes everything go
-(void) startScene
{
        self.animationInterval = 1.0/60.0;
        [self startAnimation];
        // reset our clock
        self.levelStartDate = [NSDate date];
        lastFrameStartTime = 0;
}
The instance variable lastFrameStartTime is the time interval since our level start for the last time we went through the game loop. thisFrameStartTime is the time interval since the level started for the current frame.
Finally, deltaTime is the time between our last frame time and this frame time. To get the actual frame rate of our game was, we simply need to take the inverse of that delta time:
NSLog(@"current frame rate: %f",1.0/deltaTime);
So, now that we have this handy time measurement, how do we use it?
Well, if we go into our high-level class BBMobileObject, the update method is where the speeds are all applied to the actual position of each moving object.
-(void)update
{
        CGFloat deltaTime = [[BBSceneController sharedSceneController] deltaTime];
        translation.x += speed.x * deltaTime;
        translation.y += speed.y * deltaTime;
        translation.z += speed.z * deltaTime;

        rotation.x += rotationalSpeed.x * deltaTime;
rotation.y += rotationalSpeed.y * deltaTime;
rotation.z += rotationalSpeed.z * deltaTime;
[self checkArenaBounds];
[super update];
}Now our moving objects will move smoothly no matter the frame rate. However, if you build and run this, you will notice that everything is moving very slowly. Don't forget that up until now, all of our speeds were in pixels per frame. So, we need to go back and change them all to pixels per second. This means that we need to find every place where we specified a speed—rotational or translational—and multiply that speed by 60.
For instance, in the BBSpaceShip.m file, in our fireMissile method, the changes look like this:
-(void)fireMissile
{
        // need to spawn a missile
        BBMissile * missile = [[BBMissile alloc] init];
        missile.scale = BBPointMake(5, 5, 5);
        // we need to position it at the tip of our ship
        CGFloat radians = rotation.z/BBRADIANS_TO_DEGREES;
         CGFloat speedX = -sinf(radians) * 3.0 * 60; // speed in pixels per
        CGFloat speedY = cosf(radians) * 3.0 * 60; // second
         .
        .
OK, so all the objects need to have their speeds updated. But how does this apply to our animations?
In our animation update method, we are looking at the delta time, keeping track of the total elapsed time, and setting our frame rate based on that time and how fast we should be changing our frames.
elapsedTime += [BBSceneController sharedSceneController].deltaTime;
        NSInteger frame = (int)(elapsedTime/(1.0/speed));
In this case, our animation is running at a speed of 12 fps, so whenever the elapsed time increments enough to equal 1/12 second, our frame will change to the next in the sequence. Now, in our BBAnimatedQuad.m file, the updateAnimation would look something like this:
-(void)updateAnimation
{
    // use the delta time so we can animate smoothly
    elapsedTime += [BBSceneController sharedSceneController].deltaTime;
    NSInteger frame = (int)(elapsedTime/(1.0/speed));
    if (loops) frame = frame % [frameQuads count];
    if (frame >= [frameQuads count]) {
        didFinish = YES;
        return;
    }
    [self setFrame:[frameQuads objectAtIndex:frame]];
}
The last thing we need to complete the animated quad picture is an easy way to build the quads. For this, just as with the textured quad, we will return to the material controller and add another factory method to our BBAnimatedQuad.m file:
-(BBAnimatedQuad*)animationFromAtlasKeys:(NSArray*)atlasKeys
{
        BBAnimatedQuad * animation = [[BBAnimatedQuad alloc] init];
        for (NSString * key in atlasKeys) {
                [animation addFrame:[self quadFromAtlasKey:key]];
        }
        return [animation autorelease];
}
This is a very quick way to generate an animated quad. Now we can put this to good use in our missile object.
-(void)awake
{
         self.mesh = [[BBMaterialController sharedMaterialController]
animationFromAtlasKeys:[NSArray arrayWithObjects:@"missile1",@"missile2",@"missile3",nil]];
        self.scale = BBPointMake(12, 31, 1.0);

        [(BBAnimatedQuad*)mesh setLoops:YES];
        self.collider = [BBCollider collider];
        [self.collider setCheckForCollision:YES];
 }
We simply set our mesh to be an animated quad, pass in a series of atlas keys, and we are ready to go. Don'1t forget to turn on looping, since we want the missile animation to loop until the missile is destroyed.
// called once every frame
-(void)update
{
        [super update];
        if ([mesh isKindOfClass:[BBAnimatedQuad class]]) [(BBAnimatedQuad*)mesh
updateAnimation];
}
And, lastly, we need to make sure our animation is being updated properly. We will add a quick check to make sure we have the right mesh, and if so, send it an update. Figure 8-12 shows the missile animation in action, as well as the rock-exploding animation we are about to add.
Now we have two more animations in our atlas: one for when the ship is destroyed and one for when a rock is smashed. We have a small problem, however: When our rock or ship is destroyed, it is removed from the scene and released. This means that it can no longer send updates to the animation to tell it to change frames. To fix this, we will need yet another object—a self-contained animation that can remove itself from the scene when it has finished playing. Let's call it a BBAnimation object and make it a BBSceneObject subclass.
- (id) initWithAtlasKeys:(NSArray*)keys loops:(BOOL)loops speed:(NSInteger)speed
{
        self = [super init];
        if (self != nil) {
                self.mesh = [[BBMaterialController sharedMaterialController]
animationFromAtlasKeys:keys];
                [(BBAnimatedQuad*)mesh setSpeed:speed];
                [(BBAnimatedQuad*)mesh setLoops:loops];
        }
        return self;
}
The init method passes the keys, the speed, and the looping flag directly to the animated quad that is our mesh.
-(void)awake
{
}
Override the awake method; we don't need to do anything here.
// called once every frame
-(void)update
{
        [super update];
        [(BBAnimatedQuad*)mesh updateAnimation];
        if ([(BBAnimatedQuad*)mesh didFinish]) {
                [[BBSceneController sharedSceneController] removeObjectFromScene:self];
} }
In our update method, all we need to do is to update the animation. Once it has finished, we queue ourselves for removal from the scene.
Let's have a look at how we would use this in our BBRock object:
-(void)smash
{
smashCount++;
// queue myself for removal
[[BBSceneController sharedSceneController] removeObjectFromScene:self];
// your rock asplode!
BBAnimation * splodey = [[BBAnimation alloc] initWithAtlasKeys:[NSArray
arrayWithObjects:@"bang1",@"bang2",@"bang3",nil] loops:NO speed:6];
splodey.active = YES;
splodey.translation = self.translation;
splodey.scale = self.scale;
[[BBSceneController sharedSceneController] addObjectToScene:splodey];
[splodey release];
.
.
.At the top of the smash method, immediately after we queue ourselves for removal from the scene, we build an explosion animation (see Figure 8-13). We put it right where we used to be, and then hand it off to the scene controller. That's it!
We've moved pretty quickly in the chapter so far. We converted our game from a very retro-looking 2D game that was all white outlines to fully textured graphics. We talked about texture atlases, how to get better performance by bundling your images into a single file, and how to quickly and easily build animations into your game. And we talked about how to keep your motion smooth, even if your frame rate is chunky.
You now have a simple but easily expandable game template that has all the bits and pieces you need to build full 2D games in OpenGL. The Snow Dude game uses roughly this same engine. The follow-on games—Skate Dude and BMX Dude—will use almost this same engine as well.
However, as you are probably aware, while OpenGL is really good at rendering 2D content, it is also quite good for building 3D content! So, let's move into the next dimension and talk about how to handle full 3D models. We'll do some basic lighting and get you on the path to building fully 3D immersive games.
So what does it really mean to move from 2D to 3D? Technically speaking, our 2D Space Rocks! was in a 3D world; we were just very stingy with our z coordinates. But moving into the next dimension is a bit more complicated than just adding a third axis.
Textured quads are great, and we will still be using them for our user interface items, but all of our scene objects need to get 3D models.
So far, we haven't even worried about lighting, since it doesn't matter too much with 2D (although you can do some very cool effects with 2D and lighting...). We could just render our 3D objects with the default ambient lighting, but then they won't actually look 3D. Humans tend to perceive the shape of things they see based on the contrast between the light and shadow. Without shadow, there is no perceived shape. So moving into 3D also means we need to figure out how to light our models.
As soon as we turn on the (nondefault) lights in OpenGL, we open a big can of worms. In order to light a surface, OpenGL needs to know a lot of things about how that surface reacts to light. We will need to define the properties of that surface, such as how shiny it is and how the light reflects off the surface. This requires a whole new set of numbers, called normal vectors, which we will need to provide to the engine along with our vertexes, UVs, and colors.
I mention all this to prepare you for the rest of this chapter. I am going to be moving a bit more quickly now, and I want you to be ready for it. I will cover more high-level concepts and show only a few code snippets here and there. You will want to have the sample code handy to be able to get the big picture.
For this version, make a copy of your project and rename it SpaceRocks3D. (If you are following along with the sample projects, use the project of the same name.)
For our retro version of Space Rocks!, I built all the models by hand by drawing them on a bit of graph paper. In the textured version, all of our models were the same four vertexes. Once we move into the next dimension, building models by hand becomes quite difficult.
The solution is to use a 3D modeling program to build the objects. Plenty of 3D modeling programs are available, most costing thousands of dollars. But there are a few really good modelers that are quite affordable, and some are even free.
Blender is an open source modeling tool that you can find for most any platform out there. If your budget is zero, then this is a great place to start, since it is free. Even if you have a big budget, Blender (http://www.blender.org) is worth a look. It is a very capable and advanced 3D tool.
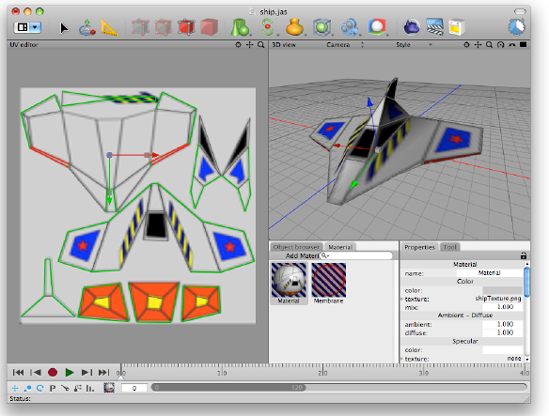
When I worked in visual effects, I used Maya, which is a fantastic commercial modeler. However, it is quite expensive. These days, I generally rely on Cheetah3D (http://cheetah3d.com) for my modest modeling needs (see Figure 8-14). It is cheap (around $150 at the time of this writing), easy to learn, and very advanced for the price.
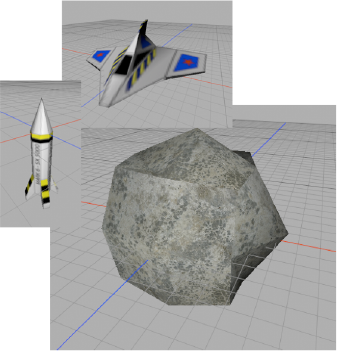
All the models for SpaceRocks3D were made in Cheetah3D and exported as .h files. Figure 8-15 shows the three main models we will be playing with in the rest of the chapter.
The other handy thing about Cheetah3D is its active and helpful community of users who can provide help. When I needed to get my Cheetah3D models to work on the iPhone, a quick Google search lead me right to a script called c3d_to_iphone_h.pl by Rob Bajorek (http://cocoaswirl.com/2009/05/09/cheetah3d-header-file-converter-for-iphone/). I used this script to get my models from Cheetah3D into my Xcode project.
Suffice it so say that you will need a 3D modeler, or at least the services of an artist who has one. Let's get to the real subject here: how to use your 3D models in your iPhone games.
There are literally dozens and dozens of formats for storing 3D model information. We are going to stick with the simplest route possible: embedding the models as static arrays in the code. This method has its advantages and disadvantages. On the plus side, it requires zero code to load these files (well, it does require an #include command). On the downside, there is no good way to dynamically load models this way, and once the code is compiled, you cannot alter the models easily.
If you want to be able to store and load your models from some sort of file, you will need to figure out which file format has the appropriate properties for your game, and then either write or find a library that parses that file into some usable format for your code.
Before we jump in and start loading textures, we need to talk about normals. A normal is the vector that is perpendicular to a surface (see Figure 8-16). It is the vector that sticks straight out.
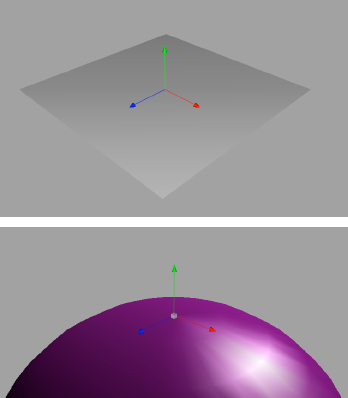
Normals are important because they tell OpenGL how to have the lights interact with the object surfaces. The normal basically tells OpenGL which direction that vertex is facing. OpenGL uses this data to calculate the angles of all the incoming light sources and decide how bright that vertex will be.
Luckily, calculating normals is not very hard. Even luckier, most 3D modeling packages do it for you.
Our models come complete with precalculated normals, so we don't need to do much. But we do need to know about them, because we will need to pass them as yet another big array of numbers into the renderer.
glEnableClientState(GL_NORMAL_ARRAY); glNormalPointer(GL_FLOAT, 0, OBJ_normal_vectors);
Let's have a quick look at how we are getting all of this information. In the sample code, you will notice a few .h files, with names like rock_iphone.h and missile_iphone.h. These are the data files that hold our 3D model data. Here is a snippet of the ship_iphone.h file:
#define Ship_vertex_count 115
#define Ship_polygon_count 82
#define Ship_vertex_array_size Ship_polygon_count * 3
float Ship_texture_coordinates [] = {
0.53796, 0.93502, 0.54236, 0.87917, 0.60727, 0.89044,
.
.
0.77903, 0.41658, 0.73596, 0.37100, 0.75723, 0.23776,
};
float Ship_normal_vectors [] = {
0.18593, −0.96722, 0.17293, 0.19288, −0.95849, −0.20998, −0.19077, −0.95848, -
0.21194,
.
.
0.91313, 0.04440, 0.40523, 0.91313, 0.04440, 0.40523, 0.76904, 0.09214, 0.63253,
};
float Ship_vertex_coordinates [] = {
−0.07586, −0.22036, −0.07558, −0.07586, −0.22036, 0.07497, 0.07470, −0.22036,
0.07497,
.
.
0.02790, −0.35827, 0.30770, 0.00559, −0.21063, 0.38461, 0.05856, 0.11942, 0.24730,
};To save some paper, I have chopped out roughly nine pages of numbers, which you can see in the full source code. However, from this excerpt, it evident that these files have our UVs (texture coordinates), the normals, and the vertexes.
It is important to note that these vertex arrays are meant to be rendered with the GL_TRIANGLES style. This is pretty standard for most basic modeler exports. It is a fairly complicated process to try to get all your triangles into one long GL_TRIANGLE_STRIP, so most modelers don't even bother. However, if you could get all your triangles in strip form, then you would be saving quite a bit of data space, since you would not be resending so many vertexes.
This brings us to our last thought about model data: How much is too much? This very simple ship model has 115 vertexes. Each vertex is 3 floats, each UV is 2 floats, and each normal is 3 floats. That is 8 floats per vertex, and a float on the iPhone is 4 bytes, so each vertex is 32 bytes of data. My calculator tells me that means this ship is 3680 bytes—not too bad. The rock model is 2592 bytes, and there are 20 rocks, so that's 51,840 bytes, and we haven't even started thinking about how many missiles we might be firing. But probably the entire scene will be under 2500 total vertexes, which is about 80,000 bytes.
Remember that we want to run at 60 fps, which means we are trying to push about 4.8 million bytes of data every second. Don't forget this is just the vertex data; we haven't even considered the texture data.
I am trying to make this sound like a big amount of data, and it is. However, the iPhone is a pretty amazing bit of hardware, and you should be able to process around 7000 and 12,000 vertexes and between 20 and 30 drawArray calls, and still hit 30 fps on the 3G and older devices.
Do keep in mind that your vertex count can go up very quickly. Make sure your models are as simple as you can make them. Even with our very simple scene and seemingly simple models, we easily found ourselves at a third of the maximum capacity. Later in the chapter, when we get to particle systems, we will push the vertex count right up to the limit.
Also note that we are using floats for all of our data. If you are trying to push the limit, you can instead use ints or shorts for all of your vertex data, cutting down on the total number of bytes flowing into OpenGL for each frame.
We already have all the data we need to render our models. Now we just need to make sure that we have the correct material loaded when we render. We already have a method to do this in the material controller:
[self loadTextureImage:@"shipTexture.png" materialKey:@"shipTexture"];
We call this in the init method of our BBMaterialController to make sure that our ship texture is available. Then when we render, we can bind to that material. In order to make it even easier, let's make a new mesh subclass: BBTexturedMesh. This will be very similar to the textured quad, but instead of hard-coded vertexes, we will allow the vertexes and UV coordinates to be set. Don't forget that we also need the normals, or our lights won't work correctly.
@interface BBTexturedMesh : BBMesh {
GLfloat * uvCoordinates;
GLfloat * normals;
NSString * materialKey;
}
@property (assign) GLfloat * uvCoordinates;
@property (assign) GLfloat * normals;
@property (retain) NSString * materialKey;We are just adding on to the BBMesh object. Now we can store UVs, normals, and a material key.
-(void)render
{
[[BBMaterialController sharedMaterialController] bindMaterial:materialKey];
glEnableClientState(GL_VERTEX_ARRAY);
glEnableClientState(GL_TEXTURE_COORD_ARRAY);
glEnableClientState(GL_NORMAL_ARRAY);
glVertexPointer(vertexSize, GL_FLOAT, 0, vertexes);
glTexCoordPointer(2, GL_FLOAT, 0, uvCoordinates);
glNormalPointer(GL_FLOAT, 0, normals);
glDrawArrays(renderStyle, 0, vertexCount);
}In our implementation, we override the render method and provide our own. Now we are ready to add the 3D models to our scene objects.
Let's begin, as we always do, with the spaceship:
-(void)awake
{
mesh = [[BBTexturedMesh alloc] initWithVertexes:Ship_vertex_coordinates
vertexCount:Ship_vertex_array_size
vertexSize:3
renderStyle:GL_TRIANGLES];
[(BBTexturedMesh*)mesh setMaterialKey:@"shipTexture"];
[(BBTexturedMesh*)mesh setUvCoordinates:Ship_texture_coordinates];
[(BBTexturedMesh*)mesh setNormals:Ship_normal_vectors];
self.collider = [BBCollider collider];
[self.collider setCheckForCollision:YES];
dead = NO;
}Again, we simply need to alter our awake method to take advantage of the new mesh object. Don't forget to include ship_iphone.h.
That's it. We can update the rocks and the missiles in the same way. Once we do that, we can build our game and see the glory of 3D (see Figure 8-17).
Well, it really is not all that glorious yet. Everything looks very flat. At this point, we could have just stuck with textured quads and 2D.
In order to be able to define a shape in our minds, our eyes need to be able to compare how the light falls across a surface. This creates light areas and shady areas. It is this contrast that helps us see shapes.
So far, our game has plenty of light. What we want is some shadow. Currently. we are just using the default "no defined lights" state in OpenGL. When you do not define any specific lighting, the renderer happily makes all the textures the same brightness, no matter how the surfaces are oriented. This is like having a big set of work lights on, and after you are finished with the construction, you want to be able to adjust the lighting.
To change this, we need to define at least one light. Once we enable lighting effects, the boring "work lights" constant lighting will go away, and we will get our shadows.
OpenGL is a very clever API. It knows how to simulate light hitting a surface, and it will figure out how the light hitting that surface will reflect back to the viewer. If that sounds complicated, it is.
Luckily, we don't need to know the esoteric ins and outs of optics and refraction theory. But we do need to know a few fairly complicated things, such as what kind of light sources we want to make.
We can look at the code while we talk about these things. In the BBSceneController, let's add a new method called setupLighting.
-(void)setupLighting
{
// light features
GLfloat light_ambient[]= { 0.2f, 0.2f, 0.2f, 1.0f };
GLfloat light_diffuse[]= { 80.0f, 80.0f, 80.0f, 0.0f };
GLfloat light_specular[]= { 80.0f, 80.0f, 80.0f, 0.0f };
// set up light 0
glLightfv (GL_LIGHT0, GL_AMBIENT, light_ambient);
glLightfv (GL_LIGHT0, GL_DIFFUSE, light_diffuse);
glLightfv (GL_LIGHT0, GL_SPECULAR, light_specular);The first thing that we want to do is tell OpenGL what kind of light we want. Each light generates three types of lighting (see Figure 8-18):
Diffuse light is what makes our shadows look real. When diffuse light hits a surface, it is applied based on the normal of the surface and the angle that the light is hitting it. (Remember the normal from a few pages ago? This is why we care about normals.)
Specular light is the light you see in the shiny spot of an object. It is the most reflective light.
Ambient light comes from everywhere. If you turned on full ambient light and turned off diffuse and specular light, you would basically have the default lighting. Every pixel will receive the same amount of ambient light.
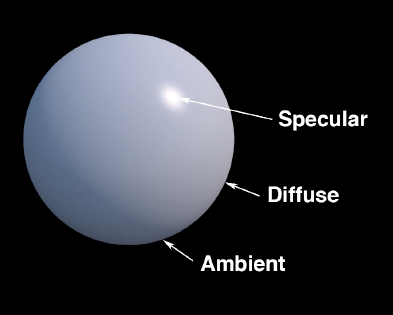
If we think of light shining on a ball, then the ambient light would be noticed on the dark side, away from our light source. The diffuse light would define the shape of the ball, and the specular light would show up at the point of greatest reflective intensity.
For our light, we have picked a pretty low level of ambient light and equally intense diffuse and specular light.
We can also define the material properties for our lighting. Our new light source will look very different reflecting off fuzzy red velvet than it would when reflecting off smooth red plastic.
GLfloat mat_specular[] = { 0.5, 0.5, 0.5, 1.0 };
GLfloat mat_shininess[] = { 120.0 };
glMaterialfv(GL_FRONT_AND_BACK, GL_SPECULAR, mat_specular);
glMaterialfv(GL_FRONT_AND_BACK, GL_SHININESS, mat_shininess);glMaterial and all the associated concepts and code that go along with it could fill yet another chapter. I added these few lines of material definition code just to whet your appetite. Using materials, you can make surfaces that are transparent, surfaces that glow with their own inner light, and surfaces that are shiny and reflective. As typical with OpenGL, this material will be applied to any models you draw until you change it. This allows you to have dozens of different material types in your scene if you want. However, in SpaceRocks3D we can get away with using the default material, so I have commented out the glMaterial commands in the sample code.
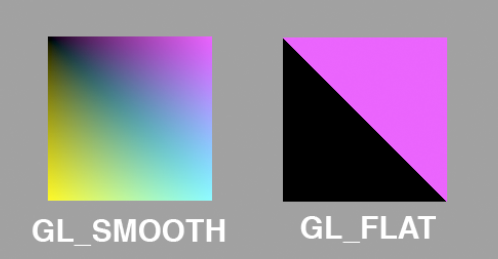
glShadeModel (GL_SMOOTH);
The glShadeModel tells OpenGL how to apply all of its light and shadow information to each surface. You have two choices (see Figure 8-19):
GL_SMOOTH: This is the default setting, which you have already seen. For our original Technicolor spinning box, the colors from each corner were smoothly interpolated inside the box. This is theGL_SMOOTHshade model at work.GL_FLAT: This makes the color of the entire triangle the same.GL_FLATis much faster thanGL_SMOOTH, but the effect is generally less than desirable. Similarly, whereasGL_SMOOTHwill blend light across each triangle in an attempt to replicate a real lighting situation,GL_FLATwill show each triangle as either light or dark.GL_FLATis not generally used unless you really need that last tiny bit of performance and are willing to take the visual degradation that comes along with it.
Next, we need to place our light source somewhere.
// place the light up and to the right
GLfloat light0_position[] = { 50.0, 50.0, 50.0, 1.0 };
glLightfv(GL_LIGHT0, GL_POSITION, light0_position);In this case, we position the light source up and to the right of our ship. This should give us some pleasing shadows and add some depth to the scene.
Now we can turn on the lights.
// Enable lighting and lights glEnable(GL_LIGHTING); glEnable(GL_LIGHT0);
A constant that you have seen a few times now is GL_LIGHT0. OpenGL provides you with eight possible light sources, GL_LIGHT0, GL_LIGHT1...GL_LIGHT7. For each source you use, you need to define all the various light properties, as we have done here for GL_LIGHT0. Then, after all that, you need to make sure that lighting is enabled, and that the light source you care about is also enabled.
The next thing we are going to do is a bit funky, and is only tangentially related to lighting. If you build the app now, you will notice that the rocks and the ship are rendering oddly, as if some of the back of the rocks were being rendered in front of the rocks (see Figure 8-20). This is not at all pleasing.
You may recall the depth buffer, introduced in Chapter 6. It is true that the depth buffer will kind of solve the problem we are having with our rocks by sorting the triangles and drawing the ones that are closer to the camera on top of the ones that are farther away. However, the depth buffer comes with a few problems.
On the plus side, the way the iPhone graphics hardware renders your models makes the use of the depth buffer a very inexpensive process. On the minus side, depth buffers in general are very bad at handling transparent textures. I won't go into the technical details, but suffice it to say you have to be very careful of the order in which you send you objects to the renderer if you have any textures that might have transparent or semitransparent pixels. This is not to say that the depth buffer and semitransparent objects cannot be used together—they absolutely can, but it takes some clever prerenderer sorting.
I really enjoy using transparent textures. I think they add a great deal of character to some scenes (usually in the form of particles, which we will be discussing shortly). But I don't like to add extra sorting code if I don't have to, so I try to avoid using the depth buffer whenever I can.
So then what is our option? Our best bet is to simply not draw the offending triangles. We do this by using the OpenGL function glCullFace.
Note
Although I'm showing the culling code after the lighting code here, it is before the lighting code in the sample project. What gives? Well, since OpenGL is a stateful API, the order of most of the calls doesn't really matter. We are just flipping all of the switches to the positions we want them before we do a drawArrays call.
// cull the unseen faces
glEnable(GL_CULL_FACE);
// we use 'front' culling because Cheetah3d exports our models to be compatible
// with this way
glCullFace(GL_FRONT);
}What does this do? The renderer actually throws out vertexes that do not match the culling filter. Since each triangle is a flat surface, depending on the orientation of that triangle in relation to the camera, it is either facing toward the camera or facing away from the camera. But wait! How can we tell which side is the front and which side is the back?
Each triangle has three vertexes, and the order in which these vertexes are handed to the renderer is known as the winding of the triangle. You can pass your three vertexes in clockwise order or in counterclockwise order, if you are facing the front of the triangle. If you flip that triangle over, then the vertexes will now be in the opposite winding from your perspective. By looking at this winding, we can tell whether a triangle is facing us. We just need to pick one and say counterclockwise is front-facing (or we could say clockwise is front-facing; it doesn't matter as long as we are consistent). It is generally accepted that counterclockwise winding is front-facing (see Figure 8-21).
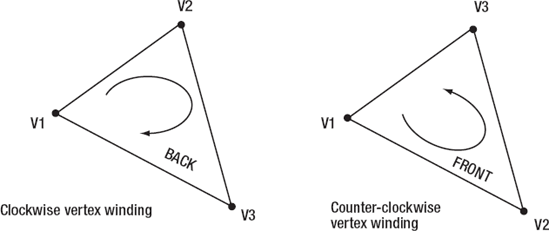
Figure 8.21. Vertex winding determines whether the face you are looking at is the front or the back of the surface.
Generally, OpenGL will just fill in the triangle irrespective of how it is facing the camera. However, this is a bit wasteful, since there are many hidden surfaces. Instead, we tell OpenGL to simply ignore the set of faces that is facing away from us.
The default front-face winding in OpenGL is counterclockwise, and the default culling face is the back face. However, sometimes your modeler will provide you with your triangles in a different order, and back-face culling makes your scene look strange. You can do one of two things:
Tell OpenGL that front faces should be defined as clockwise windings:
glFrontFace(GL_CW);Tell OpenGL to remove the front faces instead of the back faces.
OK, our lighting is set up. Now we need to add the setupLighting call to into our renderScene method in the scene controller:
- (void)renderScene
{
// turn openGL 'on' for this frame
[openGLView beginDraw];
[self setupLighting];
.
.
.If you build and run the game now, you will see our game in 3D (see Figure 8-22)!
In both the textured and 3D versions of Space Rocks!, I have glossed over a few things as we upgraded. The biggest piece is the collision-detection code. I covered it decently when we first encountered it in Chapter 7, and it really has not changed much since the retro game. I have tweaked it slightly to be compatible with the textured quads and again with the 3D models. But, in each case, the basic idea has held true: Keep the initial collision detection as simple as possible.
In the case of the retro game, we used circles and checked the distance between our objects against the radius of their collision circles. In SpaceRocksTextured, this was modified to manually adjust the radius of the collider to more closely match the artwork. I also added a half-dozen collision points to the spaceship in order to be able to do the secondary check against the mesh.
In SpaceRocks3D, our collision circles become collision spheres. I used the same code that is in the retro version for a secondary collision check.
You can examine all of these changes in the source code for the textured and 3D versions. Now, let's see how to add particle effects.
If you have played any games in the past few years, I can pretty much guarantee that you have seen a particle effect in one of them. Particle effects are generated by a particle system.
Particle systems are amazingly versatile. At their simplest, particles can simulate simple fluid systems, like a water spurt or exhaust flames from a rocket. Particle systems can be used to great effect as explosions or heavy weather. With some clever use, a particle system can become a magical energy field or a crackling laser blast. With a well-designed particle system class, you will find that you can do all of these things just by tweaking a few parameters.
OK, that all sounds very exciting, but doesn't really explain what a particle system is or how it works. At its core, a particle system is just a collection of textured quads. Each quad has its own state, much like any other scene object.
What generally makes particle systems unique is that their visual appearance is made up of many smaller images. Each tiny image is a single particle, and when all of the particles are rendered at once, they give the appearance of very fluid, living, organic effects. Figure 8-23 shows some examples of simple particle effects.
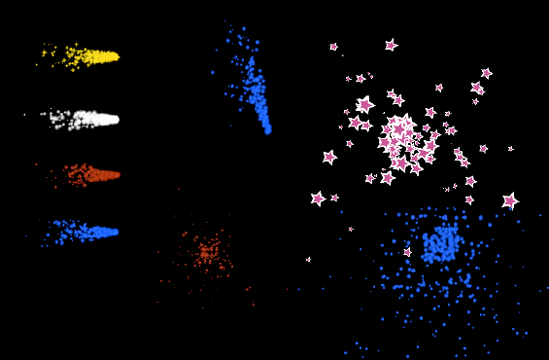
Figure 8.23. A handful of different particle effects using the same code with slightly different parameters and textures
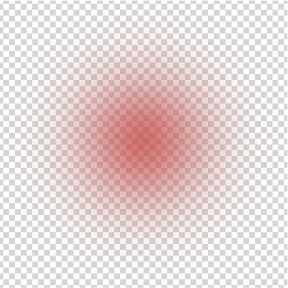
Often, the textures used to make up a particle system will be blurry, translucent textures. These tend to be very good at mimicking smoke and fire. The overall effect is that the half-opaque particles, when seen in concentration, will be very bright and intense, but as they drift apart, they become dimmer and more transparent. Figure 8-24 shows a closeup of the red particle from the example in Figure 8-23. You can see how this particle is mostly transparent. However, you can just as easily use hard-edged graphics to produce very interesting effects, such as comical stars coming off a character's head after being hit by an anvil, or coins streaming out of a slot machine.
OpenGL is one of those APIs that makes particle systems feasible. OpenGL is so incredibly efficient at pushing textures out onto the screen that you can easily have hundreds or even thousands of individual particles on the screen at once, and still maintain incredibly high frame rates. This is something that is nearly impossible to achieve with the other graphics APIs on the iPhone. That said, in order to render a few thousand individual particles at the same time, we need to be a bit clever about how we design our system.
As I mentioned earlier, one of the defining characteristics of a particle system is that each particle has unique properties. In other words, each particle should have slightly different velocity vectors and a slightly different lifetime. This variety is what gives the particle system its organic feel.
How do we give our particles a unique state? One way is to actually simulate the real-life system you are trying to portray. So if you wanted to have a particle system that looked like a stream of water jetting out of a fountain, then you could build a numeric simulator that took into account the water pressure, shape of the nozzle, viscosity of the water, and a whole host of other things that would require a degree in fluid dynamics to know.
Or you can take the easy way out (my preference) and just assign a handful of random numbers to all the state variables, and then tweak them until your effect looks good.
Much earlier, we added a handy macro for grabbing random ints. We could use that (and we will), but what we ultimately want is a bit more granular numbers. We want a random float. This means we need some new code. This will end up in our particle system, but this particular method will go into BBPoint.h with all the rest of the inline methods.
static inline CGFloat BBRandomFloat(BBRange range)
{
// return a random float in the range
CGFloat randPercent = ( (CGFloat)(random() % 10001) )/10000.0;
CGFloat offset = randPercent * range.length;
return offset + range.start;
}This is pretty simple. But it does require a new structure—a range that can be negative and floating point (unlike NSRange).
typedef struct {
CGFloat start, length;
} BBRange;
static inline BBRange BBRangeMake(CGFloat start, CGFloat len)
{
return (BBRange) {start,len};
}Great! Now we have a nice, easy way to get random floats in whatever range we desire. We are ready to build our system.
Particle systems have two main components: the particle controller, often called the emitter, and the particles themselves.
Just like all the other scene objects, each particle is updated once a frame, and each particle has some basic state associated with it—like position and speed.
So far, this is not any different than most other scene objects, but our particles will need just a bit more information. Our emitter will be making new particles and adding them to the system, but we also need to know when to remove them. In order to do this, we need to know how long a particle will stay in the system. Let's call this the particle's life. If we give each particle some amount of life and remove a bit of life every frame, then once our life gets to zero, we will know to remove it.
How much life do we take each frame? Let's call that the decay of the particle.
Finally, it would be nice if our particles could change size during their life. We will need two more state variables: size and grow. Since we want our particles to be simple, we will make size both the height and width of our quad. The grow variable will be the amount that we change each particle's size every frame, much like decay.
Position, speed, life, decay, size, and grow states should be enough to get us started.
@interface BBParticle : NSObject {BBPoint position;
BBPoint velocity;
CGFloat life;
CGFloat decay;
CGFloat size;
CGFloat grow;
}
@implementation BBParticle
@synthesize position,velocity,life,decay,size,grow;
-(void)update
{
position.x += velocity.x;
position.y += velocity.y;
position.z += velocity.z;
life -= decay;
size += grow;
if (size < 0.0) size = 0.0; // otherwise we will still render, just flipped
}Our particle is a very simple object. It has a bit of state, and during each update, it moves itself based on its speed and then decrements its life. More advanced particle systems allow for dozens of various changing states. Things like rotation and color animation will add excitement to your particle system.
Our emitter is a bit more complicated.
Before we start on the emitter code, we need to figure out a few things about our particle system. First, why don't we just make each particle a textured quad and have the particles render themselves? It seems like making a new object that is so similar to a scene object is duplicating our efforts.
This is somewhat true, but the problem with using normal scene objects as particles is the sheer volume of them. Each scene object requires its own draw call. If we have, say, 3000 particles and we called glDrawArrays 3000 times, we would probably be lucky to be getting 2 or 3 fps. We need to figure out a better way to draw our particles.
If we keep our particles fairly simple, and they all use the same material, then we can draw them all in the same draw call. In order to do this, we need to use GL_TRIANGLES and provide two separate triangles for each quad, and send them all as a single draw call.
Also be aware that allocating new objects takes an order of magnitude longer than reusing preallocated objects. We should plan to have a large pool of prebuilt particles available.
We will have some big array of currently active particles. We will iterate across that list and update each particle, and then add its vertexes to our model data.
Since we won't be able to remove particles from the active array as we are iterating across it, we will need a dead particle queue to hold the particles that are no longer active and should be returned to the pool. Figure 8-25 shows this circle of particle life.
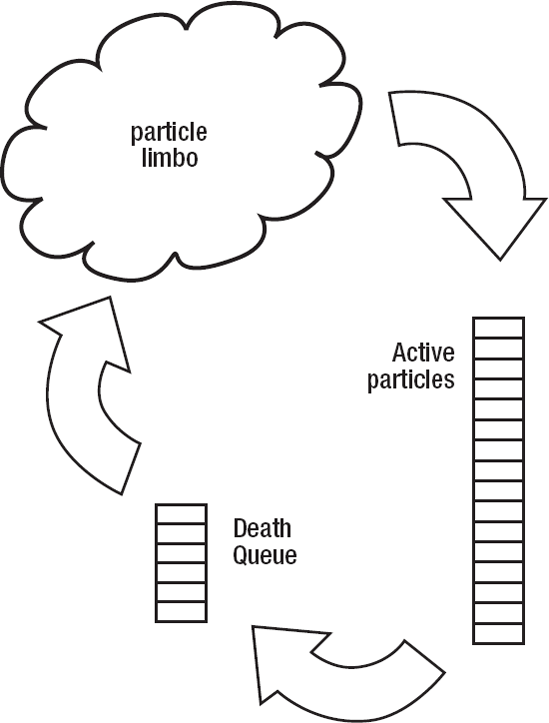
Figure 8.25. The circle of particle life. New particles are pulled from the big pool. Once they are out of life, they are queued for removal and put back into the big pool of inactive particles, shown here as particle limbo.
Once we are finished building our OpenGL data arrays, we will render them out in a single draw call.
Let's look at some code. We need a new object, the BBParticleSystem, which will be a subclass of BBSceneObject.
@interface BBParticleSystem : BBSceneObject {
NSMutableArray * activeParticles;
NSMutableArray * objectsToRemove;
NSMutableArray * particlePool;
GLfloat * uvCoordinates;
GLfloat * vertexes;
NSString * materialKey;
NSInteger vertexIndex;
BOOL emit;
CGFloat minU;
CGFloat maxU;
CGFloat minV;
CGFloat maxV;NSInteger emitCounter;
BBRange emissionRange;
BBRange sizeRange;
BBRange growRange;
BBRange xVelocityRange;
BBRange yVelocityRange;
BBRange lifeRange;
BBRange decayRange;
}The particle system has a lot of instance variables. We need to store all the particles in their various states. We need to hold onto the OpenGL vertex and UV data. And we also need to know what our particle property ranges will be.
In our awake method, we will build a whole bunch of particles and put them into the pool. Also, we will allocate some space for our vertexes and UV coordinates.
-(void)awake
{
// alloc some space for our particles
if (activeParticles == nil) activeParticles = [[NSMutableArray alloc] init];
// we are going to prealloc a whole bunch of particles so
// we don't waste time during gameplay allocing them
particlePool = [[NSMutableArray alloc] initWithCapacity:BB_MAX_PARTICLES];
NSInteger count = 0;
for (count = 0; count < BB_MAX_PARTICLES; count++) {
BBParticle * p = [[BBParticle alloc] init];
[particlePool addObject:p];
[p release];
}
// finally make some space for our final particle mesh
// our vertexes will be all 3 axes, and we need 6 axes per particle
vertexes = (CGFloat *) malloc(3 * 6 * BB_MAX_PARTICLES * sizeof(CGFloat));
uvCoordinates = (CGFloat *) malloc(2 * 6 * BB_MAX_PARTICLES * sizeof(CGFloat));
}Note that we are making our vertex and UV arrays big enough to hold every single particle. Most of the time, we will be using only a fraction of that memory space, but allocating new space is expensive, so we want to make sure we have enough to start out with. Also notice that we have set BB_MAX_PARTICLES to 100. That means that every single particle emitter we allocate will have enough space for 100 particles.
Next, we will need a method to define the texture that we will use for our particles.
-(void)setParticle:(NSString*)atlasKey
{
// ok, here we are going to go and get the quad that will be our particle image
// however, we do not want to keep the mesh, we just want to get some information
from it
BBTexturedQuad * quad = [[BBMaterialController sharedMaterialController]
quadFromAtlasKey:atlasKey];// get the material key so we can bind it during render
self.materialKey = quad.materialKey;We grab a quad from the material controller, but unlike the other scene objects, we are not going to keep it as our mesh. Instead, we just want to find out what the material key is and what the UVs are.
// now we need to find the max/min of the UV coordinates
// this is the location in the atlas where our image is, and we are
// going to be applying it to every particle
CGFloat u,v;
NSInteger index;
minU = minV = 1.0;
maxU = maxV = 0.0;
CGFloat * uvs = [quad uvCoordinates];
for (index = 0; index < quad.vertexCount; index++) {
u = uvs[index * 2];
v = uvs[(index * 2) + 1];
if (u < minU) minU = u;
if (v < minV) minV = v;
if (u > maxU) maxU = u;
if (v > maxV) maxV = v;
}
}Since we are a subclass of the BBSceneObject, we will override the update method to do our main chunk of work.
-(void)update
{
        // update active particles, they will move themselves
        [super update];

        // build arrays
        [self buildVertexArrays];

        // generate new particles and queue them for addition
        [self emitNewParticles];

        // remove old particles
        [self clearDeadQueue];
}
The first thing we will do is build the vertex arrays for our existing particles. Then we will add any new particles to the system. Finally, we will clear out the dead particles and return them to the pool.
-(void)buildVertexArrays
{
        // go through all our individual particles and add their triangles
        // to our big mesh
        vertexIndex = 0;
        for (BBParticle * particle in activeParticles) {
                [particle update]; // first, update each particle before we use its data

                // check to see if we have run out of life, or are too small to see
                // and if they are, then queue them for removal
                if ((particle.life < 0) || (particle.size < 0.3)) {
[self removeChildParticle:particle];
continue; // skip to the next particle, no need to add this one
}This is the first part of our buildArrays method. We first reset our vertexIndex. We will need this to be able to keep track of where we are in the new arrays.
We call update on the particle, and it updates its state variables. If we have sucked the last bit of life from the particle in this update, then we queue it for death and move on to the next particle.
This next bit is fairly important. Since we are culling faces, we need to make sure that we build our triangles in the proper order, or they will simply be culled and we won't ever see them.
// for each particle, need 2 triangles, so 6 verts
                // first triangle of the quad.  Need to load them in clockwise
                // order since our models are in that order
                [self addVertex:(particle.position.x - particle.size)
                     y:(particle.position.y + particle.size)
                     u:minU
                     v:minV];
                [self addVertex:(particle.position.x + particle.size)
                     y:(particle.position.y - particle.size)
                     u:maxU
                     v:maxV];
                [self addVertex:(particle.position.x - particle.size)
                     y:(particle.position.y - particle.size)
                     u:minU
                     v:maxV];

                // second triangle of the quad
                [self addVertex:(particle.position.x - particle.size)
                    y:(particle.position.y + particle.size)
                    u:minU
                    v:minV];
                [self addVertex:(particle.position.x + particle.size)
                    y:(particle.position.y + particle.size)
                    u:maxU
                    v:minV];
                [self addVertex:(particle.position.x + particle.size)
                  y:(particle.position.y - particle.size)
                  u:maxU
                  v:maxV];

        }
}
The addVertex: method is a simple method that just constructs the vertex and UV arrays one vertex at a time.
// add a single vertex to our arrays
-(void)addVertex:(CGFloat)x y:(CGFloat)y u:(CGFloat)u v:(CGFloat)v
{
        // our position in the vertex array
        NSInteger pos = vertexIndex * 3.0;
        vertexes[pos] = x;
vertexes[pos + 1] = y;
vertexes[pos + 2] = self.translation.z;
// the UV array has a different position
pos = vertexIndex * 2.0;
uvCoordinates[pos] = u;
uvCoordinates[pos + 1] = v;
// increment our vertex count
vertexIndex++;
}Next, we emit new particles.
-(void)emitNewParticles
{
        if (!emit) return;
        if (emitCounter > 0) emitCounter --; // if emitCounter == −1, then emit forever
        if (emitCounter == 0) emit = NO; // this will be our last time through the emit
method

        NSInteger newParticles = (NSInteger)BBRandomFloat(emissionRange); // grab a random
number to be emitted

        NSInteger index;
        CGFloat veloX,veloY;
        for (index = 0; index < newParticles; index++) {
                if ([particlePool count] == 0) {
                        // if we are out of particles, then just get out early
                        return;
                }
                // grab a premade particle and set it up with some new random numbers
                BBParticle * p = [particlePool lastObject];
                p.position = self.translation;
                veloX = BBRandomFloat(xVelocityRange);
                veloY = BBRandomFloat(yVelocityRange);
                p.velocity = BBPointMake(veloX, veloY, 0.0);

                p.life = BBRandomFloat(lifeRange);
                p.size = BBRandomFloat(sizeRange);
                p.grow = BBRandomFloat(growRange);
                p.decay = BBRandomFloat(decayRange);

                // add this particle
                [activeParticles addObject:p];
                // remove this particle from the unused array
                [particlePool removeLastObject];
        }
}
There is one thing of note here (well, there are a lot of things of note, but only one I haven't talked about yet): the variable emitCounter. Generally, this particle system will just emit particles forever and ever, until you release it. However, sometimes we just want a short burst of particles, say, for an explosion. To be able to handle this case, we have added this emitCounter so that the emitter will shut itself off after a certain number of frames. This way, we can set your emissionRange fairly high, set our emitCounter to 3 or 4, and get some fantastic explosion effects.
The last thing we do in our update method is to clear out the dead particles.
-(void)clearDeadQueue
{
        // remove any objects that need removal
        if ([objectsToRemove count] > 0) {
                [activeParticles removeObjectsInArray:objectsToRemove];
                [particlePool addObjectsFromArray:objectsToRemove];
                [objectsToRemove removeAllObjects];
        }
}
Here, we are simply moving particles from the active array into the pool. The reason we are doing this here instead of in the build array method is that you cannot alter an array while you are iterating across it.
So we now have a possibly huge array of vertexes and UV coordinates. We will need to override the render method since we have a bit of a special case.
// we want to override the super's render because
// we dont have a mesh, but instead are holding onto all the array data
// as instance vars
-(void)render
{
        if (!active) return;

        // clear the matrix
        glPushMatrix();
        glLoadIdentity();

        // bind our texture
        [[BBMaterialController sharedMaterialController] bindMaterial:materialKey];

        glEnableClientState(GL_VERTEX_ARRAY);
        glEnableClientState(GL_TEXTURE_COORD_ARRAY);
        glDisableClientState(GL_NORMAL_ARRAY);

        // send the arrays to the renderer
        glVertexPointer(3, GL_FLOAT, 0, vertexes);
  glTexCoordPointer(2, GL_FLOAT, 0, uvCoordinates);
        //draw
  glDrawArrays(GL_TRIANGLES, 0, vertexIndex);

        glPopMatrix();
}
Notice we are disabling the GL_NORMAL_ARRAY. We don't have normals for our particles, and we don't want the renderer thinking that the normal arrays that are resident in memory are valid for our particles, so we disable it for this draw call. This is not to say that you cannot or should not have normals for your particles. You can, and should if you want your lighting to affect them. However, for our simple system, we will go without normals.
Now we have our particle system. We will add one to our scene objects and tune it so it looks right. Let's start with the missile.
In the awake method in our BBMissile object, add this code:
particleEmitter = [[BBParticleSystem alloc] init];
particleEmitter.emissionRange = BBRangeMake(3.0, 0.0); // 3 per frame
particleEmitter.sizeRange = BBRangeMake(8.0, 1.0); // roughly the same size
particleEmitter.growRange = BBRangeMake(-0.8, 0.5); // shrinking

particleEmitter.xVelocityRange = BBRangeMake(-0.5, 1.0); //emit slowly
particleEmitter.yVelocityRange = BBRangeMake(-0.5, 1.0); //all directions

particleEmitter.lifeRange = BBRangeMake(0.0, 2.5);
particleEmitter.decayRange = BBRangeMake(0.03, 0.05);

[particleEmitter setParticle:@"redBlur"];
particleEmitter.emit = YES;
Remember that our range structure is the start of the range and the length of the range. This can be slightly confusing, especially with negative numbers. Keep in mind that BBRangeMake(−0.8, 0.5) will generate a number between −0.8 and −0.3, not −0.8 and 0.5.
We will need to move the particle system along with us as we move. And we will want it to be near the back of the missile, so we will shift it down just a bit.
-(void)update
{
        .
        .
         particleEmitter.translation = BBPointMatrixMultiply(BBPointMake(0.0, −2.0, 0.0),
matrix);
         .
        .
}
We're almost there, but before we can try this out, we need one more bit of code in our BBMissile object:
- (void) dealloc
{
        if (particleEmitter != nil) [[BBSceneController sharedSceneController]
removeObjectFromScene:particleEmitter];
        [particleEmitter release];
        [super dealloc];
}
We don't want the particle system to hang around after our missile has been destroyed!
If you build and run the game now, you will see our missiles have groovy red exhaust trails (see Figure 8-26).

With our textured version of Space Rocks!, once we had built our animated quads, we wanted to add them for everything. Similarly, you will want to do the same with the particle effects.
Since I don't have enough hands to be able to fire missiles, thrust, and avoid the enemy UFO while simultaneously taking a screenshot, I employed a bit of Photoshoppery in Figure 8-27 to make this last figure. The thrusters on the ships and the exhaust of the missiles look fairly good in a still image, but the green rock explosion is less exciting when looking at only a single frame. To fully appreciate all the explosions, you will need to compile the app yourself and smash some rocks! (Did I mention I added an enemy UFO for you? Yeah, they shoot missiles too, and they can destroy you, so look out! I know—it is pretty awesome.)

As part of iPhone SDK 3.0 and the new iPhone 3GS, Apple upgraded the OpenGL hardware on the new devices to be able to take advantage of the newer OpenGL 2.0 specification.
Probably the largest difference between 1.1 and 2.0 that you will hear about is the ability to implement shaders (there are tons of other differences as well, but that is the one that most people are excited about).
What is a shader? Shading is the process by which OpenGL takes your texture and combines it with the vertex positions, the light and color information, and a handful of other variables, and eventually ends up with a color value for every pixel on your screen. There is a mathematical function that governs how all those variables react to each other and finally come up with a color for that pixel that lands on your screen.
OpenGL ES 1.1 is a fixed pipeline, so there is no way to alter the way your triangles get shaded. This doesn't mean that you cannot do some amazing things with OpenGL ES 1.1, but it is a bit more complicated.
OpenGL ES 2.0 is a programmable pipeline. This means that you can define your own functions for how pixels get painted into your triangles. There is a whole language devoted to shaders known as the OpenGL Shading Language (GLSL). You use that to define shaders. You can then hand them to the rendering pipeline, just as you would hand it a texture, so you can have multiple shaders for all your various materials and objects.
GLSL, OpenGL ES 2.0, and shaders are yet another topic that could (and has) filled entire books, so I won't say much more about it here. The topics and concepts covered in this and previous two chapters put you well on your way to being able to pick up shaders and all the new stuff in OpenGL ES 2.0.
These chapters about OpenGL have been pretty dense with information. This chapter went especially quickly. It may be worth a second read if all the concepts have not fully seated in your brain.
And if you have grown as attached to Space Rocks! as I have, then you will be pleased to know that in the next few chapters, Eric Wing will take the 3D version to the next level and add some sound using OpenAL (and he may even give you some more advanced tips on OpenGL as well).
For more information about OpenGL ES, see the OpenGL ES Specification, header files, EGL, and manuals (http://khronos.org/opengles/spec). I know it will sound like I am joking, but the ES specification is really quite interesting, and it is not so huge that reading it constitutes a daunting task.
As always, the Apple documentation is a good place to find the platform specifics:
The iPhone OS Reference Library (
http://developer.apple.com/iphone/library/documentation/OpenGLES/Reference/OpenGLES_Framework/)The OpenGL Introduction (
developer.apple.com/iphone/library/documentation/3DDrawing/Conceptual/OpenGLES_ProgrammingGuide/Introduction/Introduction.html)
Also, if you have any questions about my code or these chapters, don't hesitate to stop by my blog (http://benbritten.com) and drop me an e-mail or a comment.