At the core of every BizTalk project is the necessity to deploy an integration project to the BizTalk execution environment. Given the complexity of the product, and the rich features it provides, this task has often been difficult and time-consuming. Every experienced BizTalk developer understands the time requirements to deploy, enlist, and start BizTalk artifacts, keeping in mind dependencies and ordering the steps accordingly. BizTalk has great functionality for this, so that a minimum of time is spent deploying solutions, and more time is available to develop new return-on-investment-producing solutions.
This chapter provides recipes for exporting and importing applications. It also covers how to start an application and begin processing within the BizTalk execution environment.
You have completed the build phase of a BizTalk project and need to migrate your work from the development environment to the test environment.
You must export the BizTalk application you have been building for use in the new environment. The BizTalk Administration Console provides the capability to export and import artifacts. Combined with the use of BizTalk applications, this allows for a simplified method of packaging your solutions and deploying them to new environments. The following steps outline the process for exporting a BizTalk application.
Open the BizTalk Administration Console.
In the left pane, navigate through BizTalk Server Administration to your BizTalk group, and expand the
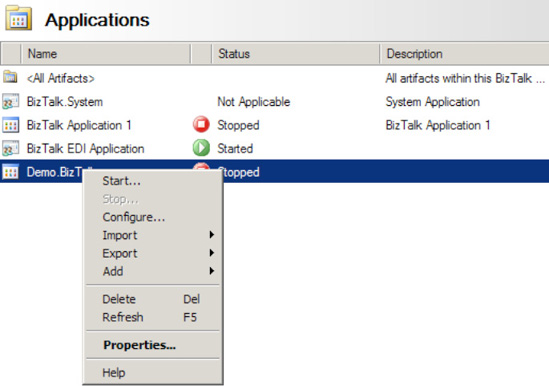
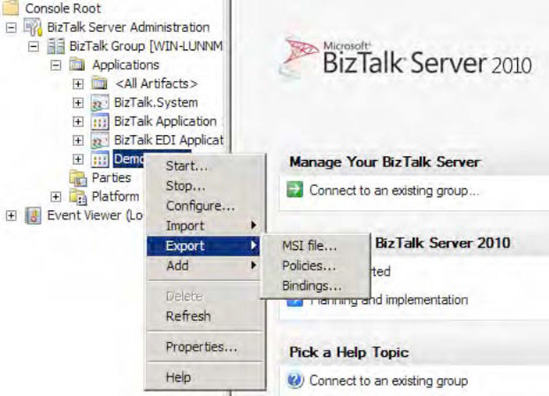
Applicationsfolder.Right-click the application you wish to export and select Export→MSI File, as shown in Figure 9-1. This launches the Export MSI File Wizard.
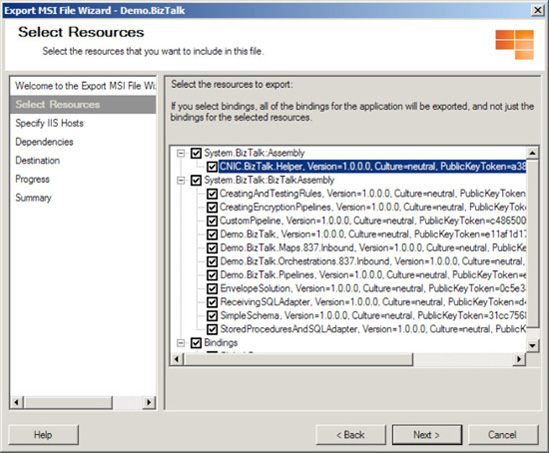
On the Select Resources page, verify that the resources you need to include in the exported MSI package are selected. In the example shown in Figure 9-2, the resources consist of a number of BizTalk assemblies and their bindings and a referenced .NET assembly. Click Next to proceed.
Note
Including bindings within your MSI package will automatically overwrite any existing bindings in the target application upon import. Exclude the bindings during the export process if you do not want to overwrite the bindings in your target application.
On the Specify IIS Hosts page, select the virtual directories you need to include in the exported MSI package. Click Next.
Note
You must specify IIS hosts for all web directory resources that have not already been added to the BizTalk Management database. In our example, the
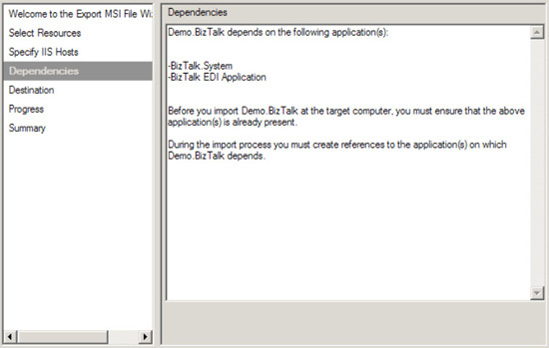
Orderapplication has a SOAP receive location, which is configured to receive messages from the/addRequestWebService_Proxy/addRequestWebService_addRequestSPMLWebService_addRequest.asmxweb service. Since the receive locations do not include the host, it must be specified during the export process.On the Dependencies page, review the BizTalk applications your exported MSI package depends on, as shown in Figure 9-3. Prior to importing your application into the test environment, you must ensure that all applications listed on this page are present in the test environment. In our example, the application depends on the
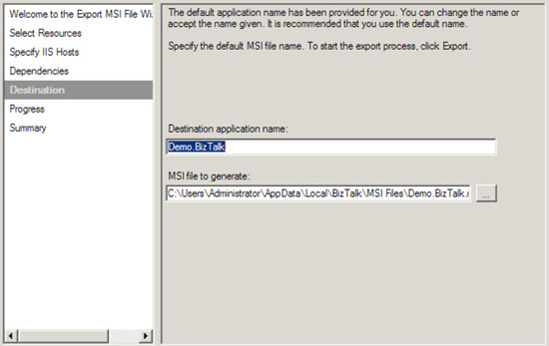
BizTalk.SystemandBizTalk EDIapplications. Click Next to proceed.On the Destination page, specify the destination application name (which indicates what the application will be named in the test environment after you have imported it) and the MSI package output location and file name, as shown in Figure 9-4. In our example, the application will be named the same as it was in the development environment (
Demo.BizTalk) and the MSI package will be written out to a folder on the C drive.Click Export to generate the MSI package.
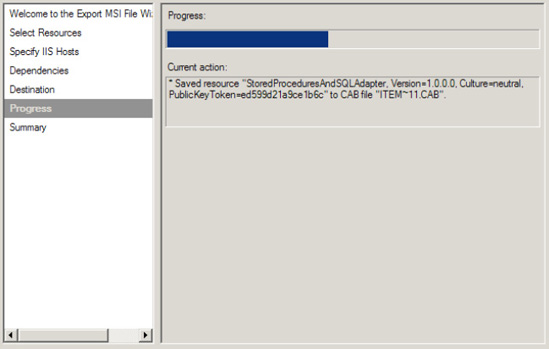
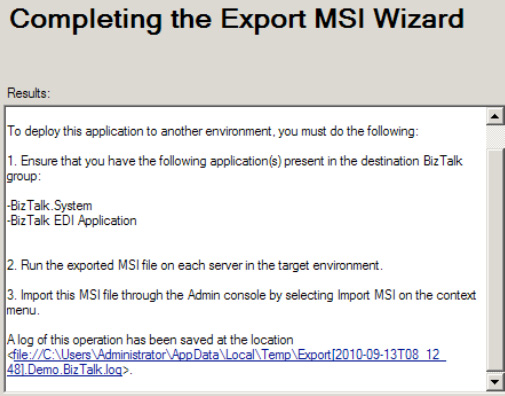
The wizard displays the progress of the export operation and then shows a progress and summary screen when it has completed, as shown in Figures 9-5 and 9-6. The summary includes a list of steps necessary to import the application into a new environment, along with a link to the log file of the export operation. Click Finish to close the wizard.
While exporting applications is an easy way to migrate solution artifacts between environments, it is important to note what is not included in exported MSI packages. Configuration values you have made in the BTSNTSvc.exe.config file are not exported. If one of your artifacts relies on a custom configuration value existing in this file, you must use another mechanism (manual or otherwise) to add that same configuration value to the target environment.
Note
In general, only those artifacts that are specific to an application are exported. This means that BizTalk group configurations (performance values or adapter settings, for example) and Business Activity Monitor (BAM) artifacts are not included in the exported MSI package.
You should be careful with regard to security when exporting applications. Depending on your solution, your MSI package may contain sensitive information (such as passwords) and should be appropriately secured. One consideration is the use of passwords in port bindings. Passwords are removed from all bindings that you export directly from an application (as we did in our example). If you want to persist passwords in a binding file, you must create a binding file with the passwords in it and then add the binding file to the application as a file resource.
You should also pay attention to access rights on resources added to your application. All permissions on files and folders are removed during the export process. For web directory resources, the security settings in place at the time of export are written to the MSI package.
In addition to using the Export MSI File Wizard, you can access the same functionality via the BTSTask ExportApp command-line utility. This utility accepts the following parameters, which mimic the steps taken in the wizard:
ApplicationName: The name of the BizTalk application to exportPackage: Path and file name of the MSI package to exportResourceSpec: Path and file name of the resource specification XML fileServer: SQL Server hosting the BizTalk Management database housing the application to exportDatabase: Name of the BizTalk Management database
In our recipe's example, the exported application includes relatively few artifacts—just several BizTalk assemblies, their bindings, and a required .NET assembly. Using the Export MSI File Wizard is simple and straightforward. It produces a single file that can be used to import the application into the test environment. On a larger project, it is likely that your application will have many more artifacts, including BizTalk assemblies, bindings, policies, and folder structures such as virtual directories and input/output folder hierarchies. Additionally, you might need to migrate only a subset of an application to a new environment. Using the BizTalk Administration Console, you can export application subsets, bindings, and policies.
Exporting applications allows for all artifacts (or a subset of artifacts) associated with an application to be exported into an MSI package. All of the artifacts you select during the export process will be packaged into a single MSI file, which you can use to install your application to a different BizTalk environment.
In addition to exporting an entire application, you can use the Select Resources page to specify a subset of artifacts to export. Let's extend the solution one step further in the project life cycle to see how this functionality might be useful. Suppose that after testing the Order application in the test environment, you find and fix an error in the Troubleshooting assembly. To apply your fix to the test environment, you need to export only the modified artifacts. Step through the Export MSI File Wizard a second time, and select only the Troubleshooting assembly on the Select Resources page. This produces an MSI package that includes only the selected assembly, which can be used to reimport the modified artifact in the test environment.
Note
Make sure that the assembly keeps the same strong name key and namespace on redeployment; otherwise, the .NET environment will consider the assembly a new component.
Exporting bindings allows for bindings associated with an application to be exported into an XML file. Bindings are the links between your physical environment (for example, a specific MSMQ queue or web service URI) and your logical environment (for example, an orchestration receive port). You can export bindings for an entire BizTalk group or a specific BizTalk application or assembly.
You can use either the Export Bindings Wizard (right-click the appropriate application in the BizTalk Administration Console and select Export Bindings) or the BTSTask ExportBindings command-line utility to export bindings.
Exporting policies allows for Business Rule Engine policies associated with a BizTalk group (all policies in your BizTalk environment's Business Rule Engine database) or application to be exported into an XML file. Take the following steps to export policies for your BizTalk application:
Right-click the appropriate application in the BizTalk Administration Console and select Export→Policies. This launches the Export Policies Wizard.
Select the policies and vocabularies you need to export, and specify a path and file name for the exported policy XML file, as shown in Figure 9-7.
Click OK to export the policies.
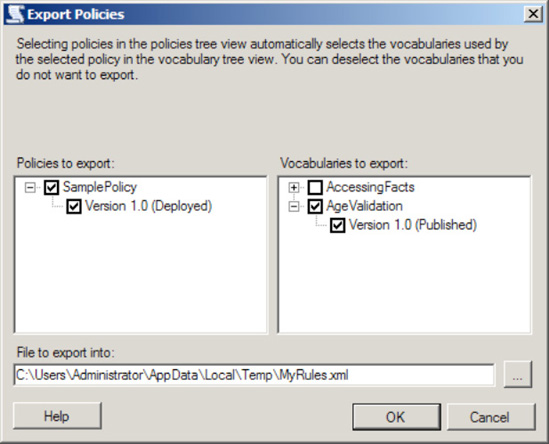
It is recommended that you include all vocabularies contained in the policies you export. This prevents any missing vocabulary issues that can arise when one vocabulary references another.
In addition to using the Export Policies Wizard, you can export bindings using the BTSTask ListApp and ExportApp command-line utilities in combination, as follows:
Run the
ListApputility to create an XML file containing all artifacts for the BizTalk group or application for which you need to export policies. An example of using the List App utility is as follows:BTSTask ListApp /ApplicationName:SampleApp /ResourceSpec:C:SampleOutput.xml
Delete all artifacts from the XML file except the policies.
Run the
ExportApputility, specifying the updated XML file for theResourceSpecparameter.
You have completed the build phase of a BizTalk project and need to import your work from the development environment to another environment. You must import the BizTalk application you have been building.
You can use the BizTalk Administration Console to import a BizTalk application (via an MSI file). The following steps outline the procedure:
Open the BizTalk Administration Console.
In the left pane, navigate through BizTalk Server Administration to your BizTalk group. Right-click the
Applicationsfolder, and select Import→MSI File. This launches the Import Wizard.On the Welcome page, navigate to and select the MSI file that is to be used to perform the import. In this example, we are importing the BizTalk
Demo.BizTalkapplication (exported in the previous Recipe), as shown in Figure 9-8. Click Next.On the Application Settings page, verify the settings for your application, references, and resources, as shown in Figure 9-9. In the list of applications available for reference, specify any references your target application has to existing BizTalk application assemblies and artifacts. You can also specify a new application (labeled during the export) or associate with an existing application within your BizTalk Management database. Click Next to continue.
On the Application Target Environment Settings page, in the Target Staging Environment drop-down list, select the environment to which the application is to be deployed. This option allows for environment specific considerations. You can partition applications that have been imported with binding specific settings. By specifying an environment value at this stage, the Import Wizard will apply only to the environment specific configuration identified during the import process. If you leave the value set to <Default>, the configuration will be applied to all environments.
On the Import Summary page, verify the application import information presented, as shown in Figure 9-10. Click Import when you're ready to complete the import process.
The wizard displays the progress of the import operation and then shows a Results page. Verify that the import was successful by checking for errors. You can also view more details of the import by clicking the link to the import operation log. Click Finish to close the wizard.
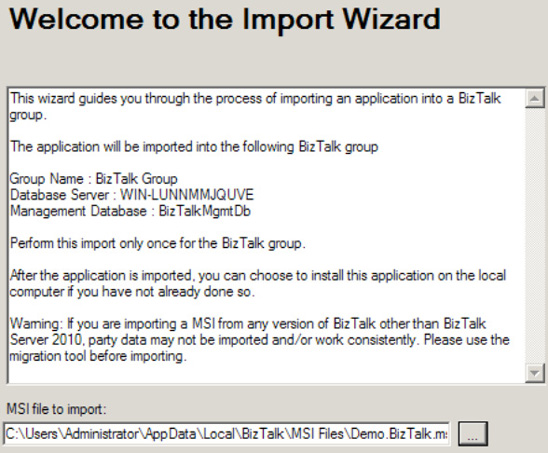
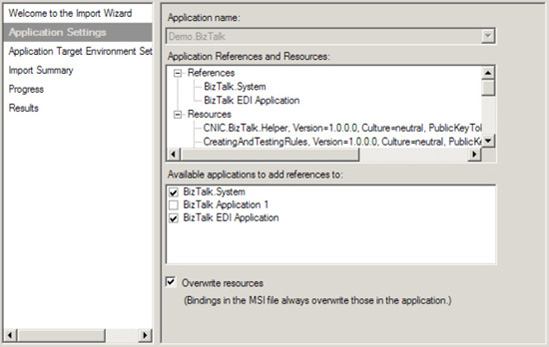
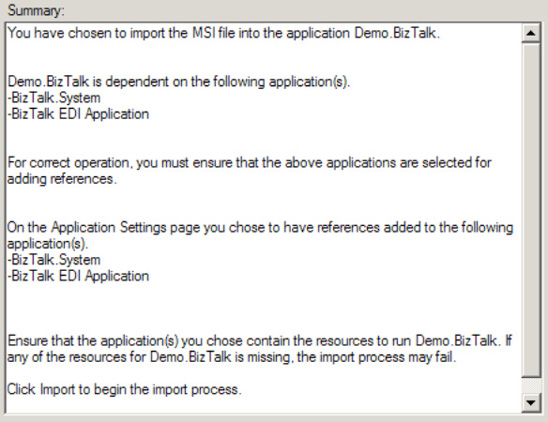
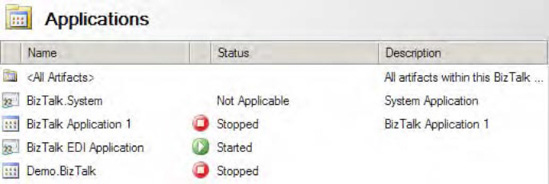
Figure 9-11 shows the Demo.BizTalk application imported in the example added to the Applications node in the BizTalk Administration Console. Once an application has been imported, starting the application will complete the necessary deployment steps.
The import process controls the sequence of shutting down services and provides the administrator with input to control and consider application references and dependencies. In addition, it controls the registering of BizTalk and .NET application artifacts into the Global Assembly Cache (GAC). This eliminates the need for IT users to know the sequence of specific BizTalk deployment steps and perform them manually, leading to faster and easier application deployment cycles.
In this recipe's example, we imported an MSI file, which contains application artifacts. You can also import policies (business rules artifacts) and bindings. Binding information examples could include an address (such as a file or queue location) port information, or specific properties that specify retries, security options, and so on. You could import bindings when the BizTalk solution artifacts already exist and the target requires only binding input/updates for deployment.
Note
Importing an MSI file can include both bindings and policies. If these artifacts are specified in the application export process, they will be imported as part of the MSI file import process.
In addition to using the Import MSI File Wizard, you can access the same functionality via the BTSTask ImportApp command-line utility. This option could be useful when performing regular environment promotion activities, fully automated deployments, and so on.
Note
BTSTask commands should not be used in a preprocessing or postprocessing script run during an application import. If this is done, any changes made during the import will not be visible to the scripts; therefore, the success of the deployment cannot be guaranteed.
The command has the following form:
BTSTask ImportApp /Package:value [/Environment:value]    [/ApplicationName:value]
[/Overwrite] [/Server:value] [/Database:value]
Note
There are options on BTSTask that allow for the deployment of the assembly to the GAC.
When importing BizTalk applications, consider the following:
Overwrites: Determine whether the import process should support overwrites. On the Application Settings page of the Import Wizard, you can set generic overwrites of BizTalk artifacts. If this check box is selected, existing artifacts will be overwritten on the target import. If this box isn't selected and a duplicate is found, the Import Wizard will raise an error.
Downstream components: Keep in mind downstream components, such as URIs, files, queues, and HTTP URLs. For example, if your solution uses send port URIs, make sure that the URIs exist before running your BizTalk operation. If a location doesn't exist (for example, a receive location), BizTalk may detect this, raise an error to the Windows Event Viewer, and show the application status as partially started. Whenever an application is in the status of partially started, it's a good idea to check the application Windows Event Viewer for failures and information.
Runtime/operational considerations: When deploying to an existing environment, keep in mind runtime considerations. Make sure that users have been notified and usages of running BizTalk processes are known.
Security: By default, BizTalk does not store passwords for binding information unless they are explicitly referenced within the binding file build process. As a matter of caution, always verify your deployment, and update passwords and access rights appropriately within your BizTalk artifacts.
You have a complex solution deployed with many orchestrations and other components. You want to deploy an update to one orchestration.
Deploying BizTalk solutions using an MSI file is great for the initial deployment but is of limited value once a solution is running in production and an update needs to be deployed. Manual deployment give the administrator 100% control over what is being deployed where, and chances for errors from incorrectly created MSIs are reduced to zero.
Manual deployment can best be summed up as follows:
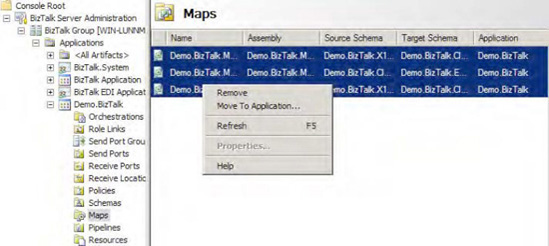
Unenlist any orchestrations that will be redeployed. This can be done from the BizTalk Administration Console. If any orchestrations have running instances in memory, two options are available: 1) wait until these instances have completed before doing the update, or 2) terminate these instances (terminating instances can be done from the BizTalk Group Hub reports and administrative functionality).
Removed any maps and schemas that will be re-deployed. This can be done from the BizTalk Administration Console by right-clicking the maps/schemas (see Figure 9-12).
Once all objects that will be redeployed have been removed, right-click the BizTalk application you are applying the updates to, and select Add→BizTalk Assemblies.
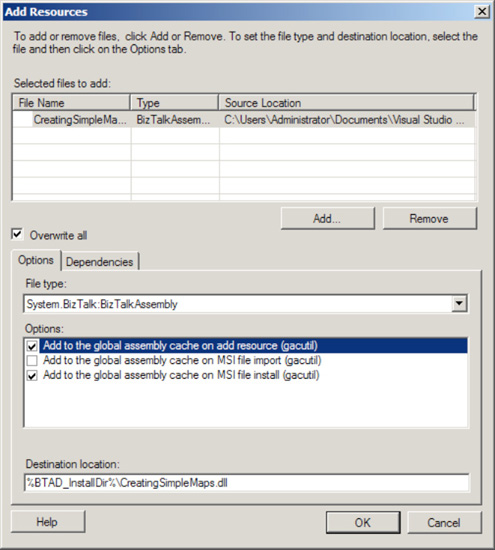
In the Add Resources dialogue box that opens, add the assemblies that you wish to redeploy, as shown in Figure 9-13.
Click the "Overwrite all" check box to ensure that this overwrites the previous version of the assemblies. This will have to be done for every assembly in the list, so make sure to click each of them separately and click this "Overwrite all" option.
Make sure that the assemblies are added to the global assembly cache. This generally means clicking the first and third check boxes in the "Options" area of the dialogue box.
Click OK to deploy the BizTalk assemblies.
Doing manual deployments will become one of the most common techniques you use once a solution has been successfully deployed to production. In fact, using the MSI deployment may not even be something you want to use at any point; manual deployments can be so much easier and less stressful, since you have complete control over everything.
When you are developing a project, make sure you think through the initial deployment and how updates will be deployed. Having an intelligent path to updating your solution prior to actual deployment is a great habit to have and one that will ease your development and deployment tasks.
You have developed a BizTalk solution and wish to deploy the solution for testing in your development environment directly from Visual Studio, rather than using other deployment methods.
Since BizTalk projects compile into .NET assemblies, the deployment process in Visual Studio is similar to deploying other .NET projects. You must first sign the BizTalk assembly before you can add the assembly to the GAC. Then, set up the BizTalk project properties, and finally, deploy the project. The following steps outline the procedure.
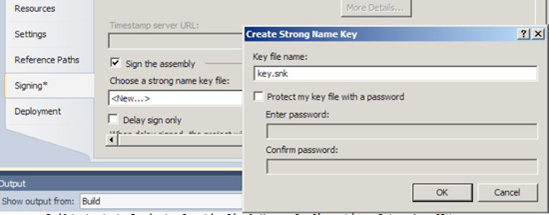
There are several ways to sign a BizTalk assembly. The easiest is to right-click the project in Visual Studio and click the Signing tab. Click the "Sign the assembly" option, and create a new strong name key (see Figure 9-14).
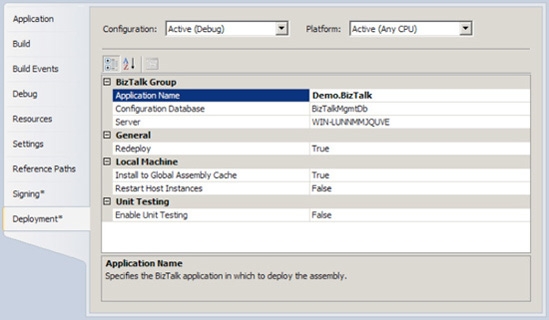
Enter an application name for the project (this usually matches a BizTalk application that has already been created). Set other properties as desired (see Table 9-1). Figure 9-15 shows a project configured for deployment. Click OK to close the dialog box.
Right-click the project or solution, and select Deploy.
Bind and start the artifacts.
Once you have bound an orchestration, the binding will be remembered the next time you deploy your project. In addition, if you have multiple projects within the solution, deploying from the solution will deploy all the projects within the solution.
Deploying directly from Visual Studio is an alternative to exporting and importing BizTalk applications through the BizTalk Administration Console.
Within Visual Studio, several deployment properties are available, as described in Table 9-1.
Table 9.1. Visual Studio Deployment Properties
Description | |
|---|---|
| Defines the BizTalk deployment server. The local server name is the default setting for this property. If the project is shared across multiple development machines, set this value to |
| Defines the name of the BizTalk configuration database. By default, and unless it was changed, the configuration database name will be |
| Defines the application that will house this BizTalk project. Although leaving this property blank will cause the solution to deploy to the default application, it is a best practice to provide a value for this property. |
| Defines whether the deployment process will automatically delete the old deployed assembly before deploying the current assembly. This option is very useful, but should be used only within a development environment. |
| Controls whether the assembly will be deployed to the GAC as part of the deployment process. |
| Controls whether to restart the in-process host instance. By default, this property is |
You have deployed a solution and need to validate that your send ports are enlisted and started.
An important step in the deployment of a BizTalk solution is to enlist and start send port messaging artifacts. You can do this from the BizTalk Administration Console, either in isolation or as part of a larger application deployment.
Note
An important prerequisite to enlisting and starting a send port involves configuring the send port to subscribe to BizTalk messages, either via setting a filter on a send port or by binding a send port to a BizTalk orchestration artifact. In both of these instances, a send port has subscription criteria identifying which messages it will consume from BizTalk.
The following steps outline the procedure for starting and enlisting send ports using the BizTalk Administration Console.
Open the BizTalk Administration Console.
In the left pane, navigate through BizTalk Server Administration to your BizTalk group, expand the
Applicationsfolder where your send port resides, and select theSend Portsnode.Right-click your send port(s), and select Enlist, as shown in Figure 9-16. The send port(s) will move from the unenlisted to the stopped state.
Right-click your send port(s) again, and select Start. Your send port(s) should now be started and enlisted.
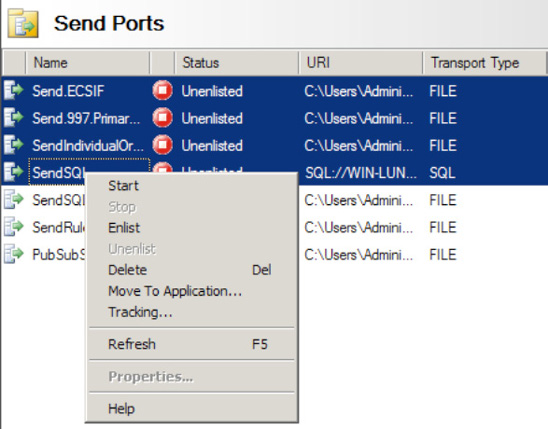
In this recipe's solution, we demonstrated how to enlist and start send ports via the BizTalk Administration Console. Enlisting and starting are two mutually exclusive states on a send port. Enlistment sets up the port and ensures that it is recognized and properly bound. Starting the port has it begin listening for the trigger that will cause it to execute. These are two logical mandatory steps to enable a BizTalk solution to be deployed.
Note
In this example, we demonstrated the explicit steps of enlisting and starting for demonstration purposes only. A send port can also be explicitly started from an unenlisted state.
Enlisting a port enables a subscription in the BizTalk MessageBox. If a send port is not enlisted, a message published to the MessageBox will not be subscribed to by the send port. If a subscriber is not found (the message had only the send port as the intended subscriber), a BizTalk error would be thrown, indicating that a matching subscription could not be found, and the message instance would be suspended but resumable in the MessageBox. (In previous versions of the product, this would have caused the message instance to be suspended but not resumable.)
If a message is published to the BizTalk MessageBox and a send port is not started, the message instance will sit in the MessageBox, waiting for the subscribing send port to be started. This situation is often hard to troubleshoot, as no error is thrown during the message submission process (an administrator would need to proactively look at what processes have been suspended using the Group Hub page).
In addition to administering send ports via the product tool set, BizTalk also has an object model available to allow programmatic administration via Windows Management Instrumentation (WMI). Send port administration is accessible via the base class Microsoft.BizTalk.ExplorerOM.SendPort. Within this class, a send port has a variety of methods available (for example, ChangeSendPortStatus()). Refer to the BizTalk product documentation for an inclusive list.
A receive location is the entry point into a receive port for pipeline processing and submission into the BizTalk MessageBox for subscribers and downstream processing. Receive ports can have multiple receive locations belonging to them. To allow messages to be received and consumed, you should enable a receive location.
Note
For a receive location to be enabled, make sure that the receive location has been associated with a receive handler and pipeline. The receive handler determines the security context (file access permissions) under which a receive location operates.
To enable a receive location, follow these steps:
Open the BizTalk Administration Console.
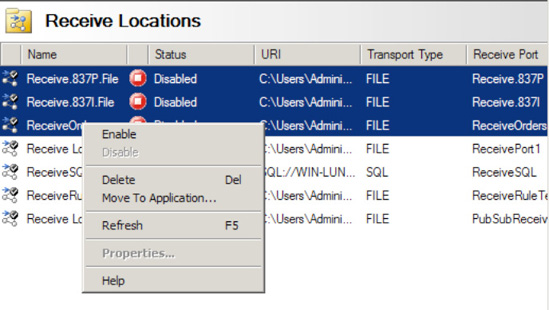
In the left pane, navigate through BizTalk Server Administration to your BizTalk group, expand the
Applicationsfolder where your receive location resides, and select theReceive Locationsnode.Right-click your receive location, and select Enable, as shown in Figure 9-17.
Note
Multiple receive locations can be enabled by holding down the Shift key as you select the target receive locations. Then right-click and select Enable from the context menu.
Enabling a receive location is an important deployment activity. If a receive location is not enabled, a message will reside in the physical adapter's transport receive location, and it will not be consumed by BizTalk. For example, the message could be a file in a folder for the file adapter or a message in an MSMQ queue for the MSMQ adapter.
A common problem when initially deploying and verifying receive locations is often security access and file permissions. When enabling a receive location, it is a good idea to check the Windows Event Viewer to ensure no errors are raised by BizTalk. Common errors with receive locations are often security related. Always check to ensure your receive location has been granted permission to the security credentials associated with the receive port's receive handler or the receive port itself.
Note
Once a receive location has been enabled, intermittent transport problems (for example, security or network access) will not disable the receive location. However, note that once a receive location is explicitly disabled, it must also be explicitly enabled to allow the receive location to function correctly.
Enlisting and starting BizTalk orchestrations allows orchestration artifacts to participate in a BizTalk solution. You can do this from the BizTalk Administration Console, as follows:
Open the BizTalk Administration Console.
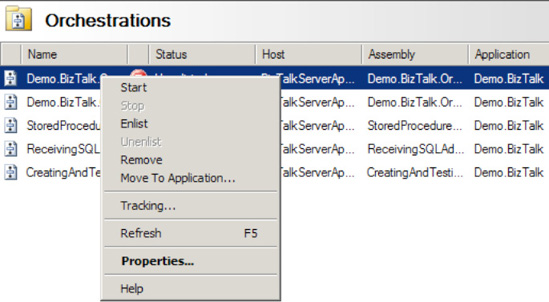
In the left pane, navigate through BizTalk Server Administration to your BizTalk group, and expand the
Applicationsfolder where your orchestration resides.Right-click the orchestration, and select Enlist, as shown in Figure 9-18. You can enlist multiple orchestrations by first holding down the Shift key as you select the target orchestration before choosing Enlist from the context menu. The orchestration will move from the unenlisted to the stopped state.
Right-click your orchestration again, and select Start. Your orchestration should now be enlisted, started, and ready for use.
Enlisting and starting BizTalk orchestrations allows orchestrations to participate in BizTalk messaging and processing solutions. You can enlist and start orchestrations from either the BizTalk Administration Console or the Visual Studio environment. In this recipe's solution, we demonstrated using the BizTalk Administration Console.
Enlisting an orchestration is similar to enlisting a send port artifact. Enlisting an orchestration allows it to set up subscriptions with the MessageBox so it can receive messages published to it. In essence, enlisting holistically in the BizTalk product gives BizTalk artifacts (send ports and orchestrations) the ability to subscribe to the MessageBox for desired message contexts. Starting an orchestration allows an orchestration to physically consume and process a message.
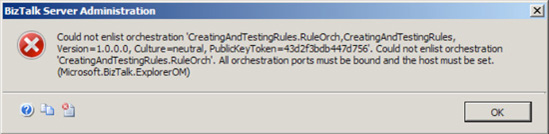
Two important prerequisites to allow an orchestration to be started and enlisted are orchestration binding and host binding. Only orchestrations that have been bound can be enlisted; that is, an orchestration's port must be bound to a solution's physical send/receive port before enlisting. Unless an orchestration is a child orchestration or is directly bound to the message box, all ports must be bound to a physical host (see Figure 9-19 for a partially bound orchestration). If you attempt to enlist or start an orchestration when a host has not been bound, an error will occur, indicating that the enlisting has failed, as shown in Figure 9-20. In addition, an orchestration's configuration cannot be unbound when in an enlisted or started state.

It's also worth noting that entire BizTalk applications can be started and stopped. This activity ensures that all BizTalk artifacts under an application are enlisted, started, enabled, and ready (depending on the artifact), without any knowledge required by the user. Figure 9-21 shows starting a BizTalk application.