
BizTalk 2010 has a number of new features that will aid developers and increase the ability of the platform to support solutions built on it. The primary updates center around the BizTalk mapper user interface and EDI trading partner configuration and management. Additional updates include improvements to administrative functionality and the consolidation of tools within the BizTalk Admin Console. The recipes in this chapter are meant to introduce this new functionality.
The most obvious piece of new functionality for all BizTalk developers will be the mapper interface. There is a new toolbar that has a number of features on it allowing for better navigation, smarter linking, and an overall better user experience. Figure 1-1 shows this new toolbar.
The most innovative piece of new functionality is the EDI Trading Partner management interface. The entire engine has been revamped, and what was impossible before is now possible. Exchanging documents between multiple business divisions and multiple partners with different envelope and document configurations and tracking settings are now a snap. Developers of EDI solutions will find this functionality refreshing and much needed.
Almost as important a questions as asking "What's new?" is considering "What's gone?" Several core pieces of functionality that have been removed in BizTalk 2010. The most notable are the Health and Activity Tracking (HAT) application and the ability to do administration of ports and orchestrations directly from Visual Studio using BizTalk Explorer. These were both central to a developer's everyday use of BizTalk, and in many respects, it is unfortunate that these tools are gone from Visual Studio. Everything is now centralized in the BizTalk Administration Console, and all of the functionality of HAT and BizTalk Explorer are available in that console.
You have complex schemas in your map, and you are having difficulty seeing what nodes are being used.
By using the relevance tree view, only the nodes that are actually being used in mapping the active tab will be shown. Use the following steps to work with this functionality:
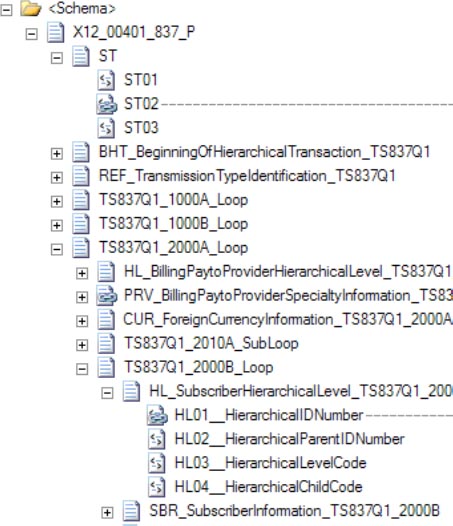
Open an existing map in Visual Studio. By default, the full tree view will be shown. Dotted lines show that some child node is being mapped, but the schema would have to be manually expanded to see what specific node it was. An example of this is shown in Figure 1-2.
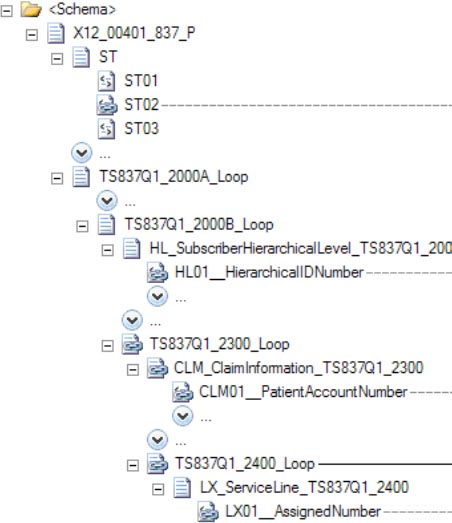
Click the first button on the mapping toolbar to show the relevant links for the source schema, or click the last button to show them for the target schema. Clicking this button causes only the mapped nodes to be displayed, as shown in Figure 1-3.
Click the button again to return to the full tree view.
Showing only the nodes that are actually being mapped can save a lot of time on schemas that have more than a few nodes. Developers of EDI maps will find these particularly helpful, since there can be hundreds or thousands of nodes and elements in a schema. Having to manually sort through all of the nodes can be confusing and time consuming.
There also exists the ability to show only links that are relevant. The mapping surface can become crowded with all of the links, and it can help to turn off any that are not pertainent to the current mapping taking place. The relevant links can be turned on and off by clicking the second button that appears on the mapping toolbar. An example of a map with all of the links turned on is shown in Figure 1-4, while the same map with only the relevant links showing appears in Figure 1-5.

You want to be able to access elements of the mapping surface as rapidly as possible and need to understand how to use the new functionality.
There are a number of new tools that can be used to move and view the mapping surface. These include
Panning
Zooming
Searching
Grid preview
This solution walks through the use of each of them.
To pan a map from top to bottom or left to right, click the hand button on the mapping toolbar, which is shown in Figure 1-6. You can now drag the mapping surface in any direction needed.
To zoom in and out on the map, use the zoom functionality on the mapper toolbar. Zooming out can give you perspective on where your functoids are and allow you to easily locate and modify mappings. If you zoom in and the functoids loose focus, you will notice flashing blue arrows to guide you to where the components are (see Figure 1-7).
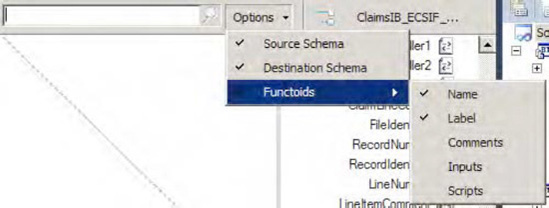
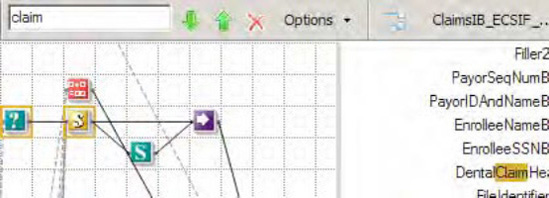
To find a specific value or word in a schema or a functoid, you can use the search functionality (see Figure 1-8). You can search on name, label, comments, inputs, and scripts in functoids. Searching on a value will highlight all of the results; you can use the up and down arrows to navigate through the results (see Figure 1-9).
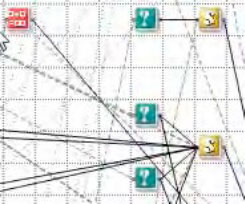
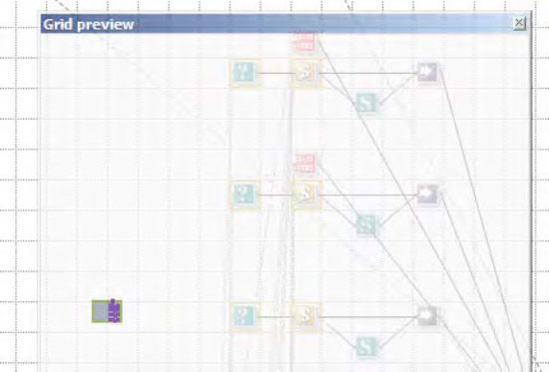
To use the grid preview functionality, right-click the mapping surface, and select Grid Preview. This will pop up a window that shows a box and all of the functoids (see Figure 1-10). You can drag and drop the box over the area of the map you want to scroll to, and the map will automatically move.

There are a variety of ways to move around a map now. Prior to BizTalk 2010, the mapping interface was pretty rudimentary and didn't provide a lot of options. Based on feedback from developers, the mapper user interface has been greatly improved.
Note
Make sure to comment your functoids so that you can use the search functionality to more easily find them. If you've got more than a handful of advanced scripting functoids, for example, you will find that by adding comments you will save a lot of time trying to figure out which ones contain the methods you are looking for.
You have some complex mappings using various functoids, and you want to make sure you don't have any obvious errors.
The new mapper brings intelligence to the functoids, showing errors prior to the testing of a map. This allows you to rapidly assess where incomplete mappings exist and eases development by indicating possible fixes to the errors. To see how this is done, follow these steps:
Open an existing map in Visual Studio.
Drop a functoid onto the mapping surface.
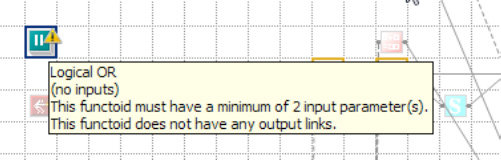
An exclamation mark will be on top of the functoid, indicating that an error exists. Roll your mouse cursor over the top of the functoid to see the details of the error (as shown in Figure 1-11).
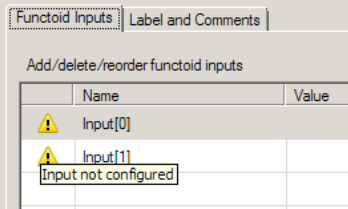
There are a number of upgrades to the coding of maps in addition to the quick overview of the error as shown in the solution to this recipe. Another valuable update is that the functoid interface actually forces the selection of required inputs (see Figure 1-12). For example, if there are two inputs required, they will appear in the functoid configuration window, and the functoid will continue to show an error until these are configured. You can scroll over the warning icons for each input to see the exception message.
There is now some intelligence built into the mapper that aids in mapping source nodes to target nodes. A developer can request all nodes in the target schema that appear to be matches be highlighted. This can be done using the following steps:
Open an existing map in Visual Studio.
Right-click a node in the source schema, and select Indicate Matches.
One or more links should appear with suggested matches (see Figure 1-13). Clicking a link will cause the link to be made permanent in the map.
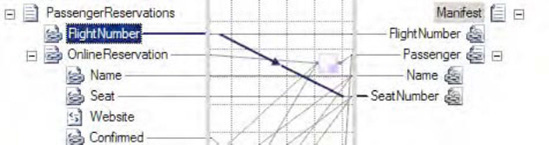
The mapper tries to find a match based largely on name, though it also looks at the structure of nodes in the source and target schemas. A related piece of new functionality allows for the auto-linking based on name or structure of the source nodes. This functionality appears when you drag a source schema record (not an element or attribute, but the record itself) and drop it on a target schema record. When the link is dropped, a context menu appears (as shown in Figure 1-14).
You want to set throttles, thresholds, tracking, polling intervals, and other systemwide settings that will be used to optimize and control processes running within BizTalk.
Prior to BizTalk 2010, configuring core settings was done through a variety of methods, including manually setting registry keys. Now, the BizTalk Settings Dashboard has been introduced. To access this dashboard, take the following steps:
Right-click the BizTalk Server Group, and select Settings. In the BizTalk Settings Dashboard that opens, you will notice a variety of properties that can be set (see Figure 1-15).

A great deal of performance tuning is available through the use of the BizTalk Settings Dashboard. It centralizes all of the throttles, timeouts, thread handling, and other functionality that used to be manually configured. Take a look at the different properties available prior to deployment, and become familiar with the settings in order to better support your BizTalk environment.
In previous versions of BizTalk Server, the FTP adapter did not support SFTP transactions. Now, support for SFTP is built into the standard adapter and can be easily configured using these steps:
Open the BizTalk Administration Console, and right-click the Send Ports folder under a BizTalk application.
Select New Static One-way Receive Port.
On the General tab, select FTP for the Type property. Once selected, click the Configure button.
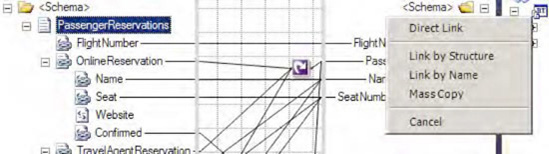
There is a new section in the FTP Transport Properties configuration window called SSL (see Figure 1-16), which allows for the specification of the client certificate hash (among other things). Set the properties for the Firewall, FTP, and SSL Sections as needed, and save the settings.
In addition to supporting SFTP, the FTP Adapter has some additional feature updates. These include support for the following:
Downloading files from read-only FTP sites: In previous versions, when BizTalk retrieved a file from an FTP site, it would automatically delete the file. This prevented the FTP adapter from being used successfully with read-only FTP sites.
Atomic ASCII-based file transfers: Previous versions only supported binary atomic transactions.
You are building an EDI (Electronic Document Interchange) solution that requires the use of 5010 HIPAA compliant schemas.
BizTalk ships with thousands of precreated schemas that support the various EDI documents. Shipping with BizTalk 2010 are a number of HIPAA 5010–compliant schemas. These schemas can be accessed using the following steps:
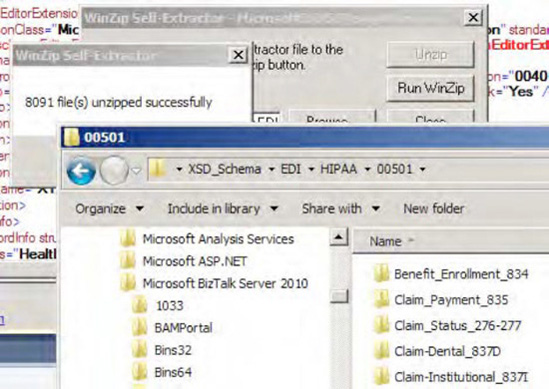
Using Windows Explorer, browse to
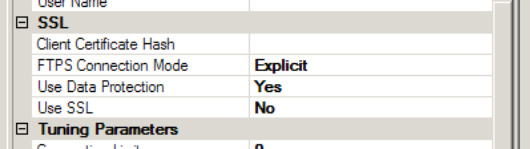
$Program FilesMicrosoft BizTalk Server 2010XSD_SchemaEDI.Double-click the
MicrosoftEdiXSDTemplates.exefile to extract all of the schemas (see Figure 1-17).Note
It can take a substantial amount of time to extract all of the schemas.
The 5010 documents will be available in the
HIPAA�0501subfolder (see Figure 1-18).
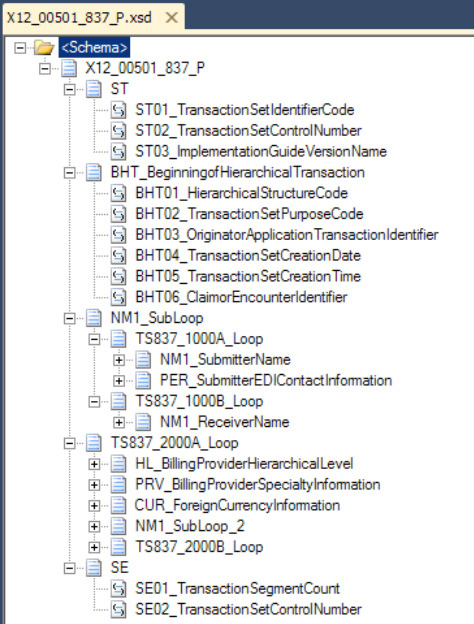
EDI schemas are identical to other BizTalk schemas and can be added to any Visual Studio solution. Generally speaking, they are more complex in structure and contain many more nodes and elements than other BizTalk schemas. An example of a 5010 HIPAA Schema in Visual Studio is shown in Figure 1-19. There are continual updates to EDI schemas. The HIPAA 5010 schemas are primarily related to Health Care, so given the volatility of health care laws today, it is very likely that there will soon be another version to these (and other) schemas.
Trading partner management is the most significant new functionality presented in BizTalk Server 2010. The new mapper has some nice features, but it doesn't bring new functionality to the product. The trading partner configuration, on the other hand, allows for the development of EDI solutions that could not be done before. This solution outlines how to create a trading partner in BizTalk Server.
Note
An entire chapter in this book (Chapter 8) is dedicated to EDI solutions and the configuration of trading partners. This recipe introduces the most basic aspect of this new functionality.
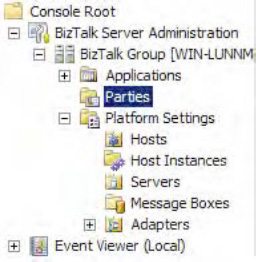
Open the BizTalk Administration Console, and click
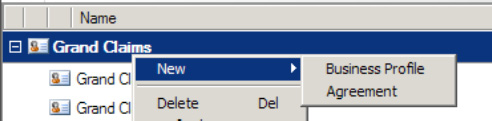
Parties(see Figure 1-20).Right-click any area in the Parties and Business Profiles area and select New

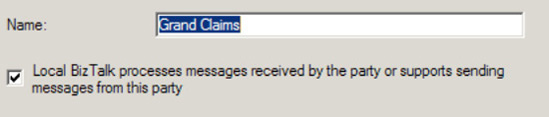
In the Party Properties dialogue box, give the party an appropriate name. This should be the name of the trading partner you will be exchanging documents with.
Enable the option for the Local BizTalk processing (see Figure 1-21). This setting is used to indicate that BizTalk Server will be used to process messages to or from the party (rather than being the default party itself).
Click the "Send ports" tab. This is where ports are associated with a party, and it is used in instances where all outbound EDI documents on this port should have envelope information configured as specified in the EDI properties of the party being configured. Add any relevant send ports, and click OK.
Now that the party object has been created, a new business profile must be created. A business profile contains all of the EDI configurations for a given business of a trading partner. For example, a trading partner may be a single company with multiple departments or divisions. Each department has its own integrations with internal and external vendors, and each uses its own X12 or EDIFACT settings. One business profile for each department must be created in order to ensure that the envelopes on the EDI documents being exchanged are set properly, and that all other EDI specific configurations are accurate for that department.
Right-click the party that was created, and select New
Give the business profile a name representative of the business unit or department being set up. In many cases, a party will only have a single business profile.
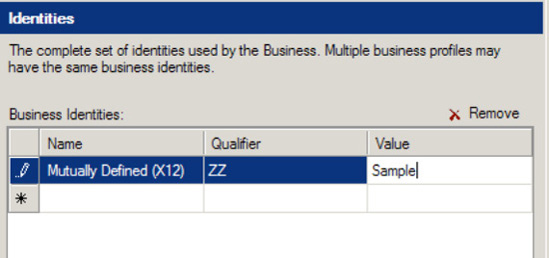
On the identities screen, set the trading partner ID(s) and qualifier(s) (see Figure 1-23). These values are given to you directly by the trading partner, and are the way trading partners are uniquely identified.
Once the business profile is fully configured, click OK.
With the business profile and core party configured, an agreement can be made. However, to create an agreement, you must have two parties configured. One party represents the recipient, and one is the sender. In many cases, BizTalk is going to be one of the parties. However, in the cases where BizTalk is acting as a value added network (VAN)—essentially, as a router of documents between parties—there may be many parties sending and receiving documents to many other parties. All of the configurations representing document communication between parties are known as agreements.
To create an agreement, right-click the business profile, and select New
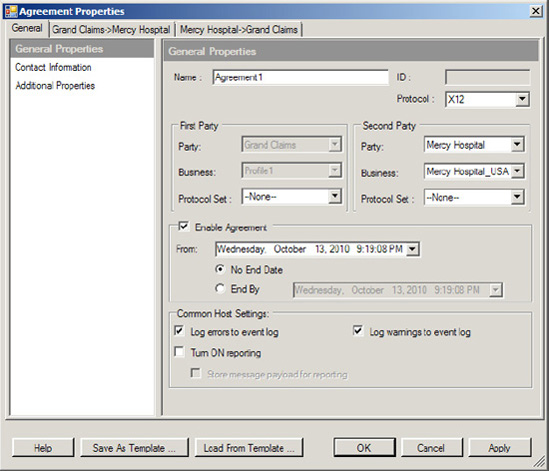
Initially, there will be only a single tab to configure. You must specify the party being interacted with and the protocol being used. To do so, set the Protocol property to (for example) X12, and the Party and Business properties to an available party. Once these have been set, two new tabs will appear (see Figure 1-24). These tabs are where all of the EDI specific information is configured for the given agreement.
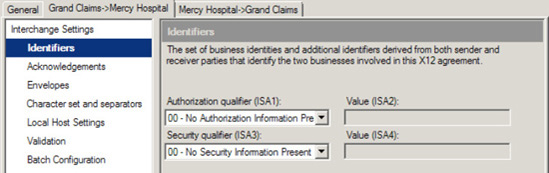
Click each of the tabs to set the EDI-specific values based on the trading partner configuration specifications. An example of the Identifiers screen is shown in Figure 1-25. Once you are finished, click OK to save the trading partner configuration.
This recipe outlined how to configure the different components that make up a trading partner, but without the full story, understanding all of the settings is difficult. Chapter 8 of this book covers a number of aspects of configuring EDI solutions, and the much of it deals with trading partner configurations. Make sure to read through the appropriate sections to understand how parties, business profiles, agreements, and other components all tie together.
Right-click the design surface of an orchestration, and select the Zoom option. Different levels of zooming are available, as shown in Figure 1-26.
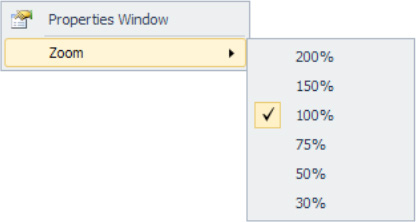
It is very simple to zoom in and out on an orchestration, but the value and benefits are great. For large orchestrations, it is invaluable to be able to get a bird's eye view of the full flow. In previous versions of BizTalk Server, no zooming was available, which was a hinderance to development and code reviews.
Note
You can get more granular levels of zooming by holding the Ctrl key and using the wheel on your mouse to zoom in and out on the orchestation.
You want to insall BizTalk Server RFID (Radio-frequency identification) on the same server as BizTalk Server 2010.
BizTalk Server RFID 2010 must be installed with BizTalk Server 2010; it is not compatible with previous versions of BizTalk. Take the following steps to install it:
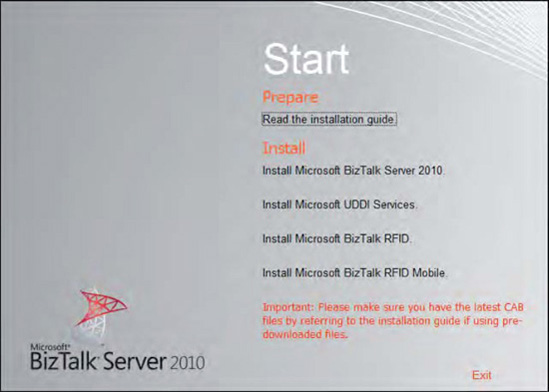
BizTalk RFID can be installed from the standard setup screen of BizTalk Server 2010. Click the Install Microsoft BizTalk RFID option shown in Figure 1-27.
Click through the initial setup screens, indicating the database to connect to and other basic information.
Note
During the System Configuration Check, you may get a message warning that MSMQ is not installed. This can be remedied by enabling MSMQ on your operating system. Figure 1-28 shows this for Windows Server 2008 R2.

Many developers assume that BizTalk RFID is built into the standard BizTalk Server application, but it is not. BizTalk Server RFID is a completely separate application from BizTalk Server 2010. It is a part of the BizTalk family, which includes applications like Host Integration Server (HIS), the Enterprise Service Bus (ESB) Framework, and the Adapter Pack. BizTalk RFID allows for the administration of RFID devices. The way in which it collects data allows for easy integration with BizTalk Server 2010, but in no way is it tied to the core product. The most common way to integrateBizTalk RFID with BizTalk Server is to use the SQL tables representing the RFID data. This integration does not differ in any way from that of any other external system.
Note
Pro RFID in BizTalk Server 2009 (Apress, 2009) is solely focused on BizTalk RFID. While it is based on the previous version of BizTalk RFID, virtually all of the concepts and process apply to the 2010 version.