In this recipe, we will create a rock material using procedural textures. We will create something similar to the following:
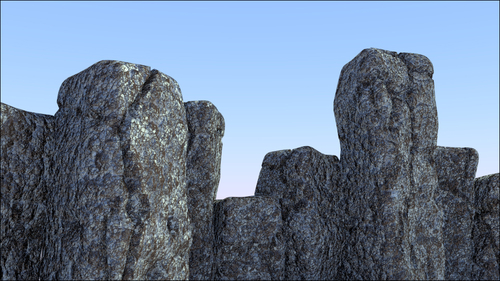
Now, this is how we are going to create the rock material:
- Select the spheroid (the subdivided cube) and click on New in the Material window under the Properties panel or in the Node Editor header. Rename the material as
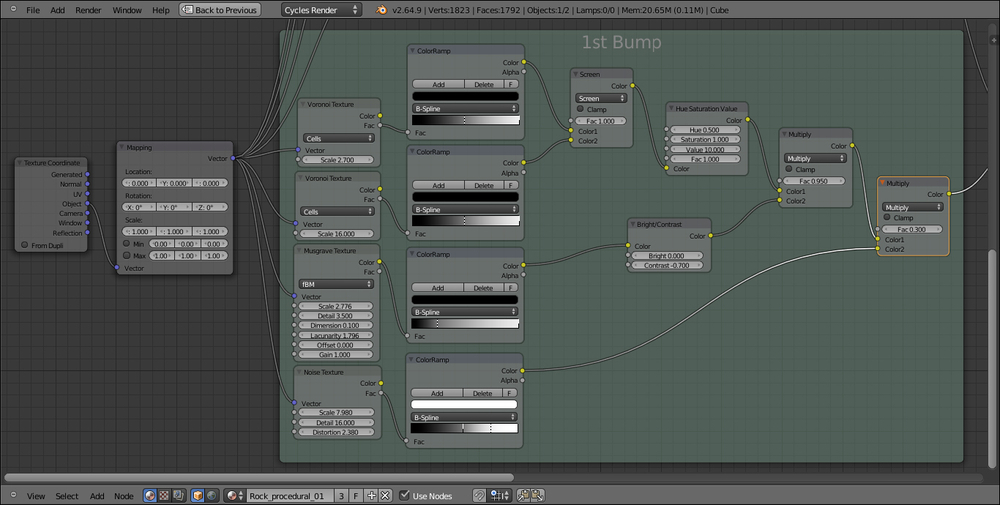
Rock_procedural_01. - Add a Voronoi texture, a Musgrave texture, and a Noise texture (press Shift + A and navigate to Texture) in the Node Editor window. Press Shift + D to duplicate the Voronoi texture and adjust them in a column.
- Add Texture Coordinate (press Shift + A and go to Input | Texture Coordinate) and a Mapping node (press Shift + A and go to Vector | Mapping). Connect the Object output of the Texture Coordinate node to the Vector blue input of the Mapping node. Now, connect the Mapping node's Vector output to the Vector input sockets of the four texture nodes.
- Add a Mix node (press Shift + A and go to Color | Mix) and connect the first two Voronoi and Fac outputs to the Color1 and Color2 inputs of the Mix node. Set the Mix node Blend Type to Screen and set the Fac value to
1.00. - Connect the Mix node output to the color input of the Diffuse shader.
- In the Voronoi textures, switch Coloring from Intensity to Cells. In the first Voronoi texture, set Scale to
2.700, and in the second to16.000. - Select the Screen node and press Shift + D to duplicate it. Drag it to the link connecting the Screen node and the Diffuse shader to paste it in between. Set its Blend Type to Multiply and the Fac value to
0.950. Connect the Color output of the Musgrave texture to the Color2 input of the Multiply node. - Set the Musgrave scale to
2.776, Detail to3.500, Dimension to0.100, and Lacunarity to1.796. - Select the Multiply node and press Shift + D to duplicate it. Paste it on the link connecting the first Multiply node with the Diffuse shader. Set its Fac value to
0.300and then connect the Fac output of the Noise texture to the Color2 input. - Set the Noise texture's Scale value to
7.980, Detail to16.000, and Distortion to2.380. - Add a Bump node (press Shift + A and go to Vector | Bump) and connect its Vector output to the Vector input of the Diffuse shader. Then, connect the second Multiply output to the Height input socket of the Bump node. Disconnect the link to the shader color input.
- Add four ColorRamp nodes (press Shift + A and go to Convertor | ColorRamp, then press Shift + D) and paste them, one for each texture node, on the four links to the Mix nodes. Set their interpolation to B-Spline. In the first two (connected to the Voronoi nodes) links, move the black color marker to the middle of the slider. You can actually edit only the first ColorRamp slider, then put the mouse cursor on the slider. Press Crtl + C to copy it and, with the mouse cursor in the slider of the second one, press Crtl + V to paste it.
- In the third ColorRamp (connected to the Musgrave texture) node, move the black marker only one-fourth to the right. In the fourth node (connected to the Noise texture), move the black marker to the middle and the white marker almost one-fourth to the left.
- Set the Bump strength value to
1.000. - Add a Hue Saturation Value node (press Shift + A and go to Color | Hue Saturation Value) and paste it between the Screen node and the Color1 input of the first Multiply node. Set Value to
10.000. - Add a Bright/Contrast node (press Shift + A and go to Color | Bright/Contrast) and paste it between the third (Musgrave) ColorRamp node and the Color2 input of the first Multiply node. Set Contrast to
-0.700. - Add a Frame (press Shift + A and go to Layout | Frame). Press Shift to multiselect the four texture nodes, the four ColorRamp nodes, the three Mix nodes, the Bright/contrast node, and Hue Saturation Value nodes and, last, the just added Frame. Press Crtl + P to parent all the selected elements to the Frame. Press N in the Node Editor window to bring out the Active Node panel and rename the Frame as 1st Bump. If you want, provide a background color to it (by checking the Custom Color box).
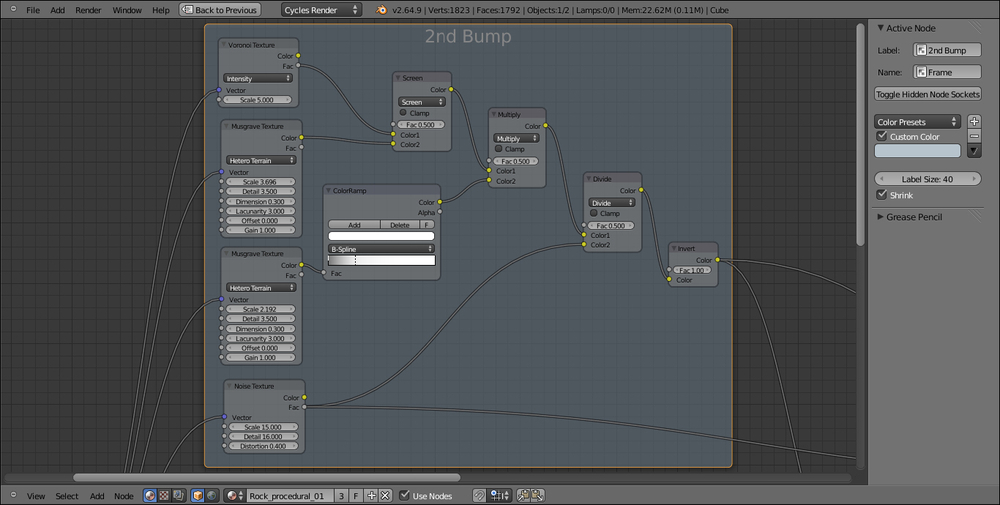
- Add a Voronoi texture, two Musgrave textures, one Noise texture (press Shift + A | Texture), and one ColorRamp node (Press Shift + A and go to Convertor | ColorRamp). Move them above and adjust the textures in a column with the ColorRamp node to their side. Connect the second Musgrave color output to the Fac input of the ColorRamp node.
- Set the ColorRamp node's interpolation to B-Spline and move the white marker three-fourths to the left. Switch the Voronoi texture's coloring from Intensity to Cell and set the Scale value to
8.000. Set both the Musgrave texture's type to Hetero Terrain. Set the first texture's Scale to3.696and the second's Scale to2.192. Also, for both the textures, set Detail to3.500, Dimension to0.300, and Lacunarity to3.000. In the Noise texture, set the Scale value to15.000, Detail to16.000, and Distortion to0.400. - Select the Mapping node and (press Shift) one texture node, and then press F to automatically connect the Vector output of the Mapping node to the Vector input of the texture. Do this for all the new texture nodes, one at a time.
- Add three Mix nodes (press Shift + A and go to Color | Mix, then press Shift + D) and move them above as well. Change their blend types to Screen, Multiply, and Divide respectively.
- Connect the first top Voronoi texture's Fac output to the Color1 input of the Screen node and the color output of the first Musgrave texture to the Color2 input of the Screen node, then connect its output to the Color1 input of the Multiply node. Connect the color output of the ColorRamp node to the Color2 input of the Multiply node. Connect the output of the Multiply node to the Color1 input socket of the Divide node and the Fac output of the Noise texture to the Color2 input of the Divide node.
- Add an Invert node (press Shift + A and go to Color | Invert) and connect the output of the Divide node to the input of the Invert node. Add a new Frame and parent all these new nodes to the Frame. Rename it as 2nd Bump.
- Finally, add a Mix node (press Shift + A and go to Color | Mix) and drag it to be pasted just before the Bump node. Change its Blend Type to Multiply and increase the Fac value to
1.000. Connect the output of the Invert node to the Color1 input socket of this Mix node. - Now select the Diffuse shader and press Shift + D to duplicate it. Then, add a Mix Shader node (press Shift + A and go to Shader | Mix Shader) and paste it between the first Diffuse shader and the Material Output node. Connect the second Diffuse shader to the empty Shader input socket of the Mix Shader node.
- Change the color of the first Diffuse shader to R 0.365, G 0.379, B 0.400, set the Roughness value to
1.000. Change the color of the second Diffuse shader to R 0.130, G 0.092, B 0.075 and set the Roughness value to1.000. - Select and press Shift + D to duplicate the Mix Shader node. Set its Fac value to
0.300and paste the duplicate between the original one and the Material Output node. Add a Glossy BSDF shader (press Shift + A to go to| Shader | Glossy BSDF) and connect its output to the second Shader input of the duplicated Mix Shader node. - Set the Glossy shader color to R 0.560, G 0.742, B 0.800 and its Roughness value to
0.400. - Add a Mix node (press Shift + A and go to Color | Mix) and change the Blend Type to Burn. Connect the Fac output of the Noise texture of the second bump to the Color1 input and the Invert node output to the Color2 input socket.
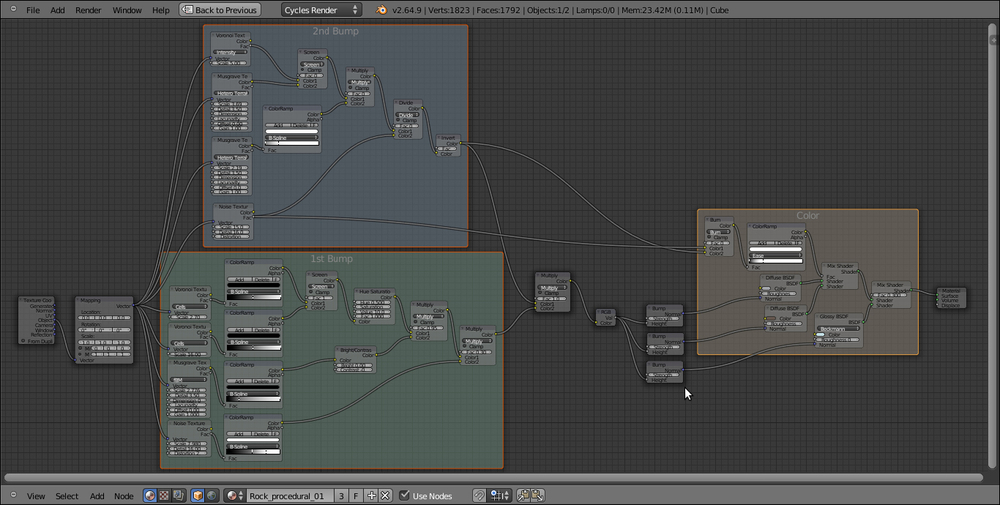
- Add a ColorRamp node (press Shift + A and go to Convertor | ColorRamp) and change its interpolation to Ease and move the white marker three-fourth to the left. Connect the output of the Burn node to the Fac input of the ColorRamp node and its color output to the Fac input of the first Mix Shader node, as shown in the following screenshot:
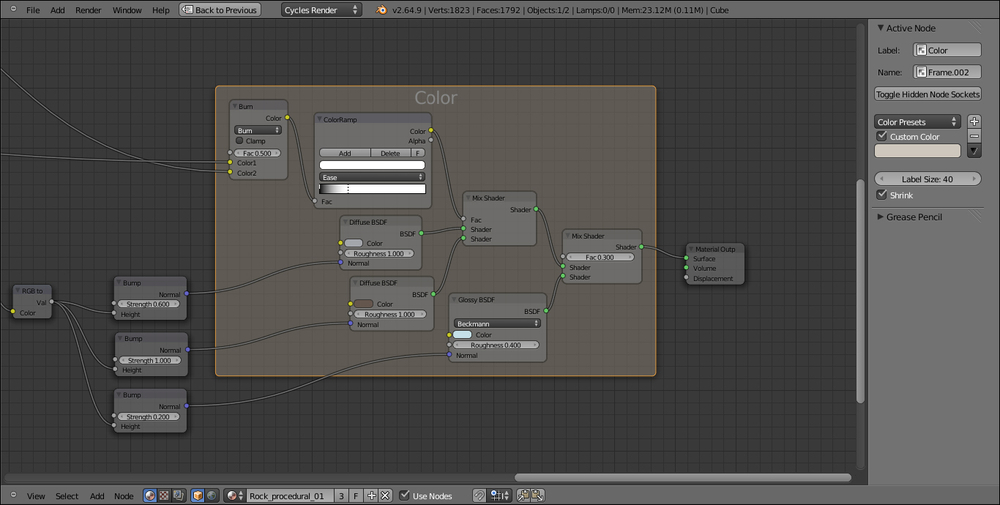
- Add a RGB to BW node (press Shift + A and go to Convertor | RGB to BW) and paste it between the Bump node and the Multiply one.
- Select the Bump node and press Shift + D to duplicate it twice. Connect the RGB to BW output to their Height inputs and then connect the Normal output of the second Bump node to the Normal input of the second Diffuse shader, and the Normal output of the third Bump node to the Normal input of the Glossy shader.
- Decrease the Strength value of the first Bump node to
0.600and the Strength value of the third Bump node to0.200. Finally, we are done! This is what we have achieved: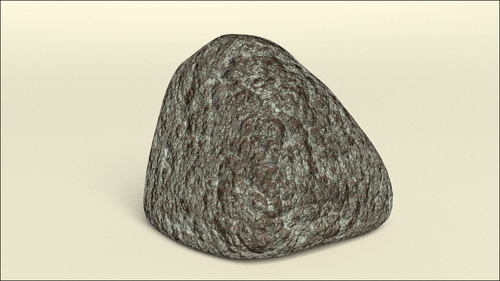
Even if at first glance, this material can look quite complex, basically we just mixed, with different blend types and iterations, three procedural textures. This process is better understood if it's divided into four separate stages, which are as follows:
- The first stage, from step 2 to step 16, in which we built a "first bump" pattern.
- The second stage, from step 18 to step 23, where we added a second bump pattern to increase the detail in the material, and then (step 23) where we multiplied it to the first bump.
- The third stage, from step 25 to step 30, where we built a color pattern by mixing two differently colored Diffuse shaders on the ground of the bump output as factor for the blending, in addition to building a Glossy shader to add specularity.
- In the last three steps, we just added an RGB to BW converter to transform the colored data to black and white data, which is more suitable for bump effects, and we then classified the bump effects as per their shader, to give different strength values to each one.
..................Content has been hidden....................
You can't read the all page of ebook, please click here login for view all page.
