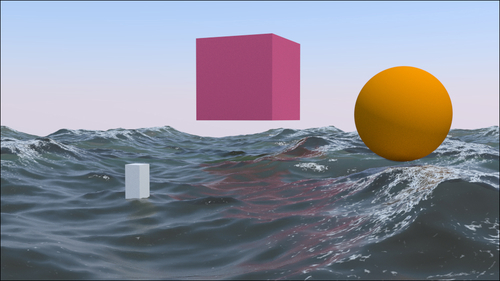
In this recipe, we will build an ocean surface material, using the Ocean modifier and procedural textures to create the foam and establish a set of nodes to locate it on the higher parts of the waves, as shown here:
Before we start with the shader's creation, let's prepare the ocean scene:
- Start Blender and switch to the Cycles rendering engine. Select the cube and delete it (press X).
- Add a plane (have your mouse in the 3D window and press Shift + A and go to Mesh | Plane). In the Object mode, scale it to
0.300. Don't apply size. - Go to the Object Modifiers window and assign an Ocean modifier. Set these values: Geometry to Generate, Repeat X and Repeat Y to
4, Spatial Size to20, and Resolution to12. - Press N and in the Transform panel set these values for the plane's Location: X -6.90000, Y -7.00000, Z 0.00000.
- Be sure to be at frame 1 and place the mouse in the modifier's Time slot, press I to add a key for the animation. Go at frame 25, change the Time value from
1.00to2.00and press I again to set a second key. - In the Screen lay-out button at the top, switch from Default to Animation. In the Graph Editor window, press T and go to Linear and press Shift + E to go to Linear Extrapolation to make the ocean animation constant and continuous.
- Rename the plane as
Ocean_surface.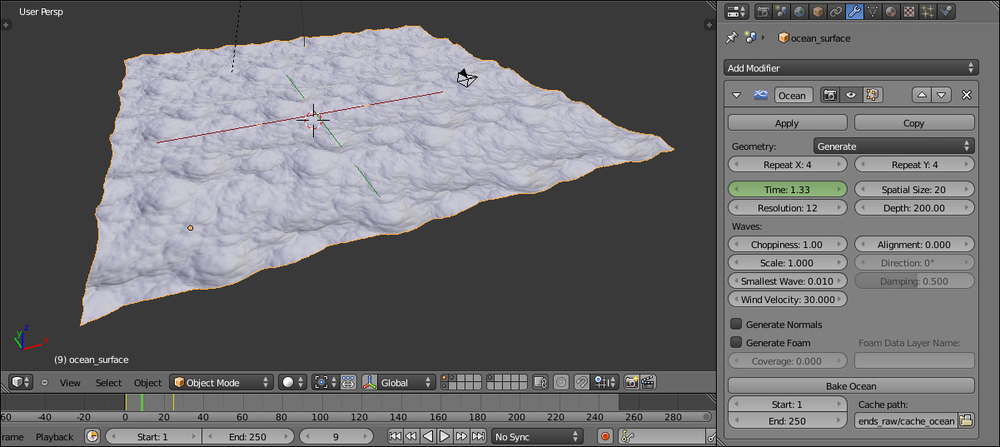
- Place the Camera to have a nice angle on the ocean and then go in Camera view (Press 0 from numpad).
- Add a cube in the middle of the scene and, if you want, also a UV Sphere in the foreground. Place them around and floating in the air, their only purpose is to be reflected by the ocean's surface.
- Go to the World window, click on Use Nodes and then click on the little square with a dot to the right side of the color slot. From the resulting menu, select Sky Texture.
- Select the lamp, click on Use Nodes and set a yellowish color for the light (R 1.000, G 0.989, B 0.700). Turn the lamp to Sun, set the Size value to
0.010and the Strength value to2.500. - Go in the Render window and under the Sampling tab, set the Clamp value to
1.00and the samples for both Render and Preview to100.
All the preceding steps were for the general settings and the ocean surface mesh. Now, because the shader we are going to build is largely transparent, we also need to simulate the water body. This is how it's done:
- Add a new plane, in edit mode scale it 10 times bigger (20 units per side). Move it to be centered on the ocean Plane location and then 1 unit down on the Z axis.
- In edit mode again, press W to subdivide it by the Specials menu. Then press T to bring out the Mesh Tools panel on the left and, under Number of Cuts, select 3.
- Go in vertex paint mode and paint a very simple gray-scale gradient, going from a medium dark gray at the vertexes close to the Camera location to a plain white color at the opposite side. In the Object Data window, under the Vertex Colors tab, rename the vertex color layer as
Col_emit.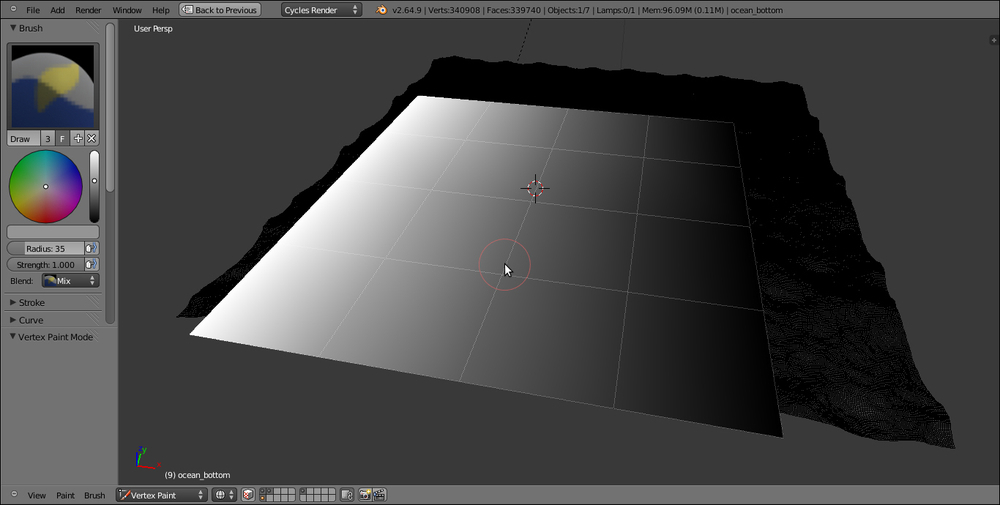
- Rename the plane as
Ocean_bottom.
We will be performing this in four parts:
First, creating the water surface and the bottom shaders
And now, let's start with the first material:
- Split the 3D view to two horizontal rows and change the upper one to a Node Editor window.
- First, give to the cube and to the UV Sphere very simple colored materials; just Diffuse shaders are enough.
- Select Ocean_bottom and click on New in the Material window under the Properties panel, or in the Node Editor window's header. Rename the new material
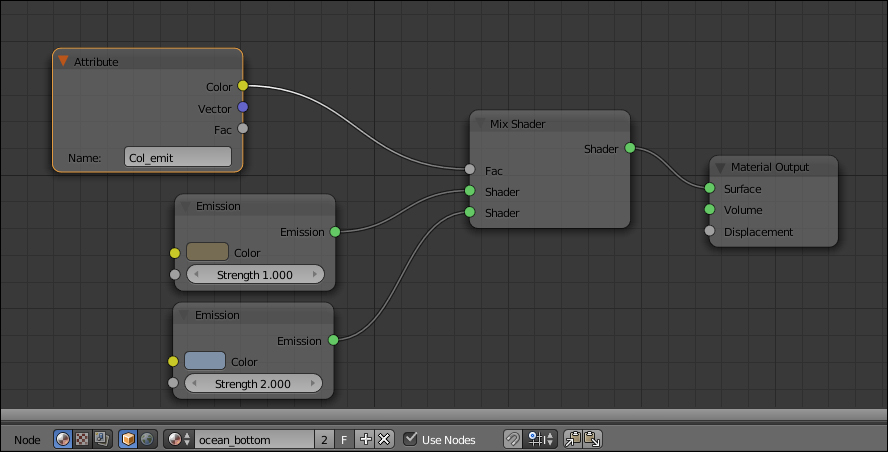
Ocean_bottomas well. - Switch the Diffuse BSDF shader with a Mix Shader node. In the first and second slots, load two Emission shaders.
- Add an Attribute node (press Shift + A and go to Input | Attribute) and connect the Color output to the Fac input of the Mix Shader node. In the Name slot of the Attribute node, write
Col_emit, the name of the vertex color layer. - Change the color of the first Emission node to R 0.178, G 0.150, B 0.085 and set the Strength value to
1.000. - Change the color of the second Emission node to R 0.213, G 0.284, B 0.380, and set the Strength value to
2.000.The Ocean_bottom material is now ready:
- Now select the Ocean_surface material and again click on New in the Material window under the Properties panel, or in the Node Editor window's header. Rename this material as
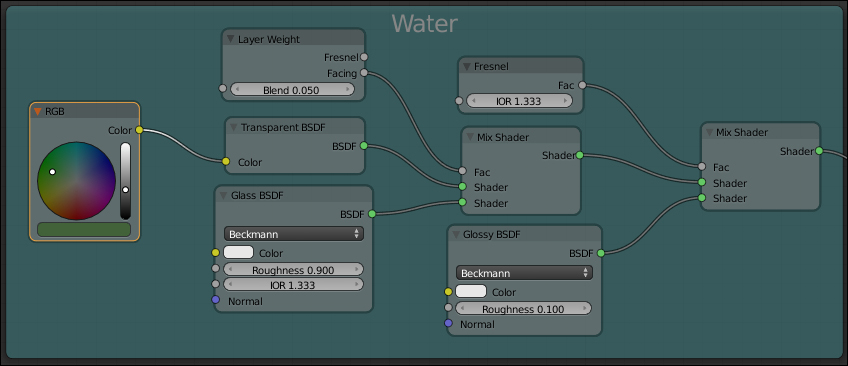
Ocean_surface. - Replace the Diffuse shader with a Mix Shader node and in the first Shader slot assign a Transparent BSDF shader, in the second a Glass BSDF shader.
- Change the Transparent color to R 0.54, G 0.124, B 0.042 (you can also do this by connecting an RGB node to the color input socket). Set the Glass shader's Roughness value to
0.900and the IOR value to1.333. - Add a Layer Weight node (press Shift + A and go to Input | Layer Weight), connect the Facing output to the Fac input of the Mix Shader node, and set the blend value to
0.050. - Select the Mix Shader node and press Shift + D duplicate it. Add a Glossy shader and connect it to the second Shader input of this duplicated node. Connect the output of the first Mix Shader node to the other Shader input socket (the first one) and then connect the output to the Surface input of the Material Output node.
- Add a Fresnel node (press Shift + A and go to Input | Fresnel), connect it to the Fac input of the second Mix Shader node and set the IOR value to 1.333, as shown here:
- Now select all the nodes except for Material Output and press Crtl + G to make a group. Confirm by clicking on New in the pop-up. Rename the group as
Ocean_waterand Press Tab to close it.
Second - creating the foam shader
Now let's make the foam shader:
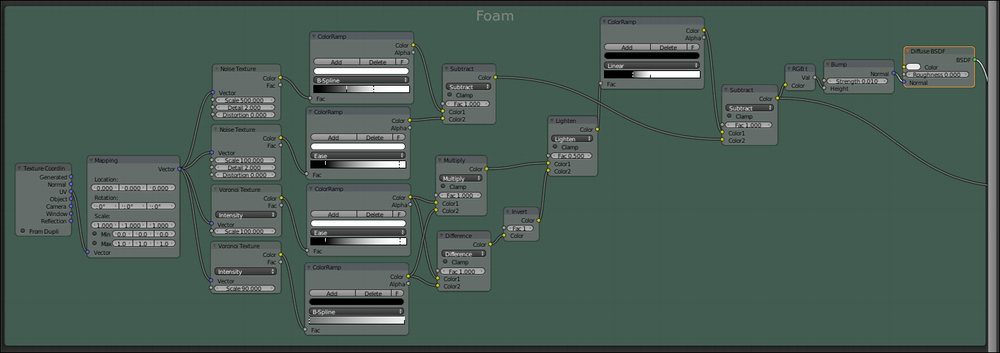
- Add a Noise (press Shift + A and go to Texture | Noise Texture) and a Voronoi (press Shift + A and go to Texture | Voronoi Texture) nodes, select them and press Shift + D to duplicate them.
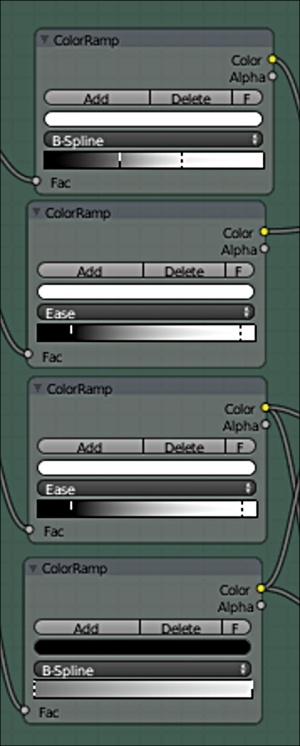
- Add four ColorRamp nodes (press Shift + A and go to Convertor | ColorRamp and then press Shift + D), move the four texture nodes in a vertical column and put the ColorRamp nodes on their side. Now, connect the Color output of each texture node to the Fac input of the respective ColorRamp node.
- Set the interpolation of the first ColorRamp node to B-Spline, the second and third to Ease, and the fourth to B-Spline again.
- Move the color markers accordingly to the following screenshot:
- In the first Noise Texture node, set the Scale value to
500.000. In the second, to100.000. In the first Voronoi Texture node, set the Scale value to100.000and in the second to90.000. - Add a Texture Coordinate node (press Shift + A and go to Input | Texture Coordinate) and a Mapping node (press Shift + A and go to Vector | Mapping). Connect the UV output of the Texture Coordinate node to the Vector input of the Mapping node and then its Vector output to the Vector input sockets of the four texture nodes.
- Add a Mix node (press Shift + A and go to Color | Mix), set the Blend Type to Subtract and the Fac value to
1.000. Connect the Color outputs of the first two texture nodes to the Color1 and Color2 input sockets of the Mix node. - Select the Mix node, press Shift + D to duplicate it and set the Blend Type to Multiply. Connect the Color outputs of the third and fourth texture nodes to the Color1 and Color2 input sockets of this Mix node.
- Again duplicate the Mix node, set the Blend Type to Difference, and again connect the Color outputs of the third and fourth texture nodes to the Color1 and Color2 input sockets of this third Mix node.
- Duplicate the Mix node one more time, set the Blend Type to Lighten, and lower the Fac value to
0.500. Connect the Color output of the Multiply node to the Color1 input of the Lighten node, and the Color output of the Difference node to the Color2 input socket. - Add an Invert node (press Shift + A and go to Color | Invert) and move it to the link connecting the Difference and the Lighten nodes, to be automatically pasted in between.
- Add a new ColorRamp node, connect the Lighten node output to its Fac input, and then move the white marker at the middle of the slider and the black one at a quarter to the right.
- Add a new Mix node, set the Blend Type to Subtract and the Fac value to
1.00, and then connect the ColorRamp color output to the Color1 input and the output of the first Subtract node to the Color2 input socket. - Add an RGB to BW node (press Shift + A and go to Convertor | RGB to BW), a Bump node (press Shift + A and go to Vector | Bump) and a Diffuse BSDF shader (press Shift + A and go to Shader | Diffuse BSDF).
- Connect the last Subtract node output to the RGB to BW node, the output of this one to the Height input of the Bump node and the Normal output to the Normal input of the Diffuse shader. Set the Bump node's Strength value to 0.010, as shown in the following screenshot:
- Select all these nodes and press Crtl + G, confirm on New, and rename the group as
Foam. - Drag the Color output of the last Subtract node on the right-hand side of the group box to expose it. Do the same with the BSDF output of the Diffuse shader and press Tab to close the group.
Third - creating the stencil material for the foam location
What we now need is a way to limit the presence of the foam only to the upper parts of the waves:
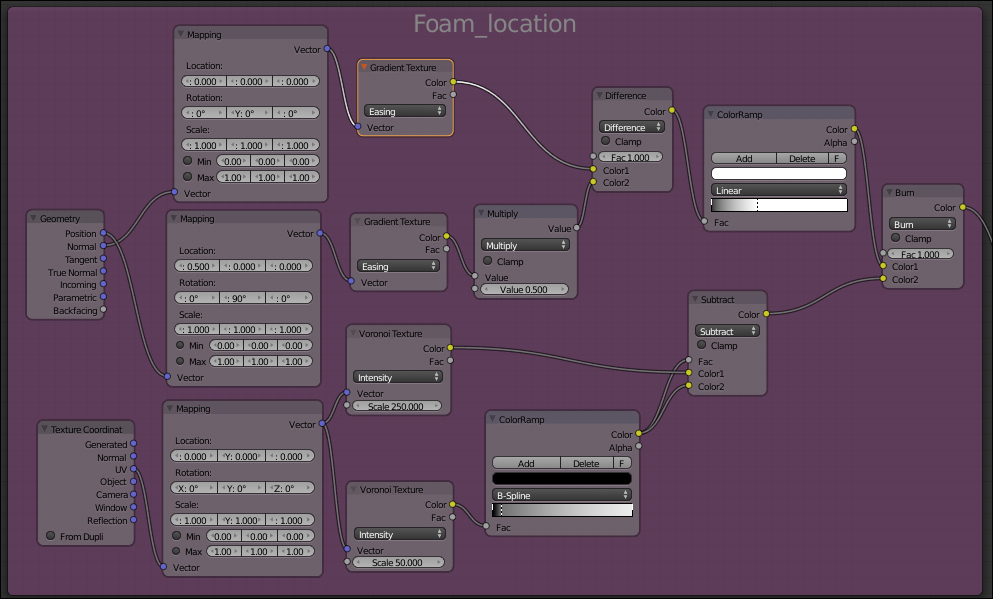
- Add a Gradient texture node (press Shift + A and go to Texture | Gradient Texture) and a Voronoi texture node (press Shift + A | Texture | Voronoi Texture), select them and press Shift + D to duplicate them.
- Set both the Gradient node's types to Easing, the Scale value of the first Voronoi node to
250.000, and of the second to50.000. - Add three Mapping nodes (press Shift + A and go to Vector | Mapping, then press Shift + D).
- Add a Texture Coordinate node (press Shift + A and go to Input | Texture Coordinate) and a Geometry node (press Shift + A and go to Input | Geometry).
- Connect the Normal output of the Geometry node to the Vector input of the first Mapping node. Connect the Position output of the Geometry node to the Vector input of the second Mapping node. Then connect the UV output of the Texture Coordinate node to the Vector input of the third Mapping node.
- In the second Mapping node, change the X location's value to
0.500and the Y rotation's value to90°. - Connect the output of the first Mapping node to the input of the first Gradient texture, the output of the second Mapping to the input of the second Gradient texture, and the output of the third Mapping to both the Vector inputs of the last two Voronoi texture nodes.
- Add a ColorRamp node (press Shift + A and go to Convertor | ColorRamp) and connect the Color output of the last Voronoi texture to the Fac input; set the interpolation to B-Spline. On the ColorRamp node, click on the little Add button. This adds a new medium gray marker in the middle of the slider. Change its color to total black and move it to the left, very close to the first black one.
- Add a Math node (press Shift +A and go to Convertor | Math) and set the operation to Multiply and connect the Color output of the second Gradient texture node to the first Value input socket of the Math node.
- Add a Mix node (press Shift + A and go to Color | Mix), set the Blend Type to Difference and the Fac value to
1.00. Connect the Color output of the first Gradient texture to the Color1 and the Value output of the Math node to the Color2 input socket. - Press Shift + D to duplicate the Mix node, set the Blend Type to Subtract, and connect the ColorRamp color output to both the Color2 and to the Fac input sockets. Connect the Color output of the first Voronoi texture to the Color1 input socket.
- Add a new ColorRamp node, connect the output of the Difference node to the Fac input, and then move the white marker two-thirds to the left.
- Duplicate the Mix node, set the Blend Type to Burn, and connect the color output of the last ColorRamp node to the Color1 input. Connect the output of the Subtract node to the Color2 input socket, as shown here:
- Now select all these nodes, press Crtl + G, confirm New, and rename the group as
Foam_location. Drag the Burn node on the right to expose the color output and press Tab to close the group.
Fourth - putting everything together
What is left at this point is just to connect these three groups to build the final shader:
- Add a Mix Shader node (press Shift + A and go to Shader | Mix Shader). Connect its output to the Surface input of the Material Output node.
- Connect the Shader output of the Ocean_water group to the first Shader input of the Mix Shader node. Then connect the BSDF output of the Foam group to the second Shader input.
- Add two Mix nodes and set the Blend Type of the first one to Multiply and the Fac value to
0.550. Set the second node Blend Type to Burn and the Fac value to0.200. - Connect the Color output of the Foam_location group to the Color1 input of the Multiply node and the Color output of the Foam group to the two Color2 inputs of both the Multiply and Burn nodes.
- Connect the Multiply node output to the Color1 input of the Burn node. Connect the output of the Burn node to the Fac input of the Mix Shader node, as shown here:
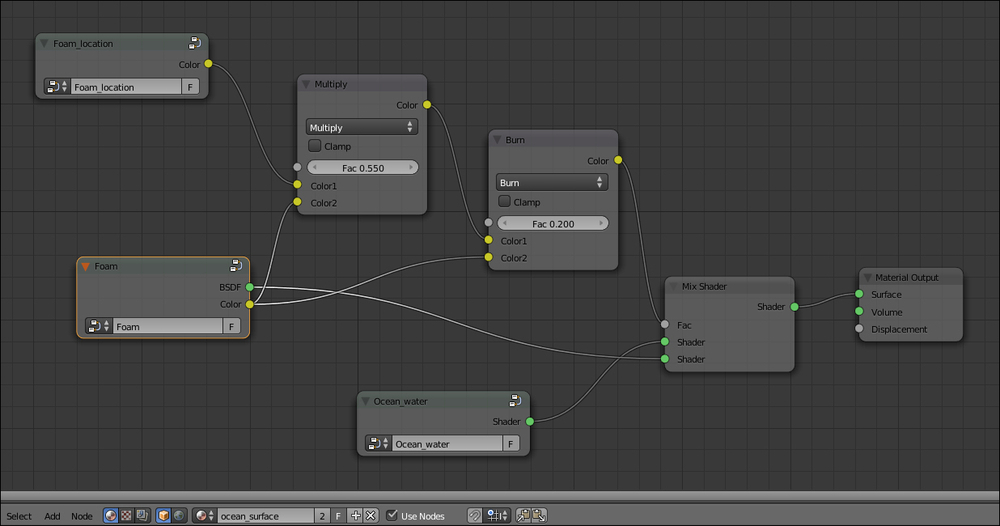
This material, which looks quite complex, is actually easy to understand by splitting the entire process in three stages corresponding to the three group nodes:
- The first stage: Here, we created the basic ocean water shader by mixing a Glass shader with a Transparent shader on the ground of the Facing value of the Layer Weight node, and then with a Glossy shader driven by the water index of refraction (the IOR value of the Fresnel node, which for water at 20° C is of
1.333). In short, this means that the ocean surface is nicely reflecting the environment, but for the faces looking towards the camera (the Facing factor), it is transparent and lets the "underwater" show through. Very important is the bottom ocean plane, used to mimic the water volume, the underwater perspective, and also emitting light to enhance the effect of the sun bouncing from the ocean surface to any floating object: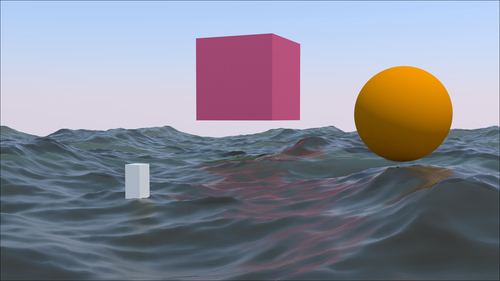
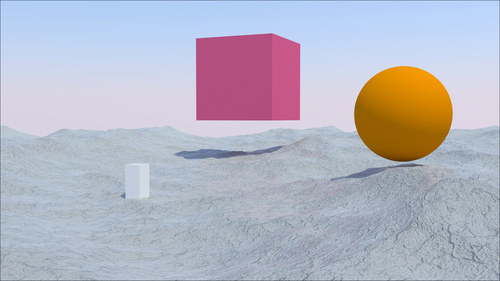
- The second stage: This is where we worked on the material for the foam, a simple white Diffuse shader. In fact, the peculiarity of the foam shader is mostly in the frothy bumpiness and in the lacy-shaped outline cut out by the procedural textures:
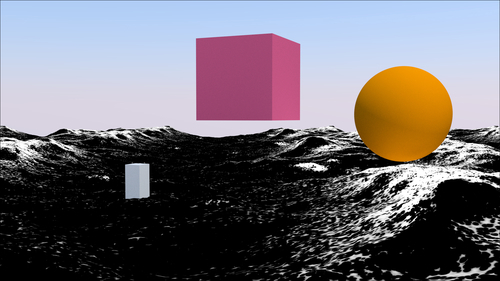
- The third stage: This group of nodes establishes the location of the foam, which in the real world is mainly created in the higher parts of the waves, behaving as a gray-scale "stencil" map. This is a bit more complex, but basically a gradient texture is mapped on the (vertexes) Position and multiplied for the Normal coordinates of the ocean mesh that, being created by the Ocean modifier, is constantly changing. So, only as the waves rise up they show foam at the top. The effect has been lessened and made a bit random, to show some foam also scattered around the rest of the surface. This works not only for stills but also in animation. In the following image, you can see the resulting black and white "mask" used as stencil for the foam location:
The Blender Ocean modifier is able to create its own foam effect, generated as vertex colors and baked to a series of images (frames) saved in a directory. These images are then automatically mapped on the surface and can be used also as stencil masks instead of the Foam_location group node. To know more about the Ocean modifier, you can have a look at the Wiki documentation at http://wiki.blender.org/index.php/Doc:2.6/Manual/Modifiers/Simulate/Ocean.
