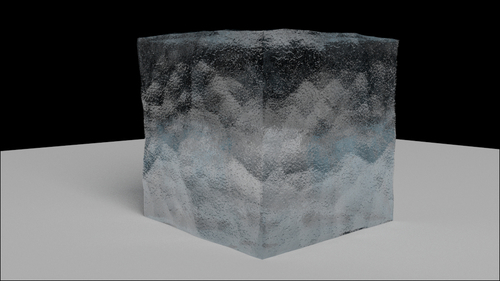
In this recipe, we will create a semi-transparent ice material.
Start Blender and load the usual blend file 1301OS_03_start.blend.
- Delete the subdivided cube and add a new cube primitive.
- In the Camera view, press Shift + F and by using the middle mouse button zoom the camera to better frame the cube.
- Select the background plane and delete it. Add a new plane, being still in edit mode, scale it eight times bigger. Go out of edit mode and move it one unit down on the z axis. Assign the Plane material to it.
- Set the World color to black.
- Select the cube, go in edit mode, and press W. In the Specials pop-up, select Subdivide. Press T and in the bottom of the Mesh Tools panel set the Number of Cuts value to
2. Go out of edit mode and press T again to hide the Mesh Tools panel. - Go to the Object Modifier panel and add a Subdivision Surface modifier. Switch from Catmull-Clark to Simple and set the Subdivision levels to
5. - Add a Displace modifier and in the Textures window click on New and select a Voronoi texture; set the Size value to
1.20. Back to the Object Modifiers window, set the displacement strength to0.050. - Add a new Displace modifier, assign a Voronoi texture again but this time set the Size value to
0.80. Set the Displace strength to0.075. - Add a third Displace modifier, assign a Voronoi texture, and let the default size (
0.25) unchanged. Set the displacement strength to0.020. - Switch the Camera view to Rendered.
After the scene preparation, now we are going to create the material itself:
- Select the cube and click on New in the Material window under the Properties panel, or in the Node Editor window's header. Rename the material as
Ice_01. - In the Material window on the right, under Surface, switch the Diffuse shader with a Mix Shader node. In the first Shader slot, select a Glass BSDF shader and in the second slot a Transparent BSDF shader.
- Set the Glass shader's color totally white and the IOR value to
1.309. Set the Transparent shader's color to R 0.448, G 0.813, B 1.000. - Add a Fresnel node (press Shift + A and go to Input | Fresnel) to the Fac input socket of the Mix Shader node and set the IOR value to
1.309as well. - Add a Glossy BSDF shader (press Shift + A and go to Shader | Glossy BSDF), set the color to pure white and the Roughness value to
0.050. - Select the Mix Shader node and press Shift + D to duplicate it. Connect the other Mix Shader output to the first Shader input socket and the Glossy shader output to the second one. Add a Layer Weight node (press Shift + A and go to Input | Layer Weight) and connect the Facing output to the Fac socket of the second Mix Shader node.
- Add a Voronoi Texture node (press Shift + A and go to Texture | Voronoi Texture), set to Cells and Scale to
50.000. - Add a Noise Texture node (press Shift + A and go to Texture | Noise Texture), set only the Scale value to
50.000. - Add a Math node (press Shift + A and go to Convertor | Math) and set the operator to Maximum. Connect the Fac outputs of the Voronoi and Noise texture nodes to the first and second Value input of the Math node.
- Add a Bump node (press Shift + A and go to Vector | Bump), connect the Math node output to the Height input of the Bump node and its Normal output to the Normal input sockets of the Glass and the Glossy shaders.
- Set the Strength value of the Bump node to
0.005. - Add a Texture Coordinate (press Shift + A and go to Input | Texture Coordinate) and a Mapping (press Shift + A and go to Vector | Mapping) nodes, connect the Object output of the first to the Vector input of the second one, and then connect the Vector output of the Mapping node to the Vector input sockets of both the Voronoi and Noise textures.
So, finally, this is our result:

And this is the nodes network as seen in the Node Editor window:

This time we started by mixing a Glass BSDF shader and a Transparent shader node, modulated by a Fresnel node, and we set the Index Of Refraction of both the Fresnel and the glass to the value of ice. We also added a Glossy BSDF shader to provide specularity, mixed by a Layer Weight node set on Facing (that is, the more a mesh normal is facing the point of view, the more evident is the specular effect).
Then, by using mixed procedurals textures we created the bump effect to perturb the object's surface (and note that the bump is also actually affecting the material's refraction).
