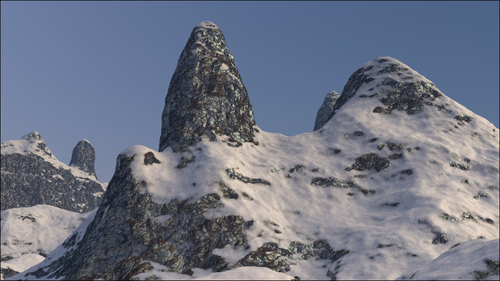
In this recipe, we will make a snowy mountain landscape by re-using already made shaders, precisely the Rock_procedural and the Snow materials. We will improve these materials by grouping them and exposing the useful values; we will then create a new group node working as a stencil to arrange the snow in a more natural-looking manner on the rocks, as shown here:
As usual, let's start with the preparation of the scene, even if in this case we start with an almost readymade blend file:
- Start Blender and open the
1301OS_05_rocksnow_start.blendfile, where there is a scene with a placed camera, a simply modeled mountain, and a plane already set as emitter. - Select the Mountain object, go to the Object Modifiers window and assign a Subdivision Surface modifier. Set the levels for both for View and Render to
2. - Assign a second Subdivision Surface modifier with the same settings simply by clicking on the Copy button of the first one.
- Assign a Displace modifier. Click on the Show texture in texture tab button on the extreme right of the Texture name slot to go to the Textures window and assign a Voronoi procedural texture. Set the Size value to
1.00. Go back to the Displace modifier and set the Strength value to-0.200. - Assign a second Displace modifier, in the Texture window assign a new Voronoi texture and set Distance Metric to Manhattan and the Size value to
050. In the Displace modifier, set the Strength value to-0.050. - Assign a third Displace modifier and select a Clouds texture. Set Noise to Hard and the Displace modifier's Strength value to
0.040. - Go to the World window and click on Use Nodes, and then click on the little square with a dot on the right side of the color slot. From the resulting menu, select Sky Texture and set the Strength value to
0.300. - Go to the Render window and under the Sampling tab set the Clamp value to
1.00and the samples to10for Preview and25for Render. Under the Light Paths tab, check the No Caustics option.
Appending and grouping the rock and the snow shaders
First, let's append the already made materials to be improved from our library:
- From the
1301OS_03_snow.blendfile, append theSnow_01material and, for the moment, assign it to the Mountain object. - In the Node Editor window, select all the nodes except for Texture Coordinates and Material Output and press Crtl + G to group them.
- Move the Snow_Diffuse frame to the right of the Snow_Bump frame. Delete the Value output at the right of the group interface by clicking on the little X icon and also delete the last Multiply node inside the Snow_Bump frame.
- Select the Snow_Diffuse frame and add a Bump node (press Shift + A and go to Vector | Bump). Connect the Value output of the Add node inside the Snow_Bump frame to the Height input of the Bump node, and connect the Normal output of the Bump node to the Normal input sockets of both the Diffuse and Glossy shaders inside the Snow_Diffuse frame.
- Set the Bump node's Strength value to
0.010. Set the Scale value of the Mapping node to1.000. - Close the group and rename it Snow. Just to be sure, check the Fake User option.
- From the
1301OS_03_rock_procedural.blendfile, append theRock_procedural_01material and assign it to the Mountain object. - In the Node Editor window, again select all the nodes except for Texture Coordinates and Material Output and press Crtl + G to group them. Rename the group as
Rock_procedural. - First, we expose the colors: click on the Color input socket of the first Diffuse shader inside the Color frame and drag it to the extreme left to the border of the group interface. Rename the newly created input socket as
Diff_Color1. Do the same with the second Diffuse shader and rename the new socket asDiff_Color2. Repeat this for the Color socket of the Glossy shader and rename the input asSpec_Color. - Now click on the Fac socket of the second Mix Shader node inside the Color frame and drag it to the left as well; rename it as
Spec_Amount. - Expose, too, the Roughness socket of the Glossy shader.
Now we have to find a way to expose a single input value to drive the scale of all the texture nodes and also need one single input value to drive the three Bump nodes piped to the Normal sockets of the three shaders, keeping at the same time their individual starting values.
- Add a Math node (press Shift + A and go to Convertor | Math) and move it closer to the first Voronoi texture inside the 2nd Bump frame. Set the operation to Multiply and, in the first Value slot, copy the Scale value of the Voronoi texture. Connect the Value output to the texture's Scale input. Set the second Value to
1.000and drag it to the left; rename the new interface input asScale. - Press Shift + D to duplicate the Math node, move it close to the following Musgrave texture node, copy the Scale value, and drag the second Value input to connect it to the Scale new input on the interface. Connect the output of the duplicated Math node to the Musgrave scale input.
- Repeat the same process for all the textures inside the 1st Bump and 2nd Bump frames, at the end you should have added and connected eight Math nodes.
- By clicking on the little upper arrow on the side of the Scale interface input, move it before the Spec_Amount node.
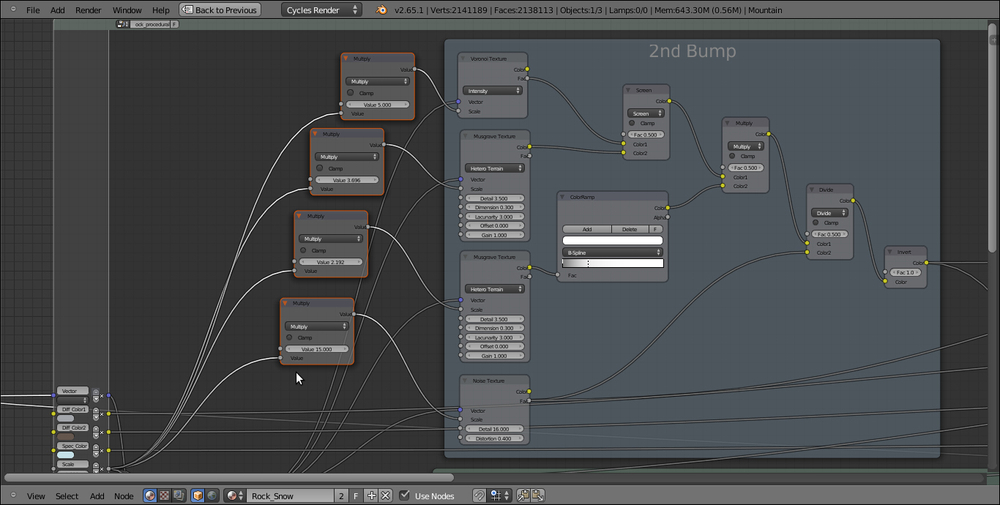
- Repeat the same process for the other three Bump nodes connected to the shaders' Normal inputs by copying the Strength value. This time, drag the first Multiply socket to create a new interface input and connect the other two to it as well. Rename it as
Bumpand finally close the group.
Mixing the materials groups
Now we can start building the real shader, by mixing the Rock_procedural and the Snow materials:
- Delete the
Rock_procedural_01material by clicking on the X icon on the Node Editor window's header. - Click on New in the Material window under the Properties panel or in the Node Editor header and rename this material as
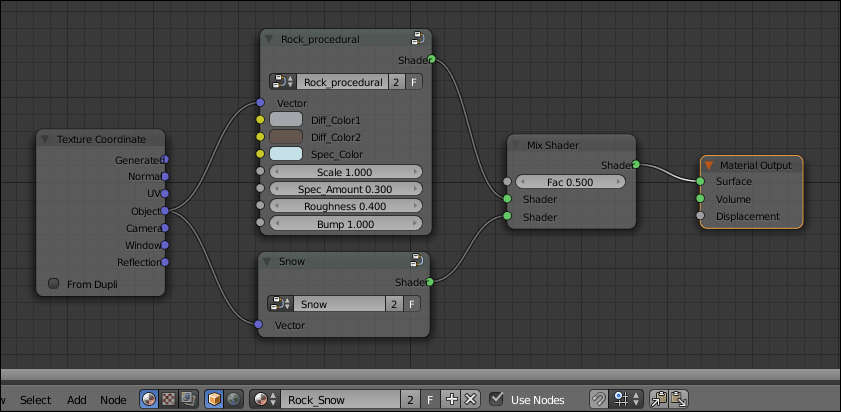
Rock_Snow. - In the Material window on the right, under the Properties panel, switch the Diffuse BSDF shader with a Mix Shader node. In the first Shader slot, load the Rock_procedural node group and in the second Shader slot load the Snow node group (they are available in a pop-up menu, under Group, by clicking on both the Shader buttons).
- Add a Texture Coordinate node (press Shift + A and go to Input | Texture Coordinate) and connect the Object output to the Vector input of both the node groups, as shown here:
Creating the stencil material
At this point, both the materials are assigned to the Mountain object, but if you render the preview now, they will show everywhere on the mesh mixed at 50 percent. We must build a separator to decide where the surface must show only the rock and where only the snow:
- Add a Geometry node (press Shift + A and go to Input | Geometry), a Mapping node (press Shift + A and go to Vector | Mapping), a Gradient Texture node (press Shift + A and go to Texture | Gradient Texture), a Mix node (press Shift + A and go to Color | Mix), and a ColorRamp node (press Shift + A and go to Convertor | ColorRamp).
- Connect the Normal output of the Geometry node to the Vector input of the Mapping node, and then connect the Mapping node to the Gradient texture. Connect the Color output of the texture to the Color1 input socket of the Mix node and the Color output of this latter to the Fac input of the ColorRamp node.
- Set the ColorRamp interpolation to B-Spline and move the black color marker to the middle of the slider. Move the white color marker to the left two-third of the remaining half of the slider. Click on the Add button to create a new marker in between them and change its color to pure black.
- Set the Mix node Blend Type to Add. Go to the Mapping node and set Y Rotation to 90°.
- Now select all these nodes except for Geometry and press Shift + D to duplicate them; move them in a row under the preceding nodes.
- Connect the Position output of the Geometry node to the duplicated Mapping node and change node's X Location value to
-1.200. Change the second Gradient texture's type to Quadratic, then go to the second ColorRamp node and click on the Delete button to erase the middle black marker; move the white color marker to the extreme right. - press Shift + D to duplicate one of the Mix nodes and move it to the right, after the ColorRamp nodes. Set the Blend Type to Burn and increase the Fac value to
1.000. Connect the first ColorRamp color output to the Color1 input socket and the second ColorRamp color output to the Color2 input socket. - Press Shift + D to duplicate the Burn node one more time and connect the Color output of the first Burn node to the Color1 input socket of the duplicated node.
- Add a Frame (press Shift + A and go to Layout | Frame), select all the nodes and the frame and press Crtl + P to parent them; rename the frame as
SLOPE.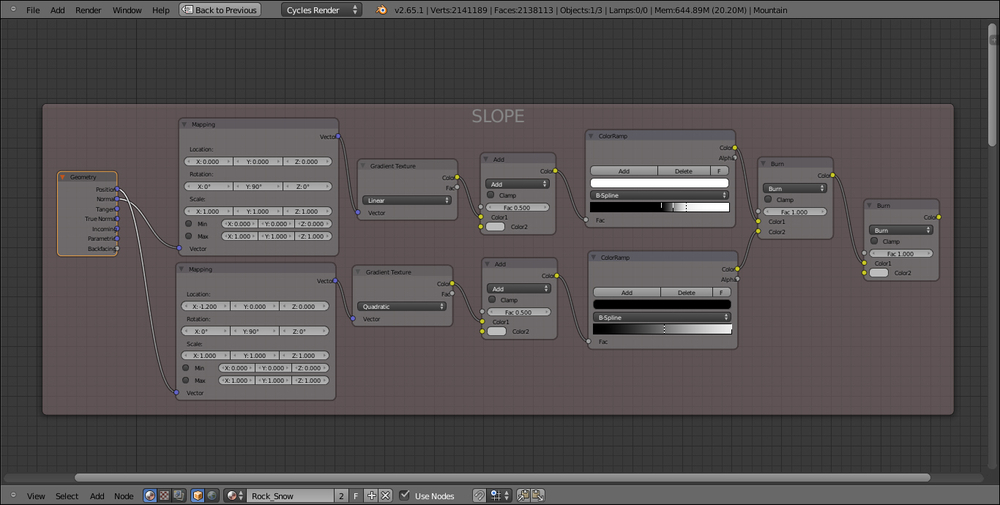
- Now press Shift + D to duplicate one of the Mapping nodes (press Alt + P to unparent it from the frame) and move it under the SLOPE frame. Also, change its X Location value to
-0.600. - Add a Noise node, a Voronoi node, and a Musgrave node (press Shift + A and go to Texture) and place them in a column aside of the Mapping node. Set the Noise texture's Scale value to
4.600. Set the Voronoi texture's Coloring value to Cell and the Scale value to28.700. Set the Musgrave texture' type to Ridget Multifractal, the Scale value to3.500, Detail to16.000, Dimension to0.900, Lacunarity to0.600, Offset to0.500, and Gain to5.000. - Connect the Vector output of the Mapping node to the Vector inputs of the three textures, and then add a Mix node (press Shift + A and go to Color | Mix). Also, set the Blend Type to Burn and place it aside of the Noise and Voronoi texture nodes.
- Connect the two texture's Fac outputs to the Color1 and Color2 input sockets of the Burn node. Press Shift + D to duplicate the latter and set its Fac value to
1.000; move it down and connect the color output of the first Burn node to the Color1 input socket of the second Burn node, and then connect the Fac output of the Musgrave texture to its Color2 input socket. - Add a ColorRamp node (press Shift + A and go to Convertor | ColorRamp) and paste it between the first and the second Burn nodes. Set the interpolation to Ease and move the white color marker to the middle of the slider.
- Add a Frame (press Shift + A and go to Layout | Frame) and select all these nodes and the frame and press Crtl + P to parent them; rename the frame as
DENSITY.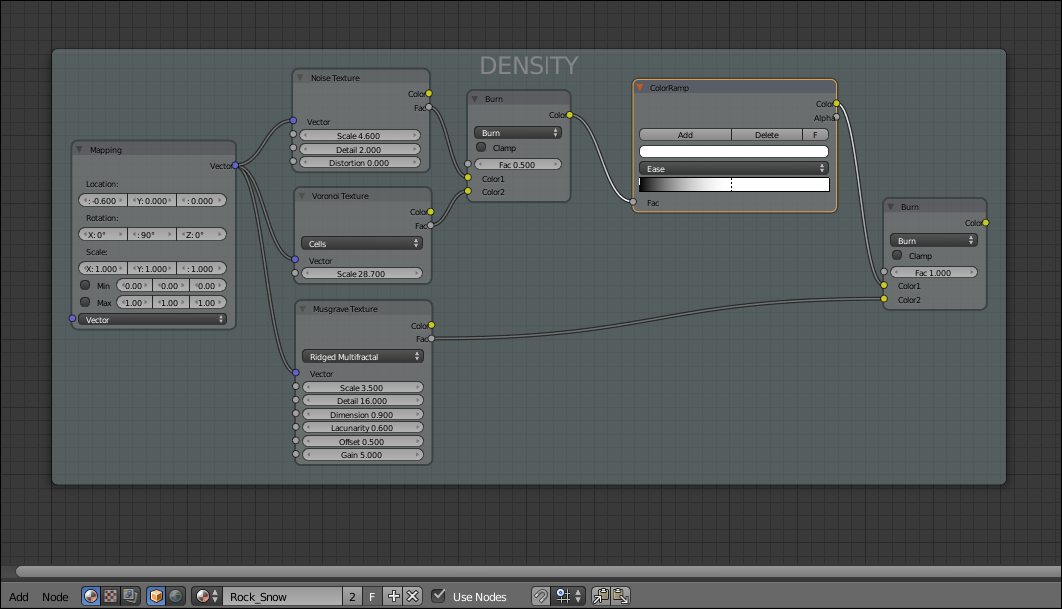
- Select the two frames and all the nodes inside and press Crtl + G to make a group. Add a Mix node (press Shift + A and go to Color | Mix) and set the Blend Type to Soft Light, the Fac value to
1.000, and connect the Color output of the last Burn node inside the SLOPE frame to the Color1 input socket. Then connect the Color output of the last Burn node inside the DENSITY frame to the Color2 input socket. - Drag the Color output of the Soft Light node on the right border of the group envelope to create a new Color output on the interface.
- Go to the SLOPE frame, click and drag to the left border of the envelope the Fac socket of the upper Add node. Rename the new input as
Snow_amountand drag and connect to it also the Fac socket of the bottom Add node. - Go to the DENSITY frame and drag the Vector input of the Mapping node to the left border of the envelope. Move it up by clicking on the little arrow icon and press Tab to close the group; rename it as
Separator. - Connect the Object output of the Texture Coordinate node to the Vector input socket of the Separator node group and its Color output to the Fac input socket of the Mix Shader node. On the group interface, set the Snow_amount value to
0.350.
Adding the atmospheric perspective
The very last thing we can do to improve our material is to append the Fog_underwater node group from the 1301OS_05_underwater_final.blend | Nodetree file. Rename it as Atmos_persp and paste it just before the Material Output node. Then press Tab to open the group and by going in edit mode, set the Multiply node value to 0.010 and the color of the Emission shader to R 0.078, G 0.133, B 0.250.
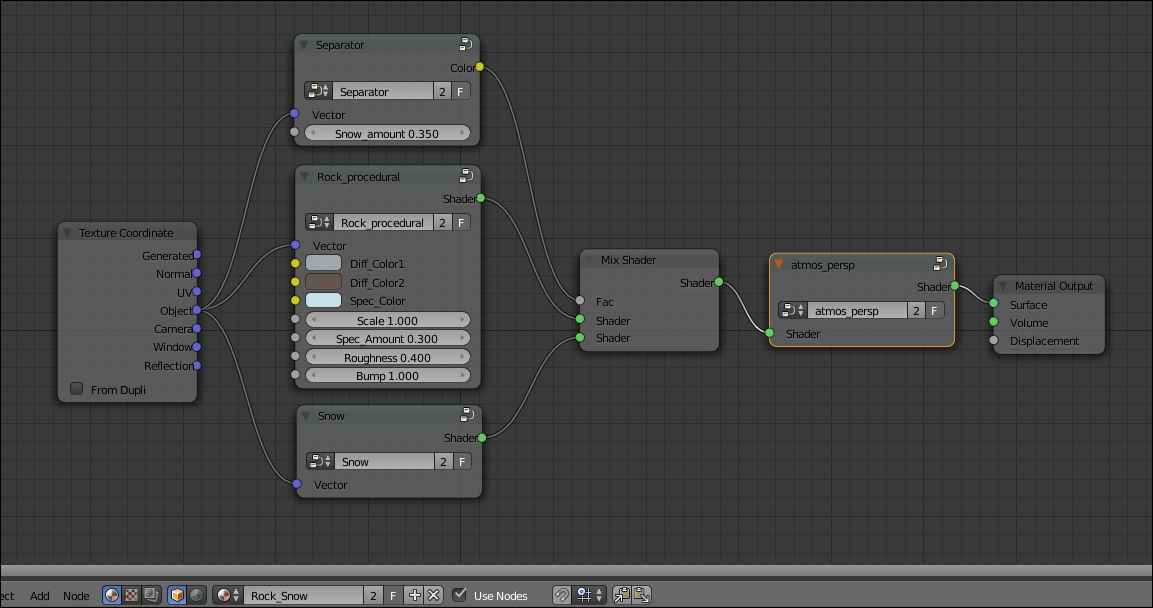
Let's see now, by dividing the process in three parts, how this material actually works:
- First, we appended the Snow material and made a group, changing only the way the bump works, that is, deleting the output to the Displacement input of the Material Output node and implementing a "per shader" bump. This doesn't make a big difference, actually, in the final render. Just be aware that a bump piped in the Displacement socket can react to the Ambient Occlusion (which we didn't use in the scene, by the way), while this is not true with a "per shader" bump. We also appended the Rock_procedural material and made a group of it as well. All the necessary values have been exposed and, although in this scene we kept the material unaltered, the group can now be easily re-used for different kinds of rocks in other projects or on different objects. We added one Math nodes set to Multiply for every texture scale and bump strength value that needed to be driven by an exposed input. The first Value, set to the original scale or strength value, gets multiplied by the driven second Value, thereby increasing or decreasing (for values lower than 1) the effect.
- We then built the Separator, a node group outputting gray-scale values which, connected to the Fac input of the Mix Shader node, work as a "stencil map", separating the two different materials on the mesh surface accordingly to the black and white values. The two gradient textures in the SLOPE frame, mapped on the position and on the normals of the mesh and then blended together by the Burn nodes, make the snow material (the white color value of the "stencil map") appear more on the mesh's faces that have a more horizontal trend than a vertical one. Thanks to the Add nodes, driven by the exposed Snow_amount input and influencing the gradient of the ColorRamp nodes, it's possible to also set the quantity of snow (that is, of the white color in the stencil) on the whole object. The mixed textures in the DENSITY frame make the separation line between black and white more frayed and natural-looking.
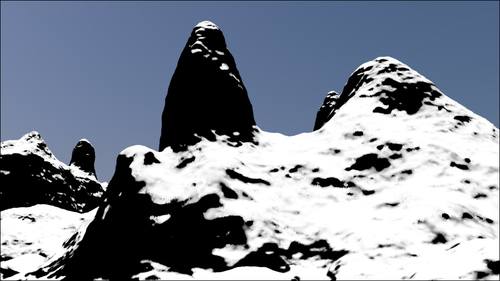
In the preceding image, you can see the "mask" black and white values working as a separator between the rock and the snow materials.
