UV Unwrap and External Textures
THE UNWRAPPING TECHNIQUE is commonly used in each film production. But we won't discuss it like a big tutorial. We'll explain in short, what unwrapping is and why studios use this technique, say for complete character textures.
In fact, it's a really important technique for mapping textures because what it does is to build a plain shape of our object's topology so that it might be modified and repainted to adapt the new texture to the same object's topology. It's easy if you think of it like origami (Figure 8.1).
8.1 Unwrapping a Mesh
Before starting to unwrap our objects, we need to be sure we don't need to modify their topology. Well that is not crucial, but it would save time because then we would have to rewrap the new changes made in the object's topology.
To wrap our objects we need to mark our edges as seams. That will tell Blender from where we want to break our object in order to create the plain shape. Once we have the object with our seams marked, we are able to go to UV/Image Editor where our unwrapped object should appear.
We should see some different points that corresponds to the vertex in the recently wrapped mesh. Consequently, we will also see the edges and the faces, but now everything is flat. Our object looks flat on the UV/Image Editor.
The UV is so complex that we won't see it in depth. We just need to know that almost every 3D film we watch has an incredible work of wrapping to apply external textures, sometimes to develop a completely new look, sometimes to paint and refine specific aspects of the object's original texture, and sometimes to add layers of details so the final appearance suits the required needs.
8.2 UV Layouts
Usually, UV maps are generated so we can use a couple of them in the same object, for example, for texture, specular, or bump maps. But, sometimes, we also need to translate a specific UV map to another mesh.
It's easily done in Blender with the Shift key and by selecting the mesh containing the UV map we want to transfer. Then, go to Object menu > Make Links > Join as UVs. When we do this we have a mesh with a UV applied that matches the original mesh UV map.
This is the easy way, of course. Talking about UV, we have some other complex things to take into consideration, like the multiple UV layouts. So imagine we have or we want several UV layouts for different parts of any object. We could make new UV layouts using the New button from the UV Maps panel within the Mesh (Object Data) Properties context as shown in Figure 8.2. This is useful, as mentioned earlier, when some UV maps are required for the same mesh but we have to take care when we need to unwrap the same face several times because the result will be determined by the combination of the alpha values of those UV layers.
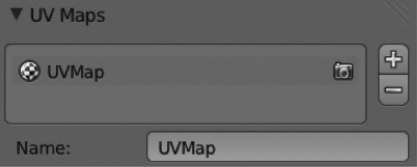
UV Maps panel within the Object Data Properties context. We can use this panel to add or delete UV layers.
Sometimes copying UV layouts from one mesh to another is very useful, especially in those cases where we need to restore something because of an issue. Anyway, we should take special care in deleting UV maps because this option deletes everything related to the unwrapping linked to the selected mesh.
As mentioned earlier, we could create new UV maps using the New button, but also delete UV layers taking special care that everything related to the unwrapped mesh will be deleted too. From this panel, we could modify the UV map to anything more comprehensible like UV Skin or UV Face.
In the same way, we can enable or disable the UV layer from the rendering process using the small camera icon close to the UV Map name.
8.3 Editing UVS
Editing the UV maps is a bit difficult at least for the very beginners but nothing we could not manage in a couple of training sessions. More complexity comes if we don't have enough knowledge of the UV wrapping feature.
At the moment, we have some basic knowledge of what the UV maps are and why they are so important for any film production. But how can we edit the UV maps within Blender?
This is probably a very huge topic that might deserve a whole book. Infact, there are some interesting publications out there on this.
Once we have our seams marked and the UV map generated, we need to accommodate our vertices and islands. The size of the UV faces might vary from a single pixel to a very wide size. Anyway, we need to adjust our points so we can convert it to anything we could paint so we can use it as texture.
We have some interesting operators to play with the UV regions:
- Border Select: We can use the B key to use something like a box lasso to select our points.
- Select or Deselect All: As we already know, we can select or deselect all with the A key.
- Linked UVs: With the combination of Ctrl+L keys, we can select everything that is part of the current UV map.
- Pin UVs: This is really useful to avoid the UV maps moving meanwhile we are making any unwrap action. This is accessible by using the combination of Shift+P keys.
- Border Select Pinned: We can use the Shift+B keys to select only the pinned UV points.
- Unlink Selection: We can use this feature to cut the selected points from the current map. This is only applicable to those points that conform to a whole face. We can do this using the combination of Alt+L keys.
When editing UVs, there is a very interesting and important option, namely, the Sync Selection. When we enable this option, which is located in the UV/Image Editor header, we are able to visualize in this editor everything we select in the 3D view.
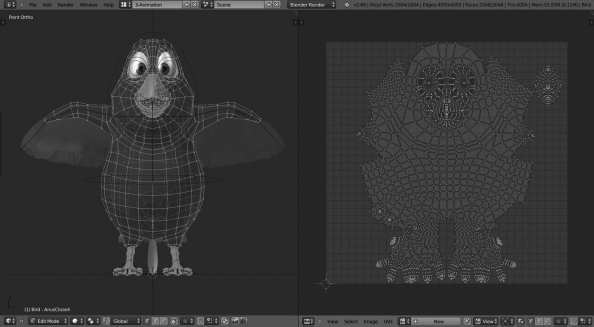
That means that if, for example, we have some faces of our object in the 3D view selected, they are also selected and visualized in the UV/Image editor. This is a very important feature because it allows us to have an accurate control over the recently unwrapped map with enough knowledge of which parts correspond to the object in 3D view as shown in Figure 8.3.

Unwrapping from the Mushroom project. With Sync Selection enabled, we can visualize the selected vertices, faces, or edges automatically in the wrapped model within the UV/Image editor.
When we are in the opposite case, with the Sync Selection disabled, only those faces selected are visualized in the UV/Image editor. Notice the edges or vertices are not visualized in this mode unless we switch to that mode in the header of the UV/Image editor as shown in Figure 8.4.

Unwrapping from the Mushroom project. With Sync Selection disabled, we only visualize in the UV/Image editor those elements selected in the 3D view.
Available selection modes are Vertex, Edges, Faces, or Islands.
We also have a small selection menu where we could manage everything our maps share, it's called the Sticky Selection Mode. The available modes are Shared Vertex, where we can visualize the vertex shared; Shared Location, where we can visualize the UVs sharing location; and Disabled that disables the Sticky Selection mode.
A peculiar thing we should have in mind is that Sync Selection doesn't work as we expect in all cases. For example, if we select Edges, it will work like when using the Shared Vertex mode but if we select Faces, then this feature works like in Disabled Stick Selection mode.
But what can we do with UVs? Just use the select feature?
Well, we can also manipulate UVs like any other object, so we can translate, rotate, or scale. We also are able to show or hide like we could do with any normal object using the H key. The UVs can also be locked in any of the X and Y axis.
As we see, the UVs behave like any other kind of object so we can manipulate it over the UV/Image editor like if it was a desktop.
Another interesting element in the UV/Image editor is the Pivot Point. This determines the behavior of the cursor with respect to the selected elements together at the center. The available options for the Pivot Point option are Bounding Box Center, Median Point, and 2D Cursor Location.
In the UV/Image editor header, we also have a Proportional Editing. This is an interesting feature that works in the same way as the 3D editor. With this feature, we can control the elements surrounding the selection in a smooth way so that moving a specific vertex within a specific range by Proportional Editing will affect those surrounding vertices (Figure 8.5).
![]()
UV/Image editor header that contains almost everything we need to manage a wrapping session.
The Snap feature works in the same way as it does in 3D view, but we have to take care that it works only if we snap to UVs and not to pixels.
For the snap feature, we could find more options if we go to the Snap submenu within the header. The available options are Snap Pixels that moves the selection to the nearest pixel if an image is loaded, Snap to Cursor that moves selection to the 2D cursor position and Snap to Adjacent Unselected that moves the selection to the close adjacent unselected element.
What if we can weld or align UVs elements? Well, what the W1 makes is to weld, in other words, move selected elements to their average position, but the Align, W2, W3, and W4 line up the selected UV elements on the X or Y axis.
It is also interesting that we can Mirror the elements that compound a UV map. And we can do it, as expected, in the X and Y axes. This is basically done as we do in the 3D view by combining the Ctrl+M key and then entering X or Y key for the axis.
In the same way that we can split and cut elements in our UVs, we also can join or stitch UVs sharing vertices. We can modify the parameters for stitching by adjusting options like Limit and Limit Distance.
But what we can't forget is the Minimize Stretch tool that helps us relax the UVs element angles. Applying this feature makes the UVs appear smooth and a bit relaxed as mentioned earlier.
We previously talked about enabling a lock for some elements in the UVs but the practical way to use is to use the Pinning feature. This is really useful sometimes because it keeps some elements without altering its location.
We can use this feature using the P key to pin selected elements or Alt+P keys to unpin those selected elements.
There are plenty of examples for the Pinning feature, but probably the analogy with the Mirror Modifier is the most effective to understand how powerful this feature can be.
When we are editing a symmetrical object in 3D view using the Mirror modifier, we have some vertices in the mirror axis that can be shared by both sides, the original and the mirrored one. If we enable the option to pin those vertices, then they will share the place and stay in the same location.
With this in mind, imagine how useful this feature can be if we use it with live unwrap, where the work is visualized automatically (Figure 8.6).
8.4 Optimize the UV Map
The usual process to unwrap a mesh is to use the Seams marks. But this is not enough to keep it clear and this isn't a warranty of success either. We have to make some changes to the recently unwrapped mesh like Modify orientation of the UV map, arrange that map, or stitch several maps together.
Sometimes, we need to add more faces or vertices to our unwrapped mesh. This could end in a kind of trouble, so even Blender adds those new elements to the UV map automatically.
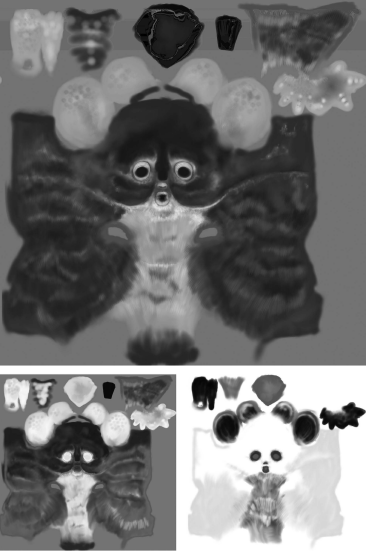
This was discussed earlier in this chapter, but again, if possible we have to try to start our unwrap process once we reckon the mesh is as complete as possible, trying to avoid adding new faces or vertices when the unwrap process has started (Figure 8.7).
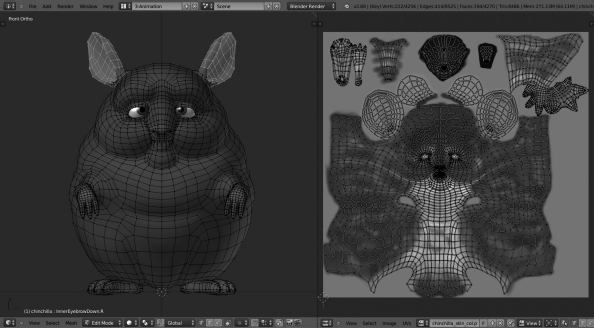
The chinchilla character from the Blender Institute's project. Notice how we have some parts of the model selected say by using vertex group and it is automatically visualized in the UVs within the UV/Image editor.
8.5 Combine UV Maps
When working on unwrapped meshes it's very common to have a very high percentage of the job done but we always have parts of the unwrapped map that don't suit the expected result ending in a very messy organization of islands, edges, or vertices.
In such cases, we need to clean up the corrupted zones so they look fine and clean and the UV texture is applied correctly.
A first step to success in these cases is to separate elements to unwrap. That is, make each one a separate UV map. If we make it in this way we ensure we are unwrapping the mesh using the right solution for each case.
Once we have the different pieces unwrapped, then we can check that we have all those different UV maps as part of the same UV Texture map so we can finally make the entire UV map using the stitch feature discussed earlier.
To complete the task, we need to arrange and stitch the different UVs. One of the most interesting operators while working in this kind of work is the Average Island Scale that creates all islands so that they are on the same scale more or less. This is a great help as generalizing and resizing the islands to the same scale ensures a smooth appearance. We can use this feature with the combination of Ctrl+A keys.
Now that we have our islands looking approximately the same size, we can use the Pack Islands feature to let them fill up almost the whole UV space. It's a very efficient feature making logical use of the available UV space so the generated UV map makes use of it.
To avoid UVs going outside of the UV range, we can enable the Constrain to Image Bound option.
8.6 Refine Layout
Once we have applied a UV map texture to our characters, we then have the option to refine it if more detail is required at some point. But sometimes we realize that we don't have enough space in pixels to achieve the desired level of details.
A common solution is to scale the UV map to a specific point where we need more details. But then, we should be careful because what we do will provide the same detail to any other zone of UV texture even to those zones with less visibility in the final film production.
We are talking about using UV textures and what we have to think about is how powerful is the machine on which we are developing or the one where we will render our film. Then we talk about memory again. We are manipulating images and this requires computation memory and resources.
So, how can we manage this memory in a responsive way? By reusing resources. So we can share some UV textures in very different objects and then modify or alter another UV map with those different elements. A very practical example is to use a generic UV texture for the skin in arms, hands, legs, and such elements so the loaded images don't jeopardize the machine resources.
8.7 Applying Images
We already have talked about this. The final reason to use UV textures is to apply such external, usually painted, textures to our characters. What we should know about UV maps in Blender is how to export UV layout images and how to apply textures.
The export process is useful because sometimes the team working in the unwrap process is not the same as the team painting those textures. So, the export option is really useful in such cases.
In Blender, we can export our UVs using the Save UV Face Layout option located in UVs > Save UV Face Layout menu. We have the option to save our UVs in very different formats.
The available export options are as follows:
- All UVs: If this option is not enabled, then only the selected UV faces will be exported.
- Modified: This option exports the UVs from the modified mesh.
- Format: We can select from among the available formats seen before.
- Size: We can select the size of the image in pixels.
- Fill Opacity: We can export our outlined image using an opacity factor or a transparent one.
We have to take care to have all our edges and islands within the boundary of the UVs space before exporting it as an image. Otherwise, everything outside that boundary will not be generated and exported.
Then we have our outlined model in a plain 2D image so the artistic team is able to edit and paint texture according to requirements or following the Concept art guidelines.
Once we have our texture painted, we can apply it back to the UVs layout.
Here, we have to say that Blender incorporates an interactive view so we can check automatically what we do in the UV/Image editor directly over our character model in the 3D view. For that we can switch the viewport shading option to Textured.
Right now we have everything in place but we have to tell Blender to enable the UVs in the render processing. There are a few ways in which this can be done. Use UV Coordinates and set up a texture using its UV coordinates.
We can do this in the Texture properties context by selecting an image as texture type. Then in the mapping panel we can choose the UV from the Coordinates menu and select the UV layer we want to use.
An option is to select the Color property in the Influence panel in the same way as the Use Alpha property in case our texture is using the alpha channel.
We are able to load or save images within the UV editor. We have to take care of this when we are working in a film production because if we are editing the .blend file and we are already modifying the UV texture with an external tool, we have to remember to Reload the texture before saving the .blend file again.
In the same way, we should take care about moving the texture between folders because we need to tell Blender where the file has been moved to.
To keep this clean is even more important where the unwrap process and texture painting are in different departments. Working both teams in separate environments makes things complex, so a clear organization and a strong communication are vital for success (Figure 8.8).
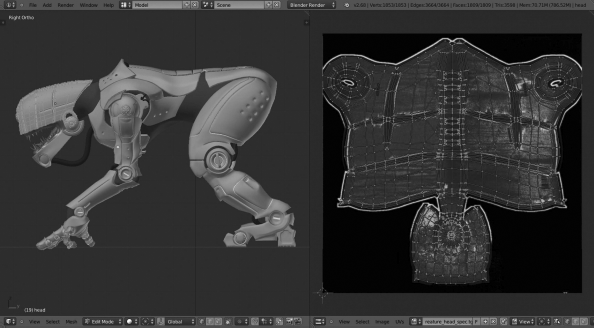
The creature character for Creatures Factory open movie. Notice different UV maps in the picture just corresponding to the head where a specular texture was applied.
In such cases, remember Blender incorporates a text editor where we could add notes, to-do lists, or messages to any specific team regarding guidelines to follow or simply track the latest changes made to such a file.
When we want to generate a new image, Blender shows us some options:
- Image name: As expected, apply a name to the generated image.
- Width and Height: We can also set the width and height in pixels.
- Color: It creates a solid color for a solid image.
- Alpha: It adds an alpha channel to the generated image.
- Generated Type: This is for the type of image to generate. The available values are UV Grid, Color Grid, Blank, and 32 bit.
In the same way, we can save our image to any of the external formats supported. This works like any other software and we have the options of Save, Save as, and Save as Copy.
There is also an interesting option that Blender supports. We can pack images within the .blend file. That means the current UVs are packed into the file. But what does the packing mean?
If we pack our images inside Blender, then in any case the file is modified in the future, the images will not be auto repacked, so the old versions of the images will be still available. To update, we have to repack or reload images.