Based on the existing blank template code, we start implementing the first user story that lists Hacker News’s top stories. Because this is the first chapter about implementing user stories, some common concepts are introduced in this chapter. We are going to cover the following topics in this long chapter.
Use the component ion-list to show top stories and test with Jasmine and Karma.
Angular services to load top stories.
Firebase basics and Hacker News API.
Infinite scrolling and pull-to-refresh in list view.
Loading indicators and error handling.
This chapter also shows how to gradually improve the implementation of a user story to make it more user friendly and reliable, which is a recommended practice in actual product development. We start from a simple list with dummy data and improve it to a full–fledged component with real data from Hacker News API. After reading this chapter, you should know how to use the component ion-list to render a list of items and use JavaScript to interact with Firebase database.
Define the Model
As we mentioned before, Hacker News has a public API to list top stories. The API is actually a public Firebase database. It’s a bad idea to jump directly into the implementation details. We should start from the user experience that we want to provide.
After the app starts, the user is presented with a list of top stories on Hacker News. The user can see basic information of each story in the list, including title, URL, author, published time, and score. The information for each story should be declared in the model. Each story has these properties: id, title, url, by, time, and score. We declare the model as a TypeScript interface in Listing 5-1. Here we use a more general model name Item instead of Story because comments and replies to comments are also items and can share the same model.
export interface Item {
id: number;
title: string;
url: string;
by: string;
time: number;
score: number;
}
Listing 5-1
Item model
The list of top stories can be represented as an array of items, that is, Item[]. However, we define a type Items in Listing 5-2 to represent a list of items. Even though Items is currently just an alias of Item[], declaring a dedicated type Items enables potential future improvements without changing existing code. For example, the list of items may only represent a paginated subset of all items, so properties related to pagination like limit, offset, or total may need to be added to the model Items in the future. All the existing code can still use the same type Items.
import { Item } from './Item';
export type Items = Item[];
Listing 5-2
Items model
List Component
After we have a list of items, we need to find a UI component to display them. We can use the Ionic component ion-list. The component ion-list is a generic container of an array of items. Items in the list can be text only or text with icons, avatars, or thumbnails. Items can be a single line or multiple lines. We can use the component ion-list to display top stories. Let's start with the introduction of the component ion-list.
Simple List
Listing 5-3 shows a simple list with three text-only items. The component ion-list is the container of items, while the component ion-item represents a single item in the list. The component ion-item has three slots. The default slot is for content displayed in the item. The slots with name start and end appear at the start or end position of the item, respectively.
<ion-list>
<ion-item>
Item 1
</ion-item>
<ion-item>
Item 2
</ion-item>
<ion-item>
Item 3
</ion-item>
</ion-list>
Listing 5-3
Simple list
Header and Separators
A list can contain a header to display a title at the top of the list. The header is created by adding the component ion-list-header as the child of the ion-list. Items in the list can be separated using the component ion-item-divider.
In Listing 5-4, a title is added to the list and a divider separates two items. The component ion-list-divider has three slots. The default slot is for content displayed in the divider. The slots with name start and end appear at the start or end position of the divider, respectively.
<ion-list>
<ion-list-header>
Items
</ion-list-header>
<ion-item>
Item 1
</ion-item>
<ion-item-divider>
<ion-button slot="start">Start</ion-button>
<ion-label>Divider</ion-label>
<ion-icon slot="end" name="book"></ion-icon>
</ion-item-divider>
<ion-item>
Item 2
</ion-item>
</ion-list>
Listing 5-4
List with header and dividers
Grouping of Items
If a list contains a lot of items, it’s better to group those items for users to view and find them easily. A typical example is the contact list, which is usually grouped by the first character of each contact’s first name. Grouping of items can be done using the component ion-item-group.
Listing 5-5 is an example of the simple contacts list. We use the component ion-item-divider to show the name of each group. We don’t need to use the component ion-list when grouping items.
<ion-item-group>
<ion-item-divider>A</ion-item-divider>
<ion-item>Alex</ion-item>
<ion-item>Amber</ion-item>
</ion-item-group>
<ion-item-group>
<ion-item-divider>B</ion-item-divider>
<ion-item>Bob</ion-item>
<ion-item>Brenda</ion-item>
</ion-item-group>
Listing 5-5
Grouping of items
Icons
Ionic provides over 700 ready-to-use icons (http://ionicons.com/). These icons can be displayed using the component ion-icon with the name of the icon. For each icon, there may be three variations for different platforms, that is, iOS, iOS-Outline, and Material Design. For example, the icon book has three variations with names ios-book, ios-book-outline, and md-book. If the name book is used, the displayed icon is auto-selected based on the current platform. We can also use the property ios and md to explicitly set the icon for different platforms.
In Listing 5-6, the first ion-item has the icon book to the left of the text. The second ion-item has the icon build at both sides of the text, but the icon on the left side is inactive. The last ion-item shows the icon ios-happy on iOS, but shows the icon md-sad on Android.
Avatars create circular images. They are typically used to display users’ profile images. In Ionic Core, avatars are created by using the component ion-avatar to wrap img elements.
Listing 5-7 shows a list of three items that have avatars.
<ion-list>
<ion-item>
<ion-avatar slot="start">
<img src="http://placehold.it/60?text=A">
</ion-avatar>
Alex
</ion-item>
<ion-item>
<ion-avatar slot="start">
<img src="http://placehold.it/60?text=B">
</ion-avatar>
Bob
</ion-item>
<ion-item>
<ion-avatar slot="start">
<img src="http://placehold.it/60?text=D">
</ion-avatar>
David
</ion-item>
</ion-list>
Listing 5-7
List with avatars
Thumbnails
Thumbnails are rectangular images larger than avatars. In Ionic Core, thumbnails are created by using the component ion-thumnail to wrap img elements.
Listing 5-8 shows a list of three items that have thumbnails.
<ion-list>
<ion-item>
<ion-thumbnail slot="start">
<img src="http://placehold.it/100x60?text=F1">
</ion-thumbnail>
Apple
</ion-item>
<ion-item>
<ion-thumbnail slot="start">
<img src="http://placehold.it/100x60?text=F2">
</ion-thumbnail>
Banana
</ion-item>
<ion-item>
<ion-thumbnail slot="start">
<img src="http://placehold.it/100x60?text=F3">
</ion-thumbnail>
Orange
</ion-item>
</ion-list>
Listing 5-8
List with thumbnails
In Listings 5-6, 5-7, and 5-8, the attribute slot="start" or slot="end" is used in the components ion-icon, ion-avatar, or ion-thumbnail to place the icon, avatar, or thumbnail to the left or right side of the item. There is a difference between slot="start" and slot="end" regarding the element’s position. The element with slot="start" is placed outside of the main item wrapper, but the element with slot="end" is placed inside of the main item wrapper. This is made clear by checking the position of the bottom line that separates each item.
Display a List of Items
After defining the model Item and learning the component ion-list, we are now ready to display a list of items in the app. We need to create a component for the list of items and another component for each item in the list. These two components are added to the module components that are created using the following command. The option --flat false means generating a separate directory for the module.
$ ng g module components --flat false
To use Ionic Core components, we need to add CUSTOM_ELEMENTS_SCHEMA in the array schemas of the module declaration to make Angular recognize custom elements; see Listing 5-9.
import { CUSTOM_ELEMENTS_SCHEMA, NgModule } from '@angular/core';
@NgModule({
schemas: [CUSTOM_ELEMENTS_SCHEMA],
})
export class ComponentsModule { }
Listing 5-9
Use CUSTOM_ELEMENTS_SCHEMA in the module
Item Component
The easiest way to create a new component is by using Ionic CLI or Angular CLI. Ionic CLI has the sub-command generate or g to generate different objects. Ionic CLI simply delegates to Angular CLI to finish the tasks after applying the naming convention for Ionic projects. It’s recommended to use Angular CLI directly for its flexibility. We can use the following command to generate the component to display items. The name components/item means the component files will be generated in the directory components. The option --flat false means the components files will be put into its own directory.
$ ng g component components/item --flat false
For each component, four files will be generated, including the TypeScript file for the component and test spec, HTML template file, and Scss file. Let’s start from the TypeScript file item.component.ts of the component ItemComponent. In Listing 5-10, class ItemComponent is decorated with @Component. The value of the property selector is app-item, which means that this component can be created using the element app-item in the template, for example, <app-item></app-item>. The property item is the Item object to display. The type of the property item is the model interface Item we defined in Listing 5-1. The @Input decorator factory of the class instance property item means the value of this property is bound to the value of the property item in its parent component. The @Input decorator factory can take an optional argument that specifies a different name of the bound property in the parent component: for example, @Input('myItem') binds to the property myItem in the parent component.
import { Component, Input } from '@angular/core';
import { Item } from '../../model/Item';
@Component({
selector: 'item',
templateUrl: 'item.html',
})
export class ItemComponent {
@Input() item: Item;
}
Listing 5-10
Item component
Listing 5-11 shows the template file item.component.html of the component Item. In the template, we can use item.title, item.score, item.by, item.time, and item.url to access properties of the current bound item. The layout of the item is simple. The title is displayed in an HTML h2 element. The score, author, and published time are displayed in the same row after the title. The URL is displayed at the bottom.
<div>
<h2 class="title">{{ item.title }}</h2>
<div>
<span>
<ion-icon name="bulb"></ion-icon>
{{ item.score }}
</span>
<span>
<ion-icon name="person"></ion-icon>
{{ item.by }}
</span>
<span>
<ion-icon name="time"></ion-icon>
{{ item.time | timeAgo }} ago
</span>
</div>
<div>
<span>
<ion-icon name="link"></ion-icon>
{{ item.url }}
</span>
</div>
</div>
Listing 5-11
Template of the item component
The timeAgo used in {{ item.time | timeAgo }} is an Angular pipe to transform the timestamp item.time into a human-readable text, like 1 minute or 5 hours. The implementation of timeAgo uses the moment.js (https://momentjs.com/) library to generate a human-readable text; see Listing 5-12.
import { Pipe, PipeTransform } from '@angular/core';
import * as moment from 'moment';
@Pipe({
name: 'timeAgo'
})
export class TimeAgoPipe implements PipeTransform {
The file item.component.scss in Listing 5-13 contains the basic style of the component Item. All the CSS style rules are scoped in the component to make sure that styles defined for this component won’t conflict with styles from other components. The styles in Listing 5-13 only apply to ItemComponent. When we inspect the DOM structure for ItemComponent, we can see unique CSS classes like _ngcontent-c1 assigned to the DOM elements. The scoped CSS is supported by Angular by default. The pseudo-class selector :host targets styles in the element that hosts the component.
:host {
width: 100%;
}
.title {
color: #488aff;
font-size: 18px;
font-weight: 500;
margin-bottom: 5px;
}
.link {
font-size: 14px;
}
div {
margin: 1px;
}
ion-icon {
margin-right: 2px;
}
div > span:not(:last-child) {
padding-right: 10px;
}
Listing 5-13
Styles of the item component
Items Component
The ItemsComponent is used to render a list of items. In Listing 5-14 of its main TypeScript file items.component.ts, the selector for this component is app-items. It also has the property items of type Items.
import { Component, Input } from '@angular/core';
import { Items } from '../../models/items';
import { Item } from '../../models/item';
@Component({
selector: 'app-items',
templateUrl: './items.component.html',
styleUrls: ['./items.component.scss']
})
export class ItemsComponent {
@Input() items: Items;
}
Listing 5-14
Items component
In the template file items.component.html shown in Listing 5-15, we use the component ion-list as the container. The Angular directive ngFor is used to loop through the array of items. For each item in the list items, a component ion-item is created to wrap a component app-item.
<ion-list>
<ion-item *ngFor="let item of items">
<app-item [item]="item"></app-item>
</ion-item>
</ion-list>
Listing 5-15
Template of items component
Empty List
If a list contains no items, it should display a message to inform the user. We can use the directive ngIf to display different views based on the length of the list; see Listing 5-16.
<ion-list *ngIf="items && items.length > 0">
<ion-item *ngFor="let item of items">
<app-item [item]="item"></app-item>
</ion-item>
</ion-list>
<p *ngIf="items && items.length === 0">
No items.
</p>
<p *ngIf="!items">
Loading...
</p>
Listing 5-16
Show empty list
Unit Tests of Components
Even though the component ItemsComponent is very simple so far, it’s still a good practice to add tests for this component. The project created using Ionic starter template already has support for unit test, so we’ll go through the process of configuring the basic tools for testing. We usually need two kinds of tests:
Unit tests - Test a single code unit, for example, a component, a service, or a pipe.
End-to-end tests - Test a user story, usually for testing integration between different components.
So far, we only need to add unit tests for the component ItemsComponent. We’ll use Jasmine and Karma for unit testing, which are both used in standard Angular projects. Jasmine is used to write test specs, while Karma is used to run tests on different browsers. The sample Ionic project is also an Ionic CLI project with Jasmine and Karma configured. We’ll go through the testing configuration first.
Testing Configuration
The file angular.json in the project’s root directory is the configuration file of Angular CLI. The configuration in angular.json is very complicated with many options. Listing 5-17 shows the partial configuration related to testing. From the configuration, we can see that the entry point file for Karma is src/test.ts. The Karma configuration file is src/karma.conf.js.
The file karma.conf.js has different configurations.
basePath – The base path to resolve other relative paths.
frameworks – Frameworks to use. Here we use Jasmine and Angular devkit.
plugins – Plugins for Karma. Here we use plugins for Jasmine, Chrome launcher, Angular devkit, and different reporters.
client.clearContext – Whether Karma should clear the context window upon the completion of running the tests.
angularCli – Configurations for the Angular CLI.
reporters – Names of all reporters.
coverageIstanbulReporter – Configuration of the istanbul coverage reporter.
port – Server port.
colors – Show colors in the console.
logLevel – Set the log level to INFO.
autoWatch – Watch for file changes and rerun tests.
browsers – Browsers to launch. Here we only use Chrome.
singleRun – Whether Karma should shut down after the first run. Here it’s set to false, so Karma keeps running tests after file changes.
The file test.ts in Listing 5-19 is the entry point to bootstrap the testing. After Angular core testing modules are imported, we initialize the test bed for component testing, then start the testing. All test spec files with suffix .spec.ts are loaded and executed.
import 'zone.js/dist/zone-testing';
import { getTestBed } from '@angular/core/testing';
import {
BrowserDynamicTestingModule,
platformBrowserDynamicTesting
} from '@angular/platform-browser-dynamic/testing';
Now we can add a test suite for the items component. A test suite file uses the same name as the component it describes but with a different suffix .spec.ts. For example, items.component.spec.ts in Listing 5-20 is the test suite file for the items component with name items.component.ts.
import { async, ComponentFixture } from '@angular/core/testing';
import { ItemsComponent } from './items.component';
import { ItemComponent } from '../item/item.component';
import { TimeAgoPipe } from '../time-ago/time-ago.pipe';
import { TestUtils } from '../../../testing/test-utils';
In Listing 5-20, we use the method describe() to create a new test suite. The method beforeEach() is used to add code to execute before execution of each spec. TestUtils used in beforeEach() is an important utility class; see Listing 5-21. The method beforeEachCompiler() takes a list of components and providers as the input arguments and uses the method configureIonicTestingModule() to configure the testing module. The testing module imports Ionic modules and adds Ionic providers. This is required to set up the runtime environment for Ionic. After the testing module is configured, the components are compiled. After the compilation, the method TestBed.createComponent() creates an instance of the first component and returns the component test fixture. In the test suite, the returned test fixture and component instance are used for verifications.
import { TestBed } from '@angular/core/testing';
import { FormsModule } from '@angular/forms';
import { IonicModule } from '@ionic/angular';
import { CUSTOM_ELEMENTS_SCHEMA } from '@angular/core';
In Listing 5-20, we created two test specs. The first spec is to test that the list component can display a list of items. The array items contains two items, so there should be two rendered h2 elements for items’ titles, and the text should match the corresponding item’s value of the property title. The fixture.debugElement.queryAll() method queries all the elements matching the given predicate. The By.css() method creates a predicate using a CSS selector. We can use the property nativeElement to get the native DOM element from the query result. The second spec is to test that the list component displays correct message when no items are in the list. The property items is set to an empty array, so there should be a p element with text No items.
Run Tests
To run tests using Karma, we can use npm run test to start the testing. Karma launches the Chrome browser and runs the tests inside of the browser. The testing results will also be reported in the console. Figure 5-1 shows the UI of Karma 3.0.0 running on Chrome 68.
Figure 5-1
Karma UI
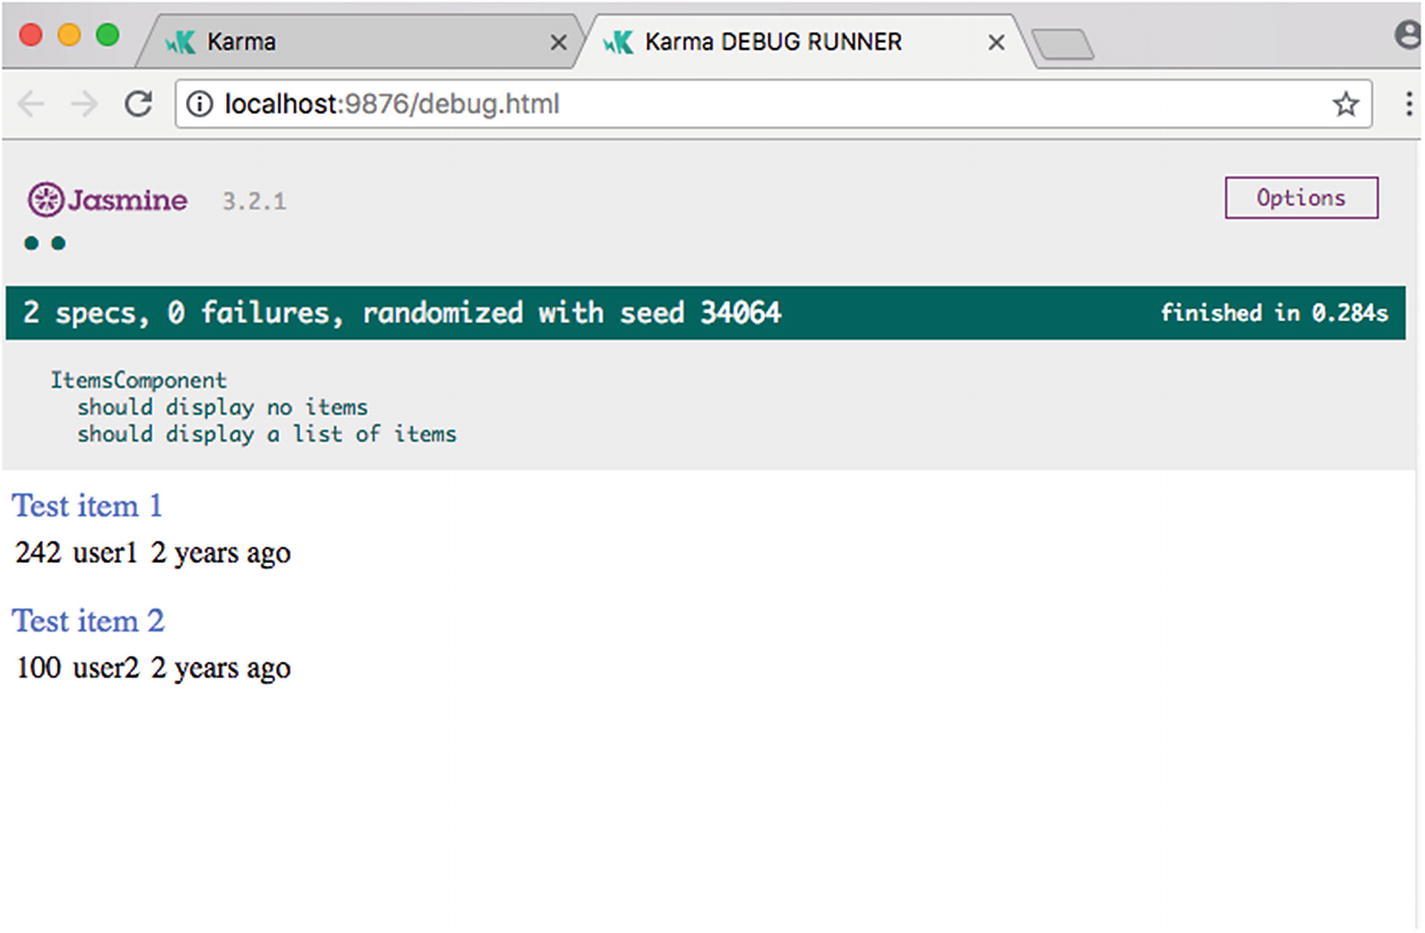
Clicking the DEBUG button in Figure 5-2 shows the debug page. In this page, we can see the results of all specs. We can also use Chrome Developer Tools to debug errors in the test scripts.
Figure 5-2
Karma debug UI
Note
Sometimes it is very hard to find causes of issues in unit tests. Below are some tips to make debugging of unit tests easier. Using ng test --source-map=false makes Angular generate detailed error messages. If you want to run a single test spec, just change the method describe to fdescribe, then only this test spec will be executed. We can also update the regular expression in const context = require.context('./', true, /.spec.ts$/) of test.ts to specify the test spec files to include.
Items Loading Service
When testing the items list component, we use hard-coded values for the arrayitems. This is good for testing since we can easily verify the test results. Now we are going to use real data to render the items list. In Angular apps, code logic that deals with external resources should be encapsulated in services.
Before creating the service, we need to create a new module for all services. This can be done by using Angular CLI with the following command. The command g is a shorthand of generate, which can generate different kinds of objects in Angular.
$ ng g module services --flat false
After running the command above, we can see the generated file services.module.ts in the directory src/app/services. Then we need to modify file app.module.ts to add the import of the created ServicesModule. After creating the module, we can continue to use the command g to generate the service itself. In the command below, g service means generating a service, services/item is the path of the service to generate, -m services specifies the module to provide this service; --flat false means generating a separate directory for this service.
$ ng g service services/item -m services --flat false
After running the command above, we can see the generated files item.service.ts and item.service.spec.ts in the directory src/app/services/item. The file services.module.ts is also updated automatically to include this newly created service.
ItemService in Listing 5-22 has a single method load(offset, limit) to load a list of items. Because there can be many items, the method load() only loads a subset of items. Parameters offset and limit are used for pagination: offset specifies the position of the first loaded item in the whole items list, and limit specifies the number of loaded items. For example, load(0, 10) means loading the first 10 items.
The return type of the load() method is Observable<Items>. Items is the model type we defined in Listing 5-2. It used to be just an alias of Item[], but now we update it to include more information related to pagination; see Listing 5-23. The type Items now has both properties offset and limit that match the parameters in the method load(). It also has the property total that represents the total number of items. The property total is optional, because in some cases the total number may not be available. The property results represents the actual array of items.
import { Item } from './Item';
export interface Items {
offset: number;
limit: number;
total?: number;
results: Item[];
}
Listing 5-23
Updated Item model
After we update the model Items, we also need to update code in the items list component and related test specs to use the new model.
ItemService uses decorator factory Injectable, so it’ll be registered to Angular’s injector and available for dependency injection to other components.
The return Observable<Items> of the method load() currently only emits an Items object with empty results. We’ll improve the implementation to use the actual Hacker News API later.
Top Stories Page
Now we can create a new page in the Ionic app to show top stories using ItemsComponent and ItemService. This page is also the new index page. Each page has its own subdirectory. We continue to use Angular CLI for components generation. In Listing 5-24, we generate the module top-stories for the top stories page and the component top-stories for this page. You may notice the option --routing when creating the module top-stories. This option is for routing support with Angular Router. We’ll discuss Angular Router in Chapter 8.
$ ng g module top-stories --routing
$ ng g component top-stories -m top-stories
Listing 5-24
Generate modules and components
After running the commands in Listing 5-24, all the required files for the top stories page are generated in the directory src/app/top-stories. We start from the file top-stories.component.ts. In Listing 5-25, the page class TopStoriesComponent implements the Angular interface OnInit. By implementing this interface, when TopStoriesComponent finishes initialization, the method ngOnInit() will be invoked automatically. The constructor of class TopStoriesPage takes one argument itemService of type ItemService. We use ItemService to load items and use ItemsComponent to display them.
TopStoriesPage class has a property items of type Items. The value of this property is passed to the ItemsComponent for rendering. In the method ngOnInit(), the method load() of ItemService is invoked. When the loading is finished, loaded items is set as the value of the property items. TopStoriesComponent class also implements the interface OnDestroy. In the method ngOnDestroy(), we use the method unsubscribe() of the Observable subscription to make sure resources are released.
import { Component, OnDestroy, OnInit } from '@angular/core';
import { Subscription } from 'rxjs';
import { Items } from '../../models/items';
import { ItemService } from '../../services/item/item.service';
@Component({
selector: 'app-top-stories',
templateUrl: './top-stories.component.html',
styleUrls: ['./top-stories.component.scss']
})
export class TopStoriesComponent implements OnInit, OnDestroy {
In the template file of Listing 5-26, <app-items [items]="items"></app-items> creates the component app-items and binds the value of the property items to the property items in TopStoriesComponent class. Because loading items is asynchronous, the value of items is undefined until the loading is finished successfully. The component app-items already handles the case when the property is undefined.
<ion-app>
<ion-header>
<ion-toolbar>
<ion-title>Top Stories</ion-title>
</ion-toolbar>
</ion-header>
<ion-content padding>
<app-items [items]="items"></app-items>
</ion-content>
</ion-app>
Listing 5-26
top-stories.html
Test
Now we need to add a test suite for this page.
Items Loading Service Mock
To test the top stories page, we need a service that can load items and simulate different scenarios. The best solution is to create a service mock. ItemServiceMock in Listing 5-27 is the mock we use for ItemService. The implementation of the method load() in ItemServiceMock creates items based on input arguments offset and limit. With this service mock, we can generate any number of items.
import { Injectable } from '@angular/core';
import { Observable } from 'rxjs';
import * as range from 'lodash.range';
import { Items } from '../model/Items';
import { Item } from '../model/Item';
import { ItemService } from '../services/ItemService';
@Injectable()
export class ItemServiceMock extends ItemService {
When we used Angular CLI to generate the component of the top stories page, the test spec file is already generated with basic setup code to test it. We can use this spec filetop-stories.component.spect.ts as the starting point to test this component. When using the method TestUtils.beforeEachCompiler() to configure the component, we need to register the ItemServiceMock as a provider. Here we use the Angular class provider. {provide: ItemService, useClass: ItemServiceMock} means the registered provider uses the default token ItemService but uses ItemServiceMock as the actual class. So TopStoriesComponent is injected with an instance of class ItemServiceMock.
The code of the test spec in Listing 5-28 is different from what’s in Listing 5-20 for the spec of ItemsComponent. This is because TopStoriesPage uses an asynchronous service ItemService that makes testing more complicated.
At first, we need to use the method async() from Angular to wrap the testing function. The first fixture.detectChanges() invocation triggers the invocation of the method load() in ItemService. fixture.whenStable() returns a promise that waits for the returned observable of the method load() to emit values. In the resolve callback of the promise returned by whenStable(), the second fixture.detectChanges() invocation triggers ItemsComponent to update itself using the loaded items. At last, we verify the rendered DOM structure matches the expected result.
import { ComponentFixture, async } from '@angular/core/testing';
import { By } from '@angular/platform-browser';
import { DebugElement } from '@angular/core';
import { TestUtil } from '../../test';
import { TopStoriesComponent } from './top-stories.component';
import { ItemsComponent } from '../../components/items/items.component';
import { ItemComponent } from '../../components/item/item.component';
import { TimeAgoPipe } from '../../pipes/TimeAgoPipe';
import { ItemService } from '../../services/ItemService';
import { ItemServiceMock } from '../../testing/ItemServiceMock';
let fixture: ComponentFixture<TopStoriesComponent> = null;
Now we have a top stories page that works with mock data. We continue to improve the implementation of ItemService to use the actual Hacker News API. The Hacker News API is a public Firebase database. We start from the Firebase basics.
Firebase Basics
Firebase is a product of Google. To create new Firebase projects, you need to have a Google account. Firebase projects can be created and managed using Firebase console (https://firebase.google.com/console/). Firebase offers two products for data persistence. The first one is the original Firebase Realtime Database, the second one is the new Cloud Firestore. These two products have different data models for persistence. Cloud Firestore offers richer features, better performance, and scalability. But Cloud Firestore is currently in beta. If you want to have a stable solution, Realtime Database is a better choice. If you want to try new features and a new data model, Cloud Firestore should be the choice. Firebase has a guide (https://firebase.google.com/docs/firestore/rtdb-vs-firestore) about how to choose between these two products. This book covers both products. Hacker News data is stored in the Realtime Database, so we use it to retrieve the data. The app’s own data is stored in Cloud Firestore. We start from the Realtime Database.
Database Structure
Firebase Realtime Database has a unique database structure that is different from other databases. Each Firebase database is stored as a tree-like JSON object. This tree structure is very flexible for all kinds of data. You can organize the app’s data in a way suitable for most of your apps. For an e-commerce app, its database can be organized as in Listing 5-29. The property products is a map of product id to its properties. The property customers is a map of customer id to its properties. The property orders is a map of order id to its properties.
Each data value in the database has a unique path to identify it. If you think of the whole JSON object as a file directory, then the path describes how to navigate from the root to a data value. For example, the path of the price of the product with id 00001 is /products/00001/price. The path /orders represents all orders. The path is used when reading or writing data, as well as configuring security rules.
To demonstrate the usage of Firebase JavaScript SDK, we use the e-commerce database as the example. The Firebase web SDK is a general library for all kinds of web apps. For Angular apps, AngularFire2 is a better choice that offers tight integration with Angular. In this section, we only discuss the usage of the general web SDK, which is very important to understand how Firebase works. AngularFire2 is used in the Ionic app and will be discussed later.
Setup
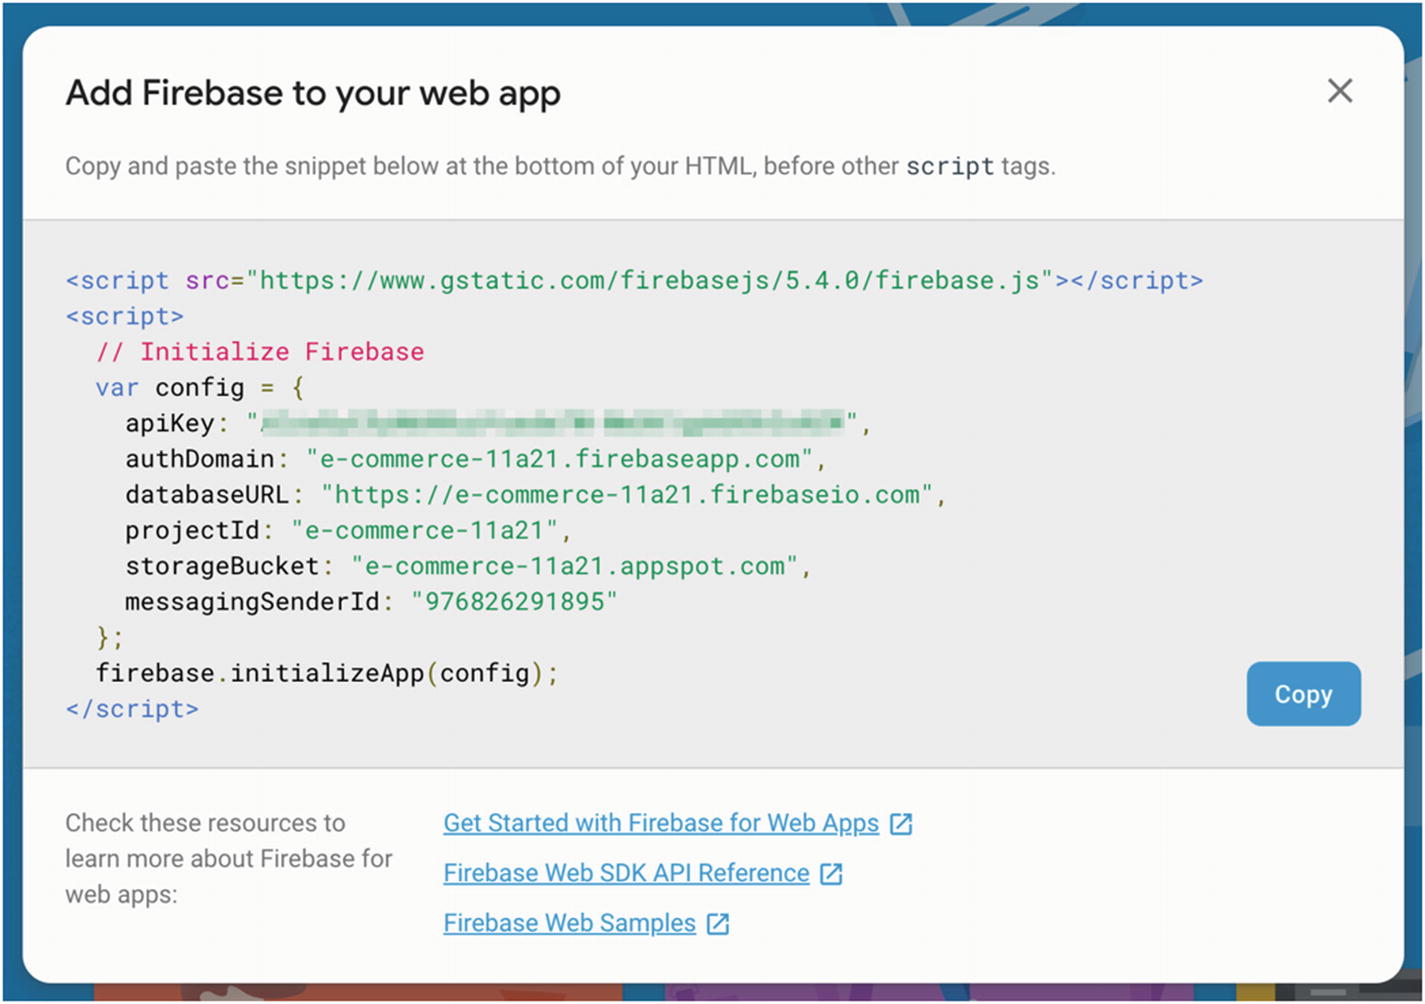
We use Firebase console to create a new project first. In the Project Overview page of your newly created Firebase project, clicking Add Firebase to your web app shows a dialog with code ready to be copied into the HTML file; see Figure 5-3.
Figure 5-3
Add Firebase to web app
In Listing 5-30, we set different configuration properties for various Firebase features. PROJECT_ID is the id of the Firebase project.
To start interacting with the Firebase database, we need to get a reference to the database itself. This is done by calling the method database() of the global object firebase. The return result is an instance of class firebase.database.Database.
let database = firebase.database();
Once we get a reference to the Firebase database, we can use the method ref(path) of the object database to get a reference to the data specified by a given path. The return result ref is an instance of the class firebase.database.Reference.
let ref = database.ref('products');
Reading data from the Firebase database is done asynchronously using event listeners. After adding a listener of a certain event to the object ref, when the event is triggered, the listener will be invoked with related data. In Listing 5-31, a listener of the event value is added to the object ref using the method on(eventType, callback). When the data of path /products is changed, the event listener is invoked with a data snapshot taken at the time of the event. The event listener will also be triggered when the listener is attached to get the initial data.
ref.on('value', function(snapshot) {
console.log(snapshot.val());
});
Listing 5-31
Reading data
The value of argument snapshot passed to the listener handler is a firebase.database.DataSnapshot object. It’s an immutable object with different properties and methods to retrieve data from the snapshot. It represents the snapshot of data at the given path when the event occurs. This DataSnapshot object is only used for retrieving data. Modifying it won’t change the value in the remote database. Table 5-1 shows the properties of DataSnapshot.
Table 5-1
Properties of DataSnapshot
Name
Description
key
Gets the key of this DataSnapshot, which is the last token in the path. For example, the key of the path /products/00001 is 00001.
ref
Gets the Reference object that created this DataSnapshot object.
Gets a JavaScript value of the data; could be a string, number, Boolean, array, or object. null means the DataSnapshot is empty.
exists()
Checks if this DataSnapshot contains any data. This method should be used instead of checking val() !== null.
forEach(action)
Invokes a function action for each child. The function receives the DataSnapshot object of each child as the argument.
child(childPath)
Gets a DataSnapshot object at the relative path specified by childPath.
hasChild(childPath)
Checks if data exists at the relative path specified by childPath.
hasChildren()
Checks if this DataSnapshot has any children.
numChildren()
Gets the number of children.
toJSON()
Returns the JSON serialized result of this object.
After an event listener of a Reference object is added, we can use the method off(eventType, callback) to remove the listener. To make sure all event listeners are correctly removed, for a certain event type on a certain reference, the number of invocation times of the method on() should match the number of invocation times of the method off(). Event listeners are not inherited. Removing an event listener on the parent node won’t remove event listeners registered on its child nodes. Each event listener should be removed individually. Listing 5-32 shows three different ways to remove event listeners.
ref.off('value', valueCallback); // Remove a single listener
ref.off('value'); // Remove all listeners of the event 'value'
ref.off(); // Remove all listeners for all events
Listing 5-32
Remove event listeners
Sometimes you may only need to retrieve the data once, so then the method once(eventType, callback) is a better choice than on(), because event listeners added using once() will only be triggered once and remove themselves after that. You don’t need to worry about removing event listeners afterward.
There are five different type of events to listen to when reading data; see Table 5-3.
Table 5-3
Event types
Name
Trigger condition
Arguments of listener function
value
Once with initial data and every time data changes.
DataSnapshot object.
child_added
Once for each initial child and every time a new child is added.
DataSnapshot object of the child added and key of its previous sibling child.
child_removed
Every time a child is removed.
DataSnapshot of the removed child.
child_changed
Every time a child’s data changes.
DataSnapshot object of the child changed and key of its previous sibling child.
child_moved
When a child moves its position due to priority change.
DataSnapshot object of the child changed and key of its previous sibling child.
Listing 5-33 shows the examples of using these events.
The reference objectref can also be used to write data. The method set(value, onComplete) replaces the data at the path of the current reference object. The method set() will override all data under that path, so be careful when using it. The method update(values, onComplete) selectively updates children data specified by relative paths in the value. Only children listed in the values will be replaced. The method update() supports updating multiple values. onComplete is the callback function to invoke after data changes are synchronized to the server. If you prefer to use Promise instead of callback functions, the return value of set() or update() is a firebase.Promise object that is similar to the standard Promise object. Corresponding events, for example, value and child_added, will be triggered after calling methods set() and update().
In Listing 5-34, the method set() replaces the whole data under the path products/00001, and the method update() only updates the property price.
let ref = database.ref('products');
ref.child('00001').set({
"name": "New iPhone 6s plus",
"price": 699.99
});
ref.child('00001').update({
"price": 639.99
});
Listing 5-34
Writing data
The Reference object also has the method remove() to remove whole data at the given path, which is the same as using set(null).
If the data to store is a list of objects without meaningful business ids, we should use the method push(value, onComplete) to add a new object to the list. The method push() creates a unique value as the key of the object to add. It’s not recommended to use sequence numbers as keys for objects in the list, as it causes synchronization problems in a distributed data system. The return value of the method push() is a new Reference object points to the newly created path. Listing 5-35 shows two different ways to use push().
The major disadvantage of reading data using event listeners on the Reference object is that the whole data at the given path will be read. This could affect performance for large objects or arrays. Sorting also cannot be done either. To filter and sort data under a given path, we can use other methods in the Reference object that return firebase.database.Query objects.
sort
Table 5-4 shows the methods for sorting. Listing 5-36 shows an example of sorting the products by price.
Table 5-4
Methods for sorting
Method
Description
orderByChild(path)
Orders by the value of specified child path.
orderByKey()
Orders by the value of child keys.
orderByValue()
Orders by the value of child values; only numbers, strings, and Booleans are supported.
let ref = database.ref('products');
ref.orderByChild('price');
Listing 5-36
Sort products by price
Filter
Table 5-5 shows the methods for filtering. In Listing 5-37, we sort the products by price first, then filter it to only return the first child.
Table 5-5
Methods for filtering
Method
Description
limitToFirst(limit)
Limits the number of returned items from the beginning of the ordered list of results.
limitToLast(limit)
Limits the number of returned items from the end of the ordered list of results.
startAt(value, key)
Sets the starting point of returned items in the ordered list of results. Only items with a value greater than or equal to the specified value or key will be included.
endAt(value, key)
Sets the ending point of returned items in the ordered list of results. Only items with a value less than or equal to the specified value or key will be included.
equalTo(value, key)
Sets the value to match for returned items in the ordered list of results. Only items with a value equal to the specified value or key will be included.
let ref = database.ref('products');
ref.orderByChild('price').limitToFirst(1);
Listing 5-37
Filter to only return the first child
The returned firebase.database.Query objects from filtering and sorting methods can be chained together to create complicated queries. There can be multiple filtering conditions, but only one sorting method is allowed.
Navigation
Given a Reference object, we can use it to navigate in the database tree. Table 5-6 shows the methods or properties for navigation. Listing 5-38 shows how to use these methods or properties.
Table 5-6
Methods or properties for navigation
Method
Description
child(path)
Gets the Reference object at the specified relative path.
parent
Gets the Reference object to its parent path.
root
Gets the Reference object to the database’s root path.
In the last section, we discussed how to use the general Firebase JavaScript SDK. For Angular apps, a better choice is AngularFire2 (https://github.com/angular/angularfire2), which makes interacting with Firebase much easier. We use npm to install AngularFire2 packages.
$ npm i firebase @angular/fire
Now we need to add the AngularFire2 module into the Ionic app. The first step is to add the Firebase configuration to the file src/environments/environment.ts. The related object in Listing 5-39 only contains the property databaseURL that points to the Hacker News public database.
Then we need to configure the application module to import Firebase modules. In the @NgModule decorator, we need to add AngularFireModule.initializeApp(environment.firebase) and AngularFireDatabaseModule to the array of imported modules; see Listing 5-40. AngularFireDatabaseModule is the module for Realtime Database. More modules need to be imported when using other features provided by Firebase.
import { BrowserModule } from '@angular/platform-browser';
import { CUSTOM_ELEMENTS_SCHEMA, NgModule } from '@angular/core';
import { MyApp } from './app.component';
import { AngularFireModule } from '@angular/fire';
import { AngularFireDatabaseModule } from '@angular/fire/database';
import { environment } from '../environments/environment';
After importing the AngularFire2 modules, we can inject instances of AngularFireDatabase into components that need to interact with Firebase databases; see Listing 5-41. Methods related to Firebase databases are in the AngularFireDatabase object. To manipulate a list in the database, the method list() is used to get an AngularFireList object bound to the given path. The similar method object() should be used to get the AngularFireObject object to manipulate a single object bound to the given path. Both AngularFireList and AngularFireObject have the method valueChanges() to return an Observable object that contains the values. For AngularFireList, the value is a JSON array; for AngularFireObject, the value is a single JSON object.
import { Component } from '@angular/core';
import { Observable } from 'rxjs';
import { AngularFireDatabase } from '@angular/fire/database';
In the code below, a binding to path /products/00001 is created. The type of the variable product is Observable<any>.
let product = db.object('/products/00001').valueChanges();
To get the actual data, we use the Angular pipe async in the template to get the value.
<span>{{ (product | async)?.name }}</span>
AngularFireObject has methods set(), update(), and remove() to update the data, which have the same meaning as in the Reference object. The method valueChanges() of AngularFireList returns an Observable<any[]>. We can use the directive *ngFor with the pipe async to display the results in the template. AngularFireList has the method push() to add new values to the list. AngularFireList also has the methods set(), update(), and remove() to update the list.
Listing 5-43 shows the implementation of ItemService that uses Hacker News API. this.db.list('/v0/topstories').valueChanges() returns a Observable<number[]> instance. Each value in the Observable<number[]> is an array of all top stories ids. This array contains a large number of ids. Then we use the operator map to only select the subset of ids base on the value of parameters offset and limit. Each story id is mapped to an Observable<Item> using this.db.object('/v0/item/' + id).valueChanges(). The result type of ids.map(id => this.db.object('/v0/item/' + id).valueChanges()) is Observable<Item>[]. All these Observable<Item> objects are combined using the operator combineLatest to create an Observable<Item[]> object. The operator mergeMap is used to unwrap the inner Observable<Observable<Item[]>>, so the outer observable is still Observable<Item[]>. The final operator map creates the Observable<Items> from the Observable<Item[]> object.
import { Injectable } from '@angular/core';
import { Observable, combineLatest } from 'rxjs';
import { map, mergeMap } from 'rxjs/operators';
import { Items } from '../../models/items';
import { AngularFireDatabase } from '@angular/fire/database';
The current implementation of ItemService uses Observable operators to watch for changes in the Firebase database and emit values. However, some of those updates may not be necessary. When a story is updated, for example; when the score is updated; or new comments are added, a new Items object that contains all items is emitted from the Observable<Items> object and triggers an update of the whole UI. This is because the operator combineLatest emits a new combined value when any source Observable emits a value. This frequent UI update is not a good user experience. We can improve the performance by changing the data model.
Currently, we use Item[] in model Items to represent the items, which means all Item objects need to be resolved asynchronously before creating the Items object for the ItemsComponent to render. This makes users wait longer than expected. We can update the model Items to use Observable<Item>[] as the type of items; see Listing 5-44. Because each item is represented as its own Observable<Item> object, it can update itself separately. After updating the model, a new Items object is only emitted when the Observable of this.db.list('/v0/topstories').valueChanges() emits a new array of ids.
import { Observable } from 'rxjs';
import { Item } from './Item';
export interface Items {
offset: number;
limit: number;
total?: number;
results: Observable<Item>[];
}
Listing 5-44
Updated model Items
If we update the model, we can simplify the implementation of the ItemService; see Listing 5-45. After slicing the original array of item ids, the operator distinctUntilChanged is used to make sure that duplicate item ids won’t be emitted to trigger unnecessary UI updates. Then the operator map is used to transform the array of item ids into an array of Observable<Item>.
import { Injectable } from '@angular/core';
import * as isEqual from 'lodash.isequal';
import { Observable } from 'rxjs';
import { map, distinctUntilChanged } from 'rxjs/operators';
import { Items } from '../../models/items';
import { AngularFireDatabase } from '@angular/fire/database';
After updating the model, the implementation of ItemService can be simplified. However, it makes the implementation of ItemComponent complicated. As the type of the property item is changed from Item to Observable<Item>, ItemComponent needs to subscribe to the Observable and re-render itself when a new value is emitted. This can be done using the pipe async.
The changes to model and ItemComponent are an alternative way to implement the user story. However, this implementation violates one fundamental principle of designing components like ItemComponent. These components should only have pure rendering logic. The logic of handling Observables in ItemComponent makes it hard to test. This section only provides information about potential alternative implementations. The actual implementation of the example still uses the old model. The aforementioned performance issue will be solved by using state management frameworks in Chapter 6.
Further Improvements
When running this app, you may see the list of stories keeps updating itself. This causes some user experience issues. If the user is currently scrolling down the list of top stories and remote data is updated, then the list may be reordered to reflect the changes. This is annoying as the user’s focus is lost. The list should only be refreshed explicitly by the user, for example, clicking a refresh button or pulling down the list to trigger the refresh. We also need to allow users to see more stories by implementing pagination.
To satisfy these requirements, we need to make changes to the ItemService. The current implementation of the method load() in ItemService returns a new Observable<Items> instance when invoked. This is unnecessary because we can reuse the same Observable<Items> instance for results of different queries. So we introduce a new method get() to retrieve the Observable<Items> instance. In Listing 5-46, the interface Query represents a query object for retrieving items. The properties offset and limit are used for pagination; refresh is used to indicate whether the list of story ids should be refreshed. The property queries is a RxJS Subject that acts as the communication channel between queries and result items. The method load() now emits a new Query object into the queries, which triggers the Observable<Items> to emit new Items object based on the value of the latest Query object.
import { Injectable } from '@angular/core';
import { combineLatest, merge, Observable, Subject } from 'rxjs';
The implementation of the method get() is a bit complicated, but it also shows the beauty of RxJS on how to simplify state management. rawItemIds is an Observable<number[]> object that represents the story ids. The method combineLatest() combines values from rawItemIds and queries to create an Observable of arrays with item ids and Query objects. The operator filter chained after combineLatest() is to make sure that values are only emitted when the property refresh is set to true in the Query object. This is to make sure the story ids are only updated when explicitly requested. Then we use the operator map to extract the ids from the array. Now the itemIds is an Observable of ids that emits the latest ids only when the property refresh is set to true.
The function selector is to combine a Query object and item ids to create Observable<Items> objects. This is done by using the similar approach as in the original implementation of ItemService in Listing 5-25. By using the operator merge, we can get an Observable<Observable<Items>> object. The merge is required to handle the case that Observable itemIds may start emitting values after the Observable queries has emitted the initial Query object. In this case, a single withLatestFrom() doesn’t work because the emitted value in Observable itemIds can only be picked up when the Observable queries emits another value. The operator combineLatest waits until both queries and itemsId to emit at least one value, then combines the values using the function selector. The operator take(1) means only the first value is used. This handles the case when the initial query happens earlier than the first emitted value of item ids. All the rest values come from the second Observable. this.queries.pipe(skip(1), withLatestFrom(itemIds, selector)) uses skip(1) to bypass the first value in queries, because the first value is already captured in the first Observable object. For all of the following values in queries, withLatestFrom() is used to combine Query object and item ids using the function selector. The difference between withLatestFrom and combineLatest is that withLatestFrom only emits a new value when the source Observable emits a value. This can make sure the result Observable only emits Items when a new query is received.
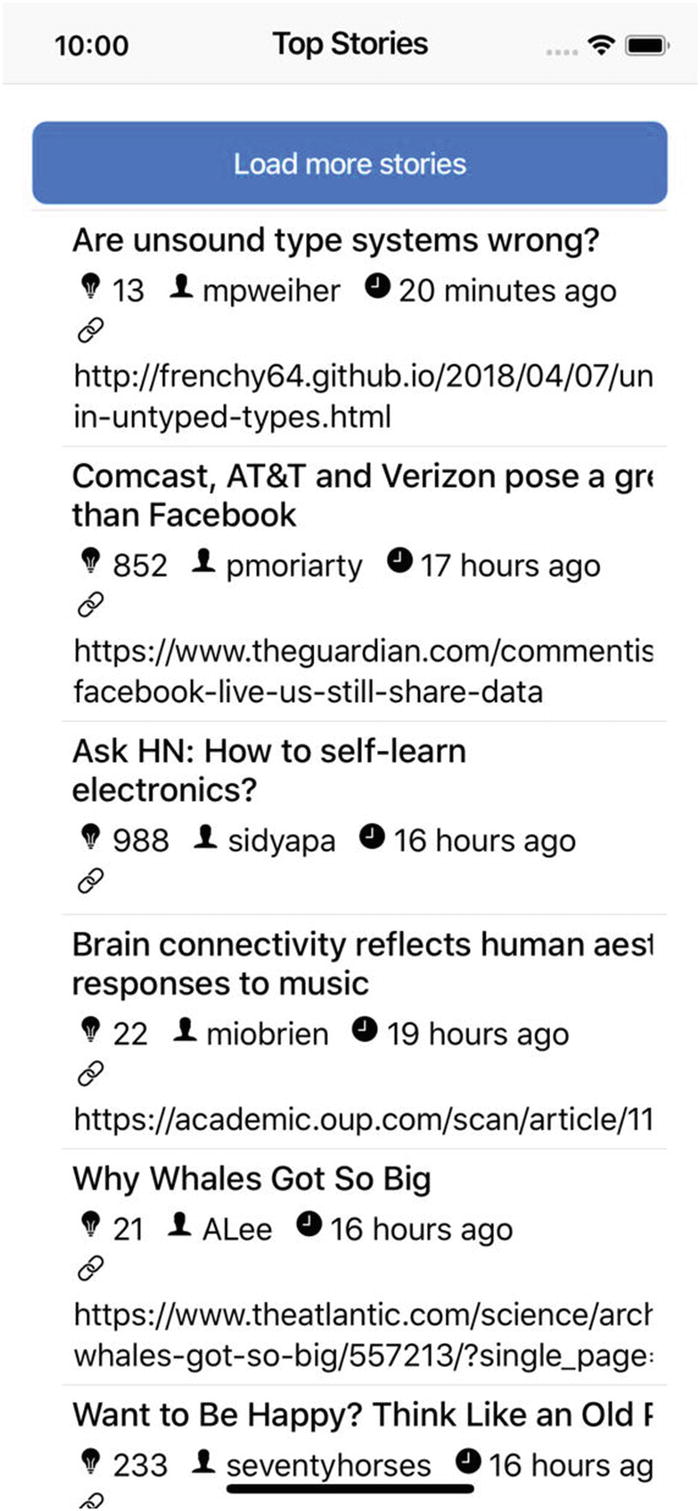
To load more stories, we can use the method load to send queries for different pages. We just need to add a button to invoke the method. In Listing 5-47, the new method doLoad() triggers the loading of items in the next pages. The argument refresh is only true for the initial loading.
export class TopStoriesComponent implements OnInit, OnDestroy {
Figure 5-4 shows the top stories page with a button to load more stories.
Figure 5-4
Top stories page with load button
Pagination and Refresh
Now we can add the UI for pagination and refresh. To build the UI, we need to add buttons to the page.
Button
Ionic provides the component ion-button for buttons. There are three types of buttons based on the value of the attribute fill. The default value is solid except inside of a toolbar, where the default value is clear.
Solid style - Button with filled background, enabled by setting the attribute fill to solid.
Outline style - Button with transparent background and borders, enabled by setting the attribute fill to outline.
Clear style - Button with transparent background and no borders, enabled by setting the attribute fill to clear.
To change the color of a button, use the attribute color to specify the color. Possible colors are light, medium, dark, primary, secondary, tertiary, success, warning, and danger. By default, the color primary is used.
For buttons with borders, we can add the attribute round to make them use round borders. For layout purposes, we can use the attribute expand to make a button take 100% of its parent’s width. The attribute expand can take two values: block for full-width buttons, fill for full-width buttons without left and right borders. To change the size of a button, add the attribute size to a button with values small, default, or large. The attribute type sets the type of buttons with possible values button, submit, and reset.
The component ion-button has four slots. The slot icon-only is used when the button only contains an icon. The default slot is for the content displayed in the button. The slots start and end are positioned before and after the default slot, respectively.
Pagination
Now we can add the pagination and refresh to the top stories page. We add the HTML markup to show the buttons in the top-stories.component.html file; see Listing 5-48.
The file top-stories.component.ts is also updated to use the new methods of ItemService and includes action handlers for pagination and refresh buttons; see Listing 5-49. The value of the property offset is the index of the first loaded item in the whole list. We use offset to determine if the previous or next button should be enabled. Pagination is done by updating the value of offset and invoking the method doLoad().
export class TopStoriesComponent implements OnInit, OnDestroy {
Figure 5-5 shows the top stories page with buttons for pagination and refresh.
Figure 5-5
Top stories page with pagination and refresh
Advanced List
So far, we have implemented the top stories list with basic pagination and refresh support. But the current implementation is more like a traditional web app instead of a mobile app. Mobile apps have their own UI patterns. For pagination and refresh, it’s better to use infinite scrolling and pull-to-refresh.
If infinite scrolling is enabled on the list, when the user scrolls down the list and nearly hits the bottom of the page, an action is triggered to load items of the next page. The user can continuously read through the list without clicking any buttons. Ionic provides built-in support for infinite scrolling with components ion-infinite-scroll and ion-infinite-scroll-content.
Pull-to-refresh is a very common feature in mobile apps. When displaying a list of items, a user can pull down the list and release, then the list will refresh to get the latest data. Ionic also provides built-in support for this feature with components ion-refresher and ion-refresher-content.
The component ion-infinite-scroll and ion-refresher follow the similar usage pattern. After adding these two components into the page, they invoke the provided callback functions when certain events happen, then wait for client code to notify them when the processing is finished. The components ion-infinite-scroll-content and ion-refresher-content are used to customize the feedback UI when the processing is still underway, respectively.
In Listing 5-50, ion-refresher is added to the top of the list of items, while ion-infinite-scroll is added to the bottom. For ion-refresher, we add a handler for the event ionRefresh and invoke the method refresh() with the current event object $event as the argument. The event object $event contains information about the event, especially the property target to get the component instance. The property disabled controls if the refresher is enabled or not. The default value of disabled is true, so a value false must be assigned to enable it. For the component ion-infinite-scroll, the event ionInfinite is handled using the methodload().
Listing 5-51 is the updated code of top-stories.component.ts to support infinite scrolling and pull-to-refresh. In the method ngOnInit(), when the Observable<Items> emits a new value, we need to check if it’s a refresh request or normal loading request. For refresh requests, we simply assign the value Items to this.items. For a normal loading request, we need to merge the items from the value Items with those items already contained in this.items, so new items are displayed below the old items. The property refresh is newly added to model Items with the value coming from the property refresh in the Query object.
In the method load(), the instance of current ion-infinite-scroll component is saved to this.infiniteScrollComponent. When the loading of items is completed, the method complete() of infiniteScrollComponent must be called to stop the loading spinner. That’s the reason to have method notifyScrollComplete() called in the subscription logic of Observable<Items>. The method refresh() also has the same logic to save the instance of the current ion-refresher component. We also call the method notifyRefreshComplete() to stop the spinner for refresh queries.
import { Component, OnDestroy, OnInit } from '@angular/core';
import { Subscription } from 'rxjs';
import * as concat from 'lodash.concat';
import { Items } from '../../models/items';
import { ItemService } from '../../services/item/item.service';
@Component({
selector: 'app-top-stories',
templateUrl: './top-stories.component.html',
styleUrls: ['./top-stories.component.scss']
})
export class TopStoriesComponent implements OnInit, OnDestroy {
As shown in Listing 5-51, we need to have a reference to the component ion-infinite-scroll to invoke its method complete. There is another way to provide the loading action without dealing with the component reference. This is done with the method waitFor of the component. This method accepts a Promise object as the action to call. When the action is finished, the method complete is invoked automatically. In Listing 5-52, the method doLoad is the action to call.
We can also customize the behaviors of the components ion-infinite-scroll and ion-refresher.
ion-infinite-scroll
By default, Ionic shows a platform-specific spinner when the infinite scrolling action is still in progress. We can customize the spinner and text displayed using the component ion-infinite-scroll-content. ion-infinite-scroll-content has two properties: loadingSpinner to set the spinner style, possible values are lines, lines-small, bubbles, circles, crescent, and dots; loadingText to set the text to display. Spinners are created using the component ion-spinner. In Listing 5-53, we configure the ion-infinite-scroll to use different a spinner and text.
<ion-infinite-scroll-content
loadingSpinner="circles"
loadingText="Loading...">
</ion-infinite-scroll-content>
Listing 5-53
ion-infinite-scroll customization
The ion-infinite-scroll also has the property threshold to control when to trigger the ionInfinite events. The value of the property threshold can be a percentage or absolute pixel value. When the current scrolling position reaches a specified threshold, the event ionInfinite is triggered. The default value of the threshold is 15%. It’s recommended to provide a relatively large value for threshold so that the loading operation can have enough time to finish to provide the user with a smooth reading experience.
ion-refresher
We can use the property pullMin of ion-refresher to control the distance that the user needs to pull down before the event ionRefresh can be triggered. If the user keeps pulling down and reaches the distance specified in the property pullMax, the event ionRefresh is triggered automatically even though the user doesn’t release yet. The default value of pullMin and pullMax is 60 and pullMin + 60, respectively.
Like ion-infinite-scroll-content, the component ion-refresher-content also provides several properties to control the style of ion-refresher. Listing 5-54 shows an example of customizing the ion-refresher.
pullingIcon - Ionic icon to display when the user begins to pull down.
pullingText - Text to display when the user begins to pull down.
refreshingSpinner - A spinner to display when refreshing. Possible values are the same as the property loadingSpinner of ion-infinite-scroll-content.
refreshingText - Text to display when refreshing.
<ion-refresher-content
pullingIcon="arrow-dropdown"
pullingText="Pull to refresh"
refreshingSpinner="bubbles"
refreshingText="Loading...">
</ion-refresher-content>
Listing 5-54
ion-refresher customization
Testing
As usual, we need to add test specs for infinite scrolling and pull-to-refresh features. In Listing 5-55, two new specs are added to existing top-stories.component.spec.ts. In the first test spec, the component is the instance of TopStoriesPage. We invoke component.next() directly to simulate the items loading triggered by scrolling. We check that there should be 20 items displayed. In the second test spec, we use component.next() to load more items, then use component.doRefresh() to simulate the refreshing event. We check that the number of items should be 10 after the refresh.
let fixture: ComponentFixture<TopStoriesComponent> = null;
let component: any = null;
describe('top stories page', () => {
it('should show more items when scrolling down', async(() => {
fixture.detectChanges();
fixture.whenStable().then(() => {
fixture.detectChanges();
component.next();
fixture.detectChanges();
fixture.whenStable().then(() => {
let debugElements = fixture.debugElement.queryAll(By.css('h2'));
All the code so far only deals with successful scenarios. An app should be robust and be ready to handle all kinds of expected or unexpected errors. For the app to be more responsive and user friendly, we also need to add loading indicators when the app is performing certain actions that require server interactions.
Loading Indicators
When the user triggers the refresh of the top stories page, a loading indicator should be displayed. Ionic provides a built-in loading component that renders spinner and text in a modal dialog.
In the ItemService, when a new Query object is received, we should immediately emit an Items object to represent the loading event and trigger the display of the loading indicator. When the items loading is finished, the subsequent Items object is emitted and triggers the dismissal of the loading indicator. We add a new Boolean property loading to the model Items.
In the updated implementation of ItemService of Listing 5-56, we use another Observable<Items> instance loadings to emit all loading events. The Items objects in the observable loadings all have property loading set to true. They are emitted when the subject queries receives Query objects with the property refresh set to true. The returned Observable<Items> object of the method ItemService.get() is the merge of the observable loadings and existing observable items.
@Injectable()
export class ItemService {
get(): Observable<Items> {
// code omitted
const loadings = this.queries
.pipe(
filter(v => v.refresh),
map(query => ({
loading: true,
offset: query.offset,
limit: query.limit,
results: [],
}))
);
// code omitted
return merge(loadings, items);
}
}
Listing 5-56
Updated ItemService
LoadingController and Loading
In the top-stories.component.ts file of Listing 5-57, we use LoadingController from Ionic Angular to show the loading indicator. LoadingController is an Angular service that can be injected into the constructor of TopStoriesComponent. Under the hood, LoadingController is a thin wrapper of Ionic component ion-loading-controller. All the methods in LoadingController delegate to the same methods in ion-loading-controller. This is a common pattern in Ionic Angular. We’ll see the usage of similar services later. LoadingController is responsible for creating new instances of ion-loading elements of type HTMLIonLoadingElement. In the method showLoading(), a new instance of the HTMLIonLoadingElement is created using the method LoadingController.create(), then it’s displayed using the method HTMLIonLoadingElement.present(). In the method hideLoading(), HTMLIonLoadingElement.dismiss() is used to dismiss the loading indicator. Once a Loading component is dismissed, it cannot be used anymore, that is, you cannot make it display again. A new instance must be created every time.
In the subscription logic of Observable<Items>, if the current Items object represents a loading event, we just show the loading indicator and return. Otherwise, the existing loading indicator is dismissed, and items are rendered. The methods in LoadingController and HTMLIonLoadingElement return Promise objects.
import { LoadingController } from '@ionic/angular';
export class TopStoriesComponent implements OnInit, OnDestroy {
In the current implementation, when a refresh query is issued, the loading indicator is always displayed. In fact, except for the first-time loading, all the other refresh requests finish immediately. The first loading request needs to wait until the top stories ids to be retrieved. But all the subsequent refresh requests just use the latest retrieved top stories ids, even though these ids may not be up to date. We can only show the loading indicator for the first time.
We just need to change loadings to emit only one single value; see Listing 5-58.
const loadings = of({
loading: true,
offset: 0,
limit: 0,
results: [],
});
Listing 5-58
Emit only one loading event
Testing
To verify that the loading indicators are displayed and dismissed as expected, we need to add test specs for this scenario. The test spec is different than previous specs as it uses spies from Jasmine.
At first, we need to update the method get() of ItemServiceMock to emit the loading event. This can be done easily with RxJS operator startWith; see Listing 5-59.
@Injectable()
export class ItemServiceMock extends ItemService {
To verify that a Loading component is created by the LoadingController and displayed, we need to use test doubles for both components Loading and LoadingController. As in Listing 5-60, loadingStub is a Promise object that resolved to a simple object with two properties present and dismiss. The values of these two properties are Jasmine spy objects created using jasmine.createSpy(). loadingControllerStub is an object for LoadingController that has the method create() to always return the same loadingStub object.
These two test doubles are declared as value providers when invoking the method TestUtils.beforeEachCompiler(). The property useValue means all the instances of LoadingController use the same object loadingControllerStub. During the testing, the class TopStoriesComponent uses loadingControllerStub.create() to create a new Loading component and get the object loadingStub as the result. All the calls to methods present and dismiss are captured by the loadingStub object and this information is available for verifications.
In Listing 5-61, we first get the Angular injector using fixture.debugElement.injector, then get the loadingControllerStub object using the injector by looking up the token LoadingController. We can verify that the method loadingControllerStub.create() has been called once to create the loading component. For the created loading component, methods present and dismiss should also be called once.
let debugElements = fixture.debugElement.queryAll(By.css('h2'));
expect(debugElements.length).toBe(10);
});
}));
Listing 5-61
Test spec for loading
Error Handling
To handle errors in the Observables, we can add an error handler in the subscriber. For the Observable<Items> of top stories ids, when an error occurs, the observable object is terminated. We need to create a new Observable<Items> object to retry the loading. We can move the code in the method ngOnInit() into a separate method init() and invoke this method upon errors; see Listing 5-62.
export class TopStoriesComponent implements OnInit {
Ionic has a built-in component to show toast notifications. We can use ToastController to create new toast notifications. The instance of ToastController is injected into TopStoriesComponent as the property toastCtrl. The usage of ToastController is similar to LoadingController. We need to use the method create() to create a new instance of HTMLIonToastElement first, then use its method present() and dismiss() to show and hide the toast, respectively. The method showError() in Listing 5-63 creates a toast and shows it.
private showError() {
this.toastCtrl.create({
message: 'Failed to load items, retry now...',
duration: 3000,
showCloseButton: true,
}).then(toast => toast.present());
}
Listing 5-63
Show error toast notifications
When creating a new toast notification using the method create(), we can pass an object to configure the toast notification. The following configuration properties are supported.
message - Message to display.
duration - Number of milliseconds before the toast is dismissed.
position - Position to show the toast; possible values are top, middle, and bottom.
showCloseButton - Whether to show a button to close the toast.
closeButtonText - Text of the close button.
dismissOnPageChange - Whether to dismiss the toast when navigating to a different page.
cssClass - Extra CSS classes to add to the toast.
The created toast object also has methods present() and dismiss() to show and dismiss it, respectively. When the toast is created with the property duration set, then it’s not required to call the method dismiss() explicitly. The toast dismisses itself after the configured duration time elapsed.
Testing
To test the error handling, we need the ItemService to generate errors. We use a Jasmine spy to control the return values of the method get() of ItemService using Jasmine’s method returnValues(); see Listing 5-64. The first return value is an Observable object that only throws an error. The second return value is a normal Observable object with items. When the test runs, the first request to load items will fail, so we verify that the error toast notification is displayed. Then we verify that the second loading is triggered automatically and renders the items correctly.
let debugElements = fixture.debugElement.queryAll(By.css('h2'));
expect(debugElements.length).toBe(10) ;
});
}));
Listing 5-64
Test spec for error handling
Summary
This longest chapter lays the groundwork for implementing various user stories in the app. It shows how to organize a user story implementation as components and services and use Jasmine and Karma to test them. Firebase basics and API are also covered. When using the Ionic 4 list component to display top stories, we also demonstrate the advanced features like infinite scrolling and pull-to-refresh. Loading indicators and error handling are also added. After this chapter, you should know how to implement a well-organized and tested user story. In the next chapter, we’ll discuss a different way to manage states using NgRx.