© Fu Cheng 2018
Fu ChengBuild Mobile Apps with Ionic 4 and Firebasehttps://doi.org/10.1007/978-1-4842-3775-5_7

7. View Story

Fu Cheng1 
(1)
Sandringham, Auckland, New Zealand
 

After we finish the TopStoriesComponent to list top stories, we are going to allow users to view the actual web pages of stories. In this chapter, we’ll use Cordova InAppBrowser plugin to view web pages.

A Simple Solution

The basic solution is quite simple. We just need to use the standard HTML <a> elements in the item’s template. As in Listing 7-1, we added the <a> element with the attribute href set to item.url. The old div element that contains the URL is removed.
<h2 class="title">
  <a [href]="item.url">{{ item.title }}</a>
</h2>
Listing 7-1

Use <a> for a story’s URL

When we run the code inside of an emulator or a device, clicking the title opens the platform’s default browser and shows the web page. On Android, the user can use the back button to return to the app; while on the iOS platform, the user can use the back button on the top left of the status bar to return to the app.

In-App Browser

Using <a> elements is a valid solution for opening links in the app, but it has one major disadvantage in that the user needs to leave the app to read the stories in the browser and return to the app after that. This creates a bad user experience for interrupting the user’s normal flow. Another disadvantage is that we cannot customize the behaviors of the opened browser windows. A better solution is to use the Cordova InAppBrowser plugin ( https://cordova.apache.org/docs/en/latest/reference/cordova-plugin-inappbrowser/ ).

To use Cordova plugins in Ionic apps, Ionic creates a library Ionic Native ( https://ionicframework.com/docs/v2/native/ ) as a wrapper for Cordova plugins. The package @ionic-native/core is already installed when the app is created from the starter template.

Installation

Cordova plugins can be installed using either the command ionic cordova plugin add or cordova plugin add. The plugins files are installed into the directory plugins. Version 3.0.0 of cordova-plugin-inappbrowser is used in the project.
$ ionic cordova plugin add cordova-plugin-inappbrowser --save
After the plugin inappbrowser is installed in the app, we also need to install the package @ionic-native/in-app-browser.
$ npm i @ionic-native/in-app-browser

To use this plugin, we need to import the module InAppBrowser and make it as a provider in the AppModule. Then we can inject InAppBrowser into components.

Open a URL

To open the story’s web page, we can create a new instance of InAppBrowserObject or use the static method InAppBrowser.create(url, target, options). The constructor of InAppBrowserObject has the same parameters as the method create(). url is the URL to open. target is the target to load the URL with following possible values:
  • _self - If the URL is in the white list, it opens in the WebView, otherwise it opens in the InAppBrowser.

  • _blank - Opens in the InAppBrowser.

  • _system - Opens in the system web browser.

The parameter options is a string to configure the on/off status for different features in InAppBrowser. Different platforms have their own supported options. location is the only option that is supported on all platforms. The option location can be set to yes or no to show or hide the browser’s location bar. The default value of options is location=yes. Options for different features are separated by commas, for example, location=no,hidden=yes.

Some common options are:
  • hidden - When set to yes, the browser is created and loads the page, but it’s hidden. We need to use the method InAppBrowser.show() to show it.

  • clearcache - When set to yes, the browser’s cookie cache is cleared before opening the page.

  • clearsessioncache - When set to yes, the browser’s session cookie cache is cleared before opening the page.

In Listing 7-2, we add a new method openPage() in the ItemComponent to open a given URL. The URL is opened using target _blank. Creating a new InAppBrowser opens the URL and shows it by default.
import { Component, Input } from '@angular/core';
import { Item } from '../../model/Item';
import { InAppBrowserObject } from ' @ionic-native/in-app-browser/ngx';
@Component({
  selector: 'app-item',
  templateUrl: 'item.component.html',
})
export class ItemComponent {
  @Input() item: Item;
  openPage(url: string): void {
    new InAppBrowserObject(url, '_blank');
  }
}
Listing 7-2

Open page

It’s not a good practice to put the actual page opening logic in the ItemComponent. As we mentioned before, we should encapsulate this kind of logic in services. We create a new OpenPageService to encapsulate the logic of opening pages. The new service is created using Angular CLI.
$ ng g service services/open-page -m services --flat false
Listing 7-3 shows the implementation of OpenPageService . OpenPageService uses the function create of the inject instance of InAppBrowser to create a new browser object of type InAppBrowserObject. We only allow at most one InAppBrowserObject to be opened at the same time, so the existing browser is closed before opening a new page.
import { Injectable } from '@angular/core';
import { InAppBrowser, InAppBrowserObject } from '@ionic-native/in-app-browser/ngx';
@Injectable()
export class OpenPageService {
  private inAppBrowserObject: InAppBrowserObject;
  constructor(private inAppBrowser: InAppBrowser) {}
  open(url: string) {
    if (this.inAppBrowserObject) {
      this.inAppBrowserObject.close();
      this.inAppBrowserObject = null;
    }
    this.inAppBrowserObject = this.inAppBrowser.create(url, '_blank');
  }
}
Listing 7-3

OpenPageService

When the user clicks an item in the list, the function open of OpenPageService needs to be invoked with the item’s URL. This is done by using Angular’s EventEmitter. In Listing 7-4, the property toOpen is an EventEmitter with the decorator Output. openPage is the handler of the click event to emit the URL of the item.
export class ItemComponent {
  @Input() item: Item;
  @Output() toOpen = new EventEmitter<string>();
  openPage(url: string) {
    this.toOpen.emit(url);
  }
}
Listing 7-4

Updated ItemComponent

Below is the updated template to add the handler.
<h2 class="title" (click)="openPage(item.url)">{{ item.title }}</h2>
The same EventEmitter is also required in the ItemsComponent. This is because Angular custom events emitted by EventEmitters don’t bubble up. Below is the updated template of ItemsComponent.
<app-item [item]="item" (toOpen)="openPage($event)"></app-item>
In the TopStoriesComponent, the event handler of toOpen is added; see Listing 7-5. We simply call the function open of OpenPageService.
openUrl(url) {
  this.openPageService.open(url);
}
Listing 7-5

Event handler of toOpen

The template file is also updated to add the event handler.
<app-items [items]="items$ | async" (toOpen)="openUrl($event)"></app-items>

Events

InAppBrowserObject has different events to listen on.
  • loadstart – Fired when the InAppBrowserObject starts to load a URL.

  • loadstop – Fired when the InAppBrowserObject finishes loading a URL.

  • loaderror – Fired when an error occurred when the InAppBrowserObject is loading a URL.

  • exit - Fired when the InAppBrowserObject is closed.

To add listeners on a certain event, we can use the method on(event) of InAppBrowserObject object. The method on() returns an Observable< InAppBrowserEvent> object that emits event objects when subscribed. Unsubscribing the Observable removes the event listener.

With these events, we can have fine-grained control over web page loading in the InAppBrowserObject to improve user experiences. For example, we can make the InAppBrowserObject hidden when it’s loading the page and show it after the loading is completed.

Alerts

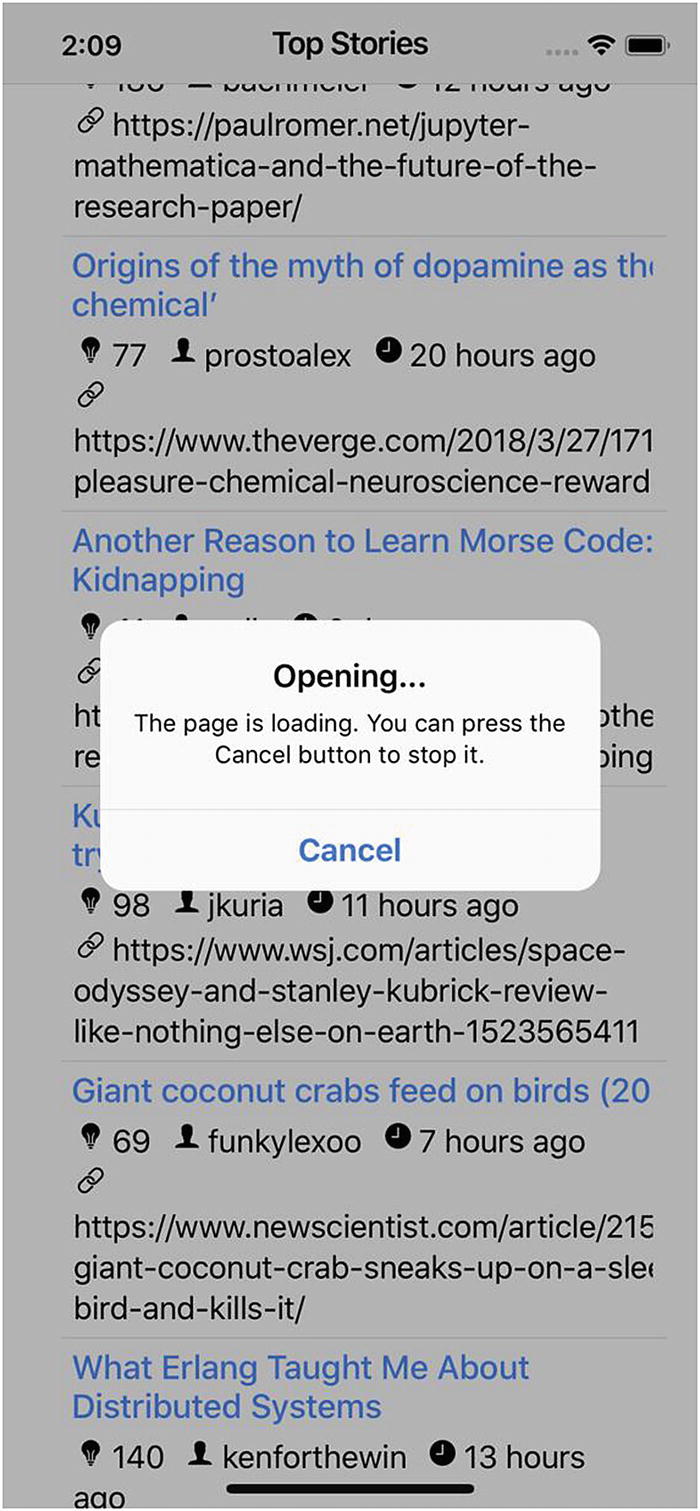
We can use components ion-loading-controller and ion-loading to show a message when the page is still loading. The component ion-loading only supports adding spinners and texts, but we need to add a cancel button in the loading indicator to allow users to abort the operation. In this case, we should use Ionic components ion-alert-controller and ion-alert.

The usage of components ion-alert-controller and ion-alert is like ion-loading-controller and ion-loading. The component ion-alert-controller has the same method create() to create ion-alert components, but the options are different. The component ion-alert has the same methods present() and dismiss() to show and hide the alert, respectively.

The method create() supports following options.
  • header – The header of the alert.

  • subHeader – The subheader of the alert.

  • message – The message to display in the alert.

  • cssClass – Space-separated extra CSS classes.

  • inputs – An array of inputs.

  • buttons – An array of buttons.

  • backdropDismiss – Whether the alert should be dismissed when the user taps on the backdrop.

Alerts can include different kinds of inputs to gather data from the user. Supported inputs are text boxes, radio buttons, and checkboxes. Inputs can be added by specifying the option inputs in the method create(). The following properties can be used to configure an input.
  • type – The type of the input. Possible values are text, radio, checkbox, tel, number, and other valid HTML5 input types.

  • name – The name of the input.

  • placeholder – The placeholder of the input.

  • label – The label of the input, for radio buttons and checkboxes.

  • value – The value of the input.

  • checked – Whether the input is checked or not.

  • id – The id of the input.

  • disabled – Whether the input is disabled or not.

  • handler – The handler function for the input.

  • min – Minimal value of the input.

  • max – Maximal value of the input.

Buttons can also be added using the option buttons. Buttons can have the following properties.
  • text – The text of the button.

  • handler – The expression to evaluate when the button is pressed.

  • cssClass – Space-separated extra CSS classes.

  • role – The role of the button – can be null or cancel. When backdropDismiss is set to true and the user taps on the backdrop to dismiss the alert, then the handler of the button with cancel role is invoked.

A Better Solution

We can now create a better implementation that combines the InAppBrowserObject events and alerts to give users more feedback and control over opening web pages. In Listing 7-6, the options when creating a new InAppBrowserObject instance is location=no,hidden=yes, which means the location bar is hidden and the browser window is initially hidden. We subscribe to all four different kinds of events: loadstart, loadstop, loaderror, and exit. In the handler of the event loadstart, an ion-alert is created and presented with the button to cancel the loading. In the handler of the event loadstop, we hide the alert and use the method show() of InAppBrowserObject to show the browser window. In the handler of the event loaderror, we create a toast notification and show it. In the handler of the event exit, we unsubscribe all subscriptions to the event observables and use the method close() of InAppBrowserObject to close the browser window.

The handler of the cancel button is the method cancel() of OpenPageService, so when the cancel button is tapped, the loading alert is dismissed and the browser window is closed.

The RxJS Subscription class has the method add() to add child subscriptions. These child subscriptions are unsubscribed when the parent subscription is unsubscribed. We can use only one Subscription object to manage subscriptions to four different events.
import { Injectable } from '@angular/core';
import { InAppBrowser, InAppBrowserEvent, InAppBrowserObject } from '@ionic-native/in-app-browser';
import { AlertController, ToastController } from '@ionic/angular';
import { Subscription } from 'rxjs';
@Injectable()
export class OpenPageService {
  private browser: InAppBrowserObject;
  private loading: HTMLIonAlertElement;
  private subscription: Subscription;
  constructor(private inAppBrowser: InAppBrowser,
              private alertCtrl: AlertController,
              private toastCtrl: ToastController) {}
  open(url: string) {
    this.cancel().then(() => {
      this.browser = this.inAppBrowser.create(url, '_blank', 'location=no,hidden=yes');
      this.subscription = this.browser.on('loadstart').subscribe(() => this.showLoading());
      this.subscription.add(this.browser.on('loadstop').subscribe(() => {
        this.hideLoading().then(() => this.browser.show());
      }));
      this.subscription.add(this.browser.on('loaderror').subscribe(event => this.handleError(event)));
      this.subscription.add(this.browser.on('exit').subscribe(() => this.cleanup()));
    });
  }
  private showLoading(): Promise<void> {
    return this.alertCtrl.create({
      header: 'Opening...',
      message: 'The page is loading. You can press the Cancel button to stop it.',
      enableBackdropDismiss: false,
      buttons: [
        {
          text: 'Cancel',
          handler: this.cancel.bind(this),
        }
      ],
    }).then(loading => {
      this.loading = loading;
      return loading.present();
    });
  }
  private hideLoading(): Promise<boolean> {
    if (this.loading) {
      return this.loading.dismiss();
    } else {
      return Promise.resolve(true);
    }
  }
  private cancel(): Promise<boolean> {
    return this.hideLoading().then(this.cleanup.bind(this));
  }
  private handleError(event: InAppBrowserEvent): Promise<void> {
    return this.showError(event).then(this.cleanup.bind(this));
  }
  private showError(event: InAppBrowserEvent): Promise<void> {
    return this.hideLoading().then(() => {
      return this.toastCtrl.create({
        message: `Failed to load the page. Code: ${event.code}, Message: ${event.message}`,
        duration: 3000,
        showCloseButton: true,
      }).then(toast => toast.present());
    });
  }
  private cleanup() {
    if (this.subscription) {
      this.subscription.unsubscribe();
      this.subscription = null;
    }
    if (this.browser) {
      this.browser.close();
      this.browser = null;
    }
  }
}
Listing 7-6

Updated OpenPageService

The new implementation gives users a better experience when viewing web pages. Figure 7-1 shows the alert when a page is opening.
../images/436854_2_En_7_Chapter/436854_2_En_7_Fig1_HTML.jpg
Figure 7-1

Opening page

Testing

We need to add test spec for OpenPageService. We create a test stub object openPageServiceStub using jasmine spy, then register the stub object as the provider of OpenPageService.
const openPageServiceStub = jasmine.createSpyObj('openPage', ['open']);
In Listing 7-7, we get the debugElement of the h2 element in the first item and use the method triggerEventHandler() to trigger the click event, which simulates a user’s clicking of the h2 element. We then verify the method open() of openPageServiceStub to have been called with the URL of the first item.
it('should open web pages', async(() => {
  const openPageService = fixture.debugElement.injector.get(OpenPageService);
  fixture.detectChanges();
  fixture.whenStable().then(() => {
    fixture.detectChanges();
    let debugElements = fixture.debugElement.queryAll(By.css('h2'));
    expect(debugElements.length).toBe(10);
    expect(debugElements[0].nativeElement.textContent).toContain('Item 1');
    debugElements[0].triggerEventHandler('click', null);
    expect(openPageService.open)
      .toHaveBeenCalledWith('http://www.example.com/item0');
  });
}));
Listing 7-7

Open page test spec

Summary

In this chapter, we implemented the user story to view stories. We used the plugin InAppBrowser to allow users to view the web pages inside of the app itself. Events of InAppBrowser are used to control its behavior. By using Ionic 4 Alerts, we can create a smooth experience for users to view web pages. In the next chapter, we’ll implement the user story to view comments of stories.

..................Content has been hidden....................

You can't read the all page of ebook, please click here login for view all page.
Reset
18.119.159.150