7
Foam Dart Blaster Hackery
We’ve worked on the programming and hardware sides of our Frankenblaster. We’ve even seen how nerd mods like this one can be applied in real-world projects. Now it’s time to get to the heart of the mission: crafting the autonomous blaster.
Step one? Procure build components. Step two? Use noodle to make good decisions. Consult Appendix A for the full list of goodies used in this book, but here’s the parts list you can use for this section in addition to what we’ve already been using.
Components
• NERF blaster. Your choice but consult The Big Chart section before making your final selection.
• Components from Servocity.com. Score all these at once if you’re going this route!
• Motorized base. Specifically, Servocity.com’s DDP155 Base Pan system, which comes with a servo. Your choice—Hitec or Futaba.
• Additional servo (for trigger). Yes, another one for a total of two. The Hitec HS-311 is recommended because it’s cheap and all the muscle you’ll need to pull the trigger.
• Ten-inch gearbox arm.
Optional Upgrades
• Battery holder
• Six lithium-ion batteries
Analog Tools
• Phillips-head screwdriver
• Power drill with assorted drill bits. A ½-inch bit is needed to create holes in the arm; smaller bits are useful to get the hole started but are not mandatory.
• Duct tape
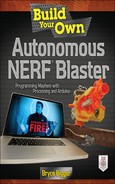
So about that motorized base and gearbox platter. What’s up with those? Glad you asked. We’ll be using Servocity.com’s DDP155 Pan System (Figure 7-1) as the base for the blaster. This preassembled system is a great way to offload the weight of the blaster from the servo to the mount. A servo that’s not holding up a blaster can focus all its power on rotating the base. The other servo is busy, too. Its job is to work the blaster’s trigger. We’ll also add a 10-inch round gearbox arm—think flat, round platter—to increase the mounting area for the blaster (Figure 7-2). We’ll be discussing the DDP155 a lot more in Chapter 8, but it’s good that you see now what you’ll be mounting on before you choose your blaster and make power considerations.

Blaster Selection
When it comes to blaster selection, there are some considerations that you must, well, consider. Are you looking to shoot the maximum number of darts in the shortest length of time? Are you more of a stickler for accuracy? Low on cash money but have a pump blaster lying around? Whatever the case, consider these blaster attributes carefully:
• Ammunition quantity and effort. Does the blaster hold nothing more than a few shots or even just one before it needs to be reloaded? Is it interchangeable with another product that has a larger magazine? Is it easy to reload or a huge pain in the butt?
• Shooting mode. This is a big one. How does the blaster fire? Does it need to be cocked, pumped, rotated, or something else before it’s ready to shoot again? When you’re creating an autonomous blaster, you really don’t want one you have to babysit to get it to blast away.
• Mounting. How will the blaster be mounted? How heavy is the blaster? Does it have any weight issues—such as a herd of D-cell batteries—that will make its badonkadonk superheavy? Can you place the blaster on its side? Will firing the weapon be impeded by its orientation?
You may already have a NERF blaster (or a small weapons cache of them) ready to enlist in your build. The bad news is that depending on the model, it could be a one-trick pony, that is, after shooting one dart, you have to reload, pump, cock, and so on to fire again. The good news is that the construction process, as described in this book, is nondestructive. So, should you decide to swap out weapons or components or abandon construction altogether, a blaster can be returned to its original functionality and use. The only telltale sign that you were up to no good may be a little duct-tape residue. But that can be easily removed, too.
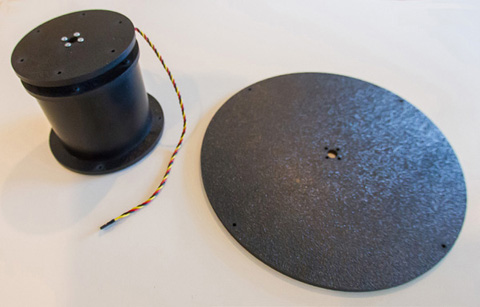
The Big Chart
Here’s everything you ever wanted to know about a lot of NERF blasters, including how they shoot, the maximum amount of ammunition a blaster can hold before it must be reloaded, and its level of viability for becoming an effective stand-alone autonomous sentry without your wanting to poke your eyes out. Viability is not a rating on quality, performance, aesthetics, or anything else. If a blaster is marked low for viability, you can still use it. The low rating means that it may not be as effective as other blasters in an autonomous setup, as this book aspires to create. If your blaster isn’t on the chart? Have at it anyway. Tinkering is supposed to be a fun learning experience, so use what you have on hand before you go out and spend a bunch of money.

Vortex Series
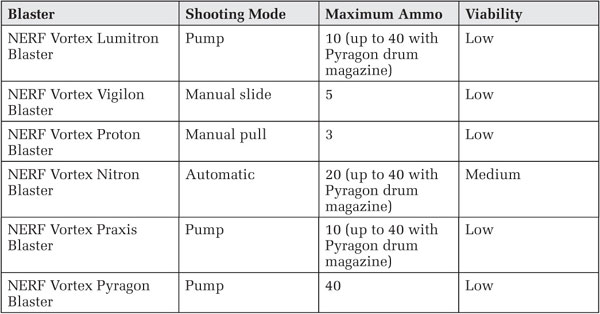
You choose whatever blaster you want. I chose two: the NERF Stampede and the NERF Speedswarm. I liked the Stampede (Figure 7-3) because it can be mounted sideways, and it uses NERF’s CLIP system, which means that you can attach a 35-dart drum magazine from the NERF Raider. The Speedswarm (Figure 7-4) is small and affordable and will mount easily to our platform. Both have the key to easy operation—automatic shooting mode. Simply pull the trigger, and blam blam blam blam. No pumping, cocking, sliding, or anything else-ing is necessary. The goal of an autonomous system is to make it as self-sufficient as possible.


Of course, there are other fish in the foam dart blaster sea. Such as BuzzBee. Generally, NERF is the most common fish, so that’s why I use its blasters. You’re welcome to try out other foam dart blasters. They may even be better!
Weight Removal
Finally got your beloved blaster of choice? Good, let’s talk about mounting it to the motorized base. The base will have a 10-inch surface on which to mount the blaster. This should be plenty of surface area.
Now for the sticky subject that no blaster ever wants to talk about: weight. The NERF Speedswarm is rather compact and uses six AA batteries. No problem there. The NERF Stampede, however, is a longer rifle-like blaster that demands six D batteries in its rump. That is a problem. Mounting the battery-laden Stampede on the base is possible, although it’s difficult to distribute the weight of the blaster on the base. To get it to work, you’d have to place most of the blaster’s rear on the base, and let the rest hang off the front. Swinging the blaster around—even when the weight is balanced—could tip the base over. Think about it like this. Those six batteries weigh nearly two pounds (1 pound 13.5 ounces to be precise). This may not sound like a lot, but it is significant considering the placement of the batteries within the blaster.
So, if your heart is set on the Stampede, Vulcan, or even Nitron, because they all have battery trays or another blaster that could shed some pounds, here are options for getting out of this fatty pickle.
Option 1: Lithium-Ion Battery Modification
Get four AA 3.7-V lithium-ion batteries. You should be able to pick these up from an online retailer such as Amazon.com or from brick-and-mortar stores such as hobby shops or battery stores. These batteries may be the same size as their AA friends (Figure 7-5), but 3.7-V lithium-ion batteries pack more than twice the punch! To use these in the NERF Stampede Vulcan or Nitron, you’ll need a battery holder (Figure 7-6). You probably can pick one up at the same place you get the batteries. Place the batteries in the holder, aligning the positive/negative ends as appropriate.


Now it’s soldering time. Soldering is joining two pieces of metal together with the use of … er … solder, which is also known as flux. This metal is easily melted with a heating iron (Figure 7-7) and cools quickly to solidify the two ends together.

Those who don’t know how to do it properly typically dread soldering. We’ll quickly review it here, but check out autonerfblaster.com for videos on how to do it easily and what you’ll need.
Heat up your soldering iron so that it’s nice and hot. With some flux, two pieces of wire, and the battery tray, solder one wire to the positive end and one to the negative end of the battery tray (Figures 7-8 and 7-9). Press the soldering iron to the metal ends of the battery tray to heat them. After a few seconds, apply some flux to the heated tab, and the solder should melt onto the wire and the tab. It may take a few tries to get it right. Do the same thing for the other side too.

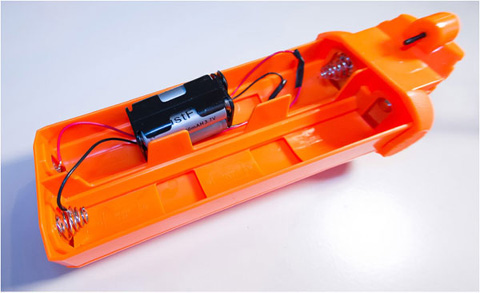
Once both wires are soldered to the battery tray, take the other ends and solder them to the battery holder, making sure that you keep positive to positive and negative to negative (Figure 7-10). Once these wires have cooled, wrap them in duct tape to shield them from touching any other metal objects, and place back in the battery tray, as shown in Figure 7-11. If you ever want to remove this setup, just melt the solder away with your soldering iron.

Option 2: Make the Battery Tray External
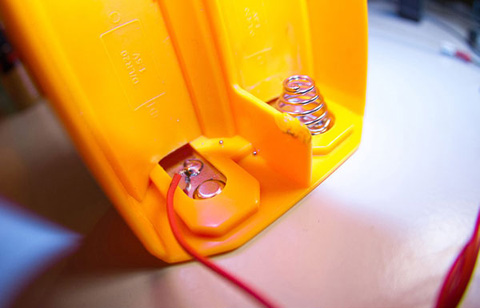
Remove the battery tray so that it sits outside the blaster but is connected with alligator clips (Figure 7-12). The problem, though, is that the connector prongs are really deep in the blaster, and it’s rather difficult to get alligator clips onto the coils. It can be done, though. You’ll also need to figure out how to connect the other ends of the alligator clips to the now-external battery tray. You could solder them like before or get a battery that has external connectors where you can attach the alligator clips. If you get another battery type, it’s up to you to monitor what voltage you’ll be using. Typically, don’t go over 12V because more than that could fry your blaster’s motor.

FIGURE 7-12 Internal battery tray connectors of the NERF Stampede. They’re way in there. Further than you think and then further.
Option 3: Power-Adapter Modification
Another option for putting a blaster on a crash diet, although it adds another cable to the fray, is to power the blaster from an electrical outlet. The benefits include not having to use batteries and endless wall power to supersize the blaster’s rate of fire. Awesome!
The downside of this is that my electrical expertise doesn’t allow me to tell you with full confidence what safety precautions to take and how to rate the power going from the wall to the blaster. I’ve had to consult an expert on these things for my projects. You should too if you’re inclined to try it.
Battery modification will typically will have a twofold effect: a lighter load on the base/servo and an increased rate of fire.
Fire Control
Now that we’ve reduced weight and increased the rate of fire, let’s look at how to make this puppy shoot foam goodness. With the original Sentinel project, a servo pulled the trigger. Although it’s down and dirty, it works well, so we’ll employ that tactic here, too. But Bryce, you may be wondering, why not crack open the blaster and rig a solution so that the Arduino board talks directly to the blaster? It’s possible, to be sure, but here are three reasons why I’m not going there:
• NERF changes blaster guts at will to reduce costs and/or raise efficiency.
• Blaster internals vary by model, so it’s impossible to post instructions on how to do it for every model. This is a manual, not an encyclopedia.
• The internal wires of NERF blasters are typically all the same color, and some have more than 40 screws. There’s not one iota of spare room inside most blasters. This means that it isn’t easy to run an extra wire in there or to even know where it’s supposed to go.
You get the idea; it’s a mess to figure out. Also don’t forget that we’re tinkering, not creating a consumer-production product ready to be placed on store shelves. The chances of breaking the blaster by trying to trick it out are high. The chances of busting your blaster with the servo implementation? Slim to zero.
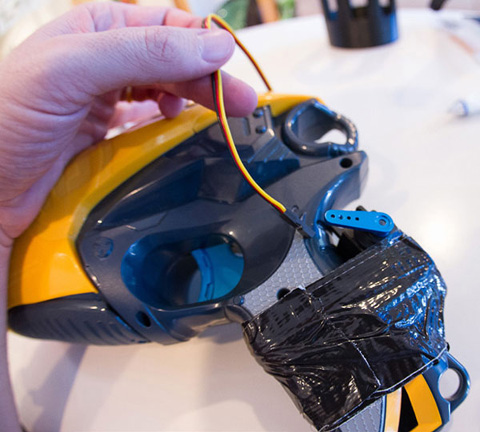
Enough talk. Let’s do this. Grab your servo and some duct tape. Strap the servo to the blaster handle, and apply a generous amount of tape around the servo (Figures 7-13 and 7-14).

FIGURE 7-13 Attach the servo to the blaster handle with duct tape. Low tech, yes. Functional, yeppers. This is the starting position with the servo at 0 degrees.
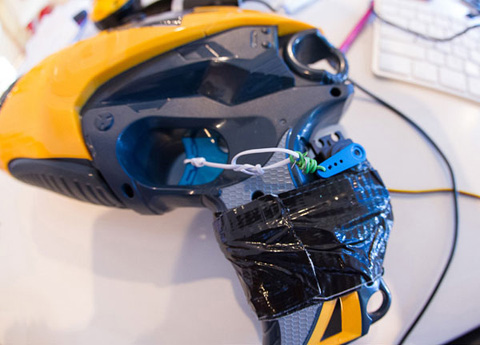
Now, a mission. Go to the kitchen and find a loaf of bread. Steal the twist tie, but remember to twist the bag to close off the opening and tuck it underneath the loaf so that the bread stays fresh. Spend all your bread on servos? Just use wire—any wire that’s lying around—or even a zip-tie cable. With the newly acquired twist tie, thread the tie through the servo’s arm and then around the blaster’s trigger. If there’s not a hole in the trigger to make your life easier, make your life easier and drill a hole (Figures 7-15 and 7-16). I used a 1/8-inch drill bit. Trigger setup complete. Sort of. Consider this: the blaster should only fire when told, so make sure that the servo is at 0 degrees. How to do that? When you’re looking at the servo from above, rotate the arm to the left until you can’t anymore. That’s 0. You also can remove the arm and place it back at a different angle from before, therefore dictating the starting position or 0 degrees rotation. Make sure that the servo starts this way. Once we get going in the code, we’ll make it move nicely in Chapter 8.

Whew. It may not seem like much, but you made a lot of decisions. Picking the blaster. You maybe even made an extra modification or two. You duct-taped. Now the Frankenblaster is trigger-ready, so let’s assemble the base and get cracking on the code.