
Chapter 14. Using Hardware APIs
Since iPhone SDK was first made available to developers, in 2008, one of the most exciting aspects of developing for Apple platforms has been access to the varied capabilities of the hardware itself. Apple Watch and watchOS are no different, allowing developers access to the potential of the heart rate sensor, the accelerometer, and the much-vaunted haptic feedback system dubbed the Taptic Engine.
Using Sensor Data
WatchKit apps can access data from two of the watch’s sensors: the heart rate sensor on the underside of the watch and the internal accelerometer. The data from these sensors is available via the HealthKit and CoreMotion frameworks.
Accessing Heart Rate Data via HealthKit
In iOS 8, Apple introduced the Health app, backed by the HealthKit framework. The intention is to provide a central repository of health-related data, populated by any app (and informed by any device) to which the user grants access.
The core design principle for HealthKit is to keep the user in control of their data at all times. This is enforced at the API and interface level by requiring an app to request access to each type of data (weight, heart rate, or step count, for example), with the user being able to authorize or deny each app’s ability to read or write each type of data. As a matter of policy, Apple insists that only apps with a clear health and fitness purpose may access health data.
Another example of how seriously Apple takes user privacy in the implementation of HealthKit and the Health app is that the database is stored and encrypted on the user’s iPhone rather than in a cloud-based repository. Of course, there are by now plenty of apps and services that can synchronize HealthKit data to their own database, and this is a valid and permitted use of the data, but again, this is only possible after the user has explicitly granted those apps access to the data.
When an app has received the necessary permission from the user, it can query the HealthKit database for a wide variety of types of data (and, with the right permissions, write data to the database). The query engine is detailed and powerful, providing a mechanism for very fine-grained queries according to timeframe and data type, but a proper exploration of its facilities is outside the scope of this book.
Instead, we will look at how to access streaming heart rate data during a workout. In the context of HealthKit and watchOS, a workout is a period of focused activity that contributes to the user’s daily Exercise total (the green ring in the Activity app). It is possible to access recorded heart rate data without initiating a workout, but for our purposes here, a workout provides two benefits: It allows the app to stay in the foreground rather than being deactivated after a short time without user interaction, and it provides frequent, streamed updates of the user’s activity.
In the following example, we will work through the various points of contact with the HealthKit APIs. There are quite a few, so prepare yourself for a workout indeed!
Preparing the user interface
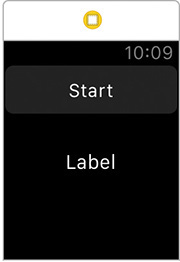
This app will have a very simple interface. It will use a HealthKit workout to access heart rate data, so it will need a button to start and stop the workout. You will also include a label for your output.
1. In Xcode, create a new app using the watchOS > Application > iOS App with WatchKit App template. Do not select the options for notification, glance, complication, or tests, since you won’t be using them here.
2. Open the WatchKit app’s Interface.storyboard, and add a button and a label as shown in Figure 14.1.
3. Open the WatchKit extension’s InterfaceController.swift, and replace its contents with the following; then connect the button and the label in the storyboard scene to the relevant @IBOutlets and @IBAction:
import WatchKit
import Foundation
class InterfaceController: WKInterfaceController {
@IBOutlet var button: WKInterfaceButton!
@IBOutlet var label: WKInterfaceLabel!
@IBAction func buttonTapped() {
}
}
4. Add the following property and method to InterfaceController:
private var readingHeartRate = false {
didSet {
updateButton()
}
}
private func updateButton() {
if readingHeartRate {
button.setTitle("Stop")
} else {
button.setTitle("Start")
}
}
5. Add the following implementation of awakeWithContext(_:) to initialize the user interface when the app launches:
override func awakeWithContext(context: AnyObject?) {
super.awakeWithContext(context)
label.setText("-")
updateButton()
}
6. Add the following two methods. For now they will simply trigger the UI updates by changing the value of readingHeartRate:
private func beginReadingHeartRate() {
readingHeartRate = true
}
private func endReadingHeartRate() {
readingHeartRate = false
}
7. Update the implementation of buttonTapped to read as follows:
@IBAction func buttonTapped() {
if readingHeartRate {
endReadingHeartRate()
} else {
beginReadingHeartRate()
}
}
Now that you have the user interface in place and the necessary @IBOutlets and @IBAction connected, the next task is to request access to heart rate data from HealthKit.
Setting up HealthKit access
In order to access heart rate data through a HealthKit workout, some preparation is required. First, the app must check that HealthKit data is available and request access to heart rate data. If the access request is successful, then the workout can be created and started.
In order to access HealthKit data, the WatchKit Extension must have the necessary entitlement.
1. In Xcode’s Project Navigator, select the top-level project. Then select the WatchKit Extension target, and navigate to the Capabilities tab. Switch on the HealthKit capability (Figure 14.2). Do the same for the iPhone app target.

2. In InterfaceController.swift, add the following line at the top of the file:
import HealthKit
3. Still in InterfaceController.swift, add the following extension at the end of the file:
// MARK: HealthKit access
extension InterfaceController: HKWorkoutSessionDelegate {
// MARK: HKWorkoutSessionDelegate
func workoutSession(
workoutSession: HKWorkoutSession,
didChangeToState toState: HKWorkoutSessionState,
fromState: HKWorkoutSessionState,
date: NSDate
) {
}
func workoutSession(
workoutSession: HKWorkoutSession,
didFailWithError error: NSError
) {
}
}
4. In the main body of the InterfaceController class, add the following properties:
let healthStore = HKHealthStore()
var quantityType: HKQuantityType?
var workoutSession: HKWorkoutSession? {
didSet {
workoutSession?.delegate = self
}
}
5. Add the following method to the main body of the class (it will be used to signal the various error conditions):
 Tip
Tip
Using emoji in source code is one of the more whimsical things enabled by the Swift programming language’s Unicode support. You can insert them using the OS X symbol picker, triggered by pressing Ctrl+Cmd+Space.
private func updateWithNoAccess() {
label.setText("![]() ")
")
endReadingHeartRate()
}
6. To request HealthKit access, add the following method to the HealthKit access extension in InterfaceController.swift:
private func beginWorkout() {
guard HKHealthStore.isHealthDataAvailable() else {
updateWithNoAccess()
print("HealthKit unavailable")
return
}
quantityType = HKQuantityType.quantityTypeForIdentifier(HKQuantity TypeIdentifierHeartRate)
if let quantityType = quantityType {
healthStore.requestAuthorizationToShareTypes(
nil,
readTypes: Set([quantityType]),
completion: accessRequestReturned
)
} else {
updateWithNoAccess()
print("No quantity type")
}
}
HealthKit supports a number of different sample and query types. Heart rate is an HKQuantityType, and you will be using an HKAnchoredObjectQuery to access it. See Apple’s HealthKit documentation for information on the other possibilities.
7. Add the following method to the HealthKit access extension to handle the authorization request:
private func accessRequestReturned(allowed: Bool, error: NSError?) {
guard allowed else {
updateWithNoAccess()
print(error?.description)
return
}
workoutSession = HKWorkoutSession(activityType: .Other, locationType: .Indoor)
if let workoutSession = workoutSession {
healthStore.startWorkoutSession(workoutSession)
}
}
8. Add one more method to the extension:
private func endWorkout() {
if let workoutSession = workoutSession {
healthStore.endWorkoutSession(workoutSession)
}
}
9. Update beginReadingHeartRate() and endReadingHeartRate() to call the beginWorkout() and endWorkout() methods you just added:
private func beginReadingHeartRate() {
readingHeartRate = true
beginWorkout()
}
private func endReadingHeartRate() {
readingHeartRate = false
endWorkout()
}
When the user is prompted to allow access to HealthKit data, the interface is presented by the iPhone app. This requires the addition of one method to the iPhone app’s application delegate.
10. Open AppDelegate.swift, and add the import for HealthKit:
import HealthKit
11. Add the following method to AppDelegate:
func applicationShouldRequestHealthAuthorization(application: UIApplication) {
HKHealthStore().handleAuthorizationForExtensionWithCompletion { (success, error) -> Void in
}
}
Responding to heart rate updates
As mentioned in the previous section, this example queries for heart rate data using an HKAnchoredObjectQuery. This type of query is so named because it has an anchor—a point in time that acts as a boundary on the results. Only data from after the anchor will be returned.
Once the query is created, it is possible to add an update handler that is called when new data that match the query is added to the HealthKit store. You will use this technique to receive heart rate data as it becomes available.
1. Returning to InterfaceController.swift, add three new properties to InterfaceController:
var unit: HKUnit?
var queryAnchor: HKQueryAnchor?
var query: HKAnchoredObjectQuery?
2. Update the two HKWorkoutSessionDelegate methods as follows:
func workoutSession(
workoutSession: HKWorkoutSession,
didChangeToState toState: HKWorkoutSessionState,
fromState: HKWorkoutSessionState,
date: NSDate
) {
if toState == .Running {
workoutStarted()
} else if toState == .Ended {
workoutEnded()
}
}
func workoutSession(
workoutSession: HKWorkoutSession,
didFailWithError error: NSError
) {
print(error.description)
endReadingHeartRate()
label.setText("Error!")
}
3. Add the following method to stop the query (which you will be creating shortly) when the user ends the workout:
private func workoutEnded() {
if let query = query {
healthStore.stopQuery(query)
}
}
4. Add the workoutStarted(_:) method, which is where you will create and execute the query, as follows:
private func workoutStarted() {
unit = HKUnit(fromString: "count/min")
if queryAnchor == nil {
queryAnchor = HKQueryAnchor(fromValue: Int(HKAnchoredObject QueryNoAnchor))
}
query = HKAnchoredObjectQuery(
type: quantityType!,
predicate: nil,
anchor: queryAnchor,
limit: Int(HKObjectQueryNoLimit),
resultsHandler: queryUpdateReceived
)
if let query = query {
query.updateHandler = queryUpdateReceived
healthStore.executeQuery(query)
}
}
Two more methods are required. The first is the callback for the query.
5. Add the following callback method:
private func queryUpdateReceived(
query: HKAnchoredObjectQuery,
samples: [HKSample]?,
deletedSamples: [HKDeletedObject]?,
updatedAnchor: HKQueryAnchor?,
error: NSError?
) -> Void {
if let updatedAnchor = updatedAnchor {
self.queryAnchor = updatedAnchor
self.heartRateSamplesReceived(samples)
}
}
Finally, add the method to update the user interface as heart rate data is received. Callbacks from HealthKit are executed on a background queue, so you need to make sure that UI updates are properly dispatched to the main queue.
6. Add the following to update the user interface:
private func heartRateSamplesReceived(samples: [HKSample]?) {
guard let quantitySamples = samples as? [HKQuantitySample] else { return }
dispatch_async(dispatch_get_main_queue()) {
guard let sample = quantitySamples.first, unit = self.unit else { return }
self.label.setText("(sample.quantity.doubleValueForUnit(unit))")
}
}
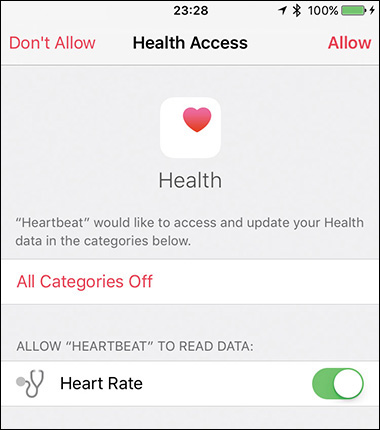
7. Run the app on your watch, and tap the Start button.
An alert on the paired iPhone will prompt you to allow the app to access your heart rate data (Figure 14.3). Once you allow access, the interface will start to update as the app receives heart rate data from HealthKit. If you stop and start the workout session, the queryAnchor property will make sure that only new, up-to-date data is received in each session.
Reading Accelerometer Data with CoreMotion
HealthKit is only one of the new (to the watch) frameworks that were made available in watchOS 2. CoreMotion has been giving developers bright ideas since the first iPhone SDK release (iPhoneOS 2), and watchOS 2 has brought it to the watch. Although CoreMotion on the iPhone has access to an exciting variety of sensors, apps running on Apple Watch have only the accelerometer. It is possible to access both the raw accelerometer data and to read step counts calculated by the system.
Reading raw accelerometer data
You’ll be glad to hear that accessing accelerometer data requires much less work than using HealthKit.
1. Open Xcode and create a new app using the watchOS > Application > iOS App with WatchKit App template. Don’t select the options for notification, glance, complication, or tests.
2. Open the WatchKit app’s Interface.storyboard, and add three labels to the interface controller scene, as in Figure 14.4.

3. Open the WatchKit Extension’s InterfaceController.swift, and replace its contents with the following:
import WatchKit
import Foundation
import CoreMotion
class InterfaceController: WKInterfaceController {
@IBOutlet var xLabel: WKInterfaceLabel!
@IBOutlet var yLabel: WKInterfaceLabel!
@IBOutlet var zLabel: WKInterfaceLabel!
}
4. Connect the labels in the storyboard scene to the matching @IBOutlets in InterfaceController.swift.
This app will take the simple approach of starting to read accelerometer data when the interface controller becomes active, and stopping when it becomes inactive. To do so, it needs an instance of CMMotionManager.
5. Add one more property to InterfaceController:
let manager = CMMotionManager()
6. Add the following implementation of willActivate() to the interface controller:
override func willActivate() {
super.willActivate()
guard manager.accelerometerAvailable else {
xLabel.setText("![]() ")
")
yLabel.setText("![]() ")
")
zLabel.setText("![]() ")
")
return
}
manager.accelerometerUpdateInterval = 0.2
manager.startAccelerometerUpdatesToQueue(NSOperationQueue. currentQueue()!) { data, error in
if let data = data {
self.xLabel.setText("X: (data.acceleration.x)")
self.yLabel.setText("Y: (data.acceleration.y)")
self.zLabel.setText("Z: (data.acceleration.z)")
} else {
print(error?.description)
}
}
}
7. Add the didDeactivate() method:
override func didDeactivate() {
super.didDeactivate()
manager.stopAccelerometerUpdates()
}
When you run the app on your watch, you will be able to see the accelerometer data update rapidly as you swing your arm around. Go on—try it!
Reading pedometer data
The raw data produced by the accelerometer is precise and updates quickly, but such unprocessed data needs interpretation. CoreMotion provides one such interpretation of the data, provided via the CMPedometer class.
You can use CMPedometer to query historical data or to receive live streaming updates. It provides instances of CMPedometerData, which can include a variety of information, each relative to the object’s startDate and endDate properties:
![]()
numberOfSteps
![]()
distance, estimated in meters
![]()
currentPace, estimated as seconds per meter (available only in live updates)
![]()
currentCadence, in steps per second (available only in live updates)
![]()
floorsAscended while walking or running
![]()
floorsDescended while walking or running
Much like the previous example, accessing pedometer data requires only a little code. The following example measures the user’s maximum number of steps per second while the app is running.
1. Open Xcode, and create a new app, selecting the watchOS > Application > iOS App with WatchKit App template. Don’t select the options for notification, glance, complication, or tests.
2. Open the WatchKit app’s Interface.storyboard, and add a label to the interface controller scene (Figure 14.5).

3. Replace the contents of the WatchKit extension’s InterfaceController.swift with the following, then connect the label in the storyboard scene to the @IBOutlet:
import WatchKit
import Foundation
import CoreMotion
class InterfaceController: WKInterfaceController {
@IBOutlet var label: WKInterfaceLabel!
}
4. Add the following properties and method to InterfaceController:
let pedometer = CMPedometer()
var maxCadence: Double = 0
private func updateLabel() {
label.setText(String(maxCadence))
}
5. Add the following implementation of willActivate() to InterfaceController:
override func willActivate() {
super.willActivate()
guard CMPedometer.isCadenceAvailable() else {
label.setText("![]() ")
")
return
}
updateLabel()
pedometer.startPedometerUpdatesFromDate(NSDate()) { data, error in
guard let data = data else {
print(error?.description)
self.label.setText("![]() ")
")
return
}
if let cadence = data.currentCadence?.doubleValue
where cadence > self.maxCadence {
self.maxCadence = cadence
self.updateLabel()
}
}
}
6. Add the following didDeactivate() method to the interface controller:
override func didDeactivate() {
super.didDeactivate()
pedometer.stopPedometerUpdates()
}
When you first install and run this app, keep an eye on the screen of your iPhone; you will be prompted to allow the app access to your motion activity. Upon authorization, the app will display your maximum cadence in steps per second as you move around.
Cadence is only one of the pieces of information available via CMPedometer, and—as with the raw accelerometer data—it is possible to query for historical data as well as receive updates with live data. Although Apple Watch has fewer sensors available than the iPhone, hopefully this small taste of what is there will start you thinking of what you can achieve with this data.
Providing Haptic Feedback
One of the most intriguing hardware features of the Apple Watch is undoubtedly the haptic feedback engine. Although the screen and audio capabilities of the device are the principal forms of interactive output, it is the haptic feedback engine that will provide much of the asynchronous communication between the watch and its wearer. In watchOS 2, Apple has given developers the ability to trigger the haptic engine directly; this provides us with a wonderful opportunity to give feedback straight to the user’s wrist.
Playing with Haptics
Experimenting with the haptic engine is trivial from an API perspective. A single method, named playHaptic(_:), is available for you to call against the WKInterfaceDevice class. The playHaptic(_:) method takes a single parameter of the enum type WKHapticType. The enum defines the complete range of feedback styles available for you to use. Each has a different character, and they (almost) all have corresponding audio tones.
![]()
Notification is the default tap that you feel when your watch has a notification to display to you. If you supply an enum value that is outside the currently defined range, this will also be “played.”
![]()
DirectionUp consists of two discrete taps. The name DirectionUp comes from the audio tone that accompanies the taps; the watch plays two ascending tones.
![]()
DirectionDown also consists of two discrete taps. This time the tone that accompanies the taps consists of two descending tones.
![]()
Success consists of three quick taps of equal duration. The accompanying audio consists of three ascending notes.
![]()
Failure also has three quick taps, but the audio consists of two equal tones following by a tone at a lower pitch.
![]()
Retry features three quick taps accompanied by three tones at the same pitch.
![]()
Start is a single strong tap accompanied by a single tone.
![]()
Stop has two strong taps accompanied by two tones; these tones are further apart that those for the preceding styles.
![]()
Click is a very short tap and is unique in that it has no accompanying tone.
It’s not that easy to mentally imagine the differences between the haptic styles, so it is worth creating a small example project; the sample app will include a Picker control to allow you to select between the different styles. On selection, the style will play for you.
1. From the Xcode main menu, select File > New > Project.
2. In the new project template chooser dialog, navigate to our old favorite watchOS > Application > iOS App with WatchKit App, and click Next.
3. Enter the Product Name as PlayHaptic, set the Language as Swift, and click Next.
Feel free to choose whichever Devices setting you wish. We won’t be worrying about notifications, glances, or complications, so you can deselect those as well.
4. Choose a location to save the project, and click Create.
Now you have your familiar project template, so let’s update the user interface to contain a Picker control.
5. In the Project Navigator, open the file group named PlayHaptic WatchKit App, and click the file named Interface.storyboard to open it in Interface Builder.
6. In the Object Library, search for the Picker control, and drag it onto the interface controller scene.
You need to hook the Picker control up to a controller class so that you can supply it with data and monitor its changes.
7. Open the assistant editor, ensuring that it displays the file named InterfaceController.swift.
8. Control-click and drag from the Picker control onto the InterfaceController class, and create an outlet named hapticPicker.
9. Repeat step 8, but instead create an action named stylePicked.
You now need to create the data for the Picker control.
10. In the InterfaceController class, add a read-only property that points to an array of tuples containing pairs of String and WKHapticType values:
let styles:[(String, WKHapticType)] = [
("Notification", .Notification),
("DirectionUp", .DirectionUp),
("DirectionDown", .DirectionDown),
("Success", .Success),
("Failure", .Failure),
("Retry", .Retry),
("Start", .Start),
("Stop", .Stop),
("Click", .Click)
]
With the data created, you can populate it into the Picker control.
11. Update the awakeWithContext(_:) method with the following:
override func awakeWithContext(context: AnyObject?) {
let pickerItems: [WKPickerItem] = styles.map { style -> WKPickerItem in
let pickerItem = WKPickerItem()
pickerItem.title = style.0
return pickerItem
}
hapticPicker.setItems(pickerItems)
super.awakeWithContext(context)
}
You now need to be able to play the selected haptic when the Picker control has been changed.
12. Edit the stylePicked(_:) method with the following code:
@IBAction func stylePicked(value: Int) {
let hapticStyle = styles[value].1
WKInterfaceDevice.currentDevice().playHaptic(hapticStyle)
}
Everything is ready to go, although you need to test this on a device because the Watch simulator cannot do justice to haptic feedback.
13. Plug your iPhone into your Mac, choose PlayHaptic WatchKit App as the scheme, and choose your iOS device and watch combination in the scheme selector pop-up menu.
The project will build and the app will eventually be transferred to the watch, presenting the Picker control with a list of haptic styles when it has loaded (Figure 14.6). Scrolling with the digital crown will cause the different haptics to play—make sure to enable sound on the watch to hear them as well as feel them!

Tap Carefully
Unlike the vibration motors within many phones, the haptic feedback engine in the Apple Watch—or the Taptic Engine, as it is known from a marketing perspective—is inside a device that is in permanent physical contact with the user. Instead of providing jarring actions designed to be felt through clothing or to vibrate through desks, the Taptic Engine can instead provide extremely discreet taps directly to the wrist.
The beauty of such a system is that because it can be felt directly rather than being heard or transferred through layers of clothing, the patterns of feedback can be distinguished and these patterns can be ascribed meanings. This is what allows wearers to know whether the watch is telling you to stand up or turn right or that an urgent notification has been received.
This gives you a great opportunity for your app to establish a truly intimate relationship with your users. It is also something that you should be wary of; just having the ability to trigger a vibration on your user’s wrist does not mean that you have to take advantage of it.
In those circumstances in which haptic feedback is appropriate, always strive to make those haptics meaningful. The value of such feedback can be severely diminished through overuse and can lead to notification fatigue in your users. You should also be aware that although you may have sounds turned off on your watch, your users may not have made the same decision. Excessive haptics can result in a barrage of noise coming from your app, and could result in it being deleted from the watch by a frustrated user. Too many haptics will also have a detrimental effect on battery life; every vibration requires power, and it may not take long for users to connect your trigger-happy tendency toward haptic feedback with the quick depletion of their precious battery.
Wrapping Up
Apple Watch is a very capable piece of hardware, and some of its best bits are hidden from view as sensors and haptic motors. By now you have covered almost all the capabilities of the device and its SDK, and in the next chapter you will venture into what might be the most exciting—and daunting—territory yet: shipping an app to the App Store.