
Chapter 15. Shipping Your WatchKit App
At the end of the app development journey comes arguably the most satisfying stage: shipping your app. Distribution of your app to paying customers takes place through the iOS App Store, but you have a surprising number of potential obstacles to consider along the way before you get to spend your App Store millions.
Preparing Your App for Distribution
Before you can take the plunge and release your app to the public, ask yourself the following questions: Have I tried it on device? Have I done enough testing? Have I done external testing? Does it run efficiently? Have I done all the due diligence to make sure I really want to release it?
Because the pre-release checklist will vary from developer to developer and even from app to app, you should not see the following guidance as exhaustive, and it may not even be applicable in all situations. However, we still think it is worth reading if only to check that you’ve covered all bases and maybe to prompt yourself to think more about your specific scenarios.
Device Support
In recent years, Apple has made huge strides in extending the life of older hardware by ensuring that the latest versions of iOS work on relatively ancient devices. Your opinion on that may be positive or negative, depending on whether you own, or are forced to support, an iPhone 4S or an iPad 2!
To use an Apple Watch with your app, your customers need to have at least an iPhone 5 or 5C. Even though the 4S is supported by iOS 9 in software, it does not have the hardware support that would allow it to pair with an Apple Watch. It is also worth reiterating that no currently available iPads have the ability to work with an Apple Watch.
For this reason, you should ensure that you carefully consider the types of devices used by your customers if you have access to such data. The Apple Watch is an amazingly useful device, but be careful when making the assumption that everyone who downloads your iOS app is intending to run your watch app. The key is to remember that, in the overwhelming majority of cases, a watch app is a companion to the iOS app.
A further point to bear in mind is that many of the frameworks and APIs used in this book are applicable to watchOS 2 only. Although watchOS 2 is a free upgrade, it is not mandatory, and some of your potential customers may still be running the original watchOS release. watchOS 2 is compatible only with iOS 9 and higher, so if large numbers of your customers are holding out on iOS 8.4, you may need to consider supporting watchOS 1 as well.
Icons and Image Resources
Although it is not a critical task, making sure that your use of icons and other image resources is appropriate can be of great benefit to your users. Fortunately, all Apple Watch devices are Retina quality, which means you don’t need to worry about including anything but @2x-quality images. This is a benefit to customers because you don’t have to include unnecessary extra images in the app bundle.
Icons
When creating an icon for your iOS app, you now need to produce even more variations, to satisfy the new requirements for app icons under watchOS. You might want to start saving up to pay that designer for some extra work, because there are now eight additional icons to be produced for all the extra new places they can be displayed. You can take a look at the placeholders for the icons by navigating to the Assets.xcassets file within a WatchKit App file group in the Project Navigator (Figure 15.1).

App icons are displayed without a name on the watch home screen, so you are relying on a familiarity with your iOS icon to help your users recognize and launch your app. Although it may be tempting to compensate by adding some text to your icon, or even just by shrinking your iOS icons to the watchOS sizes, it is a temptation worth resisting.
The Apple Watch has a small and dense display. These factors conspire to make the icon size much smaller than the iOS equivalent. Adding text to your icon will rarely result in easily readable results, and scaling down your existing icon could cause it to look like a cluttered mess. To make matters worse, watchOS icons have a circular theme—as opposed to the “squircles” employed on iOS—and the average iOS icon could be subjected to some unflattering cropping.
Redesigning your existing icon to fit the new dimensions would be a lot more sensible. Take, for example, the icons for PCalc, a successful calculator app for Mac, iOS, and now watchOS. When developer James Thomson was putting together the icons for the watchOS version, he took the time to redesign the iOS icon to fit the new circular aesthetic and to promote the most distinctive part of his icon: the number 42 (Figure 15.2). You can find more information about PCalc at the developer’s website: www.pcalc.com/iphone.
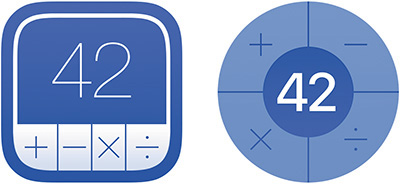
Image assets
watchOS comes prepared with the ability to support multiple devices with different screen sizes and resolutions. To make this possible, watchOS gives you the ability to configure individual user interface elements to have different property values depending on the size of the screen that the app runs on. For example, this allows you to configure your user interface elements to have different sizes, or even text contents, according to the available screen space.
Although the best user interfaces do not heavily rely on pixel-perfect images for their design, it is still possible that you will want to customize your image assets to have different sizes depending on the display size. You can of course customize the actual dimensions of the image so that it uses the available space most appropriately. Figure 15.3 shows the image size properties customized to allow the 42mm devices to use more of the space.

This is a very useful capability, but it does pose a problem for the app user. Using a single image for multiple sizes can lead to scaling artifacts as the image is stretched to fit a dimension it was not optimized for. Using asset catalogs to manage multiple images for the different screen sizes is the best solution to this problem.
1. In the Project Navigator, open the asset catalog named Assets.xcassets in the WatchKit App file group.
Take care to open the asset catalog in the file group named WatchKit App, not WatchKit Extension.
2. In the Xcode main menu, select Editor > Add Assets > New Image Set.
This creates a new image set named Image with a default set of image placeholders (Figure 15.4). Unfortunately, the default placeholders (for 1x, 2x, and 3x images) do not suit our watchOS app, so we need to change them.

3. Open the Attributes inspector, deselect the Universal checkbox, and select the Apple Watch checkbox (Figure 15.5).

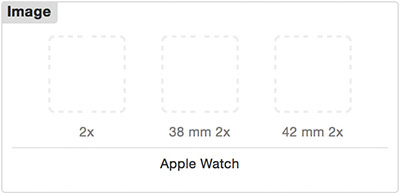
This causes the previous placeholders to be replaced with placeholders marked 2x, 38 mm 2x, and 42 mm 2x (Figure 15.6).
The next step is to place images in the appropriate placeholders. If you have only one image for all device sizes, then you can use the 2x placeholder. For our example, we want to use two images. We have created these so you don’t have to, and you can obtain them from our assets repository (bit.ly/bwa-image-assets).
4. Download the sample assets, and expand the file named image-assets.zip to create a folder containing two image files.
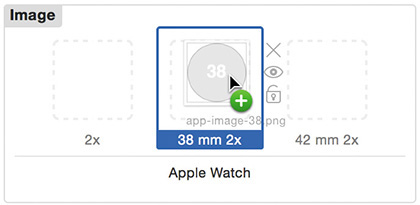
5. Drag the file named app-image-38.png over the placeholder named 38 mm 2x (Figure 15.7).
6. Drag the file named app-image-42.png to the placeholder named 42 mm 2x.
You should now have two similar but differently sized images in the image set. We’ve created the images with different numbers on them so that they can be more readily distinguished (Figure 15.8).

7. Using the Attributes inspector, change the name of the image set to multi-image; you don’t have to, but it makes the whole process feel slightly less generic.
You should now have a nicely configured image set, ready to use in the app.
8. Open the file named Interface.storyboard, and select the interface controller scene.
9. In the Object Library, find the Image object, and drag it onto the interface controller scene.
10. In the Attributes inspector, set the Image property to multi-image, and the Horizontal and Vertical Alignment properties to Center.
Strangely, when you specify the multi-image image set, the image placeholder is replaced with a question mark. Although this may suggest that Xcode cannot find the image set, it actually indicates that it can’t decide which image to display right now because Interface Builder is currently using the Any Screen Size option. If you switch to a specific size class, the correct image will be shown for that size class.
Now we are ready to check the results.
11. In the scheme selector pop-up menu, choose the HelloWrist WatchKit App as the scheme and iPhone 6 + Apple Watch – 38mm as the destination, and then build and run the app.
Once built, the app should run and display the correct image for the 38mm size class (Figure 15.9).
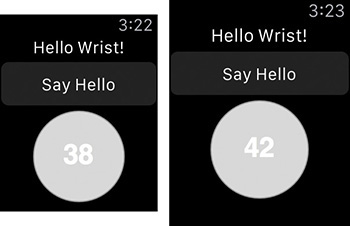
12. Repeat step 11 for the destination iPhone 6 Plus + Apple Watch – 42mm.
Again, the app should run, and this time it will display the correct image for the 42mm size class (Figure 15.9).
This technique may seem over the top, and we readily concede that it will not be necessary for every image in your app. But it is good to be aware of its availability, especially as you move into beta testing and distribution—a phase of app development that often highlights problems on a wider range of devices than you may have access to, and a phase when you’ve got more eyes on your software than ever before.
Back to the Developer Center
Despite the hassles you put up with in Chapter 13 to enable on-device testing of your app, we have some bad news for you: You need to go back to the Developer Center to do some more work if you want to be able to release your app.
App identifiers
If you have ever released an iOS app before, you are aware of the need to create an app identifier in the Developer Center. The app identifier is a unique string that Apple requires for every app that is to be released, and it is specified as part of the provisioning profile that you create to sign your app for installation onto physical devices.
During the development process, you can specify a wildcard app identifier for your development provisioning profile. This allows you to include your provisioning profile in any app whose bundle identifier matches the wildcard. For release, you must use a distribution provisioning profile—we’ll cover that in the next section—one of the requirements for which is that a wildcard app identifier cannot be used.
For your HelloWrist app, you need to create an app identifier that matches the bundle identifier that was generated when you created the project way back in Chapter 1 (Figure 1.2). The bundle identifier—build.watchosapps.HelloWrist—was generated from the organization identifier (build.watchosapps) and product name (HelloWrist) that you supplied. Knowing this, you can log in to the Developer Center and create the corresponding app identifier.
 Note
Note
Unfortunately, app identifiers must be unique across all developers, so you won’t be able to follow along with these exact instructions. You can instead change the bundle identifier in the target settings so that it maps onto an identifier of your own.
1. In a web browser, navigate to the App IDs subsection of the Identifiers section of the Developer Center (bit.ly/bwa-adc-appids).
If you are a member of multiple development teams, be sure to sign in to the correct team if prompted.
2. Click the plus (+) button near the upper right of the page.
3. Enter an App ID Description for the App Identifier; for ours, we will use HelloWrist App.
4. In the App ID Suffix field, choose Explicit App ID, and enter your bundle ID; for ours we will enter build.watchosapps.HelloWrist.
If you have any specific app services that you need to include, you can do so now. Your selection will be specific to your app, and they can be edited later anyway, so we’ll skip this section.
5. Click Continue.
The Developer Center will validate your proposed settings, and if everything is acceptable it will display a summary of your request.
6. Click Submit to register your app identifier.
You now have an identifier that you can use when you want to create a distribution provisioning profile for your app.
Unfortunately, the identifier we just created applies only to the iOS app. We also need identifiers for the WatchKit App and WatchKit Extension targets as well, and they should match the bundle identifiers that the project templates set up.
7. Repeat steps 2 through 6 for the WatchKit App target. We will use an App ID Description of HelloWrist Watch App and an Explicit App ID of build.watchosapps.HelloWrist.watchkitapp.
8. Repeat steps 2 through 6 for the WatchKit Extension target. We will use an App ID Description of HelloWrist Watch Extension and an Explicit App ID of build.watchosapps.HelloWrist.watchkitapp.watchkitextension.
Production certificates
We went through the process of creating a development certificate in Chapter 13. This was enough to code sign your app for installation on a local device, but to distribute through TestFlight or the App Store, you must use a production certificate.
1. In your web browser, navigate to the Certificates section of the Developer Center (bit.ly/bwa-adc-cert).
2. Click the plus (+) button near the upper right of the page.
3. Scroll down the page to the Production section, and select App Store and Ad Hoc as the certificate type.
4. Click Continue.
5. Create a certificate signing request by following the instructions provided, and click Continue.
If you did this in Chapter 13 and kept the CSR file, you can use the same file instead of creating a new one.
6. Choose the CSR file, and click Generate.
7. Download the generated certificate or refresh the developer team in the Accounts section of the Xcode preferences.
Distribution provisioning profile
Although we mentioned it in previous sections, it bears repeating that if you wish to distribute your app to the wider world, you need to bundle it with a distribution provisioning profile. The development profile you created in Chapter 13 is for use only with devices to which you have direct physical access, so if you want to get your app onto devices via TestFlight or the App Store, you need to move up to a distribution profile instead.
1. In your web browser, navigate to the Distribution subsection of the Provisioning Profiles section of the Developer Center (bit.ly/bwa-adc-profs).
2. Click the plus (+) button near the upper right of the page.
3. Scroll down the page to the Distribution section, and choose App Store as the profile type.
4. Click Continue.
To create the distribution profile, you need to include an app identifier.
5. Choose the app identifier you created in the section “App identifiers,” and click Continue.
6. Choose a production certification to include in the provisioning profile; the certificate created in the previous section will be sufficient.
7. Click Continue.
8. Give the profile a meaningful name so that you can identify its purpose when you stumble across it again in the future; we will call ours HelloWrist Distribution Profile.
9. Click Generate.
The result is a profile that can be downloaded and installed directly to Xcode, or it can be pulled down by refreshing the developer team in the Accounts section of the Xcode preferences.
However, we’re not finished yet; we need to create similar distribution profiles for the WatchKit App and WatchKit Extension targets.
10. Repeat steps 2 through 9 for the App target. We will use the app identifier build.watchosapps.HelloWrist.watchkitapp that we created earlier and give the profile a name of HelloWrist Watch App Distribution Profile.
11. Repeat steps 2 through 9 for the Extension target. We will use the app identifier build.watchosapps.HelloWrist.watchkitapp.watchkitextension that we created earlier and a profile name of HelloWrist Watch Extension Distribution Profile.
You now have all the pieces you need to build your app for distribution.
12. From the scheme selector pop-up menu, choose iOS Device + watchOS Device as the destination.
13. Choose Product > Archive from the Xcode main menu.
Xcode will start the process of building for release. This differs from a normal build and run action because the release configuration settings are used. This allows the compiler to do its optimization magic to get your apps running faster than normal debug builds.
At the end of the Archive action, Xcode will display its Organizer window, opened to the Archives tab (Figure 15.10). This will show you the local builds that you have available and give you the option to upload them to the App Store. Before you can do that, though, you need to make sure the App Store is ready to receive them.

 Tip
Tip
When archiving, Xcode should use the Automatic setting to choose the correct provisioning profile for each target. If the Automatic setting does not pick the correct profiles, you can set them manually in the target settings.
iTunes Connect
Whether you are aiming straight for release or are going to embark on beta distribution first, you need to sign in to iTunes Connect to prepare your app before it can be uploaded from Xcode. We mentioned way back in the mists of Chapter 1 that watchOS apps are distributed along with their companion iOS apps—like a welcome Trojan Horse. This means that a lot of what needs to be done in iTunes Connect is actually for the benefit of your iOS app, so we will skate over some of the sections quite quickly in an effort to focus on what you need to do for your watch app.
Creating an App Record
The first stage is to create an iTunes Connect entry for your app.
1. Sign in to iTunes Connect through your web browser (bit.ly/bwa-itc).
2. Click My Apps.
3. Click the plus (+) button to display the add menu, and select New App when it appears.
4. Fill in the app details, ensuring that you include the bundle identifier you created earlier.
5. Click Create.
A new app record will be created, ready to be fleshed out with some extra information. First, though, you need to send a build to iTunes Connect from Xcode.
Uploading Your App
To upload your build to iTunes Connect:
1. Open the Xcode Organizer by selecting Window > Organizer from the Xcode main menu.
2. In the left panel, select the app (HelloWrist for us), and then select the specific build you wish to upload (Figure 15.10).
3. Click the Upload to App Store button.
If you are a member of more than one development team, Xcode presents a list of teams (Figure 15.11).

4. Choose the development team that corresponds to the app identifier, and click Choose.
Xcode will now attempt to sign the build for App Store distribution. If the provisioning profile for the app is incorrect, Xcode will display an error and some information to guide you to resolution. Once it’s resolved, you will need to repeat the archiving process and then go back to step 1.
If the provisioning profile is correct, Xcode will display a confirmation screen to indicate that it is ready to upload the build (Figure 15.12).
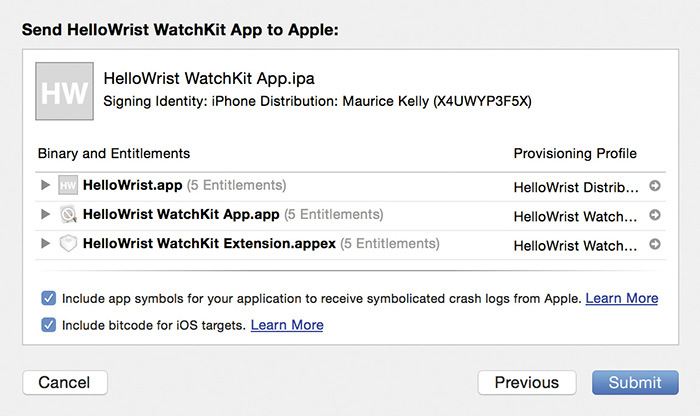
5. Click Submit to send the build to the App Store.
Xcode will perform some additional processing and then start transmitting the archive to the App Store. When the upload is completed, you should see a confirmation message, and you’re now ready to prepare for distribution to TestFlight beta testers or to put it up for sale on the App Store.
Distributing the App
The best way to be ready to ship is to ensure that you’ve done enough on-device testing. A good QA team can go a long way toward ensuring that your app is ready, but if you want to be really sure that your code covers all the edge cases that your customers can throw at it, then beta testing with a wider audience is a must.
If you’re not interested in doing so, or you simply want to get your app out there more quickly, you can jump straight into preparing your app for sale (see the “App Store Distribution” section). However, we recommend you give the following sections a read at some stage, if only to know what the rest of the Apple developer community is talking about.
TestFlight Distribution
One of the biggest barriers to beta testing iOS (and now watchOS) apps with a wider range of customers has always been the restrictions placed on deploying builds to physical devices. Until fairly recently, Apple restricted you to being able to install onto just 100 devices; when taking into account the fact that testers, who are often developers as well, can have iPhones and iPads, and over the course of a year will often have multiple phones, those 100 devices are eaten up pretty quickly.
Fortunately, Apple recently bought a beta testing service named TestFlight and brought the process in-house; it is now offered for free as part of your developer program membership. TestFlight is still a little rough around the edges (and lacking some of the more advanced crash reporting features of paid competitors like HockeyApp), but for the starting developer it is a good value for the money, and so we will focus on it here.
Accessing TestFlight
TestFlight builds can be created through the iTunes Connect interface. When you’re viewing the information page for a specific app, TestFlight will be presented as an option along the top of the page.
TestFlight builds can be one of two flavors:
![]() Internal TestFlight builds are intended for you to distribute to testers within your own organization. You are limited to 25 individual testers, although they have the ability to test the app on multiple devices. Internal builds are not subject to any form of app review, and so they are a good way to get your app out to a small group of trusted testers for immediate feedback. Internal testers can be added only if they have iTunes Connect accounts.
Internal TestFlight builds are intended for you to distribute to testers within your own organization. You are limited to 25 individual testers, although they have the ability to test the app on multiple devices. Internal builds are not subject to any form of app review, and so they are a good way to get your app out to a small group of trusted testers for immediate feedback. Internal testers can be added only if they have iTunes Connect accounts.
![]() External TestFlight builds are intended for distribution to a wider audience outside your own organization. The tester limit is significantly higher, at 1000 individuals, and again they are free to test the app on multiple devices. Due to the wider distribution, external builds are subject to beta app review. Although this is not quite as stringent as the full App Store review process, it does mean that your test builds will be placed in a queue to await review and can be delayed and even rejected if they fail the review process. This can be useful, though; beta reviews can highlight potential failures before you submit for full App Store review. External testers can be added simply by adding their email address to a tester management form, but you should make sure you have their permission first.
External TestFlight builds are intended for distribution to a wider audience outside your own organization. The tester limit is significantly higher, at 1000 individuals, and again they are free to test the app on multiple devices. Due to the wider distribution, external builds are subject to beta app review. Although this is not quite as stringent as the full App Store review process, it does mean that your test builds will be placed in a queue to await review and can be delayed and even rejected if they fail the review process. This can be useful, though; beta reviews can highlight potential failures before you submit for full App Store review. External testers can be added simply by adding their email address to a tester management form, but you should make sure you have their permission first.
It is possible to maintain different internal and external builds at the same time; this gives you a way to provide a stable beta to your external testers while the internal testers could have access to daily test builds that have varying quality levels.
Guidance for your testers
So what happens when you release a build of your app to your testers? If they’ve not received a build before, they will be sent an email to invite them to join your test program. To complete the signup they will need to install the TestFlight app from the App Store; this is not your app but an app produced by Apple to help TestFlight users maintain their test builds on their devices.
Following the link in the email will open the TestFlight app on their device and present some information about the app. When an app comes with a bundled Apple Watch app, the information page will display a banner that reads “Offers Apple Watch App” (Figure 15.13).

Once the tester taps the Install button, the test build will be downloaded and installed on the device. When installation has completed, the user can return to the TestFlight app to view the information for the app; this time the “Offers Apple Watch App” banner will be updated to say “Install on Apple Watch” and will feature a switch control (Figure 15.14). If the user taps the switch, the process of installing the app to the Apple Watch will begin. Once that’s completed, the user can start experimenting with your creation.

It is important that your testers (especially external testers) are aware of the implications of running beta versions of your software. Although many beta testers may simply want access to an early preview of your app, they may be disappointed to find that it isn’t as stable as they would like. It is in your best interests to find testers who are enthusiastic about the testing process and not just wanting access to previews. Enthusiastic testers are more forgiving of bugs and more likely to give you useful feedback.
Builds are time-limited to 30 days and will need to be replaced by App Store releases or by further test builds. If your users can create their own data within your apps, you should strive to keep providing them with a usable build before the current build has expired. You should also do your best to protect the data they create; although they know they are taking a risk using beta software, it still reflects badly upon you if every beta version destroys their data.
If the testers want to stop using the test builds, they can either remove the build from their device completely or replace it with an App Store release build. If they want to stop receiving notifications of new builds, the TestFlight app has a Stop Testing button at the bottom of the page that provides more detail about your app. Tapping the button will start the process of leaving your test program.
App Store Distribution
The endgame of this whole process is to release your app to the world via the App Store. As we’ve said before, your watch app is delivered to users inside the iOS app bundle, so the process of releasing your watch app is almost identical to that which you will be used to for iOS app release.
The only addition to the process is the additional screenshots and icons. The app information page in iTunes Connect has an expandable section named Apple Watch. When you expand the section, it reveals two new fields. The first field is for the watchOS app icon; it should be a PNG file of 1024 by 1024 pixels. The second field can be used to add up to five screenshots from the 42mm version of your watch app (312 by 390 pixels). More guidelines are available at the app submission guide for Apple Watch: bit.ly/bwa-store-guide. With this additional data in place, users browsing iTunes or the App Store will see more about the watchOS app that you are offering.
Tip
The standard product page on the iOS App Store will show the first two screenshots without scrolling, so Apple recommends that you provide at least two screenshots to take advantage of this.
Wrapping Up
We have reached the end of our watchOS journey together, but we hope that your journey is only just beginning. The Apple Watch is an exciting new platform, and although there are numerous restrictions right now—some artificial, some natural—it has always been within the confines of restriction that iOS and Mac developers have created magical and innovative apps that continue to push the boundaries of their platforms. We look forward to seeing what you can do with watchOS.