
Chapter 3. Implementing Navigation
Apps on the Apple Watch, and the watchOS APIs that we use to work with them, are very obviously siblings of iOS. As you work with the watch, you see lots of similarities in the interface and in the code—but you’ll also see significant differences. When the iPhone introduced us to what was then iPhoneOS, it was presented as relying on the same technologies as OS X, but developed in a way that works better on smaller devices. watchOS is like that, but it moves iOS to a new device.
Navigating the Apple Watch
When you’re coming to the Apple Watch from other iOS devices, the main differences you’ll encounter are in simplification, which only makes sense when you consider that you’re dealing with much less space for display and interaction, and much more constrained resources. Strong conventions are even more important than on larger devices. Perhaps in the future there will be scope for the great innovation in UI we’ve seen in iOS (with its misses as well as its hits), but in these early days of watchOS it’s worth looking first to the interface paradigms Apple has provided for us.
And that’s not a bad thing. Constraints encourage creativity, and users of these brand-new devices will be helped by learning what to expect.
Chief among those constraints are the four ways available to watchOS apps to present to the user: Apple Watch apps, with their own UIs and interactions; complications, which allow your apps to add their most important, at-a-glance piece of information to the watch face; glances, which show a chosen set of information without allowing for interaction; and notifications, which may or may not allow the user to respond with an action.
We’ll spend more time on complications, glances, and notifications in Chapters 7, 8, and 9, respectively, but for now we’ll explore some of the capabilities of apps on the watch as we take a tour of the available navigation options.
Navigation Types
iOS has given us several different approaches to navigation within an app, some designed by Apple and directly supported in the frameworks (navigation controllers, page view controllers, various modal view controllers, the hidden reverse of the Utility app, tab bars, popovers), and some dreamed up by third-party developers (the stacked cards of Twitter’s first iPad app, various kinds of sliding view controllers, and the sometimes fashionable and often controversial burger menu).
On the watch, however, are really only two options:
![]() Page-based navigation is reminiscent of the scroll view or page view controller-based navigation, such as in Apple’s Weather app on iOS.
Page-based navigation is reminiscent of the scroll view or page view controller-based navigation, such as in Apple’s Weather app on iOS.
![]() Hierarchical navigation is analogous to the drill-down walk of a navigation controller.
Hierarchical navigation is analogous to the drill-down walk of a navigation controller.
What’s more, when creating your interface you must decide which of these two options will be the basis for your navigation; an app may use one or the other.
Additionally, an app may present a modal interface, which may include page-based navigation of its own.
It doesn’t sound like much, but we think you’ll find that it’s not as restrictive as it sounds.
1. Open Xcode, and create a new project, selecting the Watch OS > Application > iOS App with WatchKit App template.
2. Choose Swift as the language for the project.
 Note
Note
This book uses Swift, so selecting it as the language for the project will allow you to follow along with the code.
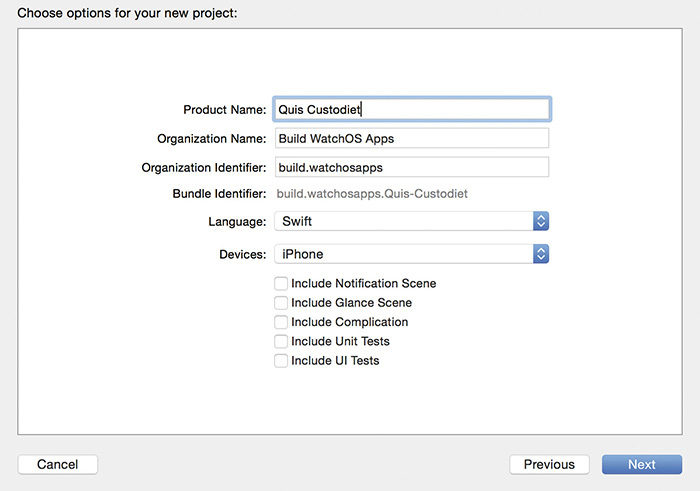
3. Leave the Include Notification Scene, Include Glance Scene, and Include Complication options unselected (unlike in Chapter 1) (Figure 3.1). We’re not going to be using them in this example. Click Next, and choose where to save your project.
4. Open Interface.storyboard from the WatchKit App’s group in the Project Navigator. You’ll see just one scene, something like that in Figure 3.2.

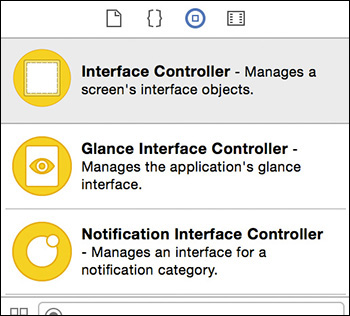
5. Add another interface controller scene to the storyboard by finding the Interface Controller entry in the Object Library (Figure 3.3) and dragging it onto the storyboard next to the existing one.
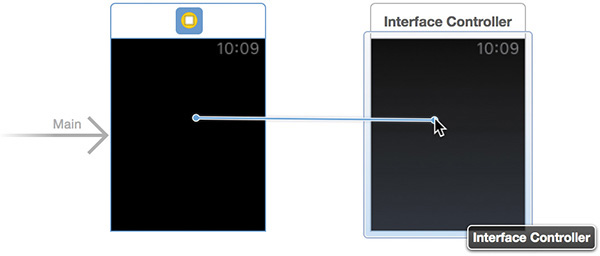
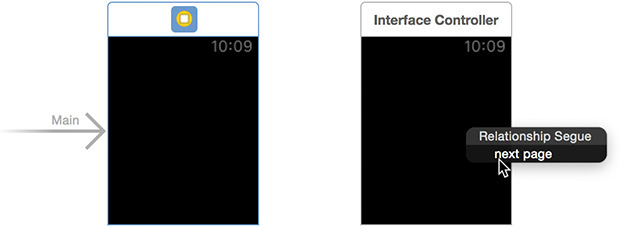
6. Control-click and drag from the first interface controller scene to the one you just placed (Figure 3.4), then select “next page” from the popup (Figure 3.5) that appears when you release your click.
You could run the app now to see how the pages work, but it would be difficult to distinguish the pages.
7. Add a couple of labels to your interface controller scenes (perhaps identifying them as shown in Figure 3.6—these have Alignment set to Center in both horizontal and vertical directions), then run the WatchKit App scheme in one of the iPhone + Watch simulator pairs.
In the Apple Watch simulator window, you should be able to happily swipe back and forth between your two interface controllers (Figure 3.7).

Swiping between full-screen pages is an interface approach that is very well established on iOS, going all the way back to the original Weather app installed as standard on the first iPhone. You may be well used to working with these interfaces, either by working with UIScrollView yourself or via the UIPageViewController class introduced in iOS 5. When working with WatchKit, you must keep a number of key differences in mind.
![]() Although you may be accustomed to dynamically providing the pages of your iOS navigation on demand, things are very different when dealing with
Although you may be accustomed to dynamically providing the pages of your iOS navigation on demand, things are very different when dealing with WKInterfaceControllers as pages: The number of pages, and the classes of the controllers, is provided in advance. This is done either by connecting a chain of scenes in the storyboard, as you’ve just done, or by calling WKInterfaceController’s reloadRootControllersWithNames(_:contexts:) class method. The array of names provided to that method contains NSStrings to match the names of scenes in the storyboard, while contexts is an optional array of AnyObjects. The arrays correspond to each other, with the first context object being passed to the first controller, the second context to the second controller, and so on.
![]() All the interface controllers represented by the pages are instantiated and initialized at once, before the interface is displayed. Your extension code manages the content displayed in response to events in the
All the interface controllers represented by the pages are instantiated and initialized at once, before the interface is displayed. Your extension code manages the content displayed in response to events in the WKInterfaceController lifecycle, which you’ll learn more about later in this chapter.
![]() If you want to include more than one interface controller in a modal presentation, they must be handled as page-based rather than in a drill-down hierarchy. This is accomplished with the
If you want to include more than one interface controller in a modal presentation, they must be handled as page-based rather than in a drill-down hierarchy. This is accomplished with the presentControllerWithNames(_:contexts:) method.
Hierarchical Navigation
The drill-down method through a series of table views, presented in a navigation controller, is possibly the most used approach to navigation on the iPhone—and the master-detail split view, originally seen on the iPad, is often best understood as a variant of this style. On the phone, think of the Music app, browsing albums and then tracks. Or remember browsing in Mail from Mailboxes to Inbox to a thread to a specific email. Even the humble Phone app displays this approach: groups to contacts list to a single contact.
Although table views tend to be a big part of a hierarchical structure, your iOS view controllers can trigger navigation to the next layer however you like. On the watch, you’ll probably find navigation being triggered by user interaction with a table row, a button, or perhaps the context menu (more on that later in this chapter).
As with the paged navigation, each screen in the user’s journey is managed by a subclass of WKInterfaceController. Navigation up the stack is provided by the system-supplied and managed back button, just like the standard Back button item of a UINavigationController. You can customize the string displayed by setting the controller’s title in the storyboard editor.
To experiment with hierarchical navigation in an app, return to your page-based app and make the following changes:
1. Delete the “next page” segue between the two scenes.
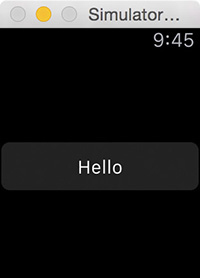
2. Delete the label from the first scene, and replace it with a button.
3. Control-click and drag from the button to the second scene in the storyboard.
4. Select “push” from the popup that appears when you release the click.
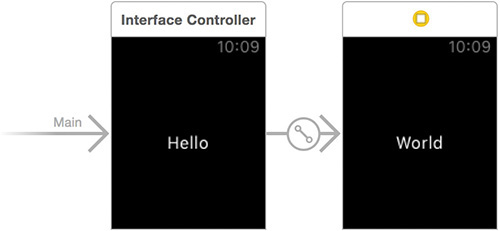
The storyboard should now look something like Figure 3.8; note the icon, embedded in the segue arrow, that identifies the type of segue, and how it differs from the simple “linked objects” icon that was used for the “next page” segue in Figure 3.6.

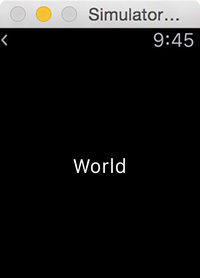
When you run your app, you’ll be able to click back and forth between the two screens (Figures 3.9 and 3.10). Notice that the back arrow in the second screen is just a small, anonymous arrow. You can add a custom title using the scene’s Title property in the storyboard editor, or in code using the WKInterfaceController’s setTitle(_:) method. “What’s WKInterfaceController?” you ask. This is a good time to find out.
The WKInterfaceController
By now you have figured out that when you’re working with WatchKit interfaces you spend lots of time in subclasses of WKInterfaceController. As suggested by the name, this class is somewhat analogous to the UIViewController of iOS, although (as is the case throughout WatchKit) the interface it presents to the developer is much simpler. WKInterfaceController feels a little like the essence of UIViewController in a smaller, lighter package.
Perhaps the most significant way this is achieved is in the very close relationship between WKInterfaceController and UI storyboards. Wherever you might seek to “instantiate” an interface controller, you reference it by its identifier from the storyboard.
We say “instantiate,” but even that isn’t something you’ll ever do directly in code. You might provide the identifier as a member of an array passed to reloadRootControllersWithNames(_:contexts:) or provide it to presentControllerWithName(_:context:), but the system will take it from there.
If you haven’t gotten Apple’s very large hint by now, take heed: There is no laying out your interface in code, however much fun you might have found that in the past. When preparing interfaces for Apple Watch, your options are to define your interface elements in the storyboard editor or to define your interface elements in the storyboard editor. The future will be storyboarded.
The Circle of Life
In a manner that will, again, be familiar from UIViewController, the lifecycle of a WKInterfaceController is marked with callbacks. Following a theme with which you are very familiar, the callbacks are many fewer than on iOS.
init()
The init() method is the designated initializer for WKInterfaceController and is ready to be overridden. As you’d expect, your override should always make sure to call super.init(). The init() method is also the first place your approach to controllers will diverge from your experience with UIViewController.
Although UIViewController has the special designated initializer init(nibName:bundle:), the WKInterfaceController has only init(). And as noted previously, you’ll never be calling it from your own code. Instead, you can override init() for when it’s called by the system. Also, although you might be accustomed to waiting until viewDidLoad() is called before you can access interface elements loaded from a storyboard, by the time init() has been called on your interface controller, the objects referred to by your @IBOutlets are ready and waiting for your attention.
That being said, updating your UI is best done in awakeWithContext(_:).
Note
The normal pattern in Swift is to call super.init() last in your override. In WKInterfaceController, it is that call to super that hooks up any @IBOutlets in your controller. So you want to make sure to call super before trying to address any interface elements. However, you should still make sure that any non-optional properties are initialized before calling super.init().
awakeWithContext(_:)
Once the interface controller is initialized, its awakeWithContext(_:) method will be called. This is the method from which you are likely to make most of the initial UI updates for the controller.
The context received is typed as an AnyObject? and is provided by the interface controller which passes control to the receiver. As an AnyObject?, the context is whatever you want to pass from one interface controller to the next—or nil if there’s nothing needed.
Bear in mind that WKInterfaceController does not have a context property, so if you want to be able to access the received object outside of this method, then your subclass will need to have its own property or properties in which to stash the received information.
willActivate(), didDeactivate(), didAppear(), and willDisappear()
WKInterfaceController has a set of lifecycle callbacks that are reminiscent of UIViewController’s methods viewWillAppear(), viewDidAppear(), viewWillDisappear(), and viewDidDisappear(). The WKInterfaceController versions are usually called exactly when you’d expect:
![]()
willActivate() is called before the interface controller’s UI is displayed on the watch screen.
![]()
didDeactivate() is called when the interface controller’s UI has been removed from the screen.
You should do as little work as possible in these methods. For example, it may seem logical to perform your UI updates in willActivate(), much as you might employ viewWillAppear(_:) in UIViewController, but the documentation stresses that as much as possible should be done at initialization, with only necessary last-minute updates performed in this method. Note as well that some time may pass between the call to willActivate() and the interface appearing onscreen.
Once didDeactivate() has been called on your interface controller, the system considers it inactive—and may deallocate it at any time to reclaim resources. In case this happens, you should perform any necessary cleanup here, including any state-persistence your app needs. The key word here is necessary. Any work in this method should be kept as quick as possible.
One further nuance is that by the time didDeactivate() has been called and the interface controller is regarded as inactive, the system will not act on any attempts to update the controller’s UI, including the values of controls. This will be the case until the next time the controller receives a call to its willActivate() method.
![]()
didAppear() is called just after the interface controller’s interface has been displayed on the screen.
![]()
willDisappear() is called shortly before the interface controller’s interface is removed from display.
As these methods coincide closely with the display and removal of your interface controller’s UI, they are a good place to perform tasks like the configuration of UI animations.
Supporting Navigation
The methods on WKInterfaceController related to navigating between controllers can be grouped as follows:
![]() Methods that directly drive hierarchical navigation
Methods that directly drive hierarchical navigation
![]() Methods that help manage page-based navigation
Methods that help manage page-based navigation
![]() Methods to support storyboarded navigation managed with segues
Methods to support storyboarded navigation managed with segues
![]() Methods to present interface controllers modally
Methods to present interface controllers modally
![]() Methods related to interactions in table views
Methods related to interactions in table views
Navigating in a hierarchy from code
As demonstrated earlier in this chapter, the hierarchical navigation on Apple Watch is very similar in approach to using a UINavigationController on iOS. The methods used to navigate between interface controllers have a straightforward equivalence to the ones you know and love so well from the larger devices.
![]()
pushControllerWithName(_:context:) is used to push a new interface controller to the top of the navigation stack—note again that the controller is referenced by the name it has been assigned in your storyboard file.
![]()
popController() and popToRootController() behave exactly as you would expect, to trigger navigation back through the stack of previous interface controllers.
In addition to using the storyboard editor to set the interface controller’s title, and so control the text shown by the back button, the controller has the method setTitle(_:), which you can use to update the back text at run time.
To try working with these transitions from code, you can replace the storyboard-based push segue of our earlier hierarchical navigation with an action method in our custom controller code.
Notice that when your project was created, Xcode added an InterfaceController.swift file to the WatchKit Extension group in the Project Navigator (Figure 3.11). This is also set as the custom class of the interface controller in the first scene that was added to the storyboard (Figure 3.12).


1. Add the following code to the InterfaceController class in InterfaceController.swift:
@IBAction func helloTapped() {
pushControllerWithName("World", context: nil)
}
2. Delete the push segue from the storyboard file.
3. Find the InterfaceController custom class in the storyboard editor’s sidebar (Figure 3.13), then Control-click and drag from the button to that class in the list.

4. Select helloTapped from the popup that appears.
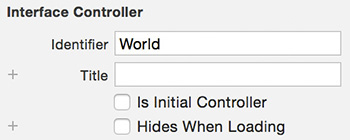
5. Select the second scene in the storyboard editor, and set its identifier to the string World (Figure 3.14).
6. Run the app. It should behave exactly as it did before—only without the segue in the storyboard!
Creating page-based navigation from code
When experimenting earlier with page-based navigation, we mentioned briefly that we are not limited to setting up chains of paged interface controllers in the storyboard. Although all controllers still have their interface defined in the storyboard file, it is possible to forgo connecting them in order there, and rather load the set of pages in code. You could do this with the initial interface controller of your app, to set up the pages at load, or you could do this at any time in response to received data—whether it’s information that your app’s collection of controllers needs to be changed, or in response to a user interaction.
The method for re-creating the pages is the class method on WKInterfaceController reloadRootControllersWithNames(_:contexts:), which instantiates and initializes a whole new collection of interface controllers and uses it to replace any current collection.
The other method available for interacting with the page-based navigation from code is becomeCurrentPage(), which an interface controller can call on itself to be animated into view.
Responding to segues
Where segues are used in the storyboard to define navigation, the methods contextForSegueWithIdentifier(_:) and contextsForSegueWithIdentifier(_:) will be called, with the returned context objects passed to the incoming interface controllers’ awakeWithContext(_:) methods. These methods allow up-to-date data to be passed to the incoming controller or controllers.
Creating a modal presentation
If your Watch app needs to present one or more interface controllers modally, you may define the presentation in the storyboard or in code. If you are performing the presentation explicitly in code, use the method presentControllerWithName(_:context:) to present a single controller, but use presentControllerWithNames(_:contexts:) to present a paging navigation between interface controllers. (Note again the method contextsForSegueWithIdentifier(_:) for handling presentation of multiple interface controllers.)
In either case, a call to dismissController() will end the modal presentation.
Touching on table views
Table views may be employed as they often are on iOS—as part of the navigation in an app. In this case, there is the very familiar-looking method table(_:didSelectRowAtIndex:) and two table view-specific segue methods, contextForSegueWithIdentifier(_:inTable:rowIndex:) and contextsForSegueWithIdentifier(_:inTable:rowIndex:). Chapter 4 explores table views and their interactions in detail.
The Context Menu
So far we’ve skipped over an important part of the interface controller’s standard user interface.
When the user performs a force touch on the interface of a WKInterfaceController, that interface controller’s context menu (something like that in Figure 3.15) will be displayed. (This is the only way a third-party app can respond to a force touch, because there is currently no public API for its detection.)
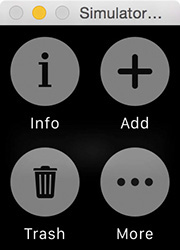
The context menu can show a maximum of four options, each of which is displayed as an image (either a custom image from your WatchKit app’s bundle or one from the set of standard icons provided by WatchKit) with a short title below it. The options may be defined either in the storyboard or in code in the interface controller, and in either case a tap on the option will send an action message to the interface controller.
To experiment with the context menu, return to the example app from earlier in this chapter.
1. Add another interface controller scene to your watch app’s storyboard, drag in a label, and give it an identifier of Info.
2. Find the Menu object (Figure 3.16) in the Object Library, and drag it onto the first interface controller in your app. Note that when you release the drag, there will be no sign of the menu on the storyboard canvas, but it will appear in the storyboard editor’s left sidebar (Figure 3.17).

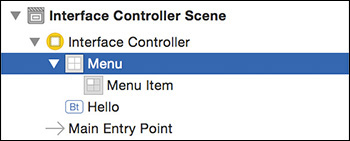
The menu is created with a single menu item already in place.
3. Select the menu item, and give it a title and image of Info, as in Figure 3.18.

4. Make the menu item trigger a navigation to your new interface controller by adding the following method to InterfaceController.swift:
@IBAction func contextInfoTapped() {
pushControllerWithName("Info", context: nil)
}
5. Connect the action of the menu item to that method, then run the app.
6. Activate an interface controller’s context menu in the simulator by clicking and holding in the Apple Watch window.
After a moment, the context menu will appear. Clicking the menu item will trigger the navigation to your new interface controller.
We’re going to add one more item to the context menu, but this time we’ll do it from our interface controller in code.
7. Open InterfaceController.swift again, and add the following method:
func contextMoreTapped() {
presentControllerWithNames(["World", "Info"], contexts: nil)
}
8. Add the following method at the top of the InterfaceController class:
override init() {
super.init()
addMenuItemWithItemIcon(.More, title: "More", action:
Selector("contextMoreTapped"))
}
9. Run the app.
10. Activate the context menu.
You should see another option: More.
11. Click the More menu item, and the eagle-eyed will spot the use of modal presentation of paged navigation back and forth between two interface controllers.
And So Much More
Because WKInterfaceController is a core class in watchOS, you will find that a great deal of what you need to do in your code will happen in—or not far removed from—its subclasses. The excitement and opportunity presented, especially with the release of watchOS 2, include:
![]() Alerts (Chapter 4)
Alerts (Chapter 4)
![]() Interface animations (Chapter 6)
Interface animations (Chapter 6)
![]() Integration with other platforms via the Handoff APIs (covered in Chapter 10 along with other cross-device communication topics)
Integration with other platforms via the Handoff APIs (covered in Chapter 10 along with other cross-device communication topics)
![]() Responding to the user’s interaction with notifications (Chapter 9)
Responding to the user’s interaction with notifications (Chapter 9)
![]() Audio recording and media playback (Chapter 12)
Audio recording and media playback (Chapter 12)
![]() Accepting user input (Chapter 11)
Accepting user input (Chapter 11)
Wrapping Up
This chapter has been a quick overview of the navigation options available to your WatchKit app, with a longer look at some of the navigation-specific API provided by WKInterfaceController. We have explored enough to be able to instantiate a whole gang of interface controllers and hook them together with a variety of navigational approaches for use in different ways.
Yet all the interface controllers we could come up with would end up being pretty boring and useless without ways of communicating with the user: presenting information and detecting interaction. Chapter 4 surveys the UI controls available in WatchKit and gives some examples of their use.