
Chapter 7. Working with Complications
If the release of the Apple Watch does not go down in history for revolutionizing the field of wearable computing, at the very least it will go down in history for inspiring countless bloggers to pretend that they’ve always known what a watch complication was.
In this chapter, we will bring you up (or down) to the level of the bloggers by explaining what a complication is, why your users might want you to add one to your app, and how you might go about doing so.
Introducing Complications
Watches started life with a simple purpose—to help people tell the current time in terms of hours and minutes. Although the internals of a watch that solely tells the time can be tiny and complex, telling time is considered the simplest function that a watch can perform. Anything else—a date indicator, a stopwatch, a calculator function—is considered a complication. Despite the fact that the standard Apple Watch faces actually include numerous complications, Apple, in its inimitable fashion, decided to co-opt the name complication to describe any additional widgets that can be configured to slot into designated areas around the rest of the watch face.
Although there were numerous Apple-supplied complications in watchOS 1, it’s only with the introduction of ClockKit (a new framework included in watchOS 2) that it’s now possible for third-party developers to include their own complications as part of their Watch app.
As one of those third-party developers, you have an amazing opportunity to get data from your app directly onto the face of your users’ watches. It might seem like the equivalent of a notification or a glance, but this is something way more. Notifications need you to push the data to the user, and glances need the user to initiate a request for information. A complication is a part of your app that is always right there on their watch face and can be kept up to date through the magic of timelines and time travel—without having to reach a speed of 88mph.
Timelines and Time Travel
Although it may sound like some sort of magic, or like Apple has achieved some feat from the realms of science fiction, the ability to provide up-to-the-minute data for your complication is actually just some very clever software engineering and data caching.
Each complication on a watch face needs to have up-to-date data at the precise moment the user raises her wrist to look at her watch. Rather than continuously fetching data on request, a complication expects the associated app to provide a timeline of data, such as a sequence of calendar appointments or predicted temperatures at intervals throughout the day. Your app will be requested to provide up to three different types of information: for the current time, for the future, and for the past.
The most important information is that for the current time. You don’t have to provide data for the future or the past—it may not even be possible to do so—but if you do provide future data, it can allow your complication to display information without resorting to repeated requests to your app every time the current information becomes outdated.
A further advantage of providing past and future data is that it allows the user to take advantage of the Time Travel feature of watchOS 2. Time Travel can be achieved by turning the digital crown while viewing the watch face; the watch will emit a brief tap, and Time Travel mode will be indicated on the screen (Figure 7.1).
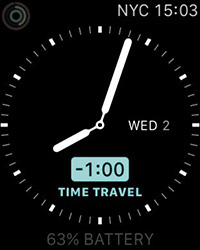
Rotating the digital crown clockwise goes forward in time (appropriately enough), and it scrubs through the timeline of future data that apps have provided to their complications. Whenever future data is not available, the complication is shown as disabled while in Time Travel mode. Rotating counterclockwise goes backward, of course, through the data timeline for the complications. Again, if historical data is not available, the complication will be shown as disabled.
You don’t have to support Time Travel with your complication (and depending on your app, you may not even be able to), but it is a delightful feature of the Apple Watch in general, and worth supporting if you can.
Complicated Arrangements
If you have browsed the available faces on an Apple Watch, you have seen a number of different complications that may, from a high level, seem like a complete mishmash of styles. Fortunately, they actually break down into just five main families, some of which have their own customizations, which can be broken down into data layouts.
Families
The complication families are broadly grouped by the watch faces that they are primarily associated with, and each of those watch faces dictates different form factors that are possible. You do not have to support all the families—and we encourage you not to abuse the space that has been made available to you—but bear in mind that the more families you support, the more chance you have of getting your complication onto a relatively sparse, but invaluable, piece of real estate.
Modular
The Modular watch face lends its name to two families: Modular Small and Modular Large. Figure 7.2 shows an example Modular watch face.
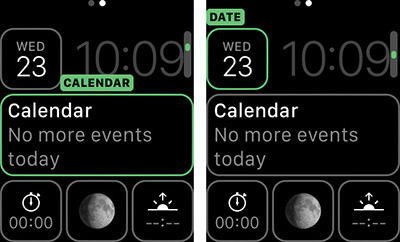
The highlighted area in the Modular Large complication in Figure 7.2 (left) is the single, large, and horizontally oriented rectangle that dominates the middle of the Modular face. Its size and orientation make it particularly suitable for displaying relatively intensive textual information.
The remaining complications on the Modular face are all examples of the Modular Small complication family (including a calendar, stopwatch, moon phase indicator, and sunrise/sunset indicator). They share a rounded rectangular shape (as highlighted in the screenshot on the right), and as a result Modular Small complications can be used interchangeably in the four available spaces on the Modular watch face.
Utilitarian
Although it may sound like a sci-fi cult, the Utilitarian complication families are named for their inclusion in the Utility watch face (Figure 7.3) as well as in the Mickey, Chronograph, and Simple faces. Unfortunately, for reasons known only to them, Apple seems reluctant to let developers customize the “Mickey butt-wiggle/foot-tap,” which is arguably the best complication there is. Our personal idea for Morse code–style message delivery through Mickey’s foot taps is currently on the shelf.

The line of information on the bottom of the face (the sunrise/sunset time) is the sole Utilitarian Large complication slot available. It is well suited to data that needs to be formatted with a reasonable amount of width, but don’t worry if your data output is a bit on the narrow side, because the complication data will be sensibly centered.
The Utility face features two other parcels of screen space that can accommodate a complication—at the upper-left and upper-right corners, meeting at the center of the screen. This complication type is named Utilitarian Small, and you are not restricted to using the entire width of the space available to you. You can use simple icons that will be pushed to the far-left or far-right side of their respective spaces.
The Utility face (and others) actually features a fourth complication when you enter its customization mode. It corresponds to the date display in Figure 7.3. We won’t consider it here because it can show only the date (in a number of styles) or be turned off. It’s not yet open to third-party developers.
Circular
The Circular family is not named for a watch face, and is a bit of a misnomer considering that it occupies a space that is actually a rectangle (Figure 7.4). They can be displayed on the Color watch faces.

In the four corners of Figure 7.4, you can see four examples of the Circular complication in action. Although they appear in similar positions to the Utilitarian Small complications, they do not have the same flexibility to occupy a rectangular shape; they can take only the form of a square and are best suited to round graphical complications.
Data layouts
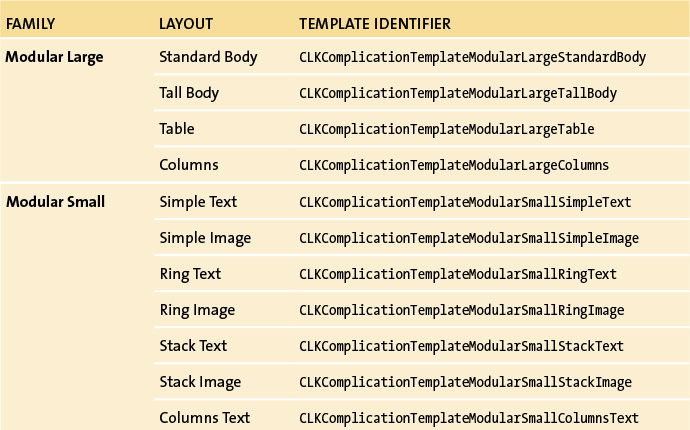
The complications you’ve seen so far have varied by the watch face they can be configured with, but also in the presentation of their data. Each of the families can be subdivided into a number of data layouts; you need to choose the layout that best suits your data and specify that layout when writing the code to support your complications. The full range of complication families, their available data layouts, and the template identifiers you can use to reference them in code are shown in Table 7.1.

With more than 20 different options to present your data in a complication (including tabular layouts, open and closed rings, and images), all that remains to be done is to choose the variations you want to support and introduce some complications to your life. Rather than display all the available styles here, we encourage you to browse the existing complications supplied by watchOS and find the styles that best suit your data.
Adding Complications
So you’ve decided that life isn’t simple enough and you want to introduce some complications. How you include a complication in your app depends on when you decide you want to do it. As you’ll see here, and in later chapters for glances and notifications, it’s always easier to include a complication when you are creating your watchOS app than it is to retrofit it to one. It’s worth giving careful consideration to your project needs at creation time.
Including a Complication in a New App
You can start from scratch and create a complication in a new iOS and watchOS app in one fell swoop, but you can also include a complication when creating a new watchOS target if your iOS app already exists.
Creating a project and app with a complication
Here are the steps to create a complication when you create your project and app.
1. From the Xcode main menu, select File > New > Project.
2. In the new project template chooser dialog, select watchOS > iOS App with WatchKit App (Figure 7.5).
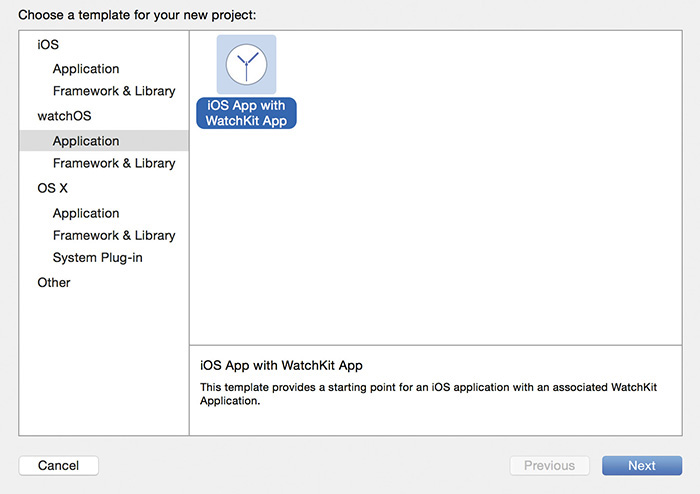
3. Click Next to choose the template.
4. In the template options dialog, set Product Name to I Said What? and ensure that the Include Complication option is selected (Figure 7.6).
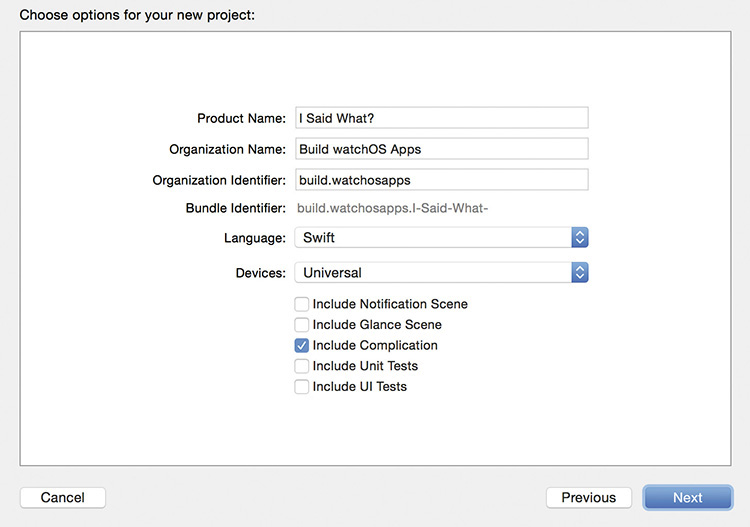
5. Click Next to confirm your options.
6. Choose a location in which to save the project—we’ll leave it to you to decide where—and click Create to finish the process.
Now that you’ve created a project with a complication, we’ll take a short diversion to look at the file artifacts and configuration associated with complications. This is important so that you can work with them, and also understand how to create them by hand or to disable them if you no longer want to include one in your app.
Configuring the complication
Unlike glances and notifications, complications, when added to your project, don’t make a change to the Interface.storyboard file that defines your app interface. This may seem unusual, but glances and notifications are displayed as complete, self-contained views that your app needs to specify and control. Complications, on the other hand, are displayed on the watch face and can be supplied by many different apps, so it is watchOS that needs to manage them. You just get to supply the data and resources that they rely upon.
Like many modern Apple frameworks, the data needs to be supplied by a data source. As part of the project template, a file named ComplicationController.swift is created in the WatchKit Extension file group. This file is strangely named, because it does not inherit from WKInterfaceController, as the class name ComplicationController suggests. Instead, it implements a protocol named CLKComplicationDataSource; it’s this protocol that defines the data source methods that your code must implement in order to render your complications on the watch face. We’ll take a closer look at the methods that need to be implemented to satisfy this protocol later in this chapter.
You’ll need to include image resources if the complication templates you decide to use include images. To make this easier for you, the project template adds a complication set to the Assets.xcassets file in the WatchKit Extension file group. The complication set contains three image groups—one each for the Circular, Modular, and Utilitarian families—and each image group takes two size variations for the 38mm and 42mm watch sizes (Figure 7.7). We’ll add some image resources in the “Including Image Assets” section later.

The final changes made by the project template to enable complication support can be found in the settings for the WatchKit Extension target. For this sample project, we would like to support only Modular Large, and here is how you can achieve this.
1. Click the I Said What? project group in the Project Navigator to open the Settings editor.
2. Select the I Said What? WatchKit Extension target in the Settings editor.
3. Open the General settings tab.
4. Scroll down to view the Complications Configuration settings group (Figure 7.8).
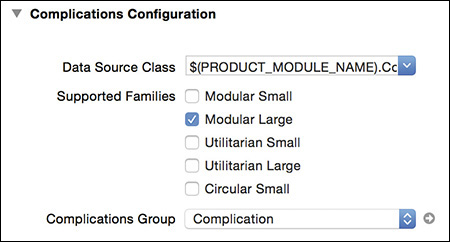
5. Deselect the complication families until only the Modular Large family remains selected (Figure 7.8).
While you are here, it is worth exploring the configuration settings in this group:
![]() Data Source Class: This setting is a combined text-entry field and popup menu. Clicking the popup menu control presents a list of the classes found in the WatchKit Extension target that implements the
Data Source Class: This setting is a combined text-entry field and popup menu. Clicking the popup menu control presents a list of the classes found in the WatchKit Extension target that implements the CLKComplicationDataSource protocol. Pick a class from the list, or type the name of one directly into the text field, in order to tell watchOS the class it should use as a data source.
In the project template, it is set to $(PRODUCT_MODULE_NAME).ComplicationController by default. If you are setting it yourself, be aware that Xcode can sometimes drop the $(PRODUCT_MODULE_NAME) portion. This will cause your app to have problems finding the data source, so make sure to replace it if necessary.
![]() Supported Families: This setting is a series of checkboxes that represent the five different complication types. By default, they are all enabled, but you can disable specific checkboxes to indicate to watchOS that you do not wish to support that complication family.
Supported Families: This setting is a series of checkboxes that represent the five different complication types. By default, they are all enabled, but you can disable specific checkboxes to indicate to watchOS that you do not wish to support that complication family.
![]() Complications Group: The final setting is a standard popup menu that, when clicked, presents a list of complication sets found in asset groups contained within the WatchKit Extension target. By default, it’s set to use the complication set within
Complications Group: The final setting is a standard popup menu that, when clicked, presents a list of complication sets found in asset groups contained within the WatchKit Extension target. By default, it’s set to use the complication set within Assets.xcassets in the WatchKit Extensions file group, but if you want to include a different set of images, you can select them here.
 Tip
Tip
The Data Source Class and Supported Families settings are mirrored within the Info.plist of the WatchKit Extension target. This could be useful if you have a complex build system and wish to change these settings for specific builds (for example, paid and free versions of your app). The Complications Group setting is held within the main project settings and is not so easily changed at build time.
If you added complication support when you created your project, you can also use these settings to disable that support. Remove the Data Source Class setting or deselect all the Supported Families options to stop your app from offering complications.
Adding a Complication to an Existing App
Sometimes it is hard to predict exactly what you’ll need in your app when you are creating the project, and it’s highly likely that at some stage you’ll need to add complication support to an existing watchOS app that doesn’t have one. Although it isn’t as easy as selecting a checkbox, it still isn’t too difficult to achieve.
1. From the Xcode main menu, select File > New > Project.
2. In the new project template chooser dialog, select watchOS > iOS App with WatchKit App (Figure 7.5).
3. Click Next to choose the template.
4. In the template options dialog, set Product Name to Simple Life and ensure that the Include Complication option is not selected (Figure 7.9).

5. Click Next to confirm your options.
6. Choose a location to save the project, and click Create to finish the process.
You are now the proud owner of a complication-free project named Simple Life. Let’s make it more complicated by adding a data source class.
7. In the Project Navigator, click the WatchKit Extension file group to select it.
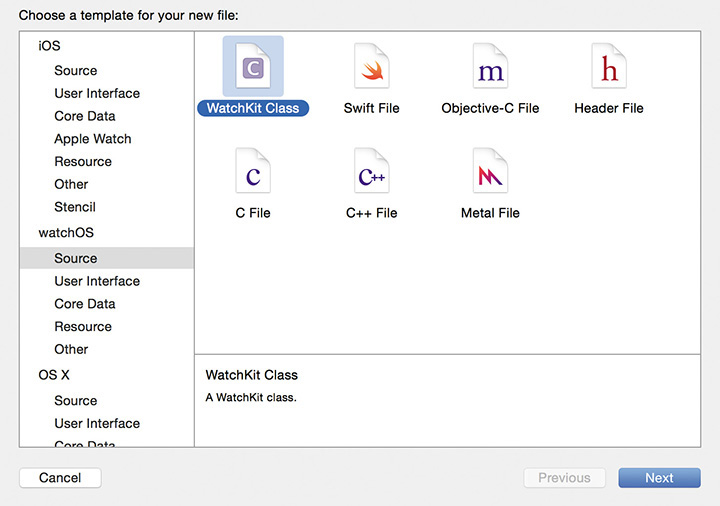
8. From the Xcode main menu, select File > New > File.
9. In the new file template chooser dialog, select the watchOS > Source category, click the WatchKit Class template to select it, and click Next to continue (Figure 7.10).
10. In the new file options dialog, set the Class name to ComplicationDataSource, and click Next to continue (Figure 7.11).
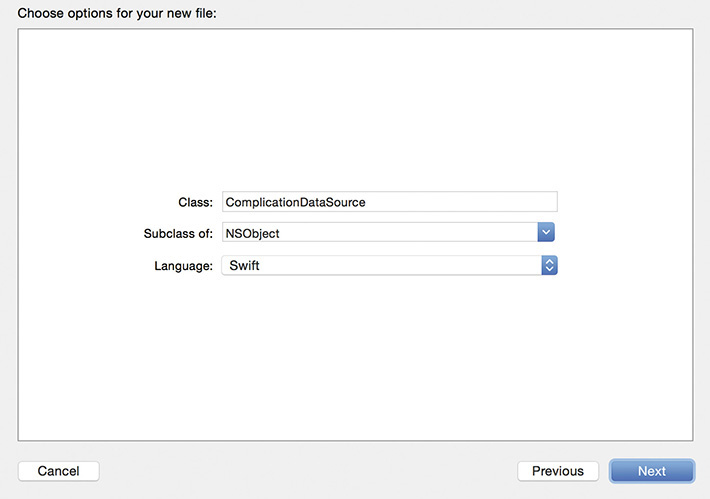
Apple named this class ComplicationController, but we want to acknowledge its true purpose in life.
11. In the save dialog, navigate to the Simple Life WatchKit Extension folder, ensure that the Target for the new file is set to Simple Life WatchKit extension, and click Create to finish creating the new file.
12. Update the newly created ComplicationDataSource.swift file to import the ClockKit module (more on this framework very soon), and add CLKComplicationDataSource as a protocol.
import WatchKit
import ClockKit
class ComplicationDataSource: NSObject, CLKComplicationDataSource {
}
This causes the ComplicationDataSource.swift file to report an error; it implements a protocol that it doesn’t completely conform to yet. We’re not worried about that right now, but if you want to populate it, see the section “Providing Timeline Entries” later in this chapter.
You now need to create an asset catalog entry that you can set as the Complications Group setting.
13. In the WatchKit Extension file group, select the asset catalog named Assets.xcassets.
14. From the Xcode main menu, select Editor > Add Assets > New Watch Complication.
This creates a new complication set named Complication, and completes the process of artifact creation. All that remains is to configure the WatchKit Extension target settings to reference the artifacts.
15. In the Project Navigator, click the Simple Life project folder to open the Settings editor.
16. Click the Simple Life WatchKit Extension target to view its settings, and scroll down to the Complications Configuration section.
17. Set the Data Source Class setting to $(PRODUCT_MODULE_NAME).ComplicationDataSource.
18. Select one or more complication families for the Supported Families setting.
19. Set the Complications Group setting to Complication.
It’s time you updated your résumé to say that you’re a traditional watchmaker; you have just handcrafted a complication.
Including Image Assets
Given the lack of space in any of the complication templates, it can be very difficult to convey a lot of information. The old adage “a picture is worth a thousand words” is rarely as appropriate as it is here. Many of the standard watchOS complications include images to help include as much data as possible.
Although it may be tempting to just throw a collection of images into your project, using just any old images in your complication will result in unexpected behavior. This is because Apple wants the complications to have a very uniform look and feel, and this is a lot harder to achieve if every developer has a different color scheme.
To prevent this, the images provided by your complication are expected to use a monochrome image with varying alpha levels that can then be rendered into any color scheme that watchOS chooses. The best way to achieve this is to create a black and white grayscale image and use an image conversion tool to convert the grayscale into different levels of transparency. Figure 7.12 shows a comparison between a grayscale image and the same converted image. We’ve created some images that you can use without having to get into image manipulation.

1. Download the compressed modular file from bit.ly/bwa-modular-assets, and decompress the file.
Once you have your images, you can include them in the asset catalog file named Assets.xcassets in the WatchKit Extension folder. As shown earlier (Figure 7.7), this asset catalog comes prepopulated with a group named Complication that contains three predefined image assets (for Circular, Modular, and Utilitarian complications). Each of the assets can supply images for 38mm and 42mm watch form factors.
2. In the Project Navigator, open the WatchKit Extension file group, and click the file named Assets.xcassets to open it.
3. Click the Complication group in the asset catalog editor to expand it, then click the Modular image asset to select it (Figure 7.13).

4. In the Finder, navigate to the folder where you downloaded the image assets, or locate your own assets if you wish to use them.
5. Drag the file named modular-38mm.png into Xcode, and drop it onto the image well named 38 mm 2x (Figure 7.14).
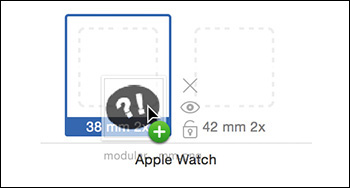
6. Repeat step 5 for the file named modular-42mm.png, and drop it onto the image well named 42 mm 2x.
The image assets are now included in the project and can be loaded into a UIImage using their path within the asset catalog. For example:
let asset = UIImage(named: "Complication/Modular")
The UIImage class will choose which of the two images to use based on the size of the device the code is actually running on.
For more information on the sizing of the various image assets that complications can take advantage of, have a look at the Complication Images section of Apple’s Human Interface Guidelines, at bit.ly/bwa-comp-hig.
ClockKit
Working with complications requires that you dive into a new framework introduced in watchOS 2: ClockKit. It is ClockKit that defines the CLKComplicationDataSource protocol that your app must implement in order to support complications. As you start to implement this protocol, you’ll quickly need to start pulling in other classes and types from ClockKit, including some interesting new classes for dealing with text and images.
First, though, you’ll look at the data source itself in the context of creating your sample app named I Said What? The purpose of this app is simple; it provides a complication to tell you what you said on Twitter exactly one year ago.
Working with the CLKComplicationDataSource protocol will feel familiar to you if you have dabbled even briefly with table views on iOS (and specifically with the UITableViewDataSource protocol). It’s a comprehensive protocol that provides a lot of flexibility, but with that flexibility comes a degree of complexity. Fortunately, the default project template contains most of the protocol methods pre-implemented. We will work through them, filling them in as we go and giving extra details where necessary.
Timeline Settings
Before the data source can provide entries for your timeline, you need to provide some basic information to ClockKit so that subsequent requests for data make sense. For example, if your complication can’t provide information for times in the future, you can indicate this and spare future requests for future timeline entries.
In the case of our example app, because the data will be one year old, you do have both future and past information. You communicate this to ClockKit through the required protocol method getSupportedTimeTravelDirectionsForComplication(_:withHandler:). Happily, the default implementation in the template covers this already, but we will replicate it here to discuss some general techniques that apply to most of these protocol methods.
func getSupportedTimeTravelDirectionsForComplication(complication: CLKComplication,
withHandler handler: (CLKComplicationTimeTravelDirections) -> Void) {
handler([.Forward, .Backward])
}
Two parameters are common to many of these methods:
![]()
complication: This parameter is a reference to an instance of a CLKComplication class. The parameter is passed in so that you can ask to which family the complication belongs. CLKComplication has just one property (family), which returns a CLKComplicationFamily enum indicating whether the complication is ModularSmall, ModularLarge, UtilitarianSmall, UtilitarianLarge, or CircularSmall.
![]()
handler: This parameter is a reference to a closure that is passed to the method by ClockKit. It’s your responsibility to call this handler at the end of the method and pass it the appropriate information. The type of information to be passed to the handler varies between the protocol methods, but the signature of the protocol method will give you the necessary guidance in each instance.
 Note
Note
If you support more than one type of complication, you should use the family property on CLKComplication to let you construct custom responses for each family you support. In our sample project we have indicated that we only support the Modular Large family, so we have skipped any family-specific handling for the sake of brevity.
In the previous sample, we are calling the handler with a set of supported directions ([.Forward, .Backward]) that our complication supports. If you wanted to support time travel only to the past, you would pass .Backward; to support time travel only to the future, then pass .Forward; or to indicate no time travel support at all, pass .None.
When a specific time travel direction has been indicated as supported, your data source will then be asked to specify exactly how far forward or back it can go. You can indicate your supported dates by implementing the methods getTimelineStartDateForComplication(_:withHandler:) and getTimelineEndDateForComplication(_:withHandler:). The handler parameter for both methods can be passed an optional NSDate. The date specified indicates the point beyond which the complication should be dimmed during Time Travel; supplying the current time is another way to say that Time Travel is not supported in the specified direction, whereas passing nil indicates that there is no limit to Time Travel capabilities in this direction.
For your app, you want to support 12 hours of past timeline entries and 6 hours of future timeline entries.
1. Update the methods as follows:
func getTimelineStartDateForComplication(complication: CLKComplication,
withHandler handler: (NSDate?) -> Void) {
let twelveHours = NSDate(timeIntervalSinceNow: -12 * 60 * 60)
handler(twelveHours)
}
func getTimelineEndDateForComplication(complication: CLKComplication,
withHandler handler: (NSDate?) -> Void) {
let sixHours = NSDate(timeIntervalSinceNow: 6 * 60 * 60)
handler(sixHours)
}
If your complication deals with sensitive data, then you need to consider whether your complication should be displayed when the watch has not been unlocked. To disable your complication from being displayed when the watch is locked, pass the HideOnLockScreen value to the handler in the protocol method getPrivacyBehaviorForComplication(_:withHandler:). If your data is not sensitive, then you can return ShowOnLockScreen instead. For our sample app, we would like to respect the privacy status of the original Twitter account, so you will programmatically determine which option to return.
func getPrivacyBehaviorForComplication(complication: CLKComplication,
withHandler handler: (CLKComplicationPrivacyBehavior) -> Void) {
let privateAcct = TwitterAccount.isPrivate()
handler(privateAcct ? .HideOnLockScreen : .ShowOnLockScreen)
}
Note
The ClockKit documentation states that the getPrivacyBehaviorForComplication(_:withHandler:) method is required, yet the protocol definition specifies it as optional. In matters of privacy, it is always best to be explicit, so we recommend that you always implement this method for the security of your users.
You need an implementation for the TwitterAccount type that you used in the previous code.
2. Create a Swift file named TwitterAccount.swift in your WatchKit Extension file group, and add the following code:
struct TwitterAccount {
static internal func isPrivate() -> Bool {
return true
}
}
You’ll use this fake data source for the purposes of example only, and you will flesh it out as you progress through the chapter.
You have now implemented most of the configuration that you need to tell ClockKit in what directions you support Time Travel and for how long. Now you need to start providing ClockKit with the data to display.
Complication Timeline Entries
When ClockKit asks your data source for timeline entries, it expects to receive collections of CLKComplicationTimelineEntry objects. These are a combination of a date and the data for the timeline from that date onward. The data is represented by a CLKComplicationTemplate subclass that corresponds to a complication family and the layout it uses. The full list of subclasses can be seen in Table 7.1 earlier in the chapter.
Each template subclass has its own very specific set of properties that correspond to the type of data it is capable of displaying. For our example, we would like to utilize a large complication on the Modular watch face to show a portion of a tweet in the body area, along with the exact time and date it was posted in the header area. To do this you can use the CLKComplicationTemplateModularLargeStandardBody complication template. Creating one is very simple, but attempting to set a time and date directly into the header and the tweet text in the body unveils the new concept of providers.
Rather than deal directly in text strings and images, ClockKit instead demands that you use a set of provider types that are more capable of adapting their content to the confines of a complication. ClockKit defines two main provider types: CLKImageProvider and CLKTextProvider, though it provides a number of subclasses of CLKTextProvider that you should use in preference.
For our complication template, you need a provider capable of formatting a date string, another to present the tweet text, and a third to display an icon to represent the app. For these you can use a CLKDateTextProvider, a CLKSimpleTextProvider, and a CLKImageProvider. The following code shows how these providers could be created; we’ll use this code later in the chapter to implement the functionality in our example app.
let tweetDate = NSDate(timeIntervalSinceNow: -365 * 24 * 60 * 60)
let dateProvider = CLKDateTextProvider(date: tweetDate, units: .Year)
let textProvider = CLKSimpleTextProvider(text: "An entertaining tweet")
let image = UIImage(named: "Complication/Modular")!
let imageProvider = CLKImageProvider(onePieceImage: image)
In this example, we have used the simpler form for creating the image provider that takes a single image. If you want more control over how your image interacts with complication color changes, you should take a look at the alternative init methods in the Apple documentation.
With the providers created, they can be combined in the creation of the CLKComplicationTemplateModularLargeStandardBody complication template:
let complication = CLKComplicationTemplateModularLargeStandardBody()
complication.headerTextProvider = dateProvider
complication.body1TextProvider = textProvider
complication.headerImageProvider = imageProvider
We’ve taken advantage of the fact that not setting the body2TextProvider property will allow the body1TextProvider to use more of the available space and wrap around.
Once a complication template has been created, the actual complication timeline entry can finally be created. Along with the complication template, you need to supply a date that represents when the timeline entry becomes valid:
let timelineEntry = CLKComplicationTimelineEntry(
date: NSDate(),
complicationTemplate: modularLargeComplication)
Note
Only the date used in creating the timeline entry is relevant to its position in the timeline. The dates used in creating date providers are for display purposes only.
This gives you a timeline entry that has a starting point of right now, but you may be wondering how to define the end of a timeline entry—after all, a calendar appointment would have an end time as well as a start time. Timeline entries are valid from their starting point until the starting point of the next timeline entry supplied by your data source.
This may mean that the source of your data (for example, a calendar API) may not map directly onto complication timeline entries. You may wish to represent non-appointment time in your complication by displaying the text “Free.” To do this, you need to map each calendar appointment into two timeline entries: one to represent the start of the appointment, and one to represent the end of the appointment. It can take a little time to get your head around the idea, but a little pen-and-paper planning can go a long way in helping to map your existing data onto a timeline.
Providing Timeline Entries
You now know how to create a timeline entry so that you can supply one on request, and the CLKComplicationDataSource protocol contains a collection of related methods that you can implement to provide the entries when ClockKit decides that your complication needs more information.
When working with other data sources, such as those for requesters like table or collection views, you are probably used to a pattern whereby you tell the requester how many items you have, and it asks you for them one by one as needed. ClockKit takes a different approach and can make three different types of request:
![]() Supply a current timeline entry.
Supply a current timeline entry.
![]() Supply a collection of timeline entries before a given date; these form your past data.
Supply a collection of timeline entries before a given date; these form your past data.
![]() Supply a collection of timeline entries after a given date; these form your future data.
Supply a collection of timeline entries after a given date; these form your future data.
The reason for doing it the ClockKit way is straightforward: If you don’t support Time Travel, you need to supply only the current entry request, and you need to implement the past and future requests only if you support those directions. ClockKit may request past and future data multiple times with varying before/after dates—it does this to request more data in the appropriate direction if it needs it.
Getting the data
When ClockKit is preparing to update your complication for display on the watch face, it executes the getCurrentTimelineEntryForComplication(_:withHandler:) method implemented by your CLKComplicationDataSource. This is a required method, so it must be implemented, though your implementation can return an optional timeline entry. If you decide to return nil, ClockKit takes this as an indication that you’re having trouble getting the data, and does not ask for more. We’ll discuss the implications of this later, in the “Budgeting” section.
You worked through the theory behind constructing a timeline entry in the previous section, so you’ll use this knowledge to create and return an entry. First, though, let’s create a helper method just to make timeline entry creation a bit quicker.
1. Open the file named ComplicationController.swift, and add the following method:
func createTimelineEntryOnTweetDate(tweetDate: NSDate, currentDate: NSDate,
tweetText: String) -> CLKComplicationTimelineEntry {
let units: NSCalendarUnit = [.Year, .Month, .Day]
let dateProvider = CLKDateTextProvider(date: tweetDate, units: units)
let textProvider = CLKSimpleTextProvider(text: tweetText)
let image = UIImage(named: "Complication/Modular")!
let imageProvider = CLKImageProvider(onePieceImage: image)
let complication = CLKComplicationTemplateModularLargeStandardBody()
complication.headerTextProvider = dateProvider
complication.body1TextProvider = textProvider
complication.headerImageProvider = imageProvider
return CLKComplicationTimelineEntry(
date: currentDate, complicationTemplate: complication)
}
2. Implement the protocol method with the following code:
func getCurrentTimelineEntryForComplication(complication: CLKComplication,
withHandler handler: ((CLKComplicationTimelineEntry?) -> Void)) {
let tweetDate = NSDate(timeIntervalSinceNow: -365 * 24 * 60 * 60)
let timelineEntry = createTimelineEntryOnTweetDate(tweetDate,
currentDate: NSDate(), tweetText: "An entertaining tweet")
handler(timelineEntry)
}
If you have the ability to display future or past timeline entries and have indicated that your complication will do so, ClockKit will make further requests for this information using the getTimelineEntriesForComplication(_:beforeDate:limit:withHandler:) and getTimelineEntriesForComplication(_:afterDate:limit:withHandler:) methods. They both work in the same way, so we’ll just talk about the beforeDate variant for now. The methods take a number of parameters:
![]()
complication: This parameter is the same as in the other method calls—it contains a reference to the complication so that you can determine what family it is and tailor your response accordingly.
![]()
beforeDate: This is an NSDate object specifying a time and date that represents the most recent point in time for which ClockKit currently has entries. When you provide timeline entries, they must occur before this date in the timeline.
![]() This may seem strange; you could just give every possible timeline entry prior to the current date, so why specify a date? ClockKit specifies a date because it may call this method multiple times and the date will allow it to ask for different segments of your timeline. Subsequent calls will include the date of the last entry in the previous response so that it can grab another batch of entries from the timeline.
This may seem strange; you could just give every possible timeline entry prior to the current date, so why specify a date? ClockKit specifies a date because it may call this method multiple times and the date will allow it to ask for different segments of your timeline. Subsequent calls will include the date of the last entry in the previous response so that it can grab another batch of entries from the timeline.
![]() For the companion future timeline method,
For the companion future timeline method, afterDate represents the last point in time for which ClockKit has entries. Your response should contain only entries that occur after this date in the timeline.
![]()
limit: This parameter is an integer that indicates the maximum number of timeline entries that you should supply to ClockKit. This is another essential component in the time budgeting process for your complication, designed to prevent you from spending too long preparing a large number of timeline entries that are not needed immediately.
![]()
handler: As per the other data source method calls, this is the handler that you should call at the end of the method to signal ClockKit that you are finished. You execute the handler with an optional array of CLKComplicationTimelineEntry objects. The array should contain entries that are no closer together in time than a minute and in chronological order up to the limit specified. Returning nil or an empty array is your way to tell ClockKit that you have no more data, so there is no point in requesting any more right now.
Having discussed how the method works and the parameters involved, you can now attempt to implement it and generate some past timeline entries. First, though, we need a quick way to generate some sample data.
3. Update the TwitterAccount.swift file to include a line that reads import Foundation, then add the following method to the TwitterAccount struct:
static func tweetsBeforeDate(date: NSDate) -> [(date: NSDate, text: String)] {
var tweets: [(date: NSDate, text: String)] = []
for i in 1...5 {
let interval = arc4random_uniform(UInt32(i * 10))
let timelineDate = date.dateByAddingTimeInterval (-1 * Double(interval) * 60)
let tweetText = "My tweet at (timelineDate)"
tweets.append((timelineDate, tweetText))
}
return tweets
}
The method is very simple and adds five tweets with increasingly older dates.
4. Update the getTimelineEntriesForComplication(_:beforeDate:limit:withHandler:) method in the data source to take advantage of the tweetsBeforeDate(_:) method:
func getTimelineEntriesForComplication(complication: CLKComplication,
beforeDate date: NSDate, limit: Int,
withHandler handler: (([CLKComplicationTimelineEntry]?) -> Void)) {
let entries = TwitterAccount.tweetsBeforeDate(date).map {
(date: NSDate, text: String) -> CLKComplicationTimelineEntry in
let tweetDate = date.dateByAddingTimeInterval(-365 * 24 * 60 * 60)
return createTimelineEntryOnTweetDate(tweetDate, currentDate:
date, tweetText: text)
}
handler(entries)
}
Note
We haven’t taken the trouble here to limit the number of entries we return for this very simple example. While experimenting with small numbers of entries, it is unlikely to cause problems, but it is worth sticking to the value of the limit parameter for production code.
Placeholder templates
When users of your app are configuring their watch face, they will want to see your complication with some representative data so that they can see how it would look should they use it. This might sound like an afterthought, but if your complication doesn’t convey just how useful an addition it will be in your users’ daily lives, then it is less likely that they will want to add it to their watch face.
ClockKit generously gives you the opportunity to supply a presentation template for display when the user is scrolling through the range of complications available to them. This is just a normal CLKComplicationTemplate but should be configured with static data. Your data source will be asked for this only occasionally, so the data you supply should be applicable to more than just the instant it was requested.
The method you should implement to support this is getPlaceholderTemplateForComplication(_:withHandler:). As per most of the data source methods, you will be supplied a complication parameter to determine the complication family to work with, as well as a handler that should be executed at the end of the method, with the template as a parameter.
For the example application, add the following method to the ComplicationController class:
func getPlaceholderTemplateForComplication(complication: CLKComplication,
withHandler handler: (CLKComplicationTemplate?) -> Void) {
let tweetDate = NSDate(timeIntervalSince1970: 499138500)
let units: NSCalendarUnit = [.Year, .Month, .Day]
let dateProvider = CLKDateTextProvider(date: tweetDate, units: units)
let tweetText = "Drove Delorian. Traveled in time."
let textProvider = CLKSimpleTextProvider(text: tweetText)
let image = UIImage(named: "Complication/Modular")!
let imageProvider = CLKImageProvider(onePieceImage: image)
let placeholder = CLKComplicationTemplateModularLargeStandardBody()
placeholder.headerTextProvider = dateProvider
placeholder.body1TextProvider = textProvider
placeholder.headerImageProvider = imageProvider
handler(placeholder)
}
Testing Complications
Once again, we have made you wait a long time to actually try out the code you have written. This is the point on your personal timeline when you finally get to see your complication in action.
If you created your complication with a new project (or target) template, then you will already have the test scheme that you need to start testing your complication—feel free to jump ahead to the “Running the Test Scheme” section. If you manually created your complication (possibly by following the steps in the earlier section “Adding a Complication to an Existing App”), then you will need to set up a test scheme.
Creating the Test Scheme
Thankfully, the process for creating a test scheme is not an arduous one. If you still have the Simple Life project from earlier, you can follow along with these steps:
1. From the Xcode main menu, select File > Product > Scheme > New Scheme.
2. In the scheme creation dialog, set the Target to Simple Life WatchKit Extension, and replace the generated Name setting with the more concise Complication (Figure 7.15).
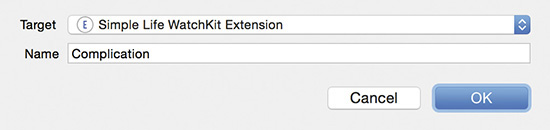
3. Click OK to finish creating the scheme.
4. From the Xcode main menu, select File > Product > Scheme > Edit Scheme to open the scheme you just created.
5. Select the Run action, and open the Info tab.
6. Click the Executable popup menu, and select Simple Life WatchKit App.app.
This will cause additional options to appear below the Executable popup menu.
7. Click the Watch Interface popup menu, and select Complication (Figure 7.16).

8. Click Close to save the changes.
1. Click the scheme selector popup menu to display the full list of available schemes (Figure 7.17).
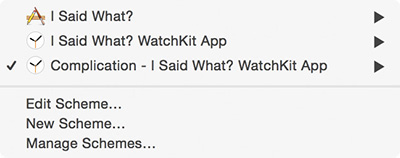
2. Click the complication test scheme to select it; ours is named Complication - I Said What? WatchKit App, but yours may be named something else (if, for example, you created it yourself).
3. Click the Run button to start testing the complication.
Xcode should build your app, then launch the Watch Simulator to the watch face. Unfortunately, it doesn’t go to the trouble of configuring the watch face to display a complication, so you’ll need to do that yourself.
As with a real device, you need to force touch the watch face to start configuring it.
4. In the simulator, press Command-Shift-2 to switch the simulator’s Force Touch Pressure mode to Deep Press.
5. Click the watch face to enter configuration mode.
6. Press Command-Shift-1 to switch the Force Touch Pressure mode to Shallow Press.
7. If necessary, swipe left or right until you find the Modular watch face.
8. Click the Customize button to edit the Modular watch face.
9. Swipe from right to left to move into the complication configuration screen (Figure 7.18).

10. Click the large complication in the center of the watch face—this is the Modular Large complication family—and change the selected complication until it shows the I SAID WHAT? WATCHKIT APP complication (Figure 7.19).

You can change the complication by two-finger scrolling with a trackpad, or by using the up and down arrow keys on the keyboard.
Tip
If you don’t like the I SAID WHAT? WATCHKIT APP name that is presented, you can change it by navigating to the General settings tab for the I Said What? WatchKit App target. Expand the Identity section and update the Display Name field.
11. Confirm your selection by pressing Command-Shift-2 and clicking the screen with a force touch.
12. Press Command-Shift-1, and click the Modular face to return to the watch face.
The Modular watch face will be displayed, and your complication will be displayed. Witness its magnificence (Figure 7.20).

Now that you have the complication running in the watch simulator, it would be nice to try out the Time Travel feature. To step back in time, use the down arrow key on the keyboard, or use a downward scroll gesture on your mouse or trackpad (Figure 7.21).
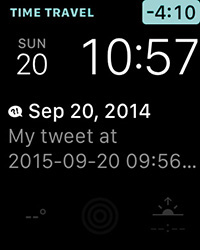
You should be able to navigate through multiple “historic” tweets; however, when you go beyond 12 hours in the past, the complication will dim. This is because you told ClockKit that you intended to supply only 12 hours of past timeline entries with your implementation of the getTimelineStartDateForComplication(_:withHandler:) method.
If you try to go forward in time, you’ll notice that the complication data does not change past the current timeline entry. This is because you haven’t yet implemented the getTimelineEntriesForComplication(_:afterDate:limit:withHandler) method. You have two choices for how to handle this: either implement the method or change the getSupportedTimeTravelDirectionsForComplication(_:withHandler:) method to return .Backward only.
If there’s one thing we’ve learned about time travel, it’s that meddling with the past can break future timelines, so we’ll leave that decision to you.
Triggering Complication Updates
You know how ClockKit gets the timeline entries from your data source, but when does it make those requests? And what happens if your data changes? Fortunately, ClockKit has a number of mechanisms for scheduling updates, as well as for requesting updates on demand.
Update Methods
The simplest way to get ClockKit to check back with you for additional timeline entries is to tell it when you next think you’ll have the information it requires. When the various timeline entry request methods have finished, ClockKit will call the getNextRequestedUpdateDateWithHandler(_:) method on your data source. When calling the handler, you can supply a date object that specifies a point in time after which you would like to provide more timeline entries.
In your complication, you said you would supply 6 hours’ worth of data, so it makes sense to have your data source be queried again after 6 hours. To do this, you would implement the method as follows:
func getNextRequestedUpdateDateWithHandler(handler: (NSDate?) -> Void) {
let sixHours = NSDate(timeIntervalSinceNow: 6 * 60 * 60)
handler(sixHours);
}
Of course, you can’t always be sure that the data you currently have will always be valid. There will be occasions when your user makes a change in their app (either on the watch or the phone) or when a push notification alerts you to the fact that the data has changed. You don’t want your user to have an out-of-date complication, so it’s vital that you have a way to tell ClockKit that the timeline entries it currently has may be outdated or need to be supplemented.
To do this, ClockKit provides you with a way to contact the complications server and ask it for references to any active complications your app currently has. You can instruct the server to either reload the entire timeline or simply extend the current timeline for a specific complication instance. You should be aware that if a user has configured multiple instances of your complication on the current watch face, you’ll have multiple complication references to deal with. The following example shows how you could extend the existing timeline:
let server = CLKComplicationServer.sharedInstance()
let complications = server.activeComplications
for complication in complications {
server.extendTimelineForComplication(complication)
}
In some circumstances you may realize that your entire timeline has become invalid, and simply extending the existing data will not be enough to remove the stale information. ClockKit provides a separate method on the complication server that you can use to force a reload of the entire timeline: reloadTimelineForComplication(_:).
We mentioned earlier that if you return nil from the getCurrentTimelineEntryForComplication(_:withHandler:) method, ClockKit would stop asking for future data. You can get yourself back on the request list by calling the reloadTimelineForComplication(_:) against the CLKComplicationServer.
Using this method is a somewhat drastic measure, and it’s important that you use it with restraint. If you fail to do so, you might soon find out that your time budget will be exhausted.
Budgeting
We’re all used to budgeting in various aspects of our lives, but what exactly do we mean by budgeting when it comes to complications? Simply put, your data source gets only a certain amount of time with which to respond to requests from timeline entries. If ClockKit determines that you have exhausted your time budget, it will stop asking you for more entries.
The purpose of budgeting is to encourage developers to respond promptly to timeline entry requests. Prompt responses make the complication usage more fluid—especially when engaging in Time Travel—and reduce CPU usage and therefore power consumption. Power is a precious resource on the Apple Watch, and anything that can reduce consumption is a good thing.
Now that you know what happens if your complication data source misbehaves, you’ll be on your best behavior, but what happens if your data source takes longer than expected on a few occasions and your time budget is exhausted? Is that it for your complication?
Fortunately not; your budget is reset every day, so even if you have a bad time one day and run out of budget, you’ll still get a chance to run again tomorrow. Just be careful, though; if it happens too frequently it may be a sign that your data source is badly written or that your data is just not suited to being displayed as part of a complication.
Of course, the big question is this: How much time do you get in your daily budget? Unfortunately, Apple is not telling, so you’ll just have to be on your very best behavior! Don’t you understand how Apple works by now?
Wrapping Up
If you feel exhausted, you are not alone. For something so insignificant and simple looking, complications can be very complicated. We think it has been worth it, though. A well-designed complication can display enough of your app’s information to keep your user informed about your app without your user having to go in search of it. You might think it a bad thing, but trust us—your users will thank you for it.
In the next chapter, we take a look at a more detailed way for users to see a summary of your app information: glances.