
The second class of security solutions that we are going to cover in the current chapter is host-based solutions. Such solutions are installed on the same hosts which they have to protect.
You need to have a host-based security solution in your lab mainly for two purposes: to practice firewall/IPS evasion techniques and to test the detectability and obfuscation of your exploits (payloads) and malware. But, as always, there could be other personal reasons for having such security measures.
To better imitate a real enterprise network and create a possibility for testing various evasion techniques, we are going to install free endpoint security solutions on our lab workstations.
We recommend that you create snapshots of your workstations before installing any host-based security solutions, as they will definitely make penetrating workstations a bit problematic and you don't need it before you proceed to an advanced hacking level. Using snapshots allows quick switching between the various system states of a VM and you can always fall back if you have broken something.
The first workstation security solution in our list is the Enhanced Mitigation Experience Toolkit (EMET) from Microsoft. This tool helps to protect applications from being exploited if they contain software vulnerabilities. The tool uses a lot of protection techniques, including memory randomization and protection techniques as well as certificate pinning feature to withstand man-in-the-middle attacks. It can be obtained from the official website at http://www.microsoft.com/emet.
We are going to install EMET 5.2 on a Windows 7 workstation. The installation process using graphical interface is not complicated, so we will use a lot of screenshots.
- Log in to a Windows 7 workstation and download EMET 5.2 (or newer if it is already available) from the official webpage:

EMET 5.2 download menu
- Start the installation wizard and follow the dialog-based instructions:

EMET 5.2 installation process
- Choose the recommended settings:

EMET 5.2 settings choice
- After the installation, you can find the EMET icon in the taskbar. Right-click on it and open EMET:

EMET 5.2 main window
- You can click on the Apps button in the menu to see which protection setting is set for which applications:
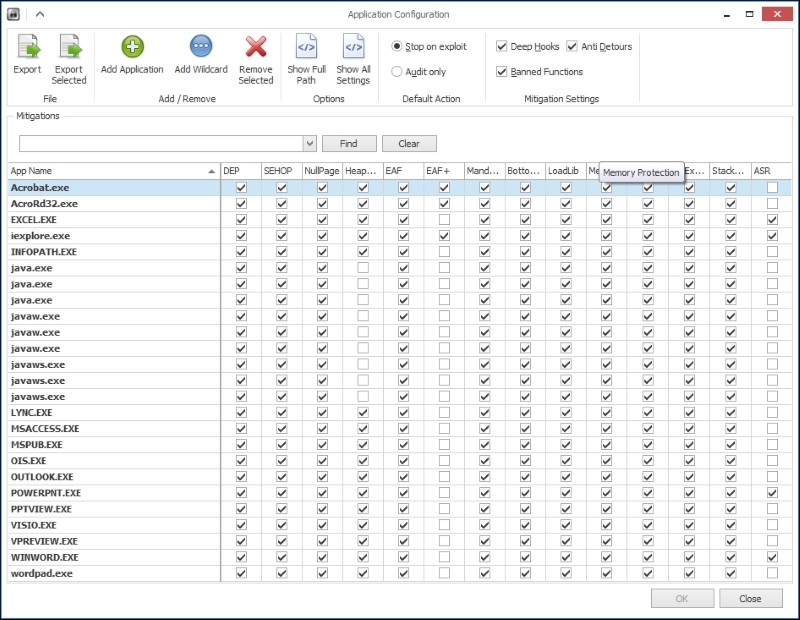
EMET 5.2 application protection settings
Now, we can proceed with installing a host-based intrusion prevention system.
Like EMET, we need a HIPS and antivirus mostly for evasion testing purposes and for advanced attacks or research scenarios. You can choose any of the popular software and the more solutions you have in the lab, the better it is because it will allow you to test your payloads and evasion techniques against a wider range of detection and protection tools. This will give you a better chance of a successful attack.
Tip
Normally, it is not recommended to install a lot of security solutions of one type from different vendors as they can conflict and cause system instability. In our example, we have tested the proposed solution, but if you want to do the same thing with other software, we recommend you test it properly.
For demonstration purposes, it will be enough to install just one solution, and preferably it should be free. We have chosen Comodo Internet Security 2015.
Comodo Internet Security (IS) is a solution that combines antivirus, firewall, and auto-sandbox software and has a free version available at Comodo's website. The steps are as follows:
- The installation process is also simple, as in the case of EMET. But it has some peculiarities. You should not miss the small link Customize Installation in the bottom-left corner of the second installation dialog:
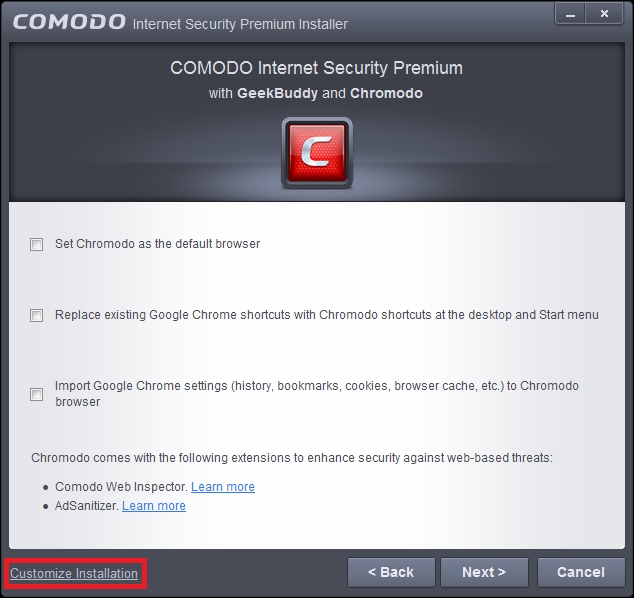
Accessing the Comodo IS installation customization dialog
- For our purposes, we don't need the GeekBuddy component or the Chromodo browser, so just uncheck the corresponding checkboxes:

Choosing Comodo IS components to install
- We also do not want Comodo to change our DNS settings, so uncheck the appropriate checkbox on the next dialog too. It is up to you to decide if you want to help Comodo by setting Yahoo! as the default search engine. However, in the case of a lab workstation, it will not help Comodo anyhow so we uncheck the option:

Comodo IS installation customization
- Finish the installation and restart the workstation.
- Comodo Internet Security 2015 is installed and working now. The last thing left to do is to create a snapshot of the VM state:
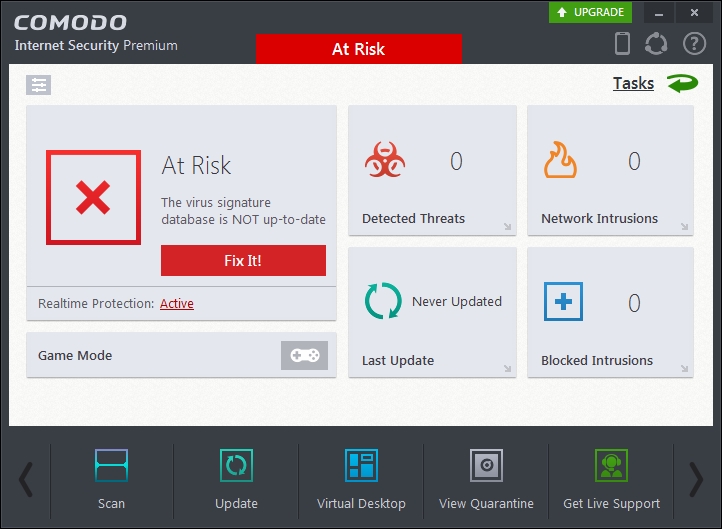
Comodo IS main window
Web application firewall is a class of security solutions that is dedicated to protecting web applications by inspecting HTTP/S requests and responses and taking various actions based on special patterns (rules). Those actions can be blocking or logging or some more complicated actions can be taken.
When talking about free web application firewalls, the first one that comes to our mind is definitely ModSecurity. To better explain what is it, we are going to quote the description from the official ModSecurity website (https://www.modsecurity.org/):
"ModSecurity is an open source, cross-platform web application firewall (WAF) module. Known as the "Swiss Army Knife" of WAFs, it enables web application defenders to gain visibility into HTTP(S) traffic and provides a power rules language and API to implement advanced protections."
We think we will not be wrong if we say that it is the most popular free web application firewall in the world and we would like to show you how to prepare it for lab usage on our web server. So, let's start.
First, we should install ModSecurity. There are several ways to install ModSecurity, but the fastest and the easiest one in our case is installing it from the Ubuntu package repository using Advanced Packaging Tool (APT). Log in to the web server and run the following commands:
sudo apt-get update
sudo apt-get install libapache2-modsecurity
To check whether ModSecurity was successfully installed and loaded, you can use the apachectl utility with the option -M and grep:
sudo apachectl -M|gerp security
You should see something similar to security2_module (shared), which indicates that ModSecurity was successfully integrated to Apache.
ModSecurity keeps its configs in the /etc/modsecurity/ directory and it is distributed with a sample of predefined rules and configs. The default configuration file is modsecurity.conf-recommended. It is a good idea to keep a backup of that file so that we will create a copy that will serve as a working config:
sudo cp /etc/modsecurity/modsecurity.conf-recommended /etc/modesecurity/modsecurity.conf
After that, we need to restart Apache web server in order to make it load with the new ModSecurity config:
sudo service apache2 restart
ModSecurity can work as an intrusion detection system and as an intrusion prevention system. When working in the detection mode, ModSecurity just logs activities that were determined as malicious according to a current rule set. In the prevention mode, it can actually block attacks.
The mode settings (as well as a lot of other ModSecurity settings) can be changed in /etc/modsecurity/modsecurity.conf.
For initial web hacking training, you probably don't want your attacks to be blocked, and in this case you can leave ModSecurity in an IDS mode (detection mode), leaving the SecRuleEngine option with the following value:
SecRuleEngine DetectionOnly
This will allow you to practice various attacks without any interference from the WAF. At the same time, it allows you to understand how WAF works with a current rule set by inspecting its logs.
When you want to practice advanced attacks with WAF evasion techniques, you can switch WAF into the prevention mode by changing the value of the SecRuleEngine option to On:
SecRuleEngine On
There is also another interesting configuration option that is important in case of limited processing resources on VMs: SecResponseBodyAccess. This option enables and disables server response body inspection, which does not makes a lot of sense in a lab environment unless you need it for specific tasks. It also consumes additional processing resources that can slow down the server a bit. Our recommendation is to turn the response body inspection off in the meantime and turn it on when it is really necessary. The feature is turned on by default:
SecResponseBodyAccess On
We need to change it:
SecResponseBodyAccess Off
To make use of ModSecurity, it should have rules set, according to which it will inspect requests (and/or responses). There is a predefined rule set distributed with ModSecurity and called Core Rule Set (CRS). You can find it in /usr/share/modsecurity-crs/. To activate the rule set, we need to explicitly include their directories in Apache's configuration in the file /etc/apache2/mods-enabled/mod-security.conf file and create symlinks to the rules that we would like to activate in /usr/share/modsecurity-crs/activated_rules/:
- Open the
/etc/apache2/mods-enabled/security2.conffile in the editor and put the following lines in the<IfModule security2_module> </IfModule>section:Include "/usr/share/modsecurity-crs/*.conf" Include "/usr/share/modsecurity-crs/activated_rules/*.conf"
- Create symlinks in
/usr/share/modsecurity-crs/activated_rules/. Go to the directory and execute the following commands:ln –s ../base_rules/modsecurity_40_generic_attacks.data ln –s ../base_rules/modsecurity_crs_40_generic_attacks.conf ln –s ../base_rules/modsecurity_crs_41_xss_attacks.conf ln –s ../base_rules/modsecurity_crs_41_sql_injeciton_attacks.conf
- Reload the Apache service for the changes to take effect:
sudo service apache2 reload
Now the configuration phase is finished, we need to check if ModSecurity works and detects malicious requests. Let's use DVWA for that. Open a browser on another machine and navigate to http://10.0.0.5/dvwa/login.php. Enter an obvious SQL injection pattern in the username field, for example:
user' or 1=1 --
Click on the Login button or just hit Enter. Go back to the web server and check the content of the ModSecurity's log:
sudo cat /var/log/apache2/modsec_audit.log
The log should contain an alert indicating that the request matched a pattern from the SQL injection rule set:
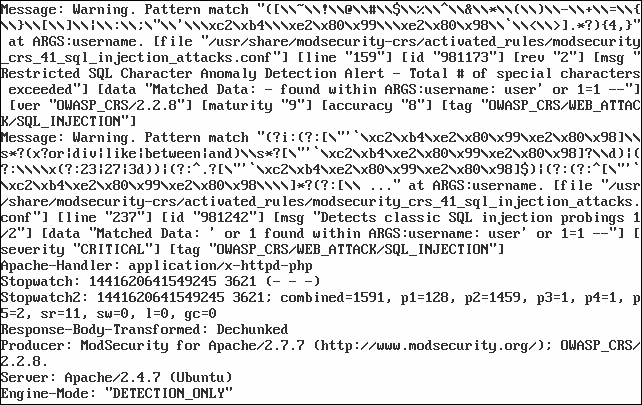
ModSecurity has detected an SQL injection
So, we have protected workstations based on the Windows operating system from virus threats. Now, it's time to protect our Linux servers and e-mail services from malicious code.
To build a multi-tier protection, we must protect not only Windows platform hosts, but also Linux servers, as well as transfer and store file services. So, we create automatic scans for viruses for all incoming and outgoing e-mail messages.
For this purpose, as an antivirus solution, we consider ClamAV. ClamAV is antivirus software that runs on many operating systems, including Unix-like OSes, OpenVMS, Microsoft Windows, and Apple Mac OS X. ClamAV is produced under the GNU General Public License and is a free software.
The main objective of ClamAV is integration with e-mail servers to verify the files attached to messages. The package includes a scalable multi-threaded daemon clamd, which is controlled from the command line scanner clamscan, as well as a module signature that updates via the Internet freshclam.
Some of the ClamAV features are as follows:
- Command-line management
- Can be used with most e-mail servers, including the implementation of milter-interface with Sendmail
- Scanner implemented as a C library
- Scanning files and e-mail on the fly
- Definition of over 850,000 viruses, worms, Trojans, and phishing messages
- Analysis of compressed files
- Support for scanning mbox, Maildir, and raw mail files
- Analysis file formats, such as portable executable, packed UPX, FSG, and Petite
Well, let's start with solution's installation. For obtaining the ClamAV distribution package, please visit the manufacturer's website http://www.clamav.net/download.html. Or, as in our case, you can use built-in operating system tools. Since we are using the Ubuntu Linux operating system 14.04.3, we just run following command in the console on behalf of the root user:
apt-get clamav clamav-daemon
If you prefer to use a normal user, you can execute following command:
sudo apt-get clamav clamav-daemon
After this, we will have a working instance of ClamAV. To start or stop the service, you can use the built-in tools of your operating system.
In the next step, we need to reconfigure ClamAV so that the ClamAV daemon uses TCP connections instead of a local Unix socket. For this, just execute the following command:
dpkg-reconfigure clamav-base
This command will start a configuration wizard. Let's leave all the answers at the default values, except for the following:
- Socket type (set it to
TCPinstead ofUnix) - The TCP port
clamdwill listen on (you can set your own TCP port address for listening to incoming messages, but we recommend you leave it as3310) - The IP address
clamdwill listen on (here, we should set the IP address of the used network interface, but you can also set it as any)
You can check or clarify your configuration of ClamAV by editing the configuration file /etc/clamav/clamd.conf.
After the reconfiguration process is completed, we need to restart the ClamAV daemon:
/etc/init.d/clamav-daemon restart
Next, we should update the database. For this, we need to execute the following command:
freshclam
We have installed the antivirus solution and updated the database. Now we need to check how it works. For example, to check a directory, run the following command:
clamscan -r /
This command will check the entire filesystem if it is necessary to check any particular directory; instead of /, specify the directory name. To check a suspicious file, just type clamscan FILENAME. Let's check our antivirus with an EICAR (European Institute for Computer Antivirus Research) test file. It is a standard file that is used to check whether the antivirus and inherently is not a virus. You can get this file at http://www.eicar.org/download/eicar.com.txt.
The next screenshot shows the output of ClamAV:
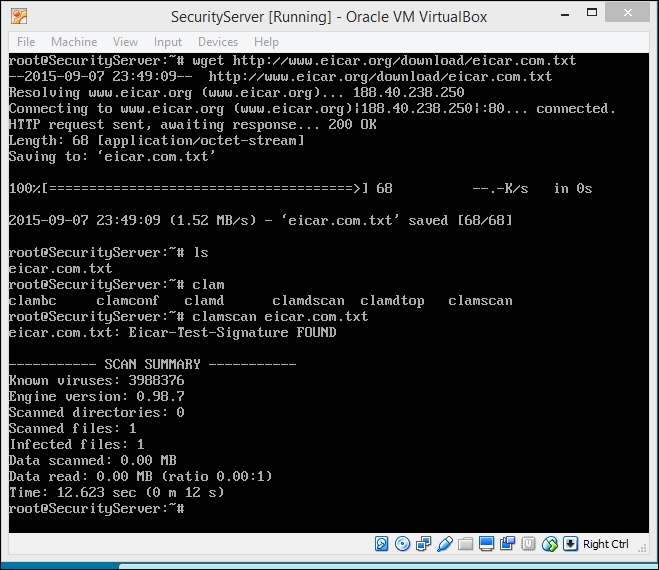
The ClamAV output
Next, we need to check the open port for connecting third-party applications. It's enough to execute the following command:
netstat -antp | grep clamd
tcp           0       0 0.0.0.0:3310        0.0.0.0:*        LISTEN       9917/clamd
tcp6          0       0 :::3310             :::0:*           LISTEN       9917/clamd
After checking that it works, let's make sure that our mail server scans all messages for viruses. To do this, perform the following steps:
- Run the management console of hMailServer and go to Settings | Anti-virus. In the right-hand pane, go to the General tab to determine what to do with infected messages:

hMailServer settings
- On the ClamAV tab, we should set connection options for the ClamAV server:
- Hostname (
10.0.0.107) - TCP/IP port (
3310)
- Hostname (
- To check the connection, click on the Test… button:
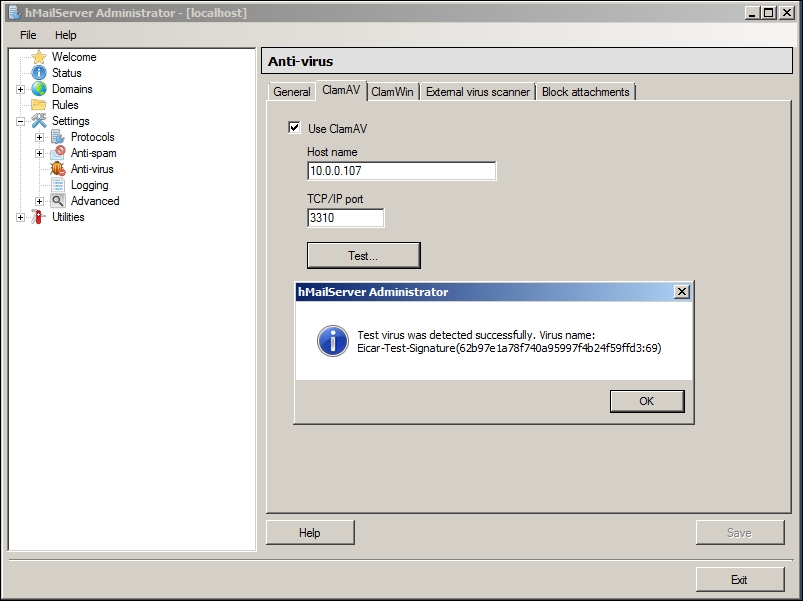
hMailServer settings
Now all the traffic of the lab.local e-mail accounts is scanning on the ClamAV server.
We have already set up a network intrusion detection system and HIPS for Windows hosts. Let's now consider another option for Linux platform hosts.
OSSEC (http://ossec.github.io/) is a host system intrusion detection system (HIDS), and it is free and open source. It conducts analysis of system logs, integrity checking, monitoring the registry of Windows, rootkit detection, and alerting at a particular time and event. It provides the function of intrusion detection for most operating systems, including Linux, BSD-like, Mac OS, Solaris, and Windows. Its cross-platform architecture makes it easy to manage and monitor for multiple operating systems.
OSSEC consists of a main application (server), agents, and the web management interface.
Well, let's start with OSSEC by installing it in our infrastructure. First of all, we need to satisfy some requirements. OSSEC requires gcc, libc, and apache with php5 support. For this, we should execute the following commands:
apt-get install build-essential
apt-get install apache2 apache2-utils libapache2-mod-php5
Next, we need to obtain OSSEC. For this purpose, we should execute the following commands:
git clone https://github.com/ossec/ossec-hids
git clone https://github.com/ossec/ossec-wui
Now that we have installation packages, let's install them using the following command:
cd ossec-hids/
./install.sh
It starts a wizard with a few questions that we should answer. The most important question is about the type of installation. Here, we should create two different types of installation: for agents and for the server.
Next, let's install the web part of OSSEC. Move the ossec-wui directory to the folder where it can be accessed by the web server:
mv ossec-wui* /var/www/htdocs/ossec-wui
Then, execute the setup script:
cd /var/www/htdocs/ossec-wui
./setup.sh
The wizard will start, so we should answer questions such as login and password to gain access to the web interface of OSSEC.
OSSEC stores all the files in /var/ossec. Let's open the /var/ossec/ossec.conf file and give it the form we need. Here, we set sending alerts to e-mail by selecting the server address, mailing address, and the maximum possible number of messages per hour.
Then, there is a block of rules that describes what and how OSSEC will react.
The syscheck section sets the integrity check. Its meaning lies in the fact that the system calculates a hash of each file in the specified directory and checks them periodically. Here, we set what we will monitor in a directory and how long it will be checked for. The section describes the command scripts that can be used by the system under certain conditions.
In the end, we set log files that need to be analyzed and compared with the rules.
Now, the coarse settings of the OSSEC server are finished and we can run it:
service ossec-hids start
If successful, you will receive an e-mail with a message on startup in the mailing address.
After this, we need to add the user account of the web server (www-data) to the OSSEC group. Open the /etc/group file in editor:
nano /etc/group
Find the line ossec:x:1002 and change it to ossec:x:1002:www-data.
After that, we need to set permissions for the tmp directory of our OSSEC instance and restart Apache service.
chmod 770 tmp/
chgrp www-data tmp/
apachectl restart
Now we can access the OSSEC web interface using the following link: http://localhost/ossec-wui/.
Let's install an OSSEC agent from the same distribution. We choose the agent mode in the wizard. For the question "What's the IP Address or hostname of the OSSEC HIDS server?" we input the IP address of our OSSEC server. Now, we need to associate the OSSEC agent with our server. For this, we should go to the server and launch the manager working with the agents:
/var/ossec/bin/manage_agents
In the interactive mode, we need to perform the following steps:
- Select A to add an agent (A).
- Write the name of our agent.
- Specify the IP address of our agent.
- Choose an agent ID. We can leave the ID that OSSEC suggests.
- "Confirm adding it? (Y / n)" Answer with y.
- Then, select the E key to extract an agent.
- Specify the ID of our new agent.
- Copy the base64 string and press Enter.
- Select the Q output from the manager to work with agents.
Restart the server for the successful addition of the agent:
/etc/init.d/ossec restart
Then, let's go to our agent and go in the manager working with the agents:
/var/ossec/bin/manage_agents
In the interactive mode, we need to perform the following steps:
- Select the I key to import from the server to add a key that we copied.
- Insert the key, add the agent, and exit.
/etc/init.d/ossec start
It should come in the mail notification that a new agent is connected. Go to the server to check whether the agent is connected:
/var/ossec/bin/agent_control -l
Here, we will see the list of our agents with the status Active. Also, /var/ossec/logs/alerts.alerts.log should have an event like that.
So the OSSEC agent is connected. Now, we can see our agent in the web interface.
Note
If you want to learn more about OSSEC, the official documentation is available at http://ossec.github.io/docs/.