
All that's written in the preceding sections is interesting for people who want to have a "clean" penetration testing platform with only the tools they have chosen and installed. But in the most cases, it is not necessary and we would say is often not worth the time you can spend on it. The convenient solution in this case is using a prepared penetration testing distribution. We have already mentioned it in the beginning of the chapter when we talked about a VM, but let's review the process of creating a bootable penetration testing USB stick.
In our example, we will show you how to create a bootable USB stick with the Kali 2.0 penetration testing distribution on both Windows and Linux systems. If you want to do it quickly and you don't want additional complexity on your USB stick, we would recommend creating it under Windows. But if you want to create a persistent encrypted USB stick, you will need to use Linux and do everything manually. We recommend this because the software that we use for image recording under Windows creates only one partition on a USB drive, and you'll need to have three partitions in the case of a bootable USB with encrypted persistent storage.
Let's start with the simplest option and create a non-persistent USB stick under Windows.
We are going to use the Universal USB Installer (UUI) software (http://www.pendrivelinux.com/universal-usb-installer-easy-as-1-2-3/) for image recording. We assume you have already downloaded the latest version of the Kali Linux 2.0 image from the official website and started UUI. The process is very simple:
- Choose the desired Linux distribution from the drop-down menu, as it is shown in the following screenshot:

Creating a bootable Kali USB stick
- Choose the OS image file you want to record.
- Choose the target USB disk from the drop-down menu. If it does not show your USB drive in the drop-down menu, set the Show all drives checkbox and it will show all system-available drives.
- Select the option to format the USB drive before recording and click on Create. Your settings should look like this:
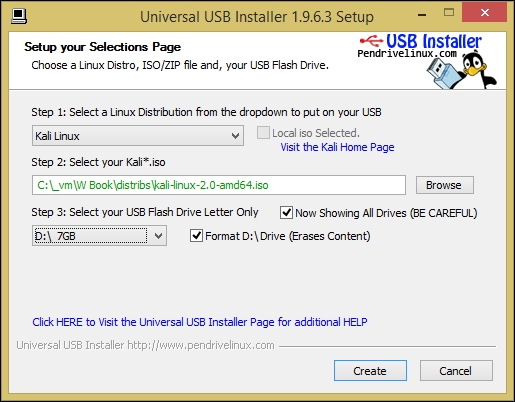
Final UUI settings for Kali USB stick image recording
- The software will show you the summary of what it is going to do and will ask you again if you agree with it.
- Agree and wait until the recording process is finished.
- Enjoy your bootable Kali Linux 2.0 USB stick.
Note
Alternatively, you can use Win32 Disk Imager to write bootable images to a USB stick or a disk. You can download the software from https://sourceforge.net/projects/win32diskimager/.
If you decide that you want to have an encrypted persistent USB stick or you just use Linux and not Windows normally, we will show you how to create a Kali USB stick under this system. You can also use a Linux VM with a USB forwarding feature on Windows if you don't have Linux installed as a host system.
We have downloaded a Kali image file called kali-linux-2.0-amd64.iso and if yours has the same name, you can leave it like that in the following guide. But if it has a different name, make sure to replace it in the commands you enter. The steps are as follows:
- Insert a USB drive or attach it to a VM. Find out the device name of the USB stick with
fdisk -l(usesudoif necessary). In our case, it is/dev/sdb. - Use the cloning
ddcommand in Linux to copy the image to the USB drive:dd if=kali-linux-2.0-amd64.iso of=/dev/sdb bs=512k - Wait until the image is fully copied to the USB drive. Depending on your software and hardware setup, it can take some time. In our case (using a VirtualBox VM with only USB 1.0 support), it took almost 20 minutes.
- When the process is finished, you will see a summary of how many bytes were copied and how much time it took. The image recording is finished at this point.
- You can run
fdisk -lagain to check the partitions on the USB drive. There should be two partitions:
Information about partitions on a bootable Kali USB stick
Now, you can boot from your newly created Kali Linux 2.0 USB stick using any laptop; this is especially convenient if you travel a lot.
Having a bootable Kali USB stick is convenient, but it has a big disadvantage: you cannot save anything in the system to keep after a reboot. Even system settings will be reset to default every time you reboot. It is especially awkward when you need to save project data in order to process it later on another computer, for example, crack hashes at a special powerful cracking server. In this subtopic, we are going to fix this issue and make our USB drive able to store our data. The manual is based on an official manual from the Kali Linux team, but we think some additional comments will help you.
Keeping in mind the fact that ethical hackers almost always work with sensitive customer data that has to be treated carefully, and USB drive is a small thing that is easy to lose, we will also secure it with encryption against unauthorized reading using Cryptsetup software. The idea is not to encrypt the whole USB stick, but to create an additional partition on it where you will keep your data persistent and encrypted.
If you have used a USB drive larger than 4 GB, there should be some unallocated space left after recording the Kali image on it. We will use this space for our persistent partition. The steps are as follows (we will continue doing it on a Kali Linux VM):
- Insert the USB drive and check the partitions with
fdisk -l. - Get the space occupied by Kali image in bytes (it is 3,167 in our case):
du -bcm kali-linux-2.0-amd64.iso - Create the third partition on the USB drive starting right after Kali image (use your Kali image size value):
parted /dev/sdb mkpart primary 3167 7gbSay Yes if parted offers you another allocation and ignore the following warning. The process should look like the following screenshot:

The partition creation process
- Check the partitions again with
fdisk -land you should see the new one (/dev/sdb3in our case). - Prepare a strong password and then continue encrypting the new partition with the
cryptsetupsoftware. The following prompt can be seen on the screen, and install it if you don't have it yet (sudo apt-get install cryptsetup-bin):cryptsetup --verbose --verify-passphrase luksFormat /dev/sdb3 - Open the new partition with the mapping name
kali_stor:cryptsetup luksOpen /dev/sdb3 kali_stor - Then, build a filesystem labeled
persistenceon the new partition. The filesystem type should beext3(this process can also take several minutes):mkfs.ext3 -L persistence /dev/mapper/kali_stor && e2label /dev/mapper/kali_stor persistence - Then, you need to mount the new filesystem. However, to be able to do it, first you need to create a mount point in
/mnt/:mkdir -p /mnt/kali_stor && mount /dev/mapper/kali_stor /mnt/kali_stor - Now, create a
persistence.conffile in/mnt/kali_storwith the content/ union:echo "/ union" > /mnt/kali_stor/persistence.conf - Finally, you can unmount the storage and encrypt it (close):
umount /dev/mapper/kali_stor && cryptsetup luksClose /dev/mapper/kali_stor - Let's check the persistent storage. Unplug the USB drive from the Linux machine and boot from it. When you boot, choose the Live USB Encrypted Persistence boot option and enter your encryption passphrase when prompted:

Kali Linux 2.0 USB stick boot menu
- When Kali starts, create a file on the desktop with random content and reboot. The file should still be there after reboot, which means persistence works well.