
In Chapter 3, Exploration and Combat, we created a character class info for learned abilities, which was done in FCharacterClassInfo.h, which is an array used to hold an array of abilities for each character that inherits a class. We need to extend this array so that it is adopted by any game character to hold abilities that they learn throughout the game. To do this, open GameCharacter.h by navigating to Source | RPG. In class RPG_API UGameCharacter : public UObject, add a public UPROPERTY to learned abilities and allow it to be editable anywhere:
UPROPERTY(EditAnywhere, BlueprintReadWrite, Category = CharacterInfo)
  TArray<FString> LearnedAbilities;
Next, open GameCharacter.cpp located in the same folder, and set LearnedAbilities to be equal to LearnedAbilities from the class info that we created the variable in:
character->LearnedAbilities = character->ClassInfo->LearnedAbilities;
This will allow each instance of a party member to hold its own LearnedAbilities array that we can now edit either in code or in Blueprint. Your game character will now look like this:
UGameCharacter* UGameCharacter::CreateGameCharacter( FCharacterInfo* characterInfo, UObject* outer )
{
  UGameCharacter* character = NewObject<UGameCharacter>( outer );

  // locate character classes asset
  UDataTable* characterClasses = Cast<UDataTable>( StaticLoadObject( UDataTable::StaticClass(), NULL, TEXT( "DataTable'/Game/Data/CharacterClasses.CharacterClasses'" ) ) );

  if( characterClasses == NULL )
  {
    UE_LOG( LogTemp, Error, TEXT( "Character classes datatable not found!" ) );
  }
  else
  {
    character->CharacterName = characterInfo->Character_Name;

    FCharacterClassInfo* row = characterClasses->FindRow<FCharacterClassInfo>( *( characterInfo->Class_ID ), TEXT( "LookupCharacterClass" ) );

    character->ClassInfo = row;

    character->MHP = character->ClassInfo->StartMHP;
    character->MMP = character->ClassInfo->StartMMP;
    character->HP = character->MHP;
    character->MP = character->MMP;

    character->ATK = character->ClassInfo->StartATK;
    character->DEF = character->ClassInfo->StartDEF;
    character->LUCK = character->ClassInfo->StartLuck;

    character->XP = character->ClassInfo->XP;

    character->MXP = character->ClassInfo->MXP;
    character->Lvl = character->ClassInfo->Lvl;
    character->LearnedAbilities = character->ClassInfo->LearnedAbilities;
    character->isPlayer = true;
  }

  return character;
}
Once done, compile and restart the editor. We can now create a spot in our game where we can hold and use abilities. In this game, we will choose to use abilities in battle only, but if you want to use abilities elsewhere, for example, outside battle, you can easily accomplish this by following similar steps. Since we will be applying abilities in battle, let's add a new abilities button to our combat interface. In the editor, navigate to Content | Blueprints | UI, and open the CombatUI Widget Blueprint.
In the Designer view, create a Combo Box that will allow us to have a drop-down menu with multiple entries, which we will use to hold and select our abilities, and place them in the characterActions Canvas Panel:

Resize the Combo Box to the same size as that of the Attack button, and place it in alignment with the Attack button:

Lastly, rename the Combo Box to fit to the elements that will be contained in the Combo Box. We can name this ComboBoxString_Abilities, and check Is Variable:

Now that we have a Combo Box that can hold abilities, it is now time to populate the Combo Box with appropriate abilities. Open the CombatUI Event Graph. Since we are concerned with having the correct abilities that are accessible during battle, it would be best to populate the Combo Box with abilities as soon as the CombatUI is created. To do this, create an Event Construct by navigating to Add Event | User Interface:
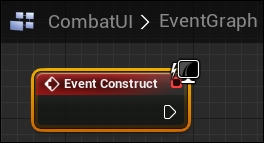
Connect the Event Construct to Cast To RPGGameInstance, which will get all the party members, so that we can get and set the proper abilities:

What we can do here is set an ability for one of the party members (in this case, the soldier) by getting an index 0 of the Party Members Array. We will give the Soldier an ability called Attack x2 if the Soldier has reached level 2. To do this, we will get the current level of the target using the Lvl variable and compare it with the integer 2 using the CompareInt macro:

If the Lvl variable is more than or equal to 2, we can set the first element of the LearnedAbilities array to Attack x2:

After we have populated the array with the new Attack x2 ability, we can now populate the Combo Box with every ability that we have by simply executing a ForEachLoop and cycling through every element of the array, and adding it to the Combo Box using the Add Option function by navigating to Combo Box | Add Option:

This is a very simple way to add combat abilities to an abilities drop-down menu in accordance with party member levels. If you want to create more abilities, all you need to do is simply compare your level with another level using the CompareInt, and you can add more abilities to the LearnedAbilities array. If you end up having additional characters in the game, it is best to create a new Combo Box for each party member, get that party member from whichever index they are in the Party Members array, and then add abilities to their own LearnedAbilities array like we did with the Soldier.
You should now be able to test this and see that when the player presses the Combo Box, Attack x2 will appear if the Soldier party member hits level 2:
