
Now, we will need to pick a good spot to cast RPGGameInstance. It would be best to cast RPGGameInstance after the pause menu has been created, so link the out pin of the Set Show MouseCursor node to the in pin of the Cast To RPGGameInstance. Then, link the Return Value of the Create Pause_Main Widget to the Target of Set Character Target. When you are finished, your EventGraph under FieldPlayer will look like this:

When you are finished, you will see that the HP of the soldier is displayed correctly as the current HP:

You can now add the remaining soldier stats to Text Blocks in Pause_Main from the pause menu by binding functions and then have these functions return values, such as the character target's MP and name. When you are finished with your soldier character, your Pause_Main should look something like this:

Note
We do not yet have levels or experience, we will cover levels and experience in a later chapter.
If you have any other characters, make sure that you add them as well. As mentioned earlier, if you have additional characters in your party, you will need to go back to your FieldPlayer Event Graph and create another GET function that will get the indexes of your other party members and assign them to new Character Targets.
Let's now head back into the Pause_Inventory widget and bind character stats to their corresponding Text Blocks. Just like in Pause_Main, select a Text Block that you want to bind; in this case, we will grab the Text Block to the right of HP:

Then, simply create a binding for the Text Block, as you did for other Text Blocks. This will, of course, create a binding for a new function that we will return the HP status of the Character Target. The issue is that the Character Target that we created in Pause_Main is a Game Character variable local to Pause_Main, so we will have to recreate the Character Target variable in Pause_Inventory. Luckily, the steps are the same as they were; we just need to add a new variable and name it Character Target, and then make its type an object reference to Game Character:

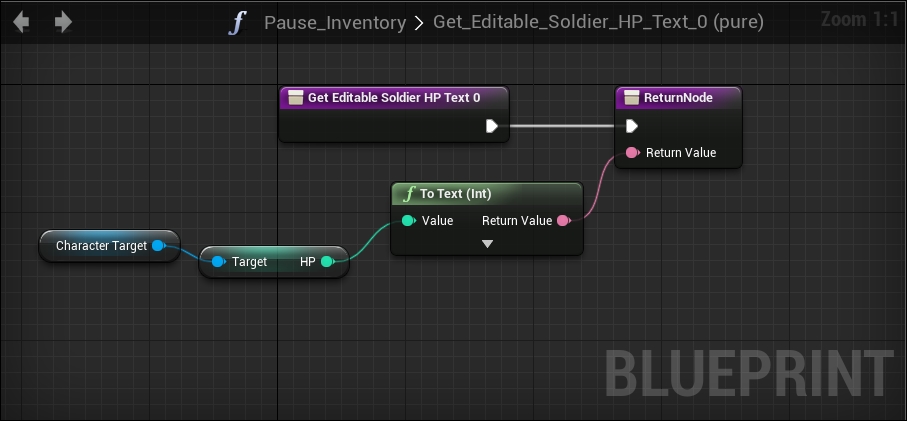
When you are finished, add the Character Target variable as a getter, link the Character Target variable to get the HP of your character, and link that value to Return Value of your ReturnNode, just like you did previously. You should have an Event Graph that looks pretty similar to the following screenshot:
If you were to test the inventory screen at this point, you would see that the HP value would be 0, but do not panic, you don't need to do much critical thinking to correct the value now that FieldPlayer has a general framework for our characters. If you remember, when we cast RPGGameInstance after creating the Pause_Main widget in the FieldPlayer class, we pulled our added party members from our game instance and set it to Character Target in Pause_Main. We need to perform steps similar to these, but instead of beginning the retrieval of party members in FieldPlayer, we must do it in the class in which we created the Pause_Inventory, which was created in Pause_Main. So, navigate to the Event Graph of the Pause_Main widget:

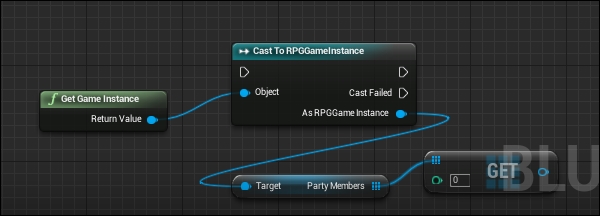
In the preceding screenshot, we see that we are creating both the Pause_Inventory and Pause_Equipment widgets by clicking on their respective buttons. When the screens are created, we remove the current viewport. This is a perfect spot to create our RPGGameInstance. So, as mentioned in the previous steps, create a Get Game Instance, which is located under Game. Then, set the return value to Cast to RPGGameInstance by going to Utilities | Casting, which will then reference the Party Members array located at Game Data under Variables. Here, you will use the Get function by going to Utilities | Array, and link it to the Party Members array, pulling index 0. This is what you should have done, and so far, the steps are identical to what you did in the FieldPlayer:
The differences set in when you set the Character Target. As mentioned earlier, we will set the Character Target variable of our newly created Character Target variable to Pause_Inventory:

Once this is done, link the out pin of Cast To RPGGameInstance to the in pin of Set Character Target. Also, link Get to Character Target:

Lastly, link the out pin of Add to Viewport coming from Pause_Inventory to the in pin of Cast To RPGGameInstance to trigger the retrieval of the character stats, and link the Return Value of the Create Pause_Inventory Widget to Target of Set Character Target:

At this point, if you test the inventory screen, you will notice that the HP value is being displayed properly:

Now that you know how to create references to party members from Pause_Main, you can follow the same steps to set each party member as a character target in Pause_Inventory. But first, we need to complete all of the stat value displays in Pause_Inventory by creating bindings in each stat's respective Text Block and setting the Return Value of each Text Block to the value retrieved from Character Target.
Once you are finished with the soldier in your Pause_Inventory, you will see something that looks like this:

At this point, you can easily navigate back to Pause_Equipment, create a new Character Target variable, then set a Party Members to the Character Target variable on displaying Pause_Equipment in Pause_Main, just like you did in Pause_Inventory. The Inventory and Equipment buttons in the Pause_Main Event Graph should look something like this when you are done:

In the Pause_Equipment widget, we can only bind the AP, DP, Lk, and Name Text Blocks, as we will be leaving the weapons for later. If you bind these Text Blocks with the newly created Character Target in exactly the same way you bound the Pause_Inventory Text Blocks, your Equipment screen will look like this on testing:

At this point, we have finished binding character stats to our pause menu screens for now.