
P A R T 1
![]()
Setup and Basics
C H A P T E R 1
![]()
Checking Your Gear for Departure
Making Sure Your Setup Is in Order
Before we start our journey, we need to make sure we have our gear in order. First, we are going to set up a common development environment in which we can experiment. This ensures that the results we get are the same and that we can explore the same files.
Second, I will introduce you to some very nice tools that will help speed up and improve your development experience. Although many such tools are available, I have found the tools I mention in this chapter to be a very valuable addition to my setup. And, best of all, they are all free.
Finally, I'll suggest a site setup that includes all the basic site definitions that ship with Windows SharePoint Service (WSS). Following this setup is important if you want to make sure you see the same results as shown in this book. I have used this site setup for all the screenshots throughout the book.
Setting Up Your Environment
Your development machine needs to run Windows Server 2003 R2. I know people would really like to develop on Windows XP, but unfortunately, until pigs fly there will be no official Share-Point support on Windows XP. And, since the wonderful object model works only locally, we actually need to also run Visual Studio on that server.
Most of us, however, have Windows XP running on our workstations, and very few of us walk around with a server under our arm. We also know that developing on a server is usually a bad idea since, well, we tend to make mistakes, and taking down a server is a bit more serious than rebooting a laptop.
I have read a lot of blogs by people cursing Microsoft for making it so difficult to develop for SharePoint, but more often than not, these arguments are based on laziness rather than an actual problem. People have developed and recommended different techniques for circumventing the server requirement, but I have a better suggestion, one that not only saves you time and frustration but also gives you a lot of added benefit.
I run all my development on virtual machines. With advances in virtual machine technology, running an isolated machine to do development work is easier than ever. And Windows Server 2003 runs quite comfortably on a gigabyte of RAM, and with cheaper and cheaper RAM prices, most people should be able to upgrade to an extra gigabyte or two to save their laptop from undue reinstalls and general messiness.
Using an isolated virtual machine with Windows Server 2003 and Visual Studio has monumental benefits to us as developers. We can tailor a single virtual machine for each development project and just offload the different virtual machines to an external hard drive when we do not need them. If we wreck our setup, snapshots make it easy to restore a previous state without needing to reinstall and set up from scratch. With some virtual machine software, we can take multiple snapshots and snapshot branches so that we can jump back and forth between different setups in a, well, snap. We can even take a snapshot before a particularly dangerous operation, and if everything blows up, it will take just seconds to get back to the predisaster state.
Besides, Microsoft now gives us all the software we need free of charge. If you do not have an MSDN subscription, you can easily download evaluation or Express versions of Windows Server 2003, Visual Studio 2008, SharePoint Designer, and Microsoft Virtual PC.
So yes, you need Windows Server 2003. Yes, you need to run Visual Studio on that server. No, that is not a bad idea, a bad development experience, or even the slightest bit of a problem. If you haven't done so already, you should now set up that server and install Visual Studio and SharePoint Designer.
![]() Tip If you have problems installing and setting up a server machine, Microsoft provides preinstalled virtual machine VHD images for you to download at
Tip If you have problems installing and setting up a server machine, Microsoft provides preinstalled virtual machine VHD images for you to download at http://www.understandingsharepoint.com/url/10029.
![]() Tip Have an external storage location available for storing your project files. That way, a snapshot restore will not delete the files that you worked so hard to create. For instance, you can use a USB key, an external hard drive, a share on your host machine, or, if your virtual machine software supports it, a static or an independent virtual drive. Put your project files, for example, from Visual Studio, on that external storage location, and if by chance your virtual machine is destroyed, you still retain all your hard work.
Tip Have an external storage location available for storing your project files. That way, a snapshot restore will not delete the files that you worked so hard to create. For instance, you can use a USB key, an external hard drive, a share on your host machine, or, if your virtual machine software supports it, a static or an independent virtual drive. Put your project files, for example, from Visual Studio, on that external storage location, and if by chance your virtual machine is destroyed, you still retain all your hard work.
Your first objective is to configure Visual Studio so it will recognize the CAML code we want to explore. Although not strictly necessary for this part of the book because we will mostly be looking and not touching, I find it useful to have IntelliSense so that I can check the syntax and subelements of a particular XML element. If you prefer another XML editor, feel free to figure out how to configure similar functionality if you like.
To configure Visual Studio 2005 to automatically recognize well-formatted CAML files, you need to create an XML file in the C:Program FilesMicrosoft Visual Studio 8Xml Schemas folder. You can call the file anything you like, for instance SPCAML.xml. Next, paste the following code into that file:
<schemacatalog xmlns="http://schemas.microsoft.com/xsd/catalog">

   <Schemahref="C:/Program Files/Common Files/Microsoft Shared/web server

extensions/12/TEMPLATE/XML/wss.xsd"

     targetNamespace="http://schemas.microsoft.com/sharepoint/" />

</schemacatalog>
We're telling Visual Studio that our file is a schema catalog and then pointing a particular schema, the WSS schema file specified in Schemahref, to a particular namespace, as specified in the targetNamespace attribute. Effectively, this means that when Visual Studio encounters an XML file with that namespace, it will automatically use the specified WSP schema file and give us IntelliSense.
This will get you far with your own files, but unfortunately, Microsoft doesn't always use this namespace in its files. If you open any of the built-in WSS CAML files, such as an onet.xml file, your IntelliSense will not work. To fix this, you can manually set the schema to be used by opening the XML file in Visual Studio and setting the proper schema file in the Schemas property. Just browse to the address listed in the Schemahref element listed previously, and you should get IntelliSense to work.
![]() Tip You can use the same technique described earlier to create schema catalogs for your own, custom XML files if you have an XSD schema file that you would like to use.
Tip You can use the same technique described earlier to create schema catalogs for your own, custom XML files if you have an XSD schema file that you would like to use.
You should consider creating some test users so that you can explore how the user experience is for different kinds of users. One of the most common reasons why projects have problems in production that were not seen during development is that developers love doing their work as administrators. This is a good thing and even a requirement when you need to do things such as deploying assemblies, updating web.config files, or creating files in the [12] structure, which are impossible to do if you are a normal user. However, testing your solution using different user accounts will help prevent problems that are not seen if you are running as an administrator, and it also helps cool down our bloated developer egos to experience life as a normal user from time to time.
Before we begin our site setup, your final objective will be to gather and install a set of useful and free tools. These tools help you with different aspects of SharePoint development and are useful for exploring properties of SharePoint objects not usually visible through any web interface.
The following are the tools you will want:
- SharePoint Manager 2007 (
http://www.codeplex.com/spm/) - .NET Reflector (
http://reflector.red-gate.com/) - WSPBuilder and Visual Studio Extensions for WSPBuilder (
http://www.codeplex.com/wspbuilder/)
These tools may seem simple enough, but I do not think having tools should be our primary strength. You are here to learn the deeper secrets of SharePoint, and doing so with a “click here to solve all your problems” tool is difficult. I would have preferred just recommending you a battery, two wires, and a nail, but I realize that manually magnetizing your hard drive with the correct bits may be a bit too hard-core, even for me.
The tools I recommend here do not spoil the fun of discovery, but they do save you tons of time when you need to quickly glance over all the properties of a list, create and deploy a list template within five minutes, or figure out how exactly a particular poorly documented feature works. And there will be plenty of the latter.
SharePoint Manager 2007
SharePoint Manager 2007, or SPM for short, is a tool developed by Carsten Keutmann, who is also responsible for the WSPBuilder tool. SPM gives you a visual interface to the object model of SharePoint, allowing you to explore what properties are available, see how a site is structured, discover “hidden” files and folders, and do a ton of other stuff. Figure 1-1 shows the basic view of SPM.
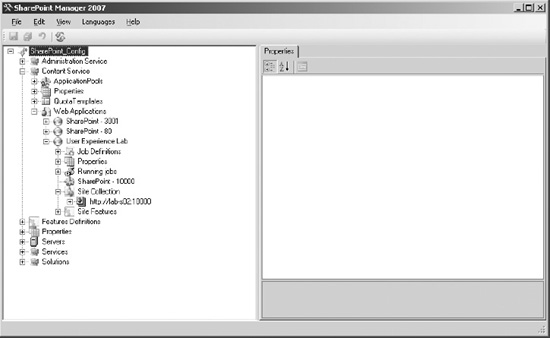
Figure 1-1. SharePoint Manager 2007
![]() Tip When you start SPM, select View
Tip When you start SPM, select View ![]() Object Model, and make sure you have set it to display the Full object model if you want all the details. And you do.
Object Model, and make sure you have set it to display the Full object model if you want all the details. And you do.
Benefits of SharePoint Manager 2007
With SPM, you can browse your entire SharePoint installation, including servers, sites, services, lists, items, and anything else. But that is only the beginning. SPM also allows you to modify the properties of all those objects, which gives you a wonderful opportunity to test how different properties affect your sites. When you click an item in the list, the right pane of SPM shows all the properties. Properties in black are editable, while properties in gray cannot be edited. Which properties are editable is a SharePoint thing, however, so don't blame SPM if you cannot change the parent web of a site.
Figure 1-2 shows the typical SPM experience and how editing properties works.
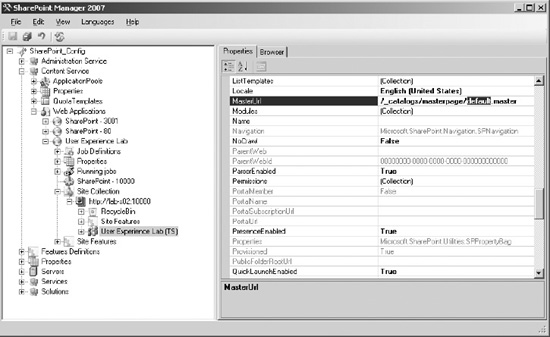
Figure 1-2. Editing properties in SPM
Another absolute killer feature of SPM is SharePoint feature handling. SPM lists all feature definitions of your farm, conveniently organized according to scope. Within each site, site collection, and web application, there is a Features node. Right-clicking a feature in that node allows you to activate or deactivate a feature without visiting the web interface. Even hidden features are listed. Figure 1-3 shows the feature deactivation of the hidden Basic Web Parts feature.
Feature handling does not stop there. Near the bottom of the node tree of SPM are all the features that are located in the [12]TEMPLATEFEATURES folder, whether they are installed or not. The right-click options give you the chance to install a feature by simply clicking your mouse. If you are fed up with writing STSADM commands or visiting the Site Settings page each time you update your feature, use SPM instead.
![]() Note
Note [12] refers to the 12 hive, the installation folder of SharePoint. This is usually at C:Program FilesCommon FilesMicrosoft Sharedweb server extensions12.
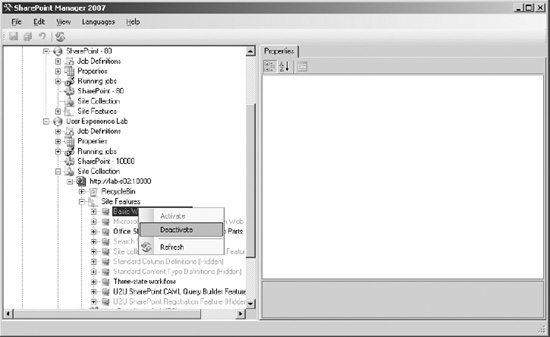
Figure 1-3. Deactivating a feature in SPM is as easy as clicking.
When you click web items such as a site, a list, or a view, you get an additional tab in the right pane, called Browser. This is simply a browser view of the object as it would appear if you had opened the object in your normal web browser. A cool trick is that since SPM shows hidden objects, you can see how the hidden views will look without exposing them to users.
![]() Tip Did you know that in the document libraries in WSS there are two “secret” features? Open a document library, such as the Shared Documents library, in SPM, and check out the views. There will be a Merge Documents view as well as a Relink Documents view. Open these in the Browser pane to see how they look. These views are tied to MOSS functionality and will not be covered in this book.
Tip Did you know that in the document libraries in WSS there are two “secret” features? Open a document library, such as the Shared Documents library, in SPM, and check out the views. There will be a Merge Documents view as well as a Relink Documents view. Open these in the Browser pane to see how they look. These views are tied to MOSS functionality and will not be covered in this book.
But wait, there's more! If you are viewing a list in SPM, you also have a grid view of the list where you can make basic data input or edits. It's nothing fancy but it's useful if you just want to make quick edits to a list item or if you are testing feature receivers and get tired of reloading the web interface for editing, deleting, or adding items. Direct editing in SPM can also be useful if you have hidden columns that do not appear in the web user interface.
The final feature I want to mention in SPM is schema output. Whenever you select an object that is defined by a CAML schema, SPM will display a Schema Xml tab and occasionally a CAML tab. These tabs contain the XML code for an object. You can more or less copy and paste this code into your own feature. Suddenly you have designer support for your CAML code; just design whatever object you want in the web interface, and then copy the CAML XML code from SPM.
Note that the XML you get from SharePoint through either SPM or other tools might not necessarily be immediately usable inside a feature. Some elements, such as fields, can be copied and pasted directly, while custom views require a bit of rewriting. In Appendix A, I will cover this in more detail and show you some examples of how you would extract CAML code for reuse in your own feature.
Danger, Will Robinson!
There are some things you need to know about SPM, however. All is not well in the state of Denmark apparently, because some of these things will kill your SharePoint server.
![]() Note Carsten Keutmann is Danish. And a genius.
Note Carsten Keutmann is Danish. And a genius.
First, let's talk about the minor stuff. SPM does not handle data refresh well. If you delete a list outside of SPM while SPM is open, the list will still be visible in SPM, even if you hit the Refresh button. Actually, this depends a bit on what you modify or delete and also what object in SPM is currently selected when you hit Refresh. This is a minor inconvenience.
Second is exception handling. Although SPM is as stable as the pyramids, meaning it might be less in use in 4,000 years but will still draw a massive amount of tourists, exceptions from SharePoint are just displayed to the user with no stack trace, inner exceptions, or anything like that. In addition, because of the refresh issue mentioned earlier, you might not even get the right exception. Again, it's just a minor issue, but it might catch you off guard and cause some bewilderment.
The third issue is a major one. Never, ever delete a site or site collection in SPM. Doing so will mess up your system. And I mean big time. Also, if you use SPM to delete anything, make absolutely sure that you first select the item using a normal left-click before you right-click to delete the item. SPM will delete whatever you clicked prior to right-clicking. That might be your entire SharePoint configuration database. And that will be bad.
Take a look at the sidebar “Dead SharePoint System: A Recovering SPM Deleter” for how to restore your SharePoint server without having to reinstall your entire computer.
DEAD SHAREPOINT SYSTEM: A RECOVERING SPM DELETER
I have done this a few times. Not just from messing around with SPM but from sheer stupidity. “Done what?” you ask. I've done something that broke my SharePoint installation, such as deleting the configuration database or corrupting that database to the extent where recovery was not possible.
The problem, especially if you don't have proper backups, is that there is no way to recover SharePoint. If you try to run Central Administration, the corrupted or missing SharePoint database will spoil the fun. If you try to run the SharePoint Products and Technologies Configuration Wizard, it will croak and complain that SharePoint is not correctly installed, or it will simply throw an exception and let Dr. Watson promise you that Microsoft will be notified if you hit a button. You don't get much help there.
So, you start the uninstallation of SharePoint, which fails, because SharePoint does not know how to uninstall itself without having access to the configuration. The same thing applies if you try to reinstall the installation using any supported method. All seems lost; you cannot set up a new configuration database, you cannot get rid of SharePoint, and you cannot reinstall and repair.
Before you start looking for your Windows Server installation discs to scratch your system, however, do read on.
What if there is a network problem and you cannot access the database at all? In that case, the Share-Point configuration wizard will allow you to disconnect from the database and connect to another database. This provides you with an opportunity to get SharePoint up and running even if you are not able to pull the network cable to simulate a network outage.
Simply stop the SQL Server instance, and rerun the configuration wizard. SharePoint will complain that it is unable to detect whether the server is part of a farm and allow you to disconnect from the database server. Next, delete the corrupt SharePoint databases, restart the database server, and run your configuration wizard again. You can then use any restore tool to restore your old content databases into the new SharePoint farm.

Despite the issues, SharePoint Manager 2007 still remains my favorite SharePoint tool. Using SPM saves me hours of development time.
.NET Reflector
.NET Reflector is not a SharePoint tool per se, but it is still incredibly useful for developers. .NET Reflector allows you to see the source code of .NET code. That's right, campers; Share-Point is a .NET application, so you can see the source code of SharePoint as clear as the sky on a sunny day Or at least you can see a lot of it; some code in SharePoint is obfuscated, and reflection will not work.
After you have started .NET Reflector, you need to load whatever assembly you want to inspect, and a prime candidate is the Windows.SharePoint.dll file located in the [12]ISAPI folder. Either open the assembly from the Open menu or drag and drop the assembly from a folder into the .NET Reflector window. Click the expand icon (the small plus sign) in front of the assembly name, and you can keep browsing down into the namespaces and classes inside the assembly. Double-click a property or method, and a second pane opens showing the source code of the method. You can also right-click an entire class and choose Disassemble to open an entire class for inspection. Figure 1-4 shows .NET Reflector with a disassembled SharePoint class.
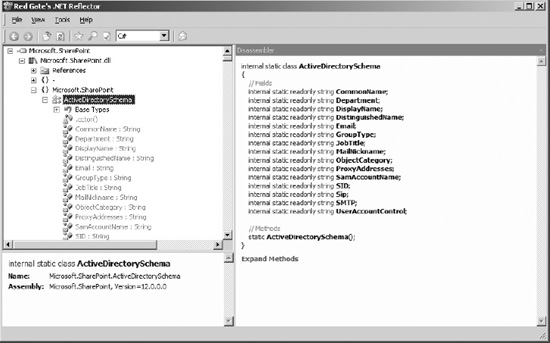
Figure 1-4. .NET Reflector
One particularly useful feature of .NET Reflector is that it will give you the four-part strong name of a strong-named assembly. Open the assembly in .NET Reflector, and look in the lower yellow section of the window.
When you browse through the code in .NET Reflector, you can click methods and properties to go directly to the code for that method or property. If the linked code is located in another assembly, .NET Reflector will prompt you for the file location and make a qualified guess if the assembly can be located in the GAC.
Other particularly useful features are the Back and Forward buttons. You may be digging through countless levels of method calls to get where you want, but it is easy to lose track of where you started. Using the Back and Forward buttons, you can navigate to previous code just like you would in a web browser.
The next cool feature of .NET Reflector is the ability to bookmark code. If you are working a lot with a certain class or assembly, you can add a bookmark to the code, and .NET Reflector will jump right to that code with the click of a mouse. If you close the assembly in which you have placed a bookmark, .NET Reflector will open the assembly for you if you click the bookmark.
The final feature I want to address here is the support for plug-ins in .NET Reflector. There is a CodePlex project that holds a range of .NET Reflector plug-ins to extend their functionality. One useful plug-in is the AutoDiagrammer, which shows the assembly classes in a Visual Studio-like class diagram.
There is only one thing truly annoying about .NET Reflector. It is a free tool, and that is great, but it still expires and requires regular updating. What happens is that at times when you start .NET Reflector, it will tell you that it has expired and needs to be updated. You are asked whether you want to update, and if you don't update, then .NET Reflector will be deleted, as in wiped from your disk. This is incredibly useful for that time when you are offline and .NET Reflector expires. Or perhaps it's not useful after all.
Reflecting code is useful for getting a true understanding of how a complex system like SharePoint works. A lot of the truly deep material in this book was discovered using Reflector. If you haven't taken the time to reflect in anything lately, doing so will pay off in the long run.
![]() Note I am beginning to sound like a marketing person here. Sorry.
Note I am beginning to sound like a marketing person here. Sorry.
WSPBuilder Extensions for Visual Studio
Authoring SharePoint solutions is a tedious task if done manually. If there was a list of most annoying software development tasks, creating DDF files for WSP building would be in the top spot, perhaps even the top two spots, with a guest appearance at the number 3 spot.
That all ended when WSPBuilder saw the light of day. Again, the awesomely cool guy Carsten Keutmann steps up to the plate to receive honors for making SharePoint development a whole lot less painful.
WSPBuilder by itself is useful, very much so. Chuck it in your solution folder, and it will magically create a WSP file for you, no questions asked. If you want to configure, you have more options than grains of sand in the Sahara. That's all great, but it is not even close to the coolness of WSPBuilder Extensions for Visual Studio.
WSPBuilder Extensions for Visual Studio… I'll just refer to the product as WSPBuilder. WSPBuilder integrates with Visual Studio in several ways. First, it creates a range of new solution and project templates for you so you can easily create SharePoint features such as event handlers, web parts, custom field types, features with receivers, and workflows. See Figure 1-5 for the project types you can add.
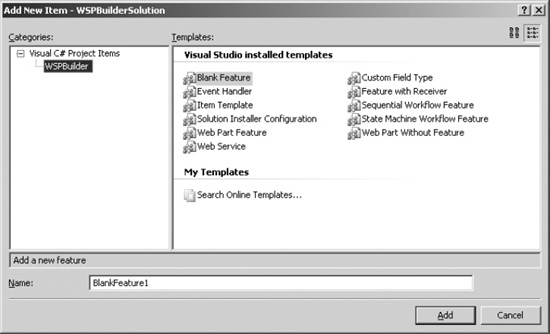
Figure 1-5. WSPBuilder project types
Adding one of these projects to your solution will not only add the required files, but it will set up your feature.xml file, create a signing key and sign your assemblies, and add the strong name to the feature files where required. This task alone takes several minutes if done manually and is also error prone and annoying.
To make WSPBuilder even cooler, you also get a new menu item under Tools that is a massive time-saver. The WSPBuilder menu item includes tasks such as building the WSP file; deploying, retracting, and upgrading the solution; attaching to the IIS worker process for debugging; recycling the application pools; copying files to [12] or the GAC; and creating a complete deployment folder with both batch files and setup files needed to deploy on another computer.
The menu items are also available on the right-click menu of the Solution Explorer in Visual Studio (see Figure 1-6).
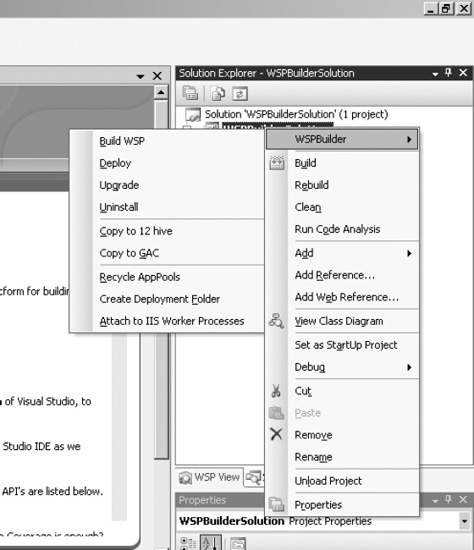
Figure 1-6. WSPBuilder integration menu
I do most of my SharePoint development using WSPBuilder, especially when I need to attach the debugger to code such as when developing event receivers or when creating code-behind classes for custom pages.
The tools I have mentioned here are the tools I use. However, there are plenty of other tools that can accomplish the same or similar things.
I prefer not to recommend any particular tool too much. I will talk a bit more about this in a later chapter, but in short, I recommend you take the time to evaluate different alternatives to find out which tools you prefer.
Setting Up Your SharePoint Environment
At this point, you should have the following environment set up:
- Windows Server 2003, any edition
- Windows SharePoint Services 3 with SP1 and otherwise fully patched
- Visual Studio, either 2005 or 2008
- SharePoint Designer 2007
- IntelliSense set up for Visual Studio
- SharePoint Manager, .NET Reflector, and WSPBuilder
![]() Tip We will be working a lot with the 12 hive. Although it's not required, I recommend you create a shortcut to the root of the hive for easy access. I recommend adding a shortcut to the Start menu or adding a toolbar to the Windows taskbar. To do so, right-click an empty section of the taskbar, click Toolbars, and then select New Toolbar. Browse to the
Tip We will be working a lot with the 12 hive. Although it's not required, I recommend you create a shortcut to the root of the hive for easy access. I recommend adding a shortcut to the Start menu or adding a toolbar to the Windows taskbar. To do so, right-click an empty section of the taskbar, click Toolbars, and then select New Toolbar. Browse to the [12] folder, and click OK.
For your development machine, you might also want to grab a copy of Microsoft Office. Although you would never put this on your production server, having Office installed in your development environment makes it that much easier to test Office integration. Also, you get access to the grid view of lists, which makes updating multiple items at the same time a lot easier.
This is completely optional, however, and since Office costs a good chunk of money, you might want to skip this part.
Site Setup
Now that we share a basic set of tools, it is time to begin our adventure. Having established that you already know how to set up a basic web application in SharePoint, there should be no problem for you to do so now. I will give you step-by-step setup instructions in a moment, so for now, focus on understanding the site hierarchy and our setup.
Our SharePoint site setup will be rather simple. We want a root site based on the Team Site definition that ships with WSS. On that site, we will create multiple subsites based on each of the major site definitions that are available out of the box, namely, a meeting workplace, a wiki site, and a blog site. We will use these particular sites because they offer us a wide variety of user experience elements that we should learn.
![]() Note Do not skip this setup. It may seem trivial, but it ensures that we will get the same results in later exercises.
Note Do not skip this setup. It may seem trivial, but it ensures that we will get the same results in later exercises.
- Create your web application any way you choose using any port number. For my examples, I have a server called LAB-S02, and I use port number 10000. When you see a reference to
http://lab-s02:10000/, you know to which site I am referring. - Create a new site collection in the root of your new web application. Choose the Team Site template, and fill in the remaining fields as you want.
- Open your new site, and create three new subsites using the following site templates. Name them whatever you like; I have placed the names I use in parentheses.
- Basic Meeting Workplace (Basic Meeting Lab)
- Wiki (Wiki Lab)
- Blog (Blog Lab)
At this point, you should have a site that resembles Figure 1-7.
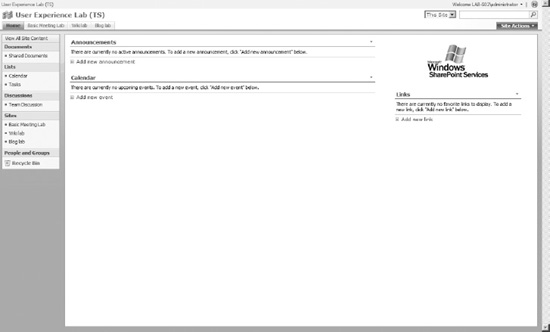
Figure 1-7. Initial site structure
This setup will allow you to test the same code that will be used in later chapters of this book and get the same results. You may of course skip or change the setup, but do so only if you feel sufficiently confident that you know what the consequences are.
Virtual Machine Snapshot
We are just about ready to start diving in, so it makes sense to take a snapshot of your virtual machine now. That way if you really mess up your installation later, you can easily come back to this state with all the setup completed. Just remember to put all your hard work on an external storage medium so a snapshot restore does not delete your files.
![]() Tip If you are using a virtual machine software package that does not support snapshots, you may chose to power down your virtual machine and back up the VM folder or disks.
Tip If you are using a virtual machine software package that does not support snapshots, you may chose to power down your virtual machine and back up the VM folder or disks.
Remember to activate your software before you take a snapshot.
That's a Wrap
OK, we now have a working environment in which we can start developing. You should also have learned a bit about how to use the set of tools that I use most frequently for making the SharePoint development experience a lot better.
Remember that tools can remove the learning experience and that you should learn how to develop without tools first. Once you know how to create a certain piece of code, using tools is a good approach to save time. Even so, I still sometimes go back and create features from scratch, in Notepad, just to make sure I remember the right syntax.
Going forward, we are going to explore a couple of topics outside the main focus of this book, namely, XML and SharePoint Features. You should have at least a cursory knowledge of these topics already, but getting a refresher is always useful.
In the meantime, pat yourself on the back for having taken the first step toward a better understanding of SharePoint and the user experience.