
P A R T 3
![]()
Building an Empire
It is time for a new era of your SharePoint adventure. Having traversed the deepest depths of SharePoint knowledge in the previous part, it is now time to put some of that knowledge to practical use.
In this part of the book, we will create a new site, from bottom to top, using the skills and techniques learned in Part 2. There will be plenty of exercises to hone your new skills, and in the end you will have a new site made with nothing but your own sweat, blood, and perhaps some tears.
The site we will be creating is a publishing site, a newspaper to be precise. That does not matter much, however, since the goal will be to practice creating a great SharePoint user experience. Each chapter will build on the previous chapters, so you will likely get more out of the process if you follow along in all the chapters.
With that said, here is a very important warning.
![]() Caution What you are about to see is extremely dangerous. Never try this at home. The stunts performed here are done by professional stunt developers and are for illustrative purposes only. Do not launch a newspaper web site based on the code provided here.
Caution What you are about to see is extremely dangerous. Never try this at home. The stunts performed here are done by professional stunt developers and are for illustrative purposes only. Do not launch a newspaper web site based on the code provided here.
Seriously, I am not joking. The code in this chapter is illustrating different aspects of SharePoint development. You will likely break every best practice for software development ever created. Your server will implode and take the entire building with it if you ever put this in a production environment. Your spouse will be very angry and make you sleep on the couch for a week. The sun will not rise tomorrow. Christmas will be canceled next year. Bob will not be your uncle or even acknowledge being in your family. In fact, Bob will likely disown you.
Be very clear on this: do not use this code in production.
So, grab a shovel, a hammer, and whatever nails you can find, because it is time to build an empire!
C H A P T E R 11
![]()
Starting Field
Getting Fields and Field Types to Behave
Fields are the smallest bits of information and so easy to overlook. Fields are as important to the user experience as anything, so you need to make sure you know how to build that experience.
Unlike Einstein, who sought to split the smallest known parts in the universe, you want to learn how to create these atomic storage units. These units will then be used when we build our empire in later chapters.
In this chapter, you will learn about custom field type development. You may have heard people talking about how difficult the process of custom field type development is. However, after you have completed the exercises in this chapter, you will likely be very surprised at how easy this can actually be.
In the second part of the chapter, we will create site columns to deploy to our new site. We will create several column types, including one approach for creating lookup columns that uses a feature receiver.
And I'll give you some parenting advice….
Mission Statement
Our goal for this chapter is to create a custom field type that will be used as the title of articles in our newspaper web site. We will create a field type that resembles the normal “single line of text” type but then add custom displaying and input of the data to see how to do this in a fullscale implementation.
Next we will create several site columns to be included in the articles. We will explore different field types for our columns and find a solution to the problem of nonworking lookup columns.
A Note on Custom Field Types
Before we dive into the deep end, I want to take a few paragraphs to talk a bit about custom field types. It seems that, right after custom views in CAML, custom field type development is among the tasks SharePoint developers fear most. A lot of web sites demonstrate how to develop custom field types, but most are either directly based on or derivatives of the custom field walkthrough example from MSDN (http://www.understandingsharepoint.com/url/10032). Even seasoned SharePoint veterans seem to be elusive about just how custom field types work and especially about how to develop one.
During this chapter you may be surprised how incredibly easy custom field type development can be, if done right. Many of the exercises here will show you, using illustrative examples, of course, how you can change a custom field type in just one or two steps while utilizing the parent field type that has already done most of the hard work for you.
Don't get me wrong, custom field type development is a complex topic, and online documentation and examples are scarce. At the time of this writing, a full eight hits are returned when googling SharePoint BaseTextField, even when this is one of the simplest (and should be most inherited) classes for explaining how custom field types can be developed.
So, even after reading this chapter and understanding how all the pieces of custom field type development work, don't just run off to your team and start evangelizing custom field type development. Yes, custom field type development is a really cool method of customizing how users interact with data. Yes, custom field type development allows you to give your designers a plain-vanilla ASP.NET control to add whatever goodies designers like to add and have it still work.
However, also consider how people will maintain your solution. Being the only person on your team who understands a particular component may make you indispensable, but it also makes your solution quite more complex and can increase the cost of maintenance. Consider whether there are alternatives among the methods you have learned in this book before you go to the somewhat drastic step of creating a custom field type.
Your First Field Type
For the exercises in this chapter, I'm going to assume that you have considered the issues in the previous section, because it would be a very short chapter if we decided that a standard Team Site would be OK. So, it is time to bring out the proverbial shovel and get to work.
![]() Note For this exercise, I will assume that you are using WSPBuilder extensions for Visual Studio. The code should still be usable with other development tools, but you will have to set up the deployment on your own.
Note For this exercise, I will assume that you are using WSPBuilder extensions for Visual Studio. The code should still be usable with other development tools, but you will have to set up the deployment on your own.
Exercise 11-1. Setting Up Your Solution
In this exercise, you are going to set up the solution with which you will be working for the rest of the book. You will use WSPBuilder as the basis because WSPBuilder speeds up development and testing by offering a lot of nice tools and shortcuts. If you need a recap of how WSPBuilder works, check out Chapter 1.
- Create a new Visual Studio project. Your project type should be a WSPBuilder project. Name the project EmpireTimes or use a name you like. Your Solution Explorer should look something like Figure 11-1.
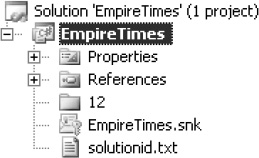
Figure 11-1. Initial setup of Visual Studio
At this point, WSPBuilder has done a lot of work for you. First, notice the
12folder. WSPBuilder will deploy anything you put inside this folder. You remember that[12]refers to the install path of SharePoint, usuallyC:Program FilesCommon FilesMicrosoft Sharedweb server extensions12, right?Second, notice that you have one
.snkfile, a signing key. WSPBuilder has set up the project to be signed and generated that key for you so that when you build you get a strong-named assembly.There are a few things WSPBuilder will not do for you when you create a new project. One thing is to add a reference to the
Microsoft.SharePoint.dll, and another is to output the four-part strong name for you. You need both, so step 2 is a little trick I'll mention a few times. - Add a new item to your project of type Feature with Receiver. Name the feature
TimesSiteColumns, and make the scope Site.
You may at this point raise your hand to say, “I thought we were doing custom field types, not columns.” This is a good point, but as I said, this is a little trick, so for now, don't think too much about this feature. We will return to this later in this chapter.
When you add a Feature with Receiver feature to the project, WSPBuilder will add the correct reference to Microsoft.SharePoint.dll for you. More importantly, the newly created feature.xml file will hold the strong name that you will need for your custom field type in the next exercise.
For now, you should be ready to start your custom field type development.
What we just did in the previous exercise is to set up the groundwork for a new solution. We will use this solution to create a complete site including all of the elements we learned in Part 2 of the book.
![]() Tip Having WSPBuilder sign your assembly and create the strong name is a real time-saver. However, should you need to find the strong name from another assembly, just go to the JustAsk web site (
Tip Having WSPBuilder sign your assembly and create the strong name is a real time-saver. However, should you need to find the strong name from another assembly, just go to the JustAsk web site (http://www.understandingsharepoint.com/justask) and search for How do I find the strong name of an assembly.
Next you'll begin the custom field type development.
The field type definition tells SharePoint the metadata about your custom field type. The remaining parts of the custom field type are .NET classes and .NET user controls and in this example comprise the two classes and one user control you need to create.
I'll take a moment to explain how these classes work and their purpose.
Field Type Classes
For the Times field type, we will utilize two classes to build a field type where we can customize the user experience. These two classes are the field type class and the field control class.
The field type class is the only required class in a custom field type. The field type class is the heart and soul of the field type and connects the other optional classes together. The field type control class is responsible for the visual representation of the field type.
You'll also want to add two user controls to your field type. One user control, containing a rendering template, will be part of the visual rendering of the input form, and one user control will be used to configure your field type when you add new columns.
So, these are the elements of the field type:
- Field type definition (
fldtypes_TimesFieldType.xml) - Field type core class (will be created as
TimesFieldType.cs) - Field type control class (will be created as
TimesFieldControl.cs) - Field type rendering template user control (will be created as
TimesTextField.ascx)
Another class that you may use, but that is less important to our example, is the field type value class, responsible for storing your data if you need a custom storage format. Using a field type value class means you get to decide how your data gets stored in the SharePoint database. If you need to store complex data, this would be the way to do so. In theory, you could easily store any kind of data within a single field type value.
However, because this is a user experience book, I will limit the scope to not include custom field type values. Instead, you will rely on the default value type of the text field type, which basically stores just a string of text.
It is easy to get confused with the different classes. After all, the field type class is actually in control, even though you do have a field type control class, so you need to keep your head really cool when you begin to include the rendering of values in the input states, in the display forms, and in the list views.
To avoid confusion, I will build the required classes with a bare minimum of required code and make very sure you have the basics down before adding some flair. As such, when you have completed creating your custom field type, it will actually just be a plain copy of the “single line of text” type. We will change that afterward, though.
Custom Field Type Class
The only class that is mandatory for a custom field type is the field type class. This is the class you reference in the field type definition. In Exercise 11-2 you named this class TimesFieldType. Let's make that class now.
OK, OK, hold on just one minute. People threaten to leave their jobs from fear of having to learn that? Surely you must be joking, Mr. Norwegian. All those hours of fighting? The therapy our team leader went through to prepare for custom field type development? And you're saying that was it?
Yup, that's what I'm saying. You're done. You've made your own custom field type. Yes, there is plenty more you can do, but those three steps are all the steps you have to do (and the field type definition you created earlier, of course).
Here's the deal: you inherit all the functionality of the parent field type text. As with all .NET classes, if you just inherit from the parent and don't add any functionality yourself, you get a copy, more or less, of the parent.
If you still don't believe me, build your solution and deploy it. The easiest way to do this is to select the Tools ![]() WSPBuilder
WSPBuilder ![]() Build WSP menu in Visual Studio and then select WSP- Builder
Build WSP menu in Visual Studio and then select WSP- Builder ![]() Deploy. Wait for solution deployment to complete, and go to your site. Create a new custom list, and add a new column to that list. The first thing you should see is what is in Figure 11-2.
Deploy. Wait for solution deployment to complete, and go to your site. Create a new custom list, and add a new column to that list. The first thing you should see is what is in Figure 11-2.
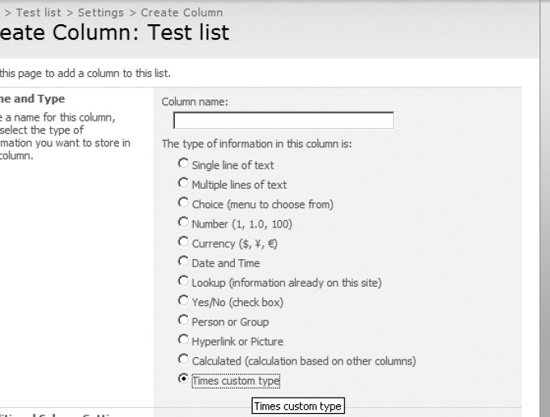
Figure 11-2. Your first custom field type available
However, getting a new entry in the list of available column types requires only a field type definition. If you want to test that your custom field type actually works, go ahead and create that new column based on your type, and then go to the list.
Add a new item, and lo and behold, look at Figure 11-3 to see the result, if you did everything correctly.
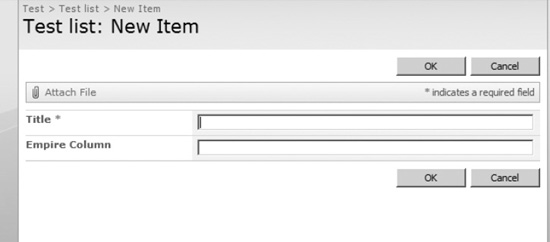
Figure 11-3. Input rendering of your custom field type
Of course, since all you have done is inherited from the text field type, the custom field type behaves exactly like a text field type. Although you may think this is a complete waste of time and energy, rest assured that you will advance the example in the next exercise when you create your field type control.
Perhaps the scary part resides here.
OK, so what did you just do? First you created a new field control class that you can use to define custom rendering of the field type. You haven't really done any custom rendering yet, but you have the class in place.
Next you connected that field control to the field type class by overriding the FieldRenderingControl property, effectively saying to the parent class that, yes, you appreciate the years of upbringing, love, and support, but now you want to stand on your own feet. You just took the first step to break the tight bonds to our parents, so to speak. Compare this to getting your own place to stay when you turn 18 but not moving in just yet.
This way of building a custom field type is really a perfect transition into adulthood for the field type. You maintain close ties with the parent class and only slowly do what you need and want to get your own independence. And, being the perfect parent, the parent class happily continues to supply you with whatever functionality you choose not to implement yourself, allowing you to move out at just the pace you want.
And now I'm giving out parenting advice. It's time to get back to the bits and bytes, but keep the parent-child relationship in mind; it makes development a lot more manageable.
For the basic outline of a custom field type, this really is all you need to do, but it is time to take your first step into custom rendering and explore how you can make the display of the column a bit more interesting. First, take a look at Figure 11-4, just to make sure you see what the default value looks like. As you can see, it is exactly like a regular text field.
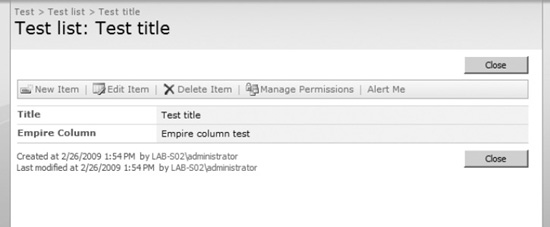
Figure 11-4. Baseline for rendering. You don't want this.
Exercise 11-5. Modifying the Display of a Custom Field Type
In this exercise, you'll modify the rendering of your custom field type. You will first focus on one method, rendering in code, for changing the display of data before you modify the input experience using a custom user control in the next exercise.
- Open the
TimesFieldControl.csfile. Inside the class, override theRenderFieldForDisplaymethod as such:protected override void
RenderFieldForDisplay(System.Web.UI.HtmlTextWriter output)
{
output.Write("<span style="font-size:18pt;background-color:red;">");
base.RenderFieldForDisplay(output);
output.Write("</span>");
} - Find a Post-it note, and write the following message: “Never, ever hire Bj⊘rn Furuknap as a designer.”
- Glue the Post-it note to your monitor. In fact, engrave your monitor with the message.
- Build your solution and deploy. Once deployed, run
IISRESETto make sure your assembly is reloaded. - Observe the changes to your display form. Or check mine, in Figure 11-5.
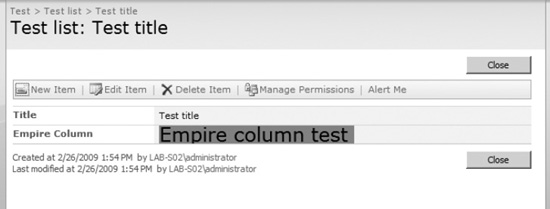
Figure 11-5. If this were a full-color book, you would see a red background.
Remember that about never hiring me as a designer.
With that massive undertaking out of the way, we should stop for a moment and think about what we have done.
Overriding the RenderFieldForDisplay is the first available method for changing the rendering of a field. Because this is .NET code only, you have full control over exactly what you do, which is a level of control that is sometimes necessary if you need to do complex operations.
The sample you just made can hardly be considered a complex operation; in fact, all you do is surround the parent's RenderFieldForDisplay method with a simple span tag to modify the display style. As I said, it's for illustrative purposes; I'm not a designer.
However, sometimes we cannot afford ourselves complete control over rendering in code. For example, if you are smart enough to hire a good designer, he or she might not be allowed or even capable of writing .NET code. This is where creating an ASP.NET user control and using that as the rendering mechanism makes sense.
Let's take a look, shall we?
Exercise 11-6. Using an ASP.NET User Control for Rendering
In this exercise, you will modify the input experience of your custom field type. This is where users enter or edit the data of our field. You will accomplish this by creating a rendering template and connecting that rendering template to your control class.
- In your Solution Explorer, add a new folder to the
TEMPLATEfolder, calledCONTROL TEMPLATES. - In the
CONTROL TEMPLATESfolder, add a new text file, and name itTimesTextField.ascx.Creating a text file but naming the file
TimesTextField.ascxwill cause Visual Studio to treat the file as a web control, even if you do not have a web project. - In the
TimesTextField.ascx, enter the following code. This code, by the way, is simply the same rendering template used for theTextFieldrendering template in[12]TEMPLATECONTROLTEMPLATESDefaultTemplates.ascx:<%@ Control Language="C#"%>
<%@Assembly Name="Microsoft.SharePoint, Version=12.0.0.0,
Culture=neutral, PublicKeyToken=71e9bce111e9429c" %>
<%@Register TagPrefix="SharePoint"
Assembly="Microsoft.SharePoint, Version=12.0.0.0,
Culture=neutral, PublicKeyToken=71e9bce111e9429c"
namespace="Microsoft.SharePoint.WebControls"%>
<SharePoint:RenderingTemplate ID="TimesTextField" runat="server"> <Template>
<asp:TextBox ID="TextField" MaxLength="255" runat="server"/><br>
</Template>
</SharePoint:RenderingTemplate>Notice that the code is plain-vanilla ASP.NET with references to the SharePoint assembly.
- Hand that file over to your designers, and let them go bananas. However, tell them to keep the
asp:TextBox with the ID="TextField"intact. I will explain why in a moment. - In your
TimesFieldControl.csfile, override theDefaultTemplateNameproperty as such:protected override string DefaultTemplateName
{
get
{
return "TimesTextField";
}
}
I bet you are itching to do the Build and Deploy dance. Before you do, however, you need to be aware of one thing. By default, WSPBuilder will upgrade a solution when you hit Deploy rather than redeploying the solution. However, in an upgrade, only existing files are replaced, and no new files are added. You added an .ascx file in this exercise, which would not have been deployed had you simply upgraded the solution.
So, to do the Build and Deploy thing, you must first uninstall your solution. Luckily, uninstalling a solution is just as easy as deploying; select WSPBuilder ![]() Uninstall first.
Uninstall first.
Now you can deploy again, and your results, depending on how wild your designers got, may resemble Figure 11-6.

Now, before you start drooling over all the possibilities, let's take a look at what just happened.
First, you created a new user control containing a SharePoint:RenderingTemplate tag, having a specific ID property. As you learned in Chapter 5 when we explored the default user interface, rendering templates is a method by which SharePoint utilized standard ASP.NET controls to render content.
Second, you overrode the DefaultRenderingTemplate of the TimesFieldControl class. As was the case with RenderFieldForDisplay, you just take over that function from the parent class and handle it yourself, returning your own rendering template name for use in your field.
Now, there is some magic going on here. Adding such a rendering template usually entails spending a lot of time in the CreateChildControls method to hook up the value of the column to the text box and reading it back out again when the user submits the form. In fact, most examples on the Wide World Web and in books usually start by making all kinds of advanced code to hook up the value with the controls in the .ascx file. So why don't we?
The secret to the trick is that you maintained the TextBox with ID="TextField". You see, the parent CreateChildControls method looks for a TextBox with that ID, and if it finds it, it will handle all the plumbing for you. Since you don't override the CreateChildControls method, the parent method looks through the rendering template for the same TextBox, and—poof!—out with a lot of plumbing code, all because you inherited from a very nice parent.
This may or may not be sufficient for your needs. You may have a project that requires you to do more complex operations, but what I'm trying to say here is that if you listen to your parents and learn how they do their thing, you might save yourself a lot of hassle.
And now I'm giving advice to teens.
Some Advice on Custom Field Types
Before we move on to the next topic of this chapter, columns, I would like to share with you some general tips and some small cool ideas you may want to explore.
Corrupted Control Template?
I need to tell you about this, because it took me literally hours figuring this one out the first time it happened.
If, by chance, you happen to make a mistake with your rendering template, for example by adding the wrong ID or removing the TextBox, you get an error message stating that you need to check your "TextField" rendering template. Figure 11-7 shows this error message.
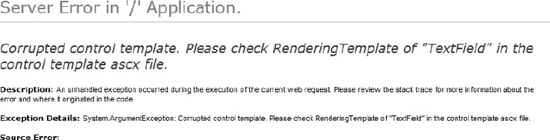
Figure 11-7. Error in error message
This, however, is not entirely accurate, since you may have created your own rendering template. The reason why "TextField" is used, however, is that you are inheriting the CreateChildControls from the parent, and the parent has hard-coded the name of its rendering template into the error message.
Custom DisplayPattern in List Views
Remember that we discussed render patterns in Chapter 9? You may or may not want to edit these patterns for your field type. If you do, you can opt to just override the default DisplayPattern by adding a RenderPattern element to your field type definition:
  <Field Name="TypeName">TimesType</Field>

  <RenderPattern Name="DisplayPattern">

    <HTML><![CDATA[<span style="font-size:large;color:red;">]]></HTML>

    <Column/>

    <HTML><![CDATA[</span>]]></HTML>

  </RenderPattern>

</FieldType>
However, you will quickly find that you get no IntelliSense. I know that being hard-core is sometimes a cool thing, but writing CAML view schema without IntelliSense is just madness.
To help out, however, open one of your list templates, and write your code inside a view where the IntelliSense will work and give you plenty of support.
Custom Field Properties
Creating custom field types is not really hard once you know the basics like you do now. However, what if you wanted to have a different background color for your display rendering? You would need to create a new field type, even if your change is a small one.
One option to solve this is to use custom field properties. You may have noticed that when you create certain types of columns you get a set of configurable options in the Additional Column Settings section on the Create Column page. Figure 11-8 shows the typical lookup column additional settings.

Figure 11-8. Custom field properties
These options may be stored in custom properties on the column itself when you create a new column, and you can use these options to configure your column, increasing the reuse of your class significantly.
However, the custom field property handling is riddled by bugs that will make using cus- tom field properties very difficult.
There is some good news, though, and again WSPBuilder comes to our rescue. The WSP-Builder project list includes a custom field type item template that includes code to fix most of the problems related to storing custom properties on field types. If you want to create reusable field types, I encourage you to explore the field type template that ships with WSPBuilder.
Even if you handle the storage of custom properties, you are still faced with a problem related to deploying site columns with custom properties through features. Where would you add the custom field property values? You only have access to the elements Field and RenderPatterns, and neither of these can be used.
To solve this, you can use a custom namespace. Although a thorough example is beyond the scope of this book, I'll point you to an online article that explains how to do this: http://www.understandingsharepoint.com/url/10033.
With these few tips out of the way, we should move on and actually start using our fancy new field type.
Columns
Now that we have a custom field type up and running, we should put it to work. Our next task will be to create a site column from our field type and see what options we have for working with that column.
The site column will be the news article title. Later you will also add more site columns to support the other parts of a news article.
Exercise 11-7. Creating Your First Site Column
For this exercise, you will be building a site column feature for your project. You will use the TimesSiteColumns you created earlier in the chapter. The goal will be to have a feature deploy your site column so you can include it in content types and lists later.
You also need to add several other site columns to support the complete newspaper site, but you shall add these columns in a later exercise.
- In your EmpireTimes project, open the
TimesSiteColumnsfeature folder.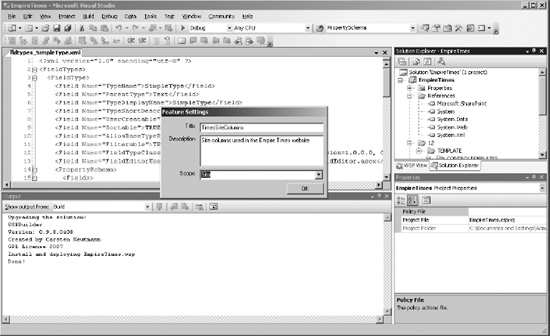
The name you chose for your feature will also be the name used in the feature folder. That folder will be placed alongside all other features in the
[12]TEMPLATEFEATURESfolder. Having a good naming policy, for example by adding an identifier to the front of the feature name, means less chance of having conflicting features. Naming your featureFeatureis not likely to be your wisest move. - Open the
elements.xmlfile.Note that WSPBuilder adds the correct namespace to the Elements element. If you have set up your IntelliSense as described in Chapter 1, you will immediately get IntelliSense support for all CAML files in this namespace.
- Add the following code to your
elements.xmlfile:<?xml version="1.0" encoding="utf-8" ?>
<Elements xmlns="http://schemas.microsoft.com/sharepoint/">
<Field ID=""
Name="ArticleTitle"
StaticName="ArticleTitle"
DisplayName="Article title"
Group="EmpireNews news articles"
Type="TimesFieldType"
/>
</Elements> - Create a new GUID value to use for the ID attribute. The easiest way to do so is to select Tools
 Create GUID in Visual Studio. Select the registry format, and hit Copy to put the new GUID value on your clipboard. Then paste the value into the ID attribute.
 Caution For site columns, you must use the full registry format, including the brackets and hyphens.
 - Open the feature receiver code file located in the
FeatureCodefolder of your solution. It should be namedTimesSiteColumn.csif you named your projectTimesSiteColumns. This file is added by WSPBuilder when you add a Feature with Receiver item. The code throws an exception when the feature is activated, so you need to delete the exceptions for the feature to be deployable. As such, delete the four lines that say this:throw new Exception("The method or operation is not implemented."); - Build and deploy your solution.
- When deployment has finished, go to the root site in your site collection, then to Site Settings, and then to Site Collection Features. Activate your feature, and verify on the Site Columns page that your new column has been added.
If everything went as planned, you should now see your new column in the list, and the column is ready for use from your lists or content types.
Adding More Columns
Of course, having articles with only a title makes no sense. You want to add more columns and at the same time explore some of the other field types and also other methods of creating fields.
We want to add four more columns for use in our articles. You want an introduction, a body text, a picture, a category, and a publishing date. These columns will offer you a variety of field types to create. Table 11-1 shows the columns and their field types.
Table 11-1. Article Columns and Field Types
| Column | Field Type |
Introduction |
Multiple lines of text |
BodyText |
HTML/rich text |
Category |
Lookup |
PublishingDate |
Date/time |
![]() Note I have no idea what data newspapers really use for their articles. I chose these columns for the sake of illustrating different field types.
Note I have no idea what data newspapers really use for their articles. I chose these columns for the sake of illustrating different field types.
Exercise 11-8. Adding More Columns
This exercise will show how different field types require different attributes. You will add three more site columns using the CAML Field definition schema.
- Open your
elements.xmlfile again, and in yourElementselement, add the following three columns:<Field ID="{A9D43B6B-F6D8-4938-B545-0465AB696F97}"
Name="Introduction"
StaticName="Introduction"
DisplayName="Introduction text"
Group="EmpireNews news articles"
Type="Note"
RichText="FALSE"
NumLines="4"
/>
<Field ID="{7439066B-E58A-448a-9BF7-73BE426150DD}"
Name="BodyText"
StaticName="BodyText"
DisplayName="Body text"
Group="EmpireNews news articles"
Type="Note"
RichText="TRUE"
RichTextMode="FullHtml"
NumLines="10"
/>
<Field ID="{B3A86425-7C09-4574-B181-B94E2DA3A07D}"
Name="PublishingDate"
StaticName="PublishingDate"
DisplayName="Publishing date"
Group="EmpireNews news articles"
Type="DateTime"
Format="DateTime"
/> - Build and then deploy or upgrade your solution.
- Activate the feature from the Site Collection Features page. If the feature is still activated from the previous exercise, deactivate first.
- Verify that your site columns appear, and feel free to check the settings to make sure you got everything correct. See Figure 11-9 for how this should look.
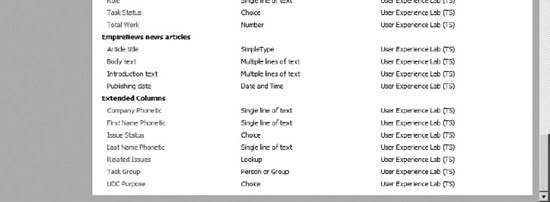
Figure 11-9. Almost all the site columns in place
You might be wondering why we have not added the Category column. We will get to that in a moment.
Lookup Columns
At this point, we have most of our site columns in place. However, we still need to add the Category site column, and that column is a lookup column.
What we are going to do, in the next chapter, is to create a list called Categories, which will hold the different news categories in which we link articles. Categories include Local, Weather, Lifestyle, Sports, and so on. The reason why we want to have a lookup rather than a choice field is that lookup columns are more dynamic.
The problem is that it is not possible to add a lookup column declaratively. Lookup columns have a List attribute in their Field element that points to the list from which the lookup values are gathered.
You might think that simply adding the name of a list to the List attribute would suffice, but unfortunately the List attribute requires the GUID of a list. The GUID of a list in turn is automatically generated when the list is created, meaning it is unique every time you create a list. Either you have to edit the field after the list is created or you must find another solution.
The good news is that modifying a lookup field to connect it to the correct list is relatively easy. The bad news is that finding the correct GUID can be a little awkward at best.
Let's see whether we can find a solution.
Exercise 11-9. Adding a Lookup Column
What you are doing in this exercise is creating a lookup column through a combination of CAML and feature receiver code.
- In your elements file, add the following site column definition:
<Field ID="{79292857-5275-4f45-8A3C-AF482F9FC565}"

        Name="ArticleCategory"

        StaticName="ArticleCategory"

        DisplayName="Article category"

        Group="EmpireNews news articles"

        Type="Lookup"

        List="Categories"

        ShowField="Title"

        />
If you were to deploy this solution now, you would indeed get a lookup column, but it would not be mapped to any list or column. Check out Figure 11-10.
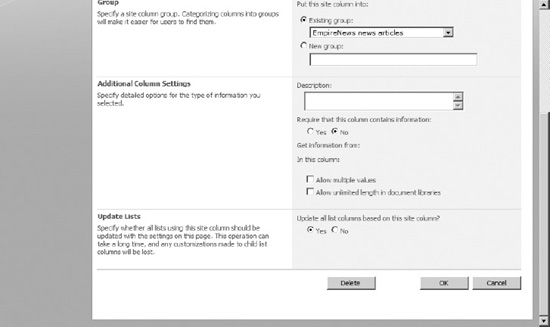
Figure 11-10. No dice. Or list. Or column.
“Ah!” you might say. “That is because the Categories list does not exist.” That would indeed be a valid suggestion, but no amount of Categories list adding will make this solution work, regardless of whether you create the list before or after provisioning the column.
No, you need to do a bit more work and set the list name in the feature receiver code.
- In your
FeatureActivatedmethod, still located in theTimesSiteColumns.csfile, add the following code, right after thearticleField.Update()line:// articleField.Update(); would be just before this
SPFieldLookup categoriesField = (SPFieldLookup)web.Fields["Article category"];
categoriesField.LookupList = "{" +
web.Site.RootWeb.Lists["Categories"].ID.ToString() + "}";
categoriesField.LookupWebId = web.Site.RootWeb.ID;
categoriesField.Update(); - On your site, create a new custom list called Categories. You do not need to do anything with the list at this point; you are only adding the list to test the lookup column.
- Build and then deploy or...oh, for crying out loud, you know the drill, right? Make sure your column looks something like Figure 11-11.
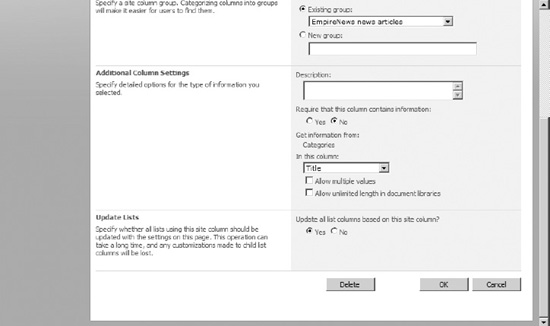
Figure 11-11. Three simple lines of code make all the difference in the world.
In the next chapter, you will be creating the Categories list through a feature, so for now, feel free to delete the list. When you do your lookup column will stop working and you will be back to Figure 11-10.
What we are doing with this code is getting a reference to our newly created column and attaching that column's LookupList property to the ID of a list in the root web of our site collection. Note that the ID of a list is a GUID, while the LookupList expects a string.
You also set the LookupWebId to the root web ID. This allows you to use the lookup column correctly in child sites regardless of where in the site hierarchy you add the column.
![]() Note You are adding
Note You are adding { and } to the LookupList string to enable the site column to properly reference the list in child sites. Omitting the curly brackets will cause the lookup to fail in child sites.
This code is not very dynamic, but it serves the purpose, which is to understand what you need to do to get a LookupField to work.
Our Empire So Far
OK, we have started building the Empire Times newspaper's web site and created a field type and some site columns. Although these columns may not be the most exiting or sexy aspects in the world of SharePoint, they are still vital to getting a site working the way you want.
In the next chapter, we will take our solution one step further and add a list template and a list based on that template.