
C H A P T E R 13
![]()
Accounting Gone Haywire
List, Forms, Reports, Views…Ah, the Bean Counters Will Go Mad!
Lists: either you love them or you need to reconsider SharePoint as your platform of choice.
Everything that is SharePoint revolves around lists of some sort. As good developers, we must thus learn how to work with and develop these lists. After reading this chapter, you will have covered the basics of both list template creation and list instantiation using features.
Mission Objective
In this chapter, we will create a list template from scratch. Actually, we will skip the view construction and just borrow code from the Custom List template.
Next, we will attach our previous content types to that list template and discover some caveats to content type deployment. Finally, we will instantiate two new lists, the “News article” list and the “Article category” list, before we add some logic to make sure our list infrastructure gets created the right way.
List Templates
Our first step is to create the list templates we will use for the news articles. So, without further delay, here is the first exercise.
Exercise 13-1. Creating the First List Template Feature
In this exercise, you will create a list template from scratch. This list template will be expanded in later exercises so that here we focus on what is required to get the template up and running.
- In your EmpireTimes solution, add yet another Feature with Receiver item. Remember to remove the exception from the
.csfile as before. Name the feature something you like, such asTimesLists. - Your new
elements.xmlfile should open; if not, open it. Add the followingListTemplateelement:<ListTemplate Name="TimesArticleList"
Type="10001"
DisplayName="Article list"
Description="List to hold Empire Times news articles"
BaseType="0"
Category="Custom Lists"
OnQuickLaunch="TRUE"
SecurityBits="11"/> - Build, deploy, and then go to the site settings and site features. Activate the
TimesListsfeature. Check your Create page. Your result should resemble Figure 13-1.If you do not see the
TimesListfeature, remember that when you add a feature to a solution, you must redeploy rather than upgrade the solution. If this happens, just retract (uninstall from the WSPBuilder menu), and then deploy the solution again.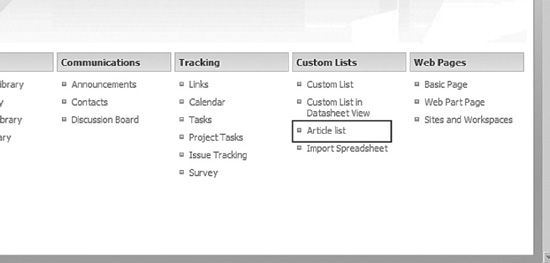
Figure 13-1. First list template installed
Don't try to create a new list from the template yet, though, because we haven't added anything to the template besides the element definition. That means more work ahead, I'm afraid.
Exercise 13-2. Creating Your Basic Schema.xml File
In this exercise, you will create the first basic Schema.xml file and see whether you can make it dance.
- In your
TimesListsfolder, create a new folder. Name it exactly the same as the Name attribute of theListTemplateelement, which would beTimesArticleListif you followed the previous example. - In the newly created
TimesArticleListfolder, create a new XML file calledSchema.xml, and then open that file. - Add the following to the
Schema.xmlfile:<List xmlns="http://schemas.microsoft.com/sharepoint/"
Name="TimesArticleList"
Title="Article list"
BaseType="0"
Url="$Resources:core,lists_Folder;/Articles"
DisableAttachments="TRUE"
Type="10001"
>
<MetaData>
</MetaData>
</List>Note the use of
$Resources:core,lists_Folder;in theUrlattribute. The resource string will make sure that the list can be deployed to the correct URL regardless of the language installed. - Inside the
MetaDataelement, add two child elements,ViewsandForms, as such:<MetaData>
<Fields>
</Fields>
<Views>
</Views>
<Forms>
</Forms>
</MetaData>This is actually all you need to create your list. Not just that, but if you did try to create your list now, it would in fact be created. You will get an error message if you do, but the list will get created. To get something useful out of our list when created, we need to fill the child elements with some more content. Let's start with the simplest addition, and for that we need to borrow a bit of code.
 Note Even if we will not be adding columns to this list in the
 Fieldselement, the empty element must be present to avoid a “Cannot complete this action” error message. Confusingly, the error log in that case will state “Failed to retrieve the list schema for feature [YOUR FEATURE ID], list template 10001; expected to find it at:…” and will state the path to the list directory, even if both the directory and theSchema.xmlfile are present. - Go to the
CustomListfeature in the[12]TEMPLATEFEATURESfolder. In theCustListfolder inside theCustomListfeature, open theSchema.xmlfile.Yup, that's right; we will be borrowing some XML from the default Custom List template. Don't worry—we'll be giving it back later.
- At the very bottom of the custom list
Schema.xml, locate theFormselement. The element contains threeFormchild elements. Copy all three lines into your ownFormselement in theSchema.xmlfile of your own list template. You may also just type in theFormchild elements yourself:<Form Type="DisplayForm" Url="DispForm.aspx"
SetupPath="pagesform.aspx" WebPartZoneID="Main" />
<Form Type="EditForm" Url="EditForm.aspx"
SetupPath="pagesform.aspx" WebPartZoneID="Main" />
<Form Type="NewForm" Url="NewForm.aspx"
SetupPath="pagesform.aspx" WebPartZoneID="Main" />We will customize these forms later, so for now these forms just serve to allow us to test our list and our initial configurations.
Next we need a basic view to help verify list functionality. Again, we borrow code from the Custom List template.
- In the
CustListfeature'sSchema.xmlfile, locate the view that hasBaseViewId="1". In my version, that view starts at line 1019. This is the All Items view, which is set to be the default view for our list.Note We will not be creating a new view from scratch. View construction was covered in Chapter 8. You can relax now. - Copy the entire
Viewelement, and paste it into your ownViewselement.Tip You might want to close the Viewtag to make copying the entire element easier. Check out Figure 13-2.Also, if you want to put your new lists in a web part, such as on the front page, include the
Viewelement withBaseViewId="0"as well. This is the default view used when adding a list as a web part to a web part page.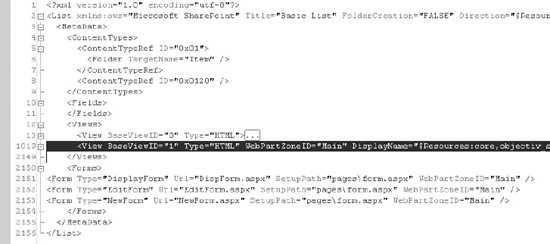
Figure 13-2. Copying the All Items view from the Custom List template
- Build, deploy or upgrade, and check out your Create page. You should now be able to create a new “Article list.” Figure 13-3 shows the results.
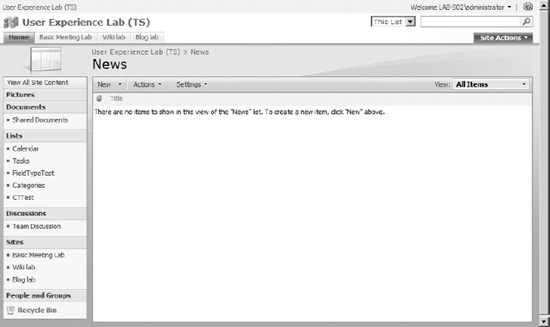
Figure 13-3. First list created
Congratulations! You have just created a new list template almost from scratch. Of course, we borrowed some of the hard work from the custom list, but we will get back to that in a few moments. For now, pat yourself on the back if everything worked as expected, and retrace your steps if something went wrong.

So, yes, you still owe me that review.
Oh, and in case you are wondering where the Title, Created By, and Modified By originate, these come from the BaseType 0 list, defined in the global site definition. The default content type added to a list without any specific content type gets columns added from the BaseType from which the list is generated.
Adding Content Types to Our List
We haven't added any content types to our list yet, and we want to do that, so let's try the most obvious thing first, the ContentTypes element of our list template.
Exercise 13-3. Adding Content Types, Take 1
In this exercise, you will add content type references to the list template using the ContentTypes element.
- In your
MetaDataelement of your list template, add the following code, right after the<MetaData>start tag:<ContentTypes>
<ContentTypeRef ID=""/>
<ContentTypeRef ID=""/>
</ContentTypes> - In the first ID attribute, paste the ID of the “Stand-alone article” content type you created in the previous chapter. In the second ID attribute, paste the ID of the “Series article” content type.
At this point, my
MetaDataelement looks like this:<MetaData>
<ContentTypes>
<ContentTypeRef ID="0x0100F2525ACE8DE54912A7A10724466A6A8001"/>
<ContentTypeRef ID="0x0100F2525ACE8DE54912A7A10724466A6A8002"/>
</ContentTypes>Your content type IDs may be different.
- Build, deploy or upgrade, and then deactivate and reactivate your list feature.
- Try creating a new list, which will succeed if you did everything correctly, and then check out the columns on the List Settings page. Figure 13-4 shows my results, which should be close to your results.
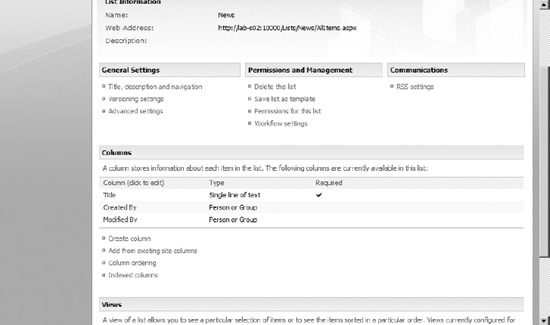
Figure 13-4. No columns added? How strange!
You will notice that none of the columns of your content types are added. Take 1 didn't work as expected. How disappointing.
The problem here is that the child content types do not inherit the parent type's proper- ties correctly. If you had added the NewsArticle root type instead, all the columns would be added as expected, but of course this is not what we want, so we need to look for alternative solutions.
You have a few options for making content types work as expected using the ContentTypes element in the list template:
- Update the content type manually through the web interface. Just go into any column on the content type and hit OK without making changes.
- Add the content type manually to the list. Remember to enable content type management from the advanced settings of the List Settings page.
- Add all the content type columns to the
Fieldselement in your list template.
These options aren't any good, though. The first two options rely on manual labor after creating a list. Imagine the overhead of instructing users to go through the hoops. The last option is a terrible approach because it relies on adding your columns in two places, first in the content type and then in any list using those content types.
No, we need a better approach. Read on….
![]() Note I am going to annoy you a bit. Now that you have created the list, try deleting it.
Note I am going to annoy you a bit. Now that you have created the list, try deleting it.
Not successful? I'll show you why later and provide you with a fix.
Exercise 13-4. Adding Content Types, Take 2
This approach does solve a few of our problems. First, we do get our content types added. Second, we also automatically enable content type management. Third, the columns from the content types are added correctly to the list.
The downside, however, is that we need to know the list URL prior to creating the feature. Since we have no way of modifying the feature after it has been deployed, this method is useful only when we also deploy the list instance using features and thus know the URL prior to creating the content type bindings feature.
Still, this may be useful, especially if you create lists as part of site creation. Next, let's see whether we can find an even better approach.
Exercise 13-5. Adding Content Types, Take 3
Although this method will allow us to add child content types and make them behave as we want, it still has issues. First and foremost, we do not enable management of content types using this method, and thus we will always be given the default content type when adding a new item through the web interface. Second, since management of content types is not enabled, there is no way to change a content type for an existing item.
The benefit of this approach is that we are fixing the inheritance issue at the source. Because of this, we do not need to know the URL of any lists that will use the content type in advance.
Sadly, there is currently no “best-of-both-worlds” solution to the issue of deploying child content types, so you need to take the approach that best fits your needs.
We should move on; there's plenty of work still to be done.
List Forms
Previously we borrowed the Forms section from the default Custom List template. This may or may not be what you need. If it is what you need, feel free to use that method, but if not, here's how to add your own list forms to customize the editing and displaying of list data.
Remember that a list form is only one part of the content type/user experience picture.
Exercise 13-6. Adding Custom List Forms
In this exercise, you will create and add your own list form to the list template. The process is similar for all three types of list forms, so for now, you will modify only the DisplayForm page.
- In your
TimesList/TimesArticleListfolder, create a new text file, and name itDisplayForm.aspx.The file should be located next to theSchema.xmlfile.Using a text file and naming it
.aspxwill make Visual Studio recognize the file as an ASP.NET file even if the original file type is text. - Copy the contents of the
[12]TEMPLATEPagesform.aspxfile into your new file.Note that the ASPX file uses the
default.masterpage, and thus you are limited to editing theContentPlaceHoldercontent. - Make a modification to the code in your own file. For example, add a comment to the
<td>HTML element inside thePlaceHolderMaincontent placeholder at line 15.Copying the out-of-the-box code may seem meaningless. As with the display form template for our content type, I have avoided pasting pages and pages of ASP.NET and kept the sample design code in a downloadable file. You can get that code from
http://www.understandingsharepoint.com/url/20003. - Open your
Schema.xmlfile. Go to theFormselement, and modify theFormelement for theDisplayFormas such:<Form Type="DisplayForm" Url="DispForm.aspx" Path="DisplayForm.aspx"
WebPartZoneID="Main" /> - Build, deploy, and so on. Create a new list from the “Article list” template. Add an item, and then click the item to go to the display form. If you have downloaded the sample code and added the included master page, you should see something resembling Figure 13-5.
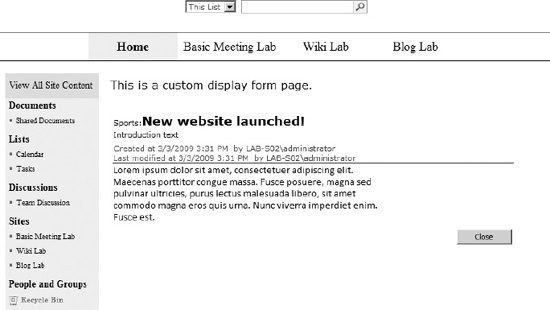
Figure 13-5. Custom display form page quite unlike regular SharePoint
Note that in the previous example you do not see the fancy, red background rendering of the article title. This is because the sample in the download uses
DataFormWebPart, which in turn uses XSLT to extract just the value, and not the rendering, of the column.If you like, repeat the process for the
NewFormand theEditFormof your list.
![]() Note When creating your own custom list form pages, remember to match any changes in the
Note When creating your own custom list form pages, remember to match any changes in the WebPartZoneId of the Form element to the web part zone in your page.
List Instances
Although it is extremely simple, we now have a working list template from which we can create our new list. We need to create two lists actually, both the article list and the category list to which the Article Category lookup column will be linked.
Let's start with the article list, because the category list will cause us a bit of a problem.
Exercise 13-7. Adding a List Instance
In this exercise, you will add a list instance based on the “Article list” template to our solution.
- In the
TimesListsfolder, add a new XML file calledArticleList.xml.This list will hold the list instance element for our new article list.
Tip To get CAML IntelliSense, remember that you can go to the Properties pane of the XML file and add the wss.xsdschema to theSchemasproperty. Refer to Chapter 1 for specific instructions. - Open the
Feature.xmlfile of theTimesListsfeature. Add the following line to theElementManifestselement:<ElementManifest Location="ArticleList.xml"/>This line will include our new XML file in the feature.
- In the
ArticleList.xmlfile, add the followingElementsandListInstanceelements:<Elements xmlns="http://schemas.microsoft.com/sharepoint/">
<ListInstance TemplateType="10001"
FeatureId=""
Title="News"
Url="$Resources:core,lists_Folder;/News"
/>
</Elements> - In the
FeatureIdof theListInstanceelement, add the ID of theTimesListfeature. You will find this in theFeature.xmlfile. - Build and then deploy or upgrade. Deactivate and reactivate the
TimesListfeature. Verify that the new list gets created. Also check out the list settings to verify that the correct columns are added. Figure 13-6 shows your first list.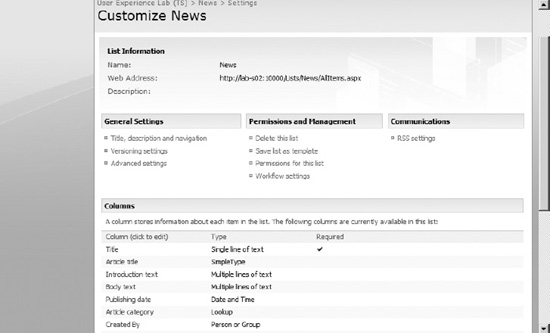
Figure 13-6. Your first list. Woo-hoo!
Right! That wasn't too painful, was it?
Adding the Categories List
The Categories list is where we will store news categories. The site column Article Category, which we created in Chapter 11, is linked to this list. We can create this list from the Custom List template, so we don't need to create a new list template for the Categories list.
It would seem that adding the category list would be really easy now. It is, but there is also a caveat. Let's take a look at what does not work.
Exercise 13-8. Adding the Categories List, Take 1
In this exercise, you will expand the TimesList feature by adding the Categories list.
![]() Caution Pay close attention to the last step in this exercise, or you will get in trouble.
Caution Pay close attention to the last step in this exercise, or you will get in trouble.
- In the
TimesListsfolder, add a new XML file calledCategoriesList.xml.This list will hold the list instance element for our new Categories list.
- Open the
Feature.xmlfile of theTimesListsfeature. Add the following line to theElementManifestselement:<ElementManifest Location="CategoriesList.xml"/> - In the
CategoriesList.xmlfile, add the followingElementsandListInstanceelements:<Elements xmlns="http://schemas.microsoft.com/sharepoint/">
<ListInstance TemplateType="100"
FeatureId="00BFEA71-DE22-43B2-A848-C05709900100" Title="Categories"
RootWebOnly="TRUE"
Url="$Resources:core,lists_Folder;/Categories"
>
<Data>
</Data>
</ListInstance>
</Elements>The
FeatureIdpoints to theCustomListsfeature that ships out of the box with SharePoint. TheTemplateType100 is theCustListtemplate within that feature. So, we are basically just creating a new list instance based on the out-of-the-box Custom List template (just so you know).Also note the addition of the
RootWebOnly="TRUE"attribute. This prevents the list from being created on subwebs. We need the Categories list only on the root web to support the site columnArticle category. - Inside the
ListInstanceelement, add aRowselement and then someRowelements as such:<Data>
<Rows>
<Row>
<Field Name="Title">Local news</Field>
</Row>
<Row>
<Field Name="Title">Weather</Field>
</Row>
<Row>
      <Field  Name="Title">Sports</Field>

    </Row>

  </Rows>

</Data>
Each of these Row child elements adds a new item to the list. We set
Titlebecause this is the only visible column of the custom list. You can add more items if you feel like it; just repeat the Row element and add differentTitlevalues. - Do not build, deploy, or upgrade. I am not joking—do not build, deploy, or upgrade after this exercise.
This is important: you cannot deploy your solution at this point. Read on, and I will explain why.
It All Depends on This...
So, why can we not deploy the solution now? At this point, we have three main components in our solution. First, there are the site columns, one of which is a lookup column to a list, and then there's the Categories list, which we are about to create. So, to activate the site columns feature, we must first make sure we activate the lists feature.
Now, the lists feature adds a content type, or two actually, to the list. So, it makes sense to have the list dependent on the content type being activated. You may see where this is going.
The content type is utilizing the site columns we added, including the lookup column. So, now the content type depends on the site columns feature, which depends on the list feature, which depends on the content type feature. Circular references and madness ahead. But we are smarter than that, aren't we?
Exercise 13-9. Adding the Categories List, Take 2
Fixing the List Deletion Problem
You may have been surprised by a small issue with the News list. If you try to delete the list, regardless of whether you have items in the list, you will get a message saying “Cannot delete news. If it happened, it happened.” Of course, you remember that we set up an event handler to give us this message in the previous chapter.
This may be surprising because there are no items in the list and the event handler that causes this error is connected to the ItemDeleting event. Even if you have no items in the list, the ItemDeleting event handler prevents you from deleting the list. Why?
The answer becomes clear after a bit of SharePoint Manager investigation. Open your list in SPM, and look at the items there (see Figure 13-7).
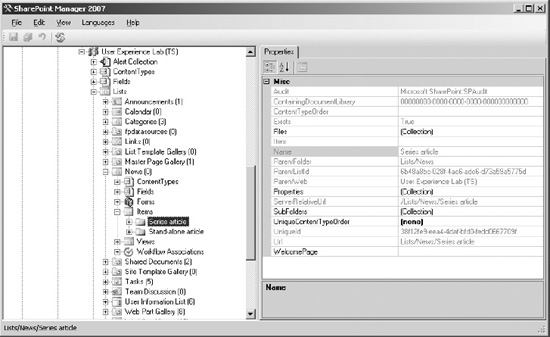
Figure 13-7. Mystery solved.
When we add a content type to a list, SharePoint creates two folders to hold content type resources for us. And, as we remember from Chapter 8, folders are nothing but normal items with a specific content type inheritance. Thus, the ItemDeleting event is fired for these two folder items, preventing us from deleting the list.
Let's see whether we can fix this annoyance.
Exercise 13-10. Fixing the ItemDeleted Event Handler
Accountants, Go Home!
We're done with lists for now. No more. The accountants may have had a field day, but we are going home. Or, at least, we are going to go to the next chapter.
Our empire is growing steadily. Using the current code, we are able to get our news web site up and running. But we want more….
In the next two chapters, we will expand our solution to add some custom pages to our site and additionally wrap up everything into a single site definition. After that, we will have a complete SharePoint site ready to deploy at the click of a button.
You know that's just a saying, right?
See you on the next page.