Microsoft Visual Studio 2008 is an extremely versatile and powerful environment for developing .NET applications. This chapter explores some of the commonly used features that you will likely use in the process of your development work. Because there are literally hundreds and thousands of ways in which you can customize Visual Studio 2008, this chapter can only explore, for the most part, the default settings in Visual Studio. While some of the topics covered are discussed in more detail in subsequent chapters, you'll want to breeze through this chapter to get an overall look at this version of Visual Studio.
This chapter examines:
Components of the IDE (Menu bar, Toolbar, Toolbox, and so on)
Code and Text Editor and the features it contains, including IntelliSense and Refactoring support
Using the debugger in Visual Studio 2008
Unit testing in Visual Studio 2008
In early 2008, Microsoft released the latest version of Visual Studio — Visual Studio 2008. With it comes a plethora of editions designed for the different types of developers in mind:
Visual Web Developer 2008 Express Edition
Visual Basic 2008 Express Edition
Visual C# 2008 Express Edition
Visual C++ 2008 Express Edition
Visual Studio 2008 Standard Edition
Visual Studio 2008 Team System 2008 Architecture Edition
Visual Studio 2008 Team System 2008 Database Edition
Visual Studio 2008 Team System 2008 Development Edition
Visual Studio 2008 Team System 2008 Test Edition
Visual Studio 2008 Team System 2008 Team Suite
For a detailed discussion of the features available in each edition, check out the following URL:
http://msdn.microsoft.com/en-us/vs2008/products/cc149003.aspx.
The Express editions are designed for hobbyists and are available for download at no charge. This is a great way to get started with Visual Studio 2008 and is ideal for students and beginning programmers. However, if you are a professional developer, you should purchase either the Standard or Professional Edition. Note that if you are developing Windows Mobile applications, you need the Professional Edition (or higher). If you are working in a large development environment and need to develop collaboratively with other developers on large projects, check out the Team System editions.
If you are not ready to purchase Visual Studio 2008, you can always download a 90-day trial edition of Visual Studio 2008 Professional from
http://msdn.microsoft.com/en-us/vs2008/products/cc268305.aspx.
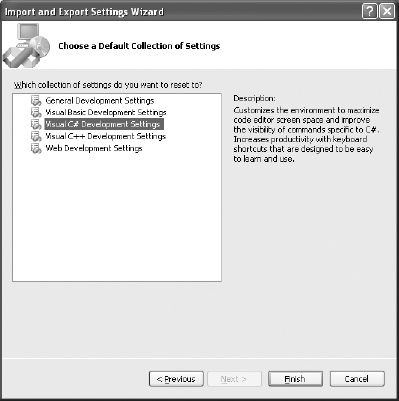
The first time you launch Visual Studio 2008, you choose the default environment settings. If you are going to use the C# language most of the time, choose the Visual C# Development Settings (see Figure 2-1). Choosing this option does not mean that you cannot use other languages (such as Visual Basic); it just means that C# will be listed as the default project type when you create a new project.

If the Visual C# Development Settings is chosen, Visual C# appears at the top of the Project Types list (see the left screenshot in Figure 2-2). In contrast, choosing the General Development Settings puts the Visual Basic language at the top (see the right screenshot in Figure 2-2).

If for some reason you want to change the development settings after you have set them, you can always select Tools

To reset to another setting, check the Reset All Settings option and click Next. In the next step, you can choose either to save your current settings or to just reset the settings without saving. Once you have selected the option, click Next, and you can select another setting (see Figure 2-4).
After you select a default setting, Visual Studio 2008 takes a couple of minutes to initialize. Once that's done, you will see something as shown in Figure 2-5.

To create a new project, select File

In the Visual C# development setting, you see the New Project dialog shown in Figure 2-7.

The default project name (WindowsFormApplication1 in this example) is provided, along with the following:
The default location for saving the project.
The solution name. The solution name by default is the same as your project name and is changed automatically to be the same as the project name. However, you can modify the solution name if you want it to have a different name than the project name.
A separate directory to store the solution; if you uncheck the Create Directory For Solution checkbox, a solution is not be created for your project.
You can target a different version of the .NET Framework by selecting it from the dropdown list at the top right corner of the New Project dialog (see Figure 2-8).
Remember: A solution contains one or more projects.

Figure 2-9 shows the various parts of the Visual Studio 2008 development environment.

These parts are described in the following sections.
The Menu bar contains standard Visual Studio commands. For example, Figure 2-10 shows that the File menu (see Figure 2-10) contains commands that enable you to create new projects, open existing projects, save the current form, and so on.

To customize the items displayed in the Menu bar, select Tools

To add a new submenu item to a main menu item, click the Rearrange Commands button. In the Rearrange Commands dialog (see Figure 2-12), select the menu you want to customize, and click the Add button. You can then select the various submenu items from the different categories to add to the menu.

The Toolbar (see Figure 2-13) contains shortcuts to many of the often used commands contained in the Menu bar.
As with the Menu bar, the Toolbar is also customizable. To add additional toolbars, simply right-click on any existing toolbar and check the toolbar(s) you want to add to Visual Studio from the list of toolbars available (see Figure 2-14).

To customize the Toolbar, select Tools

As with the Menu bar, you can also rearrange the items displayed in each toolbar. To customize the items displayed in the Toolbar, select Toolsv

Each toolbar in the Toolbar can also be physically rearranged in Visual Studio by dragging the four-dot line on the left edge of the toolbar (see Figure 2-17) and relocating it to the new desired position.

The Toolbox (see Figure 2-18) contains all the controls that you can use in your applications. You can drag controls from the Toolbox and drop them onto the design surface of your application.

Each tab in the Toolbox contains controls that are related to a specific purpose. You can create your own tab to house your own controls. To do so, right-click on the Toolbox and select Add Tab. Name the newly created tab (see Figure 2-19).

To add controls to the Toolbox, right-click on the tab to which you want the controls added and select Choose Items. The Choose Toolbox Items dialog (see Figure 2-20) opens.

You can add the following types of controls to the Toolbox:
.NET Framework components
COM components
WPF components
Workflow activities
You can also click the Browse button to locate the .dll file that contains your own custom controls.
Another way to add controls to the Toolbox is to simply drag the DLL containing the controls and drop it directly onto the Toolbox.
You can relocate the Toolbox by dragging it and repositioning it on the various anchor points on the screen. Figure 2-21 shows the anchor points displayed by Visual Studio 2008 when you drag the Toolbox.

If you have limited screen real estate, you might want to auto-hide the Toolbox by clicking the Auto Hide button (see Figure 2-22).

The Solution Explorer window contains all the files and resources used in your project. A solution contains one or more projects. Figure 2-23 shows the various buttons available in the Solution Explorer.
Note
The buttons in the Solution Explorer window are context sensitive, which means that some buttons will not be visible when certain items are selected. For instance, if you select the project name, the View Code and View Designer buttons will not be shown.

To add additional items such as a Windows Form or a Class to your current project, right-click the project name in Solution Explorer, select Add (see Figure 2-24), and then choose the item you want to add from the list.

You can also add new (or existing) projects to the current solution. To do so, right-click on the solution name in Solution Explorer, select Add (see Figure 2-25), and then select what you want to add.

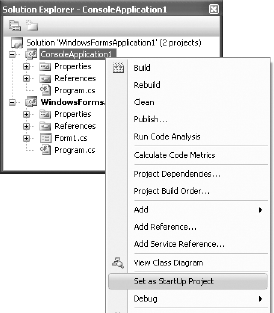
When you have multiple projects in a solution, one of the projects will be set as the startup project (the project name that is displayed in bold in Solution Explorer is the startup project). That is, when you press F5 to debug the application, the project set as the startup project will be debugged. To change the startup project, right-click the project that you want to set as the startup and select Set as Startup Project (see Figure 2-26).
To debug multiple projects at the same time when you press the F5 key, set multiple projects as the startup projects. To do so, right-click on the solution name in Solution Explorer and select Properties.
Select the Multiple Startup Projects option (see Figure 2-27), and set the appropriate action for each project (None, Start, or Start Without Debugging).

Then when you press F5, the projects configured to start launch at the same time.
The Properties window shows the list of properties associated with the various items in your projects (Windows Forms, controls, projects, solutions, etc).
Figure 2-28 shows the Properties window displaying the list of properties of a Windows Form (Form1, in this example). By default, the properties are displayed in Categorized view, but you can change it to Alphabetical view, which lists all the properties in alphabetical order.

All default property values are displayed in normal font, while nondefault values are displayed in bold. This feature is very useful for debugging because it enables you to quickly trace the property values that you have changed.
Besides displaying properties of items, the Properties window also displays events. When the Properties window is displaying an item (such as a Windows Form or a control) that supports events, you can click the Events icon (see left side of Figure 2-29) to view the list of events supported by that item. To create an event handler stub for an event, simply double-click the event name and Visual Studio 2008 automatically creates an event handler for you (see right side of Figure 2-29).

The Error List window (see Figure 2-30) is used to display:

To display the Error List window, select View
You can double-click on an error message to open the source file and locate the position of the error. Once the error is located, press F1 for help.
The Output window (View
Console.WriteLine(DateTime.Now.ToString());
Figure 2-31 shows the message displayed in the Output window.

The Designer window enables you to visually design the UI of your application. Depending on the type of projects you are creating, the Designer displays a different design surface where you can drag and drop controls onto it. Figure 2-32 shows the Designer for creating different types of projects — Windows Forms (left), Windows Mobile (right), and Web (bottom left).
To switch to the code-behind of the application, you can either double-click on the surface of the designer, or right-click the item in Solution Explorer and select View Code. For example, if you are developing a Windows Forms application, you can right-click on a form, say Form1.cs, in Solution Explorer and select View Code. The code-behind for Form1 then displays (see Figure 2-33).


Code view is where you write the code for your application. You can switch between design view and code view by clicking on the relevant tabs (see Figure 2-34).

In Visual Studio, you can right-click on the tabs (see Figure 2-35) to arrange the code view either horizontally or vertically, to maximize the use of your monitor(s).
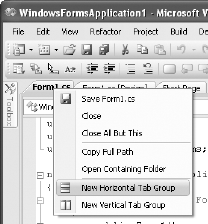
Figure 2-36 shows the code view and design view displaying horizontally.
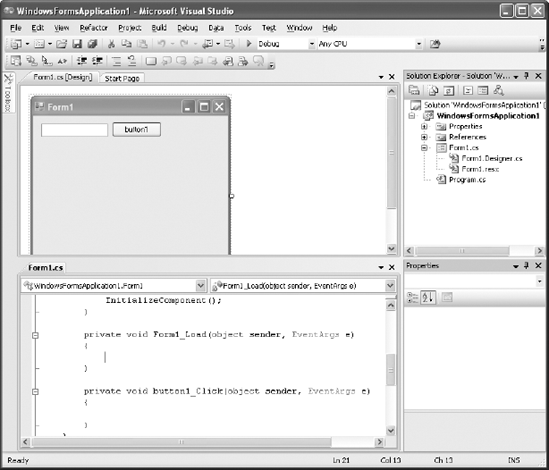
Figure 2-37 shows the code view and design view displaying vertically.

Having multiple views at the same time is useful if you have a big monitor (or multiple monitors).
Within the code view of Visual Studio 2008 is the Code and Text Editor, which provides several rich features that make editing your code easy and efficient, including:
Code Snippets
IntelliSense statement completion
IntelliSense support for object properties, methods and events
Refactoring support
The Code Snippet feature in Visual Studio 2008 enables you to insert commonly used code blocks into your project, thereby improving the efficiency of your development process. To insert a code snippet, right-click on the location where you want to insert the code snippet in the Code Editor, and select Insert Snippet (see Figure 2-38).

Select the snippet category by clicking on the category name (see the top of Figure 2-39) and then selecting the code snippet you want to insert (see bottom of Figure 2-39).

For example, suppose that you select the try code snippet. The following block of code will be inserted automatically:
private void Form1_Load(object sender, EventArgs e)
        {
            try
            {

            }
            catch (Exception)
            {

                throw;
            }
        }
You can also use the Surround With code snippets feature. Suppose that you have the following statements:
private void Form1_Load(object sender, EventArgs e)
        {
            int num1 = 5;
            int num2 = 0;
            int result = num1 / num2;
        }
The third statement is dangerous because it could result in a division-by-zero runtime error, so it would be good to wrap the code in a try-catch block. To do so, you can highlight the block of code you want to put within a try-catch block and right-click it. Select Surround With (see Figure 2-40), and then select the try code snippet.

Your code now looks like this:
private void Form1_Load(object sender, EventArgs e)
        {
            try
            {
                int num1 = 5;
                int num2 = 0;
                int result = num1 / num2;
            }
            catch (Exception)
            {

                throw;
            }
        }
IntelliSense is one of the most useful tools in Visual Studio 2008. IntelliSense automatically detects the properties, methods, events, and so forth of an object as you type in the code editor. You do not need to remember the exact member names of an object because IntelliSense helps you by dynamically providing you with a list of relevant members as you enter your code.
For example, when you type the word Console in the code editor followed by the ., IntelliSense displays a list of relevant members pertaining to the Console class (see Figure 2-41).

When you have selected the member you want to use, press the Tab key and IntelliSense will insert the member into your code.
IntelliSense in Visual Studio 2008 has some great enhancements. For example, the IntelliSense dropdown list often obscures the code that is behind when it pops up. You can now make the dropdown list disappear momentarily by pressing the Control key. Figure 2-42 shows the IntelliSense dropdown list blocking the code behind it (top) and having it be translucent by pressing the Control key (bottom).

You can also use IntelliSense to tidy up the namespaces at the top of your code. For example, you often import a lot of namespaces at the beginning of your code and some of them might not ever be used by your application. In Visual Studio 2008, you can select the namespaces, right-click, and select Organize Usings (see Figure 2-43).

Remove all unused using statements
Sort the using statements alphabetically
Remove all unused using statements and sort the remaining namespace alphabetically
Another useful feature available in Visual Studio 2008 is code refactoring. Even though the term may sound unfamiliar, many of you have actually used it. In a nutshell, code refactoring means restructuring your code so that the original intention of the code is preserved. For example, you may rename a variable so that it better reflects its usage. In that case, the entire application that uses the variable needs to be updated with the new name. Another example of code refactoring is extracting a block of code and placing it into a function for more efficient code reuse. In either case, you would need to put in significant amount of effort to ensure that you do not inadvertently inject errors into the modified code. In Visual Studio 2008, you can perform code refactoring easily. The following sections explain how to use this feature.
Renaming variables is a common programming task. However, if you are not careful, you may inadvertently rename the wrong variable (most people use the find-and-replace feature available in the IDE, which is susceptible to wrongly renaming variables). In C# refactoring, you can rename a variable by selecting it, right-clicking, and choosing Refactoring

You are prompted for a new name (see Figure 2-45). Enter a new name, and click OK.

You can preview the change (see Figure 2-46) before it is applied to your code.

Click the Apply button to change the variable name.
Very often, you write repetitive code within your application. Consider the following example:
private void Form1_Load(object sender, EventArgs e)
        {
            int num = 10, sum = 0;
            for (int i = 1; i <= num; i++)
            {
                sum += i;
            }
        }
Here, you are summing up all the numbers from 1 to num, a common operation. It would be better for you to package this block of code into a function. So, highlight the code (see Figure 2-47), right-click it, and select Refactor

Supply a new name for your method (see Figure 2-48). You can also preview the default method signature that the refactoring engine has created for you. Click OK.

The block of statements is now encapsulated within a function and the original block of code is replaced by a call to that function:
private void Form1_Load(object sender, EventArgs e)
        {
            Summation();
        }

        private static void Summation()
        {
            int num = 10, sum = 0;
            for (int i = 1; i <= num; i++)
            {
                sum += i;
            }
        }
However, you still need to do some tweaking because the variable sum should be returned from the function. The code you highlight will affect how the refactoring engine works. For example, if you include the variables declaration in the highlighting, a void function is created.
While the method extraction feature is useful, you must pay close attention to the new method signature and the return type. Often, some minor changes are needed to get what you want. Here's another example:
Single radius = 3.5f;
            Single height = 5;
            double volume = Math.PI * Math.Pow(radius, 2) * height;
If you exclude the variables declaration in the refactoring (instead of selecting all the three lines; see Figure 2-49) and name the new method VolumeofCylinder, a method with two parameters is created:
private void Form1_Load(object sender, EventArgs e)
        {
            Single radius = 3.5f;
            Single height = 5;
            double volume = VolumeofCylinder(radius, height);
        }

        private static double VolumeofCylinder(Single radius, Single height)
        {
            return Math.PI * Math.Pow(radius, 2) * height;
        }
Here are some observations:
Variables that are defined outside of the highlighted block for refactoring are used as an input parameter in the new method.
If variables are declared within the block selected for refactoring, the new method will have no signature.
Values that are changed within the block of highlighted code will be passed into the new method by reference.
You can use code refactoring to reorder the parameters in a function. Consider the following function from the previous example:
private static double VolumeofCylinder(Single radius, Single height)
{
return Math.PI * Math.Pow(radius, 2) * height;
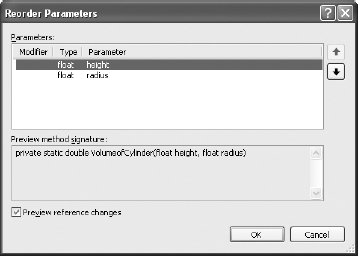
}Highlight the function signature, right-click it, and select Refactor

You can then rearrange the order of the parameter list (see Figure 2-51).
Click OK. You can preview the changes before they are made (see Figure 2-52).
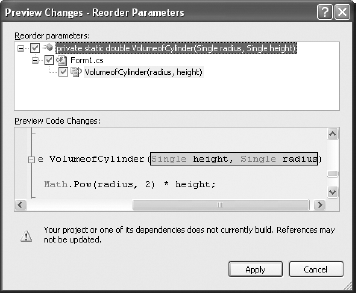
Once you click the Apply button, your code is changed automatically:
private void Form1_Load(object sender, EventArgs e)
        {
            Single radius = 3.5f;
            Single height = 5;
            double volume = VolumeofCylinder(height, radius);
        }

        private static double VolumeofCylinder(Single height, Single radius)
        {
            return Math.PI * Math.Pow(radius, 2) * height;
        }
All statements that call the modified function will have their arguments order changed automatically.
You can also remove parameters from a function by highlighting the function signature, right-clicking, and selecting Refactor

Consider the following string declaration:
namespace WindowsFormsApplication1
{
    public partial class Form1 : Form
    {
        public string caption;

        private void Form1_Load(object sender, EventArgs e)
        {
           //...
        }
    }
}
Instead of exposing the caption variable as public, it is a better idea to encapsulate it as a property and use the set and get accessors to access it. To do that, right-click on the caption variable and select Refactor

Assign a name to your property (see Figure 2-55). You have the option to update all external references or all references (including the one within the class), and you can choose to preview your reference changes. When you're ready, click OK.

After you've previewed the changes (see Figure 2-56), click Apply to effect the change.

Here is the result after applying the change:
namespace WindowsFormsApplication1
{
    public partial class Form1 : Form
    {
        private string caption;

        public string Caption
        {
            get { return caption; }
            set { caption = value; }
        }

        private void Form1_Load(object sender, EventArgs e)
        {
           //...
        }
    }
}You can use the refactoring engine to extract an interface from a class definition. Consider the following Contact class:
namespace WindowsFormsApplication1
{
    class Contact
    {
        public string FirstName
        {
            get;
            set;
        }
        public string LastName
        {
            get;
            set;
        }
        public string Email
        {
            get;
            set;
        }
        public DateTime DOB
        {
            get;
            set;
        }
    }
}
Right-click the Contact class name and select Refactor

The Extract Interface dialog opens, and you can select the individual public members to form the interface (see Figure 2-58).

The new interface is saved in a new .cs file. In this example, the filename is IContact.cs:
using System;
namespace WindowsFormsApplication1
{
    interface IContact
    {
        DateTime DOB { get; set; }
        string Email { get; set; }
        string FirstName { get; set; }
        string LastName { get; set; }
    }
}
The original Contact class definition has now been changed to implements the newly created interface:
class Contact : WindowsFormsApplication1.IContact
    {
        public string FirstName
...You can promote a local variable into a parameter. Here's an example:
private void Form1_Load(object sender, EventArgs e)
        {
            LogError("File not found.");
        }

        private void LogError(string message)
        {
            string SourceFile = "Form1.cs";
            Console.WriteLine(SourceFile + ": " + message);
        }
You want to promote the variable SourceFile into a parameter so that callers of this function can pass in its value through an argument. To do so, select the variable SourceFile, right-click, and then select Refactor

Note that the local variable to be promoted must be initialized or an error will occur. The promoted variable is now in the parameter list and the call to it is updated accordingly:
private void Form1_Load(object sender, EventArgs e)
        {
            LogError("File not found.", "Form1.cs");
        }

        private void LogError(string message, string SourceFile)
        {
            Console.WriteLine(SourceFile + ": " + message);
        }
Debugging is an important part of the development cycle. Naturally, Visual Studio 2008 contains debugging tools that enable you to observe the runtime behavior of your program. This section takes a look at those tools.
Suppose that you have the following program:
using System;
using System.Windows.Forms;

namespace WindowsFormsApplication1
{
    public partial class Form1 : Form
    {
        public Form1()
        {
            InitializeComponent();
        }

        private void Form1_Load(object sender, EventArgs e)
        {
            Console.WriteLine("Start");
            printAllOddNumbers(9);
            Console.WriteLine("End");
        }

        private void printAllOddNumbers(int num)
        {
            for (int i = 1; i <= num; i++)
            {
                if (i % 2 == 1)
                {
                    Console.WriteLine(i);
                }
            }
        }
    }
}
The following sections show how you can insert breakpoints into the application so that you can debug the application during runtime.
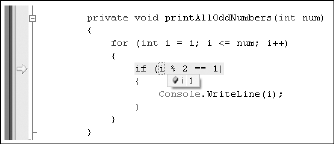
To set a breakpoint in your application, in the Visual Studio 2008 Code Editor, click in the left column beside the statement at which you want to set the breakpoint (see Figure 2-60).

Press F5 to debug the application. When the execution reaches the statement with the breakpoint set, Visual Studio 2008 pauses the application and shows the breakpoint (see Figure 2-61).

With the application stopped at the breakpoint, you have a choice of what to do:
Step Into — Press F11 (see Figure 2-62). Stepping into the code means that if the breakpoint statement is a function call, execution is transferred to the first statement in the function and you can step through the function one statement at a time.
Step Over — Press F10. Stepping over the code means that if the breakpoint statement is a function call, the entire function is executed and control is transferred to the next statement after the function.
Step Out — Press Shift+F11 to step out of the code (Step Out). If the statement at the breakpoint is part of a function, execution is resumed until the function exits. The control is transferred to the returning point in the calling function.
Step Into and Step Over are basically the same, except when it comes to executing functions.

While you are at a breakpoint stepping through the code (using either F10 or F11), you can also examine the values of variables by hovering the mouse over the object you want to examine. Figure 2-63 shows value of i when the mouse is over i.
You can also right-click on the object you want to monitor and select Add Watch or QuickWatch (see Figure 2-64).

When you use the Add Watch feature, the variable you are watching will be displayed in the Watch window (see Figure 2-65). As you step through your code, changes in the variable are reflected in the Watch window. In addition, you have the option to change the value of the variable directly in the Watch window.

The QuickWatch feature also enables you to monitor the value of variables, except that the execution cannot continue until you have closed the QuickWatch window (see Figure 2-66). You can also enter an expression to evaluate and at the same time add a variable into the Add Watch window.

To automatically view all the relevant variables in scope, you can launch the Autos window (see Figure 2-67) during a breakpoint by selecting Debug

You can use the Immediate Window (see Figure 2-68) at runtime to evaluate expressions, execute statements, print variable values, and so on. You can launch the Immediate window during a breakpoint by selecting Debug

Application testing is one of the tasks that every programmer worth his salt needs to do. For example, after writing a class, you often need to write additional code to instantiate the class and test the various methods and properties defined within it. Visual Studio 2008 Professional (and higher) provides a Unit Testing feature to auto-generate the code needed to test your application.
This section demonstrates how unit testing is performed in Visual Studio 2008. Use the following Point class definition located within a Class Library project:
using System;
using System.Collections.Generic;
using System.Linq;
using System.Text;

namespace UnitTesting
{
    class Point
    {
        public Point() { }
        public Point(int x, int y)
        {
            this.x = x;
            this.y = y;
        }

        public int x { get; set; }
        public int y { get; set; }

        //---calculates the length between 2 points
        public double length(Point pointOne)
        {
            return Math.Sqrt(
                Math.Pow(this.x - pointOne.x, 2) +
                Math.Pow(this.y - pointOne.y, 2));
        }
    }
}For this example, create a unit test to test the length() method. To do so, right-click on the length() method and select Create Unit Tests (see Figure 2-69).

In the Create Unit Tests dialog, select any other additional members you want to test and click OK (see Figure 2-70).

You are prompted to name the test project. Use the default TestProject1 and click Create. You may also be prompted with the dialog shown in Figure 2-71. Click Yes.

The TestProject1 is be added to Solution Explorer (see Figure 2-72).

The content of the PointTest.cs class is now displayed in Visual Studio 2008. This class contains the various methods that you can use to test the Point class. In particular, note the lengthTest() method:
/// <summary>
        ///A test for length
        ///</summary>
        [TestMethod()]
        public void lengthTest()
        {
            Point target = new Point(); // TODO: Initialize to an appropriate value
            Point pointOne = null; // TODO: Initialize to an appropriate value
            double expected = 0F; // TODO: Initialize to an appropriate value
            double actual;
            actual = target.length(pointOne);
            Assert.AreEqual(expected, actual);
            Assert.Inconclusive("Verify the correctness of this test method.");
        }
The lengthTest() method has the [TestMethod] attribute prefixing it. Methods with that attribute are known as test methods.
Now modify the implementation of the lengthTest() method to basically create and initialize two Point objects and then call the length() method of the Point class to calculate the distance between the two points:
/// <summary>
    ///A test for length
    ///</summary>
    [TestMethod()]
    public void lengthTest()
    {
        int x = 3;
        int y = 4;

        Point target = new Point(x, y);
        Point pointOne = new Point(0,0);
        double expected = 5F;
        double actual;
        actual = target.length(pointOne);
        Assert.AreEqual(expected, actual,
            "UnitTesting.Point.length did not return the expected value.");
    }
Once the result is returned from the length() method, you use the AreEqual() method from the Assert class to check the returned value against the expected value. If the expected value does not match the returned result, the error message set in the AreEqual() method is displayed.
Before you run the unit test, take a look at the Test Tools toolbar (see Figure 2-73) automatically shown in Visual Studio 2008.

To run the unit test, click the Run All Tests in Solution button in the toolbar. In this case, the lengthTest() method passed the test. The length between two points (3,4) and (0,0) is indeed 5 (see Figure 2-74).

You can make modifications to the lengthTest() method to test other parameters. In the Test Results window, you have the option to view the previous test results (see Figure 2-75).

You need to take special note when your test involves comparing floating point numbers. Consider the following example:
[TestMethod()]
        public void lengthTest()
        {
            int x = 4;
            int y = 5;

            Point target = new Point(x, y);
            Point pointOne = new Point(1,2);
            double expected = 4.24264F;
            double actual;
            actual = target.length(pointOne);
            Assert.AreEqual(expected, actual,
               "UnitTesting.Point.length did not return the expected value.");
        }
When you run the test, the test will fail (see Figure 2-76).

Why is this so? The reason is that floating point numbers (such as Single and Double) are not stored exactly as what they have been assigned. For example, in this case, the value of 4.24264 is stored internally as 4.2426400184631348, and the result returned by the length() method is actually 4.2426406871192848. The AreEqual() method actually fails if you compare them directly.
To address this issue, the AreEqual() method supports a third parameter — delta — that specifies the maximum difference allowed for the two numbers that you are comparing. In this case, the difference between the two numbers is 0.0000066865615. And so the following code will pass the test:
Assert.AreEqual(expected, actual, 0.0000066865616,
       "UnitTesting.Point.length did not return the expected value.");
But this code will fail:
Assert.AreEqual(expected, actual, 0.0000066865615,
       "UnitTesting.Point.length did not return the expected value.");

   Assert.AreEqual(expected, actual, 0.0000066865614,
       "UnitTesting.Point.length did not return the expected value.");
Although the documentation says that the delta specifies the maximum difference allowed for the two numbers, in actual testing the difference should be less than the delta for the Assert.AreEqual() method to pass. This explains why that first statement fails.
You can insert additional test methods by adding new subroutines to the PointTest.cs file and prefixing them with the [TestMethod] attribute. For example, the following test method uses the AreSame() method of the Assert class to check whether two objects are pointing to the same reference:
[TestMethod()]
        public void objectTest()
        {
            Point point1 = new Point(4, 5);
            Point point2 = new Point() { x = 4, y = 5 };
            Point point3 = point2;

            //---Failed---
            Assert.AreSame(point1, point2, "point1 is not the same as point2");

            //---Passed---
            Assert.AreSame(point2, point3, "point2 is not the same as point3");
        }
Figure 2-77 shows the test results.

This chapter provided a quick overview of the common features and tools available in Visual Studio 2008. Visual Studio 2008 is highly configurable, so you'll want to take some time to familiarize yourself with the environment. If you're totally new to C#, some Visual Studio features like code refactoring and unit testing may not seem all that important to you now, but once you've gotten some C# under your belt, you'll want to take another look at those features.
When you're ready, the next chapter gets you started in writing code in C#.