
Chapters 16—19 show how you can use the C# language to create a different type of application. This chapter tackles Windows application development. The best way to learn a language is to actually work on a real project from the beginning to deployment. So, this chapter leads you through creating a Windows application that performs some useful tasks and then shows you how to deploy it using a technique in Visual Studio known as ClickOnce.
Specifically, the Windows application you build in this chapter demonstrates how to:
Programmatically access FTP servers using the
FtpWebRequestandFtpWebResponseclasses (both derived from theWebRequestandWebResponseclasses in theSystem.Netnamespace)Incorporate printing capability in your Windows application using the
PrintDocumentclass (located in theSystem.Drawing.Printingnamespace)Deploy a Windows application using ClickOnce. You will also see how to programmatically cause an application to update itself.
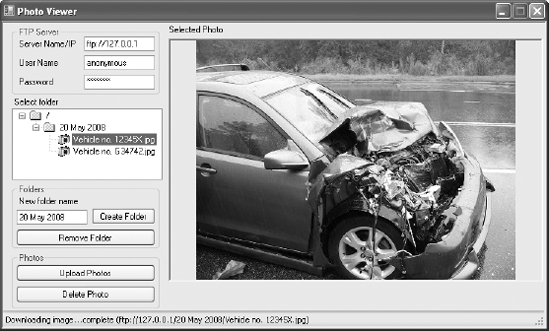
The project in this chapter is a photo viewer Windows application that accesses an FTP server. Using this application, users can upload photos to an FTP server and also download and view images stored on the FTP server. The application is useful for companies that may need to access images uploaded by their partners. Insurance companies, for instance, may need to access photographs of car damage taken by auto body shop mechanics to facilitate estimating the cost of repair. Rather than build a complex web application, the shops and insurance companies can simply use this application to quickly upload and view photos. Users can also print the photos directly from the application.
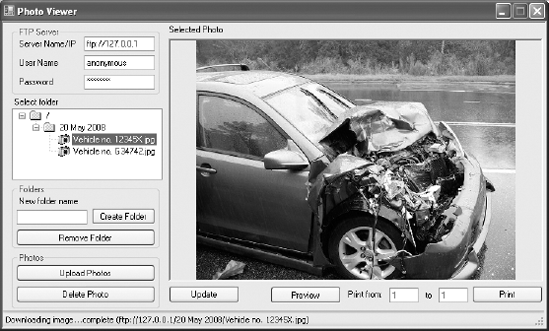
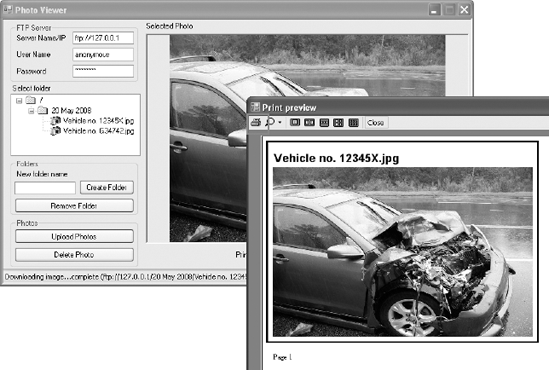
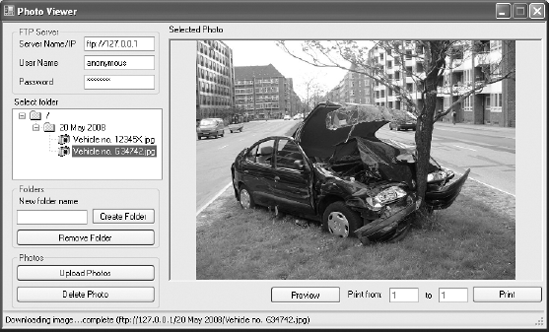
Figure 16-1 shows how the application will look like when it is completed.
Before you start writing the code of this application, you first need to configure FTP service for your computer. For this project, use the FTP service on your development machine.
Note
By default, FTP service is not installed in Windows (note that FTP service is not available on Windows Vista Home editions). To add FTP Service to your computer, select Control Panel
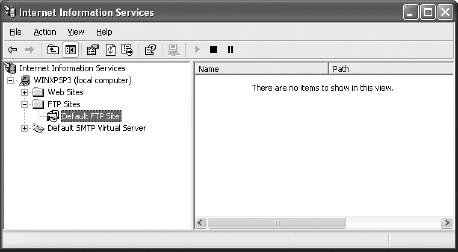
To configure the FTP service on your computer, launch the Internet Information Services management console window by typing the command —inetmgr in the Run window. Your FTP site should look like Figure 16-2.
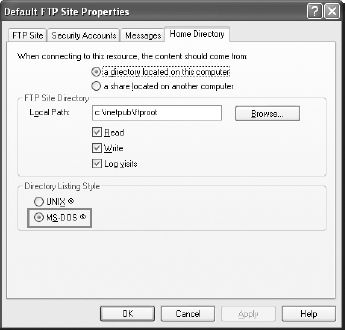
Right-click the Default FTP Site item, and select Properties. Click the Security Accounts tab. Ensure that the Allow Anonymous Connections checkbox is checked (see Figure 16-3) to enable an anonymous user to log in to your FTP service.

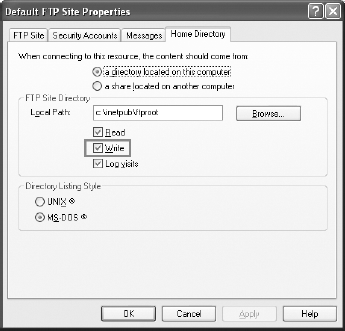
Next, click on the Home Directory tab, and check the Write checkbox (see Figure 16-4). This allows users to your FTP service to upload files and create directories on the FTP server.
Click OK to finish the configuration of the FTP service.
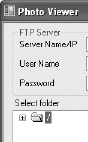
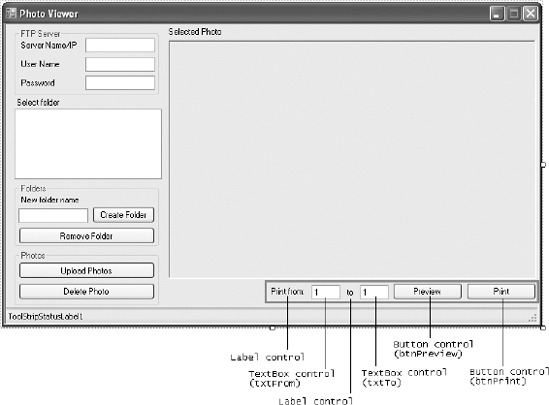
Using Visual Studio 2008, create a new Windows application and name it PhotoViewer. Populate the default Form1 with the controls shown in Figure 16-5. These controls are:
Control | Text | Name |
|---|---|---|
| Create Folder | |
Remove Folder | ||
Upload Photos | ||
Delete Photo | ||
| FTP Server | |
Folders | ||
Photos | ||
| Server Name/IP | |
User Name | ||
Password | ||
Select folder | ||
New folder name | ||
Selected Photo | ||
| ||
| ||
|
| |
|
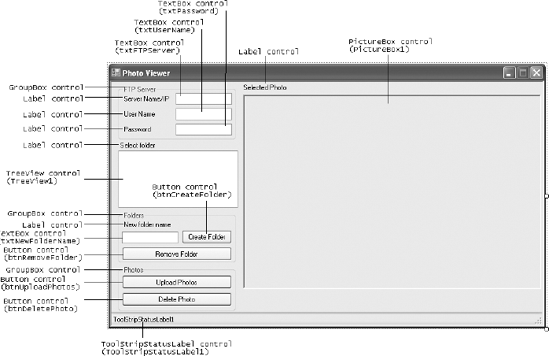
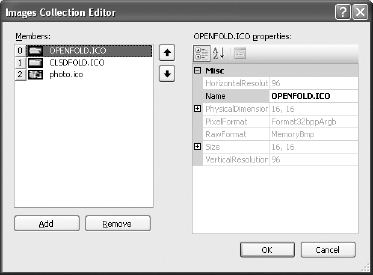
You'll also need to add an ImageList control (ImageList1) to Form1 to contain three images representing an opened folder, a closed folder, and an image file. You can specify these images in the control's Image property (see Figure 16-6).
Set the control properties in the following table.
When users launch the PhotoViewer application, they need to supply three pieces of information to access the FTP Server:
FTP Server name/IP address
Username
Password
Because this information is needed every time the user uses the application, it would be helpful to save it somewhere persistently so that the next time the user launches the application, it's available without his needing to type it in again.
In Windows Forms, a feature known as application settings allows you to store information persistently in a structured manner without resorting to using a database or forcing you to manually save it to a file. So let's see how application settings can help you in this instance.
Right-click on the PhotoViewer project in Solution Explorer and select Properties. In the Properties page, click on the Settings tab and enter the three application settings in the following table (see Figure 16-7).
Name | Type | Scope | Value |
|---|---|---|---|
|
|
| |
|
|
| |
|
|
|
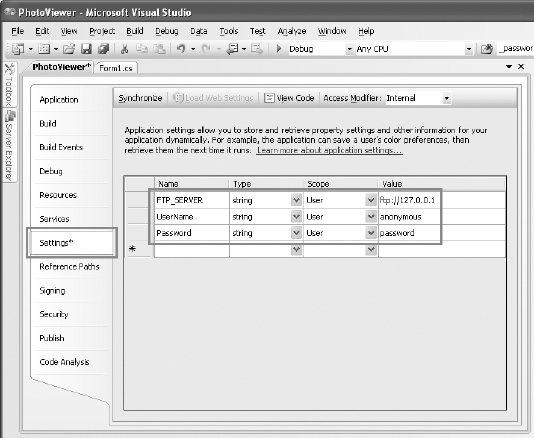
As their names suggest, FTP_Server stores the name or IP address of the FTP server, UserName stores the username used to log in to the FTP server, and Password stores the password used to log in to the FTP server.
The type of each application setting is
string. You can also specify other .NET types for each application setting.The scope for each application setting is User. Application settings can be either user-scoped or application-scoped. Application-scoped settings are not discussed because they are beyond the scope of this book.
The default value for each application setting is also specified here.
Save the solution in Visual Studio 2008 so that the application settings can be saved.
Let's examine the project a little closer to see how the application settings work. Figure 16-8 shows the three files in Solution Explorer that are used to maintain your application settings (you need to click the Show All Files button in Solution Explorer to view all these files).
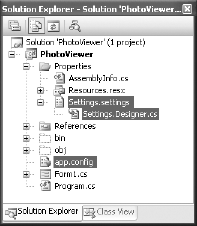
The Settings.settings file refers to the Settings page that you have been using to add the application settings. The Settings.Designer.cs file is a compiler-generated file that contains the data types of the various settings that you have defined. Here are the definitions for the various application settings:
namespace PhotoViewer.Properties
{
    [global::System.Runtime.CompilerServices.CompilerGeneratedAttribute()]
    [global::System.CodeDom.Compiler.GeneratedCodeAttribute(
       "Microsoft.VisualStudio.Editors.SettingsDesigner
.SettingsSingleFileGenerator", "9.0.0.0")]
    internal sealed partial class Settings :
        global::System.Configuration.ApplicationSettingsBase
    {

        private static Settings defaultInstance =
            ((Settings)(global::System.Configuration
             .ApplicationSettingsBase.Synchronized(new Settings())));

        public static Settings Default
        {
get
{
return defaultInstance;
}
}
[global::System.Configuration.UserScopedSettingAttribute()]
[global::System.Diagnostics.DebuggerNonUserCodeAttribute()]
[global::System.Configuration.DefaultSettingValueAttribute(
"ftp://127.0.0.1")]
public string FTP_SERVER
{
get
{
return ((string)(this["FTP_SERVER"]));
}
set
{
this["FTP_SERVER"] = value;
}
}
[global::System.Configuration.UserScopedSettingAttribute()]
[global::System.Diagnostics.DebuggerNonUserCodeAttribute()]
[global::System.Configuration.DefaultSettingValueAttribute("anonymous")]
public string UserName
{
get
{
return ((string)(this["UserName"]));
}
set
{
this["UserName"] = value;
}
}
[global::System.Configuration.UserScopedSettingAttribute()]
[global::System.Diagnostics.DebuggerNonUserCodeAttribute()]
[global::System.Configuration.DefaultSettingValueAttribute("password")]
public string Password
{
get
{
return ((string)(this["Password"]));
}
set
{
this["Password"] = value;
}
}
}
}The app.config file is an XML File containing the default values of your application settings. Its content is:
<?xml version="1.0" encoding="utf-8" ?>
<configuration>
    <configSections>
        <sectionGroup name="userSettings" type="System.Configuration.UserSettingsGroup,
System, Version=2.0.0.0, Culture=neutral, PublicKeyToken=b77a5c561934e089" >
            <section name="PhotoViewer.Properties.Settings"
type="System.Configuration.ClientSettingsSection, System, Version=2.0.0.0,
Culture=neutral, PublicKeyToken=b77a5c561934e089" allowExeDefinition="MachineToLocalUser"
requirePermission="false" />
        </sectionGroup>
    </configSections>
    <userSettings>
        <PhotoViewer.Properties.Settings>
            <setting name="FTP_SERVER" serializeAs="String">
                <value>ftp://127.0.0.1</value>
            </setting>
            <setting name="UserName" serializeAs="String">
                <value>anonymous</value>
            </setting>
            <setting name="Password" serializeAs="String">
                <value>password</value>
            </setting>
        </PhotoViewer.Properties.Settings>
    </userSettings>
</configuration>
The highlighted code shows the settings that you added earlier and their default values. When the project is compiled, this app.config file will be named <assembly_name>.exe.config and stored in the binDebug (or binRelease) folder of the project. For this project, the filename will be PhotoViewer.exe.config.
During runtime, any changes made to the application settings' values will cause a user.config file to be created in the following folder:
C:Documents and Settings<user_name>Local SettingsApplication Data<application_
name><application_name>.vshost.exe_Url_iwwpinbgs0makur33st4vnin2nkwxgq1
<version_no>
Notice the long string of random characters in the path. The folder name is generated by the system, and each time you have a different folder name.
For this project, the user.config file will be stored in a folder with a name like this:
C:Documents and SettingsWei-Meng LeeLocal SettingsApplication DataPhotoViewer
PhotoViewer.vshost.exe_Url_iwwpinbgs0makur33st4vnin2nkwxgq11.0.0.0
The content of the user.config file looks like this:
<?xml version="1.0" encoding="utf-8"?>
<configuration>
    <userSettings>
        <PhotoViewer.Properties.Settings>
            <setting name="FTP_SERVER" serializeAs="String">
                <value>ftp://127.0.0.1</value>
            </setting>
            <setting name="UserName" serializeAs="String">
                <value>anonymous1</value>
            </setting>
            <setting name="Password" serializeAs="String">
                <value>password</value>
            </setting>
        </PhotoViewer.Properties.Settings>
    </userSettings>
</configuration>
Each user (of your computer) will maintain his own copy of the user.config file.
Now to code the application. Switching to the code-behind of Form1, import the following namespaces:
using System.Net;
using System.IO;
Define the WebRequestMethod enumeration:
namespace PhotoViewer
{
    enum WebRequestMethod
    {
        MakeDirectory,
        DownloadFile,
        ListDirectoryDetails,
        RemoveDirectory,
        DeleteFile
    }
Declare the following constants and member variables:
public partial class Form1 : Form
{
//---constants for the icon images---
const int ico_OPEN = 0;
const int ico_CLOSE = 1;
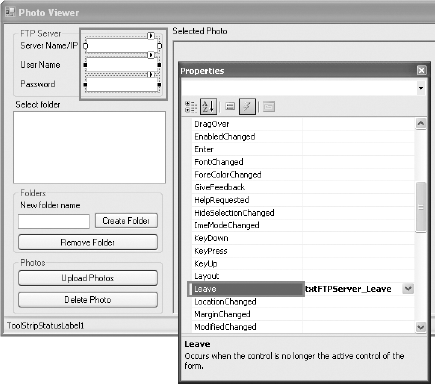
const int ico_PHOTO = 2;In Form1, select the three TextBox controls (you can Ctrl+click each of them) that ask for the FTP server name, user name, and password (see Figure 16-9). In the Properties window, double-click the Leave property to generate an event handler stub for the Leave event.
Visual Studio 2008 then generates the txtFtpServer_Leave event handler:
private void txtFTPServer_Leave(object sender, EventArgs e)
        {

        }
The event handler is invoked whenever the focus leaves one of the three TextBox controls you have selected. This is where you can save the information entered by the user into the application settings you have created in the previous section.
Code the event handler as follows:
private void txtFTPServer_Leave(object sender, EventArgs e)
        {
            //---save the values in the textbox controls
            // into the application settings---
            Properties.Settings.Default.FTP_SERVER = txtFTPServer.Text;
            Properties.Settings.Default.UserName = txtUserName.Text;
            Properties.Settings.Default.Password = txtPassword.Text;
            Properties.Settings.Default.Save();
        }
You access the various application settings using the Properties.Settings.Default class (as generated in the Settings.Designer.cs file). Once the application settings are assigned a value, you need to persist them using the Save() method.
When the form is loaded, you first load the values of the application settings into the TextBox controls, and then display a node representing the root directory of the FTP server in the TreeView control:
private void Form1_Load(object sender, EventArgs e)
        {
            try
            {
                //---load the application settings values
                // into the textbox controls---
                txtFTPServer.Text = Properties.Settings.Default.FTP_SERVER;
                txtUserName.Text = Properties.Settings.Default.UserName;
                txtPassword.Text = Properties.Settings.Default.Password;

                //---create the root node for the TreeView---
                TreeNode node = new TreeNode();
                node.ImageIndex = ico_CLOSE;
                node.SelectedImageIndex = ico_OPEN;
                node.Text = @"/";

                //---add the root node to the control---
                TreeView1.Nodes.Add(node);

                //---add the dummy child node to the root node---
                node.Nodes.Add("");

                //---select the root node---
                TreeView1.SelectedNode = node;
            }
            catch (Exception ex)
            {
                MessageBox.Show(ex.ToString());
            }
        }
You will always add a dummy node in the TreeView control after a node is created to ensure that the current node can be expanded to reveal subdirectories (even if there are none). This is shown in Figure 16-10.
When a node is expanded (by clicking on the + symbol), the TreeView1_BeforeExpand event is fired. You have to write code that checks to see if the current node is a leaf node (meaning that it is not a directory but a file). If it is a leaf node, exit the method. Otherwise, you need to display its subdirectories (if any).
You should also change the current node icon to "open" if the node is selected and "closed" if the node is not selected. Here's the code for expanding folders and displaying the proper icon at each node:
private void TreeView1_BeforeExpand(
            object sender, TreeViewCancelEventArgs e)
        {
            //---if leaf node (photo) then exit---
            if (e.Node.ImageIndex == ico_PHOTO) return;

            //---remove the dummy node and display the subdirectories and files---
            try
            {
                //---clears all the nodes and...---
                e.Node.Nodes.Clear();

                //---create the nodes again---
                BuildDirectory(e.Node);
            }
            catch (Exception ex)
            {
                ToolStripStatusLabel1.Text = ex.ToString();
            }

            //---change the icon for this node to open---
            if (e.Node.GetNodeCount(false) > 0)
            {
                e.Node.ImageIndex = ico_CLOSE;
                e.Node.SelectedImageIndex = ico_OPEN;
            }
        }
The BuildDirectory() function displays all the files and subdirectories within the current directory in the TreeView control. Before you look at the definition of the BuildDirectory() function, you define the GetDirectoryListing() function, whose main job is to request from the FTP server the directory listing of a specified path:
//---Get the file/dir listings and return them as a string array---
        private string[] GetDirectoryListing(string path)
        {
            try
            {
                //---get the directory listing---
                FtpWebResponse FTPResp = PerformWebRequest(
                    path, WebRequestMethod.ListDirectoryDetails);

                //---get the stream containing the directory listing---
                Stream ftpRespStream = FTPResp.GetResponseStream();
                StreamReader reader =
new StreamReader(ftpRespStream, System.Text.Encoding.UTF8);
//---obtain the result as a string array---
string[] result = reader.ReadToEnd().Split(
Environment.NewLine.ToCharArray(),
StringSplitOptions.RemoveEmptyEntries);
FTPResp.Close();
return result;
}
catch (Exception ex)
{
MessageBox.Show(ex.ToString());
return null;
}
}To view the directory listing of an FTP server, you make use of the PerformWebRequest() helper function, which is defined as follows:
private FtpWebResponse PerformWebRequest(
string path, WebRequestMethod method)
{
//---display the hour glass cursor---
Cursor.Current = Cursors.WaitCursor;
FtpWebRequest ftpReq = (FtpWebRequest)WebRequest.Create(path);
switch (method)
{
case WebRequestMethod.DeleteFile:
ftpReq.Method = WebRequestMethods.Ftp.DeleteFile;
break;
case WebRequestMethod.DownloadFile:
ftpReq.Method = WebRequestMethods.Ftp.DownloadFile;
break;
case WebRequestMethod.ListDirectoryDetails:
ftpReq.Method = WebRequestMethods.Ftp.ListDirectoryDetails;
break;
case WebRequestMethod.MakeDirectory:
ftpReq.Method = WebRequestMethods.Ftp.MakeDirectory;
break;
case WebRequestMethod.RemoveDirectory:
ftpReq.Method = WebRequestMethods.Ftp.RemoveDirectory;
break;
}
ftpReq.Credentials = new NetworkCredential(
Properties.Settings.Default.UserName,
Properties.Settings.Default.Password);
FtpWebResponse ftpResp = (FtpWebResponse)ftpReq.GetResponse();
//---change back the cursor---
Cursor.Current = Cursors.Default;
return ftpResp;
}The PerformWebRequest() function contains two parameters:
A path representing the full FTP path
A
WebRequestMethodenumeration representing the type of request you are performing
In the PerformWebRequest() function, you perform the following:
Create an instance of the
FtpWebRequestclass, using theWebRequestclass'sCreate()method.Create()takes in a URI parameter (containing the full FTP path).Set the command to be sent to the FTP server, using the
Methodproperty of theFtpWebRequestobject.Specify the login credential to the FTP server, using the
NetWorkCredentialclass.Obtain the response from the FTP server, using the
GetResponse()method from theFtpWebRequestclass.
The PerformWebRequest() function returns a FtpWebResponse object.
Back in the GetDirectoryListing() function, after the call to PerformWebRequest() returns, you retrieve the stream containing the response data sent by the FTP server, using the GetResponseStream() method from the FtpWebResponse class. You then use a StreamReader object to read the directory listing:
//---Get the file/dir listings and return them as a string array---
private string[] GetDirectoryListing(string path)
{
try
{
//---get the directory listing---
FtpWebResponse FTPResp = PerformWebRequest(
path, WebRequestMethod.ListDirectoryDetails);
//---get the stream containing the directory listing---
Stream ftpRespStream = FTPResp.GetResponseStream();
StreamReader reader =
new StreamReader(ftpRespStream, System.Text.Encoding.UTF8);

                //---obtain the result as a string array---
                string[] result = reader.ReadToEnd().Split(
                    Environment.NewLine.ToCharArray(),
                    StringSplitOptions.RemoveEmptyEntries);
                FTPResp.Close();
                return result;
            }
            catch (Exception ex)
            {
                MessageBox.Show(ex.ToString());
                return null;
            }
}The directory listing is split into a string array. The directory listings are separated by newline characters. If your FTP server is configured with an MS-DOS directory listing style (see Figure 16-11), the directory listing will look something like this:
12-11-06  10:54PM              2074750 DSC00098.JPG
12-11-06  10:54PM              2109227 DSC00099.JPG
12-11-06  10:49PM       <DIR>          George
12-11-06  10:49PM       <DIR>          James
12-11-06  10:58PM       <DIR>          Wei-Meng Lee
Because all subdirectories have the <DIR> field, you can easily differentiate subdirectories from files in the BuildDirectory() function by looking for <DIR> in each line:
//---Build the directory in the TreeView control---
        private void BuildDirectory(TreeNode ParentNode)
        {
            string[] listing = GetDirectoryListing(
                Properties.Settings.Default.FTP_SERVER +
                ParentNode.FullPath);
            foreach (string line in listing)
            {
                if (line == String.Empty) break;

                TreeNode node = new TreeNode();
                if (line.Substring(24, 5) == "<DIR>")
                {
//---this is a directory; create a new node to be added---
node.Text = line.Substring(39);
node.ImageIndex = ico_CLOSE;
node.SelectedImageIndex = ico_OPEN;
//---add the dummy child node---
node.Nodes.Add("");
ParentNode.Nodes.Add(node);
}
else
{
//---this is a normal file; create a new node to be added---
node.Text = line.Substring(39);
node.ImageIndex = ico_PHOTO;
node.SelectedImageIndex = ico_PHOTO;
ParentNode.Nodes.Add(node);
}
}
}When a node is selected, you first obtain its current path and then display that path in the status bar if it is a folder. If it is an image node, download and display the photo, using the DownloadImage() function. All these are handled in the TreeView1_AfterSelect event. Here's the code:
private void TreeView1_AfterSelect(object sender, TreeViewEventArgs e)
        {
            //---always ignore the first "/" char---
            string FullPath =
               Properties.Settings.Default.FTP_SERVER +
               e.Node.FullPath.Substring(1).Replace("
", "");

            //---display the current folder selected---
            if (e.Node.ImageIndex != ico_PHOTO)
            {
                ToolStripStatusLabel1.Text = FullPath;
                return;
            }

            //---download image---
            DownloadImage(FullPath);
        }
The DownloadImage() function downloads an image from the FTP server and displays the image in a PictureBox control:
//---Download the image from the FTP server---
        private void DownloadImage(string path)
        {
            try
            {
                ToolStripStatusLabel1.Text = "Downloading image..." + path;
                Application.DoEvents();

                //---download the image---
                FtpWebResponse FTPResp =
                    PerformWebRequest(path,
                    WebRequestMethod.DownloadFile);

                //---get the stream containing the image---
                Stream ftpRespStream = FTPResp.GetResponseStream();

                //---display the image---
                PictureBox1.Image = Image.FromStream(ftpRespStream);
                FTPResp.Close();

                ToolStripStatusLabel1.Text =
                    "Downloading image...complete (" + path + ")";
            }
            catch (Exception ex)
            {
                MessageBox.Show(ex.Message);
            }
        }
To download an image file using FTP and then bind it to a PictureBox control:
To set the PictureBox control to display the downloaded image, use the FromStream() method from the Image class to convert the response from the FTP server (containing the image) into an image.
The user can create a new directory on the FTP server by clicking the Create Folder button. To create a new directory, select a node (by clicking on it) to add the new folder, and then call the PerformWebRequest() helper function you defined earlier. This is accomplished by the Create Folder button:
//---Create a new folder---
        private void btnCreateFolder_Click(object sender, EventArgs e)
        {
            //---ensure user selects a folder---
            if (TreeView1.SelectedNode.ImageIndex == ico_PHOTO)
            {
                MessageBox.Show("Please select a folder first.");
                return;
            }

            try
            {
                //---formulate the full path for the folder to be created---
                string folder = Properties.Settings.Default.FTP_SERVER +
                   TreeView1.SelectedNode.FullPath.Substring(1).Replace
                   ("
", "") + @"/" + txtNewFolderName.Text;

                //---make the new directory---
                FtpWebResponse ftpResp =
                    PerformWebRequest(folder, WebRequestMethod.MakeDirectory);
                ftpResp.Close();

                //---refresh the newly added folder---
                RefreshCurrentFolder();

                //---update the statusbar---
                ToolStripStatusLabel1.Text =
                    ftpResp.StatusDescription.Replace("
",string.Empty);
            }
            catch (Exception ex)
            {
                MessageBox.Show(ex.ToString());
            }
        }
When a new folder is created, you update the TreeView control to reflect the newly added folder. This is accomplished by the RefreshCurrentFolder() function:
private void RefreshCurrentFolder()
        {
            //---clears all the nodes and...---
            TreeView1.SelectedNode.Nodes.Clear();

            //---...create the nodes again---
            BuildDirectory(TreeView1.SelectedNode);
}To remove (delete) a directory, a user first selects the folder to delete and then clicks the Remove Folder button. To delete a directory, you call the PerformWebRequest() helper function you defined earlier. This is accomplished with the Remove Folder button:
//---Remove a folder---
        private void btnRemoveFolder_Click(object sender, EventArgs e)
        {
            if (TreeView1.SelectedNode.ImageIndex == ico_PHOTO)
            {
                MessageBox.Show("Please select a folder to delete.");
                return;
            }

            try
            {
                string FullPath =
                    Properties.Settings.Default.FTP_SERVER +
                    TreeView1.SelectedNode.
                    FullPath.Substring(1).Replace("
", "");

                //---remove the folder---
                FtpWebResponse ftpResp =
                    PerformWebRequest(FullPath, WebRequestMethod.RemoveDirectory);

                //---delete current node---
                TreeView1.SelectedNode.Remove();

                //---update the statusbar---
                ToolStripStatusLabel1.Text =
                    ftpResp.StatusDescription.Replace("
", string.Empty);
            }
            catch (Exception ex)
            {
                MessageBox.Show(ex.ToString());
            }
        }
If a directory is not empty (that is, if it contains files and subdirectories), the deletion process will fail. The user will have to remove its content before removing the directory.
To upload photos to the FTP server, you first select a folder to upload the photos to and then use the OpenFileDialog class to ask the user to select the photo(s) he wants to upload. Finally, you upload the photos individually, using the UploadImage() function:
private void btnUploadPhotos_Click(object sender, EventArgs e)
        {
            //---ensure user selects a folder---
            if (TreeView1.SelectedNode.ImageIndex == ico_PHOTO)
            {
                MessageBox.Show("Please select a folder to upload the photos.");
                return;
            }

            OpenFileDialog openFileDialog1 = new OpenFileDialog()
            {
                Filter = "jpg files (*.jpg)|*.jpg",
                FilterIndex = 2,
                RestoreDirectory = true,
                Multiselect = true
            };

            //---formulate the full path for the folder to be created---
            string currentSelectedPath =
               Properties.Settings.Default.FTP_SERVER +
               TreeView1.SelectedNode.FullPath.Substring(1).Replace("
", "");

            //---let user select the photos to upload---
            if (openFileDialog1.ShowDialog() ==
                System.Windows.Forms.DialogResult.OK)
            {
                //---upload each photo individually---
                for (int i = 0; i <= openFileDialog1.FileNames.Length - 1; i++)
                {
                    UploadImage(currentSelectedPath + "/" +
                       openFileDialog1.FileNames[i].Substring(
                       openFileDialog1.FileNames[i].LastIndexOf(@"") + 1),
                       openFileDialog1.FileNames[i]);
                }
            }

            //---refresh the folder to show the uploaded photos---
            RefreshCurrentFolder();
        }
The UploadImage() function uploads a photo from the hard disk to the FTP server:
First, create a new instance of the
WebClientclass.Specify the login credential to the FTP server.
Upload the file to the FTP server, using the
UploadFile()method from theWebClientclass. Note that the full pathname of the file to be uploaded to the FTP server must be specified.
//---upload a photo to the FTP server---
        private void UploadImage(string path, string filename)
        {
            try
            {
                WebClient client = new WebClient();
                client.Credentials = new NetworkCredential(
                    Properties.Settings.Default.UserName,
                    Properties.Settings.Default.Password);

                //---upload the photo---
                client.UploadFile(path, filename);

                //---update the statusbar---
                ToolStripStatusLabel1.Text = filename + " uploaded!";
            }
            catch (Exception ex)
            {
                Console.WriteLine(ex.ToString());
            }
}To delete a photo, the user first selects a photo to delete and then you call the PerformWebRequest() helper function you have defined earlier:
private void btnDeletePhoto_Click(object sender, EventArgs e)
        {
            if (TreeView1.SelectedNode.ImageIndex != ico_PHOTO)
            {
                MessageBox.Show("Please select a photo to delete.");
                return;
            }
            try
            {
                string FullPath = Properties.Settings.Default.FTP_SERVER +
                    TreeView1.SelectedNode.FullPath.Substring(1).Replace("
", "");

                //---delete the photo---
                FtpWebResponse ftpResp =
                    PerformWebRequest(FullPath, WebRequestMethod.DeleteFile);

                //---delete the current node---
                TreeView1.SelectedNode.Remove();

                //---update the statusbar---
                ToolStripStatusLabel1.Text =
                    ftpResp.StatusDescription.Replace("
", string.Empty);
            }
            catch (Exception ex)
            {
                MessageBox.Show(ex.ToString());
            }
        }
Once the photo is removed from the FTP server, you also need to delete its node in the TreeView control.
That's it! You can now test the application by pressing F5. Ensure that the credentials for logging in to the FTP server are correct. If the login is successful, you should be able to create a new folder on the FTP server and then upload photos. Figure 16-12 shows the complete application.
The .NET Framework contains classes that make it easy for you to support printing in your applications. In this section, you add printing support to the PhotoViewer application so that you can print the photos. You'll explore the basics of printing in .NET and see how to configure page setup, print multiple pages, and preview a document before it is printed, as well as let users select a printer with which to print.
In .NET, all the printing functionality is encapsulated within the PrintDocument control/class, which can be found in the Toolbox (see Figure 16-13). The PrintDocument control defines the various methods that allow you to send output to the printer.
To incorporate printing functionality into your Windows application, you can either drag and drop the PrintDocument control onto your form or create an instance of the PrintDocument class at runtime. This example uses the latter approach.
To start the printing process, you use the Print() method of the PrintDocument class. To customize the printing process using the PrintDocument object, there are generally three events with which you need to be acquainted:
BeginPrint— Occurs when thePrint()method is called and before the first page of the document prints. Typically, you use this event to initialize fonts, file streams, and other resources used during the printing process.PrintPage— Occurs when the output to print for the current page is needed. This is the main event to code the logic required for sending the outputs to the printer.EndPrint— Occurs when the last page of the document has printed. Typically, you use this event to release fonts, file streams, and other resources used during the printing process.
To add print support to the PhotoViewer application, first add the controls (see Figure 16-14) in the following table.
Control | Text | Name |
|---|---|---|
| Print from: | |
to | ||
|
| |
| ||
| Preview |
|
Switch to the code-behind of Form1, and import the following namespace:
using System.Drawing.Printing;
Declare the following member variables:
public partial class Form1 : Form
    {
        //---constants for the icon images---
        const int ico_OPEN = 0;
        const int ico_CLOSE = 1;
        const int ico_PHOTO = 2;

        //---font variables---
        Font f_title;
        Font f_body;

        //---page counter---
        int pagecounter;

        //---PrintDocument variable---
        PrintDocument printDoc;
When the form is loaded during runtime, create an instance of the PrintDocument class, and wire up the three main event handlers described earlier:
private void Form1_Load(object sender, EventArgs e)
        {
            printDoc = new PrintDocument()
            {
                DocumentName = "Printing from Photo Viewer"
            };
            printDoc.BeginPrint += new PrintEventHandler(printDoc_BeginPrint);
            printDoc.PrintPage += new PrintPageEventHandler(printDoc_PrintPage);
            printDoc.EndPrint += new PrintEventHandler(printDoc_EndPrint);

            try
            {
                //---load the application settings values
                // into the textbox controls---
                ...
In the event handler for the BeginPrint event, initialize the page counter as well as the fonts of the text to be used for printing the page:
void printDoc_BeginPrint(object sender, PrintEventArgs e)
        {
            //---initialize the page counter---
            pagecounter = int.Parse(txtFrom.Text);

            //---initialize the fonts---
            f_title = new Font("Arial", 16, FontStyle.Bold);
            f_body = new Font("Times New Roman", 10);
        }
In the EndPrint event handler, dereference the font variables used:
void printDoc_EndPrint(object sender, PrintEventArgs e)
        {
            //---de-reference the fonts---
            f_title = null;
            f_body = null;
        }
Finally, the event handler for PrintPage is the place where you do the bulk of the work of sending the output to the printer. Basically, you use the Graphics object in the PrintPageEventArgs class to specify the output you want to print. For example, to draw a rectangle you would use the e.Graphics.DrawRectangle() method (where e is an instance of the PrintPageEventArgs class). To print a string, you use the e.Graphics.DrawString() method. After printing, you increment the page count and determine if there are any more pages to print. If there are, setting the HasMorePages property of the PrintPageEventArgs class to true will cause the printDoc_PrintPage event handler fire one more time. Once there are no more pages left to print, set the HasMorePages property to false:
void printDoc_PrintPage(object sender, PrintPageEventArgs e)
        {
            Graphics g = e.Graphics;

            //---draws the title---
            g.DrawString(TreeView1.SelectedNode.Text,
                f_title, Brushes.Black, 20, 30);

            //---draws a border...---
            Rectangle border =
                new Rectangle(10, 10,
                    PictureBox1.Width + 20, PictureBox1.Height + 60);

            //---...using a thick pen---
            Pen thickPen = new Pen(Color.Black, 3);
            g.DrawRectangle(thickPen, border);

            //---draws the picture---
            if (PictureBox1.Image != null)
            {
                g.DrawImage(PictureBox1.Image, 20, 60,
                PictureBox1.Size.Width,
                PictureBox1.Size.Height);
            }

            //---draws the page count---
            g.DrawString("Page " + pagecounter,
               f_body, Brushes.Black,
               20, 420);

            //---increments the page counter---
            pagecounter += 1;

            //---determine if you have more pages to print---
            if (pagecounter <= int.Parse(txtTo.Text))
                e.HasMorePages = true;
            else
                e.HasMorePages = false;
        }
To let the user preview the output before the image is sent to the printer for printing, use the PrintPreviewDialog() class:
private void btnPreview_Click(object sender, EventArgs e)
        {
            //---show preview---
            PrintPreviewDialog dlg = new PrintPreviewDialog()
            {
                Document = printDoc
            };
            dlg.ShowDialog();
        }
This code previews the output in a separate window (see Figure 16-15). The user can click the printer icon to send the output to the printer. The user can also choose to enlarge the page or view multiple pages on one single screen.
To print the image to a printer, use the PrintDialog class to let the user choose the desired printer (see Figure 16-16) instead of sending the output directly to the default printer:
private void btnPrint_Click(object sender, EventArgs e)
        {
            //---let user select a printer to print---
            PrintDialog pd = new PrintDialog()
            {
                Document = printDoc,
                AllowSomePages = true
            };

            DialogResult result = pd.ShowDialog();
            if (result == DialogResult.OK)
                printDoc.Print();
        }
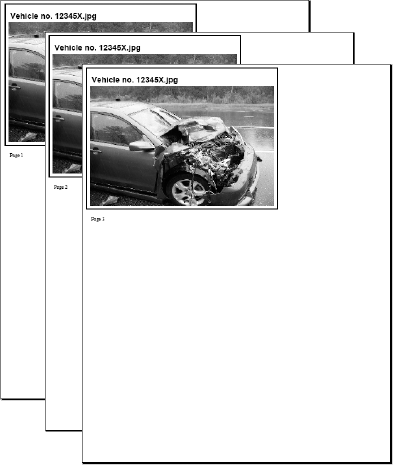
Figure 16-17 shows the output if the user indicated that he wanted to print from page 1 to 3 (in Form1). Note the page number displayed below the image.
Now the application is ready to be deployed to your customers. One of the most challenging tasks faced by Windows application developers today is the deployment of their applications on the client machines. Once an application is deployed, any change to or maintenance of the application requires redeployment. Worse, with so many different client configurations, updating a Windows application is always fraught with unknowns.
Beginning with Visual Studio 2005, Microsoft rolled out a new deployment technology known as ClickOnce, which makes such deployments and even updates extremely easy and painless. ClickOnce was designed specifically to ease the deployment of Windows applications, in particular smart clients. A smart client is basically a Windows application that leverages local resources and intelligently connects to distributed data sources (such as Web Services) as and when needed. While a lot of companies are deploying web applications (due to the web's ubiquitous access) today, network latencies and server delays are some of the problems that prevent developers from reaping the full benefits of the web. Common frustrations over web applications include slow response time from web sites and limited functionality (due to the stateless nature of the HTTP protocol). A smart client aims to reap the benefit of the rich functionality of the client (Windows), while at the same time utilizing the power of Web Services in the backend.
Using ClickOnce, a Windows application can be deployed through the convenience of a web server, file servers, or even CDs. Once an application is installed using ClickOnce, it can automatically check for new updates to the application from the publisher, saving a lot of effort in maintenance and application upgrades. On the security front, ClickOnce applications run within a secure sandbox and are configured using the Code Access Security model.
Deploying your application using ClickOnce is very straightforward. In Visual Studio 2008, select Build
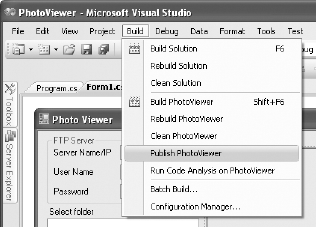
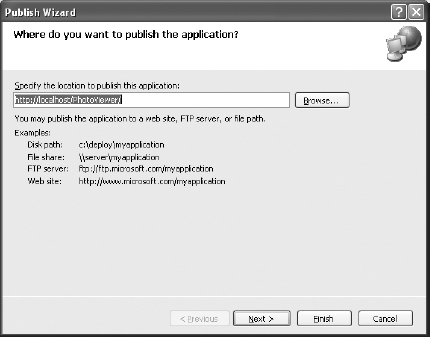
The Publish Wizard (see Figure 16-19) opens. By default, your application will be published to the local web server (IIS) using the path shown in the textbox. However, you can also publish your application using a disk path, file share, FTP, or an external web server. For this example, use the default and click Next.
In the next page, indicate if the application is available both online and offline or available online only. Accept the default selection, and click Next to proceed to the next step.
In the next page, click Finish to complete the wizard and start the publishing process. When publishing is completed, a web page (publish.htm) appears; it contains a link to install the application (see Figure 16-20).
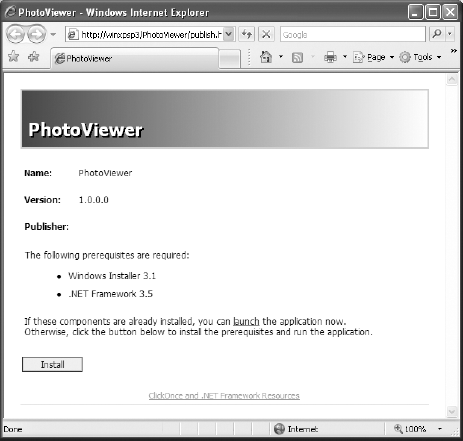
The Publish.htm page lists the following:
Name, Version, and Publisher information
Prerequisites required for your application (automatically generated based on the application you are deploying)
Note
The URL http://<server_name>/PhotoViewer/publish.htm is the deployment location of your application. Users who want to install this application through ClickOnce simply need to go to this URL, using their web browser. You provide the URL to your users through email, brochures, and so on.
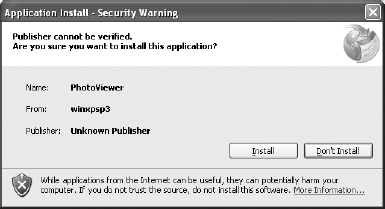
To install the application, click the Install button. You are presented with:
File Download dialog — Security Warning prompt. Click Run to download the application.
Internet Explorer dialog — Security Warning. Click Run to proceed with the installation.
Application Install dialog — Security Warning. Click Install to install the application (see Figure 16-21).
Once installed, the application is launched automatically. You can also launch the application from Start
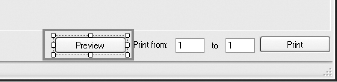
Let's now update the application so that you can republish the application and see how the changes can be updated on the client side. For simplicity, move the Preview button to the left of the Print from label control as shown in Figure 16-22. This will enable you to verify that the application has been updated after it is republished.
To republish the application, simply select Build
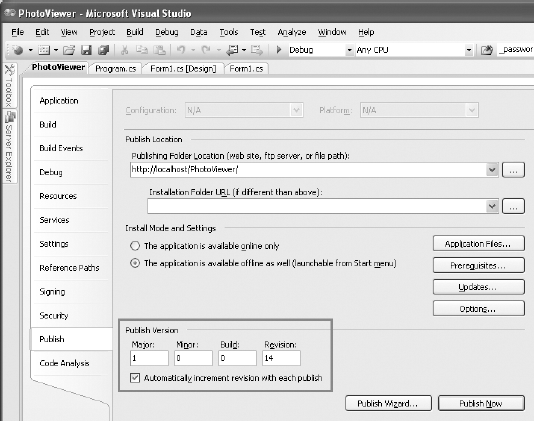
Each time you publish the application, the version number of the application is incremented automatically. That's controlled by the Publish settings page in the project's properties page (see Figure 16-23).
In addition, the Publish settings page also contains the Updates button, which enables you to specify how and when the application should check for updates (see Figure 16-24).
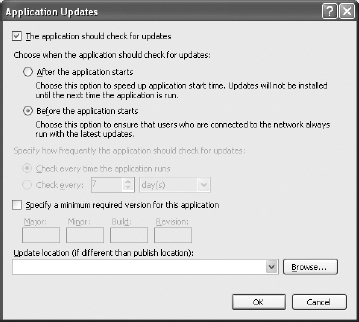
By default, the application checks for updates every time before it starts.
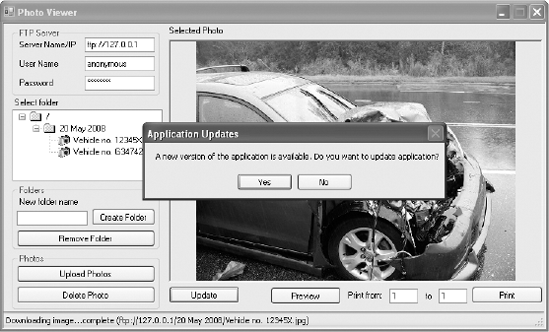
When the user closes and then relaunches the PhotoViewer application, he gets a prompt, as shown in Figure 16-25.
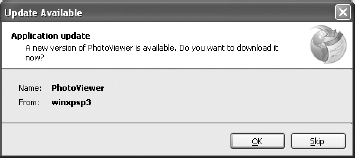
The user can click OK to download the updated application, or click Skip if he doesn't want to update the application now. The updated application will look like Figure 16-26.
Instead of the application checking for updates before it starts, it would be a good idea for users to be able to choose when they want to check for updates. For that, add a new button to the form, as shown in Figure 16-27.

Import the following namespace:
using System.Deployment.Application;
Code the Update button like this:
private void btnUpdate_Click(object sender, EventArgs e)
        {
            //---check if the application is deployed by ClickOnce---
            if (ApplicationDeployment.IsNetworkDeployed)
            {
                //---Get an instance of the deployment---
                ApplicationDeployment deployment =
                    ApplicationDeployment.CurrentDeployment;

                //---if there is any update---
                if (deployment.CheckForUpdate())
                {
                    DialogResult response =
                        MessageBox.Show(("A new version of the " +
                        "application is available. " +
                        "Do you want to update application?"),
                        ("Application Updates"),
                        MessageBoxButtons.YesNo);

                    //---if user wants to update---
                    if (response == DialogResult.Yes)
                    {
                        Cursor.Current = Cursors.WaitCursor;

                        //---update the application---
                        deployment.Update();

                        //---prompt the user to restart---
                        MessageBox.Show("Update completed. You need to restart" +
                           " the application.",
                           ("Update Completed"), MessageBoxButtons.OK,
                           MessageBoxIcon.Information);

                        //---restart the application---
                        Application.Restart();
                    }
                }
                else
                {
                    //---application is up-to-date---
                    MessageBox.Show(("Application is up-to-date."), "Update",
                        MessageBoxButtons.OK, MessageBoxIcon.Information);
                }
            }
            else
{
//---application is not installed using ClickOnce---
MessageBox.Show(("Application is not installed " +
"using ClickOnce"),
("Updates not available"),
MessageBoxButtons.OK, MessageBoxIcon.Information);
}
}You first check to see if the application is deployed using ClickOnce. This can be done by using the IsNetworkDeployed property from the ApplicationDeployment static class. If the application is indeed deployed using ClickOnce, you proceed to obtain an instance of the deployment using the currentDeployment property of the ApplicationDeployment class. Using this instance of the deployment, you call the CheckForUpdate() method to check whether there is a newer version of the application available from the publishing server. If there is, you prompt the user by asking if he wants to update the application. If he does, you update the application, using the Update() method. After that, you force the user to restart the application, using the Restart() method.
To test the update, first run an instance of the PhotoViewer application by launching it from the Start menu. Next, republish the application in Visual Studio 2008. Click the Update button to see if an update is available. You should see the prompt shown in Figure 16-28. Click Yes, and the application will be updated.
Once an application is updated, the user has a choice to roll it back to its previous version. To do so, go to the Control Panel and run the Add or Remove Programs application. Locate the application (in this case, PhotoViewer) and click on the Change/Remove button. You have two choices — restore the application to its previous state or remove the application from the computer (see Figure 16-29).
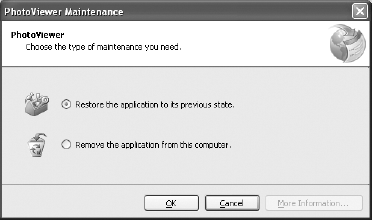
An application can be rolled back only to its previous version. If it's been updated several times, it only rolls back to the version preceding the last update.
When you use the Publish Wizard to publish your application using ClickOnce, Visual Studio 2008 publishes your application to the URL that you have indicated. For example, if you specified http://localhost/PhotoViwer/ as the publishing directory and your web publishing directory is C:Inetpubwwwroot, then the virtual directory PhotoViewer will be mapped to the local path C:InetpubwwwrootPhotoViewer.
Two types of files will be created under the C:InetpubwwwrootPhotoViewer directory:
Application Manifest
Deployment Manifest
The next two sections take a closer look at these two types of files.
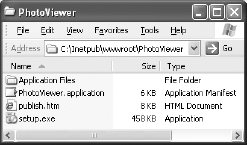
When you publish your application, three files and a folder are created in the publishing directory (see Figure 16-30):
Application Files — Folder containing the deployment files.
A
publish.htmweb page — This contains instructions on how to install the application.Application manifest —
PhotoViewer.application. This is the file that is referenced by thepublish.htmfile. An application manifest is an XML file that contains detailed information about the current application as well as its version number. Chapter 15 has more about application manifests.setup.exe— A setup application that installs the application onto the target computer.
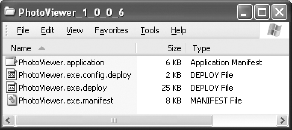
The Application Files folder contains the various versions of the application that have been published (see Figure 16-31).
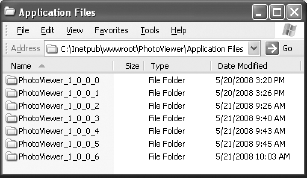
When you republish your application using ClickOnce, the content of PhotoViewer.application, publish.htm, and setup.exe are modified, and one new application manifest is created inside a new folder (for instance, PhotoViewer_1_0_0_6; located within the Application Files folder), containing the new version of deployment files, will be created.
As mentioned, the PhotoViewer.application application manifest is an XML file that contains detailed information about the current application as well as its version number. It allows the client to know if he needs to update his application.
The deployment manifest — PhotoViewer.exe.manifest, in this example — is located in the C:InetpubwwwrootPhotoViewerApplication FilesPhotoViewer_1_0_0_6 directory (assuming that the latest version published is 1.0.0.6; see Figure 16-32). It contains detailed information about the application (such as dependencies and attached files).
The PhotoViewer.exe.deploy file is the executable of your application. Other files in the same directory may include files/databases used by your application. During installation these files will be deployed (downloaded) onto the user's machine.
When the user installs an application onto his computer via ClickOnce, he does not have a choice of where to store the application. In fact, the application is stored on a per-user basis, and different versions of the application are stored in different folders. For example, when I installed the example application on my computer, the application files were stored in:
C:Documents and SettingsWei-Meng LeeLocal SettingsApps2.0JGEG6REQ.YQK
C2N9O65K.16Dphot..tion_4f46313378dcdeb5_0001.0000_ff3a6bf346a40e4d
Generally, application files are stored in subdirectories under the C:Documents and Settings<<hi>User Name</hi>>Local SettingsApps2.0 folder. To find this directory programmatically during runtime, use the following code snippet:
//---ExecutablePath includes the executable name---
            string path = Application.ExecutablePath;
            //---Strip away the executable name---
path = path.Substring(0, path.LastIndexOf(@""));This chapter explained how to develop a Windows application to upload and download pictures to and from an FTP server. Several Windows Forms controls were used to build the application's user interface, and you saw how to use the application settings feature in .NET to preserve the status of an application even after it has exited. Finally, the application was deployed using the ClickOnce, which allows applications to be easily updated after they have been deployed.