
Today's computer runs at more than 2GHz, a blazing speed improvement over just a few years ago. Almost all operating systems today are multitasking, meaning you can run more than one application at the same time. However, if your application is still executing code sequentially, you are not really utilizing the speed advancements of your latest processor. How many times have you seen an unresponsive application come back to life after it has completed a background task such as performing some mathematical calculations or network transfer? To fully utilize the extensive processing power of your computer and write responsive applications, understanding and using threads is important.
Note
A thread is a sequential flow of execution within a program. A program can consist of multiple threads of execution, each capable of independent execution.
This chapter explains how to write multithreaded applications using the Thread class in the .NET Framework. It shows you how to:
Multithreading is one of the most powerful concepts in programming. Using multithreading, you can break a complex task in a single application into multiple threads that execute independently of one another. One particularly good use of multithreading is in tasks that are synchronous in nature, such as Web Services calls. By default, Web Services calls are blocking calls — that is, the caller code does not continue until the Web Service returns the result. Because Web Services calls are often slow, this can result in sluggish client-side performance unless you take special steps to make the call an asynchronous one.
To see how multithreading works, first take a look at the following example:
class Program
{
static void Main(string[] args)
{
DoSomething();
Console.WriteLine("Continuing with the execution...");
Console.ReadLine();
}
static void DoSomething()
{
while (true)
{
Console.WriteLine("Doing something...");
}
}
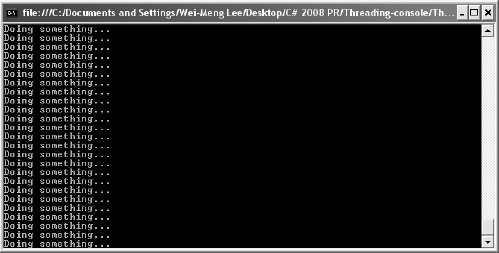
}This is a simple application that calls the DoSomething() function to print out a series of strings (in fact, it is an infinite loop, which will never stop; see Figure 10-1). Right after calling the DoSomething() function, you try to print a string ("Continuing with the execution...") to the console window. However, because the DoSomething() function is busy printing its own output, the "Console.WriteLine("Continuing with the execution...");" statement never gets a chance to execute.
This example illustrates the sequential nature of application — statements are executed sequentially. The DoSomething() function is analogous to consuming a Web Service, and as long as the Web Service does not return a value to you (due to network latency or busy web server, for instance), the rest of your application is blocked (that is, not able to continue).
You can use threads to break up statements in your application into smaller chunks so that they can be executed in parallel. You could, for instance, use a separate thread to call the DoSomething() function in the preceding example and let the remaining of the code continue to execute.
Every application contains one main thread of execution. A multithreaded application contains two or more threads of execution.
In C#, you can create a new thread of execution by using the Thread class found in the System.Threading namespace. The Thread class creates and controls a thread. The constructor of the Thread class takes in a ThreadStart delegate, which wraps the function that you want to run as a separate thread. The following code shows to use the Thread class to run the DoSomething() function as a separate thread:
Note
Import the System.Threading namespace when using the Thread class.
class Program
    {
        static void Main(string[] args)
        {
            Thread t = new Thread(new ThreadStart(DoSomething));
            t.Start();

            Console.WriteLine("Continuing with the execution...");
            Console.ReadLine();
        }

        static void DoSomething()
        {
            while (true)
            {
                Console.WriteLine("Doing something...");
            }
        }
    }
Note that the thread is not started until you explicitly call the Start() method. When the Start() method is called, the DoSomething() function is called and control is immediately returned to the Main() function. Figure 10-2 shows the output of the example application.
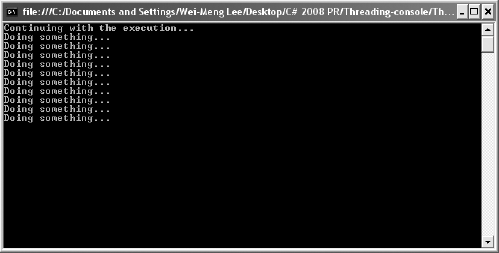
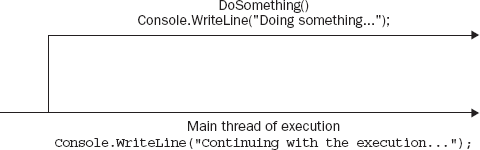
Figure 10-3 shows graphically the two different threads of execution.
As shown in Figure 10-2, it just so happens that before the DoSomething() method gets the chance to execute, the main thread has proceeded to execute its next statements. Hence, the output shows the main thread executing before the DoSomething() method. In reality, both threads have an equal chance of executing, and one of the many possible outputs could be:
Doing something...
Doing something...
Continuing with the execution...
Doing something...
Doing something...
...
A thread executes until:
It reaches the end of its life (method exits), or
You prematurely kill (abort) it.
You can use the Abort() method of the Thread class to abort a thread after it has started executing. Here's an example:
class Program
    {
        static void Main(string[] args)
        {
            Thread t = new Thread(new ThreadStart(DoSomething));
            t.Start();
            Console.WriteLine("Continuing with the execution...");

            while (!t.IsAlive) ;

            Thread.Sleep(1);
            t.Abort();

            Console.ReadLine();
        }

        static void DoSomething()
        {
            try
            {
                while (true)
                {
                    Console.WriteLine("Doing something...");
                }
            }
            catch (ThreadAbortException ex)
            {
                Console.WriteLine(ex.Message);
            }
        }
    }
When the thread is started, you continue with the next statement and print out the message "Continuing with the execution...". You then use the IsAlive property of the Thread class to find out the execution status of the thread and block the execution of the Main() function (with the while statement) until the thread has a chance to start. The Sleep() method of the Thread class blocks the current thread (Main()) for a specified number of milliseconds. Using this statement, you are essentially giving the DoSomething() function a chance to execute. Finally, you kill the thread by using the Abort() method of the Thread class.
The ThreadAbortException exception is fired on any thread that you kill. Ideally, you should clean up the resources in this exception handler (via the finally statement):
static void DoSomething()
        {
            try
            {
                while (true)
                {
                    Console.WriteLine("Doing something...");
                }
            }
            catch (ThreadAbortException ex)
            {
                Console.WriteLine(ex.Message);
            }
            finally {
                //---clean up your resources here---
            }
        }
The output of the preceding program may look like this:
Continuing with the execution...
Doing something...
Doing something...
Doing something...
Doing something...
Doing something...
Doing something...
Doing something...
Thread was being aborted.
Notice that I say the program may look like this. When you have multiple threads running in your application, you don't have control over which threads are executed first. The OS determines the actual execution sequence and that is dependent on several factors such as CPU utilization, memory usage, and so on. It is possible, then, that the output may look like this:
Doing something...
Continuing with the execution...
Doing something...
Doing something...
Doing something...
Doing something...
Doing something...
Doing something...
Thread was being aborted.
While you can use the Abort() method to kill a thread, it is always better to exit it gracefully whenever possible.
Here's a rewrite of the previous program:
class Program
    {
        private static volatile bool _stopThread = false;

        static void Main(string[] args)
        {
            Thread t = new Thread(new ThreadStart(DoSomething));
            t.Start();

            Console.WriteLine("Continuing with the execution...");

            while (!t.IsAlive) ;

            Thread.Sleep(1);
            _stopThread = true;
            Console.WriteLine("Thread ended.");
            Console.ReadLine();
        }

        static void DoSomething()
        {
            try
            {
                while (!_stopThread)
                {
                    Console.WriteLine("Doing something...");
                }
            }
            catch (ThreadAbortException ex)
            {
                Console.WriteLine(ex.Message);
            }
            finally {
                //---clean up your resources here---
            }
        }
    }
First, you declare a static Boolean variable call _stopThread:
private static volatile bool _stopThread = false;
Notice that you prefix the declaration with the volatile keyword, which is used as a hint to the compiler that this variable will be accessed by multiple threads. The variable will then not be subjected to compiler optimization and will always have the most up-to-date value.
To use the _stopThread variable to stop the thread, you modify the DoSomething() function, like this:
while (!_stopThread)
                {
                    Console.WriteLine("Doing something...");
                }
Finally, to stop the thread in the Main() function, you just need to set the _stopThread variable to true:
_stopThread = true;
            Console.WriteLine("Thread ended.");
The output of this program may look like this:
Continuing with the execution.
Doing something...
Doing something...
Doing something...
Doing something...
Doing something...
Doing something...
Thread ended.
Doing something...
The DoSomething() function may print another message after the "Thread ended." message. That's because the thread might not end immediately. To ensure that the "Thread ended." message is printed only after the DoSomething() function ends, you can use the Join() method of the Thread class to join the two threads:
static void Main(string[] args)
        {
            Thread t = new Thread(new ThreadStart(DoSomething));
            t.Start();

            Console.WriteLine("Continuing with the execution...");

            while (!t.IsAlive) ;

            Thread.Sleep(1);
            _stopThread = true;

            //---joins the current thread (Main()) to t---
            t.Join();
            Console.WriteLine("Thread ended.");
            Console.ReadLine();
        }
The Join() method essentially blocks the calling thread until the thread terminates. In this case, the Thread ended message will be blocked until the thread (t) terminates.
The output of the program now looks like this:
Continuing with the execution.
Doing something...
Doing something...
Doing something...
Doing something...
Doing something...
Doing something...
Thread ended.
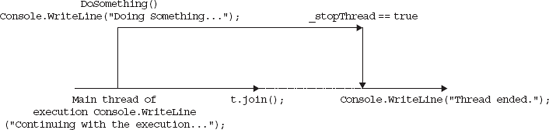
Figure 10-4 shows graphically the two different threads of execution.
In the past few examples, you've seen how to create a thread using the ThreadStart delegate to point to a method. So far, though, the method that you have been pointing to does not have any parameters:
static void DoSomething()
        {
            ...
            ...
        }
What if the function you want to invoke as a thread has a parameter? In that case, you have two choices:
Using the same example, the first choice is to wrap the DoSomething() method as a class and then expose a property to take in the parameter value:
class Program
    {
        static void Main(string[] args)
        {
            SomeClass sc = new SomeClass();
            sc.msg = "useful";
            Thread t = new Thread(new ThreadStart(sc.DoSomething));
            t.Start();
        }

    }

    class SomeClass
{
public string msg { get; set; }
public void DoSomething()
{
try
{
while (true)
{
Console.WriteLine("Doing something...{0}", msg);
}
}
catch (ThreadAbortException ex)
{
Console.WriteLine(ex.Message);
}
finally
{
//---clean up your resources here---
}
}
}In this example, you create a thread for the DoSomething() method by creating a new instance of the SomeClass class and then passing in the value through the msg property.
For the second choice, you use the ParameterizedThreadStart delegate instead of the ThreadStart delegate. The ParameterizedThreadStart delegate takes a parameter of type object, so if the function that you want to invoke as a thread has a parameter, that parameter must be of type object.
To see how to use the ParameterizedThreadStart delegate, modify the DoSomething() function by adding a parameter:
static void DoSomething(object msg)
        {
            try
            {
                while (true)
                {
                    Console.WriteLine("Doing something...{0}", msg);
                }
            }
            catch (ThreadAbortException ex)
            {
                Console.WriteLine(ex.Message);
            }
            finally {
                //---clean up your resources here---
            }
        }
To invoke DoSomething() as a thread and pass it a parameter, you use the ParameterizedThreadStart delegate as follows:
static void Main(string[] args)
        {
            Thread t = new Thread(new ParameterizedThreadStart(DoSomething));
            t.Start("useful");
            Console.WriteLine("Continuing with the execution...");
            ...
The argument to pass to the function is passed in the Start() method.
Multithreading enables you to have several threads of execution running at the same time. However, when a number of different threads run at the same time, they all compete for the same set of resources, so there must be a mechanism to ensure synchronization and communication among threads.
One key problem with multithreading is thread safety. Consider the following subroutine:
static void IncrementVar()
        {
            _value += 1;
        }
If two threads execute the same routine at the same time, it is possible that _value variable will not be incremented correctly. One thread may read the value for _value and increment the value by 1. Before the incremented value can be updated, another thread may read the old value and increment it. In the end, _value is incremented only once. For instances like this, it is important that when _value is incremented, no other threads can access the region of the code that is doing the incrementing. You accomplish that by locking all other threads during an incrementation.
In C#, you can use the following ways to synchronize your threads:
The
InterlockedclassThe C#
lockkeywordThe
Monitorclass
The following sections discuss each of these.
Because incrementing and decrementing are such common operations in programming, the .NET Framework class library provides the Interlocked class for performing atomic operations for variables that are shared by multiple threads. You can rewrite the preceding example using the Increment() method from the static Interlocked class:
static void IncrementVar()
        {
            Interlocked.Increment(ref _value);
        }
You need to pass in the variable to be incremented by reference to the Increment() method. When a thread encounters the Increment() statement, all other threads executing the same statement must wait until the incrementing is done.
The Interlocked class also includes the Decrement() class that, as its name implies, decrements the specified variable by one.
The Interlocked class is useful when you are performing atomic increment or decrement operations. What happens if you have multiple statements that you need to perform atomically? Take a look at the following program:
class Program
    {
        //---initial balance amount---
        static int balance = 500;

        static void Main(string[] args)
        {
            Thread t1 = new Thread(new ThreadStart(Debit));
            t1.Start();

            Thread t2 = new Thread(new ThreadStart(Credit));
            t2.Start();

            Console.ReadLine();
        }

        static void Credit()
        {
            //---credit 1500---
            for (int i = 0; i < 15; i++)
            {
                balance += 100;
                Console.WriteLine("After crediting, balance is {0}", balance);
            }
        }

        static void Debit()
{
//---debit 1000---
for (int i = 0; i < 10; i++)
{
balance -= 100;
Console.WriteLine("After debiting, balance is {0}", balance);
}
}
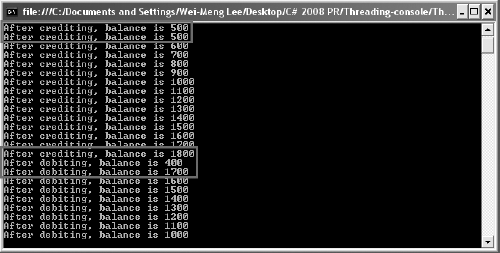
}Here two separate threads are trying to modify the value of balance. The Credit() function increments balance by 1500 in 15 steps of 100 each, and the Debit() function decrements balance by 1000 in 10 steps of 100 each. After each crediting or debiting you also print out the value of balance. With the two threads executing in parallel, it is highly probably that different threads may execute different parts of the functions at the same time, resulting in the inconsistent value of the balance variable.
Figure 10-5 shows one possible outcome of the execution. Notice that some of the lines showing the balance amount are inconsistent — the first two lines show that after crediting twice, the balance is still 500, and further down the balance jumps from 1800 to 400 and then back to 1700. In a correctly working scenario, the balance amount always reflects the amount credited or debited. For example, if the balance is 500, and 100 is credited, the balance should be 600. To ensure that crediting and debiting work correctly, you need to obtain a mutually exclusive lock on the block of code performing the crediting or debiting. A mutually exclusive lock means that once a thread is executing a block of code that is locked, other threads that also want to execute that code block will have to wait.
To enable you to create a mutually exclusive lock on a block of code (the code that is locked is called a critical section), C# provides the lock keyword. Using it, you can ensure that a block of code runs to completion without any interruption by other threads.
To lock a block of code, give the lock statement an object as argument. The preceding code could be written as follows:
class Program
    {
        //---used for locking---
        static object obj = new object();

        //---initial balance amount---
        static int balance = 500;

        static void Main(string[] args)
        {
            Thread t1 = new Thread(new ThreadStart(Debit));
            t1.Start();

            Thread t2 = new Thread(new ThreadStart(Credit));
            t2.Start();

            Console.ReadLine();
        }

        static void Credit()
        {
            //---credit 1500---
            for (int i = 0; i < 15; i++)
            {
                lock (obj)
                {
                    balance += 100;
                    Console.WriteLine("After crediting, balance is {0}", balance);
                }
            }
        }

        static void Debit()
        {
            //---debit 1000---
            for (int i = 0; i < 10; i++)
            {
                lock (obj)
                {
                    balance -= 100;
                    Console.WriteLine("After debiting, balance is {0}", balance);
                }
            }
        }
    }
Notice that you first create an instance of an object that will be used for locking purposes:
//---used for locking---
        static object obj = new object();
In general, it is best to avoid using a public object for locking purposes. This prevents situations in which threads are all waiting for a public object, which may itself be locked by some other code.
To delineate a block of code to lock, enclose the statements with the lock statement:
lock (obj)
                {
                    //---place code here---
                }
As long as one thread is executing the statements within the block, all other threads will have to wait for the statements to be completed before they can execute the statements.
Figure 10-6 shows one possible outcome of the execution.
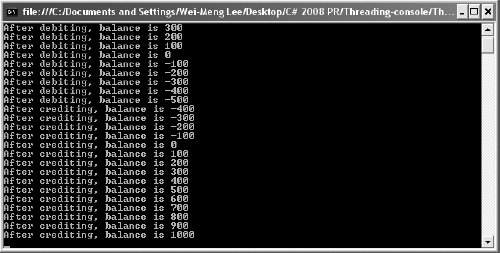
Notice that the value of balance is now consistent after each credit/debit operation.
The limitation of the lock statement is that you do not have the capability to release the lock halfway through the critical section. This is important because there are situations in which one thread needs to release the lock so that other threads have a chance to proceed before the first thread can resume its execution.
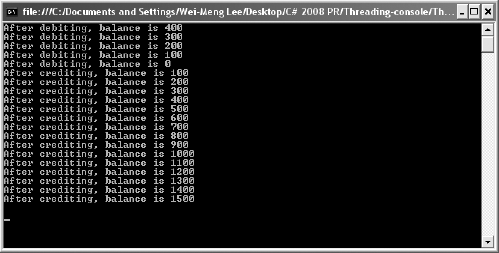
For instance, you saw in Figure 10-6 that on the fifth line the balance goes into a negative value. In real life this might not be acceptable. The bank might not allow your account to go into a negative balance, and thus you need to ensure that you have a positive balance before any more debiting can proceed. Hence, you need to check the value of balance. If it is 0, then you should release the lock and let the crediting thread have a chance to increment the balance before you do any more debiting.
For this purpose, you can use the Monitor class provided by the .NET Framework class library. Monitor is a static class that controls access to objects by providing a lock. Here's a rewrite of the previous program using the Monitor class:
class Program
    {
        //---used for locking---
        static object obj = new object();

        //---initial balance amount---
        static int balance = 500;

        static void Main(string[] args)
        {
            Thread t1 = new Thread(new ThreadStart(Debit));
            t1.Start();

            Thread t2 = new Thread(new ThreadStart(Credit));
            t2.Start();

            Console.ReadLine();
        }

        static void Credit()
        {
            //---credit 1500---
            for (int i = 0; i < 15; i++)
            {
                Monitor.Enter(obj);
                balance += 100;
                Console.WriteLine("After crediting, balance is {0}", balance);
                Monitor.Exit(obj);
            }
        }

        static void Debit()
        {
            //---debit 1000---
            for (int i = 0; i < 10; i++)
            {
                Monitor.Enter(obj);
                balance -= 100;
                Console.WriteLine("After debiting, balance is {0}", balance);
                Monitor.Exit(obj);
            }
        }
    }
The Enter() method of the Monitor class acquires a lock on the specified object, and the Exit() method releases the lock. The code enclosed by the Enter() and Exit() methods is the critical section. The C# lock statement looks similar to the Monitor class; in fact, it is implemented with the Monitor class. The following lock statement, for instance:
lock (obj)
                {
                    balance -= 100;
                    Console.WriteLine("After debiting, balance is {0}", balance);
                }
Is equivalent to this Monitor class usage:
Monitor.Enter(obj);
                try
                {
                    balance -= 100;
                    Console.WriteLine("After debiting, balance is {0}", balance);
                }
                finally
                {
                    Monitor.Exit(obj);
                }
Now the code looks promising, but the debiting could still result in a negative balance. To resolve this, you need to so some checking to ensure that the debiting does not proceed until there is a positive balance. Here's how:
static void Debit()
        {
            //---debit 1000---
            for (int i = 0; i < 10; i++)
            {
                Monitor.Enter(obj);

                if (balance == 0)
                    Monitor.Wait(obj);

                balance -= 100;
                Console.WriteLine("After debiting, balance is {0}", balance);
                Monitor.Exit(obj);
            }
        }
When you use the Wait() method of the Monitor class, you release the lock on the object and enter the object's waiting queue. The next thread that is waiting for the object acquires the lock. If the balance is 0, the debit thread would give up control and let the credit thread have the lock.
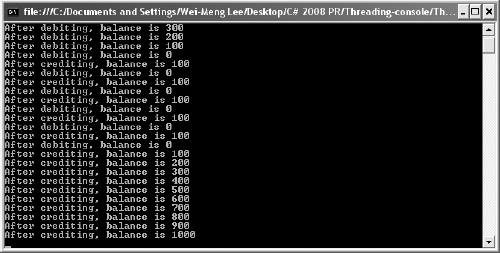
However, this code modification may result in the scenario shown in Figure 10-7, in which after debiting the balance five times, balance becomes 0. On the sixth time, the lock held by the debit thread is released to the credit thread. The credit thread credits the balance 15 times. At that point, the program freezes. Turns out that the credit thread has finished execution, but the debit thread is still waiting for the lock to be explicitly returned to it.
To resolve this, you call the Pulse() method of the Monitor class in the credit thread so that it can send a signal to the waiting thread that the lock is now released and is now going to pass back to it. The modified code for the Credit() function now looks like this:
static void Credit()
        {
            //---credit 1500---
            for (int i = 0; i < 15; i++)
            {
                Monitor.Enter(obj);
                balance += 100;

                if (balance > 0)
                    Monitor.Pulse(obj);

                Console.WriteLine("After crediting, balance is {0}", balance);
                Monitor.Exit(obj);
            }
        }
Figure 10-8 shows that the sequence now is correct.
The complete program is as follows:
class Program
    {
        //---used for locking---
        static object obj = new object();

        //---initial balance amount---
        static int balance = 500;

        static void Main(string[] args)
        {
            Thread t1 = new Thread(new ThreadStart(Debit));
            t1.Start();

            Thread t2 = new Thread(new ThreadStart(Credit));
            t2.Start();

            Console.ReadLine();
        }

        static void Credit()
        {
            //---credit 1500---
            for (int i = 0; i < 15; i++)
            {
                Monitor.Enter(obj);
                balance += 100;

                if (balance > 0)
                    Monitor.Pulse(obj);

                Console.WriteLine("After crediting, balance is {0}", balance);
                Monitor.Exit(obj);
            }
        }

        static void Debit()
        {
            //---debit 1000---
            for (int i = 0; i < 10; i++)
            {
                Monitor.Enter(obj);

                if (balance == 0)
                    Monitor.Wait(obj);

                balance -= 100;
                Console.WriteLine("After debiting, balance is {0}", balance);
                Monitor.Exit(obj);
            }
        }
}One of the common problems faced by Windows programmers is the issue of updating the UI in multithreaded situations. To improve the efficiency of their applications, Windows developers often use threads to perform different tasks in parallel. One thread may be consuming a Web Service, another performing file I/O, another doing some mathematical calculations, and so on. As each thread completes, the developers may want to display the result on the Windows form itself.
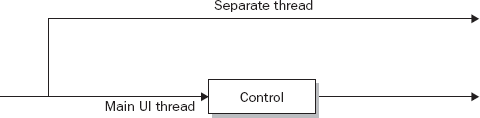
However, it is important to know that controls in Windows Forms are bound to a specific thread and are thus not thread safe; this means that if you are updating a control from another thread, you should not call the control's member directly. Figure 10-9 shows the conceptual illustration.
To update a Windows Forms control from another thread, use a combination of the following members of that particular control:
InvokeRequiredproperty — Returns a Boolean value indicating if the caller must use theInvoke()method when making call to the control if the caller is on a different thread than the control. TheInvokeRequiredproperty returnstrueif the calling thread is not the thread that created the control or if the window handle has not yet been created for that control.Invoke()method — Executes a delegate on the thread that owns the control's underlying windows handle.BeginInvoke()method — Calls theInvoke()method asynchronously.EndInvoke()method — Retrieves the return value of the asynchronous operation started by theBeginInvoke()method.
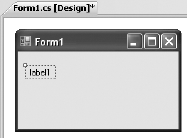
To see how to use these members, create a Windows application project in Visual Studio 2008. In the default Form1, drag and drop a Label control onto the form and use its default name of Label1. Figure 10-10 shows the control on the form.
Double-click the form to switch to its code-behind. The Form1_Load event handler is automatically created for you.
Add the following highlighted code:
private void Form1_Load(object sender, EventArgs e)
        {
            if (label1.InvokeRequired)
            {
                MessageBox.Show("Need to use Invoke()");
            }
            else
            {
                MessageBox.Show("No need to use Invoke()");
            }
        }
This code checks the InvokeRequired property to determine whether you need to call Invoke() if you want to call the Label control's members. Because the code is in the same thread as the Label control, the value for the InvokeRequired property would be false and the message box will print the message No need to use Invoke().
Now to write some code to display the current time on the Label control and to update the time every second, making it look like a clock. Define the PrintTime() function as follows:
private void PrintTime()
        {
            try
            {
                while (true)
                {
                    if (label1.InvokeRequired)
                    {
                        label1.Invoke(myDelegate, new object[]
                        {
                            label1, DateTime.Now.ToString()
                        });
                        Thread.Sleep(1000);
                    }
                    else
                        label1.Text = DateTime.Now.ToString();
                }
            }
            catch (Exception ex)
            {
                Console.WriteLine(ex.Message);
            }
        }
Because the PrintTime() function is going to be executed on a separate thread (you will see this later), you need to use the Invoke() method to call a delegate (myDelegate, which you will define shortly) so that the time can be displayed in the Label control. You also insert a delay of one second so that the time is refreshed every second.
Define the updateLabel function so that you can set the Label's control Text property to a specific string:
private void updateLabel(Control ctrl, string str)
        {
            ctrl.Text = str;
        }
This function takes in two parameters — the control to update, and the string to display in the control. Because this function resides in the UI thread, it cannot be called directly from the PrintTime() function; instead, you need to use a delegate to point to it. So the next step is to define a delegate type for this function and then create the delegate:
public partial class Form1 : Form
    {
        //---delegate type for the updateLabel() function---
        private delegate void delUpdateControl(Control ctrl, string str);

        //---a delegate---
        private delUpdateControl myDelegate;
Finally, create a thread for the PrintTime() method in the Form1_Load event handler and start it:
private void Form1_Load(object sender, EventArgs e)
{
//...
//...
myDelegate = new delUpdateControl(updateLabel);
Thread t = new Thread(PrintTime);
t.Start();
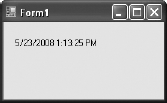
}That's it! When you run the application, the time is displayed and updated every second on the Label control (see Figure 10-11). At the same time, you can move the form, resize it, and so forth, and it is still responsive.
Because threading is such a common programming task in Windows programming, Microsoft has provided a convenient solution to implementing threading: the BackgroundWorker control for Windows applications. The BackgroundWorker control enables you to run a long background task such as network access, file access, and so forth and receive continual feedback on the progress of the task. It runs on a separate thread.
This section creates a simple Windows application that will show you how the BackgroundWorker component can help make your applications more responsive.
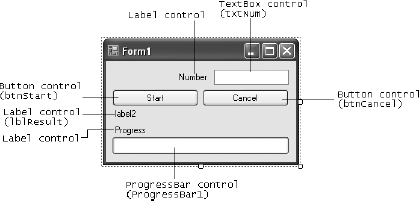
First, start Visual Studio 2008 and create a new Windows application. Populate the default Windows form with the following controls (see Figure 10-12).
Control | Name | Text |
|---|---|---|
|
| |
|
|
|
|
| |
|
| |
|
|
|
|
|
|
|
|
Drag and drop the BackgroundWorker component from the Toolbox onto the form. The BackgroundWorker is a nonvisual control, so it appears below the form in the component section (see Figure 10-13).

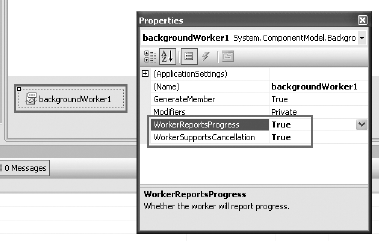
Right-click on the BackgroundWorker component, and select Properties. Set the WorkerReportsProgress and WorkerSupportsCancellation properties to True so that the component can report on the progress of the thread as well as be aborted halfway through the thread (see Figure 10-14).
Here is how the application works. The user enters a number in the TextBox control (txtNum) and clicks the Start button. The application then sums all of the numbers from 0 to that number. The progress bar at the bottom of the page displays the progress of the summation. The speed in which the progress bar updates is dependent upon the number entered. For small numbers, the progress bar fills up very quickly. To really see the effect of how summation works in a background thread, try a large number and watch the progress bar update itself. Notice that the window is still responsive while the summation is underway. To abort the summation process, click the Cancel button. Once the summation is done, the result is printed on the Label control (lblResult).
Switch to the code behind of the Windows form to do the coding. When the Start button is clicked, you first initialize some of the controls on the form. You then get the BackgroundWorker component to spin off a separate thread by using the RunWorkAsync() method. You pass the number entered by the user as the parameter for this method:
private void btnStart_Click(object sender, EventArgs e)
        {
            lblResult.Text = string.Empty;
            btnCancel.Enabled = true;
            btnStart.Enabled = false;
            progressBar1.Value = 0;

            backgroundWorker1.RunWorkerAsync(txtNum.Text);
        }
Now, double-click the BackgroundWorker control in design view to create the event handler for its DoWork event.
private void backgroundWorker1_DoWork(object sender, DoWorkEventArgs e)
        {
            BackgroundWorker worker = (BackgroundWorker)sender;
            e.Result = SumNumbers(double.Parse(e.Argument.ToString()), worker, e);
        }
The DoWork event of the BackgroundWorker component invokes the SumNumbers() function (which you will define next) in a separate thread. This event is fired when you call the RunWorkerAsync() method (as was done in the previous step).
Note
The DoWork event handler runs on a separate thread from the UI. Be sure not to manipulate any Windows Forms controls created on the UI thread from this method.
The SumNumbers() function basically sums up all the numbers from 0 to the number specified:
private double SumNumbers(
            double number, BackgroundWorker worker, DoWorkEventArgs e)
        {
            int lastPercent = 0;
            double sum = 0;
            for (double i = 0; i <= number; i++)
            {
                //---check if user cancelled the process---
                if (worker.CancellationPending)
                {
                    e.Cancel = true;
                }
                else
                {
                    sum += i;
                    if (i % 10 == 0)
{
int percentDone = (int)((i / number) * 100);
//---update the progress bar if there is a change---
if (percentDone > lastPercent)
{
worker.ReportProgress(percentDone);
lastPercent = percentDone;
}
}
}
}
return sum;
}It takes in three arguments — the number to sum up to, the BackgroundWorker component, and the DoWorkEventArgs. Within the For loop, you check to see if the user has clicked the Cancel button (this event is defined a little later in this chapter) by checking the value of the CancellationPending property. If the user has canceled the process, set e.Cancel to True. After every 10 iterations, you calculate the progress completed so far. If there is progress (when the current progress percentage is greater than the last one recorded), you update the progress bar by calling the ReportProgress() method of the BackgroundWorker component. Do not call the ReportProgress() method unnecessarily because frequent calls to update the progress bar will freeze the UI of your application.
It is important to note that in this method (which was invoked by the DoWork event), you cannot directly access Windows controls because they are not thread-safe. Trying to do so will trigger a runtime error, a useful feature in Visual Studio 2008.
The ProgressChanged event is invoked whenever the ReportProgress() method is called. In this case, you use it to update the progress bar. To generate the event handler for the ProgressChanged event, switch to design view and look at the properties of the BackgroundWorker component. In the Properties window, select the Events icon and double-click the ProgressChanged event (see Figure 10-15).

Code the event handler for the ProgressChanged event as follows:
private void backgroundWorker1_ProgressChanged(
            object sender, ProgressChangedEventArgs e)
        {
            //---updates the progress bar and label control---
            progressBar1.Value = e.ProgressPercentage;
            lblResult.Text = e.ProgressPercentage.ToString() + "%";
        }
Now double-click the RunWorkerCompleted event to generate its event handler:
private void backgroundWorker1_RunWorkerCompleted(
            object sender, RunWorkerCompletedEventArgs e)
        {
            if (e.Error != null)
                MessageBox.Show(e.Error.Message);
            else if (e.Cancelled)
                MessageBox.Show("Cancelled");
            else
            {
                lblResult.Text = "Sum of 1 to " +
                txtNum.Text + " is " + e.Result;
            }
            btnStart.Enabled = true;
            btnCancel.Enabled = false;
        }
The RunWorkerCompleted event is fired when the thread (SumNumbers(), in this case) has completed running. Here you print the result accordingly.
Finally, when the user clicks the Cancel button, you cancel the process by calling the CancelAsync() method:
private void btnCancel_Click(object sender, EventArgs e)
        {
            //---Cancel the asynchronous operation---
            backgroundWorker1.CancelAsync();
            btnCancel.Enabled = false;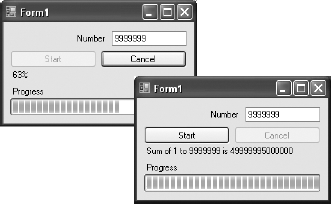
}To test the application, press F5, enter a large number (say, 9999999), and click the Start button. The progress bar updating should begin updating. When the process is complete, the result is printed in the Label control (see Figure 10-16).
This chapter explans the rationale for threading and how it can improve the responsiveness of your applications. Threading is a complex topic and you need to plan carefully before using threads in your application. For instance, you must identify the critical regions so that you can ensure that the different threads accessing the critical region are synchronized. Finally, you saw that Windows Forms controls are not thread-safe and that you need to use delegates when updating UI controls from another thread.