
ASP.NET (Active Server Pages .NET) is a web development technology from Microsoft. Part of the .NET Framework, ASP.NET enables developers to build dynamic web applications and Web Services using compiled languages like VB.NET and C#. Developers can use Visual Studio 2008 to develop compelling web applications using ASP.NET, with the ease of drag-and-drop server controls. The latest version of ASP.NET is version 3.5.
This chapter explains how to:
Display database records using a server control call
GridViewPerform data binding in an ASP.NET application using the new
LinqDataSourcecontrolAJAX-enable your application by using the new AJAX framework in ASP.NET 3.5 and the AJAX Control Toolkit
Deploy your web application to a web server
In the early days of the web, the contents of web pages were largely static. Pages needed to be constantly — and manually — modified. To create web sites that were dynamic and would update automatically, a number of server-side technologies sprouted up, including Microsoft's Active Server Pages (ASP). ASP executed on the server side, with its output sent to the user's web browser, thus allowing the server to generate dynamic web pages based on the actions of the user.
These server-side technologies are important contributions to the development of the web. Without them, web applications that users are accustomed to today, such as Amazon.com and eBay.com, would not be possible.
Microsoft ASP began as a public beta (v1.0) in October 1996 as an upgrade to Internet Information Server (IIS) 2.0. In the initial three versions, ASP used a scripting language, VBScript, as the default language. Using a scripting language had its flaws — code is interpreted rather than compiled, and using VBScript as the default language turned some people off (although technically you could configure ASP to use other languages such as JScript and Perl, but this was not commonly done). This interpreted code model of ASP seriously limited performance.
In early 2000, Microsoft introduced the .NET Framework and, together with it, the upgrade of ASP: ASP.NET 1.0 (previously known as ASP+). Over the last few years, ASP.NET has evolved to ASP.NET 3.5.
In ASP.NET, you are not limited to scripting languages; you can use the following .NET languages:
C#
VB.NET
When a web browser requests a page from a web server, the web server (IIS) first checks whether the request is for an HTML page. If it is, the request is filled by fetching the files from the hard drive and returning them to the client (web browser). If the client is requesting an ASP.NET page, IIS passes the request to the ASP.NET runtime, which then processes the application and returns the output to the client.
ASP.NET pages use the .aspx extension, which ensures that ASP.NET can run side by side with classic ASP, which uses the extension .asp.
One of the inherent problems with the HTTP protocol is its stateless nature. Put simply, a request made by a user is loaded into memory, fulfilled, and then unloaded. Subsequent requests by the same user are treated just like any other request; the server makes no attempt to remember what the user has previously requested. This stateless nature makes writing web applications a challenge because the application developer must explicitly devise mechanisms to enable the server to remember the previous state of the application. Several mechanisms have been devised over the years, including cookies and query strings for passing information to and from the server and the client.
In classic ASP, you typically need to write pages of code to preserve the state of the page after the user has posted a value back to the server. In ASP.NET, all of these mundane tasks (collectively known as state management) are accomplished by the ASP.NET runtime.
ASP.NET is supported on the following operating systems:
Microsoft Windows 2000 Professional and Server (SP 2 recommended)
Microsoft Windows XP Professional
Microsoft Windows Server 2003/2008
Microsoft Windows Vista
To run ASP.NET applications, you need to install IIS on your computer (IIS is not installed by default; you can install IIS on your computer by running the Add or Remove Programs application in the Control Panel and then selecting the Add/Remove Windows Components tab). To obtain the ASP.NET runtime, you must install the .NET Framework on your machine. You can obtain the latest .NET Framework from the following site: http://microsoft.com/downloads.
One of the most common tasks a web application does is display records from a database. For example, you may have an inventory web application with which your staff can check the latest pricing information and stock availability. This chapter explains how to retrieve records from a database and use data binding in ASP.NET to display them on a page. In addition, it shows how to use the new LinqDataSource control, which enables you to use LINQ to talk to databases without needing to write complex SQL queries.
To start, launch Visual Studio 2008 and create a new ASP.NET Web Site project (see Figure 17-1).
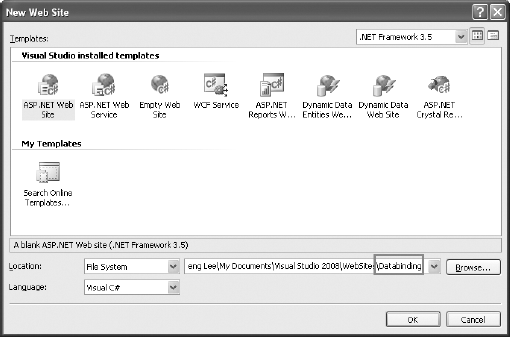
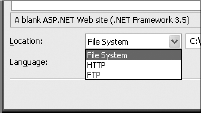
The default location is File System (see Figure 17-2), which means that you can save your ASP.NET project in any folder on your local drive so that during debugging a built-in web server is automatically launched to host your ASP.NET application. Alternatively, you can choose the HTTP option, which means that your ASP.NET application will be hosted by a web server (most commonly the local IIS), or the FTP option, which uses an FTP Server. For this example, use File System, the default option.
The example web application will display records from two tables in the pubs sample database. Because you are going to use LINQ to access the database, you do not connect to the database directly. Instead, you generate classes that represent the database and its tables and then use those classes to interact with the data. To begin, add a new item to the project and select the LINQ to SQL Classes template (see Figure 17-3).

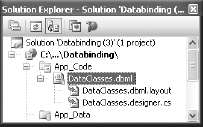
Use the default name of DataClasses.dbml. When prompted to save the item in the App_Code folder, click Yes. The DataClasses.dbml file is created in the App_Code folder of your project (see Figure 17-4).
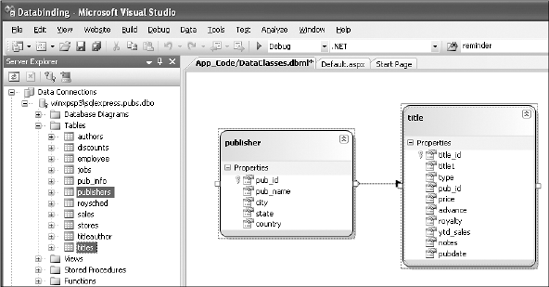
The Object Relational Designer (O/R Designer) then launches so that you can visually edit the databases and tables you want to use. Open the Server Explorer window, and connect to the pubs sample database. Drag and drop the publisher and title tables onto the design surface of DataClasses.dbml (see Figure 17-5).
Save the DataClasses.dbml file by pressing Ctrl+S. When you save the file, Visual Studio 2008 persists out .NET classes that represent the entities and database relationships that you have just added. For each LINQ to SQL designer file you add to your solution, a custom DataContext class is generated. It is the main object that you use to manipulate the table. In this example, the DataContext class is named DataClassesDataContext.
Be sure to save DataClasses.dbml before proceeding.
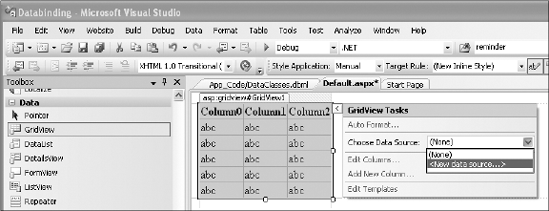
To display the records from a table, you can use the GridView control, which displays the values of a data source in a table where each column represents a field and each row represents a record. Drag the GridView control from the Toolbox and drop it onto the design surface of Default.aspx. In the SmartTag of the GridView control, select <New data source... > in the Choose Data Source dropdown list (see Figure 17-6).
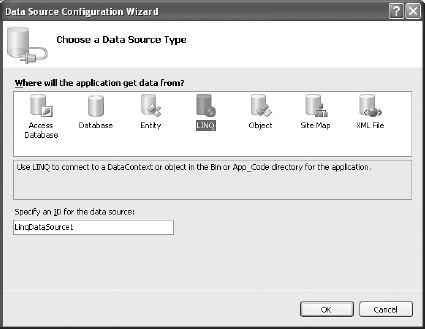
In the Data Source Configuration Wizard (see Figure 17-7), select LINQ and click OK. Use the default name of LinqDataSource1. Click OK.
For those of you familiar with the various data source controls (such as
SqlDataSourceandObjectDataSource) in<hi>ASP.NET 2.0</hi>, theLinqDataSourcecontrol works much like them. What is special about theLinqDataSourcecontrol is that instead of binding directly to a database (as with theSqlDataSource), it binds to a LINQ-enabled data model. The beauty of this is that you need not write the various complex SQL queries (such asinsert, delete, andmodify) to use it. Instead, you just need to specify the data model you are working with, and the type of operations you want to perform on it (such asdelete, insert, orupdate) and then the control takes care of performing those operations by itself.
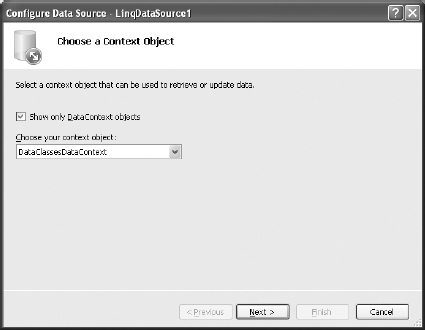
The DataClassesDataContext object that you generated earlier is automatically selected for you (see Figure 17-8). Click Next.
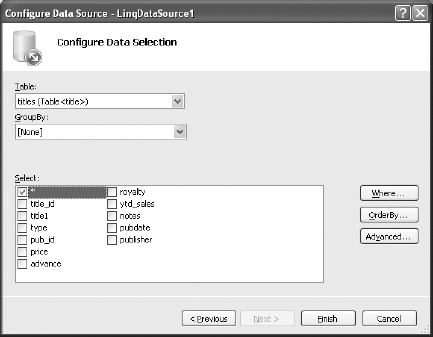
Select the titles table, and click the * checkbox to select all fields (see Figure 17-9).
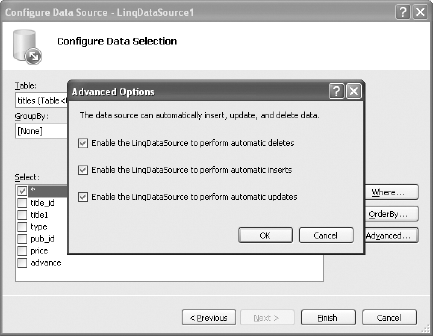
Click the Advanced button and check all the checkboxes. Click OK (see Figure 17-10) and then click Finish.
Switch to the source view of Default.aspx page, and observe the <asp:LinqDataSource> element:
<asp:LinqDataSource
            ID="LinqDataSource1"
            runat="server"
            ContextTypeName="DataClassesDataContext"
            EnableDelete="True"
            EnableInsert="True"
            EnableUpdate="True"
            TableName="titles">
        </asp:LinqDataSource>
Select the GridView control's SmartTag, and check the five checkboxes (see Figure 17-11).
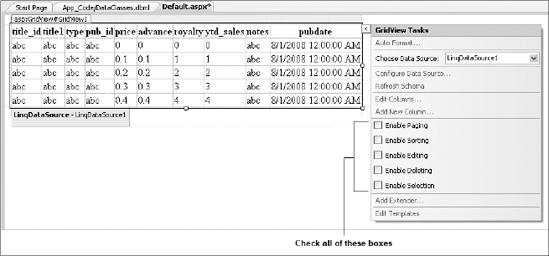
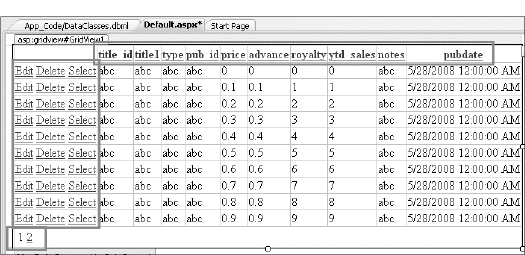
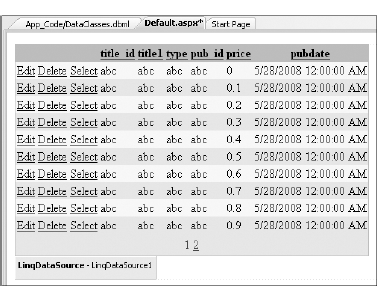
This makes the GridView look like Figure 17-12. The column names are now clickable and that new column containing Edit, Delete, and Select is added to the GridView control. Also, paging is now enabled (located at the bottom of the GridView control).
Click the Auto Format link in the SmartTag of the GridView control, and select the Sand and Sky scheme.
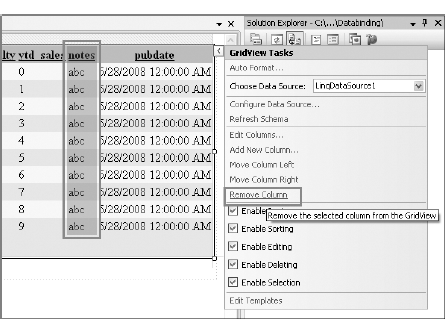
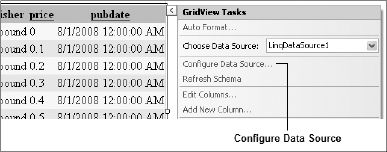
The GridView control contains all the fields of the titles table, but there are some that you don't really need. So select the notes column, and remove it by choosing Remove Column from GridView Tasks (see Figure 17-13). Delete the advance, royalty, and ytd_sales columns as well.
The GridView control should now look like Figure 17-14.
Now, to debug the application, press F5. You are asked to modify the Web.config file for debugging; click OK. You also are prompted that script debugging is disabled in Internet Explorer; click Yes to continue debugging.
Figure 17-15 shows the GridView control displaying the rows in the titles table. You can sort the rows by clicking on the column headers, and edit and delete records.
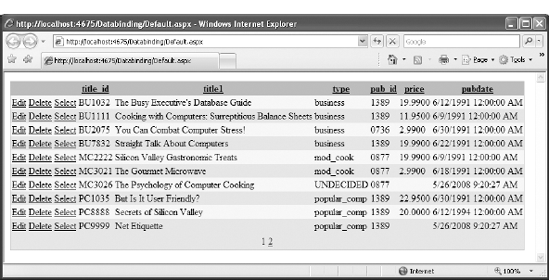
As Figure 17-15 shows, the publisher's ID appears in the GridView control under the pub_id field. It would be helpful to the user if the publisher's name displayed instead of its ID. To do that, switch to the source view of Default.aspx and within the <asp:GridView> element, replace the following element:
<asp:BoundField
    DataField="pub_id"
    HeaderText="pub_id"
    SortExpression="pub_id" />
with this:
<asp:TemplateField
HeaderText="Publisher">
<ItemTemplate>
<%#Eval("publisher.pub_name")%>
</ItemTemplate>
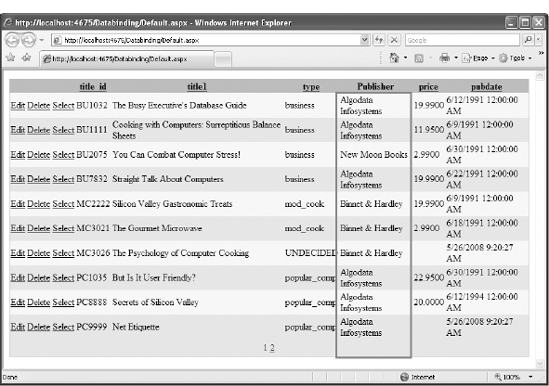
</asp:TemplateField>Essentially, this changes the header for the publisher column in the GridView to Publisher, and the values are now derived from the publisher.pub_name property of the DataClassesDataContext class.
Press F5 to debug the application again to see the publishers' names instead of the publishers' IDs (see Figure 17-16).
So far, all the titles in the titles table are displayed in the GridView control. You might want to restrict the titles displayed to a particular selected publisher. To do so, insert another LinqDataSource control to the Default.aspx page by adding the following highlighted code:
<asp:LinqDataSource
            ID="LinqDataSource1"
            runat="server"
            ContextTypeName="DataClassesDataContext"
            EnableDelete="True"
            EnableInsert="True"
            EnableUpdate="True"
            TableName="titles">
        </asp:LinqDataSource>

        <asp:LinqDataSource
            ID="LinqDataSource2"
            runat="server"
            ContextTypeName="DataClassesDataContext"
            OrderBy="pub_name"
            Select="new (pub_name, pub_id)"
            TableName="publishers">
        </asp:LinqDataSource>
Notice that the second LinqDataSource control has the Select attribute where you can specify the name of the fields you want to retrieve (pub_name and pub_id, in this example).
Add a DropDownList control to the top of the page by adding the following highlighted code:
<body>
    <form id="form1" runat="server">
    <div>
        Display titles by publisher:
        <asp:DropDownList
            ID="DropDownList1"
            runat="server"
            DataSourceID="LinqDataSource2"
            DataTextField="pub_name"
            DataValueField="pub_id"
            AutoPostBack="True">
        </asp:DropDownList>

        <asp:GridView ID="GridView1" runat="server"
        ...
        ...
This addition binds a DropDownList control to the LinqDataSource control. The DropDownList control will display the list of publisher names (pub_name), and each publisher's name has the pub-id as its value.
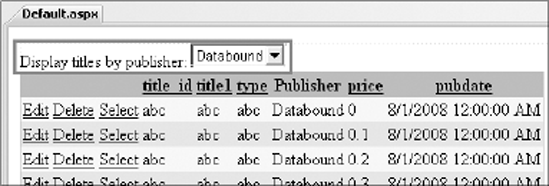
Default.aspx should now look like Figure 17-17 in design view. You will see the text "Display titles by publisher:" as well as a dropdown list control.
To configure the first LinqDataSource control so that the GridView control will only display titles from the selected publisher, click on the SmartTag of the GridView control, and click the Configure Data Source link (see Figure 17-18).
Click Next, and then click the Where button. Enter the following values in the dialog (see Figure 17-19).
Condition | Value |
|---|---|
Column |
|
Operator |
|
Source |
|
Control ID |
|
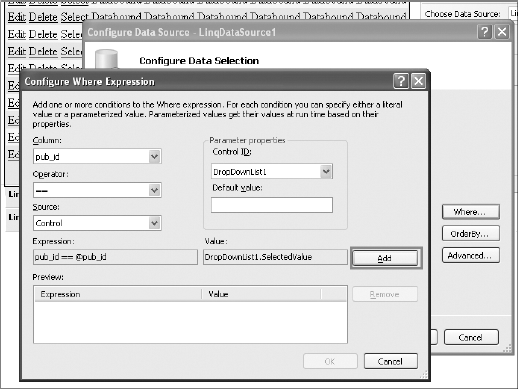
Click Add, OK, and then Finish. Visual Studio 2008 will ask if you want to regenerate the GridView columns fields and data keys. Click No.
This will make the GridView control display titles whose pub_id file match the pub-id value of the selected publisher in the DropDownList1 control.
The source of the LinqDataSource control now looks like this:
<asp:LinqDataSource
ID="LinqDataSource1"
runat="server"
ContextTypeName="DataClassesDataContext"
EnableDelete="True"
EnableInsert="True"
EnableUpdate="True"
TableName="titles"
Where="pub_id == @pub_id">
<WhereParameters>
<asp:ControlParameter
ControlID="DropDownList1"
Name="pub_id"
PropertyName="SelectedValue"
Type="String" />
</WhereParameters>
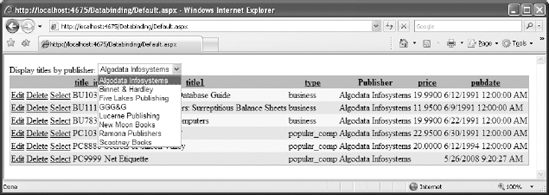
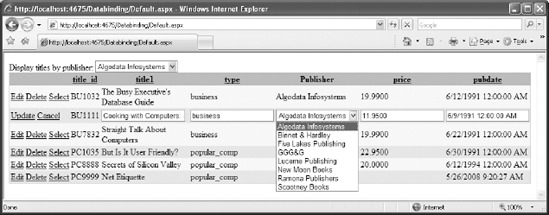
</asp:LinqDataSource>Press F5 to debug the application. When you select a publisher now, all books published by that publisher are displayed in the GridView control (see Figure 17-20).
Now select a record, and click the Edit link. Notice that the publisher is not editable (see Figure 17-21).
Here's how to make the publisher field editable. In the source view of Default.aspx, insert the following highlighted code:
<asp:TemplateField HeaderText="Publisher">
                    <ItemTemplate>
                    <%#Eval("publisher.pub_name")%>
                    </ItemTemplate>

                    <EditItemTemplate>
                        <asp:DropDownList
                            ID="DropDownList2"
                            DataSourceID="LinqDataSource2"
                            DataTextField="pub_name"
                            DataValueField="pub_id"
                            SelectedValue='<%#Bind("pub_id")%>'
                            runat="server">
                        </asp:DropDownList>
                    </EditItemTemplate>

                </asp:TemplateField>
This creates a dropdown list within the GridView control (under the Publisher column) and displays a list of publishers available.
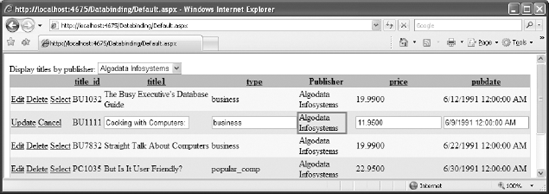
Press F5 to debug the application again. A title's publisher can now be changed (see Figure 17-22).
One of the challenges developers face in building appealing web applications is overcoming the constant need to refresh entire web pages to update just portions of their content. In the real world, network latencies prevent web applications from refreshing as often as you might want. Typically, when a user submits a request to a web server, the entire page must be refreshed and the user is forced to wait while it makes a round trip to the server even when only a fraction of the page has to be changed. Clearly, this is a key usability issue that developers want to put behind them in their quest to build applications that are more desktop-like in their responsiveness.
Enter AJAX, originally an acronym for Asynchronous JavaScript and XML but increasingly a term that embraces a collection of techniques for creating more responsive and feature-rich web applications. Instead of waiting for web pages to refresh, AJAX-enabled web sites dynamically and asynchronously update portions of the pages, thus providing a much more responsive experience to the user. What's more, with AJAX you can now develop richer applications that draw on the JavaScript and CSS support found in modern web browsers such as Firefox and Internet Explorer (IE) 6 and later. A quick look at the Windows Live Local site (see http://maps.live.com) or Google Spreadsheets (see http://spreadsheets.google.com) should be enough to convince you of the wonders that AJAX can deliver to a user experience.
AJAX is not a product but rather a collection of client-empowering web technologies, including XML, JavaScript, HTTP, the DOM, JSON, and CSS. Writing AJAX-style applications is not easy and has traditionally required that you have an intimate knowledge of client-side scripting languages, most notably JavaScript.
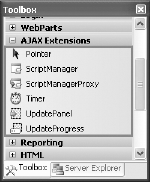
With ASP.NET 3.5, Microsoft has built-in support for AJAX. In the Toolbox, you can find a new tab called AJAX Extensions (see Figure 17-23) containing the various AJAX controls.
While ASP.NET 3.5 comes with a built-in set of controls you can use to create AJAX-style web applications, one of the greatest benefits of AJAX is that its framework is extensible, which allows you and other developers to create your own AJAX controls by extending those that already exist. Microsoft encourages this activity and sponsors an open-source-style project — the AJAX Control Toolkit that makes available a set of controls developed by Microsoft and seeks to involve the community in creating more elements to extend the functionality of AJAX. The AJAX Control Toolkit gives you access to a growing collection of robust controls that give you additional AJAX-style functionality beyond that provided by the basic AJAX framework.
You can download the AJAX Control Toolkit from: http://codeplex.com/AtlasControlToolkit/Release/ProjectReleases.aspx?ReleaseId=11121.
You have a choice of two files to download:
AjaxControlToolkit-Framework3.5.zipis the full release package with complete source code to all controls, the test framework, VSI, and more.AjaxControlToolkit-Framework3.5-NoSource.zipcontains only the sample web site and VSI, and is for people who don't need or want the source code for the controls.
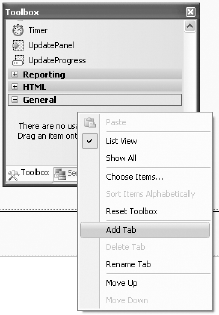
The AJAX Control Toolkit comes with a set of AJAX Extender controls. Unlike the AJAX controls that come with ASP.NET 3.5, you need to manually add these to the Toolbox in Visual Studio 2008. To do so, add a new tab in Toolbox (see Figure 17-24), and name it AJAX Control Toolkit.
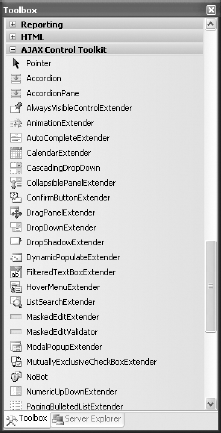
Extract the AjaxControlToolkit-Framework3.5-NoSource.zip file (assuming that you downloaded the version without source code) into a folder (C:AJAXControlToolkit, for instance). Inside the new folder is a folder named SampleWebSiteBin. Drag and drop the AjaxControlToolkit.dll library from that Bin folder onto the new AJAX Control Toolkit tab. The set of AJAX Control Toolkit Extender controls appears, as shown in Figure 17-25.
Now let's use some of the core AJAX controls in ASP.NET 3.5 to AJAX-enable the sample project created earlier in this chapter.
The first step toward AJAX-enabling an ASP.NET web page is to add the ScriptManager control to the page. That's the control that manages all the AJAX functionality on your page. It should be placed before any AJAX controls, so it's a good idea to place it at the top of the page, like this:
<body>
    <form id="form1" runat="server">
    <div>
        <asp:ScriptManager ID="ScriptManager1" runat="server">
        </asp:ScriptManager>
        Display titles by publisher:
        <asp:DropDownList ID="DropDownList1" runat="server"
            DataSourceID="LinqDataSource2"
            DataTextField="pub_name"
            DataValueField="pub_id"
            AutoPostBack="True">
        </asp:DropDownList>
        ...
To place the ScriptManager control on the page, you can either type it manually or drag the ScriptManager control from the Toolbox and drop it onto the code editor.
To delineate the part of the page you want to update without causing the entire page to refresh, drag and drop an UpdatePanel control from the AJAX Extensions tab of the Toolbox onto the Default.aspx page, like this:
<body>
    <form id="form1" runat="server">
    <div>
        <asp:ScriptManager ID="ScriptManager1" runat="server">
        </asp:ScriptManager>
        Display titles by publisher:
        <asp:DropDownList ID="DropDownList1" runat="server"
            DataSourceID="LinqDataSource2"
            DataTextField="pub_name"
            DataValueField="pub_id"
            AutoPostBack="True">
        </asp:DropDownList>

        <asp:UpdatePanel ID="UpdatePanel1" runat="server">
            <ContentTemplate>

            </ContentTemplate>
        </asp:UpdatePanel>
...
The <asp:UpdatePanel> control divides a web page into regions — each region can be updated without refreshing the entire page. The <ContentTemplate> element sets the template that defines the contents of the <asp:UpdatePanel> control.
Now, move a GridView control into the <ContentTemplate> element so that the content of the GridView can be updated without causing a postback to the server:
<asp:UpdatePanel ID="UpdatePanel1" runat="server">
            <ContentTemplate>
                <asp:GridView ID="GridView1" runat="server" AllowPaging="True"
                    AllowSorting="True"
                    AutoGenerateColumns="False" BackColor="LightGoldenrodYellow"
                    BorderColor="Tan"
                    ...
                </asp:GridView>
            </ContentTemplate>
        </asp:UpdatePanel>
Press F5 to test the application again. This time, edit the record by clicking the Edit link (see Figure 17-26). Notice that, as you click on the links (Edit, Update, Cancel, and Select), the page does not reload. Instead, all the changes happen inside the GridView control.

So far, you have used the <asp:UpdatePanel> control to enclose controls to ensure that changes in this control do not cause a postback to the server. If you select a publisher from the dropdown list, though, you will realize that the entire page is refreshed. By adding a trigger to the page, you can specify a control (and, optionally, its event) that causes an <asp:UpdatePanel> control to refresh. The trigger <asp:AsyncPostBackTrigger> causes an update when the specified control raises an event. In other words, when a control specified by a trigger causes an update to a control located with an <asp:UpdatePanel> control, only the control is updated and not the entire page.
Here's the markup you need to add a trigger to an <asp:UpdatePanel> control:
<asp:UpdatePanel ID="UpdatePanel1" runat="server">
            <Triggers>
                <asp:AsyncPostBackTrigger ControlID="DropDownList1" />
            </Triggers>
            <ContentTemplate>
            ...
Here, the <asp:UpdatePanel> control will refresh whenever the value of DropDownList1 changes.
Press F5 to test the application. Now selecting a publisher from the dropdown list updates the GridView control without causing a refresh in the page.
The refreshing of the GridView control may happen very quickly on your computer because your web server is running locally. In the real world, there is network latency, and users may experience a delay but not be aware that a control is in the midst of a refresh. Therefore, it's important to give visual cues to users to let them know when an update is in progress.
You can display a progress report while an <asp:updatePanel> is being refreshed by using the <asp:UpdateProgress> control. Add the following to the source view of Default.aspx:
<body>
    <form id="form1" runat="server">
    <div>
        <asp:ScriptManager ID="ScriptManager1" runat="server">
        </asp:ScriptManager>
        Display titles by publisher:
        <asp:DropDownList ID="DropDownList1" runat="server"
            DataSourceID="LinqDataSource2"
            DataTextField="pub_name" DataValueField="pub_id" AutoPostBack="True">
        </asp:DropDownList>
        <asp:UpdatePanel ID="UpdatePanel1" runat="server">
            <Triggers>
                <asp:AsyncPostBackTrigger ControlID="DropDownList1" />
            </Triggers>
            <ContentTemplate>
                <asp:UpdateProgress ID="UpdateProgress1" runat="server">
                    <ProgressTemplate>
                        <asp:Label ID="Label1" runat="server" Text="Label">
                           Displaying titles...Please wait.
                        </asp:Label>
                    </ProgressTemplate>
                </asp:UpdateProgress>
                <asp:GridView ID="GridView1" runat="server" AllowPaging="True"
                    AllowSorting="True"
                    AutoGenerateColumns="False" BackColor="LightGoldenrodYellow"
                    BorderColor="Tan"
                ...
To inject a delay, double-click on the dropdown list control and use the Sleep() method to insert a two-second delay:
protected void DropDownList1_SelectedIndexChanged(object sender, EventArgs e)
{
System.Threading.Thread.Sleep(2000);
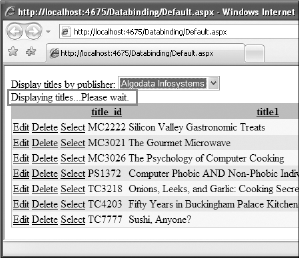
}Within the <ProgressTemplate> element, you can embed a control such as an <asp:Label> control or an <asp:img> control containing an animated GIF image to display some information to inform the user. Here, you display the message "Displaying titles...Please wait" (see Figure 17-27) to let the user know that the GridView control is updating.
Press F5 to test the application.
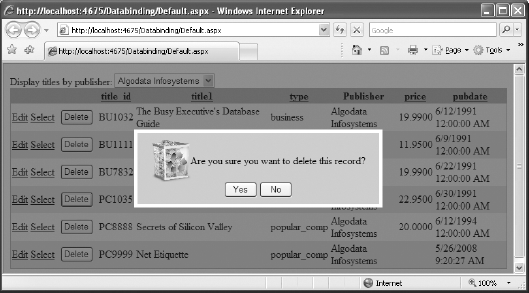
One problem with the current example is that when the user clicks the Delete link, the record in the GridView control is deleted straightaway. When you delete a record in the real world, it is always good to confirm the action with the user. In the Windows world, you can easily display a message box to let the user confirm the action. However, in a web application, it is slightly tricky.
The solution to this problem is to use the ModalPopupExtender control available in the AJAX Control Toolkit. The ModalPopupExtender control uses a popup to display content to the user in a modal fashion and prevents users from interacting with the rest of the page.
Let's modify the application to show a modal popup whenever the user tries to delete a record. Figure 17-28 shows the end result.
First, define the following CSS styles in the source view of the Default.aspx page:
<head runat="server">
    <title></title>

    <style type="text/css">
        .modalBackground {
            background-color:Blue;
            filter:alpha(opacity=50);
            opacity:0.5;
        }

        .dialog
        {
            border-left:5px solid #fff; border-right:5px solid #fff;
            border-top:5px solid #fff; border-bottom:5px solid #fff;
            background:#ccc;
            padding: 10px;
            width: 350px;
        }

    </style>
...
The .modalBackground style defines the background color of the modal popup. In this case, it is used to block off the rest of the page and prevent the user from interacting with that content. The .dialog style defines the shape and color of the popup itself. Here it has a rectangular border of 5px and a width of 350px.
Next, add a <asp:Template> control to the GridView control to display a Delete button:
<asp:GridView ID="GridView1" runat="server" AllowPaging="True"
                AllowSorting="True"
                AutoGenerateColumns="False" BackColor="LightGoldenrodYellow"
                BorderColor="Tan"
                BorderWidth="1px" CellPadding="2" DataKeyNames="title_id"
                DataSourceID="LinqDataSource1"
                ForeColor="Black" GridLines="None">
                <Columns>
                    <asp:CommandField ShowDeleteButton="True"
                        ShowEditButton="True" ShowSelectButton="True" />
                    <asp:TemplateField ControlStyle-Width="50px"
                        HeaderStyle-Width="60px"
                        ItemStyle-HorizontalAlign="Center">
                        <ItemTemplate>
                            <asp:Button ID="btnDelete"
                                runat="server"
                                OnClick="btnDelete_Click"
                                OnClientClick="displayPopup(this); return false;"
                                Text="Delete" />
                        </ItemTemplate>
                    </asp:TemplateField>
                    <asp:BoundField DataField="title_id" HeaderText="title_id"
                        ReadOnly="True" SortExpression="title_id" />
                    <asp:BoundField DataField="title1" HeaderText="title1"
                        SortExpression="title1" />
                    ...
Notice that the Delete button has two events defined: OnClick and OnClientClick. In this example, when the user clicks the button, the JavaScript function named displayPopup() (which you will define shortly) is called. You insert the return false; statement to prevent a postback from occurring while the dialog is being displayed.
You also need to disable the Delete link in the GridView control because you now have the Delete button. Set the ShowDeleteButton attribute in the <asp:CommandField> element to False:
<asp:CommandField
ShowDeleteButton="False"
ShowEditButton="True"
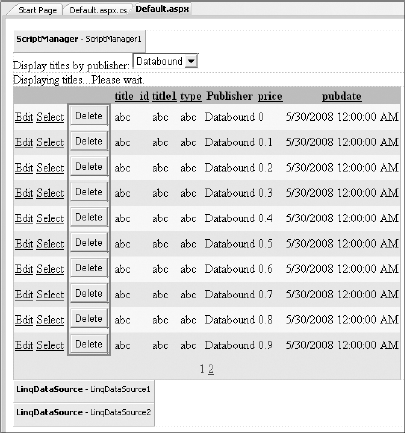
ShowSelectButton="True" />The Default.aspx page now looks like Figure 17-29.
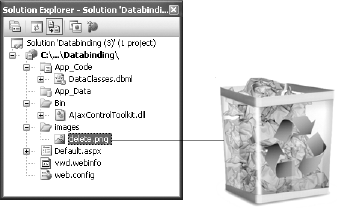
Create a new folder in the project and name it images. Add an image called delete.png into the images folder (see Figure 17-30).
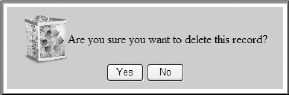
You will now use a <div> element to define the content of the popup that you want to display:
<div id="divDialog" runat="server" class="dialog" style="display: none">
        <center>
            <img style="vertical-align: middle"
                src="images/delete.png" width="60" />
                Are you sure you want to delete this record?<br />
<asp:Button ID="btnOK" runat="server" Text="Yes" Width="50px" />
<asp:Button ID="btnNO" runat="server" Text="No" Width="50px" />
</center>
</div>
</form>
</body>
</html>This block of code defines the popup shown in Figure 17-31.
To display the <div> element as a modal popup, use the ModalPopupExtender control:
<cc1:ModalPopupExtender
        ID="popupDialog"
        runat="server"
        TargetControlID="divDialog"
        PopupControlID="divDialog"
        OkControlID="btnOK"
        CancelControlID="btnNO"
        OnOkScript="OK_Click();"
        OnCancelScript="No_Click();"
        BackgroundCssClass="modalBackground">
    </cc1:ModalPopupExtender>

    </form>
</body>
</html>
The ModalPopupExtender control has the attributes described in the following table.
Attribute | Description |
|---|---|
| Identifies the |
| Specifies the control that activates the |
| Specifies the control to display as a modal popup |
| Specifies the control that dismisses the modal popup |
Specifies the control that cancels the modal popup | |
| Specifies the script to run when the modal popup is dismissed with the |
| Specifies the script to run when the modal popup is canceled with the |
| Specifies the CSS class to apply to the background when the modal popup is displayed |
Finally, insert the JavaScript functions into the source view of Default.aspx:
<script type="text/javascript">
        var _source;
        var _popup;

        function displayPopup(source) {
            _source = source;
            _popup = $find('popupDialog'),
            //---display the popup dialog---
            _popup.show();
        }

        function OK_Click() {
            //---hides the popup dialog---
            _popup.hide();
            //---posts back to the server---
            __doPostBack(_source.name, ''),
        }

        function No_Click() {
            //---hides the popup---
            _popup.hide();
            //---clears the event sourcesss
            _source = null;
            _popup = null;
        }
    </script>
</head>
<body>
The displayPopup() function looks for the ModalPopupExtender control in the page and displays the modal popup. The OK_Click() function is called when the user decides to proceed with the deletion. It hides the modal popup and initiates a postback to the server. The No_Click() function is called when the user cancels the deletion. It hides the modal popup.
That's it! Press F5 to test the application.
This chapter developed a simple ASP.NET web application that displays data stored in a database. One of the new features in ASP.NET 3.5 is the LinqDataSource control that enables you to bind directly against a LINQ-enabled data model instead of a database, so instead of specifying SQL statements for querying data, you can use LINQ queries. You also saw how to use the built-in AJAX support in ASP.NET 3.5 to create responsive AJAX applications.