Documenting your code is probably the last thing you would do in your typical project cycle. While the importance of writing documentation has been stressed umpteen times, developers usually devote the best part of the project cycle to building new features, and then finally do a mediocre job at the end writing the dreaded documentation. Borrowing the popular "clean as you go" phrase found in a lot of kitchens, the best way to churn out top-quality documentation for your project is to document as you go.
In Visual Studio 2008, you can document your code using the XML code documentation feature. This appendix shows you how to generate MSDN-style documentation for your project using Visual Studio 2008 and a third-party documentation generation tool — Sandcastle.
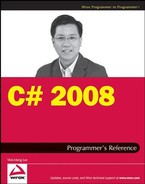
To see how XML documentation works, create a new class library project in Visual Studio 2008 as shown in Figure C-1. Name the project PointClass.
Populate the default Class1.cs with the following class definition:
using System;
using System.Collections.Generic;
using System.Linq;
using System.Text;

namespace PointClass
{
    public class Point
    {
        //---static variable---
        private static int count;

        //---properties---
        public int x { get; set; }
        public int y { get; set; }

        //---constructors---
        public Point()
        {
            count++;
        }
        public Point(int x, int y)
        {
            this.x = x;
            this.y = y;
            count++;
        }
//---overloaded methods---
public double Length()
{
return Math.Sqrt(
Math.Pow(this.x, 2) +
Math.Pow(this.y, 2));
}
public double Length(Point pt)
{
return Math.Sqrt(
Math.Pow(this.x - pt.x, 2) +
Math.Pow(this.y - pt.y, 2));
}
}
}The definition for the Point class contains the following members:
A static private member named
countTwo properties —
xandyTwo overloaded constructors
Two overloaded
Length()methods
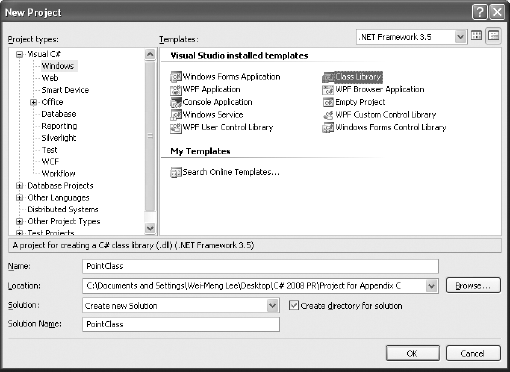
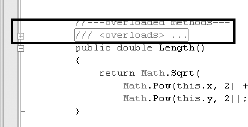
To add XML comments to the class, type three slash (/) character in succession: ///. Figure C-2 shows that when you type /// before the Point class definition, an XML comments template is automatically inserted for you.
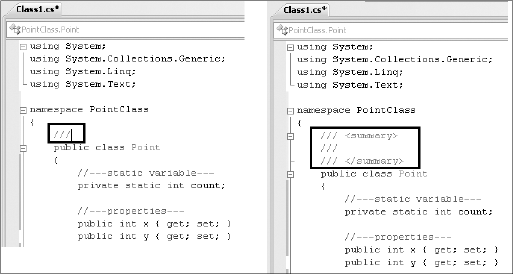
The <summary> tag is inserted by default, but you can insert additional XML comment tags within the XML comments template, as shown in Figure C-3.
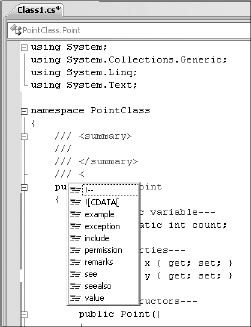
Following is a list of XML documentation tags. You can find a similar list with a link to each tag's description (its uses) at http://msdn.microsoft.com/en-us/library/5ast78ax.aspx.
<c>                  <para>              <see>
<code>               <param>             <seealso>
<example>            <paramref>          <summary>
<exception>          <permission>        <typeparam>
<typeparamrefs>      <value>             <include>
<remarks>            <list>              <returns>
Using the Point class definition, insert the XML comments highlighted in the following code:
using System;
using System.Collections.Generic;
using System.Linq;
using System.Text;

namespace PointClass
{
    /// <summary>
    /// The Point class contains 2 properties, 1 overloaded
    /// constructor, and 1 overloaded method
    /// </summary>
    /// <remarks>
    /// If you need to use the Point class in the System.Drawing
    /// namespace, be sure to reference it using the fully
    /// qualified name, i.e. System.Drawing.Point
    /// </remarks>
/// <history>
/// [Wei-Meng Lee] 5/12/2008 Created
/// </history>
public class Point
{
//---static variable---
private static int count;
//---properties---
/// <summary>
/// Property for x-coordinate
/// </summary>
/// <returns>
/// The x-coordinate
/// </returns>
public int x { get; set; }
/// <summary>
/// Property for y-coordinate
/// </summary>
/// <returns>
/// The y-coordinate
/// </returns>
public int y { get; set; }
//---constructors---
/// <summary>
/// Default constructor
/// </summary>
/// <remarks>
/// Creates a new instance of the Point class
/// </remarks>
public Point()
{
count++;
}
/// <overloads>
/// Constructor
/// </overloads>
/// <summary>
/// Constructor with two parameters
/// </summary>
/// <param name="x">Parameter x is assigned to the x-coordinate</param>
/// <param name="y">Parameter y is assigned to the y-coordinate</param>
/// <remarks>
/// Creates a new instance of the Point class
/// </remarks>public Point(int x, int y)
{
this.x = x;
this.y = y;
count++;
}
//---overloaded methods---
        /// <overloads>
        /// Calculates the distance between two points
        /// </overloads>
        /// <summary>
        /// Calculates the distance of a point from the origin
        /// </summary>
        /// <returns>The distance between the current point and the origin
        /// </returns>
        /// <example> This sample shows how to call the <c>length()</c>
        /// method
        /// <code>
        ///    Point ptA = new Point(3, 4);
        ///    double distance = ptA.Length();
        /// </code>
        /// </example>
public double Length()
{
return Math.Sqrt(
Math.Pow(this.x, 2) +
Math.Pow(this.y, 2));
}
/// <summary>
/// Calculates the distance of a point from another point
/// </summary>
/// <param name="pt">A Point object</param>
/// <returns>The distance between the current point and the
/// specified point
/// </returns>
/// <example> This sample shows how to call the <c>length()</c> method
/// with a point specified
/// <code>
/// Point ptA = new Point(3, 4);
/// Point ptB = new Point(7, 8);
/// double distance = ptA.Length(ptB);
/// </code>
/// </example>
public double Length(Point pt)
{
return Math.Sqrt(
Math.Pow(this.x - pt.x, 2) +
Math.Pow(this.y - pt.y, 2));
}
}
}Take a look at the documentation you have done for one of the overloaded Length() methods:
//---overloaded methods---
/// <overloads>
/// Calculates the distance between two points
/// </overloads>
/// <summary>
/// Calculates the distance of a point from the origin
/// </summary>
/// <returns>The distance between the current point and the origin
/// </returns>
/// <example> This sample shows how to call the <c>length()</c>
/// method
/// <code>
/// Point ptA = new Point(3, 4);
/// double distance = ptA.Length();
/// </code>
/// </example>You will notice that there is a new element — <overloads> — that is not in the list specified in the MSDN documentation. The <overloads> element is used to give a general description for methods that are overloaded. You will see the effect of this element later when you generate the documentation using the third-party tool. You only need to specify the <overloads> element on one (any one will do) of the overloaded methods.
You can also include code samples in your documentation using the <example> tag. To format a word (or sentence) as code, use the <c> tag. For multiple lines of code, use the <code> tag.
Because the XML comments that you add to your code may make reading difficult, you can hide the comments by clicking the minus sign (−) on the left of the code window. To reveal the XML documentation, click the plus sign (+) as shown in Figure C-4.
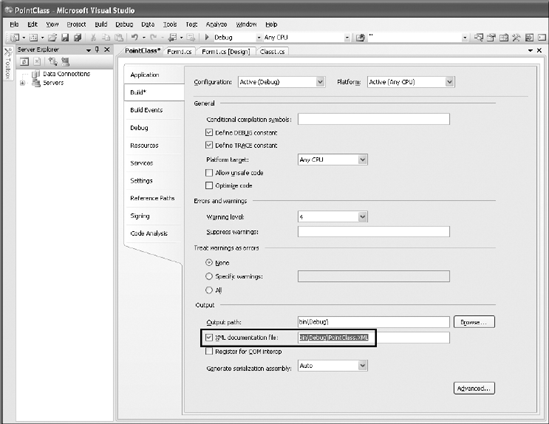
Once you have inserted the XML comments in your code, right-click the project name in Solution Explorer and select Properties. Select the Build tab and check the XML Documentation File checkbox (see Figure C-5). This indicates to the compiler that after the project is compiled, it should consolidate all the XML comments into an XML documentation file. By default, the XML document will be saved to the bin/Debug folder of your project.
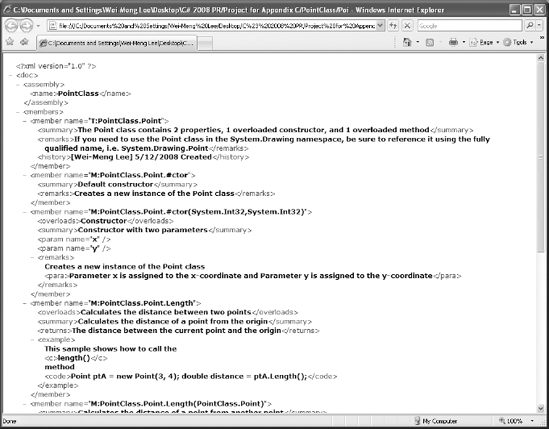
Build the project by right-clicking the project name in Solution Explorer and then selecting Build. The XML documentation file is now located in the bin/Debug folder of your project, together with the PointClass.dll library. Figure C-6 shows what the XML file looks like.
With the XML documentation file generated, you have two options in terms of using the documentation:
The second option is the easier. For this purpose, you can use the free Sandcastle tool that generates documentation in several different formats, including the MSDN-style HTML Help format (.chm), the Visual Studio .NET Help format (HTML Help 2), and MSDN-Online style Web pages.
To use Sandcastle to generate your documentation, first ensure that you have HTML Help Workshop by checking for the existence of the following folder: C:Program FilesHTML Help Workshop.
If the folder is not there or does not contain hhc.exe, you can search for it and download it from Microsoft's web site.
Next, download Sandcastle from http://codeplex.com/Sandcastle.
By itself, Sandcastle is a command-line tool and all interaction with it is via the command line. To make your life easier, you can download the Sandcastle Help File Builder, a graphical user interface (GUI) tool that makes Sandcastle easy to use.
Once Sandcastle is downloaded and installed, download the Sandcastle Help File Builder from http://codeplex.com/SHFB.
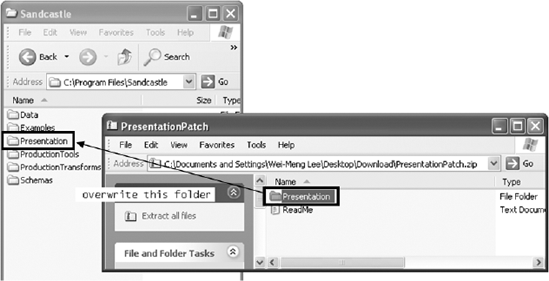
Download the Presentation File Patches from the Sandcastle Styles Project site (http://codeplex.com/SandcastleStyles). Extract the Presentation folder and overwrite the Presentation folder in the Sandcastle folder with it (in C:Program FilesSandcastle; see Figure C-7).
Due to the continual development of the Sandcastle project, these screen shots may differ from what you actually see on your screen.
Finally, you should run the BuildReflectionData.bat batch file (located in C:Program FilesEWSoftwareSandcastle Help File Builder) to build the reflection data for the version of the .NET runtime you are using.
If the C:Program FilesSandcastleData folder already contains a folder called Reflection, you need to delete that folder before running this batch file.
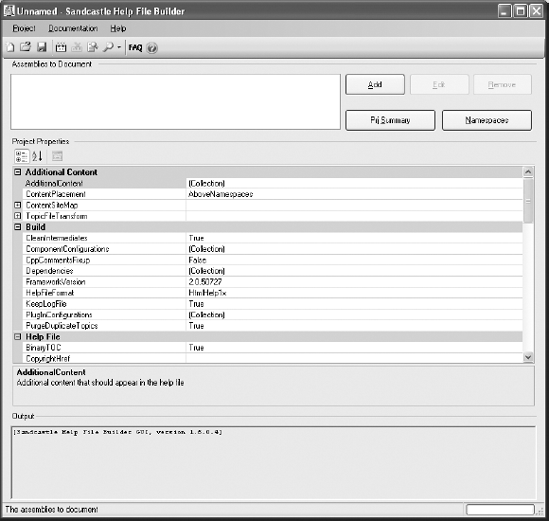
Once Sandcastle and the Sandcastle Help File Builder are downloaded and installed, launch the Sandcastle Help File Builder by selecting Start
You should see the window shown in Figure C-8 when the Sandcastle Help File Builder is launched.
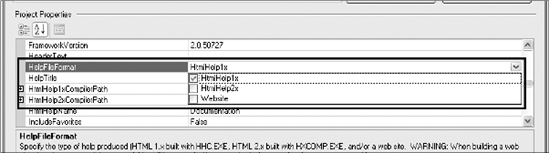
You can choose the type of documentation you want to generate from the HelpFileFormat drop-down listbox (see Figure C-9).
Click the Add button to add the assembly filename that you want to generate the documentation for (see Figure C-8). Once the assembly is selected (PointClass.dll in the bin/Debug folder, in this case), the XML document filename field is automatically selected (the same name as the assembly, but with an .xml extension).
You can add multiple projects into the same documentation by adding each assembly into the Sandcastle project.
Finally, set the ShowMissingNamespaces property to false.
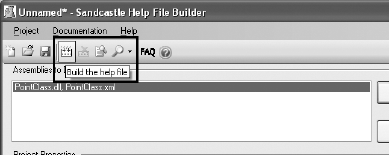
Once you are ready to build the documentation, click the Build the Help File button in the toolbar (see Figure C-10).
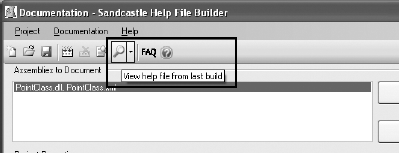
You will be asked to save the project. Name it Documentation. Sandcastle will then generate the documentation. Afterward, you can view it by clicking the View Help File From Last Build button in the toolbar (see Figure C-11).
Note
Ensure that your Sandcastle project is saved in a folder whose name does not contain any special characters (such as #, ?, &, and +). If not, you won't be able to view the documentation properly.
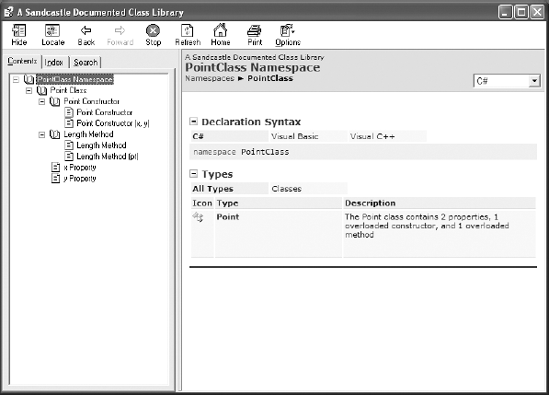
Figure C-12 shows the generated documentation (the tree view on the left is shown with all the nodes expanded to reveal the full documentation).
Let's just take a look at the documentation for the overloaded Length() method as illustrated in Figure C-13.
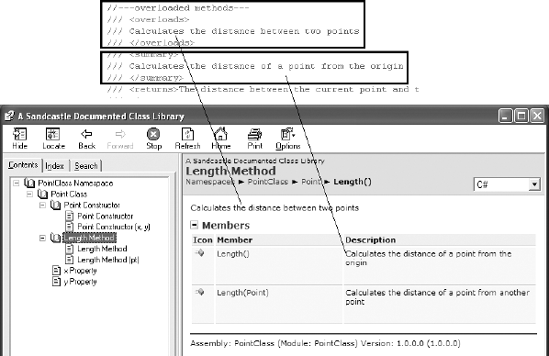
As you can see, the text in the <overloads> element is used to provide a general description for the overloaded method, while the actual description for each overloaded method is detailed in the <summary> element.
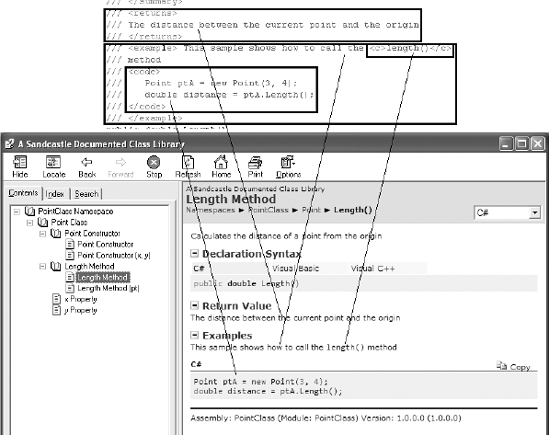
Click on the first overloaded method of the Length() method to see the relationship between the documentation tag and the actual documentation, as shown in Figure C-14.
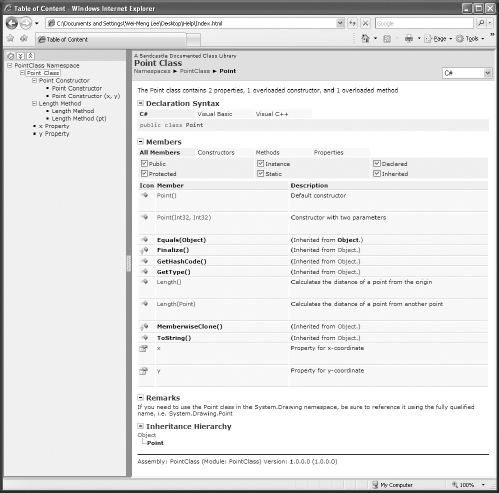
If you had earlier checked the WebSite item in the HelpFileFormat property of the project, the documentation would look like Figure C-15.
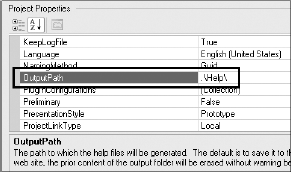
You specify the location of the generated documentation by setting the OutputPath property in the properties section in Sandcastle. By default, the documentation is always saved in the Help folder of the project's folder (see Figure C-16).
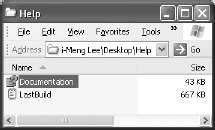
The Help folder contains a single .chm file (Documentation) and a log file (LastBuild; assuming you only checked the HelpFile1x item in the HelpFileFormat property; see Figure C-17).
To distribute the documentation with your class, you simply need to provide the file with the .chm extension.
If you checked the WebSite item in the HelpFileFormat property of the project, the Help folder will contain a list of files and folders. Simply load the Index.html file to view the documentation. To distribute your documentation, you need to distribute all the files and folders within the Help folder.