
In This Chapter
Getting started
Managing files
Mastering master pages
Testing the testable
Deploying your masterpiece
You can know the controls, and you can know the framework, but you don't really know the Web until you understand the little weird bits that make it all work together. No technology has more "glue" components than Web technology.
This chapter is about using some of those "glue" components to build an application. It gives you a chance to do things that you'll have to do every time you make a Web application — set up a master page, test your application, and a few other treats.
ASP.NET shields a lot of that from you, the developer. You don't have to worry about the details of Common Gateway Interface (CGI), for instance. Nonetheless, there are a number of details that you do have to manage in order to get an application on the Internet, such as the following:
Setting up a Web project can be ... demanding. The default options that Microsoft provides are not immediately obvious, and the need to have them right the first time is high.
There are templates for ASP.NET sites. These templates provide all those things that make a site flow as you navigate through it, like the navigation, advertising, headers, and footers.
Security for a Web application is ... different. Because a significant percentage of Web applications are available for public access (quite a shift from Windows applications), you have to consider the reality that people are going to try to use your application as a platform for phishing, XSS, and a hundred other contemporary hacks.
Testing Web applications is another consideration, because it is more than unit testing. If your Web application goes viral, you might have 1,000,000 visitors tomorrow. You don't have to be ready for that today, but you have to know what you need to do to get ready.
Finally, deploying a Web application is a new pile of joy that you'll get to know and love. I promise. Remember those UML deployment diagrams you learned in school? They can be useful after all! You actually use them in the Web world.
Setting up an ASP.NET project is not trivial, and there are a lot of wrong ways to do it. I can't tell you the right way — it just depends on your circumstances. What I want to do is give you some of the best practices that will help you form your own path. The idea is to know how the tool works, in order to help you do your work.
The first part of the process is making a new project. As with everything else in ASP.NET, this isn't a trivial prospect. You even have to use a different menu item to start the project — New Web Site rather than New Project, as shown in Figure 5-1.
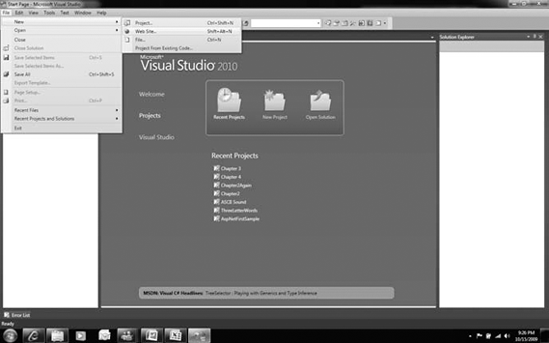
The New Web Site dialog box includes several items, but we are concerned with only one, the ASP.NET Web site. Here are all the options:
ASP.NET Web site: This is what we want. It is a file share that represents just what it says: a Web site made up of ASP.NET files. Fantastic. Not as simple as it sounds, but it is the right start.
Silverlight Script Web: This isn't the right place to talk about Silverlight. Like WPF, Silverlight is a XAML (rhymes with "camel") project, but it is designed for the Web. It is Microsoft's answer to Adobe Flash. Don't sweat it right now.
ASP.NET Web service: Don't use this; use WCF for Web Services.
Empty Web site: Just a folder and a share.
WCF Service: A template for a service. Book VII covers these.
ASP.NET Reports Web site: Same as the first bullet selection except it includes a bunch of references to the RDL reporting structure.
Dynamic Data Linq to SQL Web site: This is a simple, auto-generated forms-over-data site. I don't care for them, and they aren't good examples of C#, so I skip them for now. Plus, Linq to SQL is end-of-life (meaning Microsoft isn't supporting it any more).
Dynamic Data Entities Web site: Again, an auto-generated forms-over-data site. Not what we are looking for.
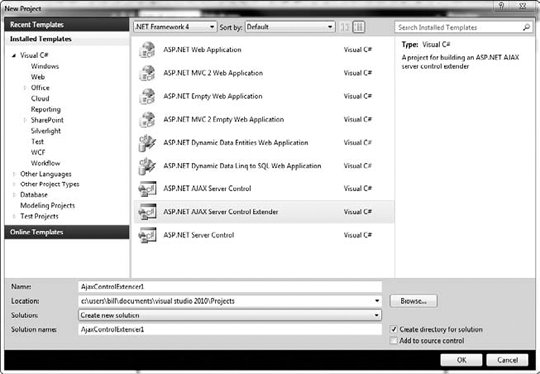
If you cancel out of the New Web Site dialog box, add a New Project, and then click on Web in the Installed Templates tree view (under C#), you find a whole new list of goodies. (See Figure 5-2.)
Note
In Visual Studio 2002 and 2003, Web projects worked like all other projects. They had a project file, needed to be compiled and packaged, and so forth. In Visual Studio 2005, that plan was scrapped for the Web site — just a loose collection of files in any folder, which would be treated like a project. No project file, no compilation of a single resource file — more like classic ASP.
Fact is, there is room for both, and in Visual Studio 2008 and 2010, both are offered. So, if you say you want a new Web Site, you get a federation of files in a folder that can just be copied over to a Web server. If you want a new Web application, you get a real, compiled application. All the same other constraints apply. Here is a breakdown:
ASP.NET Web Application: How to make a site more like a regular program. Comes with a project file, and so on.
ASP.NET Web Service application: Same advice (use WCF).
ASP.NET Ajax Server Control: This allows you to build a new Toolbox item for AJAX. Really a nice feature, but too in-depth for this minibook. Check MSDN.
WCF Service Application: How to do service-oriented development in .NET. More in Book VII.
ASP.NET Server Control: Like the AJAX control, except it allows you to make a normal control.
ASP.NET AJAX Server Control Extender: A template for changing the functionality of an existing AJAX Toolbox item.
Dynamic Data Linq to SQL Web Application: As earlier — end of life. Don't use it.
Dynamic Data Entities Web Application: Just like the Entities site, except a real application. Preferred implementation for this project type.
So which do you choose? If it is a Web site — literally a public site that will be on a public server and include a handful of pages that an anonymous user views — I use the Web site format. If it is an application — part of a larger initiative for a company with development standards and standard libraries and whatnot — I use the Web application format.
Your mileage may vary. Find out more about the controversy between the project types at http://Webproject.scottgu.com/.
Make a new ASP.NET Web site called Chapter 5, and save it in the default location. Visual Studio makes a new site for you, in the specified folder. Three files are added:
Default.aspx: This is the starter markup file. Has the HTML and ASP.NET controls.
Default.aspx.cs: The code-behind file for the Default.aspx file.
Web.config: The magic configuration file. A lot goes into this one.
There is also an App_Data folder. This is used by Visual Studio and ASP.NET to store, for instance, a SQL Lite database that you might make to store your application data. Just leave it there for a second.
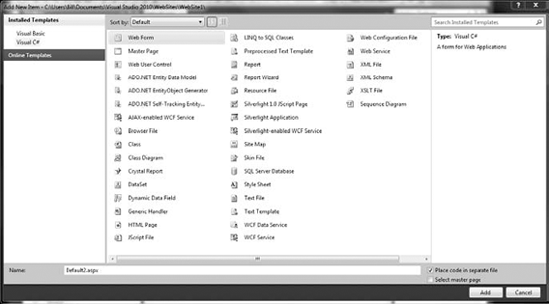
You just know we need a few new files, right? We should add a style sheet, and maybe a script file or two. Right-click on the project and select Add New Item.
You can add an absurd number of files to a site — just look at Figure 5-3. Global Application Class? Silverlight-enabled WCF Service? What are these things? Does anyone actually use this stuff?
Yes, but don't sweat it too much. You need to worry about only a few file types to make a good application, like these:
Master page: This is the template for the site. We handle these in the next section.
Style sheet: This is the CSS 2.0 style for your application. If you aren't familiar, refer to HTML and CSS For Dummies — great book.
Jscript file: So named because Microsoft can't say JavaScript anymore or the lawyers beat them up.
Class: Just your basic C# class, in its own file.
That's what you need. Now to organize them.
You have two choices when organizing your Web site. You can build a few projects to manage your files, or you can build folders into the Web project and put your files there. My usual methodology is to build separate projects for the class files and folders for the Web-related files. This way, if you want to reuse the classes for a Windows Mobile application, you can easily just reference the class file project.
Web files should be in folders in the Web application. Note that this can have some implications for referencing files. If your project isn't the root of a Web server, you might have to carefully consider how to reference files.
Note
If you are deploying your Web site to a domain, like www.mynewWebsite.com, you can use a ./ to refer to files, like this:
<img src="./images/myImage.png">
If you aren't deploying to a domain — for instance, if you are making an application that lives in a folder of a site, such as www.someoneelsessite.com/myApplication, you can't use ./ because you don't know how far away the root of the application is, or what the directory really is.
ASP.NET can handle this problem for you. A construct in ASP.NET is implemented with the tilde (~), but it works only in ASP.NET controls. That means that the img HTML tag won't work with a tilde; you have to use the asp:Image control, like this:
<asp:Image ID="Image1" runat="server" ImageUrl="~/images/
   myImage.png"/>
For organization, I have a pattern. It may or may not work for you. Please feel free to make your own. Mine breaks down like this:
I put my class libraries in a separate project. Usually, I have a business logic layer (or controller) in a second project, and a data access layer (or model) in a third project.
I add a Bits folder, and in that, I put folders for, well, all the bits.
Style sheets
Images
JavaScript files
Whatever else
I then make a root level folder for every section of the site. If I have three top level menu items in my site, I have three folders. If I just have application files, and don't have a regular menu structure, everything will be in the root.
Now that there is some form and function to the project, the next step is to add some form and function to the site itself. Master pages are exactly what they sound like, structural elements that contain the content of the site as "slave" components.
Master pages are more than page templates. They are fully functional content containers that are supported by Visual Studio in a number of ways. Master pages reduce the complexity of maintaining common content on Web pages by replicating that content automatically and containing the programming to one file from the developer's perspective.
There is no requirement to use master pages. In fact, most of the projects I work on don't use Master Pages, because of dependencies on older security or navigational frameworks. That's okay. If you are building something new, certainly consider using master pages.
We start by making a new master page. Just follow these steps:
Right-click on the Chapter 5 Web site and select Add New Item.
Click on Master Page.
Keep the default name of MasterPage.Master and click OK.
Change to Design view.
Open the Properties panel.
Click on the designer, outside of the Body marked area, so that the DOCUMENT is selected in the Properties panel.
Click on the
BgColorproperty, and pick your favorite color.Back in the designer, click on the Body marked area, and type My Web Site or something equally fascinating.
Highlight the text, and select H1 in the HTML Source Editing Toolbar, like I did in Figure 5-4.
Press Enter to add a blank line under the header.
From the Toolbox, drag a ContentPlaceholder control under the title.
Now you have a template for the rest of your pages. You can add navigation here, and I recommend it. To keep things simple for this introduction, however, I move on.

You won't believe how simple adding content is. You see, the master page is something that the content page adheres to, not something you have to inject content into. You just have to make pages like usual, and they will drop themselves in that content placeholder. Follow these steps to add content:
Right-click on the Web site, and select Add New Item.
Click on Web Form (the master page is probably still selected) and name it Home.aspx.
Wait! Don't click Add yet!
Check the Select Master Page check box in the lower right-hand corner.
Now you can click Add.
The Select a Master Page dialog box appears.
You can select which master page you want — as shown in Figure 5-4. We have only one, so click it under Contents of Folder.
Click OK.
Notice how different the template content of the page is now that you have a master page. Visual Studio knew how to handle this! There are no HTML headers or footers, because VS knows they are in the master page.
<%@ Page Title="" Language="C#" MasterPageFile="~/MasterPage.master"
    AutoEventWireup="true" CodeFile="Home.aspx.cs" Inherits="Home" %>

<asp:Content ID="Content1" ContentPlaceHolderID="head" Runat="Server">
</asp:Content>
<asp:Content ID="Content2" ContentPlaceHolderID="ContentPlaceHolder1"
    Runat="Server">
</asp:Content>
There is obviously more to learn about master pages and how to develop sites with them, but my goal here is just to cover the best practice. Now that you know, move to MSDN and see how best to use master pages for your project.
It's easy to test Web applications using Visual Studio, though it isn't a well-advertised feature.
Note
This is available only in Team System. If you have Professional, you can't do Web tests. Also important: You don't have to test a Web project in your solution — you can write a Web test against any URL.
Follow these steps to test your Web application:
Choose File

In the new project, right-click on the project file and select New Test.
In the New Test dialog box, select Web Test.
Change the test name to GoogleTest.Webtest and click OK.
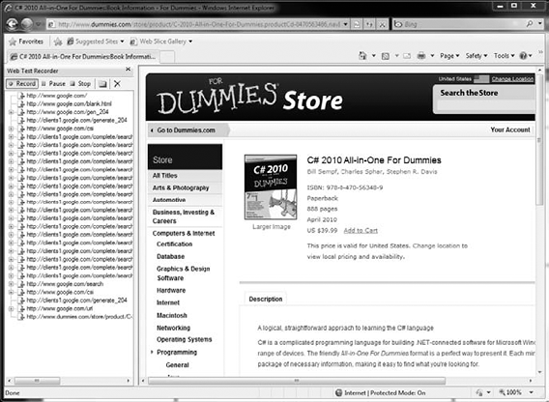
The Web Test Recorder opens in your browser. (See Figure 5-5.)
Note
Though I am going to use Google for this test, please don't use a production Web site of your own for testing.
Go to
www.google.com.Search for C# 2010 All In One.
Click on the Amazon link (I assume there is one).
Click Stop to stop the recording.
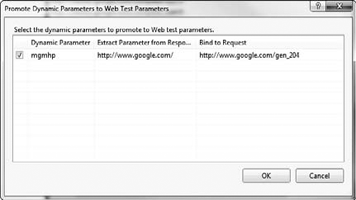
Visual Studio takes a minute and tries to detect dynamic parameters. It should find (at least) the search criteria in the Promote Dynamic Parameters to Web Test Parameters dialog box shown in Figure 5-6.
Click the search parameter (C# All In One) check box to promote it to a Web test parameter and click OK.
You are returned to the Visual Studio text manager, where you see all the requests you made (all two of them) in the Web Test panel. You can then click on separate items in the request tree and change the parameters — such as the querystring — for any request.
When you run a test, the test manager asks you for any query parameters that you promoted. In our case, the search term was promoted, so you can use the test as a search engine! There are probably more convenient ways to search, however.
Web deployment has historically been difficult in a number of platforms. Because you need the markup files, and any back-end support (like script files or compiled libraries), and perhaps even any middle support, such as an interpreter for your PHP files, getting a Web application out to a server can be demanding.
When ASP.NET came out, it promised xcopy deployment and, in general, it delivered. Because .NET components are versioned, if you strongly name your DLL files you can just use the DOS xcopy command (or drag and drop in Explorer) to drag them right to your server, thus the term xcopy deployment. If you have a permissions thing, you can use File Transfer Protocol (FTP) or whatever.
In fact, xcopy deployment has made all sorts of things possible. Dot Net Nuke, an open source content management system for ASP.NET, has taken things to a logical extreme. When you build a new module for the platform, you add the files to a compressed folder and upload them right through a File Upload control on the site. Then the component is installed — you can use it right away. Neat.
For your site, you can use Windows Explorer if you have share permissions for your server, or FTP if you don't. Figure 5-7 shows a Web site that I manage. The left side is my development copy — notice the .cs files. The right side has the version on the server.
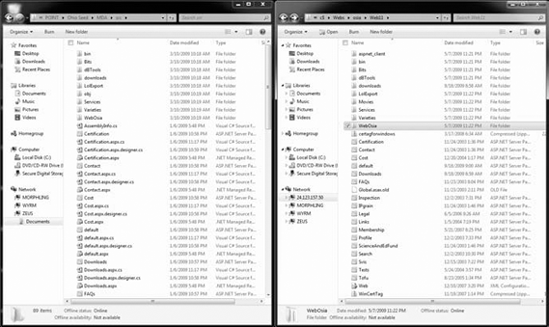
If I want, I can just select all the files that I need on the left and drag them to the right. That means I have to get all the ASPX files, but not the .CS files because they are compiled into the DLL. Oh, that's right, I have to get the DLL, too. And the script files.
Oh wait, the directories have be sorted out too, because they have their own ASPX and .CS files. And I can't remember . . . do you have to copy the report files (you don't)? Hmm, this is harder than I thought.
If you have a Web site project (earlier in this chapter I point out that there are two project types), you have a Visual Studio-driven option for the xcopy option. Because these sites don't compile and you need to move the .cs files along with the .aspx files, this tool fits the bill.
To run it, look for the Copy Web icon in Solution Explorer. I highlighted it with a red box in Figure 5-8. It launches the Copy Web design surface, which looks a lot like the two Windows Explorer boxes in Figure 5-6, except it comes with neat buttons.
To use the Web Copy tool, find the location for your deployment on the right side of the panel. Use the Connect button to get there. Because it is URI driven, you can easily push to an FTP site or a Windows share, local IIS install, or a remote site using SharePoint extensions.
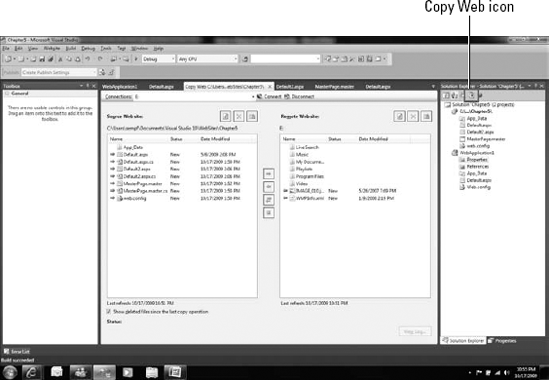
From there, highlight the files you want to copy, and click the direction you want to move them (usually the arrow pointing to the right). Visual Studio gives you a hand by telling you what direction files need to go with the icons to the left of the files.
For Web applications, there is an answer too — and one that will fix my poor application in the previous section, "Copy Web sites with 'Copy Web.'" Package and Publish is designed to assist with more sophisticated deployments usually found with Web Application projects.
To get to the package and deployment options, double-click on the Properties folder in the project, and then click the Package/Publish tab on the left-hand side of the designer surface. This panel, shown in Figure 5-9, has everything you need to solve most mid-range deployment problems.
Starting at the top — you can isolate 64-bit operating systems with the Platform drop-down list. This is good when you are developing in 32 bit but know your server is 64. Right below that is a link to the Help files, in case you don't have this chapter handy.
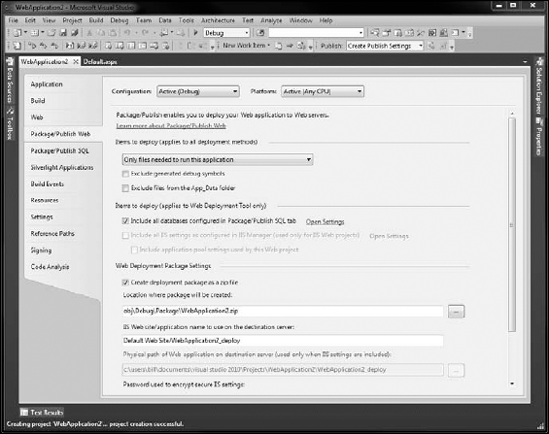
In the Items to Deploy section, you can solve the big problem that I mention earlier. There you can tell the deployment to deploy only markup and compiled files, if that is what you need to do. There are options to exclude debug symbols, too — remember, they don't run if they aren't there, and it all goes a little faster. You can always add them if you need them.
You now can use MsDeploy with Visual Studio. MsDeploy is a new feature of IIS that assists with the deployment of really complex Web applications. Search for it on TechNet for more information. It takes a Zip file, which you can configure in the MsDeploy Package Settings section.