Getting acquainted with WCF
Creating WCF services
Configuring a new service
Deploying a new service
Windows Communication Foundation is just that — the foundation for communication between Windows computers. It just so happens that thanks to open standards like SOAP and ReST, WCF can communicate with other software systems.
Although ASMX was really designed to make public services — such as, for instance, adding an API to a simple Web application — WCF is a complete distributed computing platform for Windows.
In the early days of .NET, there was a technology called .NET Remoting that replaced DCOM. DCOM was Distributed COM, or the common accepted way to communicate between distributed components. It was replaced by REmoting when .NET came out. Remoting basically took the principles of DCOM and migrated them to .NET.
WCF isn't like that. WCF is a complete rethinking of distributed computing, based on the understanding that computing is becoming more and more distributed. New protocols for communication come out every day.
The goal here then is to define the differences between ASMX and WCF, and see that WCF is a true communications protocol and that ASMX is solely for adding services to Web sites. You can use either technology for both tasks, but one is certainly more suited than the other for each.
In this chapter I look at why WCF works well and then build the SHARP service for a variety of service types. Won't have to change a lick of code to do it, either. It's all in the configuration.
First there was DCOM. Then there was .NET Remoting.
The path to a distributed computing platform for Microsoft has been a long one. Distributed computing is a hard problem to solve; nothing bad on the Microsoft developers for continuing to hone their platform.
Anyway, there is SOAP, there are Microsoft binary formats, people are creating custom HTTP contexts — the distributed computing platform is a mess. Something needed to happen to enable us to all take our existing code and make it available across the enterprise.
The designers of WCF (largely Doug Purdy, Don Box, and crew) had two diverse issues. On one hand was ASMX, providing SOAP Web service access to business logic. On the other hand was .NET Remoting, providing Microsoft a custom, black box format for the transmission of information between components via known network protocols.
In Chapter 2, I discuss ASMX and its limitations. Taking a deeper look at Remoting makes the case for a comprehensive platform even more clear. (See Figure 3-1.)
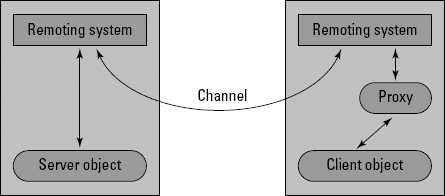
If each of two systems, say a Client System and a Server System, had a similarly configured Remoting system, then they could communicate. The problem, of course, is that it was never, ever configured correctly (or so it seemed). One side of the equation or the other will make some change, and the whole system will come to a crashing halt.
Clearly, there has to be some product that brings the various formats of remote access together under one umbrella. Something that would accept one block of logic and provide multiple service types.
Eventually, WCF was that solution. Starting as an add-on to .NET 2.0, WCF effectively enabled developers to make specific endpoints for a generic connector.
Let's be clear about the problem we were trying to solve. In Figure 3-2, we see the original problem illustrated by David Chappel for Microsoft back in 2007.
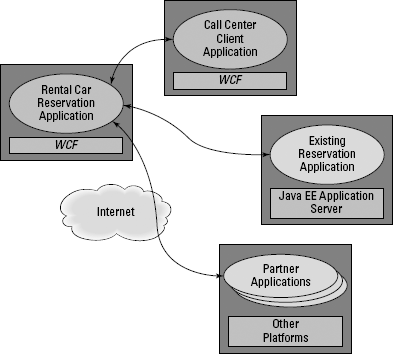
A car dealership is trying to build a new reservation application (similar to the conference management application of SHARP). The business logic needs to be both accessible to outside applications and provide a quality binary transport format for the internal communication.
WCF is the answer. It uses configuration to provide various endpoints to consuming applications, from SOAP to ReST to binary associations that resemble DCOM. It doesn't require configuration on both ends of the pipe, only on the server side. If the server serves it, the client can consume it.
As with so much in working with the .NET Framework, creating a WCF service isn't so much about the code as it is about the configuration. The SHARP project starts out a lot like the ASMX service.
To get started building out the SHARP service in WCF, follow these steps:
Open Visual Studio and click on New Project.
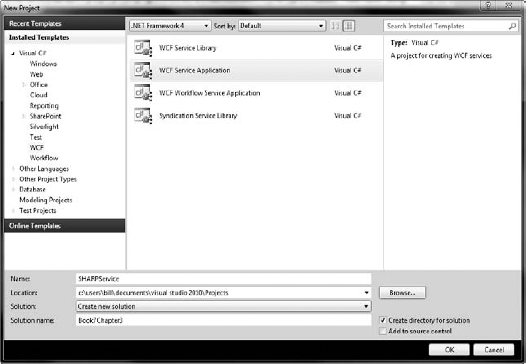
Select the WCF Service Application in the Web folder of the tree view.
Configure the project, as shown in Figure 3-3.
Click OK.
Let's look at the template code for a bit. It's nothing like the ASMX code, because remember — WCF is different. You can get it to do more or less the same thing as ASMX, but it isn't the same technology. Here's what the WCF code looks like:
1 namespace SHARPService
2 {
3     // NOTE: You can use the "Rename" command on the "Refactor" menu to change
   the class name "Service1" in code, svc and config file together.
   public class Service1 : IService1
4     {
5 public string GetData(int value)
6 {
7 return string.Format("You entered: {0}", value);
8 }
9
10 public CompositeType GetDataUsingDataContract(CompositeType composite)
11 {
12 if (composite == null)
13 {
14 throw new ArgumentNullException("composite");
15 }
16 if (composite.BoolValue)
17 {
18 composite.StringValue += "Suffix";
19 }
20 return composite;
21 }
22 }
23 }There are a few of things of interest here:
There is no
[WebMethod]decoration. You don't need it in WCF. The whole project is a service project.The class implements a custom interface,
IService. We'll look at that in a second.There are two sample methods. The usual old "hello world" style method
GetData, and a more complex example calledGetDataUsingContract.
The GetDataUsingContract method makes a lot more sense when you take a look at IService.cs below.
1  namespace SHARPService
2  {
3      // NOTE: You can use the "Rename" command on the "Refactor" menu to change
   the interface name "IService1" in both code and config file together.
4    [ServiceContract]
5    public interface IService1
6    {
7
8        [OperationContract]
9        string GetData(int value);
10
11       [OperationContract]
12       CompositeType GetDataUsingDataContract(CompositeType composite);
13
14       // TODO: Add your service operations here
15    }
16    // Use a data contract as illustrated in the sample below to add composite
   types to service operations.
17   [DataContract]
18   public class CompositeType
19   {
20      bool boolValue = true;
21      string stringValue = "Hello ";
22
23 [DataMember]
24 public bool BoolValue
25 {
26 get { return boolValue; }
27 set { boolValue = value; }
28 }
29
30 [DataMember]
31 public string StringValue
32 {
33 get { return stringValue; }
34 set { stringValue = value; }
35 }
36 }
37 }Hey, lookie here! Decorations for the classes! And the mythical CompositeType! Don't let the name fool you — this code is just a class, like any other class. It is just like the List<T> of Conference types that we returned from the ASMX service. The Framework doesn't have a Conference class — we defined it in the entity Data Model.
Line 4 has a [ServiceContract] attribute that is similar to the [WebClass] of ASMX, and the [OperationContract] too, is similar to [WebMethod], at least in usage.
Then we have the DataContract. This allows us to decorate classes — even in our domain model — with attributes that define which classes and methods get to go out to the service if and when the class is ever called into service (so to speak).
Like we do in Chapter 2, let's just start with a service that returns the list of our conferences. Follow these steps:
Create a new WCF Service project, just like the earlier example.
I called mine
SHARPService.Add a Class called
Conference.This will be a hand-rolled class that won't be connected to a database for now, but will provide a good example of how to set up a
DataContract. This listing is the code-behind of the service file.using System; using System.Collections.Generic; using System.Linq; using System.Web; using System.Runtime.Serialization; namespace SHARPService {public class Conference : SHARPService.IConference { public int Id { get; set; } public String Title { get; set; } public String Description { get; set; } public int LocationId { get; set; } }We want this to be our
DataContractfor the service. Based on what we see in the template, we should add a[DataContract]above the class and[DataMember]above the properties.Add the
DataContractfor the service.using System; using System.Collections.Generic; using System.Linq; using System.Web; using System.Runtime.Serialization; namespace SHARPService { [DataContract] public class Conference : SHARPService.IConference { [DataMember] public int Id { get; set; } [DataMember] public String Title { get; set; } [DataMember] public String Description { get; set; } [DataMember] public int LocationId { get; set; } } }Now that there is a class to use, it is time to make the service.
Right-click on the SHARPService project and add a new WCF Service.
I called mine
Registration.svc.Delete the template method and add the code below.
Unlike the ASMX sample, this isn't a working version; we are just setting up a mock reply.
namespace SHARPService
{
    public class Registration : IRegistration
    {
        public List<Conference> conferencesAtLocation(int locationId)
        {
            List<Conference> locationConferences = new
    List<Conference>();
               return locationConferences;
       }
   }
}
Right-click on the
Registration.svcfile and select Set as Start Page.Press F5 to run the Project.
Notice that though the ASP.NET development server runs, your Web browser does not. The WCF Test Client, shown in Figure 3-4, takes the place of the development test page for ASMX. It enables you to add in the request values and see what the response values are without having to depend on HTTP.
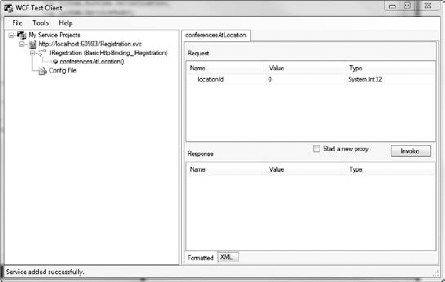
Why is this? WCF enables you to use things other than HTTP (the protocol that is the backbone of the Web) for transport of message details. (You can find a few examples in the sidebar, "Using different endpoints.")
The only downside to WCF is the configuration. Because WCF is the be-all and end-all of the remote procedure call in Windows, there are enough configuration options to handle it all. Gets a little chippy at times.
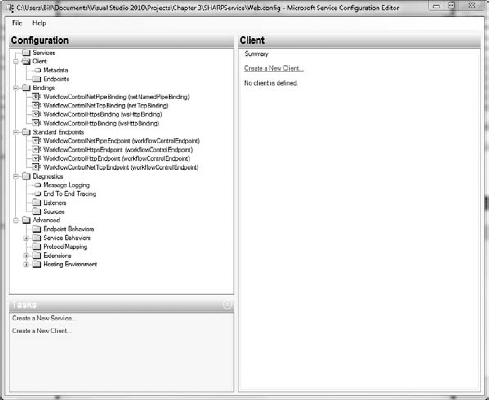
Fortunately, there is the Service Configuration Editor. Shown in Figure 3-5, the Service Configuration Editor allows you to manage the complex options that are WCF's primary power.
Using different endpoints
The whole point of WCF is that you can write one service and then have IIS accept a lot of different protocols calling on the same code. Sure, we can do SOAP, like we did in ASMX. We also can do a lot of other protocols. Here is the breakdown of all the different endpoints, according to MSDN:
BasicHttpBinding: A binding that is suitable for communicating with WS-Basic Profile conformant Web services (for example, ASP.NET Web services [ASMX]-based services). This binding uses HTTP as the transport and text/XML as the default message encoding.
WSHttpBinding: A secure and interoperable binding that is suitable for non-duplex service contracts.
WSDualHttpBinding: A secure and interoperable binding that is suitable for duplex service contracts or communication through SOAP intermediaries.
WSFederationHttpBinding: A secure and interoperable binding that supports the WS-Federation protocol that enables organizations that are in a federation to efficiently authenticate and authorize users.
NetTcpBinding: A secure and optimized binding suitable for cross-machine communication between WCF applications.
NetNamedPipeBinding: A secure, reliable, optimized binding that is suitable for on-machine communication between WCF applications.
NetMsmqBinding: A queued binding that is suitable for cross-machine communication between WCF applications.
NetPeerTcpBinding: A binding that enables secure, multiple machine communication.
MsmqIntegrationBinding: A binding that is suitable for cross-machine communication between a WCF application and existing Message Queuing applications.
BasicHttpContextBinding: A binding that is suitable for communicating with WS-Basic Profile conformant Web services that enables HTTP cookies to be used to exchange context.
NetTcpContextBinding: A secure and optimized binding suitable for cross-machine communication between WCF applications that enables SOAP headers to be used to exchange context.
WebHttpBinding: A binding used to configure endpoints for WCF Web services that are exposed through HTTP requests instead of SOAP messages.
WSHttpContextBinding: A secure and interoperable binding that is suitable for non-duplex service contracts that enables SOAP headers to be used to exchange context.
So when do you use what? Well, if you want to have two .NET applications communicate, or the layers of a single application communicate, then use NetTcpBinding. If you are cross-platform communicating, then use WSHttpBinding.
Only if for some reason those don't work do you start to look into the others. Oh, and remember that you can have many endpoints for the same service. Don't use SOAP for a data layer. Just make a separate SOAP header if you need cross-platform support.
Using the Service Configuration Editor for adding a service endpoint seems more complex than it ought to be. Just follow these steps:
Open the Web.config of your project by clicking File... Open and navigate to your Web.config.
Select File

Click Browse and find the compiled DLL of your project.
It should be in the Bin folder, and named
SHARPService.dllif you used my naming.Double-click on the DLL, and the services that are represented show up. As shown in Figure 3-6, click the Registration service. Click Open, and then Next.
Confirm the service contract.
(See, I told you it would be useful later!)
Click Next.
In the Binding Configuration window, you'll see what I mean about the number of options. Select the Existing Binding Configuration radio button and check out the drop-down list. The items in that list are covered in the sidebar, "Using different endpoints." For now, accept the default.
Click Next.
In the endpoint address, enter
http://localhost/for the purpose of this walk-through.Click Finish on your confirmation window.
When you are done, an endpoint with no name appears under the
SHARPService.Registrationservice. You can click on this endpoint and add a name, like SharpHttp. The endpoint panel is shown in Figure 3-7.Choose File

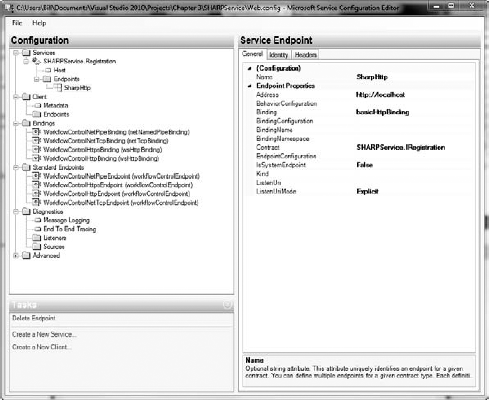
Back in Visual Studio–land, open the Web.Config file in the code editor by double-clicking it in the Solution Explorer. You'll see that the ServiceModel section has been edited with your new endpoint. The code looks like this:
<system.serviceModel>
  <services>
    <service name="SHARPService.Registration">
      <clear />
      <endpoint address="http://localhost" binding="basicHttpBinding"
        bindingConfiguration="" name="SharpHttp" contract="SHARPService.
  IRegistration" />
    </service>
  </services>
  <behaviors>
    <serviceBehaviors>
      <behavior>
        <!-- To avoid disclosing metadata information, set the value below to
  false and remove the metadata endpoint above before deployment -->
        <serviceMetadata httpGetEnabled="true" />
        <!-- To receive exception details in faults for debugging purposes, set
  the value below to true. Set to false before deployment to avoid disclosing
  exception information -->
        <serviceDebug includeExceptionDetailInFaults="false" />
      </behavior>
    </serviceBehaviors>
  </behaviors>
</system.serviceModel>
Now, would that have been easier to do in code? Maybe. Why is the service editor around then? Because when you get a lot of bindings, it can get pretty messy in there. Check out the sidebar on using other bindings to get an idea.
If you use IIS to host the service, deployment of WCF is the same as ASMX. You can effectively copy the .svc and .config files with the compiled binaries and have a working Web application.
The better way to deploy in Visual Studio 2010 is to use the Publish Web tool. If you right-click on the project and select Publish, you'll have the option to set up a repeatable profile so that you don't forget anything. (See Figure 3-8.)
This panel does all the things that you would have to do yourself:
Set the URL of the service
Name the Application (in the site properties in IIS)
Set up credentials
Copy the right files
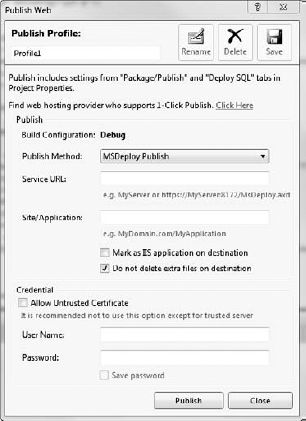
You can set up the profile once, and then reuse it every time you have to re-publish the application. Pretty slick.
All there is left to do is use it.
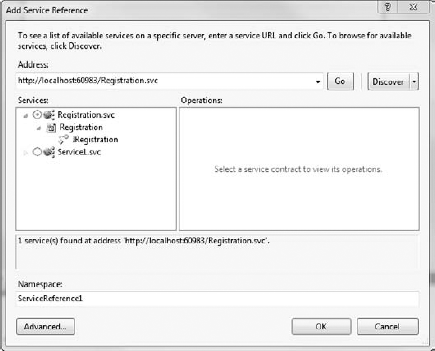
As one would expect, setting up a service reference for a WCF service is a lot like setting up a reference for an ASMX service. You still right-click and select Add Service Reference, you still get the dialog box shown in Figure 3-9, and you still can reference the service easily in your code.
Two things to remember:
The file extension you are looking for is
.svc.The binding you set up is abstracted away from you.
The filename thing is workable, but the binding is important. Keep in mind that the selecting of a binding is invisible to the developer, but it has a significant impact on functionality and especially performance. The decision of which to use is not to be made lightly; it should be done only after much research and needs analysis.