
This chapter covers the following Cisco-specific objectives for the “Implement an IP addressing scheme and IP services to meet network requirements for a small branch office” section of the 640-822 ICND1 exam:
<objective>Explain the basic uses and operation of NAT in a small network connecting to one ISP
</objective> <objective>Enable NAT for a small network with a single ISP and connection using SDM and verify operation using CLI and ping
</objective> </feature><feature><title>Outline</title>390 | |||
391 | |||
392 | |||
393 | |||
394 | |||
395 | |||
397 | |||
397 | |||
401 | |||
407 | |||
410 | |||
413 | |||
415 | |||
415 | |||
416 | |||
416 | |||
416 | |||
419 | |||
419 | |||
421 | |||
Read the information presented in the chapter, paying special attention to tables, Notes, and Exam Alerts.
Focus on the Network Address Translation terminology. Understanding these terms is paramount to understanding the NAT configuration as a whole.
When studying, focus on the static NAT configurations first, because these are the simplest. After you master this configuration, move on to NAT overload, followed by dynamic NAT.
I can still remember the very first time I saw Network Address Translation (NAT) in action. “This is the most amazing thing I have ever seen,” I said, with the same awestruck feeling as the first time you walk up and look over the Grand Canyon. Okay, perhaps it wasn’t that fantastic, but at the same time, NAT is definitely at the top of my list of configurations I love to set up.
Despite it being one of the most widely implemented concepts in the world of network technology, NAT is one of the newer topics added to the CCNA exam. This is most likely because of its configuration complexity: It requires a thorough understanding of standard access lists to successfully deploy. However, Cisco is very wise in adding it to the entry-level exam, because nearly every network in the world uses NAT in some shape or form. Even home networks using Linksys, D-Link, and Netgear routers use NAT.
NAT was originally developed through a combination of Cisco engineers and the Internet Engineering Task Force (IETF) group in 1994 to overcome the quickly approaching IP address shortage. With the Internet popularity growing at a rate far faster than expected, the remaining public IP addresses would soon be depleted. At that time, TCP/IP version 6 (IPv6, which would have solved the IP address shortage) had been created in a draft status, but it would require a worldwide upgrade of network devices and operating system software to successfully deploy. Rather than upgrading all network-capable devices, the focus was placed on creating a gateway device that could enable multiple network devices to share a single IP address.
As this concept materialized, NAT was born. Theoretically, a router running NAT is capable of allowing more than 60,000 devices to share a single Internet-valid IP address. Practically speaking, the router resources (processor and memory) and WAN bandwidth are depleted long before that limit is reached. With thousands of devices capable of using a single public IP address, the life of TCP/IP version 4 (IPv4) has been extended years beyond what was thought possible.
NAT also acts as a natural security boundary by eliminating end-to-end traceability. If your router has only a single IP address that is connected to the Internet, the public IP address, which is assigned to the outside interface, does not belong to any one internal host. For example, imagine that your router’s public IP address is 209.1.5.9, and all your internal hosts come from the subnet 192.168.1.0/24. Whenever one of the internal hosts accesses the Internet, it is seen as 209.1.5.9. However, if anyone from the Internet attempts to access 209.1.5.9, the address maps to no individual host, which makes the internal network invisible to the Internet.
Explain the basic uses and operation of NAT in a small network connecting to one ISP
Although the introductory discussion of NAT covers the most popular uses of the technology, NAT can be used for much more. Before you go deeper into the specific uses, though, you must understand the foundation concepts.
As its core function, Network Address Translation does just that: translate addresses. It can take any IP address and make it look like another. This is why the creative geniuses behind TCP/IP defined three ranges of “private IP addresses” in RFC 1918. The following is a list of the three private address ranges:
Class A: 10.0.0.0 to 10.255.255.255
Class B: 172.16.0.0 to 172.31.255.255
Class C: 192.168.0.0 to 192.168.255.255
You might notice that a private address range is defined for each class of address. This gives a company more flexibility to use different ranges based on the company size. As a general statement, most small companies use the 192.168.X.X range, most medium-sized companies use the 172.16.X.X to 172.31.X.X ranges, and most large companies use the 10.X.X.X ranges. Remember, this is just a general statement, not a solid rule.
It is commonly stated that these private addresses are nonroutable, but this is untrue. Thousands of companies around the world use these addresses and route them throughout their private networks just fine. This misunderstanding came about because all Internet service providers (ISPs) use access lists to block these addresses from entering or leaving their networks. It is accurate to say that these private addresses are not Internet routable, because if they were, there would be thousands of duplicate IP address conflicts every day.
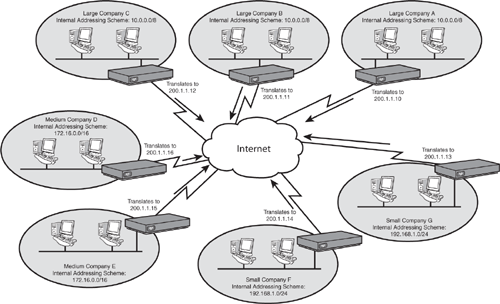
As shown in Figure 12.1, networks connected to the Internet typically use these private IP addresses internally and then translate them when attempting to access the Internet. This enables you to have many duplicate addresses around the world without any conflicts, because they never communicate directly. This can cause problems with overlapping IP addresses when companies merge, but NAT can even be engineered to solve these problems.
With this foundation in place, you’re ready to examine the styles of NAT.
Static NAT is the simplest form of NAT. It enables you to map one IP address to another in a one-to-one relationship. This is typically used to allow access to internal servers from the Internet that are using a private address space. In Figure 12.2, three servers are located on the internal network: a web server, an FTP server, and an email server. These three servers are assigned to a private IP address space (192.168.1.0/24) and would typically be inaccessible from the Internet. By using static NAT, you can map the private IP addresses to a public IP on a one-to-one basis, enabling these servers to be accessed from the Internet using the three public IP addresses shown in Figure 12.2.
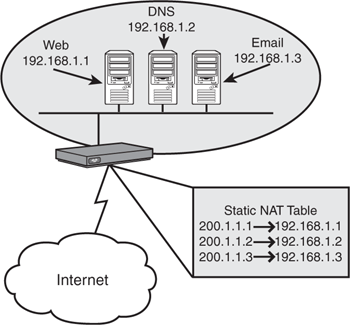
This static NAT mapping goes both ways. When someone from the Internet accesses 200.1.1.1, it is translated to the internal address 192.168.1.1. Likewise, when the server 192.168.1.1 accesses the Internet, it is seen as 200.1.1.1. Although this form of NAT does not allow multiple internal hosts to share a single address, it does implement the security features of NAT by eliminating end-to-end traceability and enables servers that are sharing your private network to be accessed from the Internet.
Static NAT can also be configured to statically translate individual TCP or UDP ports. This awesome feature enables you to take a single IP address and translate one or many ports to either the same host or many different hosts. For example, you might have a router that has the external IP address 195.1.1.1. You can statically configure NAT so that when your router receives a request on 195.1.1.1, using TCP port 80 (HTTP), it redirects it to the internal address 192.168.1.50 on TCP port 80. However, when it receives a request on 195.1.1.1, using TCP port 21 (FTP), it redirects it to the internal address 192.168.1.100 on TCP port 21. In this way, NAT can act as a type of firewall (allowing only some ports through to specific hosts) and give you the flexibility of offering many services through the same IP address. Using static NAT with ports even makes it possible to redirect port numbers. For example, you might be using one of those scandalous DSL or cable Internet providers that block certain port numbers to keep you from running a web server from home. You can configure static NAT in such a way that when your router receives a request on TCP port 800 it redirects it to an internal IP address on TCP port 80.
Static NAT is superb if you have a few hosts that need to be translated; however, if many hosts need to be translated, creating static entries for each one can be quite tedious. This is where dynamic NAT can help. Dynamic NAT enables you to define a pool of addresses to be translated along with a pool of addresses to which they are to be translated. The router then dynamically maps these IP addresses as the need arises. This is not the same thing as allowing multiple hosts to share the same IP address (known as NAT overloading). Dynamic NAT makes many one-to-one mappings without requiring you to configure them statically.
Now we come to the form of NAT that made it famous. NAT overload, also known as Port Address Translation (PAT), enables a single IP address to support many internal clients. Whenever a host establishes communication with a server outside the NAT firewall, it tries to access a specific port number (known as the destination port). However, it also uses a source port number to allow for return traffic. Figure 12.3 shows how NAT overload also incorporates this source port number into the translation.
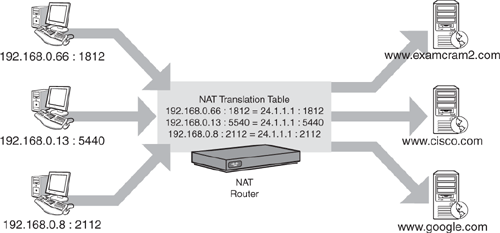
The hosts communicating randomly generate the source ports. The NAT router then appends these to the public IP address to make the source socket (or IP address and port number combination) unique. When the Internet server replies to whatever request was made, it does so to the source IP and socket. When the NAT router receives the reply, it then can redirect it to the correct internal host by referring to its NAT translation table. Because hosts use random source ports, there is very little possibility that two hosts will choose the same source port number (one chance out of some 60,000). However, if two hosts do happen to choose the same port number, the NAT device causes one of the device sessions to reset and choose a different port number. By using unique port numbers, the router can originate thousands of requests from its single Internet IP address. This provides Internet access to the internal network clients while using just one Internet address.
To review, Table 12.1 shows the three forms of NAT and the styles of translation they perform.
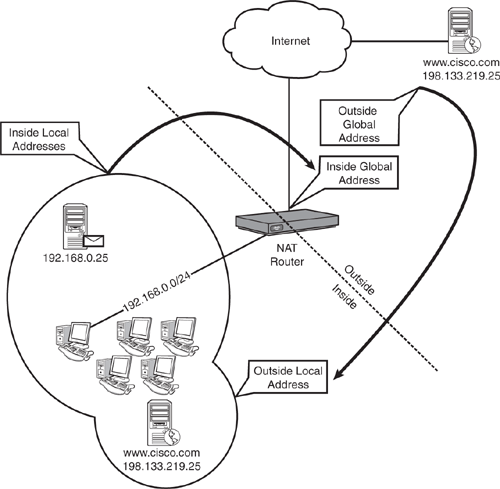
Believe it or not, setting up NAT is not very difficult; it’s learning the terminology used with NAT that can fry your brain. The first time you see these terms, it may make no sense to you, and that’s just fine. It takes some time to soak in. Now, keep in mind that these are not “Cisco terms.” Rather, they are an industry standard way of referring to the four different points in a NAT-based network. Before trying to understand four NAT address descriptions, you must understand the building blocks used to construct these terms:
Inside/outside: These NAT descriptors refer to where a device is physically located. If a device is “inside,” it is under your control; it is in your network. If a device is “outside,” it is not under your control; it is outside your network.
Local/global: These NAT descriptors refer to where an IP address is located from the perspective of a NAT device. The NAT device is a network device that has its address translated through a NAT router. It could be a PC, a server, an Xbox, or any other type of host that has a private address that is translated to a real address on the Internet. If the IP address is considered “local,” it is seen as a device on the local subnet from the perspective of a NAT device (this may or may not be true). If the IP address is considered “global,” it is seen as not on the local subnet from the perspective of a NAT device.
If that doesn’t sound confusing, just wait until we start combining these terms for the four NAT address descriptions. Figure 12.4 shows a visual location of these address on the network.
Inside local addresses: These addresses are the easiest to understand because they refer to everything inside your network. Remember the word constructs discussed just a moment ago: An address “inside” is physically located inside your network. From the perspective of the NAT device, it is “local,” meaning it is seen on the internal network. If an inside local address were to communicate with another inside local address, that communication would be described as standard LAN connectivity. No routers would be needed.
Inside global addresses: Now the terms begin to mix a little bit. Let’s break this down into the individual pieces: First, the address is “inside,” which means that it is physically located on your network; it is under your control. “Global” means that it is seen as an IP address not on the local subnet from the perspective of one of your NAT devices. Put all this together and you are left with the Internet valid IP address assigned to your router that is directly connected to the Internet. This is where a fundamental understanding of inside and outside can really help. If the address were an “outside global,” it would not be under your control, meaning that it could be any of the millions of devices attached to the Internet.
Outside global addresses: Outside global addresses refer to devices that are physically “outside” your network—outside your control. These addresses are “global,” meaning that the NAT devices on the inside of your network see these as nonlocal addresses. Put these two pieces together and you have a description of a standard Internet IP address.
Outside local addresses: I saved the best for last. Outside local addresses confused me for quite some time until I fully understood the capabilities of NAT. First, let’s look at the pieces: This address is physically “outside” your network, out of your control, out on the Internet. However, it appears to NAT devices as an IP address on the “local” subnet. What this describes is an Internet host translated as it comes through the NAT router into your local network. You can think of this as “reverse NAT,” or just NAT in the other direction. As shown in Figure 12.4, when the cisco.com web server speaks to the internal hosts on the 192.168.0.0/24 network, they believe it to be co-located on the local subnet with them. They come to this conclusion because the NAT router translates the outside global address to something local (perhaps 192.168.0.1, the NAT gateway’s address).
Objectives:
Enable NAT for a small network with a single ISP and connection using SDM
Cisco gives you plenty of flexibility when setting up NAT on a Cisco router. Now, anytime you are reading technical documentation and come across the word “flexibility,” your mind should naturally translate this to “complexity.” Thankfully, Cisco hid many of the configuration details behind the beautiful SDM interface.
Tip
For the ICND1 exam, Cisco expects you to be able to configure NAT using the Cisco Security Device Manager (SDM) graphic interface. For the ICND2 and CCNA exams, Cisco expects you to be able to configure NAT using the command-line interface.
NAT overload (also known as PAT) is required for just about any business that provides Internet access to its internal users. As discussed previously, this version of NAT allows you to share (overload) a single public IP address among many internal private IP addresses. Because of its common use, Cisco categorizes this as Basic NAT in the SDM interface. However, if you see the command-line equivalent to the Basic NAT overload configuration, you’ll realize it’s anything but “basic”! When we’re done with the SDM, I’ll show you the commands it generated as a “sneak peek” at the ICND2 exam.
To access the NAT configuration window in the SDM, click the Configure link and choose NAT from the Tasks sidebar. The window shown in Figure 12.5 appears.
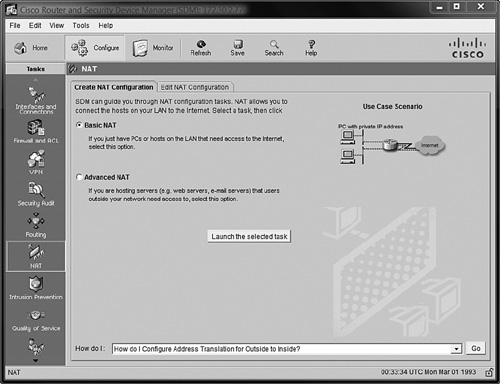
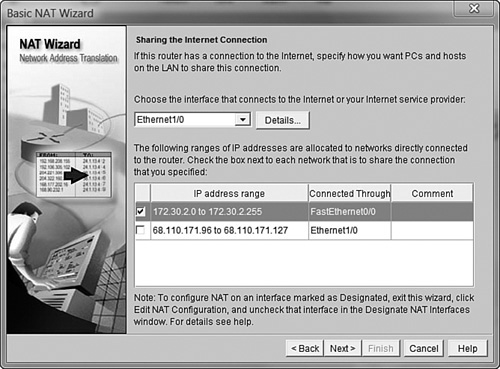
To configure NAT overload, choose the Basic NAT radio button and click the Launch the selected task button. After the initial introductory screen, you’re asked to select the outside and inside interfaces for NAT, as shown in Figure 12.6. The interface you select in the drop-down box should connect to your ISP. In this example, the Ethernet 1/0 interface connects to a local ISP. The range of IP addresses that you select using the checkbox represents internal IP address ranges. In this example, our internal network is represented by 172.30.2.0 to 172.30.2.255. If I were to translate the options shown in Figure 12.6 into a simple English statement, I would say, “Use NAT overload to translate any internal IP address starting with 172.30.2 to whatever IP address is assigned to the Ethernet 0/1 interface.”
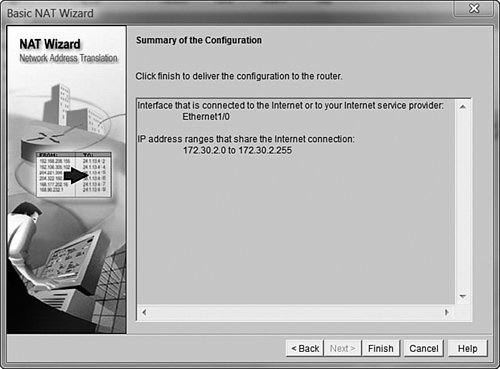
As soon as you click the Next button, you’re done. Seriously! That’s how simple Cisco makes the NAT overload configuration using the SDM GUI. The last thing you’ll see is a summary screen verifying the options you’ve selected, as shown in Figure 12.7. When you click Finish, SDM delivers the configuration commands to the router, and your network should be NAT-enabled.
I know you’re thinking, “That was way too easy.” Me too. Let’s take a quick look at some select pieces of the running configuration just to make sure we really know what is happening behind the scenes:
NAT_ROUTER#show run
Building configuration...

Current configuration : 1160 bytes
!
interface FastEthernet0/0
 ip address 172.30.2.77 255.255.255.0
 ip nat inside
!
interface Ethernet1/0
 ip address 68.110.171.98 255.255.255.224
 ip nat outside
The first thing you’ll notice is the ip nat inside and ip nat outside commands under the FastEthernet0/0 and Ethernet1/0 interfaces. The function of these commands is simple. They tell the router what interface connects to the outside world (your ISP) and what interface(s) connect to the inside world (your internal network). Keep in mind that you can have multiple inside interfaces without any difficulty. Having multiple outside interfaces can cause the router some confusion (which is why the Cisco SDM allows you to elect only a single outside interface). Let’s move on a little further in the running configuration:
!
access-list 1 remark SDM_ACL Category=2
access-list 1 permit 172.30.2.0 0.0.0.255
!
ip nat inside source list 1 interface Ethernet1/0 overload
These commands are what I consider the “power commands” of NAT. Here’s the idea: The first section represents an access list that allows the Cisco router to identify the internal network IP addresses (172.30.2.0/24 in this case). The access list is then utilized in the nat command below it. That one command is what puts this whole configuration in motion. The best way to understand that command is to imagine it as a conversation between you and the router. Trust me—the more you configure Cisco routers, the more conversations like this you will have:
You: I want to do NAT (
ip nat).Router: That’s nice. Where would you like to NAT from?
You: The inside of my network to the outside (
inside).Router: Great! What interface would you like to use for the outside IP address?
You: I’d like to use Ethernet1/0 (
interface Ethernet1/0).Router: How would you like to use it?
You: I’d like all internal IP addresses to share the single IP address on Ethernet 1/0 (
overload).
That’s the story! As the router puts these commands into action, all users in the 172.30.2.0/24 range are provided with Internet access.
Providing Internet access to the company through NAT overload is just one piece of the networking puzzle. Most companies have internal servers that need not only access to the Internet but access from the Internet. These are typically email servers, web servers, or FTP servers, to name just a few. Fortunately for your business, NAT provides a natural firewall between you and the Internet. Because private addresses are unreachable from the Internet, your internal network is protected from the outside world.
Note
Don’t get a false sense of security by running NAT! Although NAT does protect your internal network from being reached directly from the Internet, it is not flawless network security. If one of the hosts on your internal network becomes infected with a virus or worm, it can initiate connections through the NAT gateway and allow return traffic (which could potentially be malicious) back into your network.
The problem with this natural firewall is that it also makes your internal servers unreachable from the Internet. To solve this, we can use static NAT mappings.
The SDM gives you a couple methods of setting up NAT mappings: configuring the mappings at the same time as NAT overload (using the Advanced NAT selection on the Create NAT Configuration tab) or adding them individually from the Edit NAT Configuration tab. We’ll talk about both methods here, starting with the Advanced NAT selection.
The Advanced NAT configuration wizard, shown in Figure 12.8, is most useful when you are setting up NAT overload and static NAT mappings at the same time. This section assumes that you did not work through the Basic NAT wizard previously (although the Advanced NAT wizard will still function if you previously completed the Basic NAT wizard).
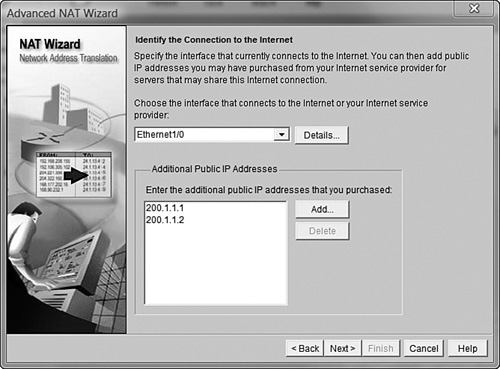
To start the Advanced NAT wizard, simply select its radio button and click the Launch the selected task button. After you see the introductory page, the wizard asks you to identify the interface connected to your ISP, just as it did in the Basic NAT wizard. However, at this point you start to see something different: The wizard also asks if you are using any additional public IP addresses, as shown in Figure 12.9. Many organizations that run their own internal servers purchase additional, dedicated IP addresses for those servers. If your organization is using more IP addresses than what is assigned to the outside interface of your router, click the Add button and enter them one by one. If you do not have additional IP addresses, don’t worry! We can do some really great stuff with the one IP address assigned to your router’s outside interface (we’ll talk about that in just a moment). In Figure 12.9, I have added the IP addresses 200.1.1.1 and 200.1.1.2 so that I can use them later in the configuration. We’ll assume that our “virtual company” owns these two IP addresses.
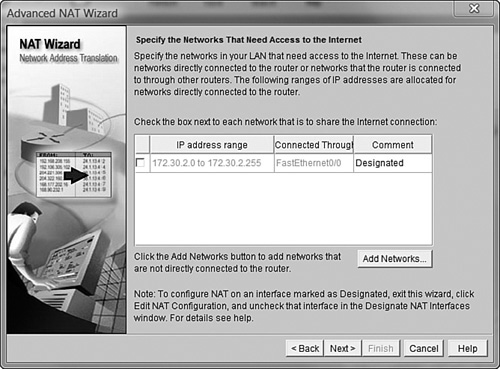
After clicking the Next button, you’re prompted to identify networks that connect to your internal network. In our case, we already went through the Basic NAT wizard and performed this step. Thankfully, Cisco SDM is smart enough to pick up on this and label the previously selected ranges as Designated, as shown in Figure 12.10. You can add ranges of IP addresses that are not listed by using the Add Networks button.
After clicking the Next button, we come to the window allowing us to configure our static NAT mappings. This is where the real action happens. We are initially given a blank window showing public-to-private IP address mappings. After you click the Add button, the Add Address Translation Rule window appears, as shown in Figure 12.11.
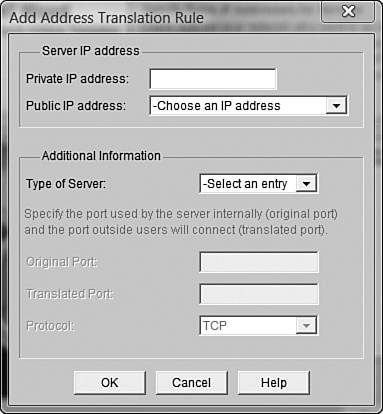
From here, we can make our static NAT mappings. The simplest way to do this is to translate a single public IP address to a single private IP address. To accomplish this, you can type in the private IP address you would like to use and select the public IP address from the drop-down box, as shown in Figure 12.12.
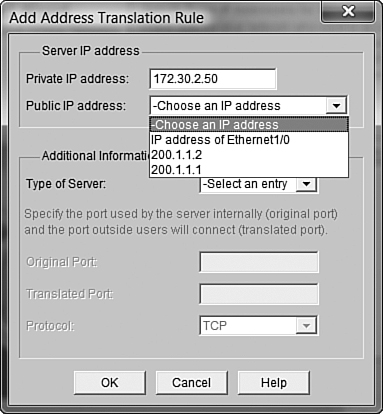
In Figure 12.12, I am planning on mapping the internal IP address 172.30.2.50 to the public IP address 200.1.1.1. However, before I do, I want you to notice the other option that is available: IP address of Ethernet1/0. If your organization has only a single IP address and that IP address is assigned to the router’s outside interface, this selection allows you to use that IP address and map it to internal servers on your network. There are some restrictions when doing this, but we’ll talk about those in just a moment. For now, I’ll click the OK button, and the public-to-private mapping is made, as shown in Figure 12.13.
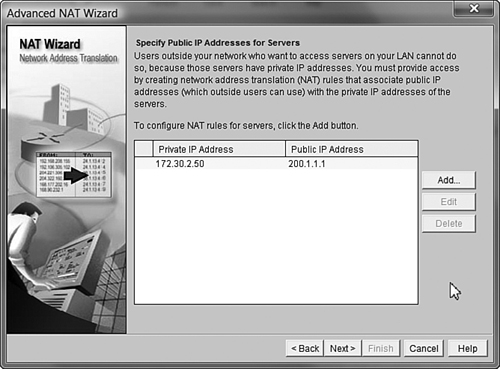
I want to make a key statement at this point: Based on what I have just done, the full public IP address 200.1.1.1 is mapped to the private IP address 172.30.2.50. This means that if someone on the Internet accesses 200.1.1.1 on TCP port 80 (HTTP), that will forward into 172.30.2.50 on TCP port 80. Likewise, if someone on the Internet accesses 200.1.1.1 on TCP port 21 (FTP), that will forward into 172.30.2.50 on TCP port 21. It is a full mapping between the public address 200.1.1.1 and the private address 172.30.2.50. In contrast to a full mapping, I will configure a specific NAT port mapping.
Port mappings allow you to map individual ports on public IP addresses to individual ports on private IP addresses. This allows you to use each public IP address to its maximum potential. For example, my company might have an internal email server (which needs at least TCP port 25), an internal web server (needing at least TCP port 80), and an internal FTP server (needing at least TCP port 21). However, at this time my company has only a single public IP address of 200.1.1.2 (pretend that you never saw the other 200.1.1.1 IP address I just configured). I could use single-port mappings to map 200.1.1.2 TCP port 25 to the email server, 200.1.1.2 TCP port 80 to the web server, and 200.1.1.2 TCP port 21 to the FTP server! All with just one public IP address.
Here’s how we can make it happen: Click the Add button to create a new NAT mapping. Just like before, enter the private IP address you’d like to map, and choose a public IP address from the drop-down menu. In this case, I’ll use 172.30.2.10 as the internal email server and 200.1.1.2 as the public IP address (my final configuration window is shown in Figure 12.10). This time, we’ll specify the service in the Additional Information section. Thankfully, Cisco SDM is so amazing that it already has a prebuilt mapping just for email servers! All I need to do is choose E-mail server from the Type of Server drop-down, as shown in Figure 12.14.
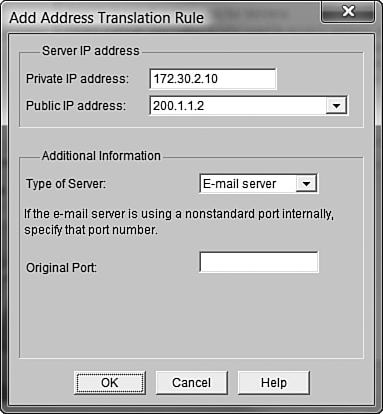
The wizard also gives me the option to use an alternative port for receiving email. If my server is not using the standard TCP port 25 (SMTP) for receiving email, I can enter that here. Otherwise, I just need to click OK, and I’m good to go. The final mapping is displayed in the Advanced NAT wizard window, shown in Figure 12.15. Notice that port 25 is designated next to the public and private IP address. This is just a port mapping rather than a full IP address mapping.

Note
The Cisco router supports only individual NAT port mappings for the IP address assigned to the outside interface. You cannot fully map the outside interface IP address to an internal server because it is partially used for communication by the Cisco router.
We can now perform another two port mappings on the same 200.1.1.2 IP address, reusing it for the web and FTP servers. The Cisco SDM has built in Web Server selection under the Type of Server drop-down (just as it did for the email server previously). Rather than wasting space showing that configuration, let me show you something more interesting: the FTP server mapping. Again, I’ll click the Add button to create a new mapping. I’ll map the public IP address 200.1.1.2 to the internal FTP server address 172.30.2.11. This time, I’ll choose Other under the Type of Server drop-down box (the Cisco SDM doesn’t have a prebuilt FTP server mapping—yet). If you look at Figure 12.16, you’ll notice that the SDM interface now gives us the opportunity to enter a value for the Original Port (received on the public IP address) and a value for the Translated Port (received on the private IP address). Most of the time, these values are the same, as shown in the Figure 12.16. Now, when 200.1.1.2 receives a request on TCP port 21, it translates it to 172.30.2.11 on TCP port 21.
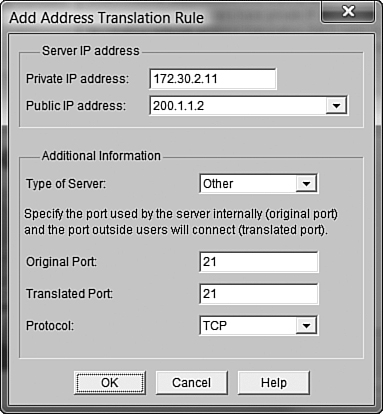
You could also perform port redirection by specifying a different port in either the Original Port or Translated Port fields. For example, if I entered 2100 in the Original Port field and kept 21 in the Translated Port field, the router would redirect (translate) requests received on 200.1.1.2 TCP port 2100 to 172.30.2.11 TCP port 21. You might be thinking, “Why on Earth would someone do this?!” There are plenty of reasons. Perhaps the network administrator did not want to use the well-known port number TCP 21 for the FTP server for security reasons. It could also be that port 21 on 200.1.1.2 was already used for another FTP server. Using TCP port 2100 would now allow you to run two FTP servers off a single public IP address! It doesn’t get much better than that! Well, I suppose it could. Because 65,535 TCP ports are defined, we could theoretically run 65,535 FTP servers off a single IP address. Now we’re talkin’!
Note
I (Jeremy) use this port redirection feature quite a bit for Microsoft’s Remote Desktop Protocol (RDP). At my office, I have five servers running that I often need to access no matter where I am in the world. The RDP protocol allows me to access the desktop as if I were sitting directly at the server console. By default, RDP uses TCP port 3389. If I were to use only this port, it would require five public IP addresses to access each server. Instead, I set up the following port mappings:
Public IP:3389 ▴ Primary Server:3389
Public IP:3390 ▴ Email Server:3389
Public IP:3391 ▴ CallManager Server:3389
Public IP:3392 ▴ DNS Server:3389
Public IP:3393 ▴ FTP Server:3389
By doing this, I can use just a single IP address, yet access any server using RDP just by specifying a different port number.
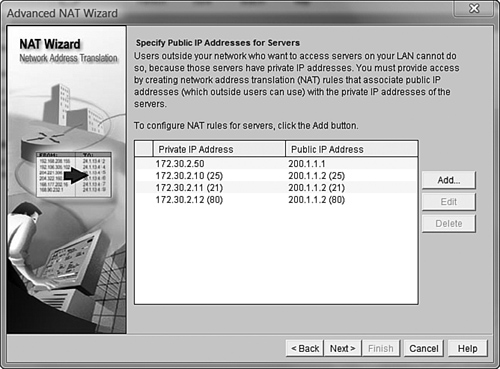
Take a look at Figure 12.17 for a final view of all our NAT mappings, including the web server. After we click the Next button, we see a configuration summary screen showing all the mappings we’ve set up. Click Finish to end the Advanced NAT wizard and deliver the configuration to the router.
Now we come to the second way to configure static NAT mappings using SDM: through the Edit NAT Configuration tab, shown in Figure 12.18.
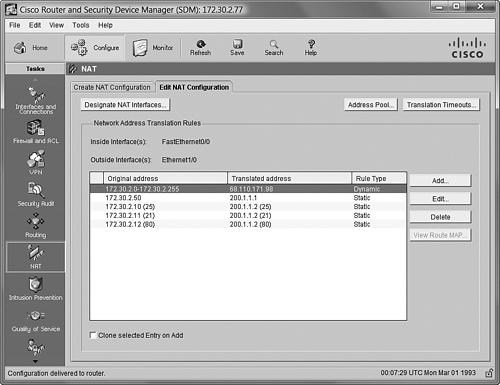
This window is most useful if you have already set up Basic NAT (NAT overload) on the router and want to make changes to your NAT configuration in some way. Just by glancing around the configuration window shown in Figure 12.18, you can see quite a few options at your disposal:
Designate NAT Interfaces: Opens a configuration window allowing you to allocate or reallocate which interfaces on your router connect to the inside or outside networks.
Address Pool: Allows you to create one or more pools of IP addresses that you can use for dynamic NAT (using NAT from one group of IP addresses to another; see the description earlier in this chapter).
Translation Timeouts: Opens a configuration window that lets you set time limits for memory-resident idle NAT entries. For example, if someone opens a Telnet session through the NAT router and does not enter information, the router maintains the mapping in the NAT table for 86400 seconds by default. After this amount of time, the NAT entry is removed, and the Telnet session terminates.
Add: Opens a window allowing you to add static or dynamic NAT mappings.
Edit: Opens a window allowing you to edit the selected NAT mapping.
Delete: Removes the selected NAT mapping.
You might also notice the Clone selected Entry on Add checkbox at the bottom of the window. If checked, this prepopulates the new NAT entry window (opened by clicking the Add button) with whatever entry you have selected. For example, let’s say I wanted to create another static NAT mapping for our web server. I would like to map 200.1.1.2 TCP port 443 (HTTPS) to 172.30.2.12 port 443. Because I already have an entry mapping port 80 to this web server, I could check the Clone selected Entry on Add checkbox, select the current TCP port 80 mapping in the list, and click the Add button. The window shown in Figure 12.19 appears.
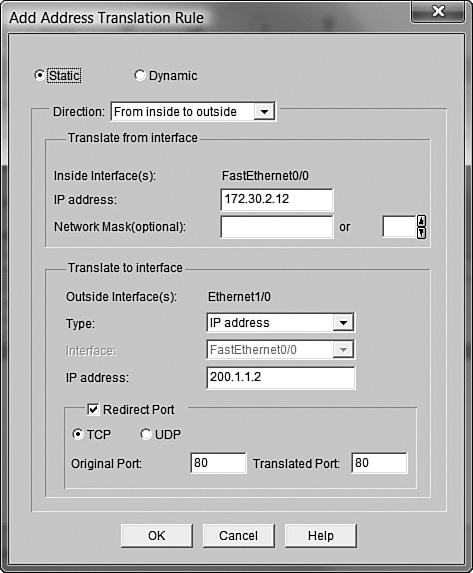
Nice! The Static radio button is already checked, the IP addresses have already been entered, and the correct interfaces are selected. All I have to do is change the Original Port and Translated Port fields to 443 and click OK. So easy a sea snail could do it! While we’re here, let’s talk about the configuration options in this window:
Static/Dynamic: Choose the style of NAT you want to apply.
Direction: This selector has caused plenty more confusion than it’s worth. Your choices in the drop-down box are From inside to outside and From outside to inside.
The common misunderstanding is that this selector makes the translation a one-way street. The truth is that regardless of the direction you choose, the mapping is always two-way. For example, let’s say I create a map by choosing From inside to outside and map the inside IP address 172.30.2.12 to the outside IP address 200.1.1.2. When the server 172.30.2.12 accesses the Internet, it is seen as 200.1.1.2. Likewise, if someone on the Internet accesses 200.1.1.2, he or she reaches the server at 172.30.2.12. It’s a two-way translation. The good news is that you can always choose which direction makes more sense to you—outside-in or inside-out. This selector also gives you more flexibility when performing dynamic NAT.
Inside IP Address/Network Mask: The inside address or pool of addresses you want to translate.
Outside Interface(s)/Type: Allows you to enter the individual IP address or interface you want to translate. If the Type drop-down box has the IP address selected (shown in Figure 12.15), the IP address field can be modified. If the Type drop-down box has the interface selected, the Interface field can be modified.
Redirect Port/Original Port/Translated Port: Allows you to choose the protocol and port numbers you want to translate.
After I click the OK button, the new static NAT translation is added. As I mentioned earlier, the Edit NAT Configuration tab is the best place to make changes to an existing NAT setup.
Objectives:
Enable NAT for a small network with a single ISP and connection using SDM and verify operation using CLI and ping
To verify that everything is working, we need to return to our command-line interface. (The SDM can verify that packets are passing through interfaces but is unable to show us the detailed NAT information we need.) The first thing I want to do when I get to the command line is issue the show ip interface brief command (by far, my favorite command in all of Cisco) to get my bearings:
NAT_ROUTER#show ip interface brief
Interface                  IP-Address     OK? Method Status                Protocol
FastEthernet0/0            172.30.2.77    YES NVRAM  up                    up
Ethernet1/0                68.110.171.98  YES NVRAM  up                    up
Serial1/0                  unassigned     YES NVRAM  administratively down down
Serial2/0                  unassigned     YES NVRAM  administratively down down
We can see our internal IP address (172.30.2.77) and our external IP address (68.110.171.98). Let’s start by ensuring that we can reach the Internet without involving NAT by issuing a ping command directly from the router. I typically ping the world’s best-known public DNS server at 4.2.2.2 anytime I want to test Internet connectivity:
NAT_ROUTER#ping 4.2.2.2

Type escape sequence to abort.
Sending 5, 100-byte ICMP Echos to 4.2.2.2, timeout is 2 seconds:
!!!!!
Success rate is 100 percent (5/5), round-trip min/avg/max = 20/23/28 ms
Beautiful. Now I’ll configure an internal client to use this router as its default gateway and do some Internet surfing. I’ll spare you the screen captures of me surfing the Internet—you’ll just have to trust that I’m really surfing. Yep, there’s my Apple homepage (I’ve recently become quite the Apple enthusiast). I’ll also surf over to www.CiscoBlog.com to see if there’s anything new. Okay, I’m done surfing. Now let’s verify that NAT is occurring from the Cisco router’s perspective. You can use two major commands to do so. Here’s the first:
NAT_ROUTER#show ip nat statistics
Total active translations: 38 (5 static, 33 dynamic; 37 extended)
Outside interfaces:
  Ethernet1/0
Inside interfaces:
  FastEthernet0/0
Hits: 1211  Misses: 121
Expired translations: 88
Dynamic mappings:
—— Inside Source
[Id: 1] access-list 1 interface Ethernet1/0 refcount 33
The show ip nat statistics command verifies NAT from a more global perspective. The primary information you can gather is the outside and inside interface configuration and the number of hits and misses. The number of hits defines how many packets match an existing NAT mapping. For example, I went to www.CiscoBlog.com while I was surfing the Internet. The very first packet that went through the Cisco router was considered a “miss” because no existing NAT translation was created. So, the Cisco router created the NAT translation, passing the traffic from my internal client (172.30.2.177) to the www.CiscoBlog.com website. The website then received my connection, created a TCP socket, and streamed many packets back to my web browsing application. All those packets were considered “hits” by NAT because they matched an existing NAT translation.
The second command you can use to verify that NAT is working is the more popular of the two:
NAT_ROUTER#show ip nat translations
Pro Inside global      Inside local       Outside local      Outside global
----- 200.1.1.1             172.30.2.50       -----               ------
tcp 200.1.1.2:21       172.30.2.11:21     ------                ------
tcp 200.1.1.2:25       172.30.2.10:25     ------                ------
tcp 200.1.1.2:80       172.30.2.12:80     ------                ------
tcp 68.110.171.98:49221 172.30.2.177:49221 17.149.160.10:80  17.149.160.10:80
tcp 68.110.171.98:49222 172.30.2.177:49222 17.149.160.10:80  17.149.160.10:80
tcp 68.110.171.98:49223 172.30.2.177:49223 17.149.160.10:80  17.149.160.10:80
tcp 68.110.171.98:49224 172.30.2.177:49224 17.149.160.10:80  17.149.160.10:80
tcp 68.110.171.98:49225 172.30.2.177:49225 17.149.160.10:80  17.149.160.10:80
tcp 68.110.171.98:49226 172.30.2.177:49226 17.149.160.10:80  17.149.160.10:80
tcp 68.110.171.98:49238 172.30.2.177:49238 17.149.160.10:80  17.149.160.10:80
tcp 200.1.1.2:443      172.30.2.12:443    ------                ------
tcp 68.110.171.98:49236 172.30.2.177:49236 66.151.152.126:80 66.151.152.126:80
tcp 68.110.171.98:49237 172.30.2.177:49237 206.16.21.35:80   206.16.21.35:80
tcp 68.110.171.98:49242 172.30.2.177:49242 69.89.31.87:80    69.89.31.87:80
tcp 68.110.171.98:49244 172.30.2.177:49244 69.89.31.87:80    69.89.31.87:80
tcp 68.110.171.98:49245 172.30.2.177:49245 69.89.31.87:80    69.89.31.87:80
tcp 68.110.171.98:49243 172.30.2.177:49243 209.85.171.167:80 209.85.171.167:80
udp 68.110.171.98:49308 172.30.2.177:49308 4.2.2.2:53        4.2.2.2:53
udp 68.110.171.98:49309 172.30.2.177:49309 4.2.2.2:53        4.2.2.2:53
udp 68.110.171.98:49310 172.30.2.177:49310 4.2.2.2:53        4.2.2.2:53
udp 68.110.171.98:49311 172.30.2.177:49311 4.2.2.2:53        4.2.2.2:53
udp 68.110.171.98:49312 172.30.2.177:49312 4.2.2.2:53        4.2.2.2:53
udp 68.110.171.98:49313 172.30.2.177:49313 4.2.2.2:53        4.2.2.2:53
udp 68.110.171.98:49314 172.30.2.177:49314 4.2.2.2:53        4.2.2.2:53
udp 68.110.171.98:49315 172.30.2.177:49315 4.2.2.2:53        4.2.2.2:53
tcp 68.110.171.98:49227 172.30.2.177:49227 208.46.174.96:80  208.46.174.96:80
tcp 68.110.171.98:49228 172.30.2.177:49228 208.46.174.96:80  208.46.174.96:80
tcp 68.110.171.98:49229 172.30.2.177:49229 208.46.174.96:80  208.46.174.96:80
Wow—look at that! These are all the NAT translations my router is currently maintaining. This is how you can really tell if NAT is working. If you look at the first few translations, you’ll be able to verify the static NAT mappings that we entered through the SDM just a few moments ago. The IP address in the Inside global column represents the address on the interface connecting to the Internet. The IP address in the Inside local column represents the internal IP address on your LAN. Do you see now why it’s so important to know that terminology mentioned at the beginning of the chapter? If it’s a little fuzzy, now would be a good time to flip back a few pages and review.
The static mappings have no data in the Outside local and Outside global columns because they are not currently in use (no one is accessing those IP addresses from the Internet at this time). If they were being accessed, we would see the IP address of the device accessing them in those two columns.
Now take a look farther down; you see a bunch of mappings on the inside global IP address 68.110.171.98 and the inside local IP address 172.30.2.177. The global IP address represents my ISP-assigned Internet address that I am using for NAT overload (all the internal clients share this one). The local IP address represents the internal client I was surfing the Internet with. Next to each of those IP addresses is a colon, followed by a port number. These are the source UDP and TCP port numbers that my web surfing client uses to keep all its applications separate.
In the two rightmost columns (Outside local and Outside global), you see the public IP addresses that my web surfing client was accessing. I know what you might be thinking: “Why do you have so many entries in the NAT table? I thought you accessed just two websites!” You’re right! I did access only two websites. However, my laptop had to do DNS lookups to access both the websites, and those websites were supported by many other servers. For example, the Apple website might have one server that supplies the raw HTML pages, another server that supplies all the graphics, another for flash content, and so on. For each of those servers, the client may have to do another DNS lookup (which is why you see so many requests to the 4.2.2.2 DNS server IP address), and the Cisco router has to maintain another NAT mapping to allow data through. On top of it all, this is just one laptop surfing the Internet! Imagine what this table would look like in a large corporate network. Good thing the show ip nat translation command supports plenty of filtering options!
When you use the SDM to configure NAT, not too much can go wrong, but you can follow some general troubleshooting steps if things don’t seem to be working correctly. To start, enter the following modified show running-config commands:
NAT_ROUTER#show running-config interface fastEthernet 0/0
Building configuration...

Current configuration : 111 bytes
!
interface FastEthernet0/0
 ip address 172.30.2.77 255.255.255.0
 ip nat inside
NAT_ROUTER#show running-config interface Ethernet 1/0
Building configuration...

Current configuration : 100 bytes
!
interface Ethernet1/0
 ip address 68.110.171.98 255.255.255.224
 ip nat outside
This filters the large running configuration to just the interfaces you’d like to see. What you want to verify is that the interface connecting to your internal network is configured as the ip nat inside interface and that the interface connecting to the ISP is configured as the ip nat outside interface.
If things look good there, do a ping from the router itself. This will test your Internet connectivity without the NAT process getting in the way. The problem could be a simple routing issue (such as missing a default route to your ISP). If things check out in the router-originated ping, try the ping from an internal client. Be sure you’re pinging an IP address rather than a hostname (such as www.examcram.com). You don’t want a DNS problem getting in the way. If the client can ping successfully, NAT is operational.
Last, but not least, is a command that has saved me plenty of troubleshooting time: clear ip nat translations *. This command wipes out the NAT table maintained on the router. Sometimes, when we are setting up a network, we end up with NAT entries in the table that don’t belong there. It could just be from changing a client’s IP address before NAT timeouts are reached, it could be that your public or private IP address changes, or it could just be that the router doesn’t feel like NATing today. It’s always worthwhile to try entering clear ip nat translations * from the privileged prompt before you get too deep in troubleshooting other issues. Don’t worry; it shouldn’t cause any connectivity problems for existing clients using the Internet. The router will just create a new NAT mapping the next packet that comes through. I have seen this command cause Instant Messenger clients to log out and log back in again, but people don’t really use Instant Messenger clients for anything productive anyway, right?
You’d be hard-pressed to find any corporate network in the world providing Internet access without using NAT. Because of this, Cisco has added it as one of the core competencies of both a CCENT and CCNA certified individual.
The big-picture concept of NAT is fairly simple: converting one IP address to another. However, the technical details behind NAT are where the complexity lies. Most of the challenge with NAT is learning the terminology that describes the different addresses on a network. Inside local addresses are internal to a network. The inside global address represents the public Internet address assigned to your router. Outside global addresses represent all the hosts outside your network attached to the Internet with Internet IP addresses. Finally, outside local addresses represent hosts outside your network as they are seen by the internal NAT hosts.
A company planning to use NAT will deploy one of the three private address ranges on its internal network, which are prevented from routing to the Internet. It then uses one of the three forms of NAT—static NAT, dynamic NAT, or NAT overload—to translate these private ranges onto the Internet. Most networks use a combination of NAT overload and static NAT to accomplish most major network objectives.
You have an internal web server that has the IP address 172.16.5.9. You need to enable this server to be accessed on TCP port 80 from the Internet. What would be the best solution for this situation?
| |||||||||
Which of the following forms of NAT incorporates the source IP address (inside local) along with the source port number to make every translation unique?
| |||||||||
Which of the following is not a task you can perform from the Edit NAT Configuration tab of SDM?
Refer to the following figure for Questions 4 and 5. 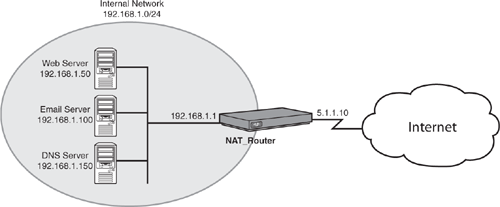 | |||||||||
According to NAT terminology, the IP address 192.168.1.100 for the email server is considered an ______________.
| |||||||||
According to NAT terminology, the IP address 5.1.1.10 is considered an ______________.
| |||||||||
Which of the following represent a private IP address? (Choose two)
| |||||||||
You are configuring a new router for NAT and would like to set up NAT overload and a single, static NAT mapping allowing access to an internal web server. What would be the most efficient way to accomplish this?
| |||||||||
You are using NAT overload on your company’s Cisco router to provide Internet access to your internal network. The NAT process is overloading the IP address assigned to the router’s outside interface. Which of the following statements are not true? (Choose two)
| |||||||||
You would like to see the active NAT translations that are happening on your router. Your primary interest is in the inside local IPs that are being translated. What command shows you this information?
| |||||||||
You have just changed one of your internal computer’s IP addresses, and it appears that it can no longer access the Internet. You have verified the correct subnet and gateway information. What commands should you perform on the router to ensure that cached information does not play a role in this failure? (Choose two)
|
A. Static NAT provides the best solution when you need a 1:1 translation from a private address or port number to a public address or port number. Answer B is incorrect because dynamic NAT allows many hosts to be translated at the same time. Answer C is incorrect because NAT overload allows many internal hosts to share a single Internet IP address. Answer D is also incorrect. Standard routing does not work because private addresses are blocked from traversing the Internet. | |
C. NAT overload uses the source port number to send many unique requests out a single, public IP address. Answer A is incorrect because static NAT performs 1:1 translations from public to private IP addresses. Answer B is incorrect because dynamic NAT performs many 1:1 translations without requiring manual entries. Answer D is incorrect because NAT port mapping is not a valid form of NAT. | |
A. You cannot create access lists for use with dynamic NAT from the Edit NAT Configuration tab. All other tasks can be performed from this window. | |
A. Inside local addresses encompass any address on your internal network that is translated to the outside network via NAT. Answer B is incorrect because the inside global addresses are the IPs assigned to the outside interface of your router. Answer C is incorrect because the outside local addresses are outside (Internet) addresses as they appear to a NAT device. Answer D is incorrect because the outside global addresses are standard Internet-attached devices. | |
B. The inside global addresses are the IPs assigned to the outside interface of your router. Answer A is incorrect because inside local addresses encompass any address on your internal network that is translated to the outside network via NAT. Answer C is incorrect because the outside local addresses are outside (Internet) addresses as they appear to a NAT device. Answer D is incorrect because the outside global addresses are standard Internet-attached devices. | |
A, C. The private address ranges are 10.x.x.x, 172.16.x.x to 172.31.x.x, and 192.168.x.x. Answers B and D fall outside these ranges. | |
B. The Advanced NAT wizard allows you to configure NAT overload and static NAT mappings at the same time in the same wizard. If you use the Basic NAT wizard (Answer A), you would have to follow it up with the Edit NAT Configuration tab, which is not the most efficient way to configure NAT. This makes both Answers A and D incorrect. Answer C is incorrect because using the Edit NAT Configuration tab would require you to manually set up NAT overload and the static NAT mapping individually, which is not the most efficient process. | |
A, C. When using NAT overload, multiple users can access the same website at the same time because the router uses unique source port numbers to distinguish each request. Also, when using NAT with the IP address assigned to the outside interface, you cannot create a static NAT mapping for the entire IP address, because this would make local router services unavailable. Both of the other statements are true. | |
B. The | |
A, C. The |
Cisco TAC NAT Configuration Syntax, http://www.cisco.com/univercd/cc/td/doc/product/software/ios122/122cgcr/fipr_c/ipcprt1/1cfipadr.htm#wp1042290.
Chris Ward and Jeremy Cioara. Exam Cram 2 CCNA Practice Questions. Que Publishing, 2004.
How Network Address Translation Works, http://computer.howstuffworks.com/nat1.htm.