This chapter covers the following Cisco-specified objective for the “Implement an IP addressing scheme and IP services to meet network requirements for a small branch office” section of the 640-822 ICND1 exam:
<objective>Configure, verify, and troubleshoot DHCP and DNS operation on a router (including: CLI/SDM)
</objective> </feature><feature><title>Outline</title>296 | ||
296 | ||
298 | ||
Changing the Hostname, Banner, Domain Name, and Secret Password | 299 | |
303 | ||
304 | ||
305 | ||
308 | ||
308 | ||
309 | ||
310 | ||
310 | ||
312 | ||
312 | ||
312 | ||
312 | ||
312 | ||
313 | ||
315 | ||
316 | ||
316 | ||
Practice using the SDM in a lab environment.
Learn how to set up basic router operation on an SDM-capable device.
The Cisco Security Device Manager (SDM) is a web-based tool that was developed by Cisco for its IOS software-based routers. The SDM tool gives users the option to configure and monitor a router without using CLI. Chapter 8, “Foundation Cisco Configurations,” covers a large number of CLI commands. This chapter reviews how to use the SDM tool for router configuration, verification, and monitoring from a web browser.
Only certain router models with more current IOS versions support SDM. For a complete list of router models and supported IOS versions, check http://www.cisco.com. This chapter demonstrates the SDM using a Cisco 851W router. This model router comes from Cisco with a “Cisco Router and Security Device Manager” CD. Cisco SDM Express is also installed on the router flash. If you are uncertain whether SDM is installed on the router flash, you can open a web browser and enter http://insert router IP address here in the address field to see if the SDM page loads. Note that a prerequisite to using SDM is an IP-configured interface that is in an administratively up/up state. This means that you need to manually configure that interface with an IP address and subnet mask and perform a no shut command before SDM will work. While you are logged into the router manually, also add the command ip https to allow for browser connectivity. Finally, ensure that the router does not have an access list in place that blocks the incoming HTTPS connection. Other outside factors might also prevent SDM from loading properly, such as services or Java plugins on the connected computer.
Figure 9.1 shows the welcome page that loads when you open the Cisco Router and Security Device Manager CD.
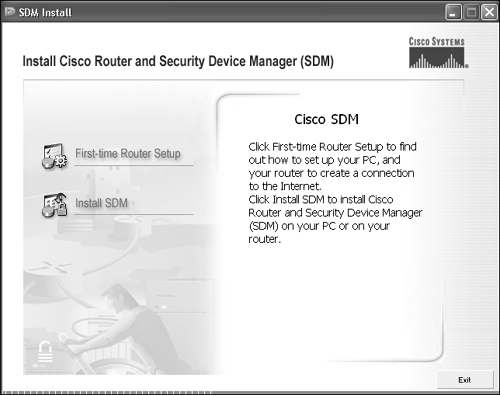
From this screen, you can choose First-time Router Setup or Install SDM. Figure 9.2 explains First-time Router Setup. If SDM is not already installed, you go through the step in First-time Router Setup and then choose Install SDM.
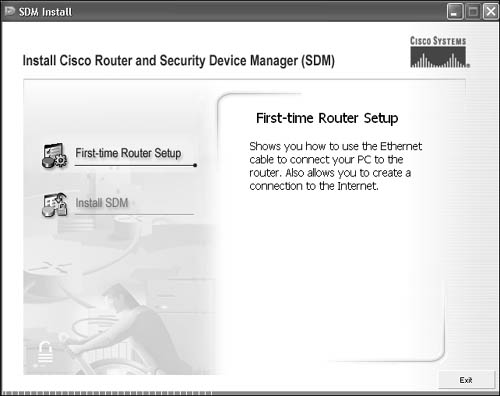
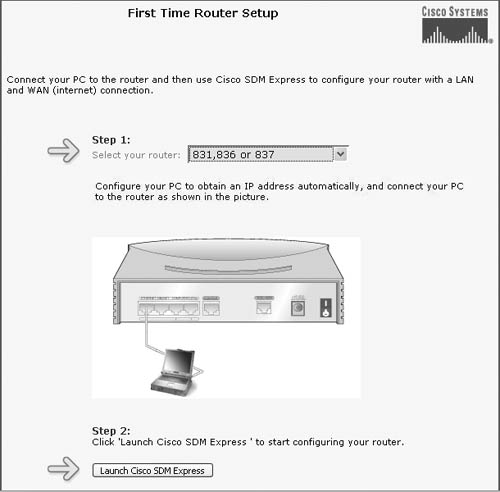
If you click First-time Router Setup, you are routed to an HTML file with detailed connection instructions. There is also a drop-down box where you may select the router model for more specific model details, as shown in Figure 9.3. The drop-down box shows models 831, 836, and 837, but selecting this option also works for the 851 model router.
After you have successfully connected to the SDM, a separate window opens, as shown in Figure 9.4.
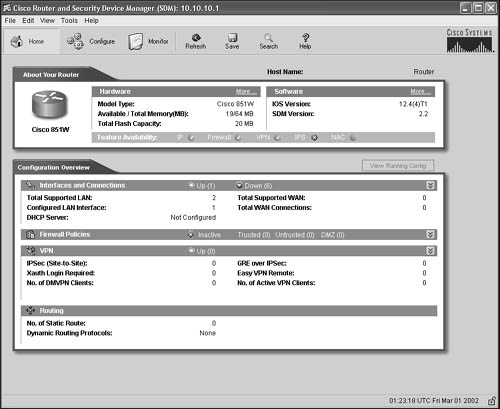
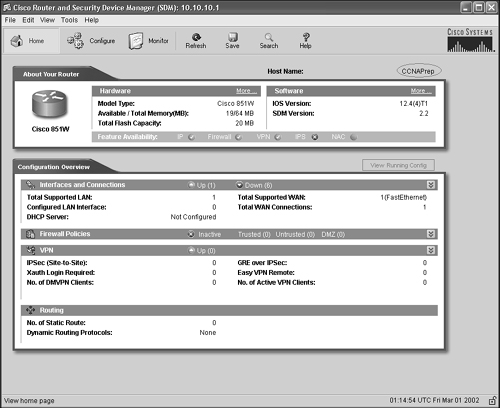
As you can see in Figure 9.4, the SDM home page has clickable buttons across the top labeled Home, Configure, Monitor, Refresh, Save, Search, and Help. Two sections display general router information. The top section, About Your Router, shows basic hardware and software details about the router. The bottom section, Configuration Overview, is broken into four subcategories: Interfaces and Connections, Firewall Policies, VPN, and Routing. As you make configuration changes to the router, the relevant fields are updated with the new information. Let’s move on and make some configuration changes on the router.
Objective:
Configure, verify, and troubleshoot DHCP and DNS operation on a router (including: CLI/SDM)
To begin router configurations, click the Configure button at the top of the Home page. Figure 9.5 shows the main Configure page of the SDM. The Configure tab has a vertical sidebar with more clickable options that are called Tasks. They include Interfaces and Connections, Firewall and ACL, VPN, Security Audit, Routing, NAT, Intrusion Prevention, Quality of Service, NAC, and Additional Tasks.

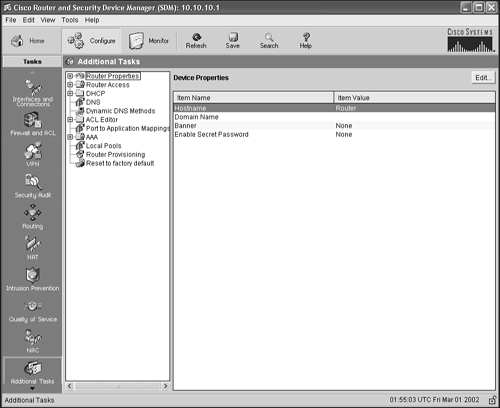
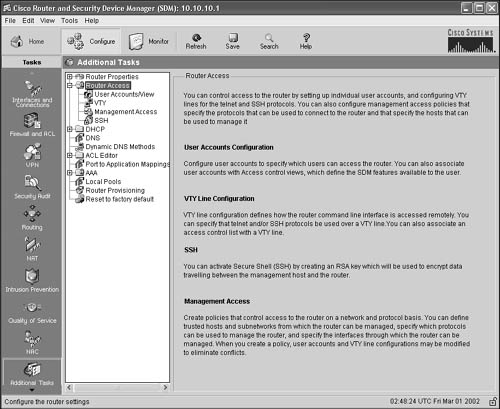
From the Configure page, click Additional Tasks in the left vertical sidebar. The Additional Tasks page opens, as shown in Figure 9.6. It has a list of additional tasks and a list of device properties. When expanded, Router Properties shows a few configurable items, including hostname, domain name, banner, and the enable secret password.
Double-click any of the item names to open a new window, as shown in Figure 9.7. Here you can change the router’s hostname, domain name, banner, and secret password all in one window.
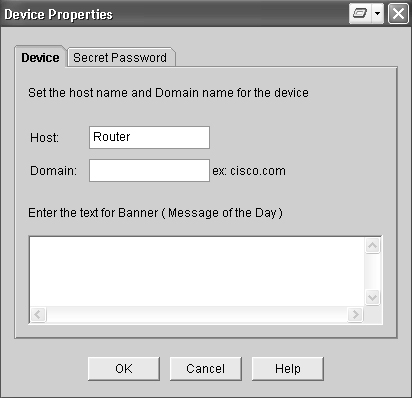
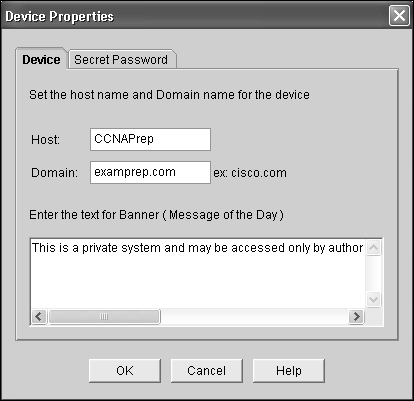
This window has two tabs. On the Device tab, click in each field and enter the desired Host (hostname), Domain (domain name), and Banner (message of the day). Figure 9.8 shows a sample configuration.
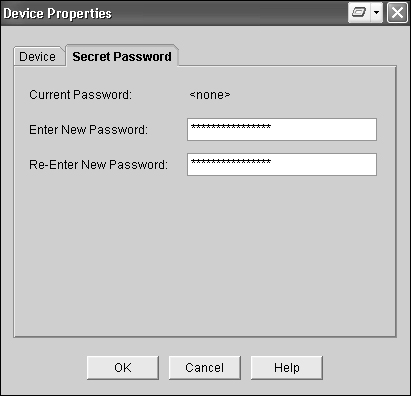
Click the Secret Password tab, shown in Figure 9.9, and enter a new password twice. Note that the window represents your password with asterisks.
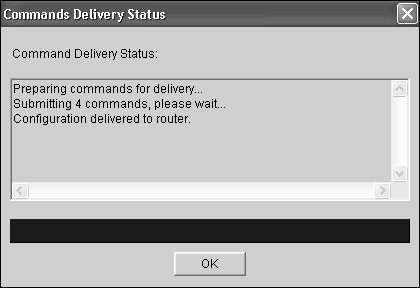
After you have entered a new hostname, domain name, banner, and enable secret password, click OK at the bottom of the window. The SDM automatically sends the new configuration commands to the router, as shown in Figure 9.10. Click OK again to close that window and return to the Additional Tasks page.
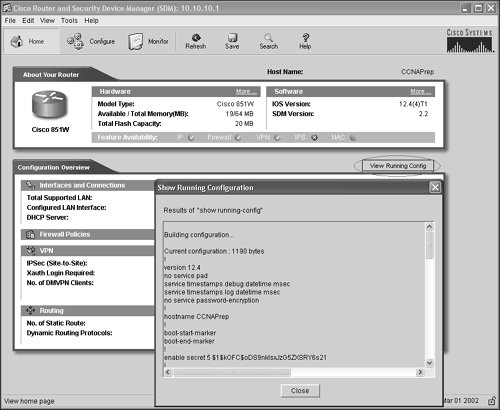
If you return to the Home page at this point, you see your router’s new hostname in the top-right corner, as shown in Figure 9.11. You can also click the View Running Config button to see the current configuration of your router.
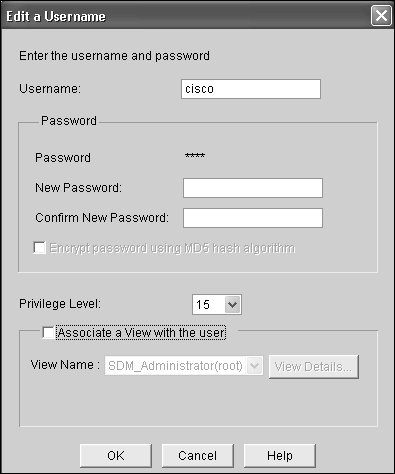
There is another way to configure username and password information using the SDM. On the Additional Tasks page, click Router Access to see what options can be configured using this tool, as shown in Figure 9.12.
Click User Accounts/View. You see a line item with the secret password entry you created in the preceding section with a privilege level of 15 and a username of cisco. If the line item is highlighted, click the Edit option in the top right of the window. You now have the option to change the username, password, and privilege level of this account, as shown in Figure 9.13.
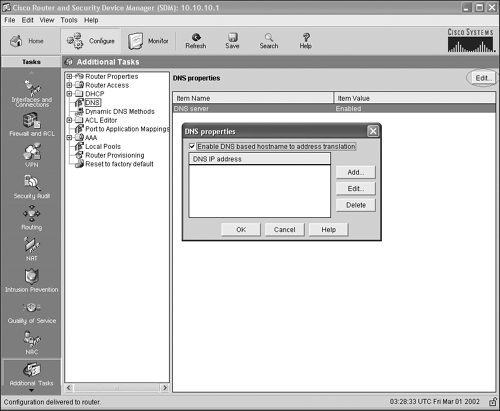
To configure DNS server information in the SDM, click DNS on the Additional Tasks page. In the DNS Properties section, click the Edit button at the top right of the page. A separate DNS Properties window opens, as shown in Figure 9.14.
Click the Add button in the DNS properties window to open the Add a DNS server IP address window, shown in Figure 9.15.
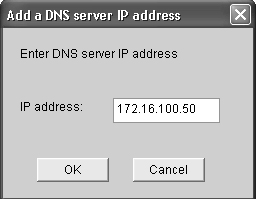
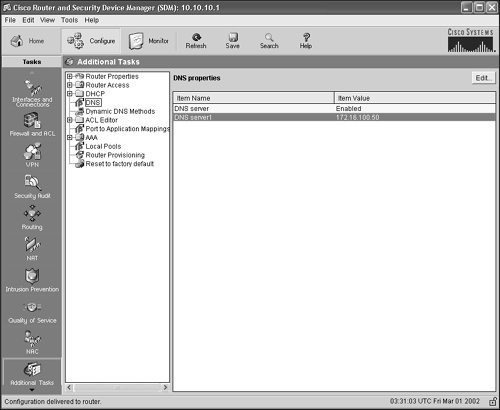
In this window, you can input the DNS server IP address and click OK. Click OK again in the DNS properties window to add the configurations to the router. Figure 9.16 shows the DNS properties section with the newly configured DNS server information.
From the Additional Tasks page, you can also add a DHCP pool to the router. Click DHCP to see the two options for DHCP configurations: DHCP Pools and DHCP Bindings (see Figure 9.17).

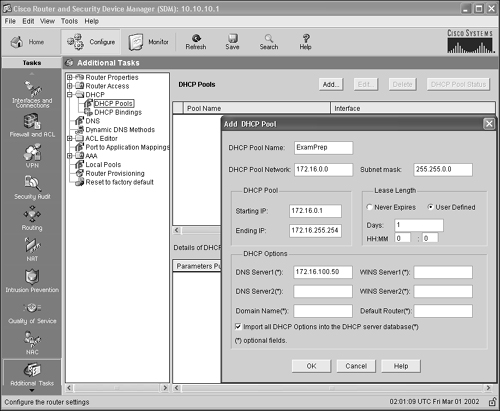
In the DHCP drop-down menu, click DHCP Pools, and then click the Add button at the top right of the page. A separate window called Add DHCP Pool opens, as shown in Figure 9.17. The DHCP Pool Name, DHCP Pool Network, Subnet mask, Starting IP, and Ending IP fields are mandatory. The Lease Length section is automatically filled in by the SDM, but you can change it to meet your individual requirements. The remaining fields are optional. Figure 9.18 shows the Add DHCP Pool with the fields filled in for a sample configuration.
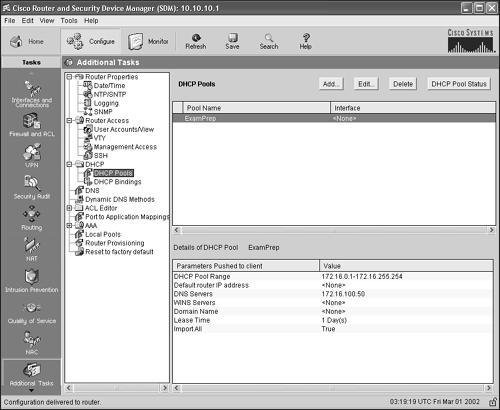
As soon as all of the parameters are filled in to your business specifications, click the OK button to configure the router. Figure 9.19 shows the DHCP Pools section with the newly configured DHCP pool properties.
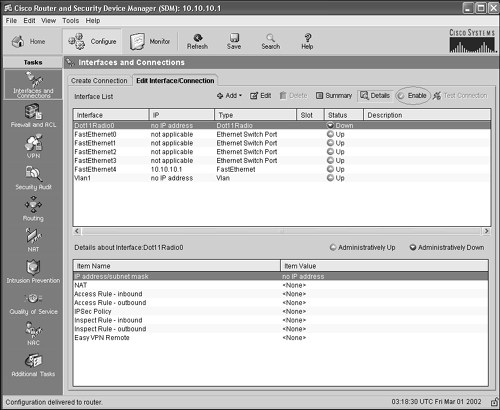
To configure router interfaces, you must be in the Configure tab of the SDM. On the left vertical sidebar, click Interfaces and Connections. This is the first option listed under Tasks. The two tabs on this page are Create Connection and Edit Interface/Connection. Click Edit Interface/Connections to see all of the interfaces that are set up on the router and their current status, as shown in Figure 9.20.
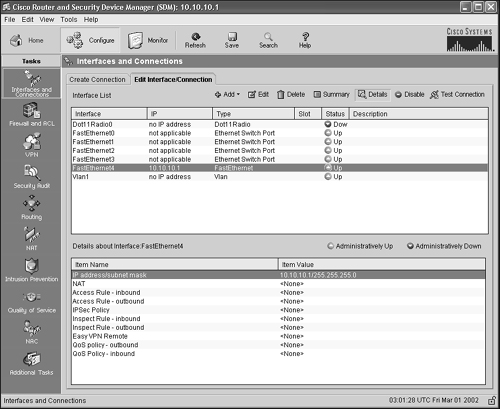
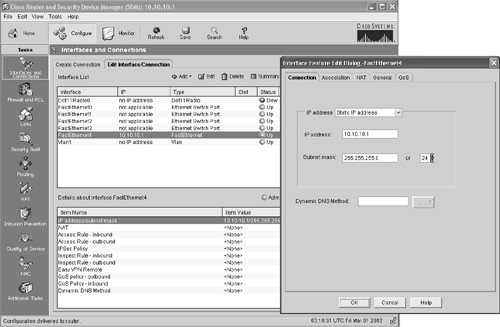
To assign an IP address to another interface, you can double-click the interface name to open another configuration window. On interfaces where an IP address assignment is applicable, this window includes tabs for Connection, Association, NAT, General, and QoS. The Connection tab shows the current IP address information (if any) of the interface, which you can change. Figure 9.21 shows the configuration window for interface Fast Ethernet 4. The router is configured with a static IP address of 10.10.10.1 and a subnet mask of 255.255.255.0.
If you look back at the top right of Figure 9.20, you see an option to Disable interface Fast Ethernet 4. If you click an interface where the status is currently Down, such as the highlighted interface in Figure 9.22, you can Enable the interface from the SDM.
After any router configuration changes, you must save the configuration by clicking the Save button. The SDM asks if you are sure about the save and then sends a copy running-config startup-config command to the router. As soon as the save is complete, the bottom of the SDM shows this message: “Running config copied successfully to Startup Config of your router.” To verify your router configuration, return to the Home page of the SDM. Click the View Running Config button to open the Show Running Configuration window, as shown in Figure 9.23.
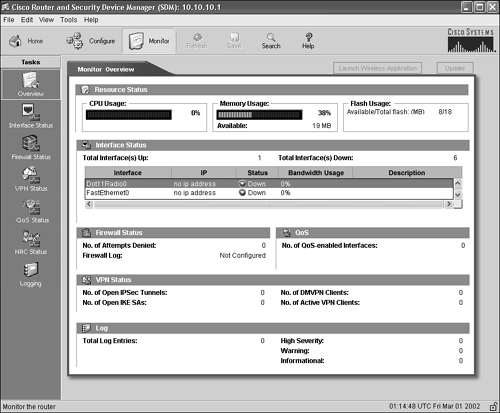
Cisco SDM also offers device monitoring, which you can access by clicking the Monitor tab at the top of the page. The sidebar shows seven monitoring options (see Figure 9.24): Overview, Interface Status, Firewall Status, VPN Status, QoS Status, NAC Status, and Logging. As we discussed in Chapter 4, “General Network Security,” logging is an important security feature on a network device. CPU, Memory, and Flash usage are shown in this view.
Now that you’ve seen a general overview of the Cisco SDM, for supported router models you can choose to use the SDM versus Cisco CLI. In my opinion, and for the CCNA exam, you should know both CLI and SDM configuration and verification methods. I encourage you to continue navigating the different pages and Tasks in the SDM to familiarize yourself with all available tools. If you are uncertain how to use an SDM Task, try the Help button for additional details and tutorials.
The best way to learn SDM is to keep practicing the configurations on a test router. In this Exercise, configure the WAN interface on your router for the following IP address and subnet mask:
IP address: 192.168.1.1
Subnet mask: 255.255.255.0
Be sure to log back into the SDM with your new IP address!
Estimated Time: 5 minutes
For questions 1 through 5, refer to Figure 9.25.

What is the router’s hostname?
| |||||||||
From the home page of the Cisco SDM, what would you click to see the router’s running configuration?
| |||||||||
Which feature is not available on the router shown in Figure 9.25?
| |||||||||
From the home page of the Cisco SDM, what would you click to configure the router’s hostname?
| |||||||||
To send a
| |||||||||
How would you navigate the SDM to find and enable an interface?
| |||||||||
The Monitor screen on the SDM gives statistics for what three types of usage?
| |||||||||
Which of the following is configured from Router Properties?
| |||||||||
What privilege level is assigned to an account that is given a secret password?
| |||||||||
User accounts can be added and edited in which section of the SDM?
|
The following is recommended reading for general network security and related terminology:
“Cisco Router and Security Device Manager Q&A,” http://www.cisco.com/en/US/products/sw/secursw/ps5318/products_qanda_item0900aecd800fd11b.shtml.