
CHAPTER 15
Virtual Private Networks (VPNs)
The following CCNA exam topic is covered in this chapter: 5.0 Security Fundamentals
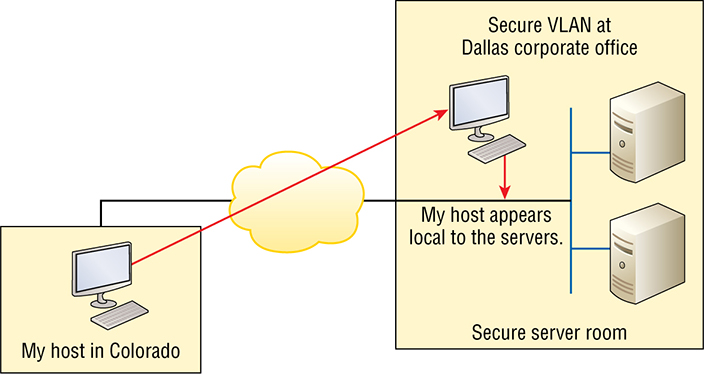
I’ll wrap up the chapter by demonstrating how to create a tunnel using GRE (Generic Routing Encapsulation). Of course, you’ve heard the term VPN before and you probably have a pretty good idea of what one is, but just in case: A virtual private network (VPN) allows the creation of private networks across the Internet, providing privacy and the tunneling of IP and non-TCP/IP protocols. VPNs are used daily to give remote users and disparate networks connectivity over a public medium like the Internet instead of using more expensive, permanent means. VPNs are actually pretty easy to understand. A VPN fits somewhere between a LAN and WAN, with the WAN often simulating a LAN link. Basically, your computer on one LAN connects to a different, remote LAN and uses its resources remotely. The challenge when using VPNs is a big one—security! This may sound a lot like connecting a LAN (or VLAN) to a WAN, but a VPN is so much more. Here’s the key difference: A typical WAN connects two or more remote LANs together using a router and someone else’s network, like your Internet service provider’s (ISP’s). Your local host and router see these networks as remote not local networks or local resources. A VPN actually makes your local host part of the remote network by using the WAN link that connects you to the remote LAN. The VPN will make your host appear as though it’s actually local on the remote network. This means we gain access to the remote LAN’s resources, and that access is also very secure. And this may also sound a lot like a VLAN definition because the concept is the same: “Take my host and make it appear local to the remote network’s resources.” Just remember this key distinction: For networks that are physically local, using VLANs is a good solution, but for physically remote networks that span a WAN you need to use VPNs instead. Here’s a simple VPN example using my home office in Colorado. Here, I have my personal host, but I want it to appear as if it’s on a LAN in my corporate office in Texas, so I can get to my remote servers. I’m going to go with VPN to achieve my goal. Figure 15.1 pictures my host using a VPN connection from Colorado to Texas. This allows me to access the remote network services and servers as if my host were right there on the same VLAN. Figure 15.1 Example of using a VPN Why is this so important? If you answered, “Because my servers in Texas are secure, and only the hosts on the same VLAN are allowed to connect to them and use the resources of these servers,” you nailed it! A VPN allows me to connect to these resources by locally attaching to the VLAN through a VPN across the WAN. My other option is to open up my network and servers to everyone on the Internet so clearly, it’s vital for me to have a VPN! There are many benefits to using VPNs on your corporate and even home network. The ones covered in the CCNA R/S objectives are: Security VPNs provide security using advanced encryption and authentication protocols, which help protect your network from unauthorized access. IPsec and SSL fall into this category. Secure Sockets Layer (SSL) is an encryption technology used with web browsers and has native SSL encryption known as Web VPN. You can also use the Cisco AnyConnect SSL VPN client installed on your PC to provide an SSL VPN solution, as well as the Clientless Cisco SSL VPN. Cost Savings By connecting the corporate remote offices to their closest Internet provider and creating a VPN tunnel with encryption and authentication, I gain a huge savings over opting for traditional leased point-to-point lines. This also permits higher bandwidth links and security, all for far less money than traditional connections. Scalability VPNs scale very well to quickly bring up new offices or have mobile users
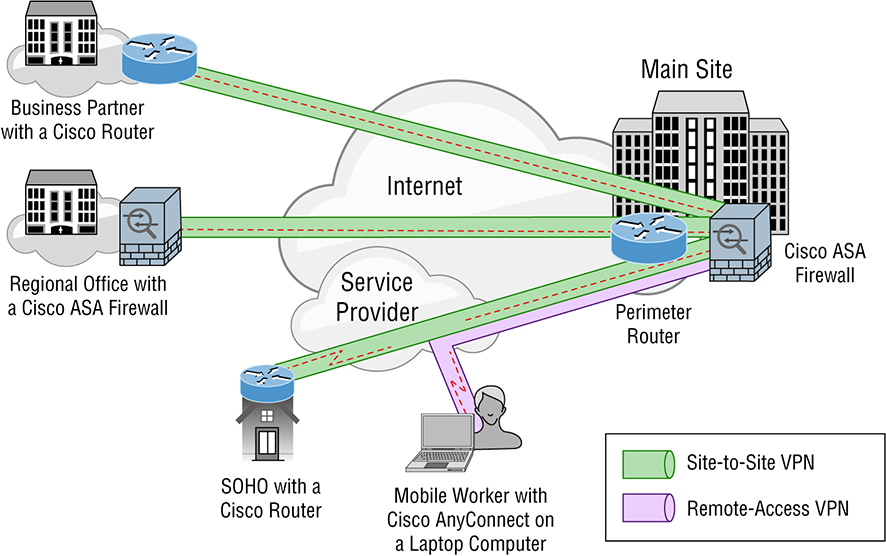
connect securely. Compatibility with broadband technology For remote and traveling users and remote offices, any Internet access can provide a connection to the corporate VPN. This allows users to take advantage of the high-speed Internet access DSL or cable modems offer. VPNs are categorized based upon the role they play in a business, such as enterprise-managed VPNs and provider-managed VPNs. You’ll use an enterprise-managed VPNs if your company manages its own VPNs. This is a very popular way to provide this service and it’s pictured in Figure 15.2. The ASA in the Main Site is used as the VPN Concentrator. Figure 15.2 Enterprise-managed VPNs There are three different categories of enterprise-managed VPNs:
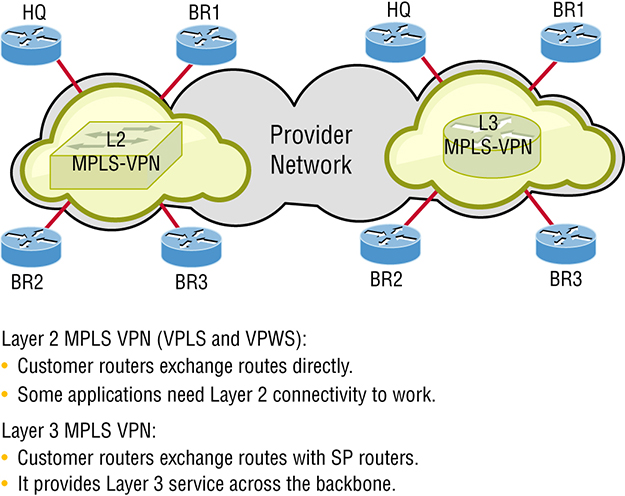
Provider-managed VPNs are illustrated in Figure 15.3 Figure 15.3 Provider-managed VPNs There are two different categories of provider-managed VPNs: Layer 2 MPLS VPN, Layer 2 VPNs are a type of virtual private network (VPN) that uses MPLS labels to transport data. The communication occurs between routers known as Provider Edge routers (PEs) because they sit on the edge of the provider’s network, next to the customer’s network. ISPs that have an existing layer 2 network may choose to use these VPNs instead of the other common layer 3 MPLS VPNs. The two typical technologies of Layer 2 MPLS VPN are: Virtual private wire service (VPWS) VPWS is the simplest form for enabling Ethernet services over MPLS. It’s also known as ETHoMPLS (Ethernet over MPLS), or VLL (Virtual Leased Line). VPWS is characterized by a fixed relationship between an attachment-virtual circuit and an emulated virtual circuit. For example, VPWS-based services are point-to-point Frame-Relay/ATM/Ethernet services over IP/MPLS. Virtual private LAN switching service (VPLS) This is an end-to-end service and is virtual because multiple instances of this service share the same Ethernet broadcast domain virtually. Still, each connection is independent and isolated from the others in the network. A learned, dynamic relationship exists between an attachment-virtual circuit and emulated virtual circuits that’s determined by customer MAC address. In this type of network, the customer manages its own routing protocols. One advantage that Layer 2 VPN has over its layer 3 counterpart is that some applications won’t work if nodes aren’t in the same Layer 2 network. Layer 3 MPLS VPN Layer 3 MPLS VPN provides a Layer 3 service across the backbone and a different IP subnet connects each site. Since you will typically deploy a routing protocol over this VPN, you need to communicate with the service provider in order to participate in the exchange of routes. Neighbor adjacency is established between your router (called CE) and provider router (called PE). The service provider network has many core routers (called P routers) and the job of the P routers is to provide connectivity between the PE routers. If you want to totally outsource your Layer 3 VPN, then this service is for you. Your service provider will maintain and manage routing for all your sites. From your perspective as a customer who’s outsourced your VPN’s, it will seem like your ISP’s network is one, big virtual switch. Because they’re inexpensive and secure, I’m guessing that you really want to know how to create VPNs now, right? Great! So there’s more than one way to bring a VPN into being. The first approach uses IPsec to build authentication and encryption services between endpoints on an IP network. The second way is via tunneling protocols, which allow you to establish a tunnel between endpoints on a network. Understand that the tunnel itself is a way for data or protocols to be encapsulated inside another protocol—pretty clean! We’ll get to IPsec in a minute, but first, you need to know about four of the most common tunneling protocols in use today:
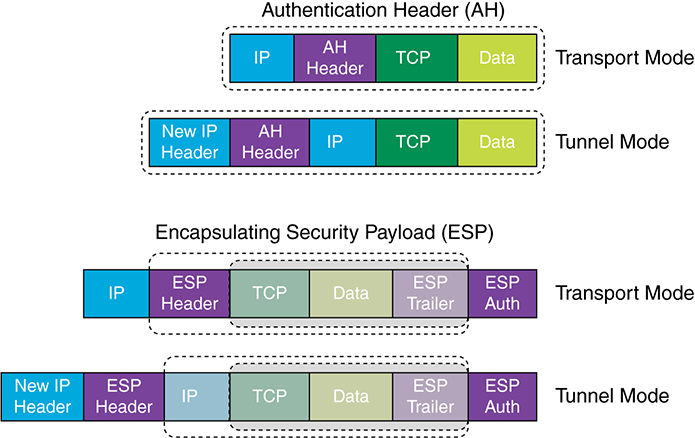
So now that you’re clear on both exactly what a VPN is and the various types of VPNs available, it’s time to dive into IPsec. Simply put, IPsec is an industry-wide standard framework of protocols and algorithms that allows for secure data transmission over an IP-based network. It functions at the layer 3 Network layer of the OSI model. Did you notice I said IP-based network? That’s really important because by itself, IPsec can’t be used to encrypt non-IP traffic. This means that if you run into a situation where you have to encrypt non-IP traffic, you’ll need to create a Generic Routing Encapsulation (GRE) tunnel for it and then use IPsec to encrypt that tunnel! An IPsec transform specifies a single security protocol with its corresponding security algorithm; without these transforms, IPsec wouldn’t be able to give us its glory. It’s important to be familiar with these technologies, so let me take a second to define the security protocols. I’ll also briefly introduce the supporting encryption and hashing algorithms that IPsec relies upon. The two primary security protocols used by IPsec are Authentication Header (AH) and Encapsulating Security Payload (ESP). The AH protocol provides authentication for the data and the IP header of a packet using a one-way hash for packet authentication. It works like this: The sender generates a one-way hash, then the receiver generates the same one-way hash. If the packet has changed in any way, it won’t be authenticated and will be dropped because the hash value no longer matched. So basically, IPsec relies upon AH to guarantee authenticity. Let’s take a look at this using Figure 15.4 Figure 15.4 Security Protocols AH checks the entire packet when in tunnel mode, but it doesn’t offer any encryption services. However, using AH in transport mode checks only the payload. This is unlike ESP, which only provides an integrity check on the data of a packet when in transport mode. However, using AH in tunnel mode ESP encrypts the whole packet. So ESP won’t tell you when or how the NASDAQ’s gonna bounce up and down like a superball, but ESP does a lot for you! It provides confidentiality, data origin authentication, connectionless integrity, anti-replay service, and limited traffic-flow confidentiality by defeating traffic flow analysis—which is almost as good as AH without the possible encryption! Here’s a description of ESPs five big features: Confidentiality (encryption) Confidentiality allows the sending device to encrypt the packets before transmitting in order to prevent eavesdropping and is provided through the use of symmetric encryption algorithms like DES 3DES, however, AES is the most common in use today. It can be selected separately from all other services, but the type of confidentiality must be the same on both endpoints of your VPN. Data integrity Data integrity allows the receiver to verify that the data received hasn’t been altered in any way along the way. IPsec uses checksums as a simple way to check of the data. Authentication Authentication ensures that the connection is made with the correct partner. The receiver can authenticate the source of the packet by guaranteeing and certifying the source of the information. Anti-replay service Anti-replay election is based upon the receiver, meaning the service is effective only if the receiver checks the sequence number. In case you were wondering, a replay attack is when a hacker nicks a copy of an authenticated packet and later transmits it to the intended destination. When the duplicate, authenticated IP packet gets to the destination, it can disrupt services and generally wreak havoc. The Sequence Number field is designed to foil this type of attack. Traffic flow For traffic flow confidentiality to work, you’ve got to have at least tunnel mode selected. It’s most effective if it’s implemented at a security gateway where tons of traffic amasses because that’s precisely the kind of environment that can mask the true source-destination patterns to bad guys trying to breach your security. VPNs create a private network over a public network infrastructure, but to maintain confidentiality and security, we really need to use IPsec with our VPNs. IPsec uses various types of protocols to perform encryption. The types of encryption algorithms used today are: Symmetric encryption This type of encryption requires a shared secret to encrypt and decrypt. Each computer encrypts the data before sending info across the network, with this same key being used to both encrypt and decrypt the data. Examples of symmetric key encryption are Data Encryption Standard (DES), Triple DES (3DES), and Advanced Encryption Standard (AES). Asymmetric encryption Devices that use asymmetric encryption use different keys for encryption than they do for decryption. These keys are called private and public keys. Private keys encrypt a hash from the message to create a digital signature, which is then verified via decryption using the public key. Public keys encrypt a symmetric key for secure distribution to the receiving host, which then decrypts that symmetric key using its exclusively held private key. It’s not possible to encrypt and decrypt using the same key. Asymmetric decryption is a variant of public key encryption that also uses a combination of both a public and private keys. An example of an asymmetric encryption is Rivest, Shamir, and Adleman (RSA). Looking at Figure 15.5, you can see the complex encryption process. Figure 15.5 Encryption Process As you can see from the amount of information I’ve thrown at you so far, establishing a VPN connection between two sites takes some study, time, and practice. And I’m just scratching the surface here! I know it can be difficult at times, and it definitely takes patience. Cisco does have some GUI interfaces to help with this process, which also come in handy for configuring VPNs with IPsec. Though highly useful and very interesting, they’re just beyond the scope of this book, so I’m not going into this topic further here. Generic Routing Encapsulation (GRE) is a tunneling protocol that can encapsulate many protocols inside IP tunnels. Some examples would be routing protocols such as EIGRP and OSPF and the routed protocol IPv6. Figure 15.6 shows the different pieces of a GRE header.
Figure 15.6 Generic Routing Encapsulation (GRE) tunnel structure A GRE tunnel interface supports a header for each of the following:
GRE tunnels have the following characteristics:
So as I mentioned, by itself, GRE offers no security—no form of payload confidentiality or encryption whatsoever. If the packets are sniffed over the public network, their contents are in plain text. Although IPsec provides a secure method for tunneling data across an IP network, it definitely has its limitations. IPsec doesn’t support IP broadcast or IP multicast, preventing the use of protocols that need them like routing protocols. IPsec also does not support the use of multiprotocol traffic. But GRE can be used to “carry” other passenger protocols like IP broadcast or IP multicast, plus non-IP protocols as well. Using GRE tunnels with IPsec allows you to run a routing protocol, IP multicast, as well as multiprotocol traffic across your network. With a generic hub-and-spoke topology like Corp to Branch, you can typically implement static tunnels (usually GRE over IPsec) between the corporate office and branch offices. When you want to add a new spoke to the network, you just need to configure it on the hub router and then a small configuration on the corp router. Also, the traffic between spokes has to traverse the hub, where it must exit one tunnel and enter another. Static tunnels are an appropriate solution for small networks, but not so much as the network grows larger with an increasing number of spokes! The Cisco Dynamic Multipoint Virtual Private Network (DMVPN) feature enables you to easily scale large and small IPsec VPNs. The Cisco DMVPN is Cisco’s answer for allowing a corporate office to connect to branch offices with low cost, easy configuration and flexibility. DMVPN is comprised of one central router like a corporate router, which is referred to as the hub, and the branches as spokes. So the corporate to branch connection is referred to as the hub and spoke interconnection. The spoke-to-spoke design is also supported for branch-to-branch interconnections. If you’re thinking this design sounds really similar to your old Frame Relay network, you’re right! The DMPVN features enable you to configure a single GRE tunnel interface and a single IPsec profile on the hub router to manage all spoke routers. This keeps the size of the configuration on the hub router basically the same even if you add more spoke routers to the network. DMVPN also allows a spoke router to dynamically create VPN tunnels between them as network data travels from one spoke to another. The IPSec Virtual Tunnel Interface (VTI) mode of an IPsec configuration can seriously simplify a VPN configuration when protection is needed for remote access. And it’s a simpler option than GRE or L2TP for the encapsulation and crypto maps used with IPSec. Like GRE, it sends routing protocol and multicast traffic, just without GRE and all the overhead it brings. Simple configuration and routing adjacency directly over the VTI are great benefits! Understand that all traffic is encrypted and that it supports only one protocol—either IPv4 or IPv6 just like standard IPsec. So let’s get ready to configure a GRE tunnel now. It’s actually pretty simple. Before you attempt to configure a GRE tunnel, you need to create an implementation plan. Here’s a checklist of what you need do to configure and implement a GRE tunnel:
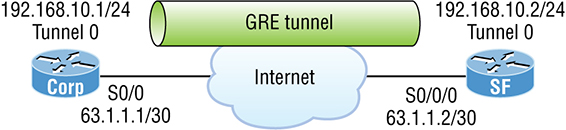
We’re now ready to bring up a simple GRE tunnel. Figure 15.7 pictures the network with two routers. Figure 15.7 Example of GRE configuration First, we need to make the logical tunnel with the interface tunnel number command. We can use any number up to 2.14 billion. Once we’ve configured our interface and created the logical tunnel, we need to configure the mode and then transport protocol: Now that we’ve created the tunnel interface, the type, and the transport protocol, we’ve got to configure our IP addresses for use inside of the tunnel. Of course, we must use our actual physical interface IP for the tunnel to send traffic across the Internet, but we also need to configure the tunnel source and tunnel destination addresses: Time to configure the other end of the serial link and watch the tunnel pop up! Oops—did I forget to set my tunnel mode and transport to GRE and IP on the SF router? No, I didn’t need to because it’s the default tunnel mode on Cisco IOS. Nice! So, first I set the physical interface IP address—which used a global address even though I didn’t have to—then I created the tunnel interface and set the IP address of the tunnel interface. It’s important that you remember to configure the tunnel interface with the actual source and destination IP addresses to use or the tunnel won’t come up. In my example, the 63.1.1.2 was the source and 63.1.1.1 was the destination. As usual I’ll start with my favorite troubleshooting command, show ip interface brief. In this output, you can see that the tunnel interface is now showing up as an interface on my router. You can see the IP address of the tunnel interface, and the Physical and Data Link status show as up/up. So far so good! Let’s take a look at the interface with the show interfaces tunnel 0 command: The show interfaces command shows the configuration settings and the interface status as well as the IP address, tunnel source, and destination address. The output also shows the tunnel protocol, which is GRE/IP. Last, let’s take a look at the routing table with the show ip route command: The tunnel0 interface shows up as a directly connected interface. And even though it’s a logical interface, the router treats it as a physical interface, just like serial 0/0 in the routing table: Did you notice that I just pinged 192.168.10.2 across the Internet? One last thing before we close and move on… troubleshooting an output that shows a tunnel routing error. If you configure your GRE tunnel and receive this GRE flapping message: It means that you’ve misconfigured your tunnel, which will cause your router to try and route to the tunnel destination address using the tunnel interface itself! In this chapter, you got the concept of virtual private networks completely down, and you learned of solutions to meet your company’s off-site network access needs. You discovered how these networks utilize IP security to provide secure communications over a public network such as the Internet using VPN’s with IPSec. We then moved on to exploring IPsec and encryption. As the chapter closed, you were introduced to GRE and found out how to create a tunnel using GRE on virtual private networks and then verify it. Understand the term virtual private network. You must understand why and how to use a VPN between two sites and the purpose that IPsec serves with VPNs. Understand how to configure and verify a GRE tunnel. To configure GRE, first configure the logical tunnel with the interface tunnel
number command. Configure the mode and transport, if needed, with the tunnel mode
mode
protocol command, then configure the IP addresses on the tunnel interfaces, the tunnel source and tunnel destination addresses, and your physical interfaces with global addresses. Verify with the show interface tunnel command as well as the ping protocol. The answers to these questions can be found in the Appendix. Which two of the following are GRE characteristics? (Choose two.)
A GRE tunnel is flapping with the following error message:
Which of the following commands will not tell you if the GRE tunnel 0 is in “up/up” state?
You’ve configured a serial interface with GRE IP commands on a corporate router with a point-to-point link to a remote office. Which command will show you the IP addresses and tunnel source and destination addresses of the interfaces?
You want to allow remote users to send protected packets to the corporate site, but you don’t want to install software on the remote client machines. What’s the best solution you could implement?
Which of the following are benefits to using a VPN in your internetwork? (Choose three.)
Which two technologies are examples of layer 2 MPLS VPN technologies? (Choose two.)
Which of the following is an industry-wide standard suite of protocols and algorithms that allows for secure data transmission over an IP-based network that functions at the layer 3 Network layer of the OSI model?
Which of the following describes the creation of private networks across the Internet, enabling privacy and tunneling of non-TCP/IP protocols?
Which two VPNs are examples of service provider-managed VPNs? (Choose two.)
![]() 5.5 Describe remote access and site-to-site VPNs
5.5 Describe remote access and site-to-site VPNs We’re going to cover VPNs in depth in this chapter. You’ll learn some smart solutions that will help you meet your company’s off-site network access needs. We’ll dive deep into how these networks utilize IP security to provide secure communications over a public network via the Internet using VPN’s with IPSec
![]() To find your included bonus material, as well as Todd Lammle videos, practice questions & hands-on labs, please see www.lammle.com/ccna
To find your included bonus material, as well as Todd Lammle videos, practice questions & hands-on labs, please see www.lammle.com/ccnaVirtual Private Networks
Benefits of VPNs
Enterprise- and Provider-Managed VPNs
Introduction to Cisco IOS IPsec
IPsec Transforms
Security Protocols
Authentication Header (AH)
Encapsulating Security Payload (ESP)
Encryption

GRE Tunnels

GRE over IPsec
Cisco DMVPN (Cisco Proprietary)
Cisco IPsec VTI (Cisco Proprietary)
Configuring GRE Tunnels
Corp(config)#int s0/0/0
Corp(config-if)#ip address 63.1.1.1 255.255.255.252
Corp(config)#int tunnel ?
  <0-2147483647>  Tunnel interface number
Corp(config)#int tunnel 0
*Jan 5 16:58:22.719:%LINEPROTO-5-UPDOWN: Line protocol on Interface Tunnel0, changed state to down
Corp(config-if)#tunnel mode ?
  aurp    AURP TunnelTalk AppleTalk encapsulation
  cayman  Cayman TunnelTalk AppleTalk encapsulation
  dvmrp   DVMRP multicast tunnel
  eon     EON compatible CLNS tunnel
  gre     generic route encapsulation protocol
  ipip    IP over IP encapsulation
  ipsec   IPSec tunnel encapsulation
  iptalk  Apple IPTalk encapsulation
  ipv6    Generic packet tunneling in IPv6
  ipv6ip  IPv6 over IP encapsulation
  nos     IP over IP encapsulation (KA9Q/NOS compatible)
  rbscp   RBSCP in IP tunnel
Corp(config-if)#tunnel mode gre ?
  ip          over IP
  ipv6        over IPv6
  multipoint  over IP (multipoint)

Corp(config-if)#tunnel mode gre ip
Corp(config-if)#ip address 192.168.10.1 255.255.255.0
Corp(config-if)#tunnel source 63.1.1.1
Corp(config-if)#tunnel destination 63.1.1.2

Corp#sho run interface tunnel 0
Building configuration...

Current configuration : 117 bytes
!
interface Tunnel0
 ip address 192.168.10.1 255.255.255.0
 tunnel source 63.1.1.1
 tunnel destination 63.1.1.2
end
SF(config)#int s0/0/0
SF(config-if)#ip address 63.1.1.2 255.255.255.252
SF(config-if)#int t0
SF(config-if)#ip address 192.168.10.2 255.255.255.0
SF(config-if)#tunnel source 63.1.1.2
SF(config-if)#tun destination 63.1.1.1
*May 19 22:46:37.099: %LINEPROTO-5-UPDOWN: Line protocol on Interface Tunnel0, changed state to up
Verifying GRP Tunnels
Corp#sh ip int brief
Interface        IP-Address      OK? Method Status                Protocol
FastEthernet0/0  10.10.10.5      YES manual up                    up
Serial0/0        63.1.1.1        YES manual up                    up
FastEthernet0/1  unassigned      YES unset  administratively down down
Serial0/1        unassigned      YES unset  administratively down down
Tunnel0          192.168.10.1    YES manual up                    up
Corp#sh int tun 0
Tunnel0 is up, line protocol is up
  Hardware is Tunnel
  Internet address is 192.168.10.1/24
  MTU 1514 bytes, BW 9 Kbit, DLY 500000 usec,
     reliability 255/255, txload 1/255, rxload 1/255
  Encapsulation TUNNEL, loopback not set
  Keepalive not set
  Tunnel source 63.1.1.1, destination 63.1.1.2
  Tunnel protocol/transport GRE/IP
    Key disabled, sequencing disabled
    Checksumming of packets disabled
  Tunnel TTL 255
  Fast tunneling enabled
  Tunnel transmit bandwidth 8000 (kbps)
  Tunnel receive bandwidth 8000 (kbps)
Corp#sh ip route
[output cut]
     192.168.10.0/24 is subnetted, 2 subnets
C      192.168.10.0/24 is directly connected, Tunnel0
L      192.168.10.1/32 is directly connected, Tunnel0
     63.0.0.0/30 is subnetted, 2 subnets
C      63.1.1.0 is directly connected, Serial0/0
L      63.1.1.1/32 is directly connected, Serial0/0
Corp#ping 192.168.10.2

Type escape sequence to abort.
Sending 5, 100-byte ICMP Echos to 192.168.10.2, timeout is 2 seconds:
!!!!!
Success rate is 100 percent (5/5)
          Line protocol on Interface Tunnel0, changed state to up
07:11:55: %TUN-5-RECURDOWN:
          Tunnel0 temporarily disabled due to recursive routing
07:11:59: %LINEPROTO-5-UPDOWN:
          Line protocol on Interface Tunnel0, changed state to down
07:12:59: %LINEPROTO-5-UPDOWN:
Summary
Exam Essentials
Review Questions