
CHAPTER 23
Configuration Management
The CCNA exam topics covered in this chapter are: 6.0 Automation and Programmability
We’re going to take things to a whole new DNA Center level now, diving deeper into Configuration Management tools like Ansible, Chef and Puppet too. These great features make it possible to automate almost everything in your infrastructure! Most Configuration Management tools like Ansible definitely help us get our networks under control, but that’s not all. It can actually handle the rest of the stack! In addition to creating VLANs, it can even configure our virtual machines for us. Ansible can actually install and configure the application it’ll use and can even add the new box in for monitoring and backup solutions. What’s more is that once you understand these sweet solutions, they’re really easy to use. The only caveat is that it does take a good bit of effort to make the switch to a more DevOps-focused infrastructure team. So, let’s jump in and explore Ansible, Puppet, and Chef now! Before we dig into configuration management tools, let’s take a minute to understand how we got here. To be real, it’s just a fantasy to think you’ll only be dealing with IT-related things. That’s really only possible when you’re working in a small company with a simple IT infrastructure. The IT department in this type of company usually brings on only one or two IT
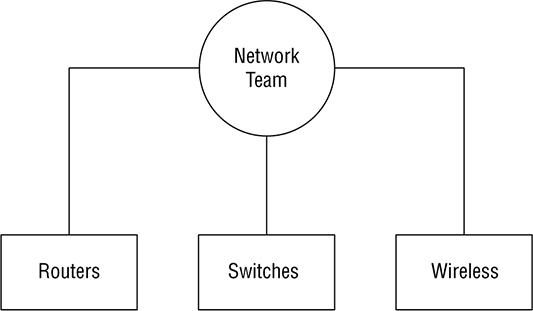
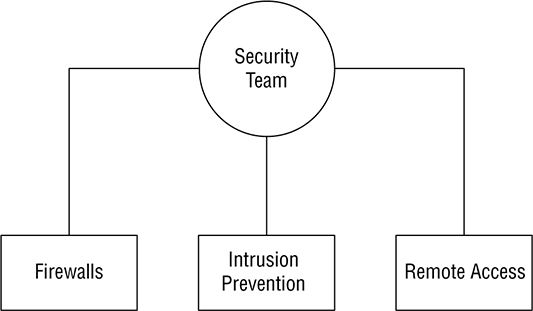
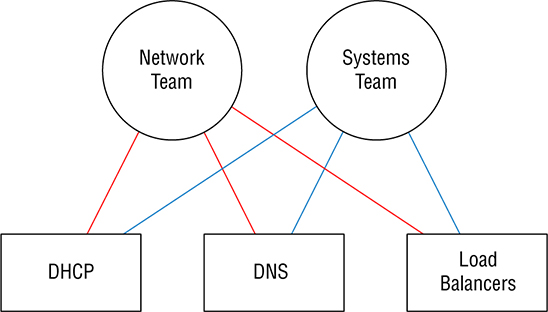
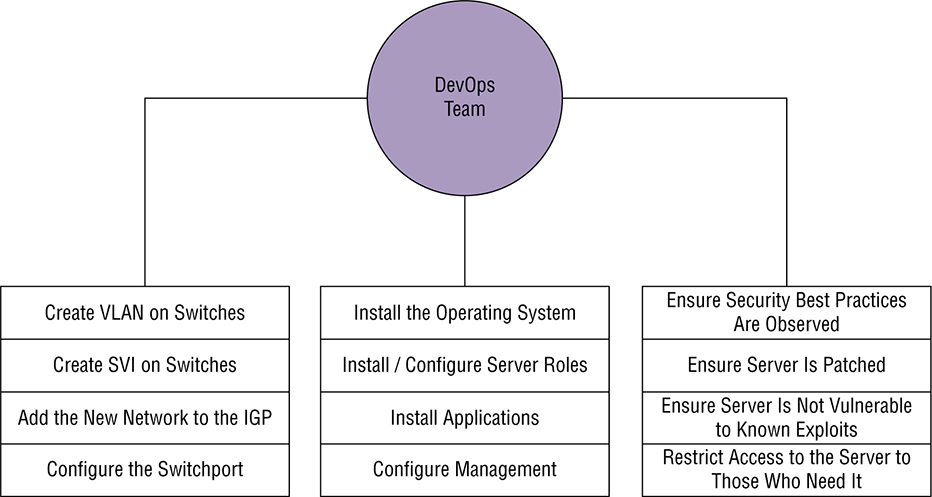
generalists to do all the computer stuff. So yes—you’ll definitely be working on IT-related things, but it’s highly likely you’ll also be the only contact when things aren’t working so well too. Figure 23.1 pictures the IT Generalist’s career reality. Figure 23.1 IT generalist Larger companies tend to be more organized by clearly defining IT team responsibilities and compartmentalizing all the work into silos. Silos exist to contain things, so calling a given department a silo is just a snappy way to say it’s only responsible for certain devices, tasks, and projects. How this actually lives for IT folk translates down to a perfectly packaged reason to blame the network and its relevant staff (us) for a world of issues, fairly or not! So yes, all things IT fall squarely on the network team, which includes everything we’ve covered in this book, from routers to switches, and wireless—down to faulty power strips! Anyway, you can get a picture of a typical network silo in Figure 23.2 Figure 23.2 Silo network team It’s the SysAdmins in the company who tend to be responsible for the actual Windows and Linux servers in the infrastructure. In really huge companies, there could even be whole, separate teams looking after the Windows and Linux environments. Figure 23.3 shows an example of the silo systems team. Figure 23.3 Silo systems team The security team usually focuses on the company’s firewalls, but they can also be in charge of creating virtual private networks (VPNs) between companies for connectivity. Remote access solutions like a client VPN and things like Citrix, which allow access to the environment, can often be in their domain too. The security group is also tasked with monitoring for security events and making sure vulnerabilities are addresses as they’re discovered. Figure 23.4 pictures the security silo team. Figure 23.4 Silo security team As usual, those neat little organizational silo boundaries end up to be more suggestion over time because they’re just too limiting. Individual companies need customized solutions to meet their individual needs so predictably, and we’re seeing a lot of cross-over between the various silos now. For instance, a network team just might be tasked with setting up VPNs because of the more advanced networking knowledge needed to pull that off well. The waters get even muddier when we consider all the roles and services that run on servers and network devices. One company will say things like DHCP, DNS, and load balancer are the network team’s responsibility, while another will let their sysadmins take charge instead. Services can even be a shared responsibility between teams, with the sysadmin team getting custody of DHCP servers while the network team is responsible for DHCP traffic leaving network devices like wireless controllers. Figure 23.5 gives you an example of roles belonging to one silo or another being seen on network services. Figure 23.5 Network services The development silo is all about the developer’s complete focus on supporting their software releases. The other IT teams support them by building the infrastructure they need for their applications. For example, if a developer needs a new web server, the network team would make sure the server can get online. The systems team would install the server’s operating system and the actual web server application. The security team would check the server after it’s built to see it complies with their best practices, ensuring anti-malware has been installed and the host firewall has been enabled. Figure 23.6 demonstrates an example of this workflow. Figure 23.6 Silo development team DevOps is one of the most popular buzzwords around in IT today, but it’s really one of those IT terms that means different things to different people. DevOps is actually more about a shift in corporate culture than it is about adding automation to everything, which is one reason why it’s easier for a startup company to embrace it than for a larger company that’s more set in its ways. Even so, most companies are working towards the goal so they can manage today’s more complex IT infrastructure and cloud implementations. So let’s define DevOps for our purposes: It’s basically a way to merge teams to solve some of the issues we just talked about regarding silos. A company would have DevOps engineers busy automating the infrastructure so that it can be spun up as needed for applications. The most obvious benefit to be had here is that IT resources needed by the company can now be provisioned very quickly instead of maybe waiting weeks for all the different IT teams to complete their various tasks required to get a vital resource online. Change control is also simplified because DevOps methodology lets us test the code in different environments. It also allows us the freedom to easily back out of changes when necessary. An example of the DevOps responsibilities is shown in Figure 23.7 Figure 23.7 DevOps team You can think of Infrastructure as Code (IaC) as the practical output that we’d get out of a DevOps practice. IaC is the fun “automate everything” part of DevOps, with the goal being to create and maintain our IT infrastructure using the configuration managers we’ll cover soon. Aside from helping improve the speed of deployments, IaC can also help combat configuration drift—something that begins anytime you make an unintended change on a network device or a server. But sadly, drift is a reality for companies over time. It happens when a server is removed from the network but the VLAN isn’t removed from the switches. Maybe a firewall rule is added to do some troubleshooting, but it’s forgotten afterwards, becoming one of hundreds—a cobweb in the rule base. Things just find their way onto servers that shouldn’t be there, and one dark and stormy night, all these random cobwebs in the environment will rise up and collectively gum things up good! Now you’ve got a code blue as assorted IT teams clamber together to figure out why some mission-critical application suddenly crashed, desperate to fix it ASAP! IT life isn’t nearly as perilous when an application is deployed using Infrastructure as Code. Armed with this little beauty, we can skip all that troubleshooting chaos by just deleting the deviant server, then redeploying it instead. Yes, it can be fun to sleuth out exactly why Apache broke, but you can still have plenty of good times during the nice break you’ll get while the virtual machine rebuilds, right? So if you’re thinking that periodically deleting the created infrastructure and remaking it can drastically reduce the amount of drifting from the intended configuration, you’re right, because the new resources will be created exactly as described by the IaC solutions—genius! As a bonus, the new VMs can be automatically patched and up to date as they’re being spun up by the solution. And if an agent-based configuration manager like Puppet or Chef is being used, then drift can be automatically corrected since the server will periodically check in to ensure it isn’t going rogue on you. An important principle of Infrastructure as Code is idempotence—a super fancy way of saying that the configuration will be only be applied to a target environment if it will result in a change. This means that if you make an Ansible playbook that enables NTP on a server, then start the service, Ansible will only do the install task if NTP isn’t already installed on that server. Plus, it’ll only do the start service task if NTP isn’t currently running—nice. Clearly this kind of behavior makes the IaC configuration much easier than trying to do the same thing with a bash script. Here’s how easy it is to install NTP in an Ansible playbook—you just add these two lines to a playbook: The actual syntax doesn’t matter right now, but the gist is that we’re naming the task Install NTP on RHEL, calling the yum module to install NTP on the Linux box and then start the service. Because of idempotence magic, Ansible will check to see if the package is installed and will skip the step if it is already. This saves us time when we run the playbook and makes the playbook’s footprint as small as possible. If you wanted to do this with bash, you would write something like this: The basic logic of the ‘if’ statement is to check the installed packages on server the for NTP. If it’s not in the list, then the package will be installed. So why we wouldn’t just push the install command again and let it run? Well, in this case it wouldn’t cause any grief, but the command could get us a different result than we’d expect: instead of installing NTP, yum would give us a message saying NTP is already installed: This is bad because it doesn’t follow the idempotence principle since the command isn’t doing exactly what’s expected by the script, which can lead to ugly, unpredictable behavior later, when doing more advanced automation! Hopefully that helps you get that using an IaC idempotence simplifies your deployments since you don’t need to start accounting for different command results in your script logic. Okay—so now that you’re familiar with Infrastructure as Code, let’s dive into the configuration management tools you’ll need to know for the CCNA exam and as a modern network professional. Ansible is currently one of the most popular configuration management solutions for networking professionals. The tool is a Python-based solution that applies configuration found in playbook files via an SSH connection. The solution is easy to get up and running because target systems don’t require agents installed and registered to a central server before the solution can work. Instead, Ansible doesn’t even require a central server—you can actually run playbooks directly off your office laptop. Even so, I recommend running Ansible from a central location because Ansible must be able to SSH to the target nodes to apply the configuration, and your
network probably has some security restricting direct access. Because Ansible primarily uses SSH to connect to nodes and doesn’t require agents, it supports almost all major vendor systems in the networking community. All the vendor needs to do is provide modules for Ansible to use. A module is basically a set of instructions written in Python to be performed by Ansible. Back in the Infrastructure of Code section I briefly mentioned the yum module to show how to install NTP on a Red Hat Linux system. Playbooks are just a set of instructions saying what should be applied to a target device. The file is written in the YAML format we talked about in the automation chapter. Here’s how Ansible and Ansible Tower/AWX compares to the other solutions: Pros: Cons:
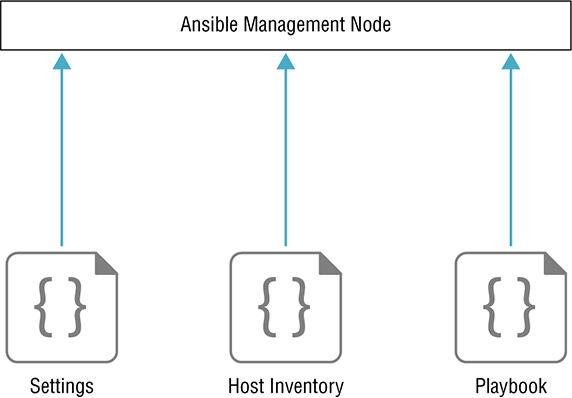
Ansible is a very lightweight solution. The tool is installed with the pip install ansible command. You can also use your Linux box’s package manager to install Ansible, but yum and apt tend to lag behind the current release. Pip generally has the latest version: Once Ansible is installed, it only has two setting files you must have on your computer before you try to run a playbook—a settings file called ansible.cfg and an inventory file typically called hosts. Once those two files are in place, we can run Ansible in ad-hoc mode or write a playbook. Let’s have a closer look at those files now. In Figure 23.8, you can see a visualization of the Ansible components. Figure 23.8 Ansible components The ansible.cfg file is entirely optional because if Ansible can’t find the settings file, it’ll just go with default values when doing tasks. When you install something through pip, it doesn’t usually create folders or files for you. By default Ansible will look for the settings file by checking the ANSIBLE_CONFIG variable to see if a path is set. If not, it’ll check for the ansible.cfg in the current directory that you’re running the playbook from. If Ansible still doesn’t find a path, it’ll try your home directory and then finally /etc/ansible/. To keep things nice and easy to maintain, use the
/etc/ansible folder if you can. So even though there are loads of settings Ansible can use, we’re just going to create a file that sets host_key_checking to false under [defaults]. Doing this makes your lab easier because Ansible won’t try to verify the target node’s SSH keys. If you don’t turn this off, the system must have all the SSH host keys saved before the playbook will work correctly. Check it out: The inventory file tells Ansible which target nodes to connect to and gives it information on how it should make that connection. The file also allows you to group nodes for easier administration. By default, Ansible will check the for the hosts file under /etc/ansible/ when trying to access a node. You can also specify another location when you run Ansible by using a command-line switch. Inside the hosts file we’ll create two groups and a subgroup: switch, router, and a third group comprised of the router and switch groups we created for easy referencing. We’ll define the variables we want the connection to use by appending “:vars” to the group name that’s going to use them. There are three built-in variables we’ll use to tell Ansible the username and password for connecting to the Cisco devices: ansible_connection This defines how Ansible connects to the nodes. Local means it will SSH from the Ansible computer. ansible_user This is the default username variable. ansible_password This is the default password variable. Here is an example of looking at an Ansible hosts file: So we can play with Ansible, I’ll configure a playbook that configures the network topology seen in Figure 23.9 Figure 23.9 Ansible topology I’ll use Ansible to configure routing between R01 and R02, and each router will connect to VLAN 101 and 102, respectively. The routers will have a default route that points to the SVI. By the time I’m done, our playbook should be able to ping from one router to the other. I have to enable SSH and create a user for Ansible to use on all our Cisco devices. I’ll also set the user to use privilege 15 to simplify our lab environment like this: Great—now that our network is up and running, I’m also going to create some host records for my Cisco devices so we can use DNS names with Ansible. You can also just use IP addresses if you prefer: Ansible version 2.9.0 is the version I’m using currently, and it comes with 3387 modules. We can check them out with the ansible-doc -l command. Because this is a CCNA book, I’ll filter the output to be just IOS-specific modules and trim it for brevity. The modules that tell Ansible how to do a task usually come from the vendor, but you can make your own custom ones in Python. For instance, you can use the ios_command module to push an exec-level command to a Cisco device so you can capture show output. The ios_config is used to push configuration commands to the device. The thing that makes Ansible unique compared to a regular Python script that pushes commands is the more specific modules available, which let you to complete specific tasks like adding a banner or enabling BGP just by calling the module. You’ll get to see this in action when we get to our playbook example. Here is an example: If you want to get detailed help on a module, just add the module name to the ansible-doc command. For example, here’s part of the output from the ansible-doc ios_vlan
command, edited a bit for brevity: Now that you’ve seen how Ansible works and been acquainted with a couple modules, let’s test things out without making a playbook by running ad-hoc commands. These come in handy when you’re troubleshooting and you just want find out quickly if things are running well. A really common ad-hoc module is ping, which simply tries to connect to the specified group and lets you know if it worked. Here’s an example using the default localhost group that’s running Ansible: With our pieces in place, let’s take a look at the playbook I put together. The final script is 144 lines, and I could have made things more efficient, but I wanted to keep things straightforward so you can follow along without a hitch. Because playbooks are YAML, every file starts with --- at the top. For each section, I’ll provide a descriptive name so that we all know what the playbook is doing when it’s running. The hosts keyword tells Ansible which group or host in the inventory file the tasks are going to run on. Know that because we’re working with Cisco devices, gather_facts will always be no. Ansible will try to gather facts about the host by default; otherwise, Cisco does provide an ios_facts module if you want similar performance for IOS devices. Okay—so what I’m doing in the All Switches play is using a loop to create three VLANs—one for each router and one between the switches. I’m also creating the trunk between the switches and ensuring ip routing is enabled on the switches so they can do OSPF. Check it out: In the All Devices play, I’m enabling OSPF on all devices in the cisco group in the host file, which combines the router and switch groups. Note: Whitespace is very important in YAML, so if you’re trying this out on your own, make sure to honor the spacing in the lines. Also, the TAB key is a huge no-no with playbooks…always use the spacebar! In the rest of the plays, I’m working with individual nodes since we have unique configuration on each of them. On SW01, I’ll have to assign the VLANs to interfaces, create the SVIs with IPs, and enable them. A good thing to keep in mind is that aside from the routing commands that I used the ios_config module for, most tasks have their own specialized module you can run to make configuration a bit cleaner. Here’s a look at SW01’s configuration: SW02 is pretty much identical to SW01’s configuration: Now I’m going to add the IP to the interface and enable it on R01. I’ll also add a default route to the mix like this: R02 is more of the same: So, now that I’m done with my playbook, I’ll go ahead and run it with the ansible-playbook command. Ansible will actually verify the file and then run it. The playbook is run one task at a time from top/down and will show feedback about each play and task that runs: Because I’ve named my plays and tasks based on what they are doing, I can tell exactly if and where something has gone off the rails during execution. This is important because when Ansible detects an error, it’ll only give you its best guess about where the error happened and why. Sometimes it’s helpful, other times, not so much. For instance, if I remove the indentation on the vlan_id line under Create VLANs and run it, Ansible gets the approximate location right, but the interpreter thinks it’s an issue with missing quotes—oops! Check it out: While it’s true no one expects to be an expert on how Ansible works for the CCNA, it’s really good for you to see it in action anyway because the Infrastructure as Code concept is actually a new way of thinking for a lot people in this industry! With that, here’s a run-down of some of the terms that Ansible uses: Inventory Defines the nodes that Ansible knows about and groups them so they can be referenced. The inventory also includes connection information and variables. Playbook A file that contains a set of instructions to be executed. Play Multiple plays can exist in a playbook, which allows the playbook to apply configuration to different nodes in different sections. Variables You can use custom variables in your playbooks. Templates You can use Python’s Jinja2 templates with your playbooks, which is really helpful for network administration. Tasks An action the playbook applies, like installing Apache on a Linux box. Handlers These are a lot like tasks, except they’re only called to an event like a service starting. Roles Allows you to spread out playbooks across several folders to make the configurations more modular, scalable, and flexible. Modules Built into Ansible, modules are files that describe how Ansible will achieve a given task. You can also write your own. Cisco has 69 modules in the current version of Ansible that cover everything from IOS to their UCS server platform. Facts These are global variables that contain a ton of information about the system, including vital stats like the system’s IP address. Ansible has two more enterprise-focused solutions to go with if you want more central management and security controls.
Puppet is more popular than Ansible is with sysadmins because it’s agent based and provides stronger configuration management. But Puppet used to require an agent so it could only run on devices that support that like Cisco Nexus. This fact is important for the CCNA exam—Cisco will test to see if you know Puppet generally requires agents, even though the tool now supports agentless configuration in the newer versions. Puppet is a Ruby-based tool and uses its own declarative language (a domain-specific language) for its manifest files. These files are like Ansible playbooks. Here’s how Puppet compares to our other two solutions: Pros: Cons:
Puppet is way more complex than Ansible, with a key difference being you have to use a central server to register Puppet’s agents to. With that, I’m going to start by downloadig the install information from Puppet like this: And now I’ll install the server with the package management: Next up is doing a little basic server configuration by editing the /etc/puppetlabs/
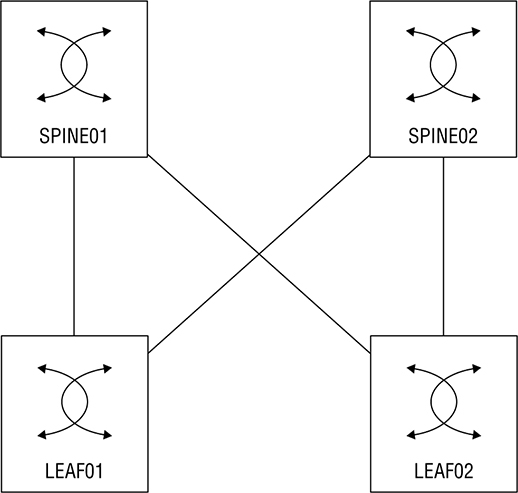
puppet/puppet.conf file. I’m going to add a [main] section plus a few fields: Certname: The certificate name the server will use. Server: The Puppet server name, which doesn’t need to match the actual server FQDN. Environment: Puppet supports different development environments; we’re going with “Production.” Runinterval: Dictates how often a Puppet agent checks in. Now we’re going to tell the Puppet certificate authority to automatically approve node requests that come from my testlab.com domain: And finally, I’ll enable and start the service on the server: For this lab we’re going to use Puppet to configure a Cisco Data Center network with Nexus 9000 switches. Puppet requires an agent for configuration, so we’ll need a platform that explicitly supports it. We’re not going to bother configuring SSH before we start because Puppet doesn’t need to SSH into the switches. But we are going to configure VLAN 10 on the DC switches, create the interfaces trunk links and some SVIs, give them IP addresses, and then set up OSPF. Figure 23.10 pictures our Puppet Lab’s network topology. Figure 23.10 Puppet lab So, now that we’ve got a running server, we’re going to move on to the site.pp manifest. This is the top-level/root configuration file where we’ll decide which nodes we’ll be configuring. You can pretty much think of the site manifest like the inventory in Ansible except that it also acts as the playbook! The site manifest is generally used to define variables, and after that, it calls other manifest files to apply the actual configuration. This helps keep the file easy to understand. These are the fields we’ll be working with: Node: The node that we’ll be applying configuration to. $last_octet: A custom variable we’ll use to build IP addresses. $int1_intf: Also a custom variable that defines an interface to be configured. $int2_intf: Another custom variable that defines an interface to be configured. $vlan: A custom variable that defines a VLAN number. Include: This allows you to keep manifests clean by letting you put configuration in other manifests to import when needed. In this case, we’re importing the dc_role.pp manifest which is where the main configuration lives: The dc_role.pp manifest file is where we define the Nexus configuration; the basic logic of the file is: cisco_interface This resource is using the provided variables to configure Ethernet1/1 and Ethernet1/2 as trunk ports with a description. The resource is also used to create the SVI with an IP address and a loopback interface. cisco_vlan This resource is used to create VLAN 10 on all the switches. cisco_ospf This resource enables OSPF on the Nexus switches; in the Nexus platform you need enable features you want to use before you can configure them; it also creates router ospf 1 in the configuration. cisco_interface_ospf This resource adds the SVIs and loopbacks into OSPF under area 0. To install the Puppet agent, we’re going use a feature called Guestshell, a built-in Centos 7 Linux container that’s available on most modern Cisco platforms. We’ll have to adjust the size of the container before we can use it with Puppet, and we’ll get that done via guestshell resize and guestshell enable. We can enter the Linux environment with the guestshell command on its own: Okay—now that we’re inside Centos, we’ve got to get it online. The CCNA doesn’t cover virtual routing and forwarding, but it really just comes down to having multiple, separate routing tables on a device. In this case, I’m going to tell guestshell to use the management routing table with chvrf management. Oh and we’ll also need to configure DNS so we can download our packages. Once we’re online, we can use yum to download the Puppet agent and install it: The Puppet agent doesn’t update the path variable, so we’ll have to add the Puppet directories to the path. We also need to install cisco_node_utils on each switch with gem, a Ruby package manager. Check it out: Next up is configuring the Puppet agent so it knows where the Pupper Master is and which name to use on its certificate. Since Guestshell doesn’t usually set a hostname, we’ll use the certname field to identify the node to the Puppet Master. If we didn’t do this, the FQDN will be used when we boot the agent: We can start the agent with the puppet agent -t command, and if all goes well, we should see the certificate being created. It will also pull the manifests and start applying them: Once we’ve completed the setup on each switch in our topology, we’ll verify the configuration that’s been applied. The output below shows us that the SVI and Loopbacks have been created with the right IP: And OSPF is also up and running—we can see the loopbacks from all the other switches: Here’s a list of some important Puppet terms you want be familiar with:
Puppet comes in an open source version that’s free to use on any Linux box and an upgraded version called Puppet Enterprise. You’ve got to pony up some cash for Puppet Enterprise, but it adds in a web interface and more enterprise features. Puppet does provide a free version that supports 10 hosts if you want to try it. Chef is by far the most complex configuration management tool in the box, but like Puppet, it’s based in the Ruby programming language and uses agents for communication. Chef is different because it has a much more distributed architecture plus a lot more features that make it a real favorite with developers! Chef has a central server just like Puppet does, but it also includes the concept of a Workstation node. Basically, it’s a standard workstation with Chef tools installed. The idea is to build your Chef cookbooks then upload them to the “bookshelf” on the Chef Server so they can be used by all the Chef Nodes—hungry yet? I am. The workstation creates a folder called the chef-repo (short for repository) to store cookbooks and recipes. A recipe is like an Ansible playbook, and a cookbook is the folder that holds the recipes. The idea behind all this is that a cookbook teaches you how to make several dishes. The Chef Cookbook contains directions on what to apply to server nodes. The Chef Workstation provides tool that interacts with the Chef server called—you guessed it—a knife. The Chef Node is the computer that Chef will control through the agent. It has two components installed: The Chef-Client is the agent that registers the node and does all the work, and another one called Ohai that monitors the server for changes in configuration that must be reported. I know that’s a lot to swallow, so here’s a quick summary of Chef components:
Figure 23.11 gives you a picture of the full Chef architecture. Figure 23.11 Chef architecture Chef Server has only a single version; the open source tool we’re all free to use on any Linux box. Chef Workstation can run on both Windows and Linux. Here’s a list of Chef’s pros and cons: Pros: Cons:
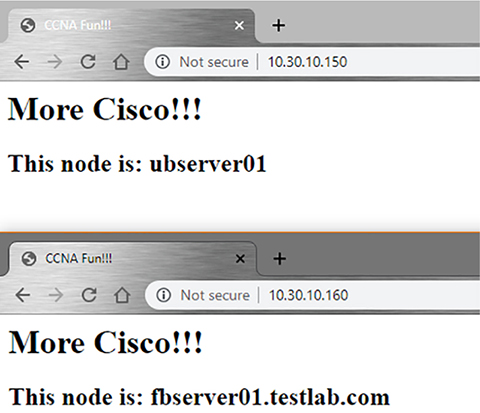
Now it’s finally time to set up the Chef Server. And just as the Puppet example did, this gets into the weeds far deeper than what you’ll need for the CCNA. To get started, we’ll download the install file from Chef: And then install it with the dnf localinstall command: Next, we’ll set up Chef by using the chef-server-ctl reconfigure command. It’ll ask us to accept the license: We’ll definitely want to allow HTTP and HTTPS traffic through the host firewall like this: Now we’ll create an admin user for Chef called chefadmin. The easiest way to do this is to enter in the user info and the certificate path as variables, then reference them in the chef-server-ctl user-create command to keep things cleaner. We’ll put the certificate in my root directory since we’ll need it later: Next we’ll create an Organization using a short name and a long name. I’ll go with testlab as the short name and Testlab as the long name. We also have to tell Chef where to export the organization validator certificate—I’ll put that in /root too: Okay—now that the server is up, we’ll configure the Chef Workstation. As usual, we’ll download the RPM: And then install it with the yum localinstall command like this: Next we need to set up the chef-repo that will store our cookbooks with the chef generate repo chef-repo. This will create a folder structure for us, and once its created, we’ll cd into it: Next we must create a .chef directory to store the server and organization certificates. We can use scp to copy them over to the directory: And of course, we’ve got to create a knife.rb file that references the certificates and points the repository to the Chef Server. The file also references where the cookbooks are stored: With all that in place we can use the knife ssl fetch command to pull the Chef Server certs. After that, we can finally check communications are working with the knife ssl check: Phew! With all that out of the way, let’s talk about our lab setup for Chef. We’re going to use Chef to configure an Ubuntu and Fedora server. Just so you know, Chef used to support Cisco Nexus like Puppet does, but the current version of Chef doesn’t do Cisco at this time. Chef also has a more complex infrastructure than what you’ve seen so far, so we’ll install the Chef Workstation on my RHEL01 host and the Chef Server on RHEL02. Our goal this time is to install Apache and generate a website that tells us which host we’re connecting to. You can check out the topology in Figure 23.12 Figure 23.12 Chef lab So let’s create a cookbook by using the chef generate cookbook command, I’ll name it create-webpage: To generate the webpage content, we’ll create an Embedded Ruby Template (ERB) with the chef generate template create-webpage. Then, we’ll edit the index.html.erb file and put in our website code. We’ll add in the node name dynamically with the <%= node[‘fqdn’] %> code: Now it’s time to create the recipe that’ll install Apache based upon the Linux OS the node happens to be running: We have the option to edit metadata.db to give us more info about the cookbook: Next we’ve got to upload the cookbook to the server bookshelf so we can deploy it to our servers: To deploy the cookbook to the nodes, we’ll use the knife bootstrap command to SSH into the host, install the agent, and trigger the deployment. Let’s do the Ubuntu host first: And now the Fedora server: To test the whole meal, I’ll plug up the pages in my browser so we can see the node name plus our “More Cisco!!!” message. Check out the results in Figure 23.13 Chef Verification. Figure 23.13 Chef verification DevOps and Infrastructure as Code are becoming seriously popular ways to keep network and server configuration under control. This chapter covered the basics of DevOps and IaC and demonstrated how Ansible, Puppet, and Chef work, including the strengths and weaknesses of each. Next, you got to have a whole bunch of fun running through the lab solutions, becoming familiar with what they look like in real-world use. Ansible Ansible is a Python-based configuration management tool that uses YAML playbooks to push configuration to nodes. It’s an agentless solution offering wide support for network devices because it uses SSH to reach nodes. Because there’s no agent, Ansible can only push configuration to nodes. Puppet Puppet is a Ruby-based configuration management tool that uses custom manifest files to configure devices. It requires an agent to be installed on the node, so it has less network support. Puppet also doesn’t support pushing configuration to nodes. Instead, the configuration is applied when the agent checks in. Puppet does support Cisco network devices that can install the Puppet agent. Chef Chef is a Ruby-based configuration tool that uses cookbooks to apply configuration. Chef is the most advanced solution in this chapter and is better suited for programmers because it’s more structured and has a strong developer focus. It also requires that nodes have an agent deployed for it to be able to manage them. Chef can’t push configurations. You can find the answers in the Appendix. Which configuration management solutions require agents? (Choose two.)
What does Ansible call the file that holds the configuration that should be applied to nodes?
What configuration management solution is best suited for managing Cisco devices?
What languages does Ansible use in playbooks?
Which configuration management solution uses manifest files?
Which configuration management solution is best suited for developers?
Which solution uses an inventory file?
Puppet is based on which language?
Which connection methods does Ansible use? (Choose two.)
What does Knife do in a Chef deployment?
What are some components used in a Chef deployment? (Choose three.)
What configuration management solution is best suited for sysadmins?
A YAML file can’t contain which type of character?
Which command do you use to run an Ansible playbook?
Which command do you use to look up a module in Ansible?
![]() 6.6 Recognize the capabilities of configuration management mechanisms Puppet, Chef, and Ansible
6.6 Recognize the capabilities of configuration management mechanisms Puppet, Chef, and Ansible After getting through Chapter 22, you’re probably really excited about DNA Center because, well, how could you not be? It just makes our lives so much easier by centrally automating network tasks. And wow… Those templates that streamline configuration, making it predictable and consistent throughout our networks! Yep, you’d be crazy not to love it—even only with what you know about it so far.
![]() To find your included bonus material, as well as Todd Lammle videos, practice questions & hands-on labs, please see www.lammle.com/ccna
To find your included bonus material, as well as Todd Lammle videos, practice questions & hands-on labs, please see www.lammle.com/ccnaTeam Silos


DevOps
Infrastructure as Code (IaC)
- name: Install NTP on RHEL
  yum: name=ntp state=present
if ! rpm -qa | grep -qw ntp; then
yum install -y ntp
fi
Package ntp-4.2.6p5-29.el7.centos.x86_64 already installed and latest version
Nothing to do
Ansible
Installation
[ansible@rhel01 ~]$ pip install ansible --user
Collecting ansible
Downloading
Installing collected packages: ansible
Running setup.py install for ansible ... done
Successfully installed ansible-2.9.0
Settings
[ansible@rhel01 ~]$ sudo mkdir /etc/ansible/
[ansible@rhel01 ~]$ cat /etc/ansible/ansible.cfg
[defaults]
host_key_checking = False
Inventory
[root@rhel01 ~]# cat /etc/ansible/hosts
[switch]
sw0[1:2].testlab.com

[router]
r0[1:2].testlab.com

[cisco:children]
switch
router

[cisco:vars]
ansible_connection=local
ansible_user=ansible
ansible_password=ansible
Lab Setup

SW01(config)#aaa new-model
SW01(config)#aaa authentication login default local
SW01(config)#aaa authorization exec default local
SW01(config)#username ansible priv 15 secret ansible
SW01(config)#ip domain-name testlab.com
SW01(config)#crypto key generate rsa modulus 2048
The name for the keys will be: SW01.testlab.com

% The key modulus size is 2048 bits
% Generating 2048 bit RSA keys, keys will be non-exportable...
[OK] (elapsed time was 2 seconds)

SW01(config)#
*Sep 23 05:29:53.728: %SSH-5-ENABLED: SSH 1.99 has been enabled
SW01(config)#line vty 0 15
SW01(config-line)#transport input ssh
SW01(config-line)#do wr
Building configuration..
[root@rhel01 ~]#
cat /etc/hosts
127.0.0.1   localhost localhost.localdomain localhost4 localhost4.localdomain4
::1         localhost localhost.localdomain localhost6 localhost6.localdomain6
10.10.21.51     sw01.testlab.com
10.10.21.52     sw02.testlab.com
10.10.21.53     r01.testlab.com
10.10.21.54     r02.testlab.com
Modules
[root@rhel01 ~]# ansible-doc -l | grep ^ios_
ios_banner                      Manage multiline banners on Cisco IOS devices
ios_bgp                         Configure global BGP protocol settings on Cisco IOS
ios_command                     Run commands on remote devices running Cisco IOS
ios_config                      Manage Cisco IOS configuration sections
ios_facts                       Collect facts from remote devices running Cisco IOS
ios_interface                   Manage Interface on Cisco IOS network devices
ios_interfaces                  Manages interface attributes of Cisco IOS network devices
ios_l2_interface                Manage Layer-2 interface on Cisco IOS devices
ios_l2_interfaces               Manage Layer-2 interface on Cisco IOS devices
ios_l3_interface                Manage Layer-3 interfaces on Cisco IOS network devices
ios_l3_interfaces               Manage Layer-3 interface on Cisco IOS devices
ios_lacp                        Manage Global Link Aggregation Control Protocol (LACP)
ios_lacp_interfaces             Manage Link Aggregation Control Protocol (LACP)
ios_lag_interfaces              Manage Link Aggregation on Cisco IOS devices
EXAMPLES:
- name: Create vlan
  ios_vlan:
    vlan_id: 100
    name: test-vlan
    state: present

- name: Add interfaces to VLAN
  ios_vlan:
    vlan_id: 100
    interfaces:
      - GigabitEthernet0/0
      - GigabitEthernet0/1
Ad-Hoc Example
[ansible@rhel01 ~]$ ansible localhost -m ping
localhost | SUCCESS => {
    "changed": false,
    "ping": "pong"
}
Playbook Example
---
######## All Switches ########
- name: Configure Switches
  hosts: switch
  gather_facts: no
  tasks:
  - name: Create VLANs
    ios_vlan:
      vlan_id: "{{ item }}"
      name: "ANSIBLE-VLAN{{ item }}"
    loop:
      - 101
      - 102
      - 123
  - name: Configure Trunk Port between SW01 and SW02
    ios_l2_interface:
      name: GigabitEthernet3/0
      mode: trunk
  - name: Enable IP Routing on Switches
    ios_config:
      lines: ip routing
######## All Devices########
- name: Configure All Devices
  hosts: cisco
  gather_facts: no
  tasks:
  - name: Enable OSPF on All Devices
    ios_config:
      lines:
        - network 0.0.0.0 0.0.0.0 area 0
      parents: router ospf 1
######## SW01 ############
- name: Configure SW01
  hosts: sw01.testlab.com
  gather_facts: no
  tasks:

  - name: Assign SW01 VLANs
    ios_vlan:
      vlan_id: 101
      interfaces:
      - GigabitEthernet0/1

  - name: Create Vlan101 SVI
    ios_l3_interface:
      name: Vlan101
      ipv4: 192.168.101.1/24

  - name: Create Vlan123 SVI
    ios_l3_interface:
      name: Vlan123
      ipv4: 192.168.123.1/24

  - name: Enable SVIs
    ios_interface:
      name: "{{ item }}"
      enabled: True
    loop:
      - Vlan101
      - Vlan123
######## SW02 ############
- name: Configure SW02
  hosts: sw02.testlab.com
  gather_facts: no
  tasks:

  - name: Assign SW02 VLANs
    ios_vlan:
      vlan_id: 102
      interfaces:
      - GigabitEthernet0/1

  - name: Create Vlan102 SVI
    ios_l3_interface:
      name: Vlan102
      ipv4: 192.168.102.1/24

  - name: Create Vlan123 SVI
    ios_l3_interface:
      name: Vlan123
      ipv4: 192.168.123.2/24

  - name: Enable SVIs
    ios_interface:
      name: "{{ item }}"
      enabled: True
    loop:
      - Vlan102
      - Vlan123
######## R01 ############
- name: Configure R01
  hosts: r01.testlab.com
  gather_facts: no
  tasks:

  - name: Create R01 G0/1
    ios_l3_interface:
      name: Gig0/1
      ipv4: 192.168.101.254/24

  - name: Enable G0/1
    ios_interface:
      name: Gig0/1
      enabled: True

  - name: Add Default Route
    ios_static_route:
      prefix: 0.0.0.0
      mask: 0.0.0.0
      next_hop: 192.168.101.1
######## R02 ############
- name: Configure R02
  hosts: r02.testlab.com
  gather_facts: no
  tasks:

  - name: Create R02 G0/1
    ios_l3_interface:
      name: Gig0/1
      ipv4: 192.168.102.254/24

  - name: Enable G0/1
    ios_interface:
      name: Gig0/1
      enabled: True

  - name: Add Default Route
    ios_static_route:
      prefix: 0.0.0.0
      mask: 0.0.0.0
      next_hop: 192.168.102.1
[root@rhel01 ~]# ansible-playbook cisco.yml

PLAY [Configure Switches]
********************************************************************************
************************************************************

TASK [Create VLANs]
********************************************************************************
******************************************************************
ok: [sw01.testlab.com] => (item=101)
ok: [sw02.testlab.com] => (item=101)
ok: [sw01.testlab.com] => (item=102)
ok: [sw02.testlab.com] => (item=102)
ok: [sw02.testlab.com] => (item=123)
ok: [sw01.testlab.com] => (item=123)

TASK [Configure Trunk Port between SW01 and SW02]
********************************************************************************
************************************
ok: [sw02.testlab.com]
ok: [sw01.testlab.com]
<Omitted for brevity>
PLAY RECAP
********************************************************************************
***************************************************************************
r01.testlab.com            : ok=4    changed=3    unreachable=0    failed=0    skipped=0    rescued=0    ignored=0
r02.testlab.com            : ok=4    changed=3    unreachable=0    failed=0    skipped=0    rescued=0    ignored=0
sw01.testlab.com           : ok=8    changed=4    unreachable=0    failed=0    skipped=0    rescued=0    ignored=0
sw02.testlab.com           : ok=8    changed=4    unreachable=0    failed=0    skipped=0    rescued=0    ignore
[root@rhel01 ~]# cat broke-cisco.yml
---
######## All Switches ########
- name: Configure Switches
  hosts: switch
  gather_facts: no
  tasks:

  - name: Create VLANs
    ios_vlan:
    vlan_id: "{{ item }}"
      name: "ANSIBLE-VLAN{{ item }}"
    loop:
      - 101
      - 102
      - 123
[root@rhel01 ~]# ansible-playbook broke-cisco.yml
ERROR! Syntax Error while loading YAML.
  did not find expected key

The error appears to be in '/root/broke-cisco.yml': line 11, column 7, but may
be elsewhere in the file depending on the exact syntax problem.

The offending line appears to be:

    vlan_id: "{{ item }}"
      name: "ANSIBLE-VLAN{{ item }}"
      ^ here
We could be wrong, but this one looks like it might be an issue with
missing quotes. Always quote template expression brackets when they
start a value. For instance:

    with_items:
      - {{ foo }}

Should be written as:

    with_items:
      - "{{ foo }}
Ansible Tower/AWX
Puppet
Installation
[root@rhel01 ~]# dnf install https://yum.puppetlabs.com/
puppet-release-el-8.noarch.rpm
Updating Subscription Management repositories.
[root@rhel01 ~]# dnf install puppetserver
Updating Subscription Management repositories
cat /etc/puppetlabs/puppet/puppet.conf
[master]
vardir = /opt/puppetlabs/server/data/puppetserver
logdir = /var/log/puppetlabs/puppetserver
rundir = /var/run/puppetlabs/puppetserver
pidfile = /var/run/puppetlabs/puppetserver/puppetserver.pid
codedir = /etc/puppetlabs/code

[main]
certname = rhel01.testlab.com
server = rhel01.testlab.com
environment = production
runinterval = 1h
[root@rhel01 ~]# cat /etc/puppetlabs/puppet/autosign.conf
*.testlab.com
[root@rhel01 ~]# systemctl enable puppetserver
[root@rhel01 ~]# systemctl start puppetserver
Lab Setup
![]() In reality, the configuration for Puppet is a whole lot more complex than the Ansible example is, and it requires more advanced Linux configuration. I just wanted to include this lab so you can see how Puppet operates.
In reality, the configuration for Puppet is a whole lot more complex than the Ansible example is, and it requires more advanced Linux configuration. I just wanted to include this lab so you can see how Puppet operates.Site Manifest File
node 'spine01.testlab.com' {
   $last_octet="1"
   $int1_intf="Ethernet1/1"
   $int2_intf="Ethernet1/2"
   $vlan=10
   include dc_role::dc_config
}

node 'spine02.testlab.com' {

   $last_octet="2"
   $int1_intf="Ethernet1/1"
   $int2_intf="Ethernet1/2"
   $vlan=10
   include dc_role::dc_config
}
node 'leaf01.testlab.com' {

   $last_octet="3"
   $int1_intf="Ethernet1/1"
   $int2_intf="Ethernet1/2"
   $vlan=10
   include dc_role::dc_config
}

node 'leaf02.testlab.com' {

   $last_octet="4"
   $int1_intf="Ethernet1/1"
   $int2_intf="Ethernet1/2"
   $vlan=10
   include dc_role::dc_config
}
DC Manifest File
class dc_role::dc_config {
  cisco_interface { $int1_intf:
      shutdown         => false,
      switchport_mode  => trunk,
      description      => 'Configured by Puppet!',
  }
  cisco_interface { $int2_intf:
      shutdown         => false,
      switchport_mode  => trunk,
      description      => 'Configured by Puppet!',
  }

  cisco_vlan { "${vlan}":
      ensure               => present,
  }
  cisco_interface { "Vlan10":
      shutdown             => false,
      ipv4_address         => "192.168.10.${last_octet}",
      ipv4_netmask_length  => 24,
      description          => 'Created by Puppet!',
  }
  cisco_interface { "Loopback0":
    ipv4_address           => "192.168.254.${last_octet}",
    ipv4_netmask_length    => 32,
  }
  cisco_ospf { "1":
      ensure => present,
  }
  cisco_interface_ospf { "Vlan10 1":
     area => 0,
  }
   cisco_interface_ospf { "Loopback0 1":
      area => 0,
   }}
Installing the Puppet Agent
SPINE02(config)# guestshell resize rootfs 1500
Note: Root filesystem will be resized on Guest shell enable
SPINE02(config)# guestshell resize memory 500
Note: System memory will be resized on Guest shell enable
SPINE02(config)# guestshell enable
SPINE02(config)# guestshell
[admin@guestshell ~]$ sudo chvrf management
[root@guestshell admin]# echo "nameserver 10.20.2.10" >> /etc/resolv.conf
[root@guestshell admin]# yum install http://yum.puppetlabs.com/puppetlabs-release-pc1-el-7.noarch.rpm
Loaded plugins: fastestmirror
puppetlabs-release-pc1-el-7.noarch.rpm
[root@guestshell admin]# yum install puppet-agent
Loaded plugins: fastestmirror
[root@guestshell ~]# echo "export
PATH=/sbin:/bin:/usr/sbin:/usr/bin:/opt/puppetlabs/puppet/bin:/opt/puppetlabs/puppet/lib:
/opt/puppetlabs/puppet/bin:/opt/puppetlabs/puppet >> ~/.bashrc
[root@guestshell ~]# source ~/.bashrc
gem install cisco_node_utils
1 gem installed
[root@guestshell ~]# cat /etc/puppetlabs/puppet/puppet.conf
[main]
server = rhel01.testlab.com
certname = spine02.testlab.com
[root@guestshell ~]# puppet agent -t
Info: Creating a new SSL key for spine02.testlab.com
Info: csr_attributes file loading from /etc/puppetlabs/puppet/csr_attributes.yaml
Info: Creating a new SSL certificate request for spine02.testlab.com
Info: Certificate Request fingerprint (SHA256):87:A0:6C:26:1B:E2:58:9E:8A:78:2A:25:75:C1:31:4E:EE:0A:93:EC:2C:76:CD:2E:77:A0:E7:C2:57:5A:8C:81
Info: Caching certificate for spine02.testlab.com
Info: Caching certificate_revocation_list for ca
Info: Caching certificate for spine02.testlab.com
Info: Using configured environment 'production'
Info: Retrieving pluginfacts
Notice: /File[/opt/puppetlabs/puppet/cache/facts.d]/mode: mode changed '0775' to '0755'
Verifying the Results
SPINE01(config)# show ip int br
IP Interface Status for VRF "default"(1)
Interface            IP Address      Interface Status
Vlan10               192.168.10.1    protocol-up/link-up/admin-up
Lo0                  192.168.254.1   protocol-up/link-up/admin-up
SPINE01(config)# show ip route ospf
IP Route Table for VRF "default"
'*' denotes best ucast next-hop
'**' denotes best mcast next-hop
'[x/y]' denotes [preference/metric]
'%<string>' in via output denotes VRF <string>

192.168.254.2/32, ubest/mbest: 1/0
    *via 192.168.10.2, Vlan10, [110/41], 00:06:40, ospf-1, intra
192.168.254.3/32, ubest/mbest: 1/0
    *via 192.168.10.3, Vlan10, [110/41], 00:06:38, ospf-1, intra
192.168.254.4/32, ubest/mbest: 1/0
    *via 192.168.10.4, Vlan10, [110/41], 00:09:47, ospf-1, intra
Puppet Enterprise
Chef

Installation – Server
[root@rhel02 ~]# wget https://packages.chef.io/files/current/
chef-server/13.0.40/el/8/chef-server-core-13.0.40-1.el7.x86_64.rpm
[root@rhel02 ~]# dnf localinstall chef-server-core-13.0.40-1.el7.x86_64.rpm
Updating Subscription Management repositories.
[root@rhel01 ~]# chef-server-ctl reconfigure
+---------------------------------------------+
            Chef License Acceptance

Before you can continue, 3 product licenses
must be accepted. View the license at
https://www.chef.io/end-user-license-agreement/

Licenses that need accepting:
  * Chef Infra Server
  * Chef Infra Client
  * Chef InSpec

Do you accept the 3 product licenses (yes/no)?
> yes
Persisting 3 product licenses...
✓ 3 product licenses persisted.
[root@rhel01 ~]# firewall-cmd --permanent --add-service={http,https}
[root@rhel01 ~]# firewall-cmd --reload
success
[root@rhel01 ~]# USERNAME="chefadmin"
[root@rhel01 ~]# FIRST_NAME="Todd"
[root@rhel01 ~]# LAST_NAME="Lammle"
[root@rhel01 ~]# EMAIL="[email protected]"
[root@rhel01 ~]# KEY_PATH="/root/chefadmin.pem"
 [root@rhel01 ~]# sudo chef-server-ctl user-create ${USERNAME} ${FIRST_NAME} ${LAST_NAME} ${EMAIL} -f ${KEY_PATH} --prompt-for-password
[root@rhel01 ~]# chef-server-ctl org-create testlab 'Testlab'
> --association_user chefadmin
> --filename /root/testlab-validator.pem
Installation – Workstation
[root@rhel01 ~]# wget https://packages.chef.io/files/current/chef-workstation/0.9.31/el/8/chef-workstation-0.9.31-1.el7.x86_64.rpm
[root@rhel01 ~]# yum localinstall -y chef-workstation-0.9.31-1.el7.x86_64.rpm
Updating Subscription Management repositories.
[root@rhel01 ~]# chef generate repo chef-repo
Generating Chef Infra repo chef-repo
- Ensuring correct Chef Infra repo file content

Your new Chef Infra repo is ready! Type `cd chef-repo` to enter it.
[root@rhel01 ~]# cd chef-repo/
[root@rhel01 chef-repo]# mkdir .chef
[root@rhel01 chef-repo]# cd .chef/
 [root@rhel01 .chef]# scp rhel02:chefadmin.pem .
root@rhel02's password:
chefadmin.pem100% 1674   674.0KB/s   00:00
[root@rhel01 .chef]# scp rhel02:testlab-org.pem .
root@rhel02's password:
testlab-org.pem
[root@rhel01 .chef]#cat knife.rb
current_dir = File.dirname(__FILE__)
log_level :info
log_location STDOUT
node_name "chefadmin"
client_key "#{current_dir}/chefadmin.pem"
validation_client_name 'testlab-validator'
validation_key "#{current_dir}/testlab-org.pem"
chef_server_url "https://rhel02.testlab.com/organizations/testlab"
cookbook_path ["#{current_dir}/../cookbooks"]
[root@rhel01 .chef]#
knife ssl fetch
WARNING: Certificates from rhel02.testlab.com will be fetched and placed in your trusted_cert
         directory (/root/chef-repo/.chef/trusted_certs).
         Knife has no means to verify these are the correct certificates. You should
         verify the authenticity of these certificates after downloading.
Adding certificate for rhel02_testlab_com in /root/chef-repo/.chef/trusted_certs/rhel02_testlab_com.crt
[root@rhel01 .chef]#
knife ssl check
Connecting to host rhel02.testlab.com:443
Successfully verified certificates from `rhel02.testlab.com'
Lab Setup

[root@rhel01 .chef]# cd /root/chef-repo/
[root@rhel01 chef-repo]# chef generate cookbook cookbooks/create-webpage
[root@rhel01 cookbooks]# chef generate template create-webpage index.html
Recipe: code_generator::template
  * directory[./create-webpage/templates] action create
    - create new directory ./create-webpage/templates
    - restore selinux security context
  * template[./create-webpage/templates/index.html.erb] action create
    - create new file ./create-webpage/templates/index.html.erb
    - update content in file ./create-webpage/templates/index.html.erb from none to e3b0c4
    (diff output suppressed by config)
    - restore selinux security context

[root@rhel01 cookbooks]# cat create-webpage/templates/index.html.erb
<html>
  <head><title>CCNA Fun!!!</title></head>
  <body>
      <h1>More Cisco!!!</>
      <h2>This node is: <%= node['fqdn'] %></h2>
  </body>
</html>
root@rhel01 cookbooks]# cat create-webpage/recipes/default.rb
#
# Cookbook:: create-webpage
# Recipe:: default
#
# Copyright:: 2019, The Authors, All Rights Reserved.

#Install Web Server

package 'Install Web Server on Node' do
  case node[:platform]
  when 'redhat', 'fedora'
    package_name 'httpd'

  when 'ubuntu'
    package_name 'apache2'
  end
end


#Enable and Start the Web Service

service 'Enable and Start Web Service' do
  case node[:platform]
  when 'redhat', 'fedora'
    service_name 'httpd'
  when 'ubuntu'
    service_name 'apache2'
  end
  action [:enable, :start]
end

# Create Main Webpage

template '/var/www/html/index.html' do
  source 'index.html.erb'
  mode '0644'
  case node[:platform]
  when 'redhat','fedora'
    owner 'apache'
    group 'apache'
  when 'ubuntu'
    owner 'www-data'
    group 'www-data'
  end
end
[root@rhel01 cookbooks]# cat create-webpage/metadata.rb
name 'create-webpage'
maintainer 'The Authors'
maintainer_email '[email protected]'
license 'All Rights Reserved'
description 'Installs/Configures create-webpage'
long_description 'Installs/Configures create-webpage'
version '0.1.0'
chef_version '>= 14.0'

# The `issues_url` points to the location where issues for this cookbook are
# tracked.  A `View Issues` link will be displayed on this cookbook's page when
# uploaded to a Supermarket.
#
# issues_url 'https://github.com/<insert_org_here>/create-webpage/issues'

# The `source_url` points to the development repository for this cookbook.  A
# `View Source` link will be displayed on this cookbook's page when uploaded to
# a Supermarket.
#
# source_url 'https://github.com/<insert_org_here>/create-webpage'
[root@rhel01 cookbooks]# knife cookbook upload create-webpage
Uploading create-webpage [0.1.0]
Uploaded 1 cookbook.
[root@rhel01 ~]# knife bootstrap 10.30.10.150 --ssh-user the-packet-thrower --ssh-password cisco1234 --sudo --use-sudo-password cisco1234
> --node-name UBServer01.testlab.com -r 'recipe[create-webpage]'
Connecting to 10.30.10.150
The authenticity of host '10.30.10.150 ()' can't be established.
fingerprint is SHA256:VpH/gzMW9kFZ7NMiWMRgL/B4hukaLsFYdgZhobGlT60.

Are you sure you want to continue connecting
? (Y/N) y
[root@rhel01 ~]# knife bootstrap 10.30.10.160 --ssh-user the-packet-thrower --ssh-password cisco1234 --sudo --use-sudo-password cisco1234
> --node-name UBServer01.testlab.com -r 'recipe[create-webpage]'
Connecting to 10.30.10.160
The authenticity of host '10.30.10.160 ()' can't be established.
fingerprint is SHA256:VpH/gzMW9kFZ7NMiWMRgL/B4hukaLsFYdgZhobGlT60.

Are you sure you want to continue connecting
? (Y/N) y
Verifying the Results
Summary
Exam Essentials
Review Questions