
7
IOS Device Management
CERTIFICATION OBJECTIVES
7.01 Router Configuration Files
7.04 Remote Access to Your IOS Device
This chapter covers important IOS features that you can use to manage your IOS device. Many of these features are supported across all IOS devices, but some of them are supported on only certain devices. This chapter offers an in-depth discussion of configuration files. It also discusses how to upgrade your IOS device and remotely access it via Secure Shell (SSH). You can use many tools on your IOS device for troubleshooting connection problems, including the Cisco Discovery Protocol (CDP), ping, traceroute, telnet, and debug. These tools are discussed toward the end of the chapter.
CERTIFICATION OBJECTIVE 7.01
Router Configuration Files
You had a basic introduction to configuration files during your CCENT studies. Remember that a configuration file contains the commands used to configure an IOS device. Configuration files are typically located in one of three places: RAM, NVRAM, and/or an external server, such as a TFTP, FTP, HTTP, or Secure Copy (SCP) server. The configuration that the router is currently using is in RAM. You can back up, or save, this configuration either to NVRAM or to an external server.
As you may recall from your CCENT studies, the commands related to configuration files, even show commands, require you to be in Privileged EXEC mode. Also, the running configuration of an IOS device is not automatically saved to NVRAM—you must manually do this with the copy running-config startup-config command. The following sections show you how to manipulate your configuration files.
Saving Configuration Files
You can save your configuration from RAM to NVRAM with the copy running-config startup-config command. When you execute this command, whatever filename (the default is startup-config) you are copying to in NVRAM is completely overwritten. If you want to keep an old copy and a newer one in NVRAM, you’ll need to specify a name other than startup-config. Note that the copy command has two parameters: The first parameter refers to where the source information is (what you want to copy it from), and the second parameter refers to where the destination is (where you want to copy it to).
You can copy your running-config or startup-config configuration file to flash, like this:

This allows you to have multiple configuration files stored locally on your IOS device; however, when booting up, your IOS device, by default, will use the startup-config file in NVRAM to load its configuration.

It is not common practice to copy configuration files to flash, and for exam purposes, this is not where you back them up. However, I commonly do this when an FTP or TFTP server currently isn’t reachable and I am too lazy to copy the configuration to the Windows Notepad application.
You can also back up your configuration to an external server. This requires you to have the server software on a server or PC and IP configured correctly on your IOS device in order to access the server. The syntax looks like this on your IOS device:
![]()
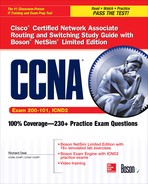
For example, to back up your configuration file to a TFTP server, the configuration would look like this:
![]()
The configuration is backed up to an ASCII text file. If you don’t supply the full URL, just the protocol information, you’ll be prompted for the additional information, like this:
If the filename already exists on the server, the server overwrites the old file. After entering this information, you should see bang symbols (!) indicating the successful transfer of UDP segments to the TFTP server. If you see periods (.), this indicates an unsuccessful transfer. Plus, upon a successful transfer, you should also see how many bytes were copied to the server.
7.01. The digital resources that accompany this book contain a multimedia demonstration of backing up the configuration file of a router.
Restoring Configuration Files
There may be situations in which you have misconfigured your router or switch and want to take a saved configuration file and load it back into your Cisco device. You can do this by reversing the source and destination information in the copy command:

Three variations of the copy command can restore your configuration. A TFTP server is used in this example for the first two options. Here is the first one:

In this example, the configuration file is copied from a TFTP server to NVRAM (the startup-config file); if the file already exists in NVRAM, it will be overwritten.
You can also restore your configuration from a TFTP server to active memory:
![]()

7.02. The digital resources that accompany this book contain a multimedia demonstration of restoring the configuration file on a router.
There is one main difference between moving the configuration file from TFTP to NVRAM and moving it from TFTP to RAM. With the former method, the file in NVRAM is replaced with the one being copied; with the latter method, a merge process is used. During a merge process, IOS updates commands that are common to both places—the new file and in RAM. IOS also executes any new commands it finds in the uploaded configuration file and adds them to the running-config file. However, IOS does not delete any commands in RAM that it does not find in the uploaded configuration file. In other words, this is not a replacement process. As an example, assume that you have a configuration file on a TFTP server that has IPX and IP information in it, but your RAM configuration has IP and AppleTalk. In this example, the router updates the IP configuration, adds the IPX commands, but leaves the AppleTalk commands as they are.
This process is also true if you want to restore your configuration from NVRAM to RAM with this command (the third restore option):
![]()
If your backed-up configuration is in flash, use this syntax to restore it:
![]()

The copy command backs up and restores configuration files: copy running-config startup-config and copy running-config tftp back up the configuration file. The copy startup-config running-config and copy tftp running-config or copy tftp startup-config commands restore the configuration file. The erase startup-config command deletes the configuration file.
Creating and Deleting Configuration Files
Along with knowing how to back up and restore configuration files, you also need to know how to create and delete them. Actually, you already know how to create a basic configuration file by going into Configuration mode with the Privileged EXEC configure terminal command. When you are executing commands within this mode (whether by typing them or pasting them in), IOS is using a merge process (unless you use the no parameter for a command to delete or negate it).
7.03. The digital resources that accompany this book contain a multimedia demonstration of deleting the NVRAM configuration file of a router.
You can also delete your configuration file in the startup-config file in NVRAM by using the following command:

IOS 11.1 and earlier versions of this process, which are still supported, use the write erase command.
To verify the erasure, use the show startup-config command:

Configuration File Nomenclature
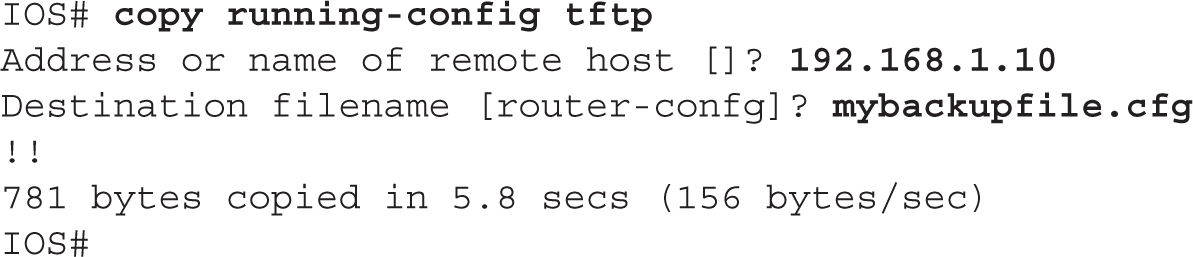
Starting with IOS 12.0 and later, Cisco introduced command and naming nomenclatures that follow Cisco IOS File System (IFS) guidelines (what you are used to when entering a URL in a web browser address text box). Therefore, instead of entering a command and having a router prompt you for additional information, such as the IP address of a TFTP server as well as the filename, you can now put all of this information on a single command line. Commands that reference configuration files and IOS images contain prefixes in front of the file type, as shown in Table 7-1.
TABLE 7-1 File Locations
Let’s take a look at an example. For instance, say that you want to back up your router’s configuration from RAM to NVRAM. With the new syntax, you could type in the following:
![]()
You don’t always have to put in the type; for instance, in the preceding example, you could easily have entered this:
![]()
In many cases, IOS knows, based on the name of the file, which location you’re referring to. For example, when you use running-config, IOS assumes you’re referring to RAM, or system:, as the location.
To view the active configuration, you can use this command:
![]()
If you want to delete a file in flash, such as a backed-up configuration file, use the following command:
![]()
You’ll be asked to verify whether you want to delete the file. You can also use this command to delete any file in flash.
The older style of entering configuration and IOS commands is still supported along with the new one. One command that I constantly use in production environments is the write memory command, which can be abbreviated as wr. This performs the equivalent of the copy running-config startup-config command, but it requires only two keystrokes to perform! Please note, however, that the older command syntax is not supported on Cisco exams!
Review of Configuration Files
It is important that you understand what action IOS will take when it is either backing up or restoring a configuration file to a particular location. Table 7-2 summarizes this information for the routers.
TABLE 7-2 Overview of IOS Process When Dealing with Configuration Files


Manipulating Your Router’s Configuration Files
The last few sections dealt with the router’s configuration files and how you manipulate them. This exercise will help you reinforce your understanding of this material. You’ll perform these steps on a 2600 router using Boson’s NetSim simulator. You can find a picture of the network diagram for the simulator in the Introduction of this book. After starting up the simulator, click the Lab Navigator button. Next, double-click Exercise 7-1 and click the Load Lab button. This will load the lab configuration based on the exercises in Chapter 6.
1. Access the 2600-1 router.
Click the Labs tab at the bottom left of the window. Click the McGraw-Hill Education tab (to the right of the Standard and Custom tabs) at the top left. Click the Lab Instructions tab and use the drop-down selector for Devices to choose 2600-1; or click the NetMap tab and double-click the 2600-1 device icon.
2. Access the 2600-1 router’s Privileged EXEC mode and view the running configuration.
Access Privileged EXEC mode: enable. Use the show running-config command.
3. Save your router’s active configuration to NVRAM. Verify the copy.
Use the copy running-config startup-config command. Verify the copy: show startup-config.
4. Change the hostname on the router to different and then reload the saved configuration from the NVRAM into RAM. What is the hostname once the restore has completed?
Access Configuration mode (configure terminal) and use the hostname different command to change the router’s name to different. Exit Configuration mode: end. Restore your configuration with copy startup-config running-config. Your prompt should change back to the previous name of the router (2600-1). (You might have to wait a few seconds for this to complete.)
5. Erase your router’s saved configuration in NVRAM. Examine the configuration file in NVRAM. Save the active configuration file to NVRAM. Examine the configuration file in NVRAM.
Use the erase startup-config command to erase your configuration in NVRAM. Press ENTER to confirm the erase. Use the show startup-config command to verify that the configuration file was deleted.
6. Save your configuration file in RAM to NVRAM. View the newly saved configuration file in NVRAM.
Use the copy running-config startup-config command to save your configuration to NVRAM. Use the show startup-config command to verify that your router’s configuration was backed up from RAM to NVRAM.
Now you should be more comfortable with manipulating a router’s configuration files. In the next section, you will learn how you should deal with changes in your network.
Changes in Your Network
When you decide to make changes to your network, including the addition or deletion of devices, you should always do some preparation work before you make the changes. Making changes can cause things to not function correctly, or not function at all, so you should always prepare beforehand. The following two sections cover the basics of handling changes.
Adding Devices
Before you add an IOS device to your network, you should gather the following information and perform the following tasks:
1. Decide which IP address you’ll assign to the device for management purposes.
2. Configure the ports of the device, including the console and VTY ports.
3. Set up your passwords for User and Privileged EXEC access.
4. Assign the appropriate IP addresses to the device’s interface(s).
5. Create a basic configuration on the device so that it can perform its job.
Changing Devices
You will constantly be making configuration changes to your network to enhance performance and security. Before you make any changes to your network, you should always back up your configuration files. Likewise, before you perform a software upgrade on your Cisco device, you should always back up the old IOS image.
You should check a few things before loading the new image on your IOS device. First, does the new image contain all of the features that your previous image had? Or at least the features that you need? Also, does your IOS device have enough flash and RAM to store and load the IOS image? You need to check these items before proceeding to load the new image.
At times, you may need to upgrade the hardware or add a new module to your Cisco device. Some devices require that you turn them off before doing the upgrade, while other devices can be left powered on. It is extremely important that you read the installation manual that comes with the hardware before performing the installation. If you install a hardware component into a device that requires that the device be turned off and the device is running, you could damage your new component or, worse, electrocute yourself.
Remember that it is much easier to restore a backup copy than it is to re-create something from scratch. Also, whenever you make changes, always test the change to ensure that your Cisco device is performing as expected.
CERTIFICATION OBJECTIVE 7.03
IOS Image Files
The default location of IOS images is in flash. Some IOS devices have flash built into the motherboard, some use PCMCIA cards for storage, and some use a combination of both. At times, you will have to deal with the device’s flash when you want to perform an upgrade, for instance. To view your files in flash, use the show flash command:

In this example, you can see that a router’s flash holds many files. Below the list of files, you can see how much flash is used (about 32MB), how much is available (about 32MB), and the total amount of flash on the router (64MB). You can also see how much flash you have installed on your IOS device with the show version command.
Use the show flash, show version, or dir command to see how much flash memory is installed on your IOS device.
In addition to using the show flash command, you can use the dir command:

In this example, the amount of available flash is 31,946,752 bytes—you need to ensure that there is enough flash available before adding additional files to flash.
Know how to verify the amount of free space in flash.
7.04. The digital resources that accompany this book contain a multimedia demonstration of viewing the contents of flash on a router.
Naming Conventions for IOS Images
Cisco has implemented a naming convention for its IOS images, allowing you to see the platform, software version, and features included in the image just by looking at the name of the image file. As an example, consider the image name from the preceding show flash command, c1841-advipservicesk9-mz.124-6.T7.bin, which is from a router. Here’s an explanation of the nomenclature that Cisco uses for their IOS image names:
![]() c1841 refers to the name of the platform on which the image will run. This is important because different router models have different processors, and an image compiled for one processor or router model will typically not run on a different model. Therefore, it is very important that you load the appropriate image on your device.
c1841 refers to the name of the platform on which the image will run. This is important because different router models have different processors, and an image compiled for one processor or router model will typically not run on a different model. Therefore, it is very important that you load the appropriate image on your device.
![]() advipservicesk9 refers to the features included in this IOS version, commonly referred to as the feature set. In this example, IOS is the advanced IP services and k9 refers to the inclusion of encryption support.
advipservicesk9 refers to the features included in this IOS version, commonly referred to as the feature set. In this example, IOS is the advanced IP services and k9 refers to the inclusion of encryption support.
![]() mz or z means that the image is compressed and must be uncompressed before loading/running. If you see l (the letter l, not the number 1) here, this indicates where the IOS image is run from. The l indicates that it is a relocatable image and that the image can be run from RAM. Remember that some images can run directly from flash, depending on the router model.
mz or z means that the image is compressed and must be uncompressed before loading/running. If you see l (the letter l, not the number 1) here, this indicates where the IOS image is run from. The l indicates that it is a relocatable image and that the image can be run from RAM. Remember that some images can run directly from flash, depending on the router model.
![]() 124-6.T7 indicates the software version number of IOS. In this instance, the version is 12.4(6)T7. Images names with T indicate new features, and those without T indicate the mainline (only bug fixes are made to it).
124-6.T7 indicates the software version number of IOS. In this instance, the version is 12.4(6)T7. Images names with T indicate new features, and those without T indicate the mainline (only bug fixes are made to it).
Finally, .bin at the end indicates that this is a binary image.
The naming nomenclature discussed here applies to IOS images that are either included on your IOS device when you buy it from Cisco or applied when you download them from Cisco’s web site. However, the name, in and of itself, has no bearing on the actual operation of IOS when it is loaded on your IOS device. For instance, you can download an image from Cisco and rename it poorperformance.bin, and this will have no impact on the IOS device’s performance.
Before Upgrading the IOS Image
This and the next section discuss how to upgrade and back up IOS software on your router. Before you upgrade IOS on your device, you should first back up the existing image to an external server, for two reasons. First, your flash might not be large enough to support two images—the old one and the new. If you load the new one and you experience problems with it, you’ll probably want to load the old image back onto your device. Second, Cisco doesn’t keep every software version available on its web site. Older versions of IOS are hard to locate, so if you are upgrading from an old version of IOS, I would highly recommend backing it up first.
Before you back up your IOS image to an external server, you should perform the following checks:
![]() Is the server reachable (test with the
Is the server reachable (test with the ping command)?
![]() Is there enough disk space on the server to hold the IOS image?
Is there enough disk space on the server to hold the IOS image?
![]() Does the server support the file nomenclature that you want to use?
Does the server support the file nomenclature that you want to use?
![]() Does the file have to exist on the server before you can perform the copy? (This is true with certain TFTP UNIX servers.)
Does the file have to exist on the server before you can perform the copy? (This is true with certain TFTP UNIX servers.)
Once you have performed these checks, you are ready to continue with the backup process.
Backing Up an IOS Image
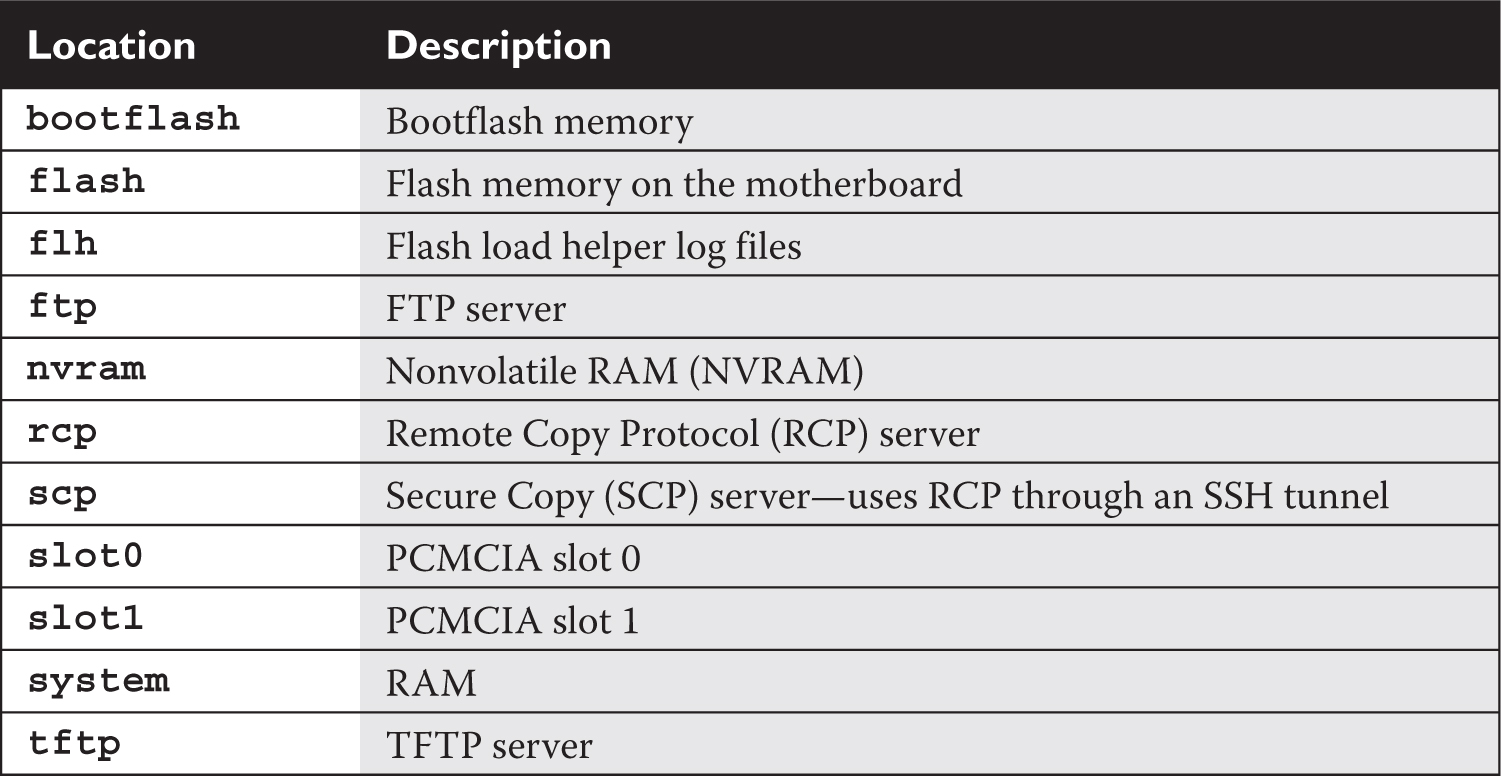
To back up your IOS image, you’ll use the copy flash URL command. Optionally, you can specify the name of the IOS in flash in the command line. The URL specifies a URL-style syntax and includes the protocol, such as TFTP, the IP address of the server, possibly the directory to put it in, and the name the image will be called on the server. Optionally, you can just specify the protocol in the URL, and you’ll be prompted for the rest of the information, like this:
As the image is backed up, you should see a bunch of exclamation points filling up your screen (as shown here)—this indicates the successful copy of a packet. If you see a sequence of periods (.) instead, this indicates a failure. After a successful copy operation, you should see the number of bytes copied as well as how long it took. Compare the number of bytes copied to the file length in flash to verify that the copy was actually successful.
7.05. The digital resources that accompany this book contain a multimedia demonstration of backing up an IOS flash image on a router.
Loading an IOS Image
Before you upgrade IOS on your Cisco device, you first need to verify that your device meets the minimal hardware requirements:
![]() Does your router have the minimal amount of required RAM?
Does your router have the minimal amount of required RAM?
![]() Does your router have the minimal amount of required flash memory?
Does your router have the minimal amount of required flash memory?
You can see the installed amount of RAM and flash with the show version command. Also remember to verify that your IOS device has enough free flash memory to add the device (show flash command or dir command); if not, you’ll need to delete unneeded files to make room for the new image.
Before upgrading IOS on a Cisco device, you should verify the flash and RAM requirements of the new IOS: does your IOS device support the new image’s requirements? You can verify the amount of RAM and flash installed on your IOS device with the show version command. You can verify the amount of free flash memory with the show flash command or dir command.
If you want to upgrade your IOS or load a previously saved IOS image, you’ll need to place the IOS image on an external server and use the copy URL flash command. You’ll be prompted for the same information you needed when you used the copy flash tftp command; however, the process that takes place after you enter your information is different. After you enter your information, IOS first verifies that the image exists on the TFTP server. If the file exists on the server, IOS then asks you if you want to erase flash. Answer y if you don’t have enough space in flash for the older image(s) as well as the new one. If you answer y, flash is erased and reprogrammed; as this step proceeds, you will see a list of “e”s appear on the screen.
After flash is initialized, your router pulls the IOS image from the TFTP server. Just as in the copy operations with configuration files, a bunch of exclamation marks indicates successful copies, while periods indicate unsuccessful copies.
Here is an example of loading an IOS image into your router:
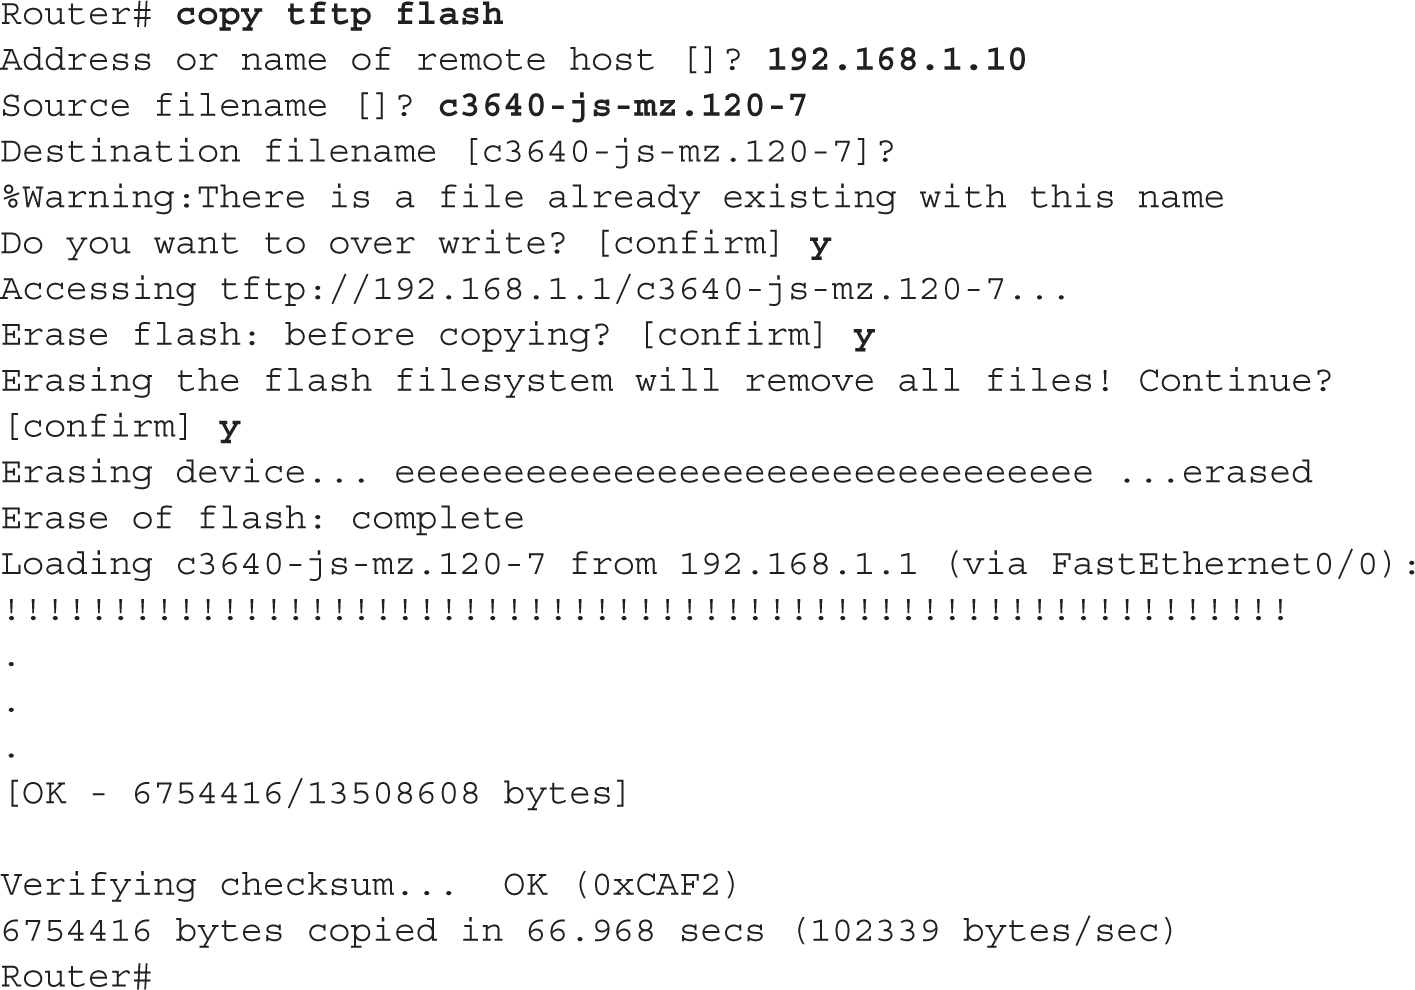
In this example, the router noticed that the name of the image that exists on the TFTP server is the same name that is in flash and verifies that you want to overwrite it. Also, notice that the router prompts you to erase flash—this is the default with IOS and will delete all files. Answer n if you don’t want to completely erase flash.
After the router copies the IOS image to flash, you must reboot your router in order for it to use the new image. However, by default, the Cisco device loads the first valid IOS image in flash. To use a different one, you need to define this in your configuration with the boot system command (discussed in Chapter 6) and save this as part of the startup configuration file. The boot system commands are processed in order in the startup configuration file—if there is one there that is no longer needed, you should remove it with the corresponding no boot system command, followed by the old IOS image name. You can reboot your router in two ways: turn it off and back on, or use the Privileged EXEC reload command. The first method is a hard reboot, and the second one is a soft reboot.
7.06. The digital resources that accompany this book contain a multimedia demonstration of loading an IOS flash image on a router.
If you place an incorrect image on your router—for instance, a 3600 series image on a 2800 series router—the router will not boot up. You’ll need to break into ROMMON mode and either do a TFTP boot or boot from the Mini-IOS in ROM (if this exists).
Use the copy flash URL command to back up the IOS image, and use the copy URL flash command to restore or upgrade the IOS. The reload command reboots the router. When doing an upgrade, if either the server is not reachable or you have misconfigured the IP address or filename, you’ll get an error message on your CLI.
If you encounter a problem with accessing a remote server when performing the upgrade, you’ll receive an error message. This could be because you configured the wrong IP address of the server in the copy command, or you entered a nonexistent IOS image name. Here’s an example illustrating this problem:

CERTIFICATION OBJECTIVE 7.04
Remote Access to Your IOS Device
In many instances, it might not be possible to be physically in front of your IOS device to manage it. You can optionally manage it remotely by accessing its CLI via telnet or SSH, or you can manage it with a GUI with a web browser. To access your IOS device’s CLI remotely, you must first set up its virtual type terminals (VTYs), as discussed in Chapter 10. If you’re accessing a layer 2 IOS switch, you’ll need to assign an IP address to a VLAN interface; if you’re accessing a router, you’ll need to assign an IP address to one of its interfaces and enable it (discussed in Chapter 6). By default, only telnet is enabled on the router; this section will discuss how you enable SSH.
One common solution for accessing a console remotely is to connect the console ports of your IOS devices to a terminal server and access them via the terminal server. You’ll need to log into the terminal server first, either via its console line or remotely via SSH or telnet. From there, you can jump directly into an IOS device’s console port to manage it. Many IOS routers support multiport async cards that can be used as this function: I commonly use Cisco routers for terminal servers.
SSH vs. Telnet Access
One of the most common tools used by network administrators to manage their devices remotely is the telnet application. Telnet allows you access to the CLI of a device. However, the problem with telnet is that all information sent between you and the IOS device is sent in clear text, including your username and/or password. Since you don’t want someone eavesdropping on your connection and seeing everything you do—logging in, viewing the operation of the device, and configuring the device—you want to protect yourself by encrypting the traffic.
The easiest way to accomplish this is to replace the use of telnet with SSH (Secure Shell). SSH uses RSA as an encryption algorithm to encrypt any data sent between you and your networking device. SSH is actually disabled, by default, on your IOS device.
Telnet sends traffic in clear text, making it susceptible to an eavesdropping attack. To secure remote access to your IOS device and prevent eavesdropping on the commands you’re entering and the configurations you’re viewing, use SSH as your remote-access terminal connection: SSH encrypts traffic. To prevent an access attack against your IOS device, you should combine SSH with filtering of management access to your device by using access control lists (which indicate what IP addresses can manage it).
SSH Configuration
To set up SSH on your IOS device so that you can use an SSH client to access it, you’ll need to configure the following:
![]() A local username and password SSH requires both (the
A local username and password SSH requires both (the username command configures both).
![]() A hostname and a domain name This information is required to label the RSA key pair on the IOS device (
A hostname and a domain name This information is required to label the RSA key pair on the IOS device (hostname and ip domain-name commands).
![]() The SSH version to use The default is version 1, but the recommended version to use is 2 (
The SSH version to use The default is version 1, but the recommended version to use is 2 (ip ssh version command).
![]() RSA public and private keys These are used to encrypt and decrypt the remote-access connection (
RSA public and private keys These are used to encrypt and decrypt the remote-access connection (crypto key generate rsa command).
![]() Restricting VTY access By default, telnet is allowed on the VTYs—you should ensure that only SSH access is allowed (
Restricting VTY access By default, telnet is allowed on the VTYs—you should ensure that only SSH access is allowed (login local and transport input Line Subconfiguration commands).
7.07. The digital resources that accompany this book contain a multimedia demonstration of configuring SSH on an IOS device.
Here is an example configuration setting up SSH:

Notice in this example that when you execute the crypto key generate rsa command, you are prompted for the length of the RSA keys. The longer the keys, the more secure your connection will be, with 2048-bit keys being the strongest. Choosing a higher value, however, will take longer for the IOS device to generate. On IOS devices shipped today, this shouldn’t take that long: it took me about 30 seconds to generate 2048-bit keys on an 1841 router.
The transport input command on a line restricts remote-access connectivity to IOS based on the protocol/application you specify.
Another item to point out about this configuration is the two commands on the VTYs. The login local command specifies the use of the local database (username command) for authentication: this causes the IOS device to prompt for both a username and password for authentication. Without the local parameter, the IOS device prompts only for a password, using the password command on the line to do the authentication (this process was discussed in Chapter 1). SSH requires the use of both usernames and passwords. The transport input ssh command restricts access to the VTYs to SSH use only; by default, all forms of remote access, including telnet, are allowed.
If you will be using SSH to access your IOS device, you must use either a local username database, as described here, for your VTYs, or an authentication server (AAA). Also, I commonly use PuTTY as a console-access program (instead of HyperTerminal), telnet client, and SSH client. It’s a great little program that does all these things, and it’s free!
CERTIFICATION OBJECTIVE 7.05
Basic Troubleshooting
This section focuses on troubleshooting tools that you can use on your routers and switches. One of your first troubleshooting tasks is to figure out in which layer of the OSI Reference Model things are not working. By narrowing down the problem to a specific layer, you’ve greatly reduced the amount of time that you’ll need in order to fix the problem or problems.
When troubleshooting problems from user desktops, Cisco always recommends to start at the lowest layer and work your way up:
1. Verify the Ethernet cable connection.
2. Verify the operation of the NIC (ipconfig).
3. Verify the IP configuration of the NIC (ipconfig).
4. Verify the application information.
Be familiar with these steps. Of course, many administrators perform the verification steps in the reverse order (4 to 1); however, the exam tests you on Cisco’s troubleshooting preference.
Cisco offers a wide variety of tools that you can also use. Table 7-3 has a list of the more common IOS commands and identifies at which layer of the OSI Reference Model each can be used in troubleshooting. The following sections cover most of these commands in more depth.
TABLE 7-3 IOS Troubleshooting Commands
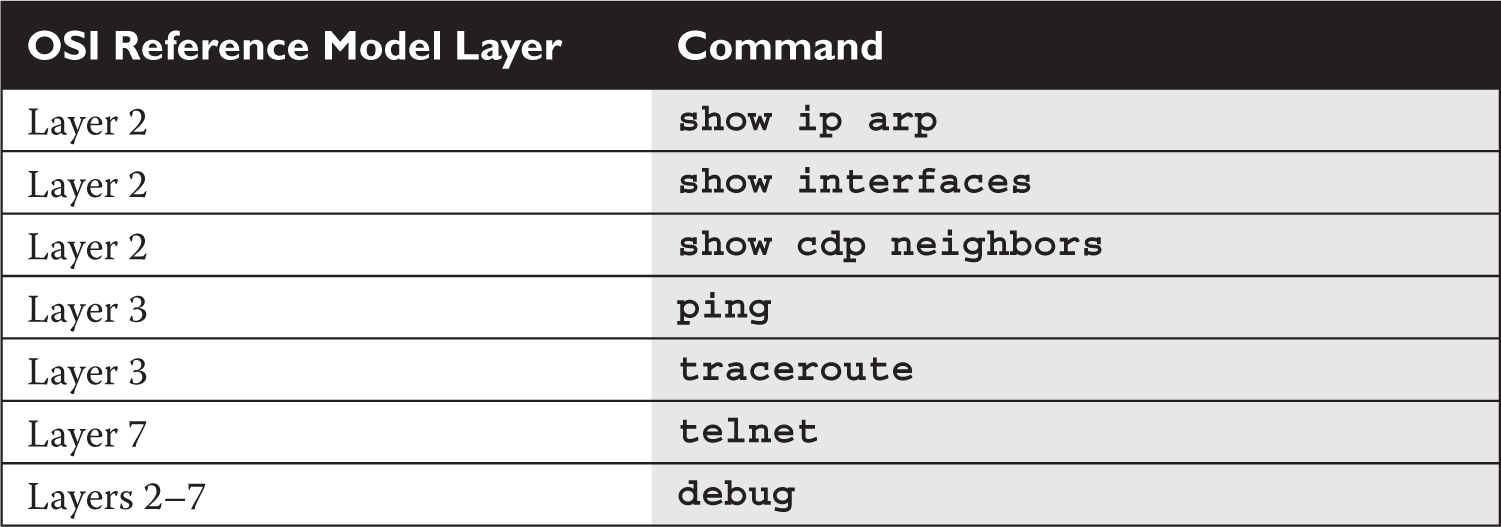
Remember at which layer of the OSI Reference Model the commands shown in Table 7-3 operate.
Local ARP Table
ARP is used to resolve layer 3 IP addresses to layer 2 MAC addresses. When a LAN device in a subnet needs to access resources beyond the subnet, it must forward its frames to the MAC address of the default gateway (router) and uses ARP for the resolution. The router builds a local ARP table when it receives traffic on an interface, keeping track of the IP-to-MAC address mappings. This can be viewed with the show arp command or show ip arp command:

A dash (-) in the (min) column means the address is local to the router; a time value indicates that the router learned the IP/MAC addressing mapping dynamically. The last entry in this example was dynamically learned within the last minute. If a particular MAC address isn’t seen for a period of time, it is aged out of the ARP table. Likewise, when a frame matches an existing entry in the table, its aging time is reset to zero in the table. The Type column denotes the Ethernet encapsulation type (ARPA, SNAP, or SAP) used in the frame: TCP/IP uses ARPA for Ethernet.
The show ip arp command is important because if you see at least the router’s own mappings in the table for its interfaces and that entries are being learned and updated in the table, then you have layer 2 connectivity on those interfaces.
7.08. The digital resources that accompany this book contain a multimedia demonstration of examining an ARP table on a router.
Cisco Discovery Protocol (CDP)
CDP is a Cisco proprietary data link layer protocol that was made available in version 10.3 of the router IOS. Many, but not all, Cisco devices support CDP, including Cisco routers and Catalyst switches. For those devices that support CDP, CDP is enabled by default. CDP messages received from one Cisco device, by default, are not forwarded to any other devices behind it. In other words, you can see CDP information about only other Cisco devices directly connected to your device. Most people misunderstand this, since CDP uses multicasts to disseminate its information. You would think that a Cisco switch would flood this kind of traffic; however, CDP is an exception to the rule in a network of Cisco devices.
With regard to CDP, you should know that if you are receiving CDP frames from a directly connected Cisco neighbor, then at least the data link layer is functioning correctly. CDP information is not propagated to other Cisco devices behind your directly connected neighboring Cisco devices.
CDP Information
CDP, as mentioned, works at the data link layer. However, since CDP uses a Subnetwork Access Protocol (SNAP) frame type, not every data link layer media type is supported. The media types that are supported are Ethernet, Token Ring, Fiber Distributed Data Interface (FDDI), Point-to-Point Protocol (PPP), High-Level Data Link Control (HDLC), Asynchronous Transfer Mode (ATM), and Frame Relay.
The information shared in a CDP packet about a Cisco device includes the following:
![]() Name of the device configured with the
Name of the device configured with the hostname command
![]() IOS software version
IOS software version
![]() Hardware capabilities, such as routing, switching, and/or bridging
Hardware capabilities, such as routing, switching, and/or bridging
![]() Hardware platform, such as 2800 or 2960
Hardware platform, such as 2800 or 2960
![]() The layer 3 address(es) of the device
The layer 3 address(es) of the device
![]() The interface on which the CDP update was generated
The interface on which the CDP update was generated
CDP Configuration
As mentioned in the last section, CDP is enabled on all Cisco CDP–capable devices when you receive your product from Cisco. On Cisco routers and switches, you can globally disable or enable CDP with this command:
![]()
You can also enable or disable CDP on an interface-by-interface basis:

Since CDP doesn’t use many IOS resources (a small frame is generated once a minute), it is recommended that you keep it enabled unless your router is connected to the Internet or untrusted devices; then you should at least disable CDP on these interfaces. At a minimum, the information is only 80 bytes in length. Other, optional commands are related to CDP, such as changing the update and hold-down timers, but these commands are beyond the scope of this book.
CDP Status
To see the status of CDP on your Cisco device, use this command:

As you can see from this output, CDP is enabled and generating updates every 60 seconds. The hold-down timer is 180 seconds. This timer determines how long a CDP neighbor’s information is kept in the local CDP table without seeing a CDP update from that neighbor. These are the default timers for CDP.
You can also see the CDP configuration on an interface-by-interface basis by adding the interface parameter to the show cdp command:

CDP Neighbors
To see a summarized list of the CDP neighbors to which your Cisco device is connected, use the show cdp neighbors command:

In this example, one device is connected with a device ID of Router-A, which is a 2621 router. If you see a MAC address for the device ID, this indicates that the connected Cisco device wasn’t assigned a name with the hostname command. This update was received on ethernet0/0 on this device 4 seconds ago (hold-down timer of 176 seconds subtracted from the hold-down time of 180 seconds). The Port ID refers to the port at the remote side from which the device advertised the CDP message.
You can add the optional detail parameter to the preceding command to see the details concerning the connected Cisco device. You can also use the show cdp entry * command. Here is an example of a CDP detailed listing:

In this example, you can see that the connected device is a 2621 series router running IOS 12.2(15)T9 and has an IP address of 192.168.1.1 configured on the connected interface.
To list the details of a specific neighbor, use this command:
![]()
The advantage of this approach over the approach in the preceding example is that this command lists only the specified neighbor’s information. You can use an “*” as a wildcard to display all the neighbors. Here’s an example of this command:

In this example, Router2 has an IP address of 10.1.2.1 and Router1’s serial0/1 interface is connected to Router2’s serial0/0 interface.
7.09. The digital resources that accompany this book contain a multimedia demonstration of using CDP on a router.
IOS devices support one additional CDP command, which allows you to view CDP traffic statistics:

If you are receiving CDP traffic (Input parameter is incrementing with each execution of the command every minute), then the data link layer is functioning correctly.
CDP is enabled, by default, on all Cisco devices. CDP updates are generated as multicasts every 60 seconds with a hold-down period of 180 seconds for a missing neighbor. The no cdp run command globally disables CDP, while the no cdp enable command disables CDP on an interface (you should do this on a device’s interface connected to the Internet or untrusted devices). Use show cdp neighbors to list your directly connected Cisco neighboring devices. Adding the detail parameter will display the layer 3 addressing, device model, software version, and other information configured on the neighbor. Be familiar with the output of the show cdp commands.
Layer 3 Connectivity Testing
As you saw in the preceding section, CDP can be very useful in determining whether the data link layer is working correctly with another directly connected Cisco device. You can even see the layer 3 address(es) configured on your neighboring device and use this for testing layer 3 connectivity. In addition to using CDP, you could use the show interfaces command for data link layer testing.
However, the main limitation of these two tools is that they don’t test layer 3 problems. Cisco does offer tools for testing layer 3 connectivity, however. This section focuses on two of these commands: ping and traceroute. Both of these commands come in two versions: one for User EXEC mode and one for Privileged EXEC mode. The Privileged EXEC version provides additional options and parameters that can assist you in your troubleshooting process. The following sections cover these tools in more depth.
Using Ping
Ping (Packet Internet Groper) was originally developed for the IP protocol stack to test layer 3 connectivity. The Internet Control Message Protocol (ICMP) is used to implement ping. However, Cisco IOS has expanded the ping command to support other protocols, including Apollo, AppleTalk, CLNS, DECnet, IP, IPX, Vines, and XNS. Cisco uses ping to test layer 3 connectivity with other, non-IP protocols in a (typically) proprietary fashion. However, Cisco follows the standard when using ping to test IP connectivity. With each hop (routing device) a ping (or traceroute) packet traverses, that device decrements the time-to-live (TTL) field in the IP header. By default, ping and traceroute set the TTL to a value of 255. When the TTL is decremented to 0, the receiving device will drop the corresponding packet. For example, if a device sends a ping to a connected router, the device sets the TTL to 255. The receiving router would then decrement that by 1 upon receipt, resulting in a TTL of 254.
Ping was originally never intended to be an acronym. It was developed by Mike Muuss, who named it ping simply because it worked like sonar. Later on, David Mills created an acronym for it: Packet Internet Groper. Muuss was, apparently, not amused by the acronym.
Users can use the ping command from their Windows desktop to check for connectivity. Here are a couple of messages that indicate problems and possible reasons:
![]() Destination host unreachable The router connected to the remote host cannot contact that host on the connected segment.
Destination host unreachable The router connected to the remote host cannot contact that host on the connected segment.
![]() Destination network unreachable A router between the source and destination doesn’t have a routing table entry that determines how to reach the destination (discussed in Chapter 9).
Destination network unreachable A router between the source and destination doesn’t have a routing table entry that determines how to reach the destination (discussed in Chapter 9).
Ping uses ICMP echo messages to initiate the test. If the destination is reachable, the destination responds with an echo reply message for each echo sent by the source. If the destination is not reachable, an intermediate router, if it exists, will respond with a destination network unreachable message, indicating where the problem begins. If a router is connected to the remote segment where the destination host is connected and that router can’t reach the destination host, this will cause a destination host unreachable message. Both the Cisco IOS ping and traceroute commands test layer 3 connectivity. Be familiar with how the TTL field is decremented on a layer 3 hop-by-hop basis: each routing device will decrement the TTL value by 1 upon receipt of the ping or traceroute packet.
Simple ping Command To execute a simple ping from either User mode or Privileged EXEC mode, enter the ping command on the CLI and follow it with the IP address or hostname of the destination:
![]()
Here is a simple example of using this command:
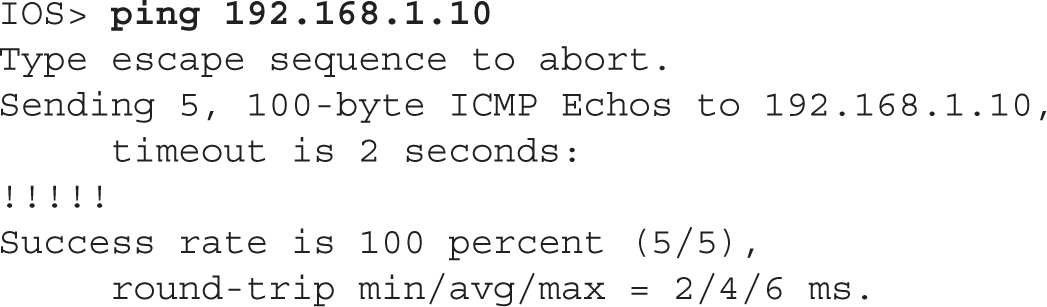
In this example, five test packets were sent to the destination and the destination responded to all five, as is shown by the exclamation marks (!). The default timeout to receive a response from the destination is 2 seconds—if a response is not received from the destination for a packet within this time period, a period (.) is displayed.
Be familiar with the output descriptors used by the ping command in Table 7-4.
Table 7-4 shows examples of ping messages that you might see in displayed output. The bottom of the output shows the success rate—how many replies were received and the minimum, average, and maximum round-trip times for the ping packets sent (in milliseconds). This information can be used to detect whether a delay exists between you and the destination.
TABLE 7-4 Output Codes for the ping Commands

You might see a period (.) in the output for a couple of reasons: a response was received, but after the timeout period; or no response was seen at all. If a response was received, but after the timeout period, this might be because an ARP had to take place to learn the MAC address of a connected device or because of congestion—and this process could have occurred on multiple segments. Consider two examples: .!!!! and !!..!. If devices have to perform ARPs to get the MAC address of the next-hop device, you’ll typically see the first example in your output. However, if your output looks like the second example, you’re probably experiencing congestion or performance problems.
Extended ping Command IOS devices support an extended ping command, which can be executed only at Privileged EXEC mode.
To execute this command, just type ping by itself on the command line:

7.10. The digital resources that accompany this book contain a multimedia demonstration of using the simple and extended ping commands on a router.
Following is an explanation of the parameters that might be required when you execute this command:
![]()
Protocol The protocol to use for the ping (defaults to IP).
![]()
Target IP address The IP address or hostname of the destination to test.
![]()
Repeat count How many echo requests should be generated for the test (defaults to 5).
![]()
Datagram size The size, in bytes, of the ping packet (defaults to 100).
![]()
Timeout in seconds The amount of time to wait before indicating a timeout for the echo (defaults to 2 seconds). When seeing a mix of periods and bangs in the displayed output, increasing this value can help determine if you are experiencing congestion problems with a slow response time between your IOS device and the destination.
![]()
Extended commands Whether or not the remaining questions should also be asked (defaults to no).
![]()
Source address The IP address that should appear as the source address in the IP header (defaults to the IP address of the interface the ping will use to exit the IOS device).
![]()
Type of service The IP level for QoS (defaults to 0).
![]()
Set DF bit in IP header? Whether or not the ping can be fragmented when it reaches a segment that supports a smaller MTU size (the default is no—don’t set this bit). Sometimes, a misconfigured MTU can cause performance problems. You can use this parameter to pinpoint the problem, since a device with a smaller MTU size will not be able to handle the larger packet.
![]()
Data pattern The data pattern that is placed in the ping. It is a hexadecimal four-digit (16-bit) number (defaults to 0xABCD) and is used to solve cable problems and crosstalk on cables.
![]()
Loose, Strict, Record, Timestamp, Verbose IP header options (defaults to none of these). The record parameter records the route that the ping took—this is somewhat similar to traceroute. If you choose record, you will be asked for the maximum number of hops that are allowed to be recorded by the ping (defaults to 9, and can range from 1 to 9).
![]()
Sweep range of sizes Send pings that vary in size. This is helpful when trying to troubleshoot a problem related to a segment that has a small MTU size (and you don’t know what that number is). This defaults to n for no.
When troubleshooting PC problems, first determine whether the user can ping the loopback address of their PC: ping 127.0.0.1. If this fails, you know something is wrong with the TCP/IP protocol stack installation on the PC. Next, have the user try to ping the configured IP address. If this fails, you know that something is wrong with their IP address configuration. Next, have the user ping the default gateway. If this fails, either something is wrong with the configured default gateway address, the default gateway itself, the subnet mask value configured on the user’s PC, or the layer 2 switch connecting them together (perhaps a mismatch in the VLAN on the router and PC interfaces of the switch).
Using Traceroute
One limitation of ping is that it will not tell you where, between you and the destination, layer 3 connectivity is broken. Traceroute, on the other hand, will list each router along the way, including the final destination. Therefore, if a layer 3 connection problem exists, traceroute will tell you at least where the problem begins. Like the ping command, traceroute has two versions: one for User EXEC mode and one for Privileged EXEC mode. The following two sections cover the two different versions.
Simple traceroute Command The simple traceroute command, which works at both User and Privileged EXEC modes, has the following syntax:
![]()
Here is an example of this command:
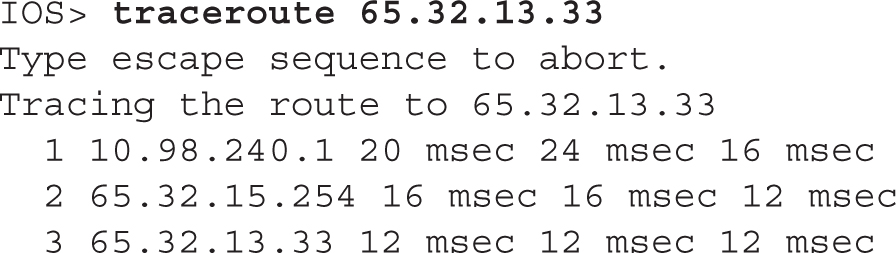
In this example, the destination was three hops away—each hop is listed on a separate line. For each destination, three tests are performed, where the round-trip time is displayed for each test. If you don’t see a round-trip time, typically indicated by an asterisk (“*”), this indicates a possible problem or timeout in the response.
To break out of a ping or traceroute command, use the CTRL-SHIFT-6 break sequence. Also, instead of using the script to perform an extended ping or traceroute, you can execute by specifying all of the parameters on a single command line.
Table 7-5 shows other values that you might see instead of the round-trip time.
TABLE 7-5 Traceroute Messages
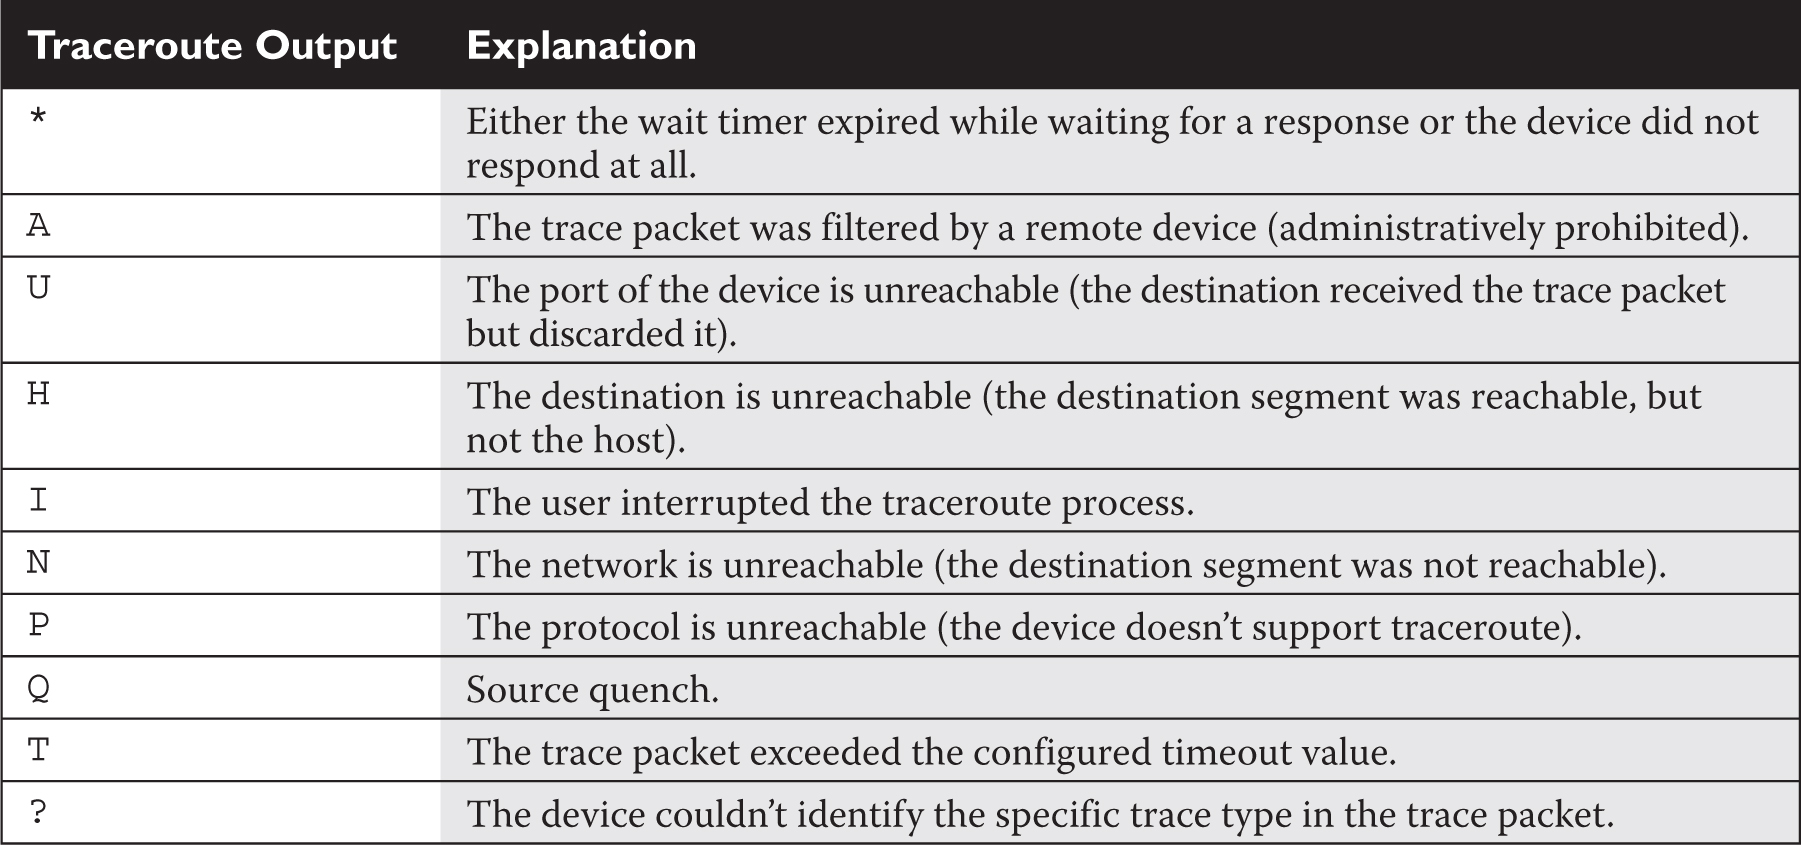
In certain cases, for a specific destination, you might see three asterisks (***) in the output; don’t be alarmed if you see this, since it can occur for a variety of reasons: for instance, there may be an inconsistency in how the source and destination devices have implemented traceroute, or the destination may be configured not to reply to these messages. However, if you continually find the same destination repeated in the output with these reply messages, this indicates a layer 3 problem starting with either this device or the device preceding it.
If you have DNS lookups enabled on your IOS device (this is the ip domain-lookup command), IOS will attempt to resolve the IP address to a domain name before printing the output line for that device. If your traces seem to take a long time, this is usually the culprit. You can disable DNS lookups on your IOS device with the no ip domain-lookup command.
Extended traceroute Command The extended traceroute command is similar to the extended ping command and requires Privileged EXEC mode access to execute it:

Some of these options are the same ones used by ping.
7.11. The digital resources that accompany this book contain a multimedia demonstration of using the simple and extended traceroute commands on a router.
Here is an explanation of the other options:
![]()
Numeric display Turns off a DNS lookup for the names of the routers and the destination.
![]()
Time to Live Specifies how many hops the trace is allowed to take.
![]()
Loose Tells the router that the hops you specify must appear in the trace path, but other routers can appear as well.
![]()
Strict Restricts the trace path only to those routers that you specify.
![]()
Record Specifies the number of hops to leave room for in the trace packet.
![]()
Timestamp Allows you to specify the amount of space to leave room for in the trace packet for timing information.
![]()
Verbose Automatically selected whenever you choose any of the options from this question; it prints the entire contents of the trace packet.
One important item to point out about the traceroute command is that if more than one path exists to reach the destination, this command will test each path, which can take the trace process longer. And like the extended ping command, instead of using the script to perform the test, you can enter the command and all of its parameters on a single command line.
The ping command uses ICMP to test layer 3 connectivity to a device. The traceroute command lists each routing device along the way to the destination (a list of the layer 3 hops) and is typically used to troubleshoot routing problems. Windows devices can perform traceroute by using the tracert command.
Layer 7 Connectivity Testing
The ping and traceroute commands can test only layer 3 connectivity. If you can reach a destination with either of these two commands, this indicates that layer 3 and below are functioning correctly. You can use other tools, such as telnet, to test the application layer. If you can telnet to a destination, then all seven layers of the OSI Reference Model are functioning correctly. As an example, if you can telnet to a machine but can’t send an e-mail to it, then the problem is not a networking problem, but an application problem (with the e-mail program). Of course, if you are filtering traffic with an access control list, this could also be the culprit.
The telnet command is used to test layer 7 (application layer) connectivity. To test telnet, the remote destination must have telnet configured and enabled. If the remote device is an IOS device, you must minimally configure the login and password commands on the VTYs (see Chapter 1).
Using Telnet
If you’ve configured your Cisco devices correctly (with IP addressing and routing information and the appropriate commands on the VTYs), you should be able to telnet to them successfully. However, if you have followed the advice mentioned earlier in the “Remote Access to Your IOS Device” section, you might have to test connectivity with SSH instead. Cisco routers and switches support both incoming and outgoing telnet and SSH. This assumes you have set up the VTYs and configured your IP addressing correctly.
To open up a telnet session from your IOS device, you can use any of the following three methods:
![]()
or
![]()
or
![]()
All three of these methods work in the same manner: they all have IOS attempt to telnet the specified destination.
If you mistype a command name from the CLI, IOS assumes you’re trying to use the first telnet method I’ve listed and attempts to resolve the name to an IP address using the local host table, a DNS server, or a DNS broadcast. To stop this behavior, configure the no ip domain-lookup command.
Suspending Telnet Sessions
If you are on an IOS device and telnet to a remote destination, you might want to go back to your IOS device. One way of doing this is to exit the remote device; however, you might just want to go back to your source Cisco device, make a quick adjustment, and then return to the remote device. Logging off and back onto the remote device is a hassle in this instance.
Cisco, however, has solved this problem by allowing you to suspend a telnet session, return to your original router or switch, do what you need to do, and then jump right back into your remote device—all without your having to log off and back onto the remote device. To suspend a telnet session, use the CTRL-SHIFT-6, X (hold down the CTRL, SHIFT, and 6 keys simultaneously, let go, and then press the X key) or CTRL-^ control sequence, depending on your keyboard.
On your source IOS, if you want to see the open telnet sessions that are currently suspended, use the show sessions command:

This example shows two open telnet sessions. The one with the * preceding it is the default (last accessed) session. To resume the last session, all you have to do is press ENTER on an empty command line.
To resume a specific session, use this command:
![]()
The connection number to enter is the number in the Conn column of the show sessions command. As a shortcut, you can just list the number of the connection without typing resume, and this will accomplish the same thing. If you are on the source router or switch and want to terminate a suspended telnet session without having to resume the telnet session and then log out of it, you can use this command:
![]()
7.12. The digital resources that accompany this book contain a multimedia demonstration of using telnet on a router.
Verifying and Clearing Connections
If you are logged into an IOS device, you can view the other users that are also logged in with this command:

If you see an * in the first column, this indicates your current session. If you want to terminate someone’s session, use the Privileged EXEC clear line command:
![]()
The line number that you enter can be found in the Line column of the output of the show users command.
Debug Overview
One problem with using show commands is that they display only what is currently stored somewhere in the router’s RAM, and this display is static. You have to re-execute the command to get a refreshed update. And show commands, unfortunately, do not always display detailed troubleshooting information. For instance, perhaps you want the router to tell you when a particular event occurs and display some of the packet contents of that event. The show commands cannot do this; however, debug commands can. One of the most powerful troubleshooting tools of IOS is the debug command, which enables you to view events and problems, in real time, on your Cisco device.
The debug commands, however, do have a drawback: Since the router has to examine and display many different things when this feature is enabled, the performance of IOS will suffer. As an example, if you want to see every IP packet that travels through a router, the router has to examine each packet, determine whether it is an IP packet, and then display the packet or partial packet contents on the screen. On a very busy router, this debug process can cause serious performance degradation. Therefore, you should be very careful about enabling a debug process on your router; you might want to wait till after hours or periods of lesser activity before using this tool.
You should never use the debug all command—this enables debugging for every process related to IOS features enabled on your router. In this situation, you’ll see pages and pages of output messages on all kinds of things and, on a busy IOS device, probably crash it.
Typically, you will use debug commands for detailed troubleshooting. For instance, you may have tried using show commands to discover the cause of a particular problem, but without any success. You should then turn to using a particular debug command to uncover the source of the problem. This command has many, many options and parameters—use context-sensitive help to view them. Many of the remaining chapters in this book will cover specific debug commands and their uses. To enable debug, you must be at Privileged EXEC mode. If you are not on the console when enabling debug, you’ll also need to execute the Privileged EXEC terminal monitor command to actually see the debug output on your nonconsole line.
7.13. The digital resources that accompany this book contain a multimedia demonstration of using debug on a router.
Once you’ve fixed your problem or no longer need to see the debug output, you should always disable the debug process. You can disable it either by prefacing the debug command with the no parameter or executing one of the following two commands:
![]()
or
![]()
These two commands disable all running debug commands on your router. You can first use the show debug command to see which events or processes you have enabled.
If you want to see timestamps displayed in your debug output, enter the following command:
![]()
The datetime parameter displays the current date and time, while the msec parameter displays an additional timing parameter: milliseconds.
If you think your debug commands are causing performance problems, use the show processes cpu command (covered in Chapter 3) to check your CPU utilization for the device’s various processes, including debug.
You can use the undebug all command or the no debug all command to disable all debug functions.
Using the Router’s Troubleshooting Tools
The last few sections dealt with the router’s troubleshooting tools. This exercise will help you reinforce your understanding of this material. You’ll perform these steps using Boson’s NetSim simulator. You can find a picture of the network diagram for the simulator in the Introduction of this book. After starting up the simulator, click the LabNavigator button. Next, double-click Exercise 7-2 and click the Load Lab button.
1. Access the 2600-1 router in the simulator included with the media that accompanies this book. See what neighbors are directly connected to the router. What is the IP address of the 2600-2 router?
Click the Labs tab at the bottom left of the window. Click the McGraw-Hill Education tab (to the right of the Standard and Custom tabs) at the top left. Click the Lab Instructions tab and use the drop-down selector for Devices to choose 2600-1; or click the NetMap tab and double-click the 2600-1 device icon. Use the show cdp neighbors command to view the 2600-1’s neighbors—you may have to wait 60 seconds to see all the neighbors connected to this device (repeat the command as necessary). You should see one of the 2950 switches and the 2600-2 router. Use the show cdp neighbors detail command to view the 2600-2’s address: it is 192.168.2.2.
2. Access the 2950-2 switch in the simulator. See what neighbors are directly connected to the router. Which neighbors do you see? What are their IP addresses?
Click the Lab Instructions tab and use the drop-down selector for Devices to choose 2950-2; or click the NetMap tab and double-click the 2950-2 device icon. Use the show cdp neighbors command to view your neighbors. You should see the 2950-1 switch and 2600-1 router. You’ll see the 2950-1 twice since there are two connections between these two switches. Add the detail parameter to the preceding command to see the neighbors’ IP addresses.
You now should be more comfortable with some of the router’s troubleshooting tools.
CERTIFICATION OBJECTIVE 7.06
Licensing
This section will focus on licensing on the Cisco ISR G2 routers. Licensing has become more and more common across many of Cisco platforms; even Cisco’s switches are starting to support licensing of features and use.
Prior to Cisco IOS version 15 on Cisco routers, Cisco had up to 12 different image types for a particular device model and software version. To simplify this, Cisco now has only four image types:
![]() IP Base
IP Base
![]() Data (MPLS and ATM)
Data (MPLS and ATM)
![]() Unified Communications (VoIP and IP telephony)
Unified Communications (VoIP and IP telephony)
![]() Security (Firewall, IPS, and VPNs)
Security (Firewall, IPS, and VPNs)
You can use the show license feature command to view the technology package licenses and the feature licenses supported by your router. Here’s an example of the use of this command:
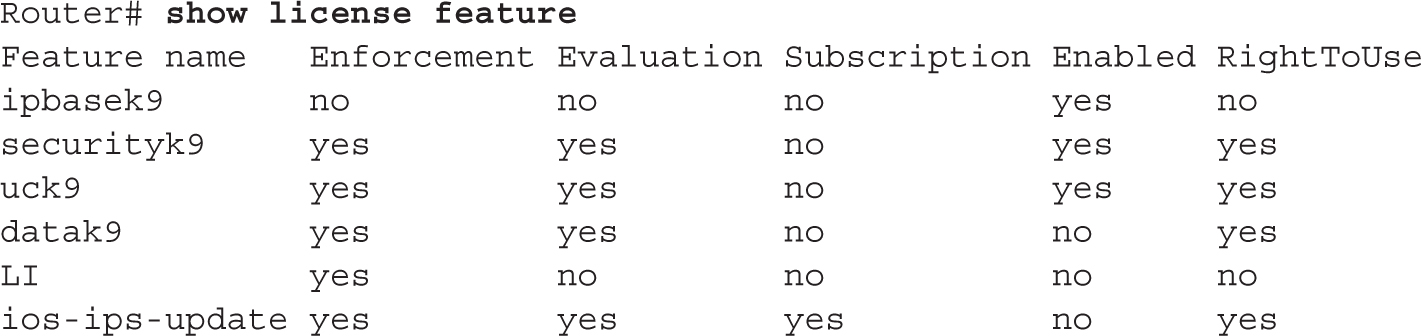
Licensing is enforced starting with Cisco ISR G2 routers (1900, 2900, and 3900 series). Licensing unlocks features in IOS code. Licenses come in two types:
![]() Evaluation This license is a temporary license that is only valid for a period of time, such as 60 days or 1 year.
Evaluation This license is a temporary license that is only valid for a period of time, such as 60 days or 1 year.
![]() Permanent This license is valid for the life of the product.
Permanent This license is valid for the life of the product.
Licenses are associated with two values from a Cisco ISR G2 router, referred to as a universal device identifier (UDI):
![]() Product ID (platform type)
Product ID (platform type)
![]() Serial number (found in ROM on the motherboard)
Serial number (found in ROM on the motherboard)
The importance of the UDI is that the license you obtain from Cisco is tied to this value. In other words, you can’t take a license from one router and copy it to another router: the license is tied to the UDI value of your Cisco ISR G2 router. Here’s an example of viewing the UDI information for license purposes on a 3925 ISR G2 router:

Use the show license feature command to view the package and feature licenses installed on your router.
Installing Licenses
Your router comes with an evaluation license, also known as a temporary license, for most packages and features supported on your router. If you want to try a new software package or feature, you can activate the evaluation license for that package or feature.
To install a permanent license, use the following Privileged EXEC command:
![]()
The license file is an XML file that you download from Cisco. Typically, you would place this in flash on the router, but you could pull it from a remote server via TFTP or FTP. Here’s an example of installing a license on a 3950 router:

Once you’ve installed a license, it is not used until the router is rebooted. You can execute the reload command to do this.
To activate an evaluation license to try out technology packages, use this command:

The module_name is the product model, like c3900 for a 3950 router. The technology package name is one of the four packages. For example, the Security package parameter is securityk9. As with a permanent license, you must reboot the router for the license to take effect.
Licensing Verification
One of the first commands you can use to verify your licensing is the show version command. Here’s an example based on the previous license installation example:
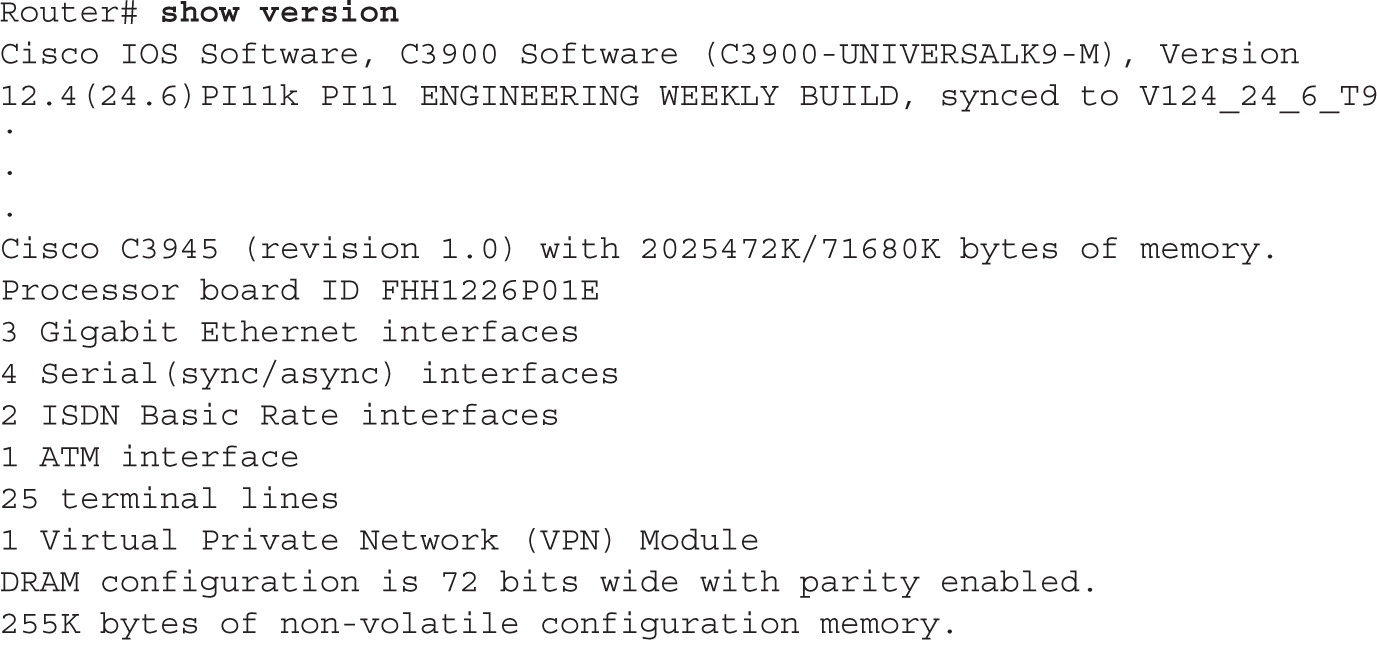
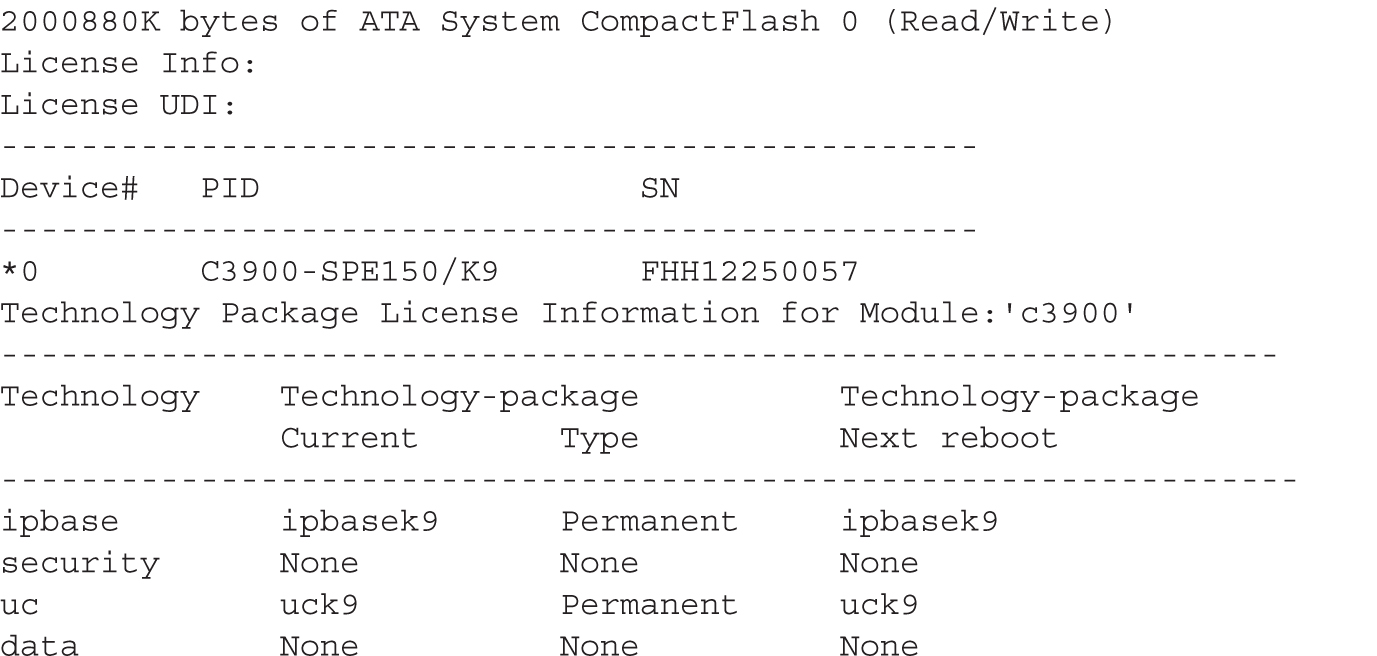
Notice that in this example, the router has both an IP Base and Unified Communications (UC) permanent license installed.
You can also use the show license command to view the installed license, as shown in this example:
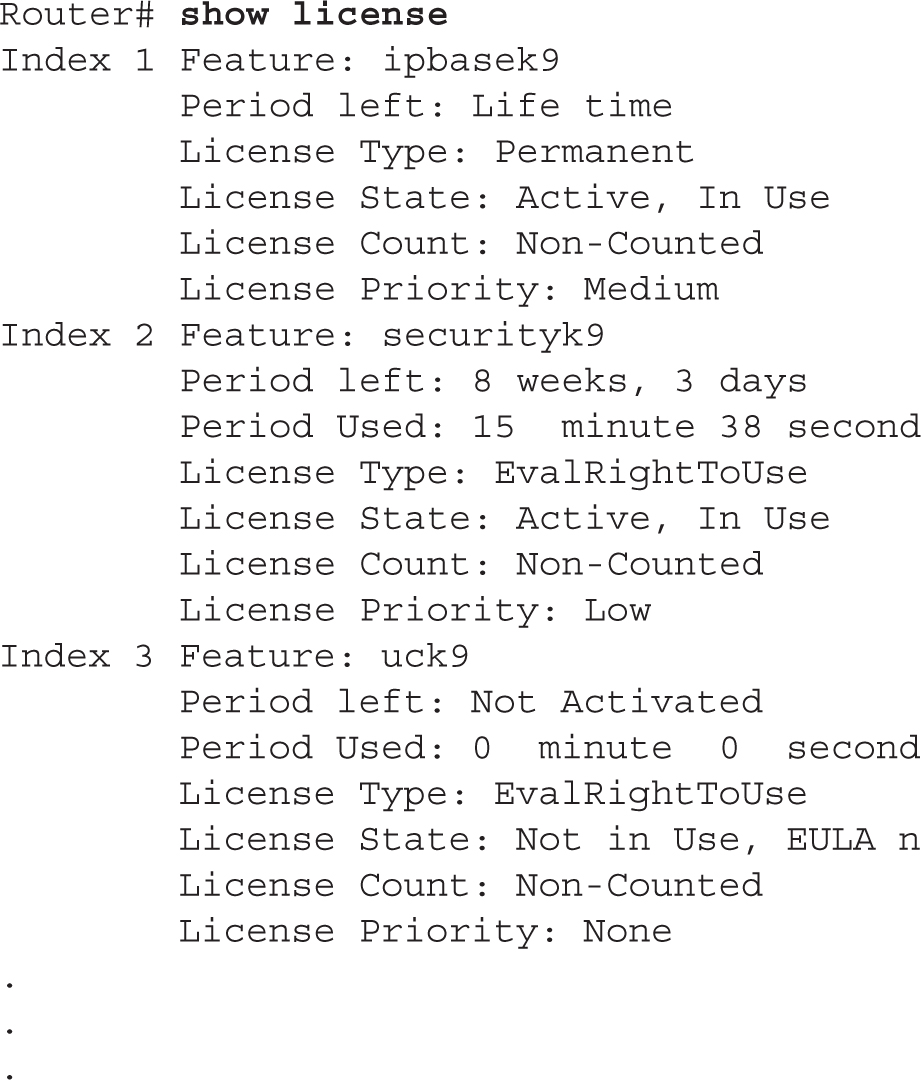
In this example, the IP Base package has a permanent license installed, the Security package has an activated evaluation license installed, and the Unified Communications package doesn’t have a license installed.
Managing Licenses
This section will cover how to back up your license as well as how to uninstall a license. To back up a license, use the license save command:
![]()
You can save the license file to the local file system or a remote server. Here’s an example of the use of this command:

To uninstall (remove) a license from a router, you need to perform two actions:
1. Disable the technology package.
2. Clear the license.
To disable the technology package, use the license boot module command. Here’s an example of disabling the Unified Communications package on a 3900 series router:

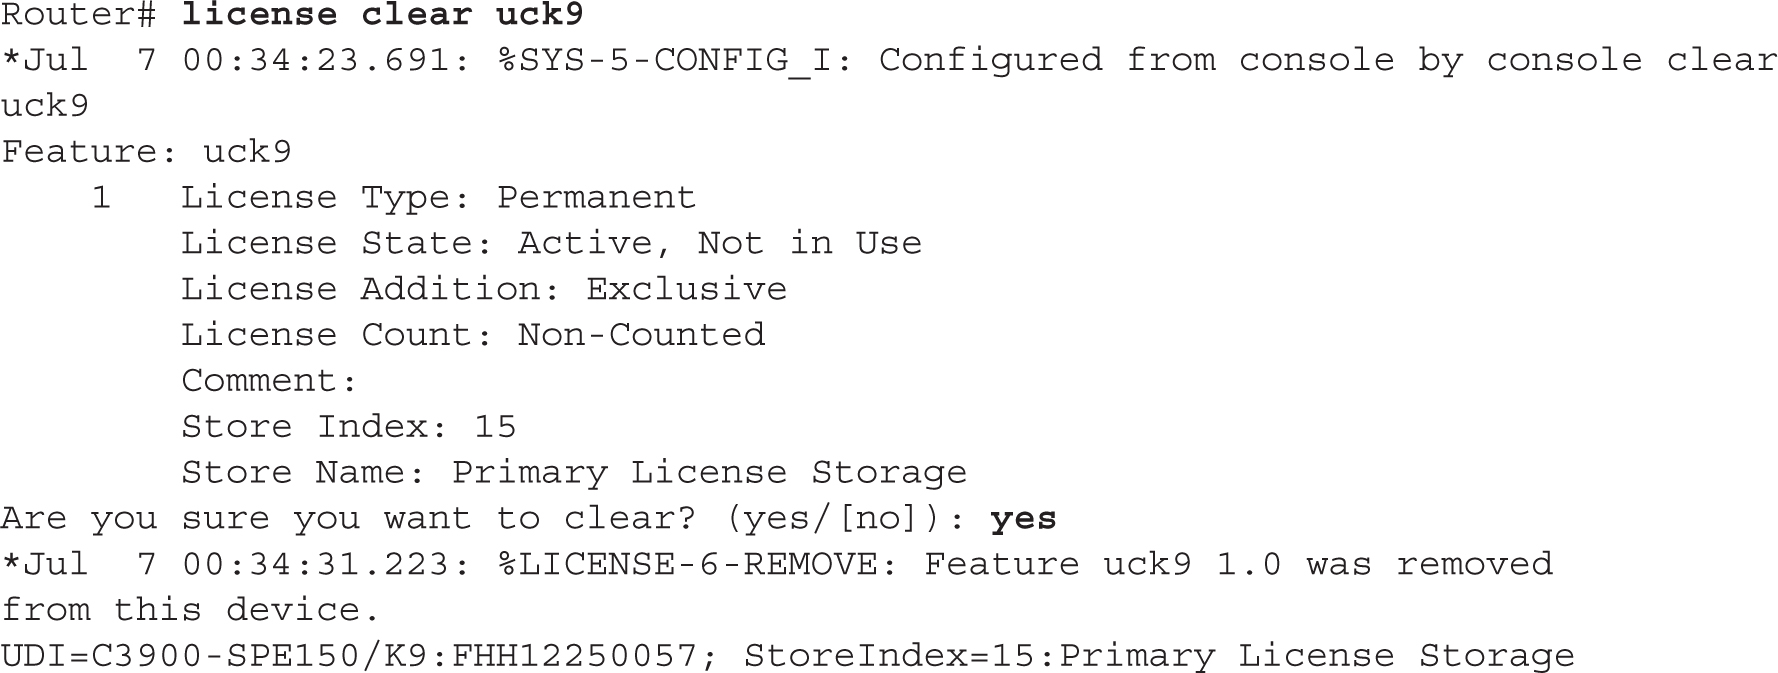
Once the router has rebooted, you need to clear the license with the license clear command. Here’s an example:
Once done, you can re-enable the technology package:

Upon rebooting, use the show version command to verify the license change.
CERTIFICATION SUMMARY
Use the copy commands to manipulate files, including configuration files and IOS images. Any time you copy something into RAM, IOS uses a merge process. For any other location, IOS uses an overwrite process. On IOS devices, use the erase startup-config command to delete the startup-config file in NVRAM. SSH should be used instead of telnet for remote terminal (CLI) access to the router, since SSH encrypts traffic between your desktop and an IOS device.
CDP is a Cisco-proprietary protocol that functions at the data link layer. Every 60 seconds, Cisco devices generate a multicast on each of their interfaces, containing basic information about themselves, including the device type, the version of software they’re running, and their IP address(es). To disable CDP globally, use the no cdp run command. To see a list of your neighbors, use the show cdp neighbors command.
The ping and traceroute commands support an extended version at Privileged EXEC mode. If you want to suspend an active telnet session, use the CTRL-SHIFT-6, X control sequence. Pressing ENTER on a blank command line resumes the last suspended telnet session. Use the resume command to resume a telnet connection. Use the show sessions command to see your open telnet session. Use the disconnect command to disconnect a suspended telnet session. To disable debug on your IOS device, use undebug all or no debug all. Debug functions only at Privileged EXEC mode.
Starting in IOS version 15.0, the ISR G2 routers now require licenses to legally operate. Licenses are of two types: evaluation and permanent. To install a permanent license, use the license install command. To verify the licensing on your router, use the show version and show license commands.
 TWO-MINUTE DRILL
Router Configuration Files
![]() These commands perform a merge process:
These commands perform a merge process: copy startup-config running-config, copy tftp running-config, and configure terminal. These commands perform an overwrite process: copy running-config startup-config and copy running-config tftp.
![]() IOS devices do not automatically save their configuration in RAM: you must execute the
IOS devices do not automatically save their configuration in RAM: you must execute the copy running-config startup-config command to save the active configuration file to NVRAM.
Changes in Your Network
![]() Always back up your configuration before making any changes to it—preferably to a remote server using SCP, which encrypts it.
Always back up your configuration before making any changes to it—preferably to a remote server using SCP, which encrypts it.
IOS Image Files
![]() When upgrading your IOS, make sure you download the version of IOS from Cisco that contains the features that you purchased, and verify that your router has enough flash and RAM for the new image. Use the
When upgrading your IOS, make sure you download the version of IOS from Cisco that contains the features that you purchased, and verify that your router has enough flash and RAM for the new image. Use the copy URL flash command to perform an IOS upgrade.
![]() Use the
Use the reload command to reboot your router.
Remote Access to Your IOS Device
![]() Use SSH for an encrypted remote-access terminal session to your router. The
Use SSH for an encrypted remote-access terminal session to your router. The transport input command can be used to limit what management protocols are allowed on the VTYs.
Basic Troubleshooting
![]() For layer 2 troubleshooting, use the
For layer 2 troubleshooting, use the show interfaces command and show cdp command. For layer 3 troubleshooting, use ping and traceroute. For layer 7 troubleshooting, use telnet. For detailed troubleshooting, use debug.
![]() CDP is used to learn basic information about directly connected Cisco devices. It uses a SNAP frame format and generates a multicast every 60 seconds. It is enabled, by default, on a Cisco device.
CDP is used to learn basic information about directly connected Cisco devices. It uses a SNAP frame format and generates a multicast every 60 seconds. It is enabled, by default, on a Cisco device.
![]() To execute an extended
To execute an extended ping or traceroute, you must be at Privileged EXEC mode. ping tests only if the destination is reachable, while traceroute lists each layer 3 device along the way to the destination.
![]() To suspend a telnet session, use the CTRL-SHIFT-6, X or CTRL-^ control sequence.
To suspend a telnet session, use the CTRL-SHIFT-6, X or CTRL-^ control sequence.
![]() The
The debug commands require Privileged EXEC access. To disable all debug commands, use no debug all or undebug all.
Licensing
![]() Use the
Use the license install command to install a new license. Use the show version and show licenses commands to view installed licenses.
SELF TEST
The following Self Test questions will help you measure your understanding of the material presented in this chapter. Read all the choices carefully, as there may be more than one correct answer. Choose all correct answers for each question.
Note: There are no practice questions for the “Changes in Your Network” section, since this information is provided for on-the-job practical usage.
Router Configuration Files
1. Which router commands perform an overwrite process? (Choose two answers.)
A. copy running-config startup-config
B. copy startup-config running-config
C. copy tftp running-config
D. copy running-config tftp
2. Enter the router command to delete your configuration file in NVRAM: __________.
3. You have executed the show startup-config command and see the following message: “%%Non-volatile configuration memory is not present.” Which of the following answers are correct about these two things? (Choose two answers.)
A. This command displays the running configuration in NVRAM.
B. This command displays the saved configuration in NVRAM.
C. This command displays the saved configuration in flash.
D. The message indicates that flash needs to be reformatted.
E. This message indicates that NVRAM needs to be reformatted.
F. This message indicates that there is nothing stored in this memory location.
IOS Image Files
4. When backing up your IOS image from flash, which of the following will the copy flash tftp command prompt you for? (Choose three answers.)
A. TFTP server IP address
B. Verification to copy
C. Source filename
D. Destination filename
5. What IOS command will display the version of software your device is running?
A. show startup-config
B. show flash
C. show version
D. dir and show version
Remote Access to Your IOS Device
6. Enter the IOS configuration on the first five VTYs to allow only SSH access and to prompt for both a username and password for line authentication: __________.
7. Enter the IOS command that will create RSA public and private keys to encrypt and decrypt traffic for an SSH session: __________.
Basic Troubleshooting
8. Which of the following is true of CDP?
A. The show cdp neighbor command displays what version of software the neighbor is running.
B. The no cdp run command disables CDP on an interface.
C. CDP sends out broadcasts every 60 seconds.
D. CDP can be used to validate layer 2 connectivity.
9. Which router command would you use to test only layer 3 connectivity?
A. telnet
B. show cdp traffic
C. show interfaces
D. traceroute
10. How would you suspend a telnet session?
A. CTRL-SHIFT-X, 6
B. CTRL-SHIFT-6, X
C. CTRL-6, X
D. CTRL-C
11. What IOS command is used to verify the installed licenses on a Cisco router?
A. show installed-licenses
B. show flash:licenses
C. license view
D. show version
SELF TEST ANSWERS
Router Configuration Files
1. ![]() A and D. Copying to any other place besides RAM (running-config) causes an overwrite.
A and D. Copying to any other place besides RAM (running-config) causes an overwrite.
![]() B and C are incorrect because copying to RAM is a merge process, not an overwrite process.
B and C are incorrect because copying to RAM is a merge process, not an overwrite process.
2. ![]() Use the
Use the erase startup-config command to delete your configuration file in NVRAM.
3. ![]() B and F. The
B and F. The show startup-config command displays a backed-up configuration in NVRAM. If no configuration is stored there, you see the “%%Non-volatile configuration memory is not present” message.
![]() A is incorrect because a saved configuration, not the running configuration, is found in NVRAM. C and D are incorrect because these commands show the configuration to flash, not NVRAM. You cannot reformat NVRAM; you can only copy over it or erase it, making E incorrect.
A is incorrect because a saved configuration, not the running configuration, is found in NVRAM. C and D are incorrect because these commands show the configuration to flash, not NVRAM. You cannot reformat NVRAM; you can only copy over it or erase it, making E incorrect.
IOS Image Files
4. ![]() A, C, and D. When you use the
A, C, and D. When you use the copy flash tftp command, you are prompted for the TFTP server’s IP address, the source filename of IOS in flash, and the name you want to call the IOS image on the TFTP server.
![]() B is incorrect because you are not prompted for a verification before the command is executed; however, you are prompted for this information if you are doing the reverse: upgrading the IOS device.
B is incorrect because you are not prompted for a verification before the command is executed; however, you are prompted for this information if you are doing the reverse: upgrading the IOS device.
5. ![]() C. The
C. The show version command will display the current software version your IOS device is running.
![]() B is incorrect because
B is incorrect because show flash displays the saved configuration file in NVRAM. B and D (dir command) are incorrect because these commands display the files in flash, but not necessarily the IOS version currently running on the router.
Remote Access to Your IOS Device
6. ![]()

7. ![]()
crypto key generate rsa
Basic Troubleshooting
8. ![]() D. CDP can be used to validate that you have layer 2 connectivity with a connected device.
D. CDP can be used to validate that you have layer 2 connectivity with a connected device.
![]() A is incorrect because
A is incorrect because show cdp neighbor displays neighbors, but not their configuration, software version, or model number; you need the detail parameter for this information. B is incorrect because no cdp run disables CDP globally. C is incorrect because CDP uses multicasts, not broadcasts.
9. ![]() D. The
D. The traceroute command tests layer 3.
![]() A is incorrect because
A is incorrect because telnet tests layer 7. B and C are incorrect because show cdp traffic and show interfaces test layer 2.
10. ![]() B. Use CTRL-SHIFT-6, X to suspend a telnet session.
B. Use CTRL-SHIFT-6, X to suspend a telnet session.
![]() D is incorrect because this break sequence is used to break out of the System Configuration Dialog. A and C are incorrect because these are nonexistent break sequences.
D is incorrect because this break sequence is used to break out of the System Configuration Dialog. A and C are incorrect because these are nonexistent break sequences.
Licensing
11. ![]() D. Use the
D. Use the show version or show licenses command to display the licenses activated on an IOS device.
![]() D is incorrect because this break sequence is used to break out of the System Configuration Dialog. A and C are incorrect because these are nonexistent break sequences.
D is incorrect because this break sequence is used to break out of the System Configuration Dialog. A and C are incorrect because these are nonexistent break sequences.