
7. Accessorizing

ISO 100 • 1/200 sec. • f/1.8 • 85mm
Lens add-ons that work
When you purchased your camera and lens, whether online or in a store, you were likely asked if you wanted to add some extras to your shopping cart—a gear bag, perhaps a memory card or two, and for the lens, maybe a UV and/or polarizing filter.
Accessories are the ancillary tools that work in concert with your new gear. There’s an entire industry built on proprietary and third-party accessories. Do you need them? Maybe, maybe not. It’s inevitable that we’ll pick up certain gadgets that help us make pictures along the way, and some of these gadgets are made specifically for your lens(es).
This chapter highlights some of the most popular lens accessories. There is a world of niche accessories not explored here; you can find more-obscure and lesser-used tools for your lenses in any camera store or online retailer. What are perhaps the most important accessories of all—hoods, lens caps, and cleaning supplies—are covered in the next chapter.


Teleconverters (Extenders)
When you survey the field of Canon telephoto lenses, you’ll notice that going longer means digging deeper into your pocket. It also means carrying some more weight on your shoulder. The solution to both of these issues lies in Canon’s two teleconverters (also known as extenders), devices that extend the focal length of the lens to which they are attached (Figure 7.1).

Figure 7.1 Canon’s two teleconverters, the Extender EF 1.4X III (left) and the Extender EF 2X II (right), are good for reaching out in genres such as wildlife and sports.
How They Work
Canon’s two models are the Extender EF 1.4X III (commonly referred to as the one-four) and the Extender EF 2X III (the two-X). The focal length of any lens used in conjunction with either of the converters is simply multiplied by the factor in the accessory’s name. For example, a one-four extender used with a 200mm focal length (1.4 x 200mm) will produce a focal length of 280mm. A two-X extender used with the same focal length (2.0 x 200mm) will provide an effective 400mm focal length. The extenders, which are built with similar construction to most L- series telephoto lenses, use optic-grade glass to perform the focal length magnification. The setup is pretty simple—just attach the extender to the camera body like you would any other lens, and then attach the lens to the extender.
Using an extender is an excellent way to go long without needing to acquire another lens. I often carry a one-four or two-X with me when I travel and need to keep the amount of lenses I pack to a minimum. However, they are also popular with wildlife and sports photographers who already use extremely long focal lengths. A 400mm lens quickly becomes a 560mm lens with the one-four, and 800mm with the two-X. Talk about versatility in a small package (Figures 7.2, 7.3, and 7.4)! Bird and other wildlife photographers love converters since controlling their subject matter’s distance from the lens is often impossible or comes at great risk (think grizzly bears).
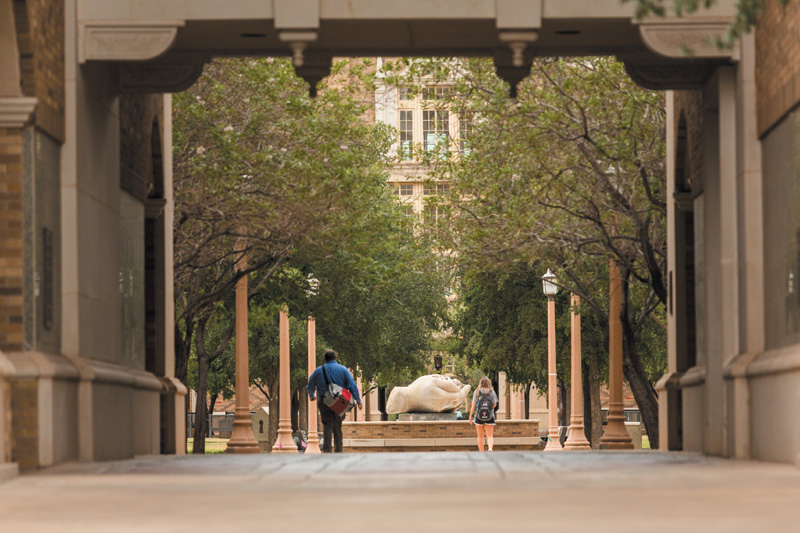
ISO 400 • 1/800 sec. • f/4 • 200mm
Figure 7.2 Taken without a teleconverter, this shot has merit given the framing and interesting background subject matter.
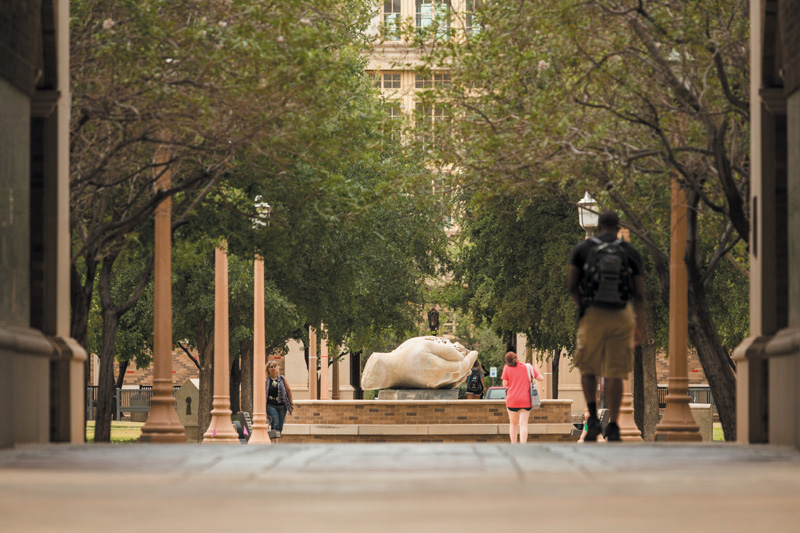
ISO 400 • 1/400 sec. • f/5.6 • 280mm (200mm with 1.4X teleconverter)
Figure 7.3 A one-four extender pushes the 200mm focal length to 280mm, doing away with the frame in the first shot.
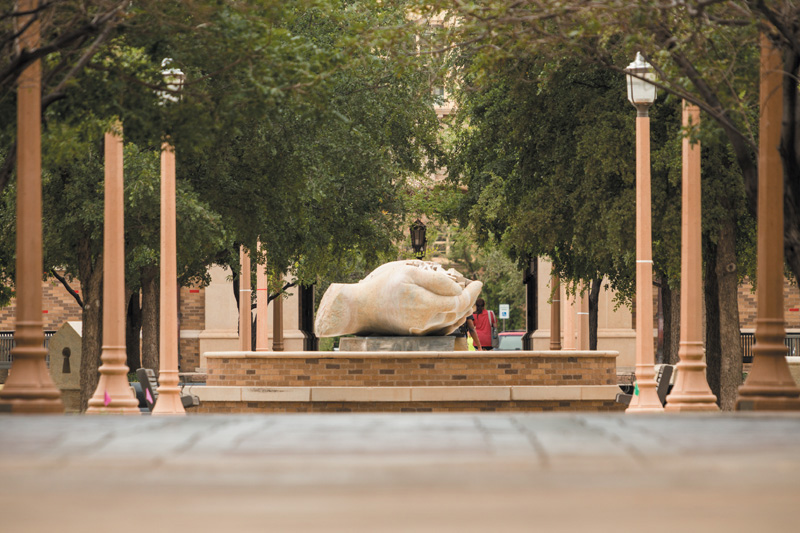
ISO 400 • 1/200 sec. • f/8 • 400mm (200mm with 2X teleconverter)
Figure 7.4 From the same position, a two-X extender produces yet another look, this time using the light poles as framing devices for the fountain.
Extender Caveats
Extenders sound great, right? For the most part, they are great. However, there are a few things to ponder before purchasing.
First, both the one-four and the two-X only work with certain Canon lenses. According to the manufacturer, they work only with prime L-series lenses at and longer-than-135mm, as well as the L-series 70–200mm models (both f/2.8 and f/4) and the EF 100–400 f/4.5–5.6L. These lenses have rear elements that are deep enough within their construction that the converting optics in the extender can fit snuggly inside (Figure 7.5).
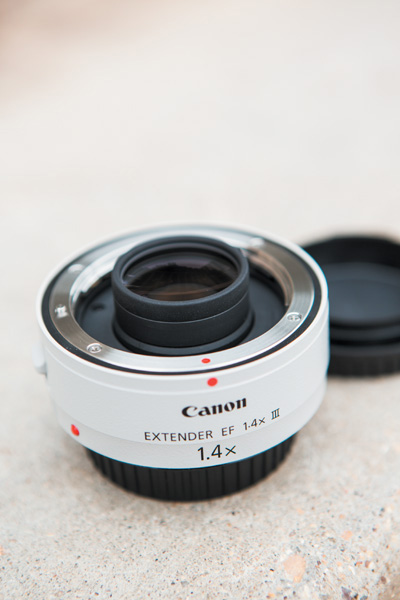
Figure 7.5 Optics contained within an extender and the way extenders are constructed to work with Canon lenses limit the lenses with which they can be used.
The second issue to consider is the effect extenders have on maximum aperture. Using a one-four extender will cost you one stop of aperture, and the two-X will cost you two. For example, if you are using a lens that opens up to f/2.8 and you slap a one-four on it, you can only open the aperture to f/4. With a two-X, the maximum aperture would be f/5.6. This issue alone might keep some folks from investing in an extender. I love using my EF 300mm f/4L IS, but after attaching it to a two-X extender, I can only open up to f/8. This isn’t necessarily an issue when it comes to depth of field, but in losing two stops of aperture, I lose two stops of light and am forced to shoot with a much slower shutter speed (two stops slower) or bump my ISO up two stops (which increases the noise in the image).
Third, extenders can slow down or eliminate autofocus capabilities. A camera’s autofocus system needs light for it to detect contrast and find focus. By putting an extender between the camera and lens, and reducing the maximum aperture of said lens, you are essentially reducing the amount of light let in through the lens and detected by the autofocus sensor. The greater the reduction in maximum aperture, the slower the autofocus becomes. Imagine shooting a fast-paced sports game with a sluggish autofocus system. But where does it fail completely? Anywhere past f/8. At f/8 (a combination of an f/5.6 lens and a one-four extender, or an f/4 lens and a two-X extender), autofocus is typically sluggish. Combine a two-X converter with an f/5.6 lens (f/11 maximum aperture) and say goodbye to autofocus.
Re-emphasizing a point made in Chapter 5, the fourth issue to consider is what extending the focal length means for your minimum sustaining shutter speed. Using an extender may necessitate putting the camera on a tripod or monopod to accommodate the longer focal length and the increase in sensitivity to any lens movement.
Fifth, some photographers claim that extenders degrade image quality. It’s true that putting another piece(s) of glass between your lens and camera might introduce certain deficiencies. It’s hard to detect, but extenders can magnify the effect of a lens’s chromatic aberration and some vignetting. Canon’s newly designed extenders work hard to mitigate the negative effects. Older versions of the Canon two-X had a softening effect, but the most current iteration is much improved. I have heard nothing but praise for the one-four extender; I’ve yet to see any visible degradation.
Finally, even though extenders are cheaper than new telephoto lenses, they’re still not cheap. Even with rebates, both extenders are somewhere north of US$400.
Extension Tubes
In the previous chapter, I highlighted how great Canon’s macro lenses are for getting in tight on small subject matter. What if there was a way to do the same thing—minimize the focusing distance of your lens—without forking over the cash for a new piece of glass and without sacrificing image quality? You’d probably say, “Sign me up!” Enter extension tubes.
How They Work
Extension tubes look and feel like extenders, but there is no glass inside their barrel construction (Figure 7.6). They are simply tubes—placed between your lens and the camera—that decrease the minimum focusing distance by moving the lens’s optics away from the camera’s sensor, and in some cases, allowing you to push the lens much closer to the subject than any macro lens allows. A telephoto zoom lens, such as an EF 70–200mm f/2.8L, is my favorite lens to combine with one or more extension tubes. (The tubes work equally well with a shorter lens, such as an EF 24–105mm f/4L IS.) I like using zoom lenses with extension tubes because the zoom ring becomes more of a focus ring. With a bit of experience, you can become comfortable using extension tubes by moving in tightly on a subject and using the zoom ring to manipulate focus. The focus ring will also fine-tune where the image is sharp, but it serves a lesser role in these circumstances.

You can purchase extension tubes individually or as a package of three. They come in various sizes; the longer the tube, the tighter you can push in on a subject. I usually advise purchasing proprietary gear when you choose a camera system, but I use Kenko extension tubes (Figure 7.7). For just over the price of one Canon tube, you can purchase a set of three Kenko tubes that retain autofocus, transmit data electronically from the lens to the camera, and fit both EF and EF-S lens mounts. For around US$180, you can convert just about any lens you own into a close-focusing macro lens. Since the tubes don’t include glass, you don’t need to worry about them degrading the optical quality of a lens. Some vignetting may occur, and if all three tubes are used in conjunction with your lens, some light may drop off, but sharpness is not a concern.
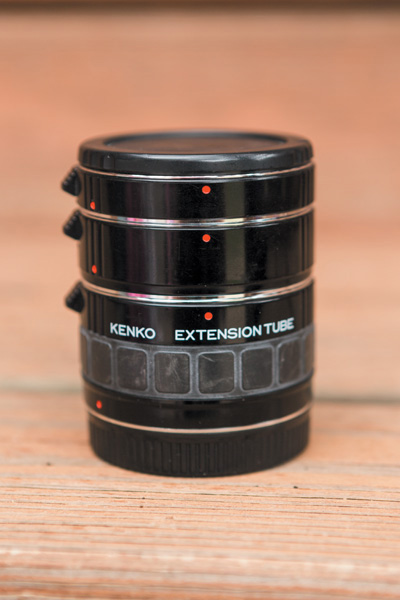
Figure 7.7 For less than US$200, a set of three Kenko extension tubes can turn any of your Canon lenses into a close-focusing macro machine.
Using Extension Tubes
Extension tubes share many of the same rules and techniques as traditional macro lenses. It is best and most stable to put a camera-extension tube(s)-lens combination on a tripod. The lens is more sensitive to movement in the macro world, and the tripod adds more stability than the human body. Using a shutter release also helps prevent movement in an image (Figure 7.8).
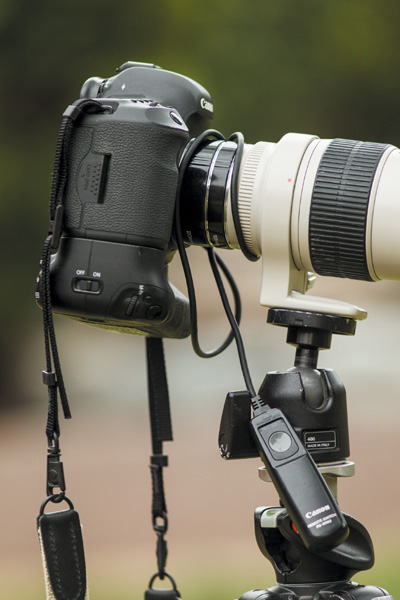
Figure 7.8 I often wrap my shutter release cable around the lens barrel and extension tubes when shooting macro to keep it close at hand while carefully composing images in the little world.
Also, become comfortable with manual focus. Even though Canon and Kenko extension tubes allow you to use autofocus, in many macro settings autofocus can get in the way. Using the lens’s zoom ring as a focus pull gives you much more nuanced control over the focal plane, especially when you have your composition just right and need to tweak focus just a bit (Figure 7.9).

ISO 200 • 1/80 sec. • f/4.5 • 105mm with extension tube
Figure 7.9 I shot this magazine cover in my office with nothing more than a standard zoom lens, a small piece of white fabric, a couple of lights, and one extension tube.
Last, have fun and experiment. As I said in the last chapter, I enjoy the stress- relieving qualities of shooting macro. Be patient and methodically try out different compositions, using one, two, or three of the extension tubes in tandem. Becoming comfortable with how the tubes work will result in some interesting images (Figure 7.10).
ISO 50 • 1/160 sec. • f/4 • 115mm with extension tube
Figure 7.10 A small extension tube on a telephoto lens can help you push in just a bit more for a dramatic image.
Keep in mind that, like with macro lenses, using a shallow depth of field may result in an image that either misses focus on the primary subject or one that renders the subject “unreadable” (Figure 7.11).

ISO 50 • 1/8000 sec. • f/2.8 • 93mm with extension tube
Figure 7.11 I nailed the focus on the front of the flower, but the first flower doesn’t stand out from the one in the background. Using extension tubes on an already fast lens resulted in a short, soft depth of field.
Filters
The ultimate lens accessory is a filter. Or perhaps several filters. Filters are valuable to photography and they can be employed strategically and creatively in your work. Yet, filters are probably the accessories that cause the most consternation among photographers. I don’t use them much, except for the occasional neutral density filter.
There is a large variety of filters out there. The following sections highlight three of the most popular types. Like most camera gear, filters come at several different price points via several manufacturers. They are also manufactured out of different materials, such as glass, plastic, and a high-quality resin. While filters do get expensive, it is in the buyer’s best interest to not go cheap. That doesn’t mean you must buy the priciest filters available, but it does mean do your research. I try to avoid plastic filters altogether.
UV Filters
Perhaps the most popular filter is one that greatly reduces or completely blocks ultraviolet (UV) rays from passing through the lens (Figure 7.12). UV filters have been around for a while. Film was especially prone to the effects of UV rays, which are invisible to our eyes. UV filters were an essential addition to many film photographers’ lenses, helping to mitigate loss of contrast and an anemic haziness sometimes seen on film.
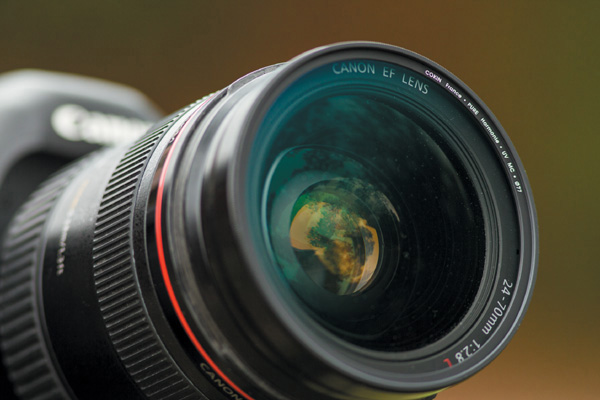
Figure 7.12 It would be easy to mistake a good UV filter as simply another clear piece of glass in front of a lens.
UV filters still do what they have always done, but since digital sensors are not affected by UV rays, these filters are less relevant now. It’s hard to detect the lens’s effect (Figures 7.13 and 7.14). They do come in handy where UV rays are prevalent, such as at higher altitudes. However, these days many folks simply fix any issues in postprocessing.


ISO 100 • 1/320 sec. • f/5.6 • 70mm
Figure 7.14 With a UV filter in front of the lens, it is hard to detect whether it has any effect on the image.
Why even consider buying a UV filter? One very important reason: to protect the front element (Figure 7.15). Imagine dropping your lens and the front element hits something jagged or hard. Having a good UV filter in front of that element is like having an extra insurance policy on it as you go banging through the streets. And, if it prevents any negative effects of UV rays along the way, all the better. This is also why I always use my lens hood—to reduce the chance that my front element ever comes in contact with anything.
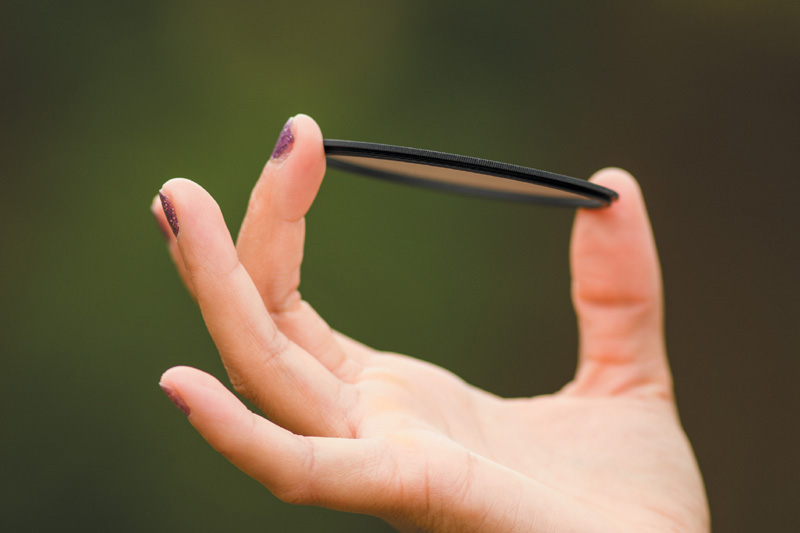
Figure 7.15 UV filters offer great protection for your lens’s precious front element, and they are being manufactured by some companies, like Cokin, in a thinner form than in previous years.
With this protection comes a risk of decreased image fidelity, which is why I don’t use a UV filter often. (It is worth pointing out that any filter will degrade the quality of the image.) That being said, many photographers claim that good UV filters don’t negatively impact image quality.
Compared to other types of filters, UV filters are relatively inexpensive. And they are the type of filter you can leave on your lens all the time. Make sure you purchase a multicoated glass filter that is less prone to greasy smudges and scratches.
Polarizing Filters
Unless you’ve taken a physics or engineering course, polarization may be a tough subject to swallow. My head still spins when someone tries to explain vertical and horizontal (both linear) and circular polarized light, as well as unpolarized light. Essentially, photographers use a polarizing filter to manipulate light. Certain light waves in a field of vision that are not polarized the same way as others can simply be blocked from entering the lens via a polarizing filter.
Circular polarizers and position
For photographers, the most popular type of polarizing filter is the one called a circular polarizer (Figure 7.16), a rotating filter that allows the user to block different light waves based on their polarization. For example, when the filter is rotated to allow only vertically polarized light to pass through, horizontally polarized light is barred entrance. All other light waves that are neither vertical nor completely horizontal are only partially allowed through depending on their angle to those two axes.
Figure 7.16 A circular polarizing filter allows the photographer to dial in the appropriate angle of polarization by spinning the outer ring.
Practically speaking, colors become more saturated and reflections disappear when you bar some light with a polarizing filter. As you rotate the filter, the angle of light allowed through changes, enabling you to take advantage of polarized light waves entering the lens at many different angles (Figures 7.17, 7.18, 7.19, and 7.20). You can see this change take place through the viewfinder or Live View display as you rotate the filter. It is very difficult, if all but impossible, to replicate this type of physical effect through postprocessing.

ISO 100 • 1/100 sec. • f/5.6 • 24mm
Figure 7.17 Even on an overcast day, a bronze statue can reflect a large amount of light.

ISO 100 • 1/100 sec. • f/5.6 • 24mm
Figure 7.18 By turning the outer element on a circular polarizer, certain light waves are barred from passing through the lens, resulting in a different reflection in the statue.

ISO 100 • 1/100 sec. • f/5.6 • 24mm
Figure 7.19 Turning the polarizing filter even more continues the change in reflection.

ISO 100 • 1/100 sec. • f/5.6 • 24mm
Figure 7.20 While you turn a polarizing filter, the change in effect is continuous and visible through the viewfinder, letting you fine-tune the amount of polarization for any particular light-wave orientation.
Note that the effect of the filter is strongest at 90-degree angles from the direction of the sun, and it lessens the more you point toward the sun or directly away from it. For example, since the sun rises in the east, you would need to point your camera either north or south to see the effect of the filter, as opposed to due west.
Saturation
During the middle of the day, light and color can be weak, especially in a digitally captured image. Time for a polarizing filter. At an appropriate position to the sun, rotate the filter against a weak blue sky to get a saturated blue that contrasts nicely with white clouds (Figures 7.21 and 7.22). At its most saturating, the filter is barring the prevailing angle of polarized light and essentially underexposing the sky as a result of this reduction in light passing through the filter.

ISO 100 • 1/200 sec. • f/5.6 • 17mm
Figure 7.21 Late-morning light can dull an otherwise interesting sky with good cloud structure.

ISO 100 • 1/200 sec. • f/5.6 • 17mm
Figure 7.22 A circular polarizer can saturate the blue in the sky and boost the contrast between the blue and the white clouds.
Be careful not to oversaturate. If the sky appears very dark (note that the higher in elevation you go, the darker the sky), it might not fit with the foreground exposure or content, producing an unrealistic-looking image (Figure 7.23). After making a few images of a sky at what seems like the correct level of color, rotate the filter back just to be sure you haven’t gone too far (Figure 7.24).

ISO 100 • 1/400 sec. • f/5.6 • 24mm
Figure 7.23 Even though the result is dramatic, a polarizing filter’s saturation can go a bit too far, as shown in the sky above the lit building.
ISO 100 • 1/400 sec. • f/5.6 • 24mm
Figure 7.24 Recognizing that the saturation is too much for the content, rotate the filter back to lighten the sky.
Polarizers sometimes stand out when used in conjunction with wide-angle focal lengths. Since such focal lengths have wide angles of view, the field of view captured in the frame may include areas of the sky that are not at 90-degree angles from the sun. The result is a band of saturation that will appear close to that 90-degree mark but nowhere else (Figure 7.25). It is awkward to have this band of color move through the frame with two areas of nonsaturated color on both sides of it in the sky.

ISO 100 • 1/250 sec. • f/5.6 • 17mm
Figure 7.25 Even at a 90-degree angle to the sun, an ultra-wide focal length with a polarizer can produce an obvious saturated band in the sky.
Reflections
Polarizers are also great for cutting through reflections. Imagine shooting through a window from a city sidewalk. More than likely, you will capture a reflection of the building across the street or something else outside the window. You can use a circular polarizer to reduce the light waves that create this reflection, allowing you to make a picture of what is inside the window (Figures 7.26 and 7.27).

ISO 100 • 1/60 sec. • f/4 • 30mm
Figure 7.26 Without a polarizing filter, the reflection of the vehicle in the window is quite distracting.

ISO 100 • 1/60 sec. • f/4 • 30mm
Figure 7.27 A polarizer blocks the light waves responsible for the vehicle’s reflection.
The same technique applies to reflections on highly specular surfaces, such as water, oily roads, and just about any shiny surface that is mostly horizontal to your position. Instead of being blinded by the light reflecting off water (Figures 7.28 and 7.29), use a circular polarizer to cut through such reflections. If the water is clear enough, you can see what lies below its surface (Figure 7.30).
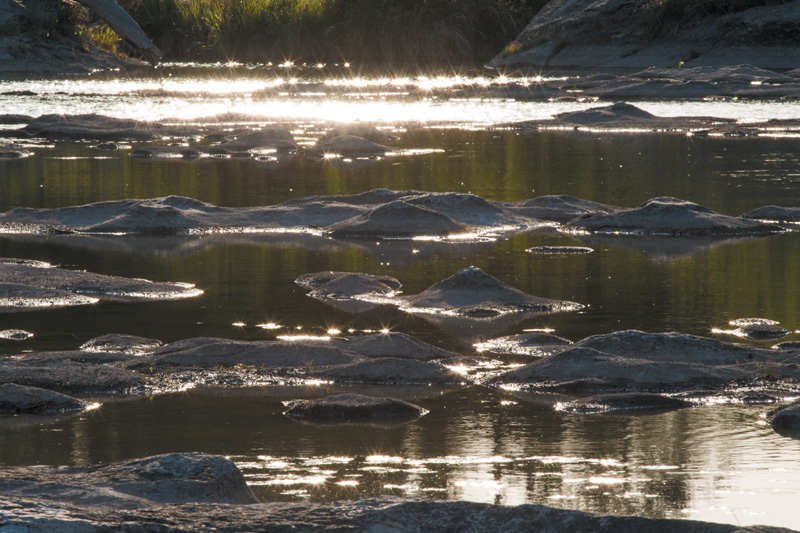
ISO 100 • 1/25 sec. • f/32 • 300mm
Figure 7.28 Bright, distracting specular highlights dot the surface of the Llano River.

ISO 100 • 1/125 sec. • f/5.6 • 70mm
Figure 7.29 Even with overcast skies, reflections in the water can shine fairly bright.

ISO 100 • 1/125 sec. • f/5.6 • 70mm
Figure 7.30 A polarizer can mitigate the presence of that reflection, and with calm waters, allow you to see past the surface.
Finally, polarizers are great in reducing the light reflections on some vegetation. I like overcast days for shooting plant life, but a sunny day is not necessarily reason to quit shooting as long as you have a polarizing filter. For a lot of green vegetation with reflective leaves, you can reduce the brightness and reveal detail in the leaves and plant surfaces in the image (Figures 7.31 and 7.32). The polarizer reduces contrast (much like the overcast sky does) and helps bring out colors in the vegetation.

ISO 100 • 1/160 sec. • f/2.8 • 70mm
Figure 7.31 Glossy green leaves can often be highly reflective, resulting in a loss of detail in the specular areas.

ISO 100 • 1/160 sec. • f/2.8 • 70mm
Figure 7.32 Use a circular polarizing filter to reduce the reflections, bring back detail to the leaves, and saturate the greens.
Polarizer best practices
Aside from keeping a polarizer at a right angle to the direction of sunlight, here are three best practices for working this kind of filter.
First, you must take into account the drop in exposure caused by a polarizer. When a polarizer blocks certain light waves from passing through, it also reduces the amount of exposure by up to two stops. Be sure to compensate for this drop in exposure by slowing down your shutter speed. But note that if you open up your aperture to make this compensation, you also change the image’s depth of field.
Second, be aware of what is called birefringence when pointing a polarizing filter toward surfaces like LCD monitors, tinted windows, and certain translucent plastics such as those that cover some smartphones (Figure 7.33). If you wear polarized sunglasses, you know exactly what this is. Birefringence shows itself as a rainbow effect on some surfaces. Although this psychedelic effect can be interesting, many people frown upon it. Note that if you rotate the circular polarizer enough, you can block all light emitted from these types of surfaces, especially computer LCDs.
ISO 400 • 1/60 sec. • f/2.8 • 70mm
Figure 7.33 Although birefringence adds an interesting, psychedelic effect when you photograph surfaces like a smartphone screen, it’s a distracting element in a shot.
Third, it’s not a good idea to use a polarizer at night or in dark interiors. It’s hard to see through them when there is not much light. Remember that, depending on its rotation, a polarizer can reduce the light coming through by two stops. And since an abundance of light is what makes the polarizer sing, it’s just not worth keeping it on when it gets dark.
Neutral Density Filters
The type of filter I use most often is a variation on the popular neutral density (ND) filter. An ND filter is just a dark yet transparent piece of glass, resin, or plastic you put in front of your lens. It does not affect anything except exposure, hence the name neutral. ND filters come in several versions based on darkness, from less than one stop of light reduction up to ten stops. You can load up on several ND filters, or you can opt for a variable ND filter (Figure 7.34), which rotates through levels of exposure reduction. For those who want the most flexibility out of an ND filter, the variable ND is the way to go. They are more expensive than individual ND filters, but over time they are a money saver if you would otherwise buy multiple filters.

Creative applications
So what’s the big deal? It’s amazing what can be achieved by having less light for the camera’s meter to measure. You have seen those images of piers in lakes surrounded by what seems like swirling smoke or those waterfalls that were obviously shot with extremely long shutter speeds. Although some of these shots were made when the light was conducive to longer shutter speeds (Figure 7.35), others were made with the light-blocking assistance of an ND filter.

ISO 50 • 20 sec. • f/22 • 24mm
Figure 7.35 Pre-sunrise light is low enough to get extremely long shutter speeds. However, not all situations are alike, and obtaining the same effect for the water at any other time might call for a dark ND filter.
By reducing the amount of light passing through the filter, the camera must expose much longer to compensate for that drop. This means using slower shutter speeds, and the resulting effect of such speeds on dynamic subject matter like water can be drastic (Figures 7.36, 7.37, and 7.38). We all enjoy using long shutter speeds on waterfalls, but with the help of an ND filter, the smoothing effect becomes that much stronger.

ISO 100 • 1/8 sec. • f/22 • 42mm
Figure 7.36 One-eighth of a second was as slow as I could get the shutter speed on this overcast day. It made some motion blur in the water, but the speed was too fast for a dramatic effect.

ISO 100 • 2 sec. • f/22 • 42mm
Figure 7.37 With a variable ND filter on the lens, I lowered the incoming light’s intensity by four stops, resulting in a misty fountain.

ISO 100 • 15 sec. • f/22 • 42mm
Figure 7.38 With the ambient light dialed down seven stops, I was able to get a 15-second exposure and an even smoother waterfall and pool. Notice that at such a long exposure, the trees are less in focus due to the wind.
Lighting issues
ND filters also help photographers combat intense light during the middle of the day. Although high noon may not have the best or most flattering light to shoot with, it’s sometimes the most convenient time. An ND filter can help take a bit of intensity out of the bright light, and as a result, the photographer can use wider apertures and achieve shallower depth of field than if she had no filter.
Many cameras have a maximum shutter speed of 1/4000 of a second. While this is fairly fast, opening a fast prime lens’s aperture up to, say, f/1.4, even while using a very low ISO, may necessitate a faster shutter speed usually reserved for higher-end cameras. It will force you to close down your aperture and gain depth of field. If this is not the look you are going for, throw on a one- or two-stop ND filter, and you can then open your aperture back up (Figures 7.39 and 7.40).

ISO 100 • 1/4000 sec. • f/2 • 50mm
Figure 7.39 At high noon, some cameras would top out at 1/4000 of a second, forcing the photographer to stop down a fast lens and sacrifice a bit of what the lens is about—extra-soft bokeh.

ISO 100 • 1/4000 sec. • f/1.4 • 50mm
Figure 7.40 A one-stop ND filter allowed me to recoup one stop of depth of field, and I didn’t have to touch the shutter speed.
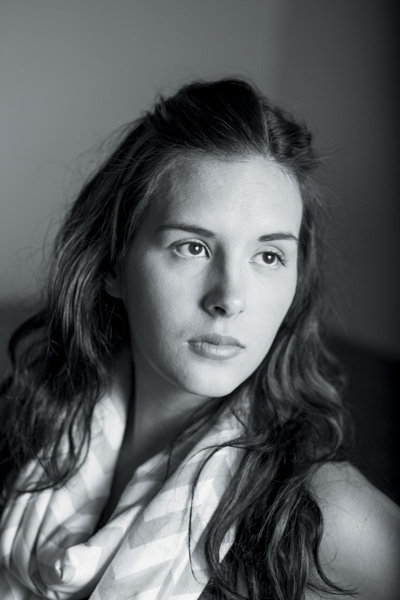
ND filters are especially useful for portrait photographers using artificial light. Many cameras paired with speed lights or studio flash systems sync with the lights at 1/200, 1/250, or 1/300 of a second, which are not fast shutter speeds when you want to open up an aperture to f/1.8 (Figures 7.41 and 7.42). Using an ND filter will knock the ambient light down enough in many cases that you can slow your shutter speed to an adequate sync speed and achieve the look you want.
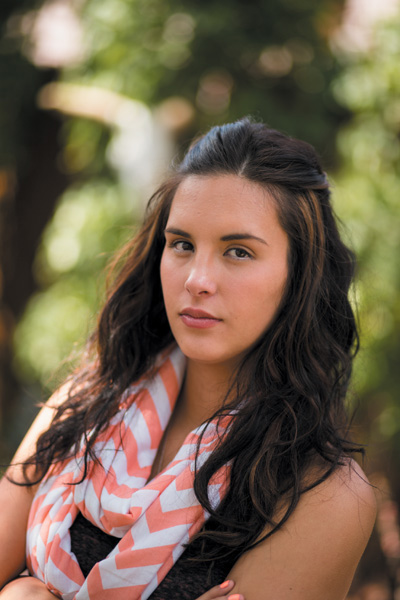
ISO 100 • 1/640 sec. • f/1.8 • 85mm
Figure 7.41 Although the light on Naomi is pleasant enough, the shutter speed I’m forced to use with my aperture open all the way will not sync with my lights.
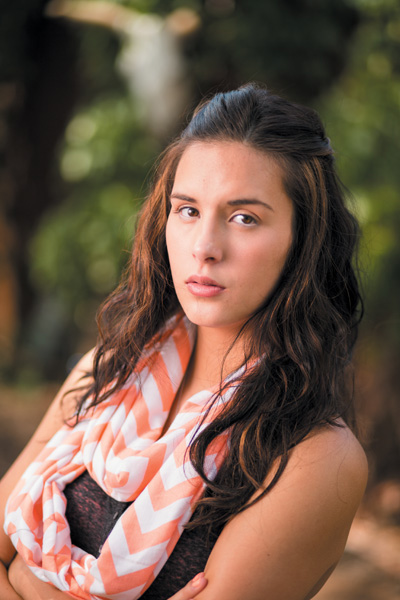
ISO 100 • 1/200 sec. • f/1.8 • 85mm
Figure 7.42 By dialing in nearly two stops of darkening filtration, I used a variable ND filter to reduce the ambient light and allow my shutter speed to sync with artificial light units, even with the aperture opened up all the way. The drop in ambient light muted the background and let Naomi stand out.
Likewise, ND filters work in a studio setting, especially when a drop in depth of field is necessary but difficult to achieve given the intensity of many standard studio flash systems (Figures 7.43, 7.44, and 7.45).
ISO 100 • 1/200 sec. • f/1.8 • 85mm
Figure 7.43 When you want to create a portrait at extremely wide apertures, like f/1.8, some studio lighting units are simply too powerful, even at their lowest setting.
ISO 100 • 1/200 sec. • f/2.8 • 85mm
Figure 7.44 One way to offset overpowering studio lighting units is to simply stop the aperture down. However, this comes with a gain in depth of field—an effect I did not wish to have in this portrait.

ISO 100 • 1/200 sec. • f/1.8 • 85mm
Figure 7.45 Using a variable ND filter to reduce the light by a little over a full stop, I was able to open the aperture back to f/1.8 while keeping the studio lighting unit’s output the same and the shallow depth of field where I wanted it.
Graduated ND filters
A variation on the traditional ND filter is a graduated ND filter—a clear filter that gradually transitions to a darker area (Figure 7.46). Graduated ND filters are especially popular among landscape photographers who want to darken a bright sky above relatively dark terrestrial subject matter (Figures 7.47 and 7.48). For example, shooting among mountains or tall hillsides usually poses exposure issues. If you meter on the ground, the brighter sky will more than likely overexpose. Metering on the sky will render the ground too dark.
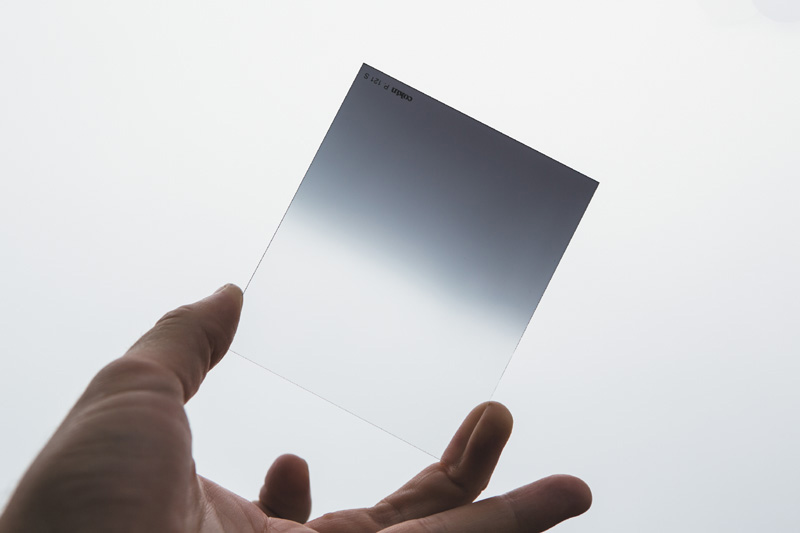
Figure 7.46 A graduated ND filter darkens a portion of the frame while gradually transitioning to complete transparency.

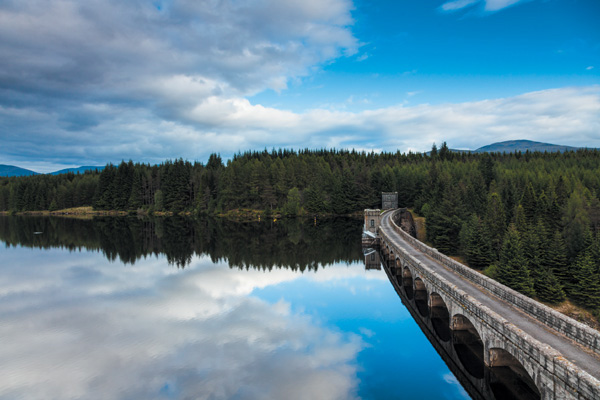
ISO 200 • 1/125 sec. • f/8 • 24mm
Figure 7.47 The sky above the darkened foreground of this Scottish forest and reservoir is just above one stop overexposed.
ISO 200 • 1/125 sec. • f/8 • 24mm
Figure 7.48 Using a two-stop graduated filter to darken the sky above the horizon makes for a colorful and more compelling image, and the sky matches its reflection in the water.
A graduated filter set to where the areas transition or close to the horizon in the frame will allow the photographer to meter on the ground yet subdue the bright sky and maintain detail in both areas (Figures 7.49 and 7.50).

ISO 100 • 1/500 sec. • f/2.8 • 70mm
Figure 7.49 The overexposed areas of the sky take away from the lovely roll of the Scottish farm hills.

ISO 100 • 1/500 sec. • f/2.8 • 70mm
Figure 7.50 A graduated filter with the transition point positioned on the upper-third horizon line helped tame the sky and save the shot.
Graduated ND filters, like their nongraduated brethren, come in various levels of darkening strength. The most popular graduated ND filters are those you can simply drop into a filter holder attached to the end of the lens (Figure 7.51), as opposed to screwing the filter itself to the lens. A filter-holder system like this makes using graduated ND filters an efficient process (you can use several filters together), and it also allows the photographer more precision on where the filter’s graduation appears in the frame. Other types of filters, including polarizers, are often manufactured as rectangle or square drop-in filters and can be used with such a system. The entire toolset may look complicated, but it really is quite simple and useful.

Figure 7.51 A square filter holder like this Cokin system is the most efficient mechanism for working with individual or combined graduated ND filters as well as other filters in square format.
The effect graduated ND filters create can be replicated in postprocessing with software like Adobe Lightroom and Photoshop (Figure 7.52), and some photographers choose to bypass purchasing ND filters. However, using graduated ND filters in the field can often save you time on the computer later. Even though software programs have strong processing engines, I still haven’t seen one bring back completely overexposed highlights like a graduated ND filter can.
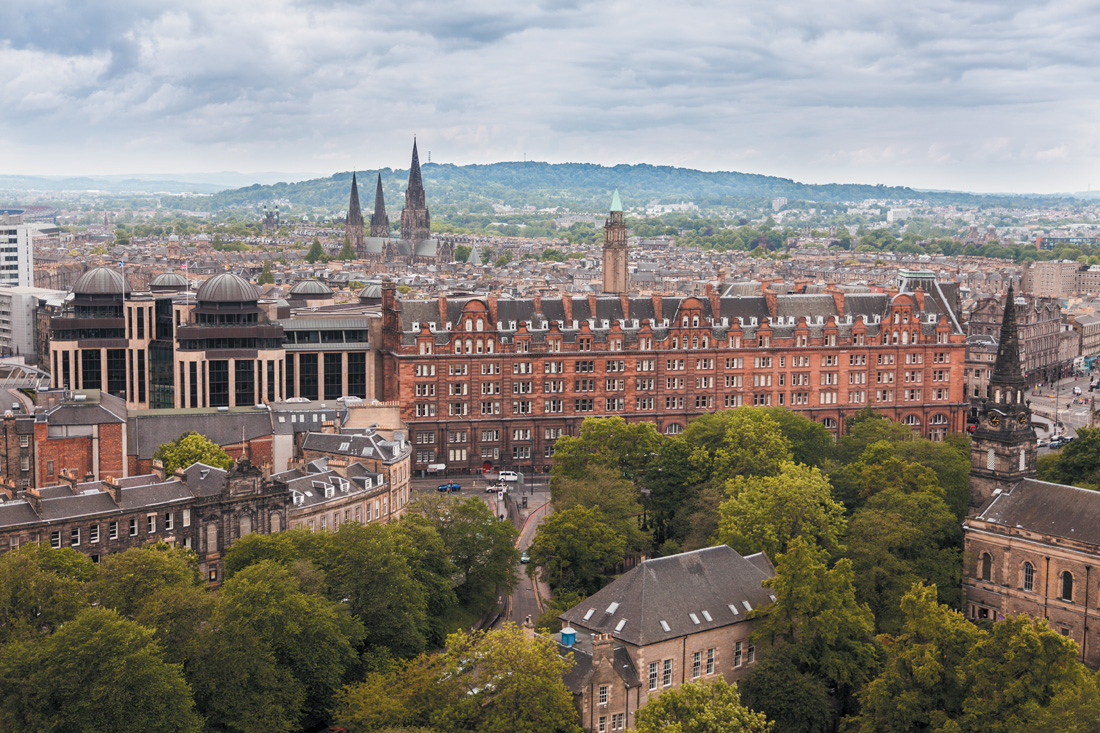
ISO 100 • 1/400 sec. • f/4 • 50mm
Figure 7.52 I brought the exposure of the bright sky above Edinburgh down one stop using Adobe Lightroom, one of many software applications that can be used instead of graduated ND filters.
Lens Covers
Photographers have been covering up their lenses with different materials, for different purposes, for as long as lenses have been used outdoors. The following sections highlight lens covers that can be used for transportation, blending in, and protection from the elements.
Neoprene Casings
Neoprene is a fantastic material. It is lightweight, thin, easily conformed, and impact absorbent. Neoprene makes for a great transportation and storage material for camera gear, especially for lenses. Many camera-bag manufacturers incorporate neoprene into their products, some of which are bags designed specifically for individual lenses. LensCoat is a company that specializes in neoprene wraps that can be installed around telephoto lenses that are used in rowdy environments, such as sports events and landscape and wildlife photography.
Are individual neoprene cases and covers necessary? Maybe not. It depends on the level of security you wish your lenses to have. I don’t use them. When I don’t need a lens in hand, mine goes right back to its bag (some of which have neoprene components). However, LensCoat’s neoprene covers are worth considering for protecting expensive telephoto lenses. They also help reduce the public visibility of such lenses, allowing you to remain more inconspicuous.
Camouflage
Speaking of visibility, wildlife photographers will certainly benefit from encasing their lenses in camouflage. Many of Canon’s long lenses are white (for heat-dispersing reasons), and they can be alarming to some species of wildlife. Imagine setting up to photograph white-tailed deer, unknowing that you won’t see one because they notice that big white blob in front of your camouflaged body. Get that lens covered up as well!
LensCoat makes several neoprene covers that are camouflaged with popular patterns, and for around US$100, you can get a lens cover that protects and blends into the environment. Not a bad deal. However, there are other options. My favorite is simply wrapping my lens with a camouflage fabric stretch wrap (Figure 7.53). You can pick up a 4-yard roll at a sporting-goods store for around US$8. It is thin, easily wrapped around a lens, and it stays put (Figure 7.54). Be sure to get a type of stretch wrap that does not leave any adhesive residue on your lens. More than likely, it is reusable in case you need to remove it and put it back on.

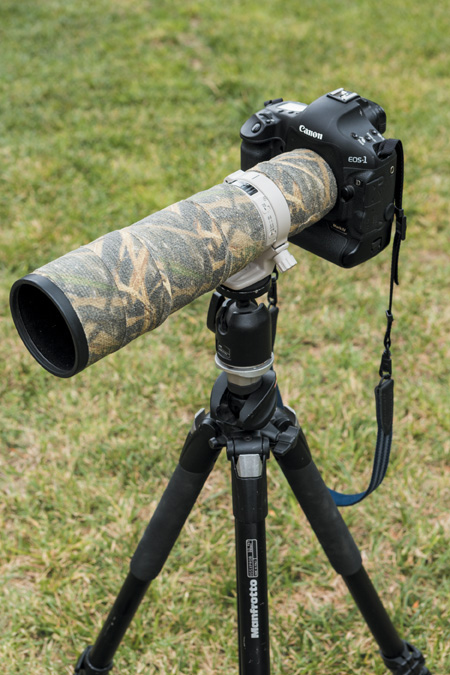
Figure 7.54 In about 2 minutes, you can change an EF 400mm f/5.6L from a white-barreled spectacle to an easily concealed wildlife lens.
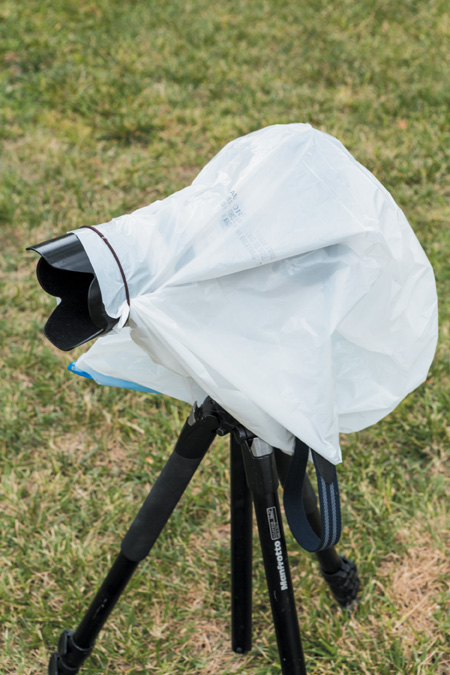
Rain/Weather Covers
Quite possibly the most useful lens covers are those that protect your glass from inclement weather. There have been several times on the field during football season when I needed to protect my lenses from a rain or dust storm (I live in west Texas). These are great moments to employ a cover like the Think Tank Hydrophobia or the OP/TECH Rainsleeve (Figure 7.55).
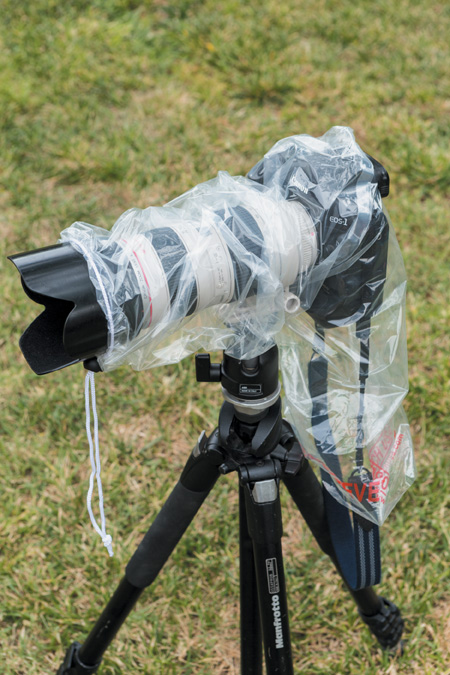
These covers fit securely around a lens’s hood, and the cover encloses the camera body as well, with an opening in the rear for you to see through the viewfinder while protected from the elements. Many of the more expensive rain covers are tailored for a particular range of lenses, but other affordable options are made for general use.
To save money, grab a plastic trash bag and a rubber band large enough to fit snuggly around a lens hood. After unfolding the bag, use scissors to cut the bottom out. Place the camera and lens in the bag, using the rubber band to fit one opening around the lens hood. The other opening is an entrance for you to access the camera (Figure 7.56). You can customize the bag to fit more securely or to fit around a monopod or tripod. I usually carry a few large plastic trash bags in my camera bag for this reason. Here’s a tip: Spend the extra US$2 for good-quality Hefty bags for increased protection.
Chapter 7 Assignments
Lens accessories, such as filters and extenders, are optional equipment, but when the shot counts, they are invaluable. The following assignments help familiarize you with some of the more popular lens accessories.
Go macro with extensions
If you’re into macro photography, extension tubes offer a very affordable way to get in close without breaking the bank. Most extension-tube manufacturers, like Kenko, offer an option to buy three together, and they can be used individually or in conjunction. Start with the thinnest tube between the camera and lens (make sure it is a lens that will reach past 85mm to get the best macro effect). See how close you can focus, paying attention to how you can fine-tune focus with the lens’s zoom ring.
Make a few pictures of your subject, changing your composition as you get used to how the tubes affect the frame’s content. Add an additional tube. Repeat the process, but just a bit tighter, exploring in more detail. Add the last tube to see how the ambient light drops a bit and how getting in even closer affects your composition. Notice how the depth of field decreases with every extension tube you add.
Polarize the world
A polarizing filter’s effect is the only effect that postprocessing-software applications cannot replicate. Spend a morning shooting with just your circular polarizer on a standard zoom lens. Get a feel for how it works in a number of scenarios, keeping in mind that the filter’s effect is most prominent when you point the lens 90 degrees from the sun’s rays. Shoot wide, including the sky, to see how saturated you can make the blues, noting how the changes convey different moods.
Go window shopping on a commercial street and learn how you can eliminate reflections in shop windows by turning the polarizer. Near a lake instead of a downtown? Shoot long exposures of the lake with the polarizer to minimize distracting reflections and see through the top of the water.
Share your results with the book’s Flickr group!
Join the group here: www.flickr.com/groups/canonlenses_fromsnapshotstogreatshots