
6. Specialty Lenses

ISO 100 • 1/60 sec. • f/8 • 100mm
Macros and tilt-shifts
I don’t often practice macro photography (which requires a lens that is essentially a low-powered microscope), but for two consecutive weeks each year I lead a photography field course in a diverse area of Texas rich in greenery and natural color. During that time, shooting the expanse of flowers is just not enough. I also need to get low and close to my subject matter—so close that a trusty telephoto lens is useless due to its long minimum focusing distance. To get extremely close, I need a dedicated macro lens, designed to have a short minimum focusing distance, allowing me to push close enough in on a flower that I can count the veins in the petals. Every spring, I’m thankful that these lenses are available.
Every lens could be considered a specialty lens. Each has its typical area of use—wide-angles for landscapes, medium telephotos for portraits, super telephotos for wildlife, and so on. However, Canon manufactures some lenses that fit within the previous designations but are also capable of much more. Enter macro and tilt-shift lenses, two different types of lenses with two very different and creative functions.
Macro Lenses
“Macro” is not usually associated with “small.” However, in the case of photography, macro lenses are what it takes to shoot the ultimate close-ups. I’m a sucker for great flower photography, and in order to capture the delicate nature of the flower’s structure, the minimum focusing distance—the closest one can focus on a subject—of many lenses is simply too long. That’s not to say you can’t crop an image to make it a closer shot of the subject, but then you sacrifice printability and image real estate. Some folks also use their telephotos to zoom in tight on a subject, but this risks motion blur and a lower level of compositional control. Macro lenses are just the thing to get in close on a subject without sacrificing quality and aesthetics.
The Lineup
Macro lenses are built with short minimum focusing distances for their overall focal length. Canon makes six dedicated macro lenses: the EF 50mm f/2.5 Compact Macro, the EF-S 60mm f/2.8 Macro, the MP-E 65mm f/2.8 1–5x Macro, the EF 100mm f/2.8 Macro, the EF 100mm f/2.8L Macro IS (Figure 6.1), and the EF 180mm f/3.5L Macro. The longest lens in the lot, the EF 180mm f/3.5L Macro can focus as close as 1.6 feet away from the subject, with the other lenses able to focus even closer. Don’t think that sounds impressive? The closest focusing distance of an EF 70–200mm f/2.8L, a lens that encompasses 180mm, is 4.9 feet.

Thinking Smaller
The first time you use a macro lens is fun, letting you see a very different, almost magical world our eyes cannot see. However, making nice images with macro lenses can be daunting. In many cases, it forces photographers to explore the frame and its content in a very different way than they would a wider, backed-out shot of a larger context, such as a landscape.
We have to put ourselves into the macro mindset. This means instead of looking at a large area for composition, you look for it in several square inches of space, or less! Macro photography requires a great deal of patience. Folks who consider themselves macro photographers can spend an hour in a spot no larger than a sedan if it is rife with subject matter. Working on a much closer scale amplifies both the subject and the precise technique required (covered later in the chapter). Macro work can often be therapeutic, especially outdoors with the right light.
Light
As with other areas of photography, where the lens is pointed in relationship to the direction of light hitting the subject is of great importance. Light from over the shoulder (Figure 6.2) is not as dramatic as light coming from the side (Figure 6.3) or behind the subject. In fact, front light can sometimes be downright boring for macro work.

ISO 400 • 1/200 sec. • f/4.5 • 180mm
Figure 6.2 Soft front lighting does little to produce dramatic shadows since they are mostly behind the subjects of interest.

ISO 50 • 1/2000 sec. • f/3.5 • 180mm
Figure 6.3 Shooting the same subject with artificial light hitting it from slightly off-axis increases the visual intensity of the shot and makes the lechuguilla look more mean.
Diffused light is the softest, most relieving type of light for natural subject matter like flowers (Figure 6.4). When I’m in a park, my ideal day for photography includes strong, dramatic light in the early morning and late evening, and overcast skies in between. In overcast conditions, sunlight is dispersed in all directions as it exits the clouds toward Earth, dissipating any strong shadows on subjects of interest.

ISO 100 • 1/125 sec. • f/2.8 • 100mm
Figure 6.4 Diffused light, like that produced by overcast skies, reveals great color detail.
Ultimately, light will react the same way on a smaller scale as it does on a larger one. Working the light in macro photography just means you have to adjust your idea of what large and small lights do for a particular subject. While a relatively large light source, such as a floor-to-ceiling window, may provide soft shadows for a portrait, the same light source used with something much smaller can completely remove shadow.
Composing with macro lenses
You need patience when composing with macro lenses. You cannot just walk up to a macro subject, quickly compose, and fire off a shot. It takes time and minute adjustments to the placement of the lens in order to find just the right composition. Principles like the rule of thirds still have their value, but macro shots often involve one subject that really stands out, so your composition will revolve around that primary point.
I usually consider design when I’m composing, especially with macro images. Since I shoot quite a bit for magazines, I want shots to engage a viewer with great leading lines (even if they are part of the shot’s bokeh), to have visual real estate so the eyes move freely around, and allow for a designer to use that space (Figure 6.5). For many of my macro shots, the depth of field is very shallow, and the bokeh is a void space that counterbalances the subject. I want such a space to complement the subject instead of provide another visual attraction (Figure 6.6). Taking the time to find this balance of void versus content is valuable. I love close-up shots where the visual direction of the image is pushed primarily by out-of-focus nothingness!

ISO 100 • 1/320 sec. • f/4 • 100mm
Figure 6.5 Because a large area to the right of the hummingbird is out of focus, a magazine designer can include type for a story about these small flyers.

ISO 200 • 1/320 sec. • f/3.5 • 180mm
Figure 6.6 There’s not much other than the dragonfly’s eyes to draw the eye compositionally in this shot of it resting atop a blade of grass.
Also consider the angle at which the lens is pointed at a subject. My first hundred or so macro shots of flowers were from straight above, splays of colorful petals. I would move in on one flower, throw the background completely out of focus with a large aperture, and shoot. Great, right? For some shots, yes (Figure 6.7). There are fantastic ways of composing shots like this, with one flower taking up most of the frame and a couple more reaching into the image.

ISO 400 • 1/400 sec. • f/2.8 • 100mm
Figure 6.7 Shooting straight down on macro subject matter works, but it can result in a less-than-dynamic visual, such as this flower that seems to be floating on top of a bed of green.
For other shots, shooting straight down on a subject like this can result in images lacking dimension and personality. One way to resolve this is to simply angle the lens—and in doing so, the plane of critical focus—away from being parallel to the subject. Even if you are shooting with very shallow depth of field, angling the lens just the slightest adds visual depth to macro shots. In fact, a very soft bokeh is sometimes necessary to stress this depth. For flowers, I like to use the stem as a strong leading line to the main subject matter, the petals (Figure 6.8). You can only find the flower’s stem by angling the lens. The stem will more than likely be out of focus, but it will appear as if it is emerging from far below to bring a colorful gift (Figure 6.9).

ISO 200 • 1/160 sec. • f/4 • 100mm
Figure 6.8 Moving the lens to where it is at a more extreme angle to the flower reveals the stem as a leading line to the primary subject.

ISO 50 • 1/8000 sec. • f/3.5 • 180mm
Figure 6.9 Stems and other leading lines do not necessarily need to be in focus for them to draw the eye.
Depth of field and shutter speed
Something you should know about depth of field with macro images: It’s a bit more shallow than you think. Relative to the focal length and its macro capability, the selected aperture setting will provide you the proper amount of depth of field, but since the area being photographed is much smaller and the lens is much closer to the subject, the depth of field seems much more shallow than if the shot was a portrait from ten feet away (Figure 6.10).

ISO 100 • 1/60 sec. • f/8 • 100mm
Figure 6.10 I shot the prickly-pear cactus pad straight on using an aperture of f/8 to ensure the small spines would be in focus as well.
Why is this worth talking about? For one, at extremely shallow depth of field, any movement of the camera and/or subject will knock the image out of focus. Even if the shutter speed is fast enough for both types of movement, the subject can easily be moved away from the focal plane and the shallow depth of field. This is true for all lenses with fast apertures, but it is amplified at macro distances (Figure 6.11). If you encounter this issue, consider stopping the aperture down a full stop, or maybe more (Figure 6.12). The effect on the soft bokeh behind and in front of the subject will be minimal, and the smallest parts of the subject that were out of focus will become clear with the depth-of-field expansion.

ISO 200 • 1/60 sec. • f/3.5 • 180mm
Figure 6.11 Using a maximum aperture on some macro subjects shot at an angle may not provide the necessary depth of field for strong subject identification.

ISO 100 • 1/200 sec. • f/11 • 180mm
Figure 6.12 Shooting a profile of the caterpillar at f/11 captures the creature mostly in focus.
It is also wise to work with a tripod when shooting macro. A tripod might feel like it slows you down, but it will mitigate the amount of movement in your shot. It will also keep you from creating a blurry shot from using too slow a shutter speed. Like super-telephoto lenses, macro lenses—when pushed in extremely close to the subject—are essentially telescopes to handhold steadily on a subject. What might be a fast-enough minimum shutter speed to shoot a portrait will more than likely be too slow for a macro shot. Use a tripod or try to shoot with at least a one-stop-faster shutter speed and save yourself frustration at the computer later. If you’re using a tripod, be sure to use a shutter-release cable.
Tilt-Shift Lenses
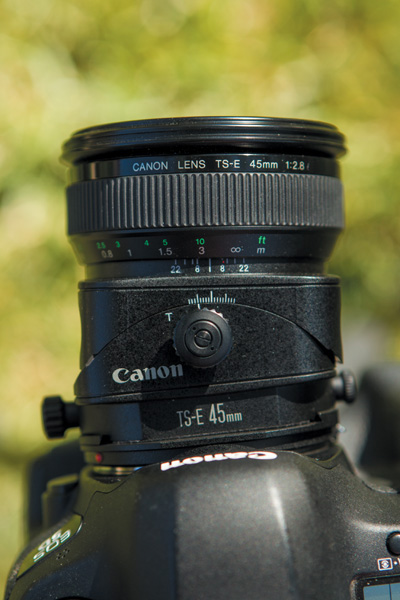
Most people will never use a tilt-shift lens, not even most professional photographers. Why? For one, they just look complicated (Figure 6.13), what with all the knobs and the strange-looking barrel construction. Two, they are kind of complicated—at least at first. There’s a learned technical and creative approach to using them. Three, they are very specialized. Sure, you can use any of Canon’s four tilt-shifts as prime lenses, but you don’t buy or rent them for that. Most people use tilt-shifts for perspective control, and in doing so, create a unique look in their images (some smartphone apps mimic this look in their presets). The fourth reason: They’re pricey. Even the non-L-series lenses run over US$1,000 brand new.
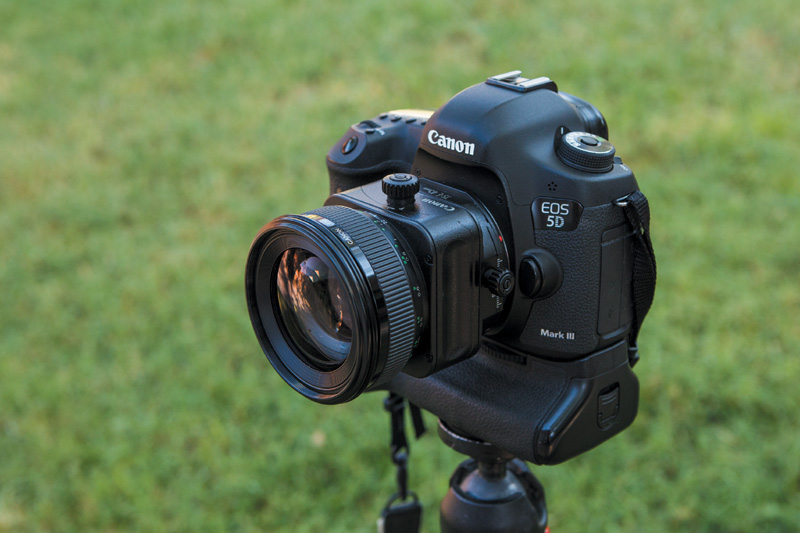
Figure 6.13 It is easy to avoid or be intimidated by tilt-shift lenses, like this TS-E 45mm f/2.8, with its strange knobs and absence of autofocus!
Why even have a section on these lenses when the majority of this book’s readers may never use them? This type of lens serves a purpose for a number of us, and offers a creative outlet for others. Traditional landscape, commercial architecture, food, and portrait photographers use tilt-shifts in many ways. And the lenses are easy to rent (this is what I do).
How Tilt-Shift Lenses Work
All four Canon tilt-shift lenses—the TS-E 17mm f/4L, the TS-E 24mm f/3.5L, the TS-E 45mm f/2.8, and the TS-E 90mm f/2.8—are about control over perspective and depth. They are constructed in a way that the user can manipulate not only a lens’s focus but also the angle of the focal plane and the position of the lens’s optics parallel to the camera’s sensor. Sound confusing yet? Let’s break down the lens’s technological capabilities.
Shift
The Shift function of the lens allows the user to move the optics of the lens up/down or left/right while keeping them parallel to the camera’s sensor. When you turn the Shift knob, marked by an S (Figure 6.14), you will notice the bulk of the lens move, or shift, parallel to the camera itself. Shifting vertically (up or down) is a great way to correct for optical distortion, particularly the wide-angle variety (Figures 6.15 and 6.16).
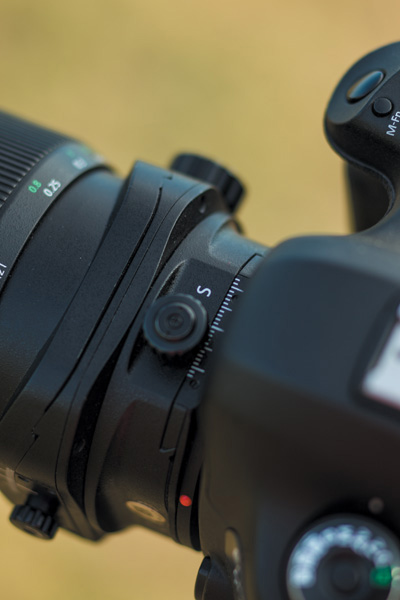
Figure 6.14 The Shift function offers maneuverability to correct for optical distortion, usually made more dramatic by wide-angle focal lengths.
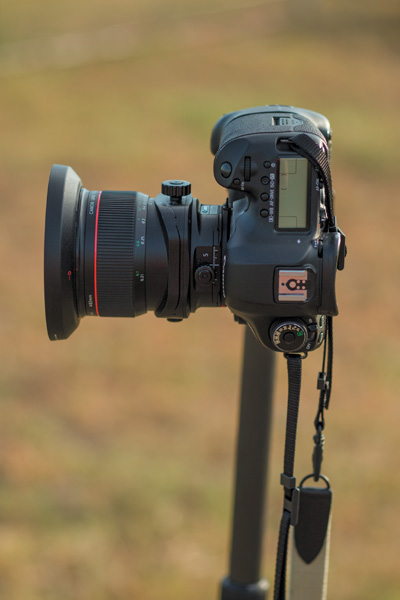
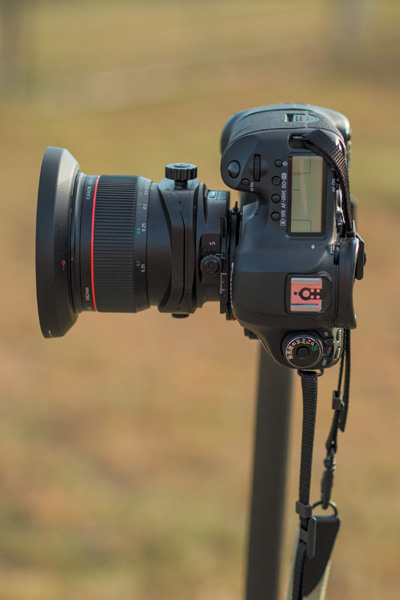
Figure 6.16 Shifting a tilt-shift lens moves the entire lens up/down (or right/left) parallel to the camera’s sensor.
Keystoning, an issue we discussed in Chapter 3, can be corrected using the Shift function (Figures 6.17 and 6.18). For example, when you have to point a wide focal length (let’s say 24mm) upward to photograph something very tall, like a building, the vertical lines of everything in the shot begin to converge toward the middle of the frame. Keystoning might be tolerated in many areas of photography, but in commercial or architectural photography, it is a faux pas. Enter the tilt-shift lens.
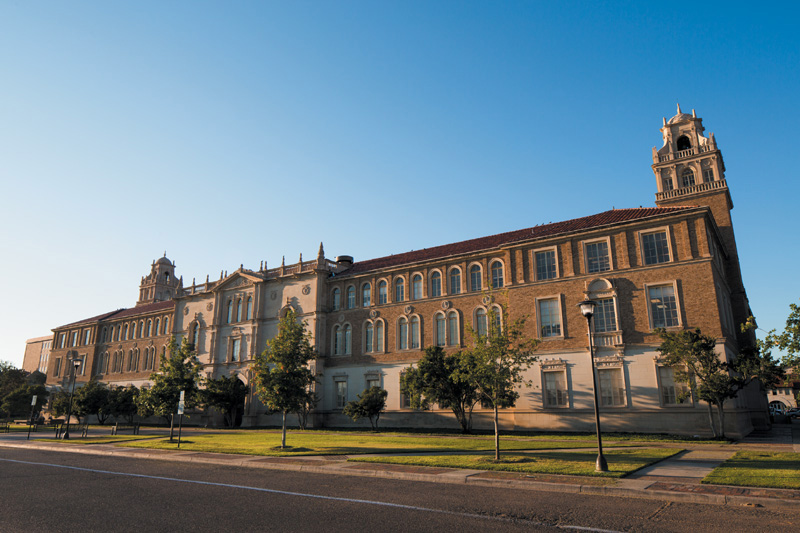
ISO 100 • 1/100 sec. • f/11 • 24mm
Figure 6.17 Shooting upward on a building at 24mm will result in dramatic keystoning, where the vertical lines of the subject angle inward toward an optical center. For many photographers, this is an issue worth fixing.
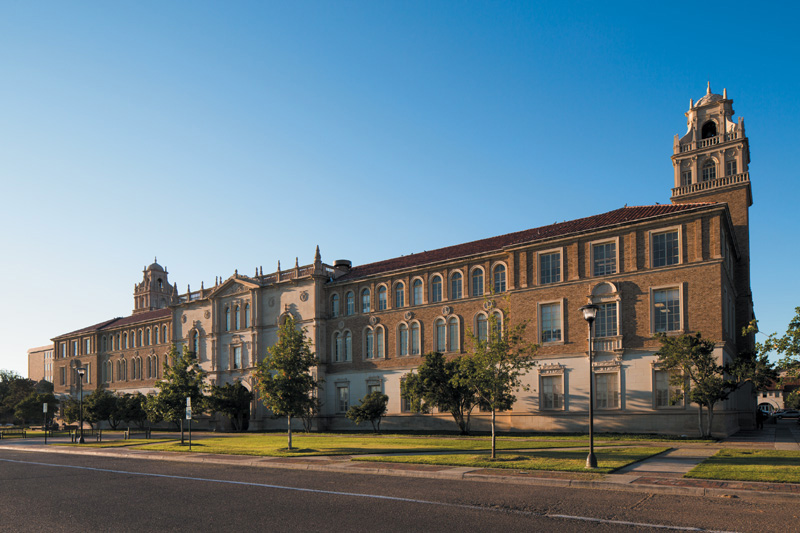
ISO 100 • 1/100 sec. • f/11 • 24mm
Figure 6.18 Simply shifting the lens up after leveling the camera to the subject straightens out the walls of the building and corrects the distortion.
To correct for keystoning (Figure 6.19), place the lens on a tripod (tripods work well for these types of lenses) and with the subject of interest composed where you want it, level your camera out. Level it vertically and horizontally. What happened? More than likely, the horizon is in the middle of the frame, and the building’s top is cut off (Figure 6.20). Not to worry. Using the Shift knob, shift the lens up vertically until the top of the building is where you want it in the frame (Figure 6.21). Turn on your camera’s Live View to help you see this in action. As a result of shifting the perspective of the lens’s optics, you are able to keep vertical lines straight while still working at wide (and all) angles. Likewise, you can also operate this lens vertically by the simple flick of a small locking switch near the lens mount, on the right side of a tilt-shift lens.
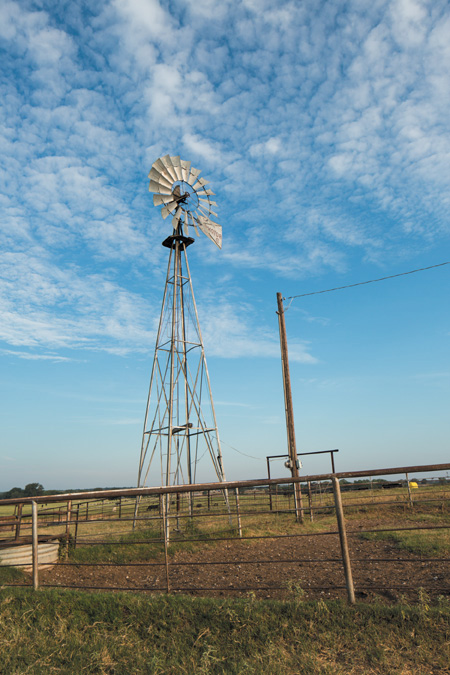
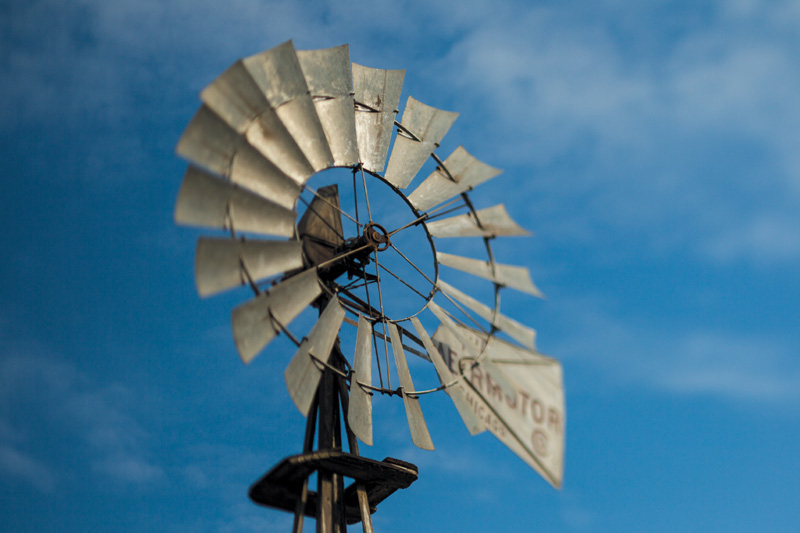
ISO 100 • 1/400 sec. • f/8 • 24mm
Figure 6.19 Keystoning appears in all vertical lines in the frame, even the structure of the windmill itself.

ISO 100 • 1/400 sec. • f/8 • 24mm
Figure 6.20 The first step in correcting keystoning with a tilt-shift lens is to level the camera to the point that all vertical lines are parallel with the vertical sides of the image frame.
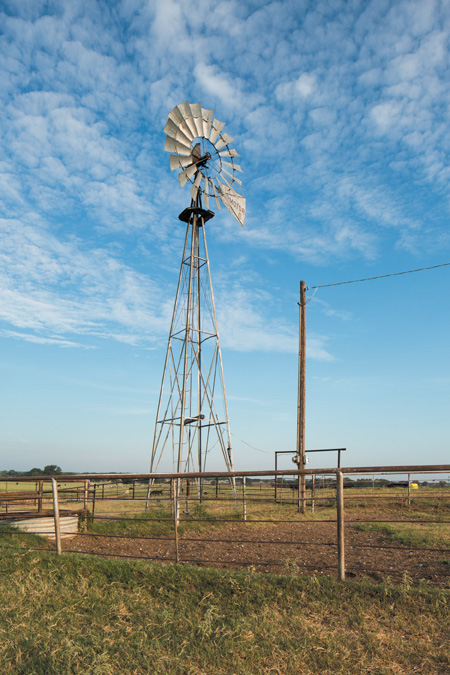
ISO 100 • 1/400 sec. • f/8 • 24mm
Figure 6.21 After you level the camera, a simple shift up will lower the horizon and bring the subject completely in the frame as well as maintain the straight vertical lines.
Tilt
The Tilt function of the lens lets the user take control over the focal plane. Normally, the focal plane is parallel to the camera’s sensor, just like the lens’s optics. The Tilt mechanism allows the user to swing the focal plane, on a horizontal or vertical axis, away from being parallel.
This function can be used to obtain extreme depth of field in cases where f/22 is not enough or when such a small aperture slows the shutter down too much. When you tilt the lens downward—using the knob marked T (Figure 6.22)—the focal plane, and the subsequent depth of field, are laid over the frame instead of moving into the frame (Figures 6.23 and 6.24). This means that the infinite theoretical plane that makes up the plane of critical focus can now be simply placed on top of the content in the shot, and you can use a larger aperture to obtain maximum depth of field. This is more complicated than shifting a lens, but the technique is now easier than ever with digital cameras. Turn on Live View again to aid in seeing what happens when you tilt the lens down or up and then stop the aperture open or down. To obtain maximum depth of field after tilting the lens on the subject, start with a middle aperture, maybe around f/8. Theoretically, with the focal plane tilted onto the subject, a middle aperture value will provide you enough depth of field to ensure everything is in focus. If you do not see it as so, stop down the aperture more and/or tilt the lens onto the subject more.

Figure 6.22 The Tilt function of tilt-shift lenses allows the user to swing the focal plane horizontally or vertically, making for some interesting manipulations of an image.
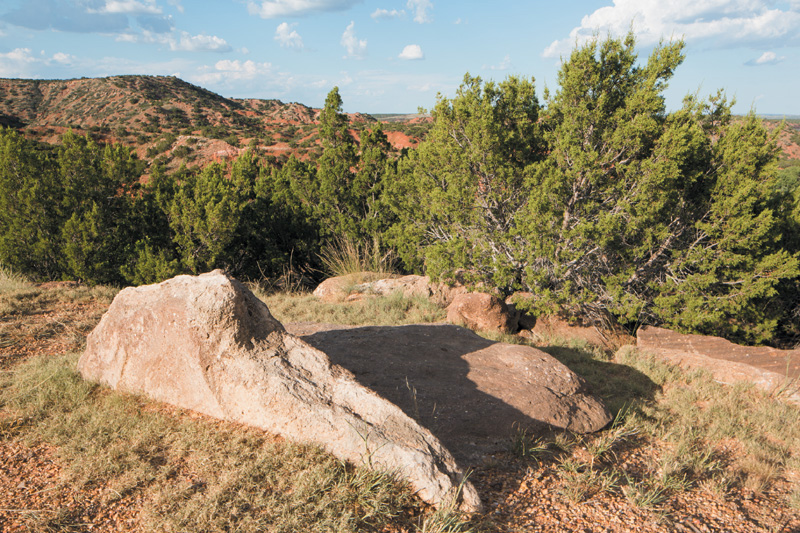
ISO 100 • 1/100 sec. • f/11 • 24mm
Figure 6.23 At f/11 and with the plane of critical focus placed on the top of the rock in the foreground, there is not enough depth of field to pull the hillside into focus.
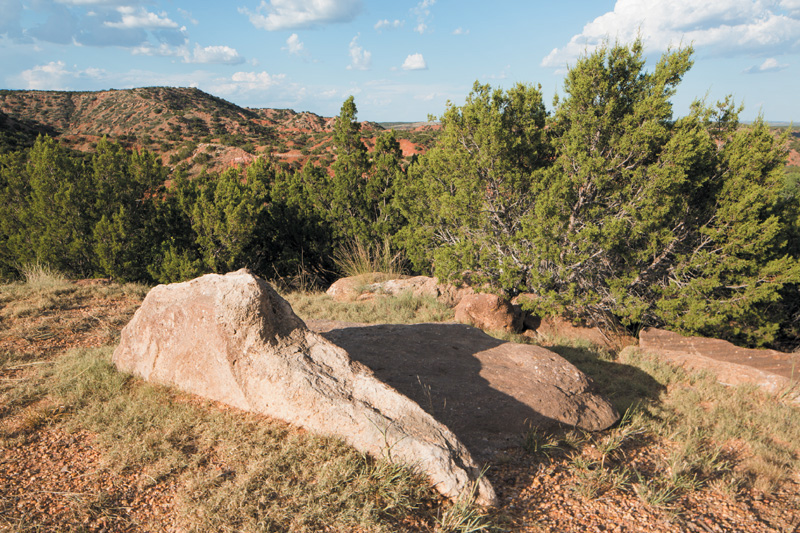
ISO 100 • 1/100 sec. • f/11 • 24mm
Figure 6.24 When you tilt the focal plane downward ever so slightly, f/11 pulls everything into focus, from foreground to background.
You can use the Tilt function to maximize focus into an area of the frame without adding depth of field. This works especially well when you are photographing a row of similar objects that are not parallel to the camera. Leaving the aperture fairly open and the lens untilted, depth of field falls off just like it normally would with any lens (Figures 6.25 and 6.26). However, you can tilt the focal plane horizontally (or vertically, depending on your original orientation) to where it lines up with the row of subjects. The result is a row of subject matter that is in focus but with areas outside the row blurred (Figures 6.27 and 6.28). This is a popular technique for commercial-product photographers.

Figure 6.25 Left “zeroed” out, a tilt-shift lens, such as this TS-E 45mm f/2.8, will act just like any prime lens.
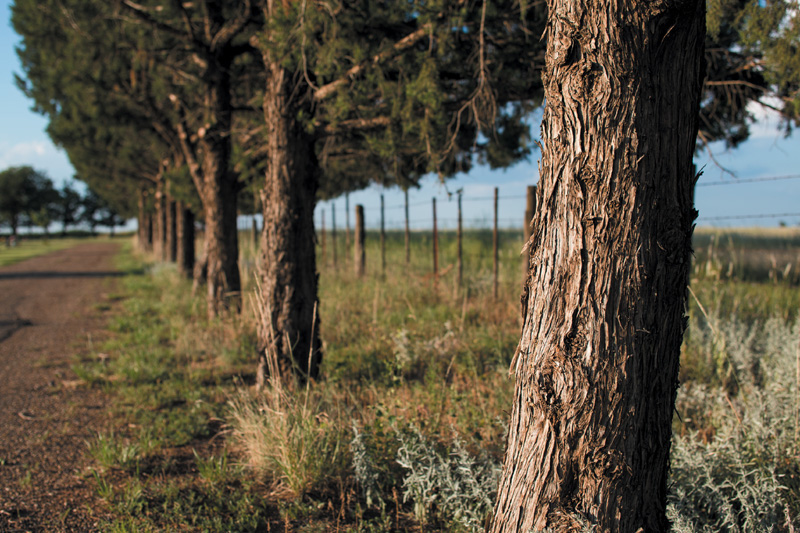
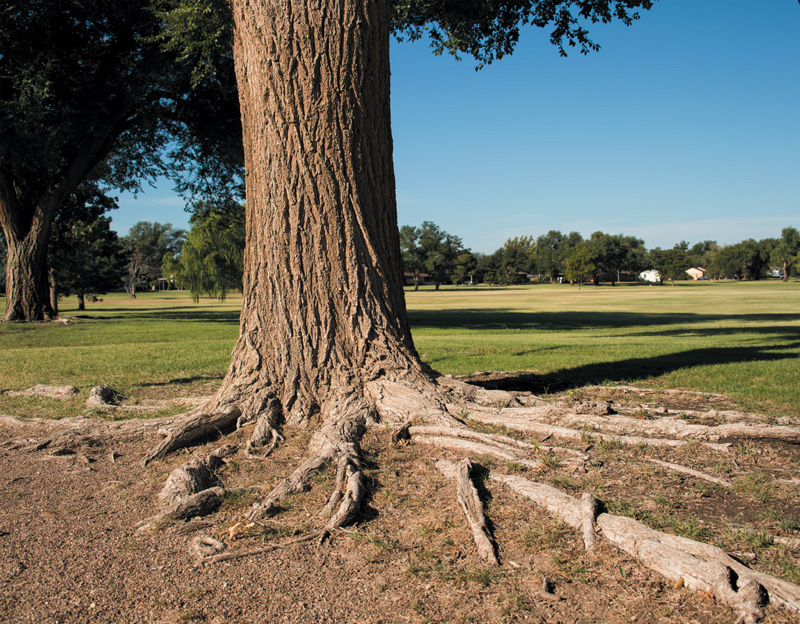
ISO 100 • 1/800 sec. • f/4 • 45mm
Figure 6.26 The depth-of-field drop-off is the result of the focal plane being parallel to the camera’s sensor; the out-of-focus area starts directly after the tree on which the focus is placed.

ISO 100 • 1/800 sec. • f/4 • 45mm
Figure 6.28 The lens is tilted enough to place the focal plane along the row of trees, but the fairly open aperture keeps the depth of field that extends from that plane to a minimum.
Tilt-Shift Creative Applications
Tilt-shift lenses offer similar capabilities to those of old view cameras (still used by some photographers). The accordion-like construction of view cameras lets the user shift and tilt the optics at the front of the camera easily. This not only enables you to control perspective and optical issues, but it also allows for quite a bit of creative flexibility. With modern-day tilt-shift lenses, these creative applications are put into practice with the Tilt function.
The miniature effect
Probably the most popular tilt-shift look in the past decade, the miniature effect has done quite a bit to bring tilt-shift lenses into the mainstream (Figure 6.29). Simply put, tilt-shift lenses can be used to make an otherwise normal-looking world seem as though it was a toy. This is a fun and interesting way to showcase an environment as well as a unique way to grab the viewer’s eyes.
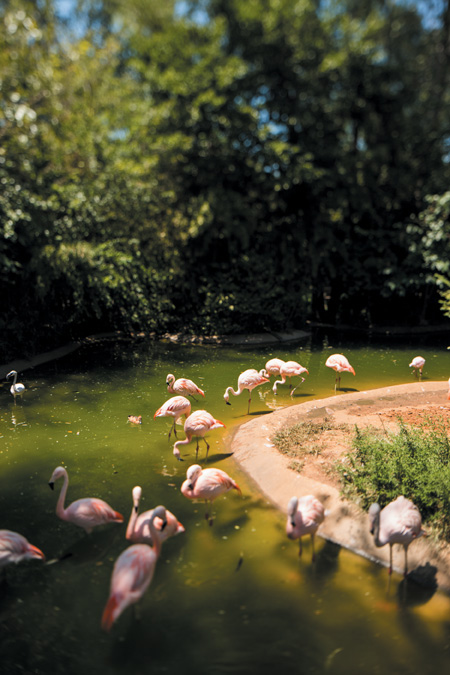
ISO 100 • 1/640 sec. • f/3.5 • 24mm
Figure 6.29 Tilting a tilt-shift lens upward while using shallow depth of field can quickly create a miniature effect. The effect is exaggerated when there are many similar subjects within the frame.
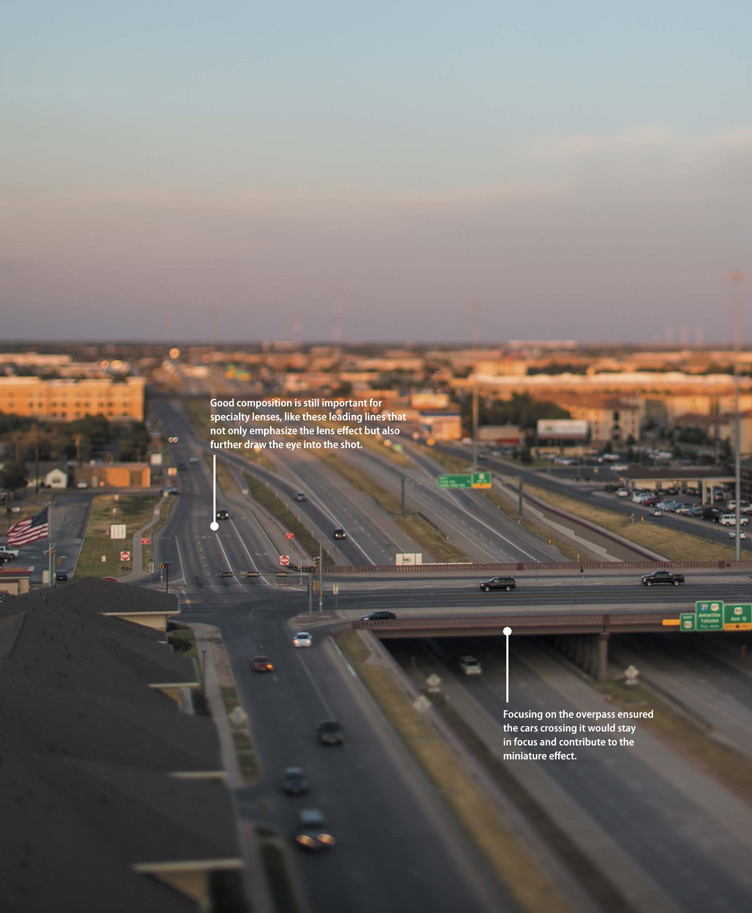
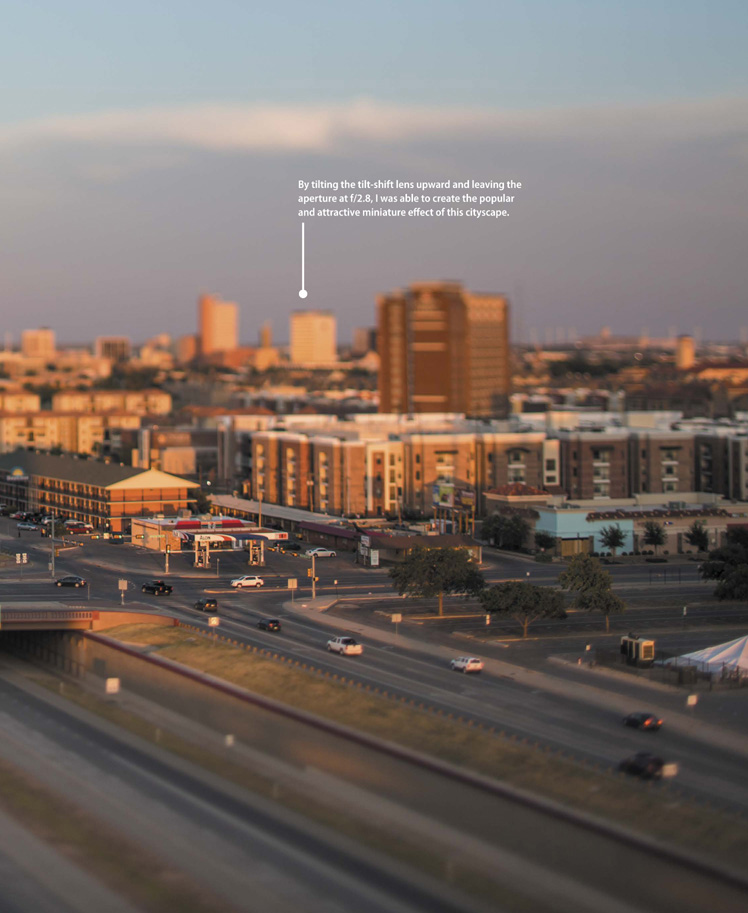
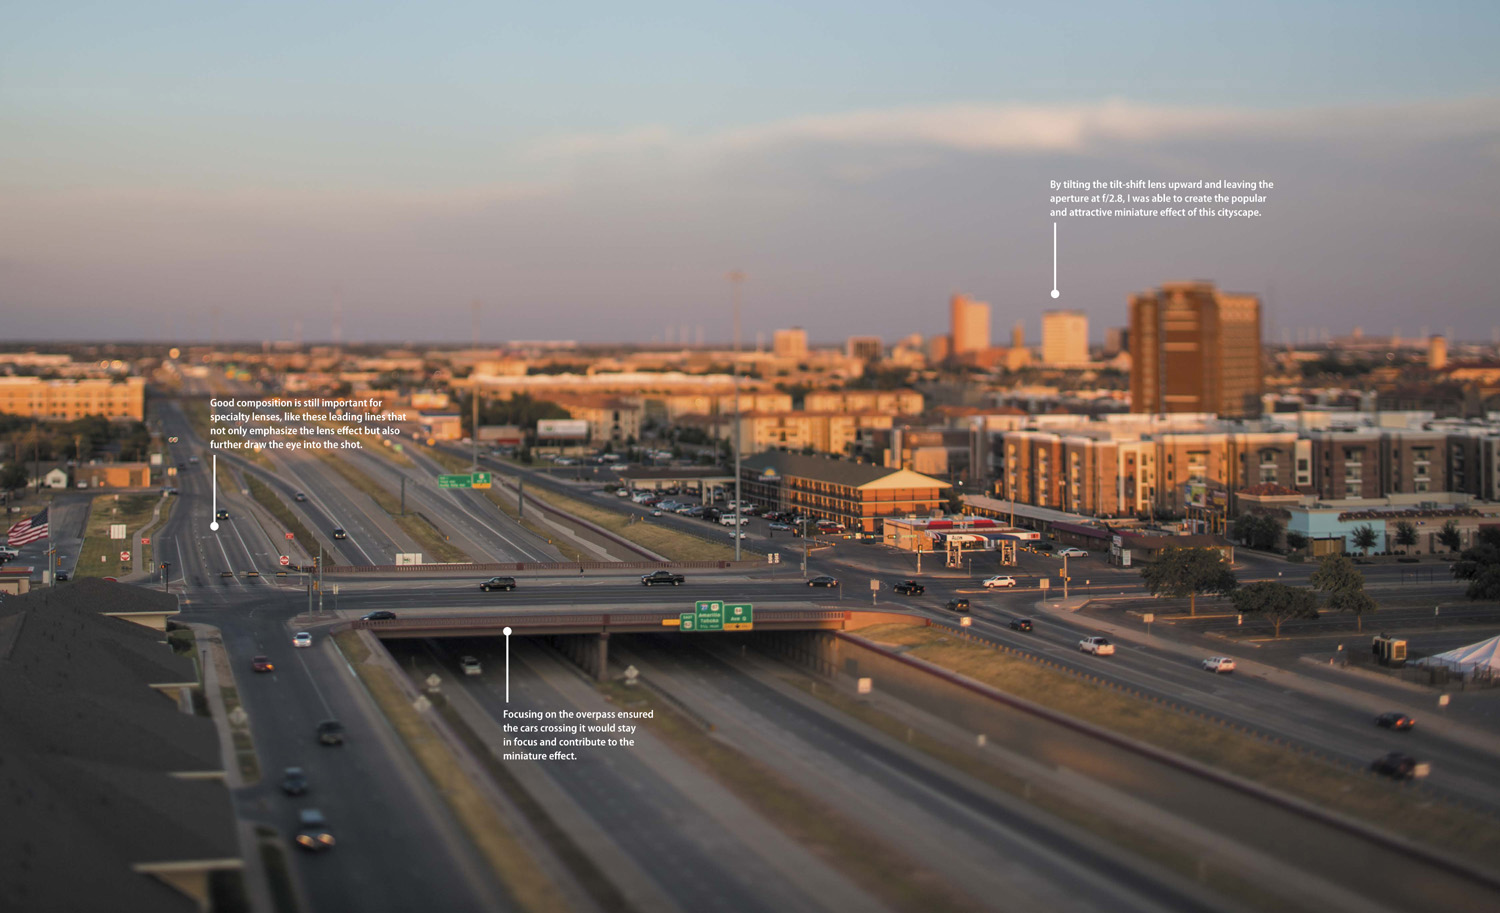
Invoking the miniature effect is quite simple. Find a worthy looking land- or cityscape, and find a place where you can position yourself a bit higher than ground level. A bridge, hill, or ladder will work. Once you are in position, you can choose to shoot vertically or horizontally (Figure 6.30).
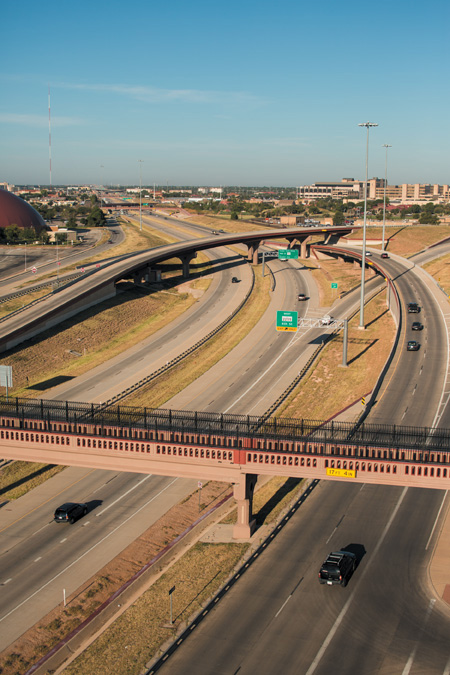
Get the miniature effect in three steps: (1) Point the lens down while composing the shot. (2) Tilt the lens upward, away from the relative position of the subject matter in your shot. (3) Use a large aperture, such as f/2.8 or f/4. As a result, the only thing(s) in focus will be content through which the focal plane passes, and everything below and above the plane will go out of focus (Figure 6.31). This special tilt of the optics is synonymous with the miniature effect. Remember, though, that if you increase the aperture too much, you will quickly increase depth of field. The miniature effect relies on shallow depth of field. Use cars, planes, and other modes of transportation (or people) in your shot to help convey the toy look.
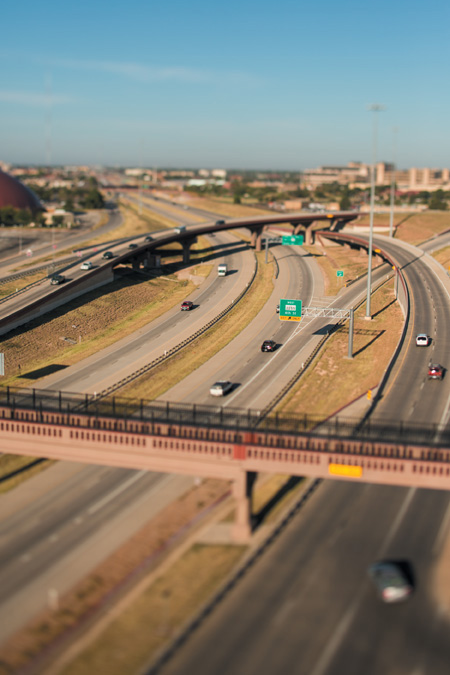
ISO 100 • 1/2000 sec. • f/2.8 • 45mm
Figure 6.31 The same freeway with the lens tilted upward and set to f/2.8. Increase the miniature effect by photographing from an elevated position, such as this nine story parking garage.
The miniature effect is based on a vertical tilting of the lens. However, nothing is stopping you from tilting the lens horizontally. Simply use the lock near the lens mount to rotate the lens on the camera, and your tilting capabilities move horizontally. Although tilting the lens horizontally, even with a shallow depth of field, does not result in a miniature effect, it creates a great way to showcase important subject matter (Figure 6.32).
ISO 100 • 1/1600 sec. • f/2.8 • 90mm
Figure 6.32 Tilting the lens horizontally results in a creative, view-camera-type look.
Portraits
We are all drawn to portraits with a soft background and foreground and tack-sharp focus on the subject. But what if you wanted the background and foreground out of focus as well as everything else except the subject’s head? No worries. You can do that with a simple tilt of the lens and some precise focusing.
Creating unique portraits with the Tilt function is similar to creating the miniature effect, except you do not need to be above your subject. For example, this portrait of my brother, Seth, was shot from slightly under him (he is much taller than me) with the lens tilted all the way to the left (Figure 6.33). I set the aperture at f/2.8. Be aware that using the maximum aperture for portraits may result in a harder time focusing on the subject’s eyes or face. The effect you are going for is possible using a stop or two down from maximum. You can also rotate the lens (using the aforementioned lock switch) on 30-degree angles to create even more focusing possibilities for your portraits (Figure 6.34).

ISO 100 • 1/1250 sec. • f/2.8 • 45mm
Figure 6.33 With the focus on the subject’s left (camera-right) eye, a tilted portrait offers another creative perspective.

ISO 400 • 1/200 sec. • f/2.8 • 90mm
Figure 6.34 Whether horizontal or vertical, portraits made with tilt-shift lenses can be fun to make. It’s easier to keep both eyes in focus if the tilt is vertical.
Panoramas
Tilt-shift lenses are also great for creating images that stitch together in a panorama. The first, and probably the easiest, way to shoot a panoramic image with a tilt-shift is to simply shoot multiple images along a Shift range. You need to set up the camera on a tripod the same way you would when correcting distortion: Level it out so the horizon is in the middle and the vertical lines are straight up and down. Now, with the Shift knob, shift the lens along its horizontal range (you can also do this vertically), shooting an overlapping image at each full mark highlighted on the lens. You will create five images that can then be stitched together in post with software such as Adobe Photoshop (Figure 6.35). This technique can be used with any of the tilt-shift lenses available, even the wide-angles. The optical distortion of such lenses is corrected before the shooting begins, so there is no need to worry about the wide angle being an issue.
ISO 100 • 1/200 sec. • f/9 • 45mm
Figure 6.35 A panorama comprised of five vertical images shot by shifting the lens horizontally. Although not particularly long, the pano showcases a wide perspective without the optical distortion associated with wider focal lengths.
The second way to create a pano with a tilt-shift is more traditional. Again, a tripod is necessary, as well as a tripod head designed for panoramic photography (Figure 6.36). This type of head is designed so you can rotate the camera without having to loosen the entire structure, risking moving the camera out of line. In this scenario, a tilt-shift lens atop the tripod (shifted for perspective control) is rotated in set increments to create multiple overlapping images. This setup is more for those instances when the Shift range of a lens is not long enough for the very long panoramas we’re used to seeing in galleries. However, this technique of creating panos is losing steam due to the advancements in stitching software and high-resolution cameras. Many folks are now handholding their panos (Figure 6.37). As a side note, it is best to shoot these types of panos with the camera turned to a vertical orientation.
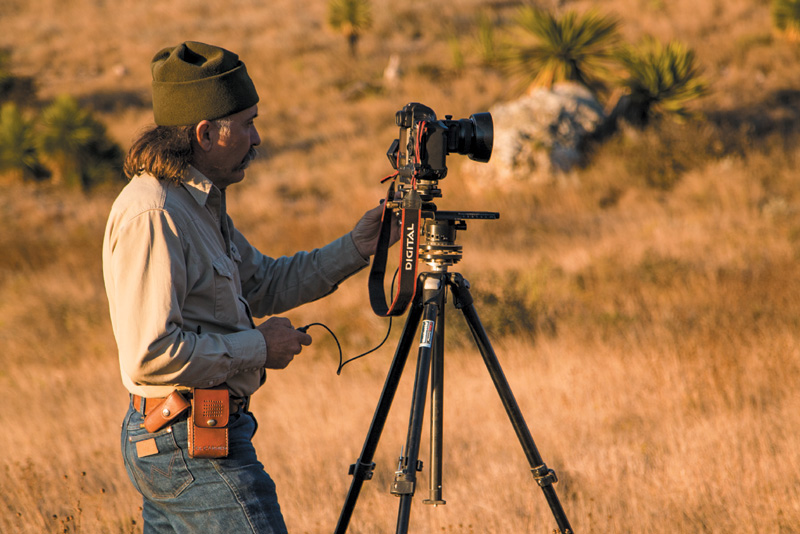
ISO 100 • 1/200 sec. • f/4 • 105mm
Figure 6.36 Photographer Wyman Meinzer uses a Manfrotto Virtual Reality and Pan Pro Head on top of a set of Manfrotto tripod legs to shoot a panoramic of a north Mexican mountainscape.
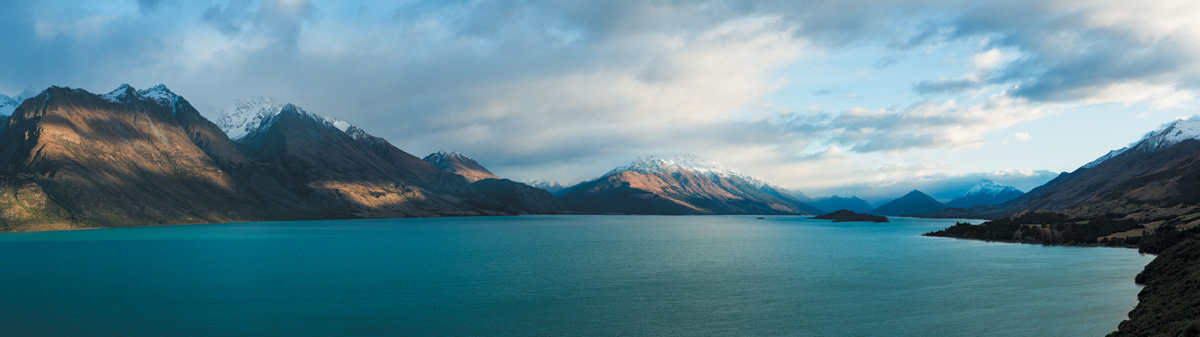
ISO 200 • 1/200 sec. • f/8 • 70mm
Figure 6.37 I handheld this nine-shot pano of Lake Wakatipu near Queenstown, New Zealand. The images were overlapped enough for Photoshop CC to easily stitch them together in post.
Chapter 6 Assignments
Although specialty lenses can be used as prime lenses, they excel in those niche areas for which they are manufactured. Whether you own one, are looking to buy one, or are renting one for a weekend photo walk, take some time to work the lens the way it was intended. Use the following assignments to improve your technical and creative skills.
Push in tight
Using macro lenses is all about seeing the possibilities in a very small space. One of the best areas to explore with a macro lens is a small garden. Look for interesting subject matter to shoot, and find out how far you can push the lens in and maintain focus. Open the aperture up all the way and create mystical dreamscapes of color, but also pay attention to how low amounts of depth of field can be potentially distracting. Compose at all angles, giving special consideration to creating abstract leading lines to the primary subjects. Learn how to be patient by spending time with each subject (to start off, try working each small subject for at least ten minutes).
Adjust for keystoning
Take a wide-angle tilt-shift lens, such as the TS-E 17mm f/4L or the TS-E 24mm f/3.5L, and go hunting for structures that would normally keystone a great deal if shot with these focal lengths. Consider photographing a large church or just about any building that is over two stories high. The taller the building, the more extreme the keystoning. Shoot the building from a nice angle (or several), and correct for distortion. It’s best to use a tripod. First, shoot the building at the desired angle, keystoning and all. Second, level the camera to where all vertical lines are exactly that: vertical. More than likely, this will cut the top of the building out of the frame. Third, use the lens’s Shift function to shift the optics up, bringing the structure fully into the frame at the angle you originally desired without the keystoning. Keep in mind that if you are too close to the structure, you may not be able to shift up enough to include the top of the building in the frame (so back up). Do this for both horizontal and vertical shots of the structure.
Create small worlds
Master the miniature effect. From an elevated position, such as a pedestrian bridge, building rooftop, parking structure, or even a ladder, identify subject matter and composition that would make for a great miniature-effect shot. I like to shoot traffic along city roads. Using a tilt-shift lens (I suggest a 24mm or 45mm), make a shot or two of the scene sans miniature effect to give you an idea of the composition. Then, simply tilt the lens upward and open the aperture up all the way. You will more than likely need to refocus after tilting. See the miniature effect come alive in the viewfinder. You can increase the depth of field if desired, but don’t do it too much or the effect will dissipate. Remember to be careful while shooting from an elevated position! Few shots are worth falling and breaking bones.
Share your results with the book’s Flickr group!
Join the group here: www.flickr.com/groups/canonlenses_fromsnapshotstogreatshots