
1. The Canon Lenses

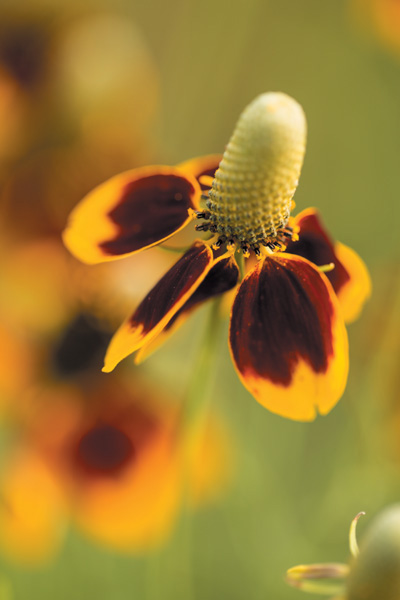
ISO 100 • 1/500 sec. • f/2.8 • 200mm
Top seven considerations
Photography wouldn’t be much without lenses. Sure, you can make images without them, but if you want something more than just a blob of light and color, lenses come in quite handy. All you really need to make images is light, a way to focus the light, and something to capture or fixate the light. A lens’s basic function is to channel a reflection of light through a number of pieces of glass (referred to as elements) and project it on the sensor or film. But lenses do so much more than just focus light.
Used well, they help bring our creative vision to some sort of reality. Lenses are an essential part of the photography equation. Each lens has its special use, and when pushing the limits of that use, all lenses offer creative routes to making great images!
Consider the following seven issues not only for researching and purchasing a new lens for your camera body, but also for learning about and using lenses in a way that resembles how a skilled artisan uses her tools.
Poring Over the Lens
Lens Front
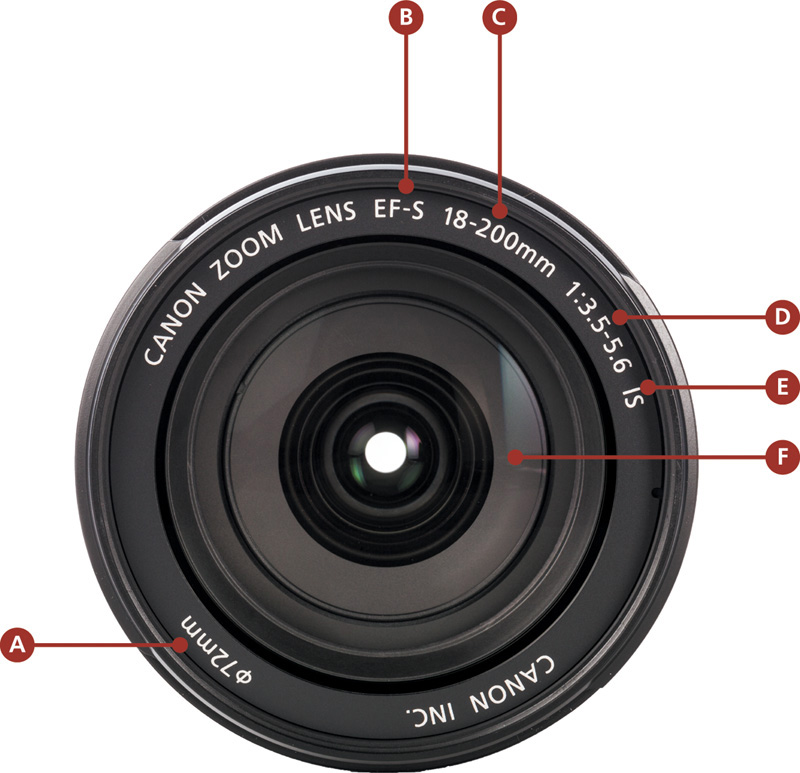
A Filter size
B Lens type (EF or EF-S)
C Focal length
D Maximum aperture value
E Indicator of Image Stabilization–equipped lens
F Front lens element
Lens Side
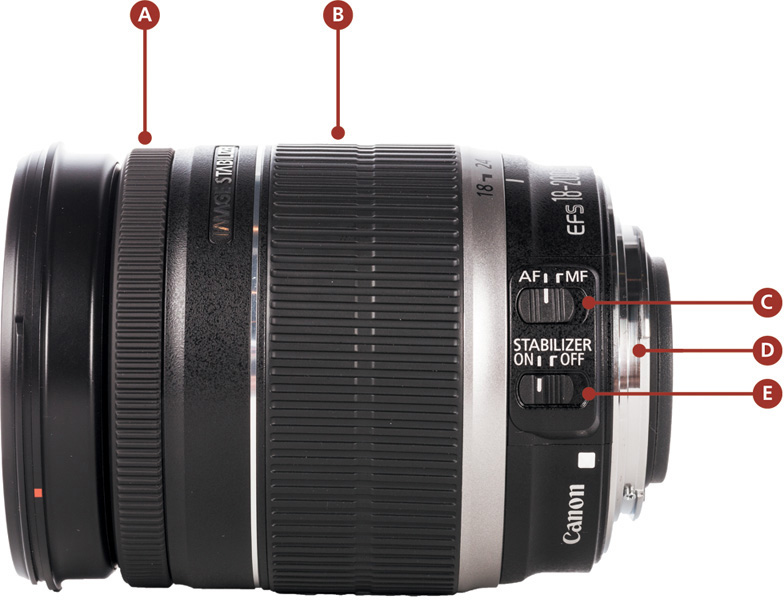
A Focus ring
B Zoom ring
C Auto/Manual Focus switch
D Lens mount
E Image Stabilization switch (only on IS-equipped lenses)
Poring Over the Lens
Lens Rear
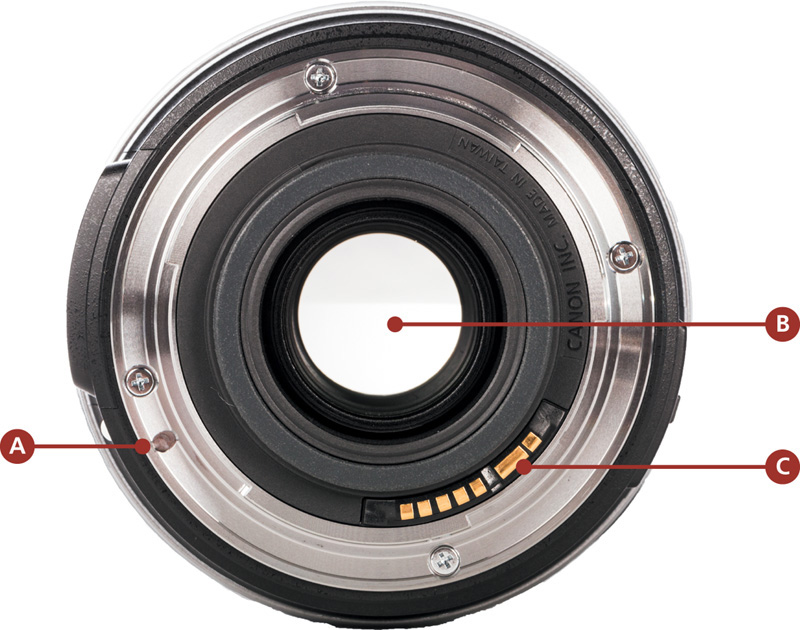
A Lens mount lock
B Rear lens element
C Lens contact points (transmits information between the lens and camera body)
1. Fast vs. Slow Lenses
Within all Canon lenses, there is something called the aperture. More specifically, the mechanism that makes up the aperture is the diaphragm, a ring of overlapping, thin metal plates that either close down or remain open during exposure. For the sake of clarity, we refer to this mechanism as the aperture.
The aperture controls two things: how much light is let in through the lens and exposed on the sensor (or film), and depth of field, or how much of the shot is in focus. We’ll discuss these two points in the next chapter.
Lenses are often described as either fast or slow, based on their maximum aperture openings. When making an exposure in any given light condition, the larger, or more open, the aperture is, the faster the shutter speed needs to be. When you allow a large amount of light to pass through the lens, you need to cut it off more quickly for a proper exposure. Conversely, an aperture that is closed, or stopped down in that same light condition requires a slower shutter speed to create the exact same exposure (Figures 1.1 and 1.2). Essentially, faster lenses are those with large maximum apertures, and those that cannot open up as much are referred to as slower lenses.
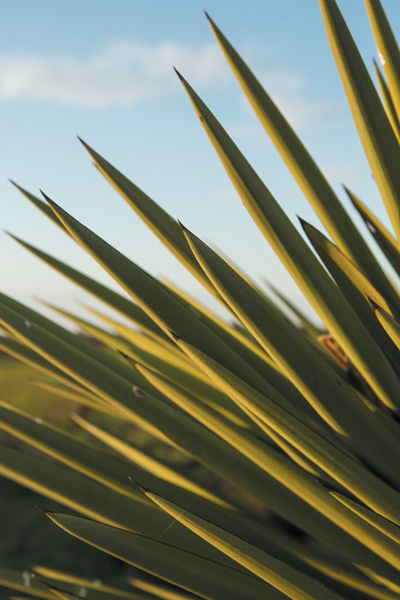
ISO 200 • 1/1000 sec. • f/2.8 • 46mm
Figure 1.1 At f/2.8, the lens’s aperture is considered fast since it allows much more light in at one time than a slower aperture value, such as f/5.6 (see Figure 1.2).
ISO 200 • 1/250 sec. • f/5.6 • 46mm
Figure 1.2 An aperture value of f/5.6 is two stops slower than f/2.8, meaning the shutter speed used in this shot is two stops slower than the speed used in Figure 1.1.
Canon makes several variations on many of their lenses, and much of the variance between them is aperture based. For example, there are three different 50mm lenses in the Canon lineup: the flagship 50mm f/1.2L, the 50mm f/1.4, and the 50mm f/1.8 (also known as the “nifty fifty”). The number following the f-stop is used to identify the maximum aperture opening—the lower the number, the larger the opening.
The 50mm f/1.2L is the fastest of the 50s, and the 50 f/1.8 is the slowest. Practically speaking, the 50mm f/1.2L—at its maximum aperture—lets in more light and allows the shooter to use faster shutter speeds than the other two 50s allow. This comes in handy when shooting in low-light conditions (Figure 1.3). As we’ll discuss later, faster lenses are also valuable on the sports field.
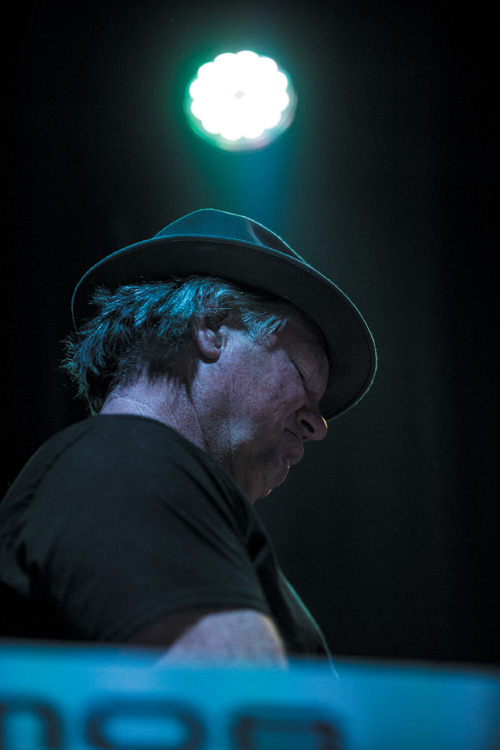
ISO 2000 • 1/320 sec. • f/2.8 • 93mm
Figure 1.3 Shooting live music requires a fast aperture to freeze the action and handhold longer lenses, even if the shot is a tight headshot of a keyboard player.
These three lenses are non-zoom lenses (also known as prime lenses, covered later in this chapter). Canon also manufactures many great zoom lenses, and in doing so, introduces another issue—lens speed. Some lenses, such as the 24–70mm L and the 70–200mm L have a fixed f/2.8 maximum aperture opening. However, other lenses, such as the 18–55mm f/3.5–5.6 and the 70–300mm f/4–5.6, have what is commonly known as variable maximum apertures. Simply put, lenses with variable maximum apertures will close down their maximum aperture as they are zoomed in to the scene. For example, when shooting with an 18–55mm f/3.5–5.6 lens at 18mm—the widest focal length on that lens—the maximum aperture is f/3.5. When zoomed in to 55mm, though, the maximum aperture changes to f/5.6. Along the zoom range, as the focal length increases, the maximum aperture changes to a slower aperture.
These types of lenses are fairly common, and the variable maximum aperture is a result of using smaller-diameter lens elements in the lens, which subsequently keeps costs down. It’s worth noting here that the faster the lens, the more expensive it is. It takes more materials to manufacture faster lenses—more glass, more housing for that glass—since the diameter of the lenses are larger. Oftentimes, the fastest lenses are reserved for the L series. These lenses are made with premium materials, glass being just one of them (more on this subject later in this chapter as well).
Lens speed also refers to how a lens handles depth of field, so keep in mind that the faster the lens, the more one can theoretically throw the background (and foreground for that matter) out of focus. Consider again the 50mm example above. The 50mm f/1.2L, while set at f/1.2, will produce a softer bokeh (the area of the image that goes out of focus when using a faster aperture) than the 50mm f/1.4 and f/1.8 (Figure 1.4). It might be a stretch to see the difference between f/1.2 and f/1.4, but it is there. A more extreme example is the difference between the iconic sports lens, the 400mm f/2.8L, and the nimble-yet-razor-sharp 400mm f/5.6L. There is a considerable difference between the lowest amounts of depth of field each produces when set to maximum aperture.

ISO 50 • 1/200 sec. • f/1.2 • 50mm
Figure 1.4 An aperture lower than f/2.8 offers a unique way of isolating portrait subjects from otherwise distracting backgrounds. At f/1.2, there is only a sliver of carpenter Jason Duby in focus, while the rest of the foreground and background soften drastically.
2. Full-Frame vs. Crop Sensors
Even if you’re new to the world of digital single-lens reflex (DSLR) photography, you’ve probably heard a comparison between full-frame and crop sensors. It might not have meant much to you when purchasing your first camera, but it certainly means a lot in regard to the use of lenses and your future lens purchases.
Full-Frame Sensors
A full-frame sensor is the same size as a 35mm film frame—just think of the film shot in many pre-digital cameras. You can find full-frame sensors in Canon camera models such as the 6D, the 5D (all versions), the 1D-X, and all of the older 1D-S models. For those photographers moving from film SLR cameras (and many other types of cameras) to a DSLR, a full-frame sensor does not affect how you use your lenses and see your images, and you can more than likely use the same lenses, as long as they are designated as EF glass. For many, a full-frame sensor is much desired for many reasons beyond how it correlates with the use of our lenses, particularly among portrait and landscape photographers and photojournalists.
Crop Sensors
A crop sensor shares the same rectangular perspective (often referred to as the 3:2 ratio) but is considerably smaller. How much smaller? For Canon crop-sensor cameras, a bit more than 50 percent smaller. At the time of writing, Canon makes only one size of crop sensor, known as an APS-C sensor (Figure 1.5). These sensors can be found in anything “below” the 5D lineup, such as the Rebel series, the 70D (and its previous iterations), and the 7D. Up until a few years ago, Canon also manufactured another, larger crop sensor known as an APS-H sensor. It was exclusively reserved for the 1D lineup until Canon introduced the 1D-X, at which point the APS-H sensor disappeared from production.
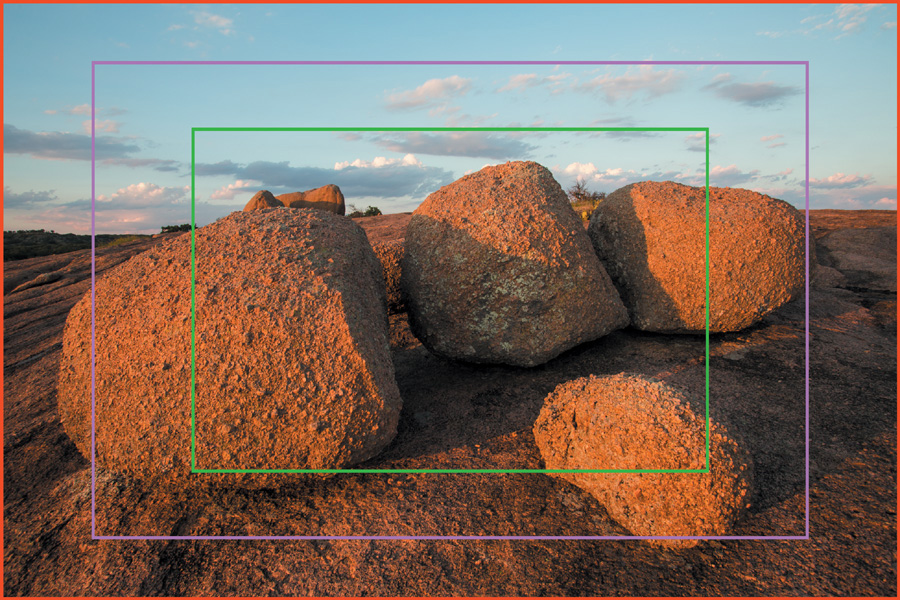
Figure 1.5 This image represents what you would capture using the three different-sized Canon sensors. The red stroke represents a full-frame shot made at 17mm. When using the same lens, and APS-H sensor (purple stroke) captures a bit-tighter shot because of its 1.3x crop. Even tighter is the APS-C sensor’s crop (green stroke), offering a roughly 32mm perspective.
The size difference for crop sensors is determined by the sensor’s crop factor. This is where the sensor matters when it comes to lenses. A Canon APS-C crop sensor has a crop factor of 1.6x (the now-discontinued APS-H has a 1.3x crop factor). The larger the crop factor, the smaller the sensor. For the crop factor to become relevant in this case, you must multiply the focal length of the lens by 1.6 to determine the actual focal perspective in which you are shooting. Sounds confusing, and it is unless you see it for yourself!
Let’s say you are using a 50mm focal length on both a full-frame camera, such as the Canon 6D, and on an APS-C crop-sensor camera, such as the Canon 70D. For the full-frame camera, which has a crop factor of 1x, the perspective provided when looking through and shooting with the 50mm focal length is actually 50mm. However, for the 70D, we must multiply the focal length, 50mm, by the crop factor, 1.6, to determine the visual perspective with which we’re shooting: 80mm. Since the crop sensor chops a considerable amount of sensor away from a full-frame chip’s perimeter, the area of the lens now used can be equated to an 80mm lens on a full-frame sensor. If you are using a crop-sensor camera, multiply any focal length by 1.6 (or 1.3 if you have an APS-H camera), and you’ll find out what the equivalent perspective is on a full-frame camera.
A crop sensor does not actually magnify the focal length of any lens. It simply crops the sides, top, and bottom of the lens’s angle of view. However, crop-sensor cameras are a big hit with folks in the sports and wildlife photography arenas, because compared to a full-frame camera that packs the same resolution (megapixels) as a crop-sensor camera, the crop sensor provides a bit further “reach” when looking at two images of the same size. This is not magnification, just simply the result of two different-sized sensors of the same resolution being combined with the same focal length.
Putting Them in Perspective
So, practically speaking, how does this affect you? It really all depends on which camera you are using. If you are shooting with a full-frame Canon camera, the focal length of the lens with which you are shooting is going to result in that true perspective. However, on a crop-sensor camera, the perspective you get when putting any lens on the camera is simply not as “wide” as it would be on the former type of camera. There is nothing wrong with a crop-sensor camera. They are more affordable because of manufacturing costs, and many are built with the same structural quality as their full-frame versions. However, the next time you read online that an ultra-wide image was shot with a Canon EF 16–35mm f/2.8L on a Canon 5D Mark III, you might consider looking into a Canon EF-S 10–22mm f/3.5–4.5 for your Canon Rebel T5i. At 10mm with this latter combo, you are actually achieving the 16mm perspective of the former’s image.
Wait, we’re not done with this subject yet! To make it even more complicated, Canon makes a set of lenses that work exclusively with their APS-C crop-sensor cameras. Whereas all EF-marked lenses work on both full-frame and crop-sensor cameras, EF-S lenses only work on crop-sensor cameras. The EF-S lenses are fewer in number, but Canon tries to accommodate crop-sensor camera owners by offering equivalents to some of the most popular EF lenses (such as the previous example). Typically, EF-S lenses are more affordable than their EF counterparts, but if you are thinking about upgrading your camera body from a crop-sensor to full-frame sensor unit, you might hold out for EF glass instead of purchasing a lens that might be useless in the near future. This is one of the deficiencies of moving to a full-frame sensor camera system: Some, if not all, lenses might also need to be updated (or upgraded) to fit the new camera. Usually, photographers see this as a valuable transition from one system to the other, but it does come at a premium.
3. Autofocus vs. Manual Focus
The majority of lenses being manufactured today are capable of being used in either autofocus or manual focus mode. Canon does not make a single lens for their DSLR cameras that isn’t capable of both. This wasn’t always the case. Before Canon helped pioneer autofocus systems, it produced all-manual-focus FD lenses. FD lenses are antiques these days, some of which—if kept in good condition—still work well with older all-manual cameras, as well as newer cameras with the help of a mount conversion adapter.
After the development of autofocus, Canon began producing its current line of lenses, known as EF lenses. EF lenses, aside from having a new mount that fits on Canon’s EOS system cameras (just think of pretty much any camera Canon makes these days that allows the interchangeability of lenses), can be put into autofocus mode or manual focus mode with the flick of a switch on the lens barrel.
Now, if you are a purist, you might be thinking, “Why would I ever want to shoot in autofocus mode?” To which my reply would be, “Why would you ever want to shoot solely in manual focus mode?” There is value in shooting in both modes, and knowing when to move to one or the other will help capture the image you want without undue frustration with your technology.
Autofocus is a fantastic innovation for camera technology—a paradigm shifter. It allows us to be efficient in shooting and more accurate in many cases. When subject matter is in motion, such as a running horse (Figure 1.6) or football player, autofocus is an innovation I do not like to go without. My “good” shot rate increases in circumstances where auto-focus can be used, as opposed to manually focusing on such subject matter.
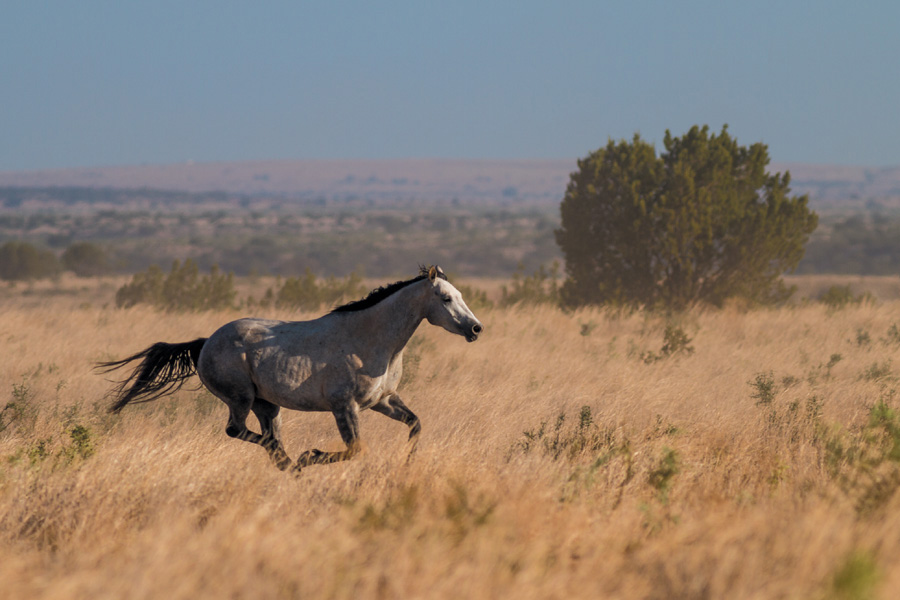
ISO 100 • 1/800 sec. • f/5.6 • 400mm
Figure 1.6 Continuous autofocus was necessary for me to capture this horse running fast and at an angle that closed the distance between us. Although possible, manually focusing this event would have presented a few more challenges and a lot more missed shots.
However, there are times when manual focus is indeed your best option. Autofocus in Canon DSLRs works well when there is enough contrast (the difference between light tones) on or between subject matter that the camera is able to detect. There are times when subject matter lacks enough contrast for the autofocus to work properly, leaving you with a lens—and really a camera—searching for focus. Low-light situations, such as dimly lit concerts or nighttime landscapes, come to mind (Figure 1.7). In these instances, flicking the switch on the lens to manual focus puts you in full control of the lens’s focal plane.
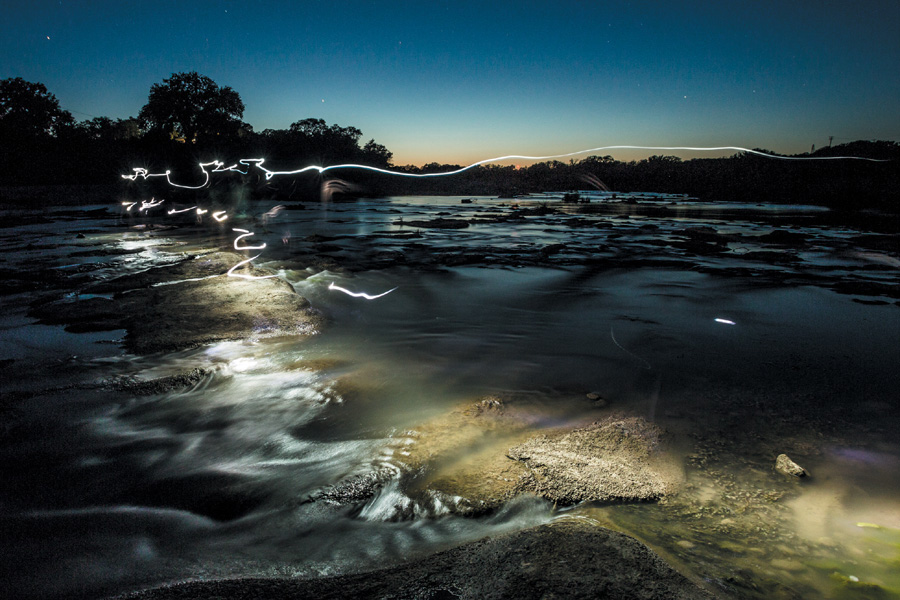
ISO 800 • 30 secs. • f/11 • 17mm
Figure 1.7 For a timed exposure of some adventurous photography students crossing the Llano River, I set my camera on a tripod and switched my lens to manual focus to maintain a steady shot and to keep the lens from “hunting” focus.
Shooting macro (extreme close-up) photography also benefits greatly from manual focus mode. There is nothing more frustrating to this nature photographer than trying to autofocus on the petals of a flower that is occasionally bumped by a soft breeze. Autofocus will continually search for something to focus on, even if the autofocus mode is turned to One Shot in the camera. This isn’t easy on the eyes.
You can also use autofocus and manual focus together to achieve a single image. When shooting landscapes for which you want maximum depth of field, it is often helpful to use autofocus to focus exactly one-third into the scene (more on hyperfocal distance in the next chapter) and then switch to manual to keep the same focal plane when recomposing the frame. I do this when I intend to set up for a while—such as capturing a really large thunderstorm or light painting a structure—and want to make multiple exposures without refocusing for each shot.
In the end, using autofocus or manual focus is based largely on user preference. I am in autofocus 90 percent of the time. Over time, I’ve become used to the different autofocus modes Canon cameras allow the shooter to use, and I’m extremely comfortable in “AF.” However, if manual focus is the wheelhouse in which you find yourself, then use it!
4. Prime vs. Zoom
Speaking of things purists and non-purists alike are passionate about, discussing the difference and overall value of prime lenses versus zoom lenses can cause some photographers to have a conniption. Many times, this argument is focused on which is sharper, lighter, or more true to the roots of photography. Nevertheless, photographers prefer to shoot with one or the other, or a combination of the two.
Prime Lenses
Prime lenses are those that are limited to only one focal length (Figure 1.8). The first camera lenses ever were prime lenses, and they are still very popular, especially among those wanting lighter loads and incredibly shallow depth of field. Prime lenses have fewer moving parts than zoom lenses, making them easy to carry around (aside from the super telephoto lenses), smaller (again, aside from the big glass), and less intrusive to subject matter (super telephotos might as well have red flags flying atop). Since they have fewer moving parts, and fewer pieces of glass or lens elements that might be moving otherwise, prime lens are arguably sharper than zoom lenses.
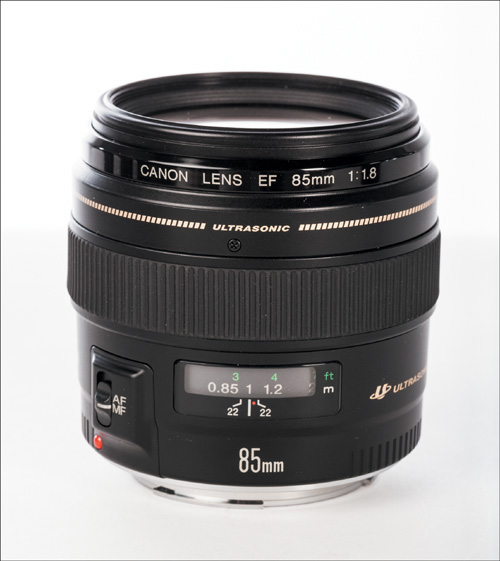
Figure 1.8 Prime lenses, like this EF 85mm f/1.8 L, are appealing to many photographers for their size and quality.
There are plenty of focus charts online and research on the subject. When you nail focus with prime lenses, especially at very large apertures, they are sharp. Perhaps the sharpness is heightened by the extreme bokeh. And when it comes to bokeh, prime lenses cannot be beat. At only one focal length, manufacturing is capable of building lenses that have very wide maximum apertures. Whereas the maximum aperture opening of any zoom lens Canon makes is f/2.8, some prime lenses open up all the way to f/1.2, a whole two-and-a-third stops more open. Talk about great lenses for low-light conditions and isolating subject matter from an environment!
Prime lenses are not without their issues. Some prime lenses do not allow stopping their aperture down more than f/8 (such as the EF 50mm f/1.2L and the EF 85mm f/1.2L). This might pose problems for the photographer looking to achieve hyperfocal distance depth of field, albeit the lenses that stop at f/8 are not ideal for landscapes and other types of photography that maximize depth of field. Prime lenses, as their name indicates, are also limited to just the one focal length. This isn’t necessarily a negative, unless you are the type of shooter who requires a range of focal lengths but doesn’t have room in the camera bag—nor the budget—for every prime lens available. Prime-lens advocates encourage those wanting the flexibility and convenience of zoom lenses to “zoom with their feet” and move around in the landscape. However, there are times when the prime lens comes up too short or too long, without the ability to change on the fly. This usually happens to me when I’m using telephotos such as the EF 300mm f/4L or EF 400mm f/2.8L. While shooting football games, these focal lengths are great, until the action comes real close, real fast!
Zoom Lenses
Zoom lenses, on the other hand, offer a range of focal lengths and are many folks’ go-to lenses. Consider Canon’s EF-S 18–200mm f/3.5–5.6. For crop-sensor camera users, this lens offers enough range for 90 percent of their work. On top of that, it’s fairly light and much smaller than the EF 70–200mm f/2.8L and the popular EF 24–105mm f/4L.
Zoom lenses come in all shapes and sizes, and if you just bought a Canon Rebel or another crop-sensor camera, you more than likely combined it with Canon’s standard EF-S zoom, the 18–55mm f/3.5–5.6. Many folks also purchase an EF-S 55–250mm f/4–5.6 IS or the affordable telephoto zoom, the EF 75–300mm f/4–5.6. With just two of these lenses, a shooter has an entire bag full of prime focal lengths—and more—at her disposal. Personally, I carry an EF 24–70mm f/2.8L the majority of the time, and when I’m on assignment where I expect a variety of shots and perspectives, I carry an EF 70–200mm f/2.8L attached to an additional camera body.
However, zoom lenses are anything but invisible. If your goal is to be inconspicuous in a crowd, a long telephoto zoom is probably not the best choice. Higher-end L-series lenses are also much heavier than their prime counterparts, as well as non-L-series zooms. Canon has done a great job in previous years of manufacturing lighter lenses, but big zooms are still heavy (part of which helps stabilize some to be handheld). Lastly, zoom lenses cannot reach the maximum aperture openings of many prime lenses. More expensive, higher-end zooms, such as those mentioned in the previous paragraph, can open up to f/2.8, the largest opening of any zoom lens Canon makes. But this doesn’t compare to lower-end, less-expensive primes that open up to f/1.8 or f/1.4.
Which One?
Like shooting in manual focus or autofocus, shooting with prime or zoom lenses is a choice based on preference and shooting style. Ultimately, you might have the best luck working with a combination of the two types, if you have room in your camera bag. If I need a lens that offers as much flexibility as I can possibly squeeze out of it, I’ll go with a zoom, particularly if I foresee shots made at multiple focal lengths. If I’m needing a lens that does not get in the way, is easy to carry—and more important, doesn’t seem aggressive to my subjects—then a prime lens or two is what I will throw in a small bag. The majority of the time, though, I have a bag with a few zoom lenses and a couple of prime lenses.
5. Minimum Sustaining Shutter Speed
This is a simple issue, and more of a tip, when it comes to working with and even purchasing lenses. Minimum sustaining shutter speed refers to the slowest shutter speed one can handhold a lens and maintain focus. Any shutter speed slower may incur camera shake and potentially ruin an otherwise great shot (Figure 1.9). When shooting with shutter speeds slower than the minimum sustaining shutter speed, it is best to stabilize the camera by placing it on a monopod, tripod, or anything solid. So, how do you determine minimum sustaining shutter speed? The two determining factors are focal length and your own personal stability.
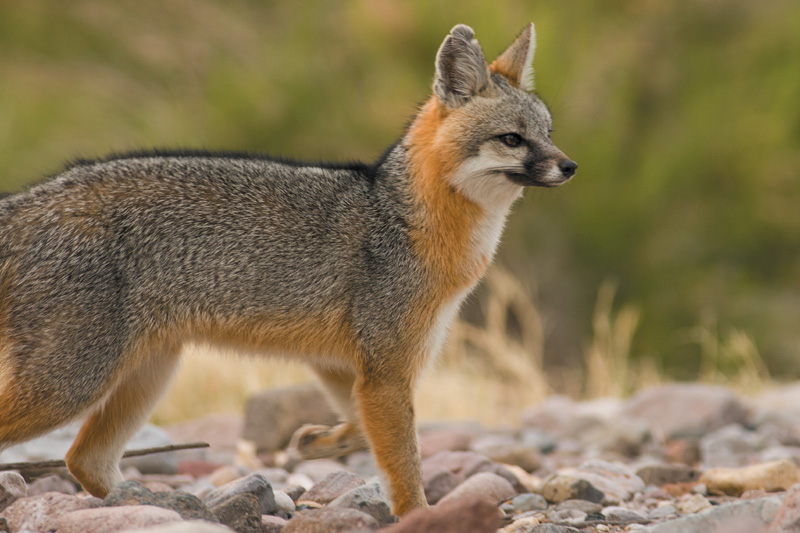
ISO 160 • 1/250 sec. • f/4 • 300mm
Figure 1.9 This shot of a gray fox is out of focus due to my inability to handhold the 300mm lens I was using at 1/250 of a second shutter speed, just a bit slower than the lens’s minimum sustaining shutter speed.
Focal Length
The first factor is the most technical and worth keeping in the back of your mind. The minimum sustaining shutter speed is the shutter speed that has a denominator (since shutter speeds are measured in fractions of a second) that is closest to the focal length in which you are shooting. For example, let’s say you are shooting at 100mm. Theoretically, a shutter speed of 1/100 of a second is your minimum shutter speed—the slowest you could shoot before your own body shake forces the image out of focus. For a 24mm focal length, 1/30 of a second might work best. For a much longer focal length, such as 400mm, 1/500 of a second might sustain focus.
Personal Stability
A minimum sustaining shutter speed also has a lot to do with your own stability. With experience and technique, and a better sense of balance, some folks can shoot with much slower shutter speeds than those suggested above. When I’m locked in a stable stance, I feel fairly comfortable shooting a 24mm lens, and especially a 16mm lens, at 1/15 of a second. Test your stability while practicing at different focal lengths, slowing your shutter speed down for any given focal length until you notice a big difference. Sometimes you can feel it, but it is best to run through a range of shutter speeds while focusing on the same subject and then review the files on a computer screen. Keep practicing, and your minimum sustaining shutter speed will lower.
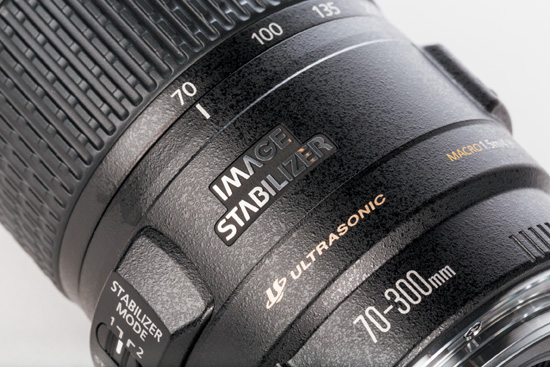
Image Stabilization (IS) is a feature of many lenses in the Canon lineup (Figure 1.10), allowing photographers to shoot with slower and slower shutter speeds. Lenses with IS—such as the EF 70–200mm f/2.8L IS and the EF 70–300mm f/4–5.6 IS—contain a mechanism that shifts the optics in a way that stabilizes the unsteady hands of the shooter, especially for precarious shutter speeds. In some cases, Canon Image Stabilization claims four stops worth of IS, an amazing amount of stabilizing when you’re in a pinch (Figure 1.11).
ISO 100 • 1/80 sec. • f/2.8 • 100mm macro
Figure 1.11 It is fairly common to place a camera and lens on a tripod to shoot macro work. Macro lenses with Image Stabilization help alleviate camera movement, allowing many to handhold these tight shots.
There is no rule stating you must shoot at the minimum sustaining shutter speed. In fact, you should shoot with as fast a shutter speed possible given your aperture and ISO. However, some moments call for shooting with slower shutter speeds, and when they do, it is worth knowing where your minimum sustaining shutter speed exists for the focal length in use.
6. The Lens Trinity
Many photographers who have been at it a while develop an affinity to three lenses: a wide, a standard, and a medium telephoto. In an effort to accomplish as much range with as few lenses as possible, photographers are attracted to this “holy trinity” of glass (Figure 1.12). In all practicality, three lenses capable of covering focal lengths from the ultra-wide (less than 24mm) to the medium telephoto (approximately 200mm to 300mm) can make a lifetime of images.
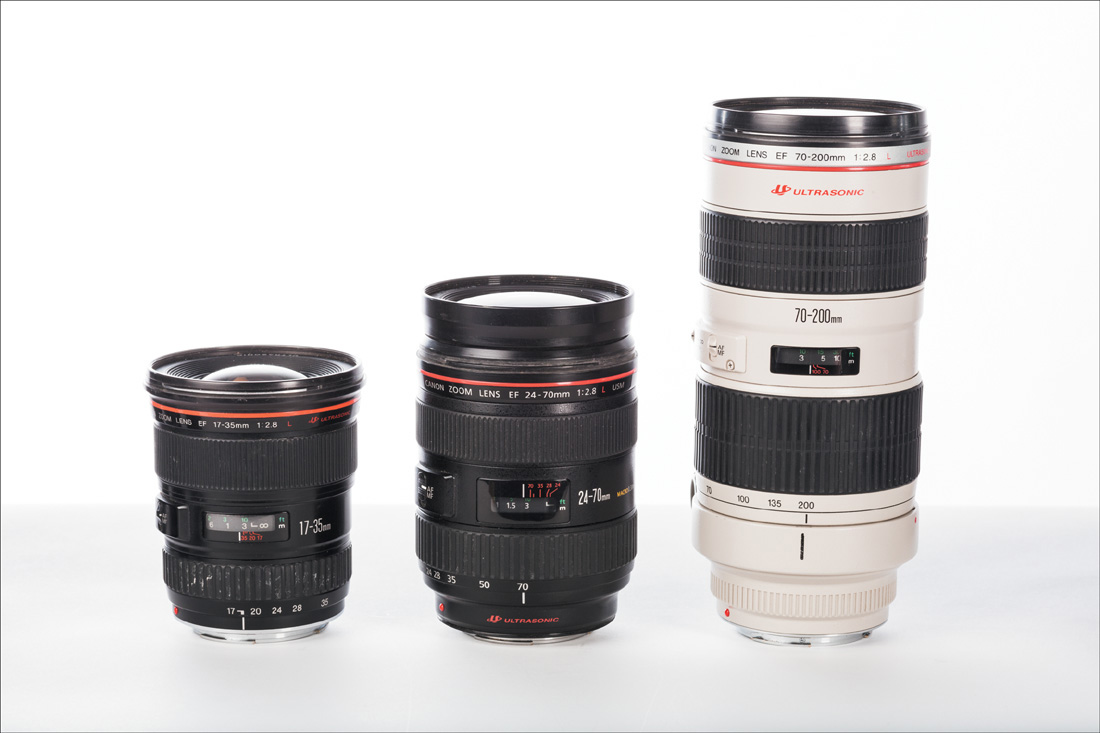
Figure 1.12 My own personal lens trinity: an EF 17–35mm f/2.8L, an EF 24–70 f/2.8L, and an EF 70–200mm f/2.8L. The majority of images I make are shot with these three.
Traditionally, the lens trinity is composed of a lens capable of going extremely wide, such as the EF 16–35mm f/2.8L, a standard zoom lens that moves from wide to just over normal (50mm), like the EF 24–70mm f/2.8L, and one that continues moving toward a longer focal length capable of handling portraiture, sports, and wildlife, such as the EF 70–200mm f/2.8L. These lenses—and really the focal lengths covered—are considered to be the trinity for full-frame cameras, such as the Canon 6D, 5D series, 1DX, and the 1DS models. These focal lengths are also what many of the EF-S lenses—made for the APS-C crop-sensor camera bodies like the Rebel series—are designed around when taking into consideration the cameras’ crop factors.
A lens trinity for a Canon APS-C camera may look more like the EF-S 10–18mm f/4.5–5.6 IS for the ultra-wide zoom, an EF-S 18–55mm f/3.5–5.6 IS for the standard zoom, and the EF-S 55–250mm f/4–5.6 IS for the telephoto zoom (Figure 1.13). This doesn’t mean the so-called full-frame trinity does not work on your crop-sensor camera bodies; you just wouldn’t be able to take advantage of the visual perspective the wider EF-S lenses offer—which when factoring in the crop factor of APS-C bodies equates to trinity-esque focal lengths for a full-frame system.
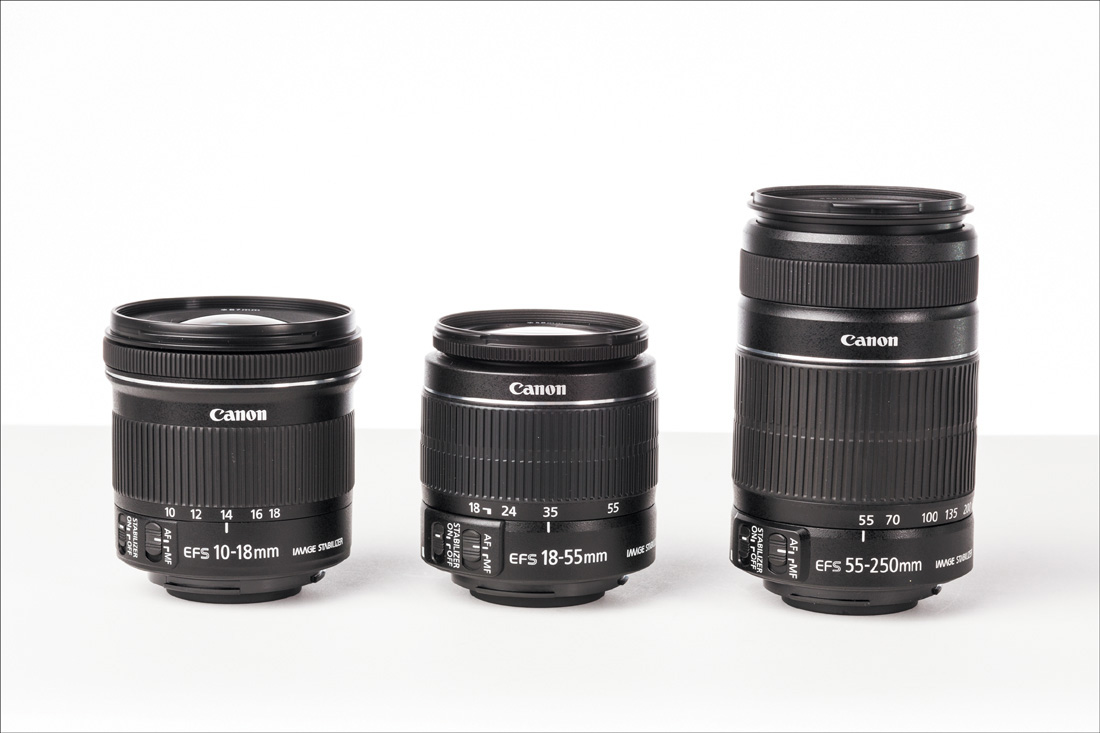
Figure 1.13 A lens trinity built for the APS-C crop-sensor camera: an EF-S 10–18mm f/4.5–5.6 IS, an EF-S 18–55mm f/3.5–5.6 IS, and an EF-S 55–250mm f/4–5.6 IS
The lens trinity is arguably the most popular set of lenses for those starting out in photography as well. Read online gear forums anywhere (using caution about some of the information on them) and you’ll see many experienced folks encourage new photographers to seek out focal lengths resembling what the trinity offers.
I suggest starting with a standard zoom (which many of you just starting out probably have in an EF-S 18–55mm if you purchased an APS-C camera, or an EF 24–105mm f/4L if you purchased an entry-level full-frame camera). From there, I advise getting the medium telephoto zoom before the wide zoom, simply because it offers a bit more versatility to your shooting and comes in handy when you need the reach—which in my case happens more often than needing to go more wide.
Round out your trinity with an ultra-wide zoom lens. These lenses are usually operated at their maximum widths. There is something really special about shooting at 16mm on a full-frame sensor camera, or 10mm on an APS-C sensor. However, as visually interesting and attractive that focal length is, these types of lenses usually offer the least amount of range and focal lengths. I would lean toward the standard zoom and medium telephoto zoom before plunking down cash for an ultra-wide zoom, based on the sheer amount of images that can be produced with the former two.
7. Investment
By now, you’re a few pages into this book, you have read about several different types of Canon lenses, and learned some essential information about them. And you understand the issues that position certain lenses at different price points. Lenses vary greatly in price, and they are generally split among three groups: 1) the EF-S crop-sensor body-only lenses, 2) non-L-series EF lenses, and 3) L-series EF lenses.
The EF-S lenses, discussed earlier, are generally crop-sensor equivalents to EF lenses and follow similar pricing as non-L-series EF lenses. Both EF-S and non-L-series EF lenses are considerably more affordable than L-series lenses. The iconic red ring encircling the end of Canon’s L-series lens barrels is the visual indicator of premium lenses. (The L in L series is rumored to stand for several things, like low dispersion. However, Canon and others claim it stands for “luxury.”) L-series lenses are among some of the best lenses in the world, and they demand a higher price.
To understand why some lenses are more affordable than others, let’s look at the factors that determine price: quality of glass, construction quality, maximum aperture, and Image Stabilization.
Quality of Glass
All Canon lenses are made with a level of precision that results from many performance-testing, designing, and engineering hours. However, some lenses are less expensive than their L-series counterparts, based partly on the glass used and the manufacturing process. To quote Canon’s highly technical but informative EF Lens Work III, The Eye of EOS, “The Canon EF lens L series possesses a level of quality sufficiently high to be called professional.... This name is reserved only for those few lenses that can meet stringent standards of performance, using fluorite (an artificial crystal), a ground and polished aspherical surface, UD, super UD lenses, and other special optical materials.” Fluorite and UD (ultra-low dispersion) glass are extremely high-quality materials for lens construction and command a premium in combination with other superior construction materials used in L-series glass (Figure 1.14). Glass in higher-end lenses tends to flare or ghost less, as well as provide optimal contrast and lower levels of distortion and vignetting (but not in all cases).
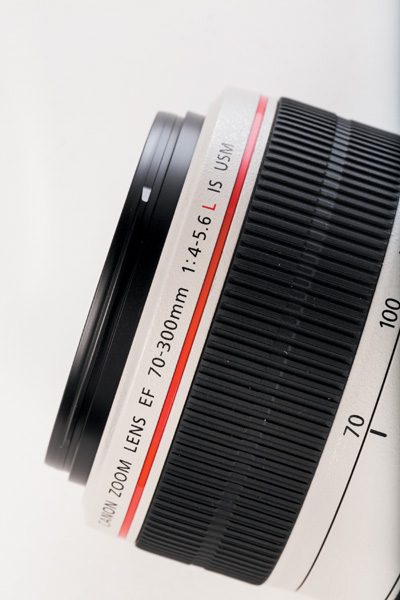
Figure 1.14 The iconic red ring around the end of the lens barrel paired with the red L symbolizes Canon’s highest-quality glass and lens construction.
This doesn’t mean that non-L-series lenses are poor performers. In fact, the glass quality in lenses like the EF-S 10–22mm f/3.5–4.5 and the EF 70–300mm f/4–5.6 IS is noted for being just as sharp. Canon glass is engineered, at each level, to perform with the highest quality possible. In the end (and at the end of this chapter, also), the choice between L-series quality glass and non-L-series quality glass is a budget issue and depends on your practical and professional use of the gear.
Construction Quality
When it comes to overall construction quality, L-series lenses are made to take a bigger beating than non-L-series lenses. Most are contained within relatively thicker metal barrels and mounts that are weather-sealed to protect the expensive internals from the elements (Figure 1.15). Many non-L-series lenses (and some L-series) are constructed with mostly plastic lens barrels or a combination of plastic and metal. Consider that trio of 50mm lenses highlighted earlier. The EF 50mm f/1.8’s lens barrel is plastic, as is the EF 50mm f/1.4. However, the EF 50mm f/1.2L is a solid chunk of metal, increasing its weight (along with other factors such as the amount of glass it contains) and ability to take abuse under extreme conditions.
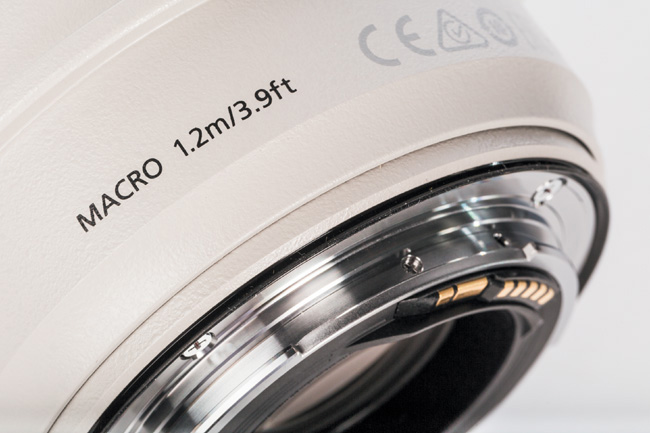
Figure 1.15 The small rubber flange on many of Canon’s L-series lens mounts helps seal the lens to the body of the camera, preventing dust and moisture from entering both pieces of gear.
As for the weather sealing on many lenses, take it from someone who has field tested the weather sealing—it works. I once dropped and fully submersed a 24–105mm f/4L attached to a Canon 5D in a river for several seconds. After pulling it out, frantically wiping everything down with my shirt, rushing it all back to camp and setting it out to dry for several hours, the lens was fully functional with only a few water spots noticeable at aperture values higher than f/11. The camera did not fair so well since it was a pre-weather-sealed version of the 5D.
Maximum Aperture
The L-series lenses are also more likely to be those that have the widest apertures available. Aside from the super telephotos longer than 400mm, there are not many L-series lenses that do not open up to f/2.8 or wider. The widest aperture available on any Canon lens exists in the 50mm f/1.2L and the 85mm f/1.2L. Extremely wide apertures mean larger lens diameters, which mean lots of glass. And when it is extremely high-quality glass, those wide apertures play a part in the higher price.
The maximum aperture opening is a point on which many people base lens purchases, but it is important to consider your own applications for different lenses. For example, Canon makes an EF 16–35mm f/2.8L, which is considered to be a fantastic ultra-wide zoom, great for everything from landscape to editorial photography. However, if you are primarily a landscape photographer, where f/2.8 might not be used as much as more closed-down apertures, you might consider the EF 17–40mm f/4L. It is still a higher-quality lens, but with f/4 as its maximum aperture opening, it contains less glass and comes in nearly a thousand dollars under the price of the former.
Canon has many alternate versions of lenses, with their biggest difference in features being their maximum aperture openings. This is especially noticeable in their telephoto range. Personally, I am a fan of the EF 300mm f/4L IS and the EF 400mm f/5.6L lenses when it comes to longer glass. They are constructed with very-high-quality glass, but they are literally pounds lighter and several inches shorter than their counterparts sporting f/2.8 aperture openings (Figure 1.16). For an outdoors shooter, these lenses are easier to carry long distances and take up less space in the camera bag, leaving room for other lenses and accessories.
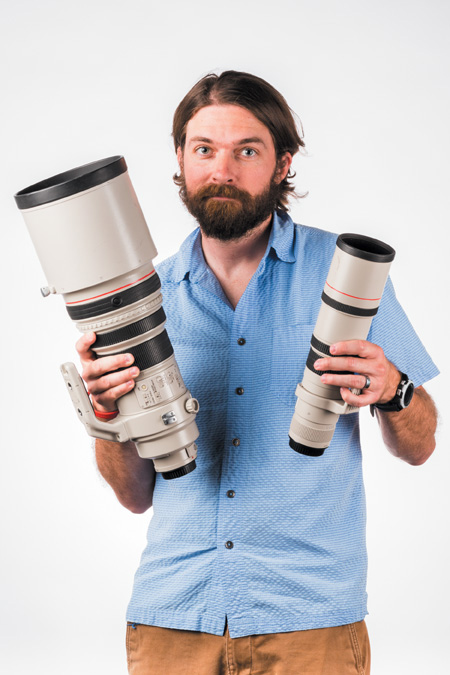
Photo by Sam Norman
Figure 1.16 Photographers choose lenses based on style, quality, and often size and weight. On the left, an EF 400mm f/2.8L IS (the most previous version) weighs nearly 12 pounds, and on the right, an EF 400mm f/5.6L is nearly three pounds.
I still use an EF 400mm f/2.8L IS for shooting college football each fall, though. Having the two extra f-stops of light (correlating with two stops of faster shutter speeds) comes in handy when stopping the action—not because I enjoy hefting a 10-plus-pound lens around for several hours every Saturday. If all games were day games, when the light was bright and I could afford to lose a couple of stops of light to the lighter f/5.6 lens, I would be tempted to cart it to the field instead.
Stouter lens construction and wider apertures make for physically larger lenses. Therefore L-series lenses are the largest Canon makes, no matter the focal length. Place an EF 70–300mm f/4–5.6 IS and an EF 70–300mm f/4–5.6L IS side by side, and compare the difference (Figure 1.17). They are the exact same focal length, but the L-series lens is considerably larger in circumference and weight due to its hardier construction. The heavier weight of L-series lenses is a turn-off for some. However, weight is simply the result of the higher build quality. Some folks enjoy the way the heavier lenses help them stabilize handheld shots (I even know some photographers who add more weight to their long lenses to make them “seat” heavier in their hands).
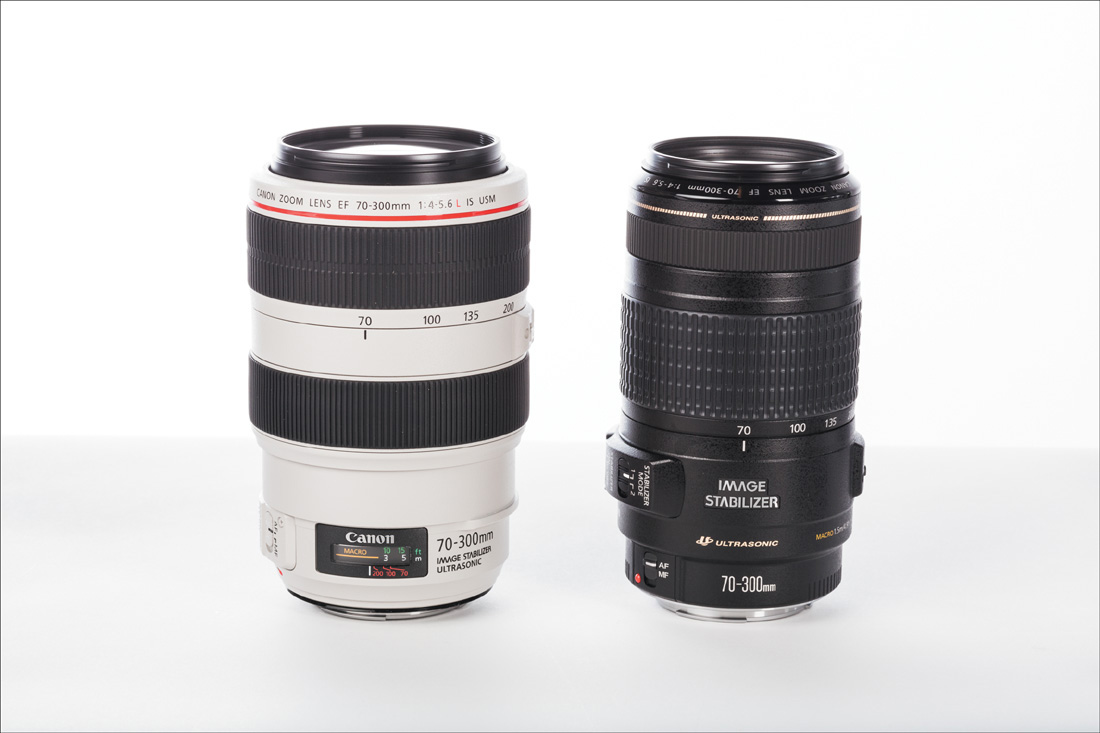
Figure 1.17 The L-series version of the EF 70–300mm is larger and much heavier than its non-L-series IS relative.
Image Stabilization
Another technology that increases the price of certain lenses is Image Stabilization, discussed later in the book. For those with unsteady hands or who work in low-light environments, this price difference may be worth it. It is technology that only gets better as it advances, and the Image Stabilization available on some lenses currently offers up to four stops of stability. IS increases the size and weight of the lens due to the internal mechanism that controls the technology, so take that into consideration when adding to your lens kit.
As with most tech products, today’s innovations in professional-grade equipment tend to transfer to consumer-level gear over time. Image Stabilization is a great example of trickle-down technology. It can be commonly found in non-L-series lenses—albeit not all of them. Fortunately, no matter what your budget, you are more than likely able to enjoy some of the largest innovations in lens construction and operation of all time in Canon lenses, at all price points.
Buying New, Buying Used
Lenses are long-term investments when it comes to acquiring photography gear. Therefore, many folks (including myself) deliberate quite a bit over purchasing glass. One of the burning questions is whether one should purchase new or used.
There are several advantages that come along with buying new, all of which are similar to purchasing any new technology. New lenses offer up the latest and greatest technology to aid the photographer in the image-making process. Buying new from a reputable retailer usually means you get a warranty for the gear (go ahead and register your newly purchased gear at www.usa.canon.com/cusa/registration/professional/professional_cameras).
Like insurance, the warranty is for those “you never know” moments. However, unlike extensive insurance, warranties typically do not cover all types of damage to newly purchased lenses, so be sure to read the fine print. Buying new also means you can assume you are obtaining a pristine copy of the lens, free of defects, and if it isn’t, the warranty comes in handy.
Finally, new and recent versions of lenses also come with support from Canon and Canon Professional Services (CPS). For the most part, Canon Professional Services is available for those who obtain professional-grade equipment, such as L-series lenses. However, several non-L-series lenses are supported as well.
The drawback to buying new glass, however, is the expense. The primary reason to buy used is simply to save money. I have nothing against buying used glass. In fact, half the lenses in my kit were purchased used. However, there are a few things to consider before plunking down money for used glass. First, make sure you are shopping from a reputable vendor (some of which might even offer a warranty for used gear). I am a fan of B&H Photo (www.bhphotovideo.com) and Adorama (www.adorama.com), both of which have great used departments with many options from which to shop. In the business for many years, KEH (www.keh.com) is another resource. Also consider photography rental businesses, such as LensRentals.com. I have purchased used lenses from them and would not think twice about doing it again. They have great customer service, and both lenses I purchased were in exquisite shape when shipped to me.
This brings me to the second point to consider when buying used: lens condition. All of the above vendors thoroughly check the equipment they intend to sell before it is put on the market, and each of them has a very similar condition rating for their products. When shopping for used gear online, be sure to consult the descriptions for each value used to rate lens conditions, and if you have any questions, contact the seller.
I prefer to buy used lenses that have no scratches on the front or rear elements and show little to no sign of wear on the barrel. Scratches on the lens elements may not show up when the aperture is set to wide open, but they may begin to appear the more you stop down the aperture to achieve greater depth of field. Although wear on the lens barrels—especially for L-series lenses—may not matter too much to some, it might indicate some internal wear as well, as a result of being knocked around or dropped. I also want lenses on which all of the rings (zoom and focus) operate appropriately and the autofocus and Image Stabilization (if included) work well.
If you are purchasing from a local colleague or a friend, check for those issues mentioned above, but also spend some time with the lens(es). Ask to handle and possibly field test the glass before making a purchasing decision. Used lenses (and used camera gear in general) are much like used cars. Some have more mileage than others, some do not have as many or the newest features as others, and normal wear and tear needs to be taken into consideration. Overall, though, doing your research and smart shopping will most likely land you great versions of the lenses you want without paying for new.
Renting
Renting camera gear, especially lenses, is a relatively new opportunity for folks to get their hands on all types of equipment. Two reasons for which you might consider renting a lens: needing it for a one-time-only shoot or photographic experience and testing a lens you are considering purchasing. I do not have much need for an EF 85mm f/1.2L, but occasionally I will rent one for a few days for a fraction of the price it costs to purchase a new or used version.
If you are comfortable with the lens kit you have for your Canon DSLR, but occasionally want to shoot with another perspective, renting is a great alternative. It is even a smart alternative to borrowing a friend or colleague’s lens because most rental services offer insurance in case of an accident. If you scratch the front lens element of your buddy’s new EF-S 18–200mm f/3.5–5.6 IS, you might be obligated to replace it for much more than the nominal insurance fee.
If you are thinking about buying a new or used lens, especially any pricey L-series lens, consider renting it first for a few days. Use it extensively during the time you have it, putting it through its paces with your shooting style. This trial period will hopefully inform your purchasing decision. Remember that 85mm I was just talking about? After renting one, I didn’t buy it. However, after trialing an EF 50mm f/1.2L, I was convinced that it belonged in my bag, resulting in a visit to my local camera store.
So, where do you go to rent lenses? Check locally for any camera shops that rent. Many smaller shops are adding rentals to diversify their business, and with renting locally comes a level of support that few non-local entities can achieve. There are also several great online rental services, such as LensRentals.com, LensProToGo (www.lensprotogo.com), and BorrowLenses (www.borrowlenses.com). I have been a LensRentals.com user for years (several of the images in this book were made with gear I rented specifically for it). Online rental services usually offer more gear and also make it easy for the renter to return lenses back to headquarters.
Conclusion
Lenses, as opposed to many camera bodies, are long-term investments in your photography kit. Since 2004, I have owned six camera bodies as my primary workhorses (probably not many by some professionals’ standards, but enough), and a few more as backups. In that time, I have owned only one version of every lens I have purchased. I bought my first L-series lens in 2005 (a five-year-old EF 17–35mm f/2.8L), and I don’t see myself selling it or trading it in anytime soon. It’s still sharp, functions like new, and I think it flares less than newer ultra-wide lenses. It is easily the oldest lens I own, and the rest of my “trinity” isn’t too much younger.
The point is that lenses can offer you many more years of photography than a digital body. Depending on the model, a newer version of a camera body can be released what seems like every year. Lenses, because the technology does not change as frequently, have much longer shelf lives than cameras. Even though camera bodies cost more than lenses in some cases, the glass is where you see your kit really develop due to its longevity.
Lens investments are informed by our own personal, professional, and stylistic needs. Want to upgrade that kit lens immediately after purchasing your first DSLR combo kit? Spend a bit more time with it to see if the investment is necessary. I’m not one to encourage going into debt over photography; instead, consider your purchase options and your own style/needs to make an informed decision about the lenses you acquire.
Chapter 1 Assignments
Let’s start the book’s assignments by doing some homework and getting in some practice.
Get the manual out
There are many different Canon lenses, and all share the same basic functions. However, many have unique differences. Pore over the technical manual, familiarizing yourself with the features of a lens (many of which we cover in this book). At the same time, have the lens near you and handle it as you read about it. Getting accustomed to the size and form of the gear you use is essential to working with it efficiently, effectively, and more important, creatively.
How slow can you go?
Test out the minimum sustaining shutter speed you are capable of shooting with for various focal lengths. Choose any lens to which you have access. Perhaps it’s the kit lens that came with your camera. Shoot at set focal lengths, such as 18mm, 24mm, 35mm, and 50mm (you can use any focal length you want). For each, test how slow you can shoot before the image becomes out of focus due to camera shake. Be sure to turn Image Stabilization off, and handhold the camera and lens. To be sure of focus, download the images later on the computer, and zoom in to see if and how blur occurs at slow shutter speeds.
Share your results with the book’s Flickr group!
Join the group here: www.flickr.com/groups/canonlenses_fromsnapshotstogreatshots