
6
Securing Kubernetes
This chapter will cover how Kubernetes authentication and authorization patterns work and dive into Kubernetes role-based access control (RBAC). We’ll also learn about managing the security of applications deployed on Kubernetes.
Since most of the Kubernetes security-related content released prior to November 2020 has gradually moved to the Certified Kubernetes Security Specialist (CKS) exam instead, this chapter will just cover the essentials to help you to learn about Kubernetes security. We’ll specifically focus on Kubernetes RBAC since it is close to 5% of the CKA exam content.
Nonetheless, a good understanding of the Kubernetes security fundamentals will be a great help for the CKA exam and prepare you for further development in the Kubernetes space.
In this chapter, we’re going to cover the following main topics:
- Securing Kubernetes in layers
- Kubernetes authentication and authorization
- Kubernetes RBAC
- Managing the security of Kubernetes applications
Technical requirements
To get started, you will need to make sure that your local machine meets the technical requirements described as follows:
- A compatible Linux host – we recommend a Debian-based Linux distribution such as Ubuntu 18.04 or later.
- Make sure that your host machine has at least 2 GB of RAM, 2 CPU cores, and about 20 GB of free disk space.
Securing Kubernetes in layers
Kubernetes security is a broad topic due to the sophistication of the platform. It includes secure Kubernetes nodes, networks, and Kubernetes objects such as Pods. The Cloud Native Computing Foundation (CNCF) defines Kubernetes security in layers, which they call the four Cs of cloud-native security, taking the topic of security beyond Kubernetes and its ecosystem. The four Cs stand for Cloud, Cluster, Container, and Code, as shown in the following diagram:
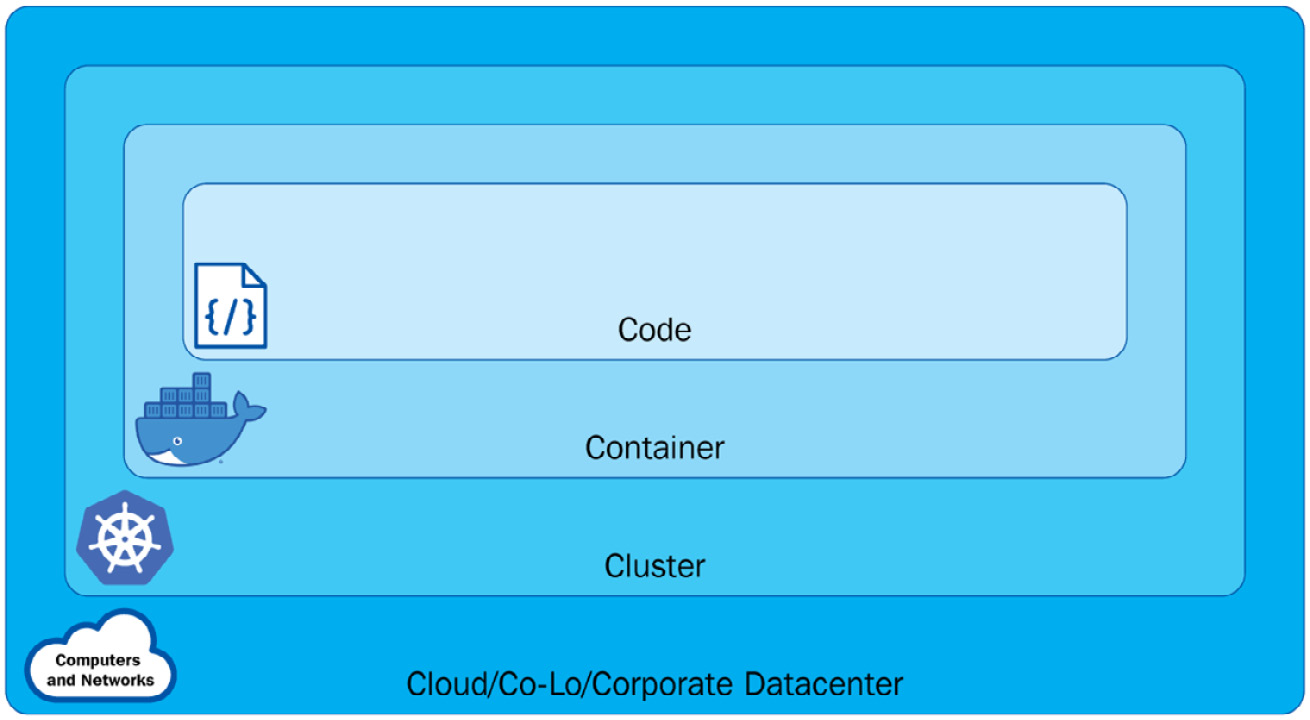
Figure 6.1 – The different layers in Kubernetes
From the preceding diagram, we can see the following:
- The Cloud layer is based on the underlying infrastructure where the Kubernetes cluster is deployed – it is managed by the cloud provider when it is in the cloud or by the organization when it comes to a private data center.
- The Cluster layer is more about securing the Kubernetes cluster components, ensuring each component is secured and conjured correctly. Looking back at Chapter 1, Kubernetes Overview, will help you understand how those components work together.
- The Container layer includes container vulnerability scanning, hosted OS scaling, and container privileged users.
- The Code layer is focused on the application code. Different from traditional application security approaches, it now works with DevSecOps and vulnerability assessment tools. This layer is relevant but outside of the scope of Kubernetes security.
Cloud-native security or, more specifically, Kubernetes security requires organizations to address each layer. In this chapter, we’ll focus on the following topics:
- Kubernetes API security with an admission controller
- Kubernetes authentication and authorization with RBAC, Attribute-Based Access Control (ABAC), and node authorization
- Managing the security of Kubernetes applications with security contexts
The preceding topics are either part of cluster-layer or container-layer security, and they help us run our Kubernetes application securely. We’ll cover Kubernetes network security and dive deeper into network policies in Chapter 7, Demystifying Kubernetes Networking.
Kubernetes authentication and authorization
In Chapter 1, Kubernetes Overview, we talked about a typical workflow of Kubernetes components collaborating with each other. In this workflow, when a request comes through the Kubernetes API server, it invokes an API call. This API request now needs to be authenticated and authorized by the API server before a request is made to a Kubernetes API resource. As a result, the request can either be allowed or denied. The authentication process can be depicted as in Figure 6.2:

Figure 6.2 – API Kubernetes authentication
You can refer to the following article to get an overview of how the Kubernetes authentication process works: https://kubernetes.io/docs/reference/access-authn-authz/authentication/.
Before getting into authentication and authorization, let’s take a look at the user accounts and service accounts in Kubernetes.
Service accounts versus user accounts
In Kubernetes, we have a distinction between normal user accounts and service accounts managed by Kubernetes. An account represents an identity for a user or a service process. The main difference between a user account and a service account is as follows:
- User accounts are for normal human users. In Kubernetes, the RBAC subsystem is used to determine whether the user is authorized to perform a specific operation on a specific scope. We’ll look into this further in the Kubernetes RBAC section later in this chapter.
- Service accounts are for services or processes running in a Pod in the Kubernetes cluster. The service accounts are users managed by the Kubernetes API. In Kubernetes, it is possible to use client certificates, bearer tokens, or even an authenticating proxy to authenticate API requests through an API server.
We’ll take a closer look at the following things from hereon:
- Kubernetes service accounts and how to work with them
- How to organize cluster access using kubeconfig as a Kubernetes user
- How to configure access to multiple clusters as a Kubernetes user
Let’s take a look at the Kubernetes service account first.
Kubernetes service accounts
Back in the previous chapter, we created a new Pod with kubectl, although there is a default service account in the default namespace, which the Pod was actually automatically assigned to. Now, let’s have a look at how to work with a service account in Kubernetes.
Managing service accounts
You can use the following command to get the current service account in the default namespace:
kubectl get serviceaccounts
Alternatively, you can simply use the shortcut command as follows:
kubectl get sa
The output will return the default service account in the default namespace:
NAME SECRETS AGE
default 1 5d
The service account is a namespaced resource – you can use the following command to check out all the service accounts in the current cluster:
k get sa -A
Alternatively, you can use the complete command as follows:
k get serviceaccounts --all-namespaces
The output of the preceding commands will list the service account information by namespace, similar to the following in Figure 6.3:
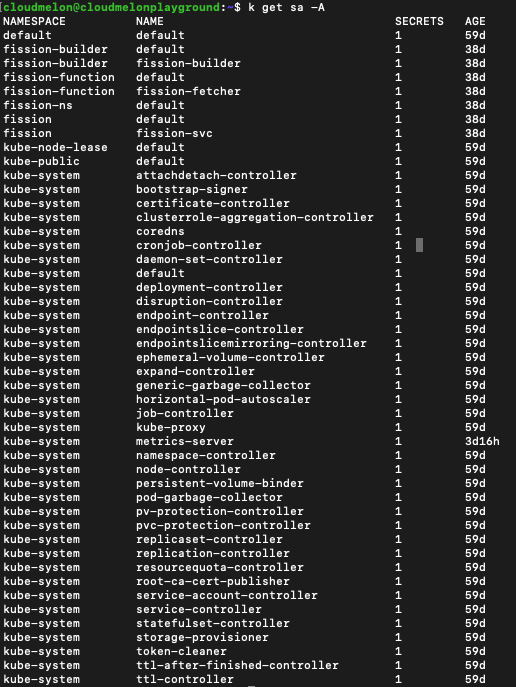
Figure 6.3 – The service account information by namespace
This also means we can get the service account information by namespace using the kubectl get sa command and then by specifying the -n flag with namespace name to get the service account with that particular namespace. For example, using kubectl get sa -n with kube-system will only return the service account in the kube-system namespace.
The kubectl create sa command
You can use the kubectl create command to create a new service account, the following being an example:
kubectl create serviceaccount melon-serviceaccount
The following output will show that the service account is created successfully:
serviceaccount/melon-serviceaccount created
We can also create the service account in a different namespace using the kubectl create command by specifying the -n flag. Additionally, we also need to make sure that the namespace exists prior to creating a service account in that namespace. The following is an example of using a kubectl create command to create a service account named melonsa in a namespace called melon-ns:
kubectl create ns melon-ns
kubectl create sa melonsa -n melon-ns
The preceding output displays that you have created the service account successfully. You can also use the following command to check that the service account has just been created:
k get –n melon-ns serviceaccounts
The following output lists the service account and how long it’s been created:
NAME SECRETS AGE
melon-ssa 1 46s
Similarly, if you want to check out the service account in another namespace, you can use the kubectl get sa <service account name> command and then add the -n flag, for example, k get sa melonsa -n melon-ns.
Assigning a service account to a Pod
The purpose of having a service account is to provide an identity to serve the process running in the Pod. To determine the service account that a Pod will use, you can specify a serviceAccountName field in the Pod YAML specification called sa-pod.yaml, as shown here:
apiVersion: v1kind: Podmetadata: name: melon-serviceaccount-podspec: serviceAccountName: melon-serviceaccount containers: - name: melonapp-svcaccount-container image: busybox command: ['sh', '-c','echo stay tuned!&& sleep 3600']Then, when we use the kubectl apply -f sa-pod.yaml command to deploy this YAML file, we’ll be able to see a Pod spinning up.
The kubectl delete sa command
You can delete a service account using the kubectl delete sa <account name > command:
kubectl delete sa melon-serviceaccount
The output comes back showing that the service account was deleted:
serviceaccount "melon-serviceaccount" deleted
Hopefully, you now have a better idea of how to work with a Kubernetes service account using what you learned in this section. Now, let’s take a look at how to organize the cluster access using kubeconfig.
Organizing the cluster access using kubeconfig
As a Kubernetes user, when you deploy the Kubernetes cluster with kubeadm, you will find a file called config in the $HOME/.kube directory:
cloudmelon@cloudmelonplayground:~$ cd $HOME/.kube
cloudmelon@cloudmelonplayground:~/.kube$ ls
cache/ config
In other cases, this kubeconfig file can be set up as a KUBECONFIG environment variable or a --kubeconfig flag. You can find detailed instructions in the official documentation: https://kubernetes.io/docs/tasks/access-application-cluster/configure-access-multiple-clusters/.
The kubeconfig files help organize information clusters, users, and namespaces. From the kubectl utility point of view, it reads kubeconfig files to locate the information of the cluster and communicate with the API server of that Kubernetes cluster.
The following is an example of a kubeconfig file:
apiVersion: v1clusters:- cluster: certificate-authority: /home/cloudmelon/.minikube/ca.crt extensions: - extension: last-update: Wed, 11 May 2022 23:47:43 UTC provider: minikube.sigs.k8s.io version: v1.25.2 name: cluster_info server: https://192.168.49.2:8443 name: minikubecontexts:- context: cluster: minikube extensions: - extension: last-update: Wed, 11 May 2022 23:47:43 UTC provider: minikube.sigs.k8s.io version: v1.25.2 name: context_info namespace: default user: minikube name: minikubecurrent-context: minikubekind: Configpreferences: {}users:- name: minikube user: client-certificate: /home/cloudmelon/.minikube/profiles/minikube/client.crt client-key: /home/cloudmelon/.minikube/profiles/minikube/client.keyYou can see config by using the following command:
kubectl config view
The output should look as follows:

Figure 6.4 – The kubectl config view output
You can use the kubectl config command to display current-context:
kubectl config current-context
The returned output will be the current context – in my case, it is minikube. You may notice that it is the same as current-context shown in the aforementioned config file:
minikube
To know more about how to organize the cluster access using kubeconfig, refer to the official article to learn more:
https://kubernetes.io/docs/concepts/configuration/organize-cluster-access-kubeconfig/
Configuring access to multiple clusters
As a Kubernetes user, when it comes to multiple clusters, we can also use the kubectl config command to configure the current context to switch between different Kubernetes clusters. To find all the commands provided by kubectl config, use this command:
kubectl config --help
The following is an example of how kubeconfig contains the access information of two different Kubernetes clusters:
apiVersion: v1clusters:- cluster: certificate-authority-data: < authority data > server: https://xx.xx.xx.xx name: gke_cluster- cluster: certificate-authority-data: < authority data > server: https://xx.xx.xx.xx name: arctestakscontexts:- context: cluster: gke_cluster user: gke_cluster name: gke_cluster- context: cluster: arctestaks user: clusterUser_akscluster name: aksclustercurrent-context: aksclusterkind: Configpreferences: {}users:- name: gke_cluster user: auth-provider: config: access-token: < token data > cmd-args: config config-helper --format=json cmd-path: C:Program Files (x86)GoogleCloud SDKgoogle-cloud-sdkingcloud.cmd expiry: '2022-05-12T00:28:06Z' expiry-key: '{.credential.token_expiry}' token-key: '{.credential.access_token}' name: gcp- name: clusterUser_akscluster user: client-certificate-data: <data> client-key-data: <data> token: < token >We could use the kubectl config current-context command to see the cluster that I am working on and it would be displayed as the following:
gke-cluster
The preceding output indicates that I am on a Kubernetes cluster called gke-cluster and that I am using the following command to switch my default context to another Kubernetes cluster called akscluster:
kubectl config use-context akscluster
We could use the kubectl config current-context command to check my current working Kubernetes cluster and it would be displayed as the following:
aks-cluster
Switching context is an important technique that you can apply during your actual CKA exam and it’s important to perform tasks in the targeting Kubernetes cluster so that you’ll be scored accurately. It also comes in handy in your real life working as a Kubernetes administrator, as often, you’ll be working on multiple Kubernetes clusters.
To know more about how to configure access to multiple clusters, check the official article: https://kubernetes.io/docs/tasks/access-application-cluster/configure-access-multiple-clusters/
Kubernetes authorization
In Kubernetes, a request must be authenticated before it can be authorized with permissions granted to access the Kubernetes cluster resources.
There are four authorization modes in Kubernetes:
- RBAC authorization: Kubernetes RBAC is more about regulating access to Kubernetes resources according to the roles with specific permissions to perform a specific task, such as reading, creating, or modifying through an API request. We’ll focus on Kubernetes RBAC in this section.
- Node authorization: As the name suggests, this grants permissions to the API requests made by kubelets agent. This is a special - purpose authorization mode not covered in the CKA exam. You can check out the official documentation about node authorization to find out more: https://kubernetes.io/docs/reference/access-authn-authz/node/.
- ABAC authorization: ABAC is an access control granted to users by policies and attributes such as user attributes, resource attributes, and objects. This topic is not covered in the current CKA exam. If you want to learn more about using the ABAC mode, you can refer to the official article: https://kubernetes.io/docs/reference/access-authn-authz/abac/.
- Webhook authorization: Webhook authorization through WebHooks is an HTTP POST triggered by an event. An example of this is that the Webhook will react to a URL when triggered by certain actions. This topic is not covered in the current CKA exam. You can explore the following article if you want to know more about it: https://kubernetes.io/docs/reference/access-authn-authz/webhook/.
Let’s take a look at what the key areas covered in the CKA exam are, starting with Kubernetes RBAC.
Kubernetes RBAC
Kubernetes RBAC aims to regulate access to Kubernetes resources according to the roles with specific permissions to perform a specific task.
Once specified, RBAC checks the rbac.authorization.k8s.io API group membership to see whether it is allowed through the Kubernetes API.
Let’s take a look at the different Roles and RoleBindings in Kubernetes.
Roles versus ClusterRoles and their RoleBindings
In Kubernetes, we have Roles and ClusterRoles. A Kubernetes RBAC Role or ClusterRole represents a role with a set of permissions. In a nutshell, they differ by the scope of these permissions:
- A Role represents permissions within a particular namespace
- A ClusterRole represents permissions within the cluster – it could be cluster-wide, across multiple namespaces, or individual namespaces
With Roles and ClusterRoles, we have the concept of RoleBinding and ClusterRoleBinding. The bindings bind the role to a list of subjects such as users, groups, or service accounts, as can be seen in the following figure:

Figure 6.5 – Kubernetes RBAC
Let’s define a new role called dev-user in a namespace called dev. We can use the following command to do this:
kubectl create role dev-user --verb=get --verb=list --resource=pods --namespace=dev
The preceding command is the same as the following YAML definition:
apiVersion: rbac.authorization.k8s.io/v1kind: Rolemetadata: namespace: dev name: dev-userrules:- apiGroups: [""] resources: ["pods"] verbs: ["get", "list"]The output of the preceding command is the following:
role.rbac.authorization.k8s.io/dev-user created
Then, we can use the kubectl get role command to check the role that we have just created:
cloudmelon@cloudmelonplayground:~$ k get role -n dev
NAME CREATED AT
dev-user 2022-05-13T04:14:59Z
We then need to create the RoleBinding to bind this role to the subjects as follows:
kubectl create rolebinding dev-pods-binding --role=dev-user - -user=melon-dev --namespace=dev
Alternatively, we could also use the following YAML file:
apiVersion: rbac.authorization.k8s.io/v1kind: RoleBindingmetadata: name: dev-pods-binding namespace: devsubjects:- kind: User apiGroup: rbac.authorization.k8s.io name:melon-devroleRef: kind: Role name: dev-user apiGroup: rbac.authorization.k8s.ioLet’s define a new ClusterRole called secret-reader – note that the ClusterRole is not namespaced. We could use the following YAML definition:
apiVersion: rbac.authorization.k8s.io/v1kind: ClusterRolemetadata: name: secret-readerrules:- apiGroups: [""] resources: ["secrets"] verbs: ["get", "list"]Then, we need to create the RoleBinding to bind this role to the subjects, as shown in the following YAML definition:
apiVersion: rbac.authorization.k8s.io/v1kind: RoleBindingmetadata: name: read-secrets namespace: developmentsubjects:- kind: Group name: manager apiGroup: rbac.authorization.k8s.ioroleRef: kind: ClusterRole name: secret-reader apiGroup: rbac.authorization.k8s.ioWe can use the following command to get all the roles across all the namespaces:
cloudmelon@cloudmelonplayground:~$ kubectl get roles -ANAMESPACE NAME CREATED ATdev dev-user kube-public kubeadm:bootstrap-signer-clusterinfo kube-public system:controller:bootstrap-signer kube-system extension-apiserver-authentication-reader kube-system kube-proxy kube-system kubeadm:kubelet-config-1.23 kube-system kubeadm:nodes-kubeadm-config kube-system system::leader-locking-kube-controller-manager kube-system system::leader-locking-kube-scheduler kube-system system:controller:bootstrap-signer kube-system system:controller:cloud-provider kube-system system:controller:token-cleaner kube-system system:persistent-volume-provisioner We can use the following command to get all the RoleBindings across all the namespaces:
cloudmelon@cloudmelonplayground:~$ kubectl get rolebindings -ANAMESPACE NAME ROLE AGEdev dev-pods-binding Role/dev-user 15skube-public kubeadm:bootstrap-signer-clusterinfo Role/kubeadm:bootstrap-signer-clusterinfo 6dkube-public system:controller:bootstrap-signer Role/system:controller:bootstrap-signer 6dkube-system kube-proxy Role/kube-proxy 6dkube-system kubeadm:kubelet-config-1.23 Role/kubeadm:kubelet-config-1.23 6dkube-system kubeadm:nodes-kubeadm-config Role/kubeadm:nodes-kubeadm-config 6dkube-system metrics-server-auth-reader Role/extension-apiserver-authentication-reader 3hkube-system system::extension-apiserver-authentication-reader Role/extension-apiserver-authentication-reader 6dkube-system system::leader-locking-kube-controller-manager Role/system::leader-locking-kube-controller-manager 6dkube-system system::leader-locking-kube-scheduler Role/system::leader-locking-kube-scheduler 6dkube-system system:controller:bootstrap-signer Role/system:controller:bootstrap-signer 6dkube-system system:controller:cloud-provider Role/system:controller:cloud-provider 6dkube-system system:controller:token-cleaner Role/system:controller:token-cleaner 6dkube-system system:persistent-volume-provisioner Role/system:persistent-volume-provisioner 6dKnowing the ways that Roles and RoleBindings work in Kubernetes, let’s now take a look at how to implement your own Kubernetes RBAC Roles and RoleBindings.
Implementing Kubernetes RBAC
To enable RBAC, set apiserver –authorization-mode to RBAC, which defaults to AlwaysAllow. The other possible values include node, ABAC, Always deny, and webhook. In the following command, we’re showing an example of setting it to use Kubernetes RBAC:
kube-apiserver –authorization-mode=RBAC
To know more about how to set up authorization mode, visit the following link: https://kubernetes.io/docs/reference/command-line-tools-reference/kube-apiserver/
Let’s start by creating a new deployment using our current context, which is minikube:
kubectl create deployment mybusybox –-image=busybox
Then, switch to the context for dev-user:
kubectl config use-context dev-user
As our dev-user only has list and get permissions, let’s try to use this profile to delete the deployment:
cloudmelon@cloudmelonplayground:~$ kubectl delete deployment mybusybox
Error from server (Forbidden): deployments.apps is forbidden: User "dev-user" cannot delete resource "deployments" in API group "apps" in the namespace "t
Now that we have learned how to manage our own Kubernetes RBAC roles, let’s take a look at how to manage the security of Kubernetes applications.
Managing the security of Kubernetes applications
A securityContext field defines the privilege and access control settings for a Pod in the Pod YAML specification. We need to configure the security context in case a Pod or container needs to interact with the security mechanisms of the underlying operating system unconventionally, and in this section, we’ll introduce how to configure a security context for a Pod or container.
As a part of your prep work, you can create a new user and a new group as shown in the following:
sudo useradd -u 2000 container-user-0
sudo groupadd -g 3000 container-group-0
We will now log in to the worker node and create a new .txt file called message.txt:
sudo mkdir -p /etc/message
echo "hello Packt" | sudo tee -a /etc/message/message.txt
From here, you’ll see the message that we input from the terminal:
hello Packt
Now, we need to adjust the permission to limit the permission for testing purposes, which is shown as the following:
sudo chown 2000:3000 /etc/message/message.txt
sudo chmod 640 /etc/message/message.txt
Finally, we could deploy a new Pod in our current Kubernetes cluster to test it out. The securityContext field is defined as part of a Pod’s YAML spec called pod-permission.yaml. With a section called securityContext, we can specify the security permissions information, as in the following YAML file:
apiVersion: v1 kind: Pod metadata: name: melon-securitycontext-pod spec: securityContext: runAsUser: 2000 fsGroup: 3000 containers: - name: melonapp-secret-container image: busybox command: ['sh', '-c','cat /message/message.txt && sleep 3600'] volumeMounts: - name: message-volume mountPath: /message volumes: - name: message-volume hostPath: path: /etc/message In the preceding YAML definition file, the runAsUser field means that for any container in this Pod, all processes run with a user ID of 2000. The fsGroup field is 2000, which means that all the processes of the container are also part of the supplementary group, ID 2000. The owner for volume/message and any files created in that volume will be the ID 2000 group.
Let’s go ahead and deploy this YAML file as follows:
kubectl apply -f pod-permission.yaml
Then, we’ll see the Pod is spinning up but will quickly encounter the following error:
NAME READY STATUS RESTARTS
AGE
melon-securitycontext-pod 0/1 CrashLoopBackOff 1 5m
From the preceding example, we can see the Pod is BackOff due to the lack of permission. Now, let’s pull a similar example to see whether we can fix this. Let’s configure a YAML file with a similar configuration to the following:
securityContext: runAsUser: 1000 runAsGroup: 3000 fsGroup: 2000Let’s deploy this using the following YAML example:
apiVersion: v1kind: Podmetadata: name: security-context-messagespec: securityContext: runAsUser: 1000 runAsGroup: 3000 fsGroup: 2000 volumes: - name: sec-ctx-msg emptyDir: {} containers: - name: sec-ctx-msg image: busybox:1.28 command: [ "sh", "-c", "sleep 1h" ] volumeMounts: - name: sec-ctx-msg mountPath: /message securityContext: allowPrivilegeEscalation: falseWe can see this example is now up and running in my local Kubernetes cluster:
cloudmelon@cloudmelonplayground:/$ kubectl get pod security-context-demo
NAME READY STATUS RESTARTS AGE
security-context-message 1/1 Running 0 3m4s
Let’s get inside this running pod:
kubectl exec -it security-context-message -- sh
Then, we’ll get into the interactive shell, input id, and we’ll get the following output:
/ $ id
uid=1000 gid=3000 groups=2000
From the output, we can see that uid is 1000, the same as the runAsUser field; the gid is 3000, the same as the runAsGroup field; and the fsGroup is 2000.
To learn more about the security context, check out the official documentation here: https://kubernetes.io/docs/tasks/configure-pod-container/security-context/
Summary
This chapter gave an overview of Kubernetes security with a focus on three key topics about container security, RBAC, and the security context. You can use this chapter to assist you with laying the foundations for your CKS exam. With the addition of the next chapter, Demystifying Kubernetes Networking, you will get a complete view of working with Kubernetes networking security-related concepts and practice examples to help in your daily work as a Kubernetes administrator, and this will all cover 20% of the CKA exam content. Let’s stay tuned!
Mock CKA scenario-based practice test
You have two virtual machines, master-0 and worker-0 – please complete the following mock scenarios.
Scenario 1
Create a new service account named packt-sa in a new namespace called packt-ns.
Scenario 2
Create a Role named packtrole and bind it with the RoleBinding packt-clusterbinding. Map the packt-sa service account with list and get permissions.
Scenario 3
Create a new pod named packt-pod with the busybox:1.28 image in the packt-ns namespace. Expose port 80. Then, assign the packt-sa service account to the Pod.
You can find all the scenario resolutions in Appendix - Mock CKA scenario-based practice test resolutions of this book.
FAQs
- Where can I find the latest updates about Kubernetes security while working with Kubernetes?
The Kubernetes Security Special Interest Group (SIG) has a GitHub repository, which you can find here: https://github.com/kubernetes/community/tree/master/sig-security.
- What is the recommended Kubernetes official article for configuring the ephemeral storage?
I recommend bookmarking the official documentation about Kubernetes RBAC, which you can find here: https://kubernetes.io/docs/reference/access-authn-authz/rbac/.