
2
Installing and Configuring Kubernetes Clusters
This chapter introduces the different configurations of Kubernetes, which is the first step toward working with Kubernetes. We’ll get our hands dirty by setting up a Kubernetes cluster with a single worker node and then multiple worker nodes. This chapter familiarizes you with Kubernetes installations, which is one of the key skills that will serve in your daily job as a Kubernetes administrator.
In this chapter, we’re going to cover the following topics:
- Hands-on Kubernetes tooling
- Installing and configuring a Kubernetes cluster
- Using minikube to set up a single node Kubernetes cluster
- Using kubeadm to install a basic Kubernetes cluster
- Setting up a highly available cluster with kubeadm
Technical requirements
To get started, we need to make sure your local machine meets the technical requirements described as the following:
- A compatible Linux host – we recommend a Debian-based Linux distribution such as Ubuntu 18.04 or later.
- Make sure your host machine has at least 2 GB RAM, 2 CPU cores, and about 20 GB of free disk space.
Hands-on Kubernetes tooling
There are a handful of Kubernetes tools on the market – we’ll start by covering some widely used Kubernetes tools to interact with the Kubernetes cluster. We’ll dive into some key tools with hands-on labs later in this chapter.
Core tools
In this section, we are going to cover tools which are required to work with Kubernetes and containers.
kubectl
kubectl is a Kubernetes command-line tool used to talk to the Kubernetes cluster. It is hands down the most common and important utility that allows you to run commands against the Kubernetes cluster. There are a handful of kubectl commands available that will allow users to work with the Kubernetes cluster, such as deploying a containerized application, managing cluster resources, and monitoring and visualizing events and logs. We’ll cover most of the common kubectl commands with examples as we go through the process.
To set up the kubectl utility, if you’re on Red Hat-based distributions such as CentOS or Fedora, check out the official article for further information: https://kubernetes.io/docs/tasks/tools/install-kubectl-linux/#install-using-native-package-management. You can use the following commands:
cat <<EOF | sudo tee /etc/yum.repos.d/kubernetes.repo
[kubernetes]
name=Kubernetes
baseurl=https://packages.cloud.google.com/yum/repos/kubernetes-el7-x86_64
enabled=1
gpgcheck=1
repo_gpgcheck=1
gpgkey=https://packages.cloud.google.com/yum/doc/yum-key.gpg https://packages.cloud.google.com/yum/doc/rpm-package-key.gpg
EOF
sudo yum install -y kubectl
If you’re on Debian-based distributions such as Ubuntu 18.04, you can follow the following instructions:
- Firstly, you need to update the apt package index – then, you need to install the packages needed to use the Kubernetes apt repository by running the following commands sequentially:
sudo apt-get update
sudo apt-get install -y apt-transport-https ca-certificates curl
- Download the Google Cloud public signing key and add the Kubernetes apt repository by using the following command:
sudo curl -fsSLo /usr/share/keyrings/kubernetes-archive-keyring.gpg https://packages.cloud.google.com/apt/doc/apt-key.gpg
echo "deb [signed-by=/usr/share/keyrings/kubernetes-archive-keyring.gpg] https://apt.kubernetes.io/ kubernetes-xenial main" | sudo tee /etc/apt/sources.list.d/kubernetes.list
- Now, you’re ready to go. Make sure you update the apt package index with the new repository again and then install the kubectl utility using the apt-get install command:
sudo apt-get update
sudo apt-get install -y kubectl
- You can verify whether kubectl has been successfully installed by running the following command upon the completion of the previous steps:
kubectl version --client
You’ll see an output similar to the following if you have installed kubectl successfully:

Figure 2.1 – A successful installation of kubectl
For instructions on installing kubectl in different environments, please refer to https://kubernetes.io/docs/tasks/tools/.
Container runtimes
Now, we are going to set up containerd as our container runtime by following these instructions:
- Update the apt index, add Docker’s official GPG key, and set up the apt repository by running the following instructions:
sudo apt-get update
sudo apt-get install
ca-certificates
curl
gnupg
lsb-release
curl -fsSL https://download.docker.com/linux/ubuntu/gpg | sudo gpg --dearmor -o /usr/share/keyrings/docker-archive-keyring.gpg
echo
"deb [arch=$(dpkg --print-architecture) signed-by=/usr/share/keyrings/docker-archive-keyring.gpg] https://download.docker.com/linux/ubuntu
$(lsb_release -cs) stable" | sudo tee /etc/apt/sources.list.d/docker.list > /dev/null
- Install the Docker engine and containerd.io:
sudo apt-get update
sudo apt-get install docker-ce docker-ce-cli containerd.io
- Validate that Docker has been installed successfully by using the following commands:
sudo docker ps
#optional - running your first docker container
sudo docker run hello-world
You’ll see an output similar to the following:

Figure 2.2 – Docker is up and running
- If you’re about to configure containerd as the container runtime, you can use the following command and set the configuration to default:
sudo mkdir -p /etc/containerd
containerd config default | sudo tee /etc/containerd/config.toml
- Restart containerd to make sure the changes take effect:
sudo systemctl restart containerd
If you want to know more about how to set up CRI-O as a runtime, please check out the following link: https://kubernetes.io/docs/setup/production-environment/container-runtimes/#cri-o. It will show you how containerd serves as a container runtime in the context of Kubernetes.
Deployment tools
To bootstrap a Kubernetes cluster, we rely on the deployment tools. There are lots of useful tools on the market to help spin up a Kubernetes cluster, of which a lot of them are vendor-affinity. Here, we will cover what’s requested in the CKA exam. That’s the primary reason that we focus on upstream Kubernetes and these tools will help bootstrap a cluster on-premises. The following tools help you set up a Kubernetes cluster and we’ll cover the detailed instructions while working with each of them in the next chapter:
- kubeadm: kubeadm is the most important tool to help you crack the exam exercises. It helps install and set up the Kubernetes cluster with best practices. With kubeadm, you can provision a single node cluster and, more importantly, multi-node clusters. This is the first choice for most large organizations that want to manage their own Kubernetes cluster and use their own on-premises servers.
- minikube: minikube is a popular local Kubernetes that can be provisioned on your local laptop or a virtual machine (VM). It’s very lightweight, focusing on making it easy to learn and testing Kubernetes quickly.
- kind: kind is similar to minikube. It focuses on provisioning local Kubernetes clusters and some simple CI scenarios and development. It runs local Kubernetes clusters using a Docker runtime – it can run as a single node Kubernetes cluster or a Kubernetes multi-node cluster. You can test lots of useful, simple scenarios with kind.
Other tools
Some of the other tools are not covered in the CKA exam – however, they will still come in handy in your daily work as a Kubernetes administrator.
Helm
Helm is a management tool for managing packages of pre-configured Kubernetes objects in the form of charts – we call these Helm charts.
To install helm, you can follow the following instructions for a Debian-based distribution such as Ubuntu 18.04:
- Update the apt package index:
curl https://baltocdn.com/helm/signing.asc | sudo apt-key add -
sudo apt-get install apt-transport-https --yes
- Install the packages to use the Helm apt repository with the following command:
echo "deb https://baltocdn.com/helm/stable/debian/ all main" | sudo tee /etc/apt/sources.list.d/helm-stable-debian.list
- Make sure you update the apt package index with the new repository again and then install Helm using the apt-get install command:
sudo apt-get update
sudo apt-get install helm
- Use the following Helm command to validate its successful installation:
helm version
You’ll see output similar to the following:
Figure 2.3 – Successful installation of Helm
To know more ways to install Helm, check out the following link: https://helm.sh/docs/intro/install/.
Kompose
Most people who work with Docker will know about Docker Compose. Docker Compose is a tool used to define and run the multi-container applications containerized by Docker. It also uses a YAML file to define the application specifications. As more and more people are moving away from purely using Docker Swarm or Docker Desktop to take advantage of the enterprise-scale container orchestration system, Kompose comes in handy as a conversion tool for Docker Compose to contain orchestrators such as Kubernetes – the same structure works for Redhat OpenShift too.
You can install Kompose by running the following instructions on your Ubuntu 18.04:
- Fetch the kompose binary:
curl -L https://github.com/kubernetes/kompose/releases/download/v1.26.0/kompose-linux-amd64 -o kompose
chmod +x kompose
sudo mv ./kompose /usr/local/bin/kompose
- Then, you can fetch a docker compose example file from the official website and test the kompose convert command as follows:
wget https://raw.githubusercontent.com/kubernetes/kompose/master/examples/docker-compose-v3.yaml -O docker-compose.yaml
kompose convert
Your output will look similar to the following:
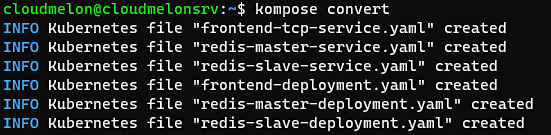
Figure 2.4 – A kompose convert command translating Docker compose into Kubernetes-native YAML-defined files
- Then, deploy those YAML files to your local Kubernetes cluster by using the following command:
kubectl apply -f .
Your output will look similar to the following:

Figure 2.5 – Kubernetes Pods up and running
The preceding screenshot shows the Redis Pods running in your Kubernetes cluster.
The dashboard
You can install a web-based user interface (UI) to your Kubernetes cluster. It not only displays the cluster status and shows what’s going on with the Kubernetes cluster but also allows you to deploy containerized applications, troubleshoot, and manage the cluster and all related resources in the cluster.
The following is a sample dashboard:
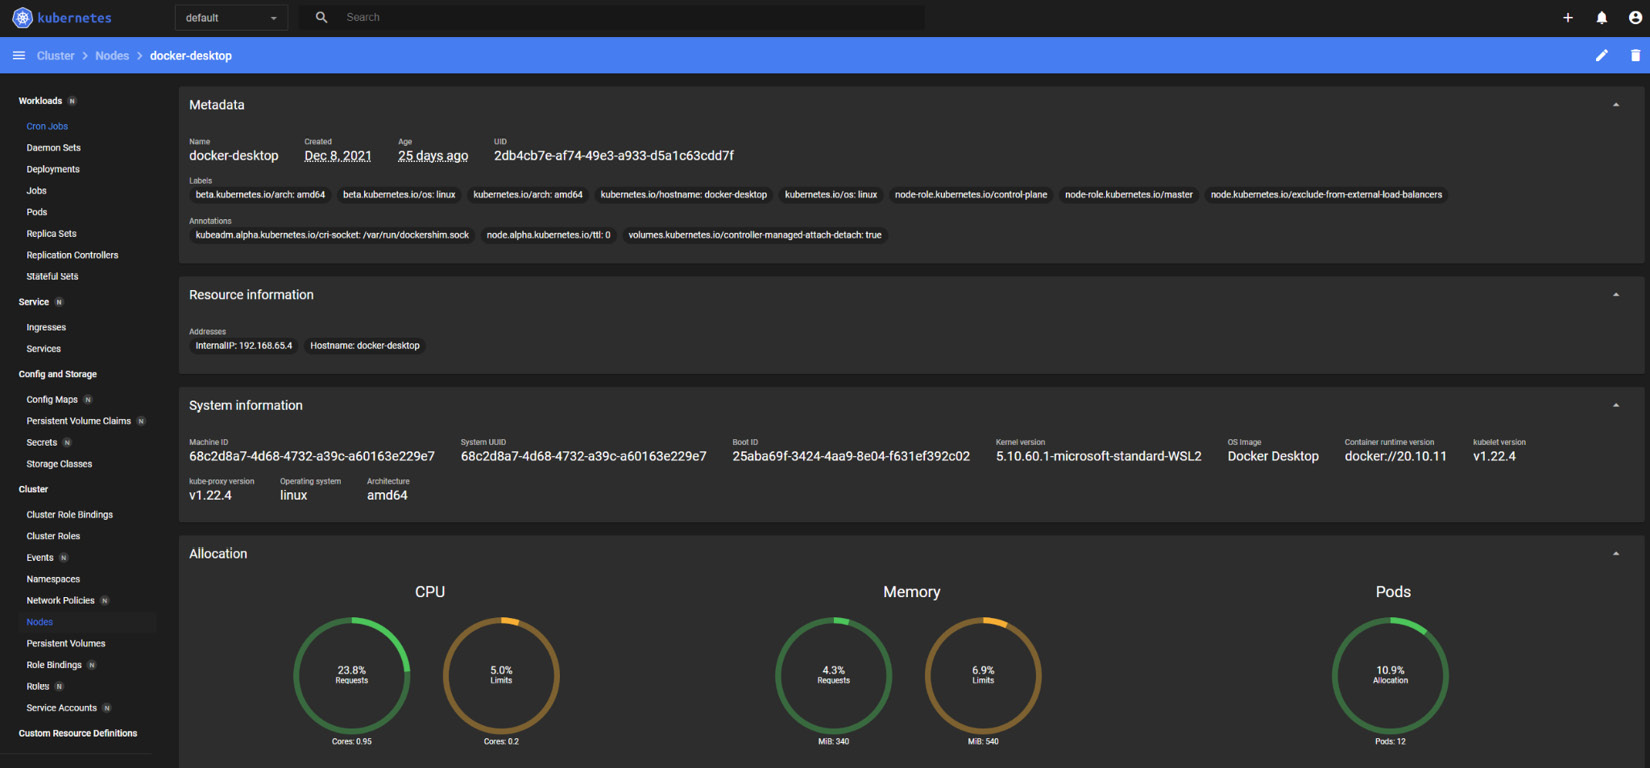
Figure 2.6 – The Kubernetes dashboard
The dashboard is sometimes handy for quick monitoring of the cluster states from the UI and user-friendly for collaborating with people who are not familiar with kubectl commands.
Installing and configuring a Kubernetes cluster
This section focuses on the installation of the Kubernetes cluster and the related configurations for it. With a good understanding gained from Chapter 1, where you learned about the Kubernetes cluster architecture and Kubernetes toolings, you will perform the Kubernetes cluster installation the hard way with minikube and kubeadm, and then update the cluster version.
Note that using minikube to spin up a single node cluster is not covered in the CKA exam but it comes quite handy when you’d like to test out Kubernetes in your local machine. The same goes for using kubeadm to install a Kubernetes multi-node cluster, as well as setting up a highly available (HA) Kubernetes cluster.
We expect you to learn both ways while putting more focus on the hands-on lab working with kubeadm. Starting with the next section, we’ll walk you through the process of installing a new Kubernetes cluster and configuration.
Prerequisites for installing a Kubernetes cluster
To get started, we need to make sure your local machine meets the following technical requirements for both minikube and kubeadm:
- A compatible Linux host – we recommend a Debian-based Linux distribution such as Ubuntu 18.04 or later.
- Make sure your host machine has at least 2 GB RAM, 2 CPU cores, and about 20 GB of free disk space.
- Internet connectivity, as you will need to download dependencies throughout the process.
- A container runtime is needed prior to creating a Kubernetes cluster. During the cluster creation process, the Kubernetes cluster automatically detects an installed container runtime by scanning through the Unix domain sockets, if there are any, within your local machine. The Unix domain socket uses Transmission Control Protocol (TCP) as the underlying transport protocol. It is used for bidirectional data communication happening on the same operating system. We talked about how to install and configure container runtime in Chapter 1 – please follow those instructions.
Before we get started, let’s get the following checklist done.
Checking whether swap is disabled
For kubeadm, we have to disable swap in order to make kubelet work correctly, you can disable swap by doing the following:
sudo swapoff -a
Checking the container runtime
You can check the path to the Unix domain socket as instructed to verify your container runtime – this path is detectable by Kubernetes. Following the instructions to install Docker covered earlier in this chapter, you will find the Unix domain path under the /var/run/dockershim.sock path once you have installed the kubelet agent. To validate that Docker has been installed successfully, run the docker ps command:
sudo docker ps
The outcome of the following command is as follows:
Figure 2.7 – Checking the Docker runtime
If you have installed containerd as the container runtime, which we covered earlier in this chapter under the Container runtimes section, you will find the Unix domain path under the /run/containerd/containerd.sock path as the following:
Figure 2.8 – Checking the containerd runtime
kubeadm picks docker over containerd as the container runtime when both the docker and containerd runtimes are detected. At the time of writing, as announced at the beginning of Jan 2022, Kubernetes is removing dockershim in the upcoming v1.24 release. This is not surprising at all since it was first announced in Dec 2020 and Kubernetes’ built-in dockershim component was deprecated in Kubernetes v1.20. In most cases, it won’t affect the applications running in Kubernetes or the build process of the containerized applications if the following conditions are satisfied:
- There’s no privileged root permission applied at the container level while it executes inside the pods using Docker commands and it restarts docker.service with systemctl
- Docker configuration files such as /etc/docker/daemon.json are modified
At this point, the official Kubernetes documentation has published this article to help users check whether dockershim deprecation will impact them. Check it out here for more ways to check the dependencies on Docker: https://kubernetes.io/docs/tasks/administer-cluster/migrating-from-dockershim/check-if-dockershim-deprecation-affects-you/#find-docker-dependencies.
Checking whether the ports required by Kubernetes are opened
We also need to check if certain ports are open on your local machines prior to installing kubeadm. You can use the telnet command to do so:
telnet 127.0.0.1 6443
You can check the official documentation to make sure the ports and protocols used by Kubernetes are available by visiting this link: https://kubernetes.io/docs/reference/ports-and-protocols/.
Ensuring iptables sees bridged traffic
Make sure your Linux node’s iptables is correctly configured to be able to watch the bridged traffic. You can set the net.bridge.bridge-nf-call-iptables parameter to a value of 1, just as we did here:
cat <<EOF | sudo tee /etc/modules-load.d/k8s.conf
br_netfilter
EOF
cat <<EOF | sudo tee /etc/sysctl.d/k8s.conf
net.bridge.bridge-nf-call-ip6tables = 1
net.bridge.bridge-nf-call-iptables = 1
EOF
sudo sysctl --system
You’ll see an output similar to the following:
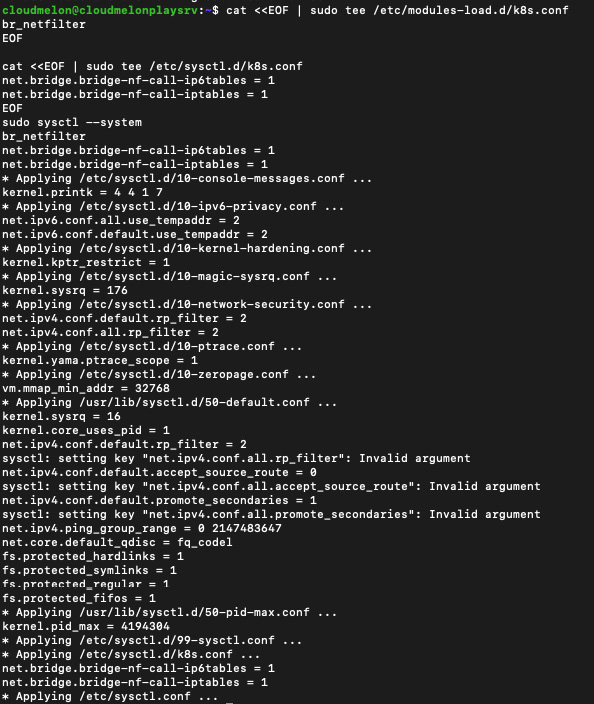
Figure 2.9 – iptables watching bridged traffic
The preceding screenshot shows the values in iptables have been updated.
Checking whether you have installed kubectl
kubectl is the command-line utility that you can use to talk to the Kubernetes cluster. Using the kubectl version command, you can verify whether kubectl has been successfully installed:
kubectl version --client
A successful installation will show an output similar to the following:
Figure 2.10 – Checking the kubectl version
Make sure you have completed the checklist in this section before moving on to the next section. These tools and requirements are essential and you may use them accordingly in the future.
Using minikube to set up a single node Kubernetes cluster
Creating a Kubernetes cluster using minikube is the easiest way to spin up a local Kubernetes cluster and it can be achieved in a matter of minutes. Here’s what you need to do.
Installing minikube
Follow these steps to install minikube:
- On your local or cloud-based Linux VM, use the curl command to retrieve the minikube binary, and then install it under /usr/local/bin/minikube as follows:
curl -LO https://storage.googleapis.com/minikube/releases/latest/minikube-linux-amd64
sudo install minikube-linux-amd64 /usr/local/bin/minikube
- You can go to /usr/local/bin/minikube to check whether you have successfully installed the minikube binary before moving to the next steps or you can also check by typing the following command into the terminal:
minikube –-help
Using minikube to provision a single node Kubernetes cluster
Follow these steps to use minikube to provision a single node Kubernetes cluster:
- When using minikube to provision a single node Kubernetes cluster, you can simply use the minikube start command:
minikube start
- You can also set up the CPU cores and memory to start your minikube cluster by adding a --memory and --cpus flag as follows:
minikube start --memory 8192 --cpus 4
After the command is executed, it kicks off the minikube cluster provisioning process. You’ll see an output similar to the following:

Figure 2.11 – Spinning up a minikube cluster
By the end, you will see a message telling you we’re ready to use the minikube Kubernetes cluster (as concluded in the preceding screenshot).
Verifying the minikube cluster installation
Your minikube cluster contains one node that serves as both the control plane and worker node. That means that once you have it set up, you can start to schedule workloads in your local Kubernetes cluster. You can use the following command to see whether the node is ready to use:
kubectl get node
You can also use the shortcut of this command:
alias k=kubectl
k get no
The output will show you the following:
- The status of the node and whether it’s ready to use
- The role of that node
- The Kubernetes version
- The age of that node since it’s been deployed
Here is the output:

Figure 2.12 – Checking the Docker runtime
Configuring the minikube cluster
If you’d like to configure the minikube cluster without reprovisioning a new one, you need to stop the minikube cluster using the minikube stop command.
The minikube config set command will help you apply the settings such as CPU and memory that you’ll allocate to the minikube cluster. After configuring the minikube cluster, you need to start the minikube cluster and from there, you’ll be working on the cluster with the new configurations.
Here’s the process to configure minikube using more memory and CPUs:
minikube stop
minikube config set memory 8192
minikube config set cpus 4
minikube start
After that, you can continue to play with the minikube cluster. In case you have any questions about how the commands work, use the minikube config - - help command to get help.
Deleting a minikube cluster
The following command deletes all local Kubernetes clusters and all profiles:
minikube delete --all
What you learned from this section can be used repeatedly every time you need a local Kubernetes cluster. You can replicate what you have learned from this section for quick testing of the latest Kubernetes release for most of the new features featured in the release note: https://github.com/kubernetes/kubernetes/releases.
However, most enterprise-grade environments will not be satisfied with a single node cluster. They are mostly multi-node setups. In the next section, we will dive into creating a Kubernetes multi-node cluster with kubeadm.
Using kubeadm to install a basic Kubernetes cluster
In this section, we will create a multi-node Kubernetes cluster using kubeadm. The following are the steps we need to achieve the goal:
- Install kubeadm.
- Bootstrap a master node where your control plane will be located
- Install the network plugins (we will get to the detailed supported plugins later in this chapter and use Calico as an example in that section).
- Bootstrap the worker nodes.
- Join the worker nodes to the control plane.
Before getting started, you need to make sure your master node meets all the technical requirements listed in this chapter.
We’ll deploy a basic Kubernetes cluster by going through the steps described in this section, as shown in Figure 2.7:

Figure 2.13 – The workflow of using kubeadm to spin up a basic Kubernetes cluster
The Kubernetes cluster will be similar to the architecture featured in Figure 2.14:
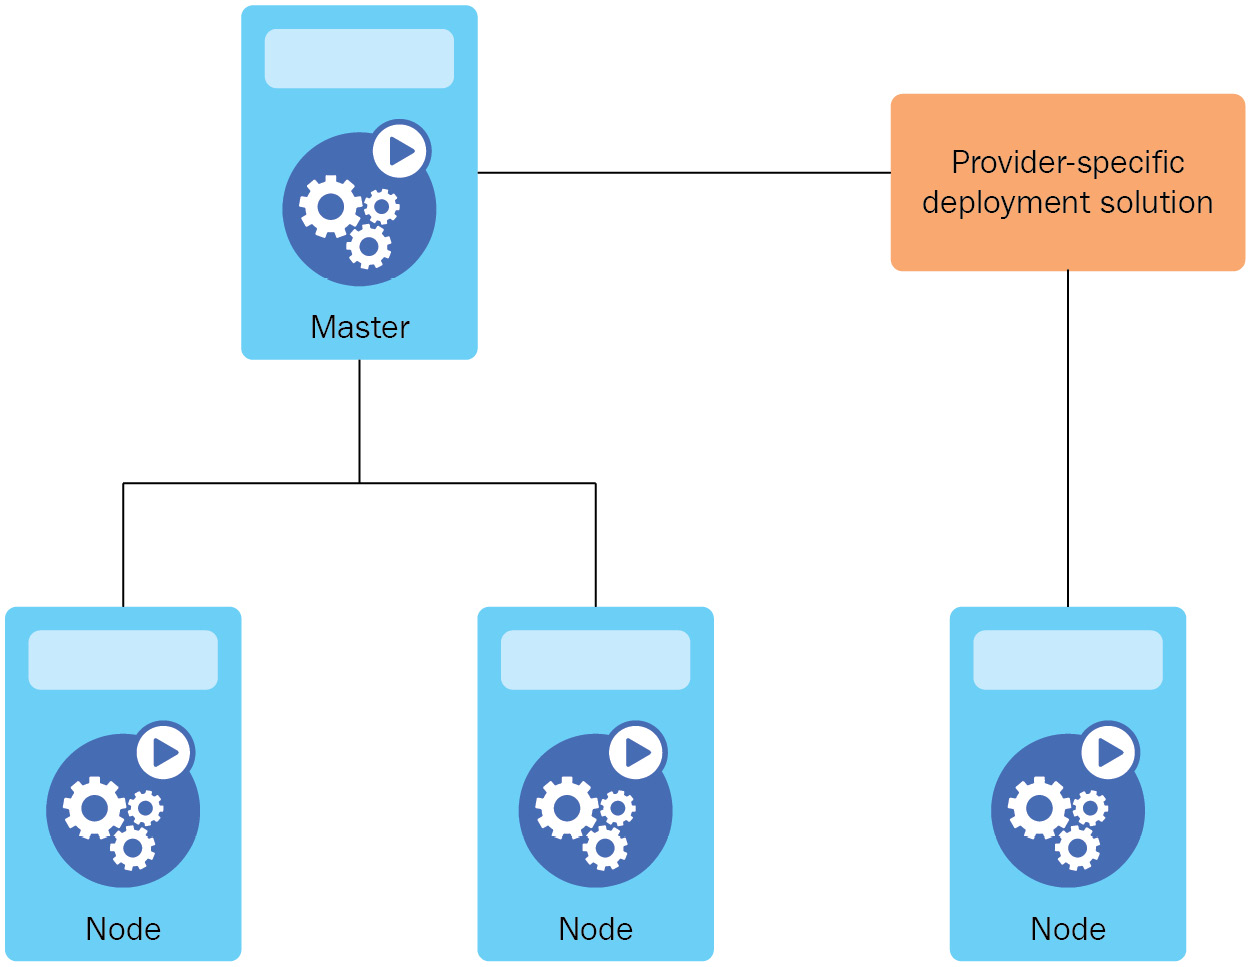
Figure 2.14 – A standard multi-node Kubernetes cluster
From now on, you can follow these instructions to create a multi-node Kubernetes cluster. To create a Kubernetes cluster using kubeadm, its default settings conform to best practices of setting up a standard Kubernetes cluster. This set of best practices is encapsulated as Kubernetes Conformance tests. Check out the details about the Kubernetes Conformance Program here: https://kubernetes.io/blog/2017/10/software-conformance-certification/.
Installing kubeadm
We introduced setting up docker or containerd as the container runtime – we can then install kubeadm by following these instructions:
- Update the apt package index, add the Google Cloud public signing key, and set up the Kubernetes apt repository by running the following instructions:
sudo apt-get update
sudo apt-get install -y apt-transport-https ca-certificates curl
sudo curl -fsSLo /usr/share/keyrings/kubernetes-archive-keyring.gpg https://packages.cloud.google.com/apt/doc/apt-key.gpg
echo "deb [signed-by=/usr/share/keyrings/kubernetes-archive-keyring.gpg] https://apt.kubernetes.io/ kubernetes-xenial main" | sudo tee /etc/apt/sources.list.d/kubernetes.list
- Start by updating the apt package index and then install kubelet and kubeadm:
sudo apt-get update
sudo apt-get install -y kubelet kubeadm
- Here, if you haven’t installed kubectl yet, you can also install kubelet, kubeadm, and kubectl in one go:
sudo apt-get update
sudo apt-get install -y kubelet kubeadm kubectl
- Use the following command to pin the version of the utilities you’re installing:
sudo apt-mark hold kubelet kubeadm kubectl
The output shows those packages are set on hold as shown in Figure 2.9:

Figure 2.15 – Checking the containerd runtime
- From here, you can check whether kubeadm has been successfully installed by typing kubeadm into the command shell. Here’s the output of the command:
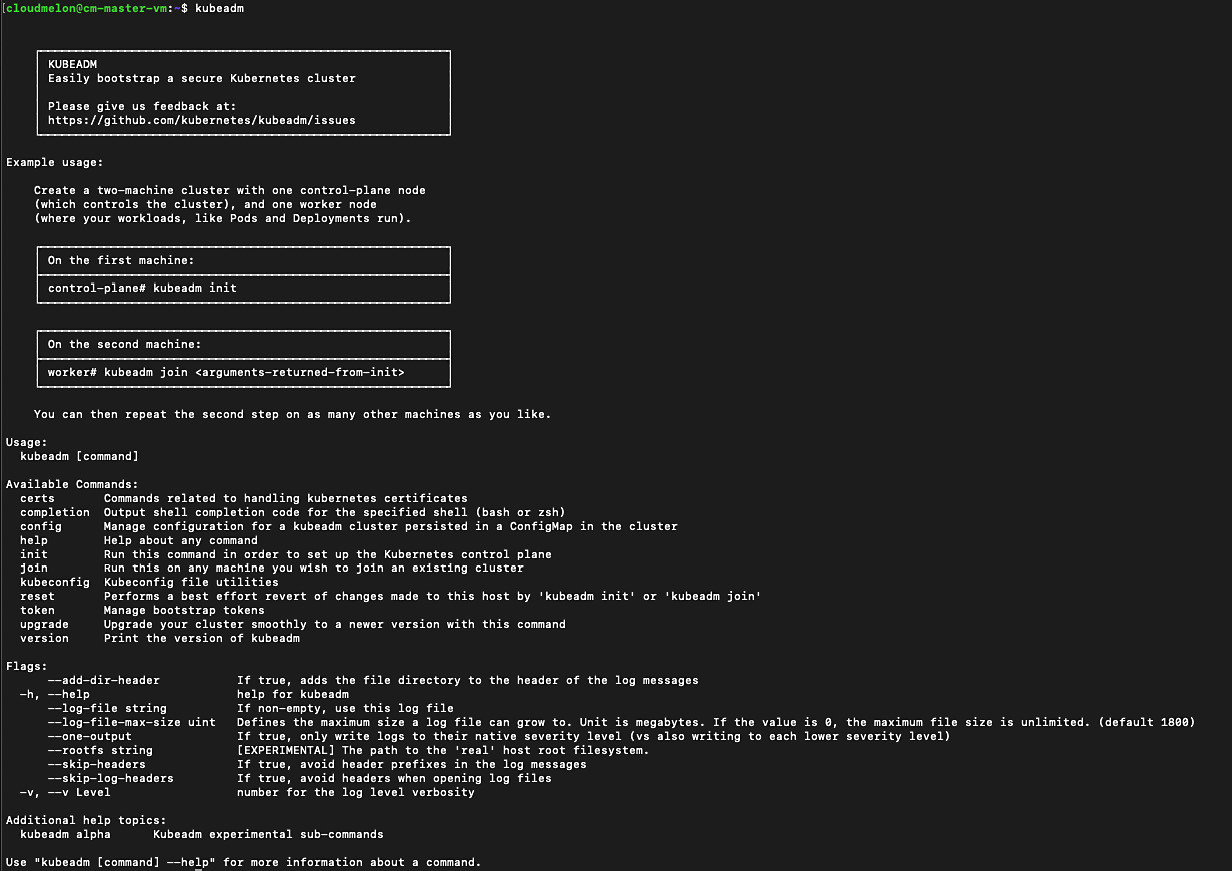
Figure 2.16 – Checking the containerd runtime
- To verify that kubelet is present on the master node, you can use the which kubelet command, which returns the location of the kubelet agent:

Figure 2.17 – Checking kubelet’s presence
As you have successfully installed kubeadm and kubelet, you can now start initiating a control plane.
Here, we will show an optional operation where you can use images pull to pre-pull the images that are required to set up the Kubernetes cluster:
sudo kubeadm config images pull
The output should be similar to the following screenshot:

Figure 2.18 – Pre-pulling the images
Note that the preceding operation is optional – you’re free to skip it and go straight to the next section.
Bootstrapping a master node
You can use the kubeadm init command to initiate the control plane as a regular user and gain sudo privileges from your master node machine by using the following command:
sudo kubeadm init --pod-network-cidr=192.168.0.0/16
You will see an output similar to the following:
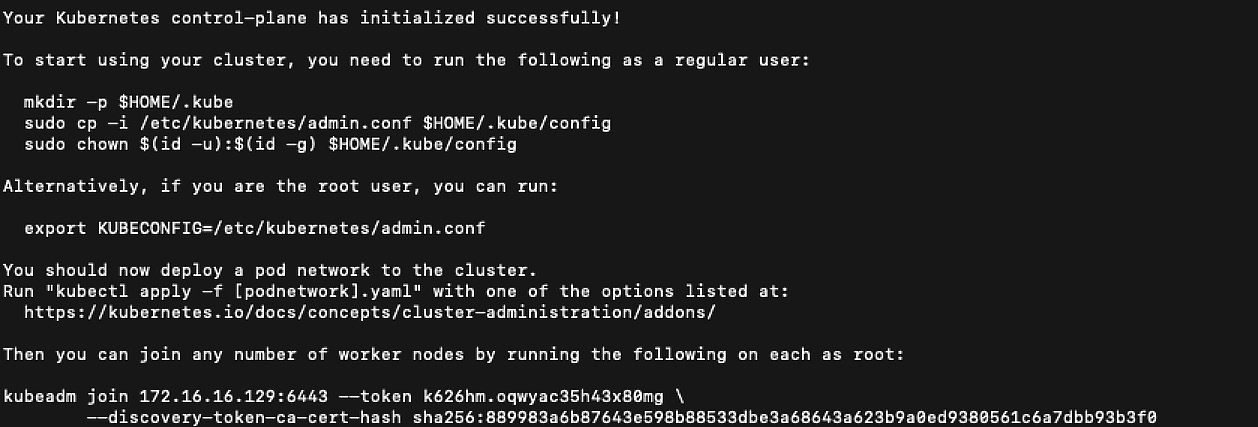
Figure 2.19 – The control plane initiated successfully
After your Kubernetes control-plane is initialized successfully, you can execute the following commands to configure kubectl:
mkdir -p $HOME/.kube
sudo cp -i /etc/kubernetes/admin.conf $HOME/.kube/config
sudo chown $(id -u):$(id -g) $HOME/.kube/config
If you’re a root user, you can use the following:
export KUBECONFIG=/etc/kubernetes/admin.conf
Then, the next step is to deploy a pod network to the Kubernetes cluster.
Installing the networking plugins
In order for the pods to talk to each other, you can deploy the networking by enabling Container Network Interface (CNI) plugin. The CNI plugins conform to the CNI specification, and as per the official Kubernetes documentation, Kubernetes follows the v0.4.0 release of the CNI specification.
There’s a wide range of networking plugins working with Kubernetes – we will dive into Kubernetes networking in Chapter 7, Demystifying Kubernetes Networking. Here are some add-ons options:
- Calico
- Flannel
- Weave Net
For all the possible options acknowledged by the Kubernetes community, please check out the official documentation: https://kubernetes.io/docs/concepts/cluster-administration/addons/. You can check out the links from this page to get the installation instructions for the respective options.
Here, we’re going to use the Calico plugin as the overlay network for our Kubernetes cluster. It is a Kubernetes CNI networking provider and it allows you to write up the network policies, which means that it supports a set of networking options to suit your different requirements. Here’s how we’ll approach it:
- Deploy the Tigera Calico Custom Resource Definitions (CRDs) and operator by using the kubectl create -f command:
kubectl create -f https://docs.projectcalico.org/manifests/tigera-operator.yaml
kubectl create -f https://docs.projectcalico.org/manifests/custom-resources.yaml
- You can use the watch command to monitor the pod status in the process:
watch kubectl get pods -n calico-system
Alternatively, use the following alternative command:
kubectl get pods -n calico-system -w
Now, you can see the pods have a Running status:

Figure 2.20 – The control plane initiated successfully
- For the Kubernetes cluster created by kubeadm, there’s a taint by default for master nodes. Therefore, we need to remove taints so that the master node is available to schedule pods. To remove the taint, you can use the following command:
kubectl taint nodes --all node-role.kubernetes.io/master-
The following screenshot shows that the taint on the master node has been successfully removed:

Figure 2.21 – Removing the taint on the master node successfully
- You can use the following command to check out the current nodes that are available:
kubectl get no
- To get more information from the node, you can use the following command:
kubectl get no -o wide
The following screenshot shows the sample output:

Figure 2.22 – The Kubernetes node status
From the preceding command output, you can see the Kubernetes node is operational after enabling the CNI networking and it has been assigned an internal IP address.
Bootstrapping the worker nodes
To add more worker nodes to the Kubernetes cluster, we will SSH to the client machine, and make sure the worker nodes meet the same technical requirements as the master node. Check out the Prerequisites for installing a Kubernetes cluster section of this chapter and refer to the information on kubeadm for more details. Make sure you have installed the container runtime and kubeadm, although kubectl is optional for worker nodes since we usually use the master node for management.
Joining the worker nodes to the control plane
We can go ahead with installing kubeadm for the master node after making sure that your worker nodes and local environment meet the technical requirements that we set, as we mentioned earlier in this section. As introduced in Chapter 1, Kubernetes Overview, the worker nodes are where your containerized workloads are up and running.
You can use the following command to join the worker nodes to the Kubernetes cluster. This command can be used repeatedly each time you have to join new worker nodes:
sudo kubeadm join --token <token> <control-plane-host>:<control-plane-port> --discovery-token-ca-cert-hash sha256:<hash>
You can actually go back and copy the output of the master node control plane, which would look similar to the following sample command:
sudo kubeadm join 172.16.16.129:6443 --token k626hm.oqwyac35h43x80mg --discovery-token-ca-cert-hash sha256:889983
a6b87643e598b88533dbe3a68643a623b9a0ed9380561c6a7dbb93b3f0
You can use the preceding command to join the worker node to the control plane and set up your Kubernetes cluster with multiple worker nodes.
Setting up a highly available cluster with kubeadm
In Chapter 1, Kubernetes Overview, we introduced the cluster architecture, which gives us two options: setting up a single node Kubernetes cluster for dev/test quick testing or setting up a multi-node Kubernetes cluster for more professional use, or even use in production. A standard configuration would be one master with multiple worker nodes. As we stated in the previous chapter, the Kubernetes master node is where the control plane resides. In the event of a master node going down, either the containerized workloads up and running in the worker nodes will still keep running until the worker node is off the grid for some reason or there are no available master nodes, meaning no new workloads will be scheduled to the worker node.
There are two options available to build a HA Kubernetes cluster:
- Building multiple master nodes: This is the option where the control plane nodes and etcd members co-exist in the same master nodes. Figure 2.16 shows the stacked etcd topology:

Figure 2.23 – A stacked etcd topology for a HA kubeadm cluster
This topology makes the cluster more resilient compared to the basic Kubernetes cluster architecture that we built in this chapter, thanks to the redundancy of the master node. In case one master node goes down, it’s easy to switch to another available master node to ensure the health of the entire Kubernetes cluster.
However, in some cases where we need to manage the cluster and replicate the cluster information, the external etcd typology comes in.
- Building an external etcd cluster: Compared to the previous option, the key idea of this option is to decouple the etcd store to a separate infrastructure since the etcd, as we mentioned in Chapter 1, is where Kubernetes stores the cluster and the state information about the Kubernetes objects. The kubeadm HA topology architecture for an external etcd cluster is shown in Figure 2.24:
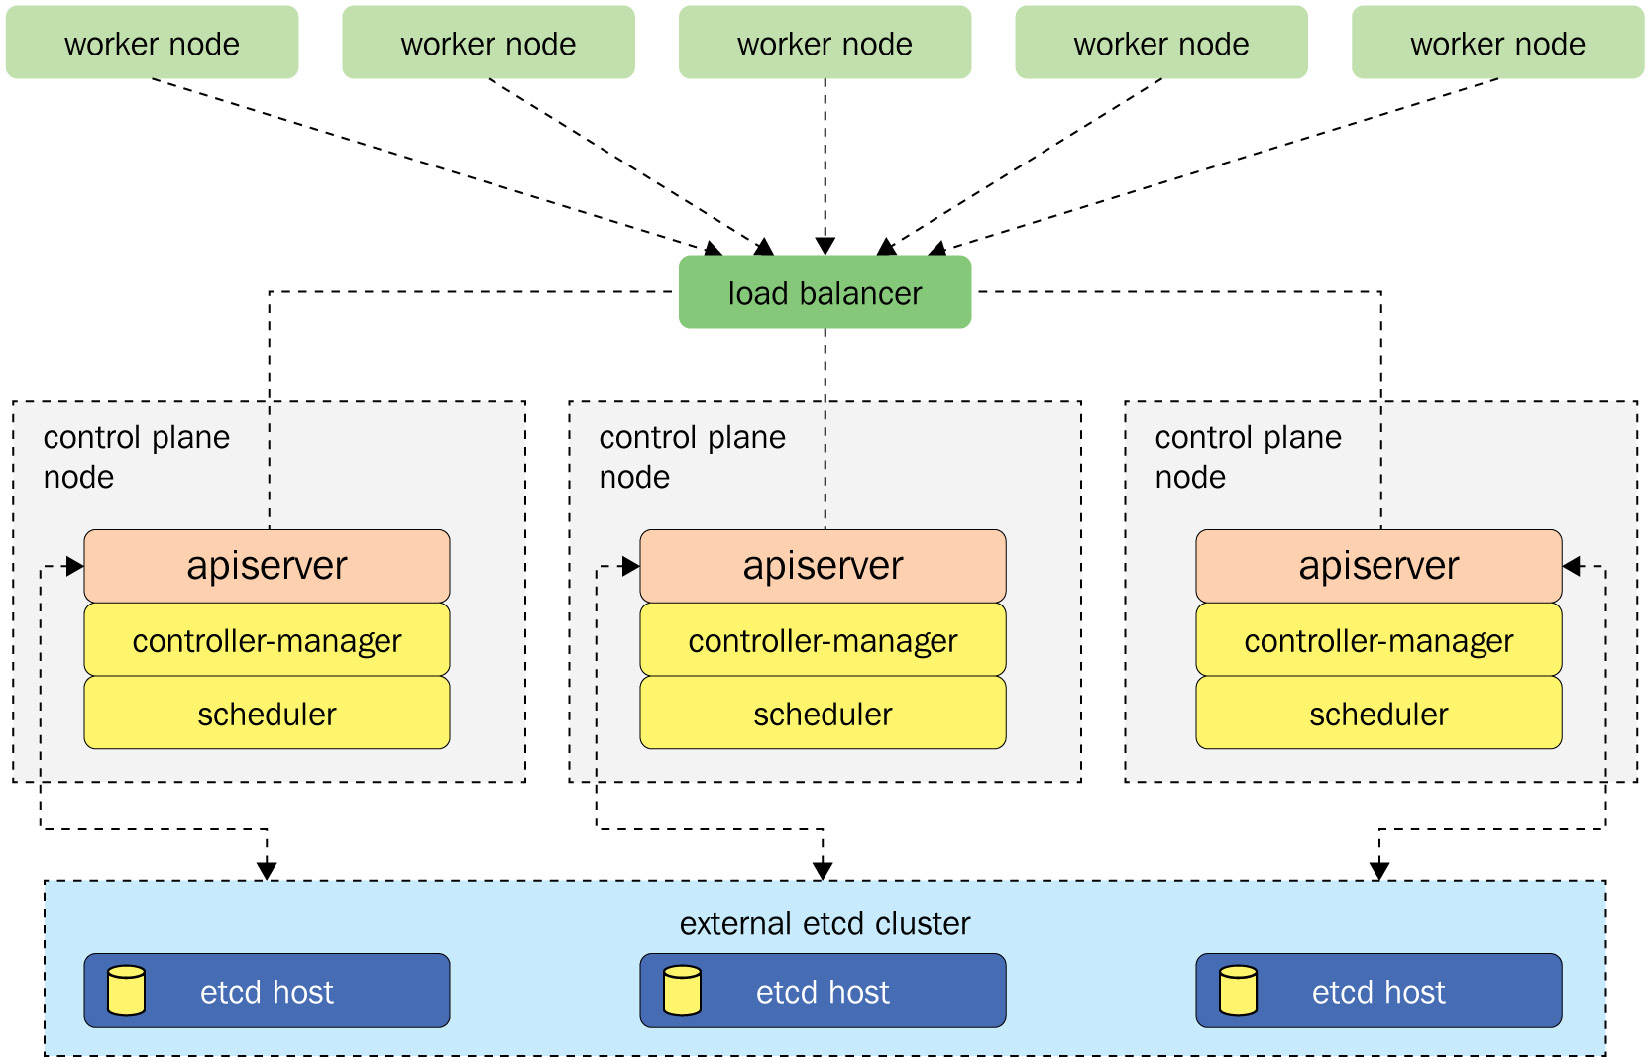
Figure 2.24 – The topology for an external etcd HA kubeadm cluster
As shown in Figure 2.24, the external etcd is a cluster and it communicates with the API server of each control plane. In the event of the control plane node going down, we won’t lose all the information stored in the etcd store. It also makes the control plane more decoupled and manageable, as we only need to add more control plane nodes. A loss of the control plane node won’t be as impactful as it would with the stacked etcd topology.
Summary
This chapter covers the very first job for most Kubernetes administrators who are setting up a Kubernetes cluster with a single worker node or with multiple worker nodes. The various tools introduced in this chapter will help your daily routine at work beyond the exam. Nevertheless, this is also one of the most time-consuming tasks in the CKA exam. Practice, practice, and more practice will help you get the hang of it. Knowing the HA topology for a Kubernetes cluster will also help you address the requirements of the organization that you’ll be working for as a Kubernetes administrator. As you master the setup process for a basic Kubernetes cluster, it will become easier to apply your skills to different typologies.
In the next chapter, we’ll talk about Kubernetes cluster maintenance, including some important topics such as upgrades to Kubernetes components, which is quite an essential task in the daily work of a Kubernetes administrator. Touching on external etcd typology in this chapter is just a start, as we’ll dive into more interesting work with etcd in the next chapter. Happy learning!
Mock CKA scenario-based practice test
You have two VMs, master-0 and worker-0. Please complete the following mock scenarios.
Scenario 1:
Install the latest version of kubeadm, then create a basic kubeadm cluster on the master-0 node, and get the node information.
Scenario 2:
SSH to worker-0 and join it to the master-0 node.
Scenario 3 (optional):
Set up a local minikube cluster and schedule your first workload, called hello Packt
You can find all the scenario resolutions in Appendix - Mock CKA scenario-based practice test resolutions of this book.
FAQs
- Where should I start to test the Kubernetes cluster?
You can start on your local laptop or desktop on Windows, Linux, or Mac OS, and we recommend using VMware player or Hyper-V to spin up multiple VMs so you can test out a multinode scenario. Using Multipass from Canonical is also great for creating Ubuntu VMs and it supports Linux, Mac, and Windows. Check it out here: https://multipass.run/.
Another option is to get a cloud subscription such as Microsoft Azure, AWS, or GCP, using which you can provision a VM with a click-through experience.
- Where can I find the latest Kubernetes release to test out?
The Kubernetes GitHub repository is where you can find all the releases as well as changelogs, and you can get the latest release and build it by yourself: https://github.com/kubernetes/kubernetes.
We can also use kubeadm or minikube to get Kubernetes, as they are aligned with the Kubernetes source code delivery cycle and are up to date.