Configuration Example
This section looks at some sample configurations of the NAS (client) and the ACS (server). Included are examples of authentication, authorization and accounting—all three of the AAA services. These examples are based on a simple case study.
Scenario
You are the security administrator responsible for ensuring that the corporate security policy is enforced throughout the company. You recently installed two new services, a direct Internet connection and remote dial-in access for senior management so that they can dial into the office at night and on weekends. You are concerned about the threats these new connections pose to the security of the internal network. No other third-party links have ever existed, so this is the first external penetration of the network.
Technical Aspects
The network diagram is shown in Figure 9-19.
Figure 9-19. Example Network Diagram
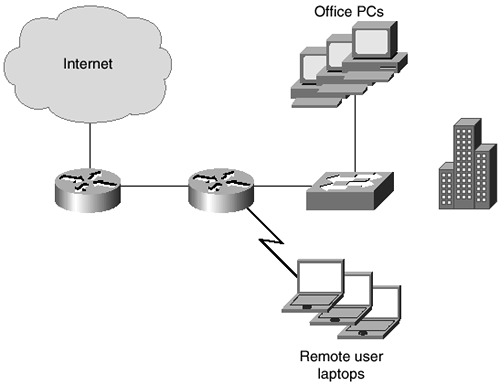
You can see in Figure 9-19 that the network simply consists of a switched LAN, an internal router, and an Internet-connected router all located at one office. The internal router has eight asynchronous serial ports that provide remote access to the remote users over modems and PPP. An RFC 1918-compliant private address is used internally with NAT providing the public address over the leased-line 128-kbps Internet connection. Windows NT is currently used on the network as the network operating system (NOS).
Potential Risks
As the security administrator, your concerns are with the authentication of the remote access users and also with the authentication of administrators to the Cisco internetworking devices for command-line editing and monitoring.
Configuration
The first service to implement is authentication. For any of this to work, there must be an authentication server located on the network. You decide to install the Cisco Secure ACS on your network as shown in Figure 9-20. You give the ACS server an IP address of 192.168.0.10/24. You give the NAS an IP address of 192.168.0.9/24.
Figure 9-20. Example Network Diagram with the AAA server
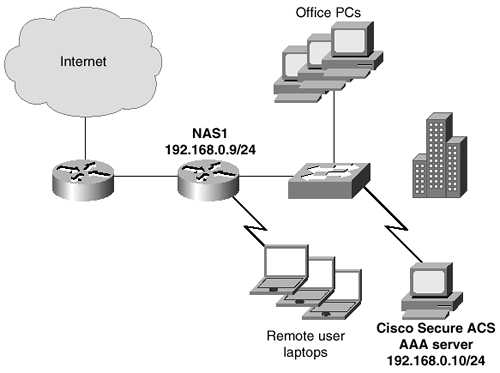
All users currently have a Windows NT user account, so you decide to use the Windows NT domain database instead of the built-in Cisco Secure ACS database. You also decide not to use any group mappings, but to allow and disallow remote access by the Grant Dial-In Permission, which is already available within the Windows NT user profile from the User Manager for Domains application.
ACS Server Configuration
Before you can configure anything on the network access server, you must configure the ACS server to communicate with the NAS and to authenticate against the Windows NT domain database. This is explained in the following steps:
Step 1. |
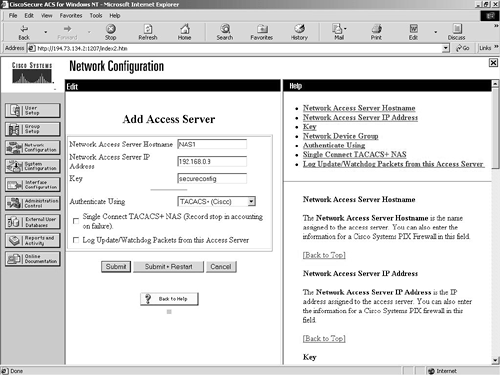
You have to configure the ACS server to accept AAA requests from the NAS. To do this, you have to go to the Network Configuration screen and click Add Entry for the network access servers. Figure 9-21 shows you the resulting screen. Figure 9-21. Network Configuration Screen
You can see in Figure 9-21 that the IP address, name, and key have been entered. The key entered is “secureconfig.” This also has to be entered on the NAS. TACACS+ has been selected as the method of authentication. You should now click the Submit+Restart button to submit the addition and restart the AAA services on the Windows NT server. |
Step 2. |
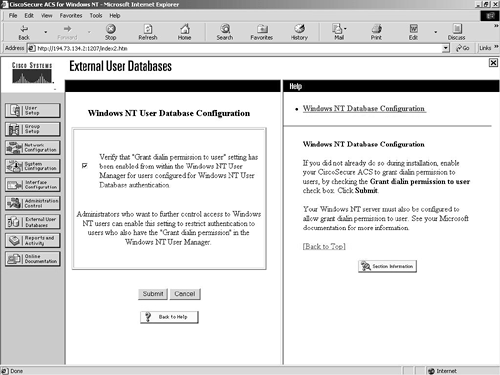
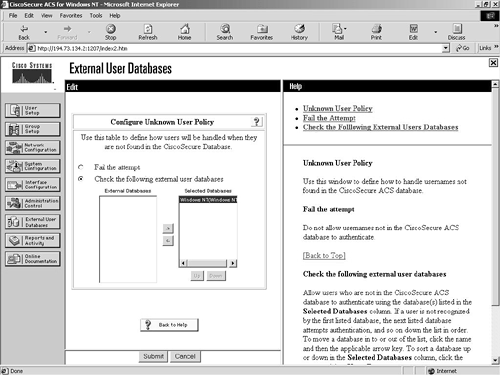
The next step is to enable authentication against the Windows NT domain database. This is a two-step process. The first step is to tell the ACS server to use NT. The second step is to set the unknown user policy to use the NT server for authentication. Both of these are done from within the External User Databases configuration screen. Click the External User Databases configuration icon, then click the Database Configuration link. Select Windows NT and check the box to allow access by the Grant Dial-in Permission. This is shown in Figure 9-22. Figure 9-22. External User Databases
Return to the External User Databases configuration screen and select the Unknown User Policy link. You will now be presented with the screen shown in Figure 9-23. Figure 9-23. Unknown User Policy
|
NAS Configuration
As with the ACS server, certain configuration tasks have to be carried out on the NAS just to initiate communication with the ACS server. You are using TACACS+ for this example. The following commands have to be entered on the NAS:
NAS1(Config)#aaa new-model
NAS1(Config)#tacacs-server host 192.168.0.10
NAS1(Config)#tacacs-server key secureconfig
These commands enable the new model for AAA on the NAS. The TACACS+ server is identified as IP address 192.168.0.10, and the shared key is set as “secureconfig.” This matches the value entered into the ACS server and enables all traffic between the NAS and the ACS to be encrypted. The NAS is now configured to allow further AAA configuration.
Authentication Configuration
You are going to start the AAA services by configuring authentication on the NAS. You require authentication for both EXEC logins and PPP network connections. The easy way to achieve this is to create a method list named “default” for both login and PPP access. This is then applied to all lines and interfaces on the NAS. The following commands enable authentication:
NAS1(Config)#aaa authentication login default tacacs+ local
NAS1(Config)#aaa authentication ppp default tacacs+ local
These two commands both enable authentication for login and PPP access to the NAS. Notice that two methods are defined, TACACS+ and local. Authentication uses TACACS+ first, but if no response is received, it then uses the local user information on the NAS. It is useful always to include both in case the ACS server is ever unavailable. It is more for administrative access to the CLI than for PPP access. Create some administrative users on the NAS that can be used in an emergency to gain access to the CLI.
These two commands enable authentication for the NAS.
Authorization Configuration
With authentication configured, you now want to configure authorization to deny users access to the dial-in system between the hours of 22:00 and 06:00, and to ensure that each user can only have one active session at any one time. These two functions improve on the security of the system and are both configurable as authorization commands.
This process involves creating the changes on the Cisco Secure ACS server and a simple one-line configuration on the NAS.
On the ACS server, click the Group Setup configuration link. By default, all users are made members of the Default Users group. You want to apply these changes to every user, so choose to edit the settings for the default group. The first change is the time of day access for the users. Click the Set As Default Access Times checkbox and deny the times between 22:00 and 06:00. Figure 9-24 shows this completed task.
Figure 9-24. Time of Day Settings
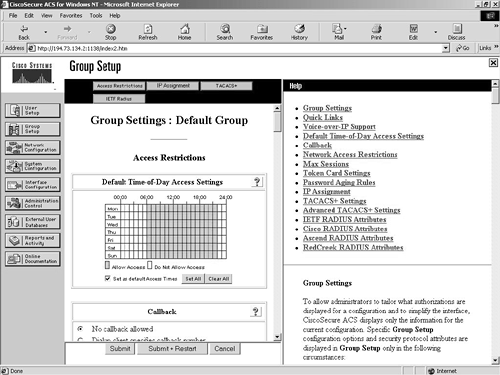
You can see in Figure 9-24 that during the times between 22:00 and 06:00, access is denied. You then need to scroll down this page to the Max Sessions section. Here you have two options. You can apply a max session figure to the entire group or to users of this group. You need to apply this to the users of this group and select the default, one connection. Figure 9-25 shows this configuration.
Figure 9-25. Max User Connections
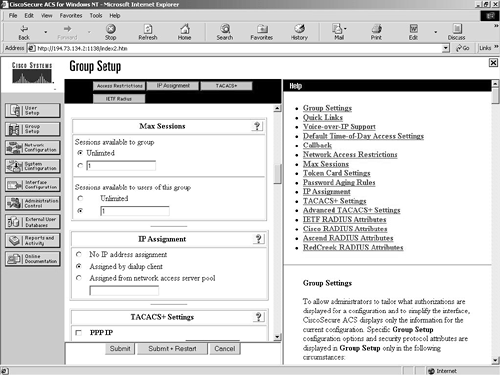
Now that you have configured the ACS server, you have to configure the NAS. To configure the NAS, enter this command:
NAS(Config)aaa authorization network default tacacs+
This command applies this method list to all lines and interfaces on the router. The network service type specifies that all network-based services such as PPP, SLIP, and ARAP will use the TACACS+ server for authorization.
Accounting Configuration
You wish to keep a record of all CLI access to the NAS to track administrator access of what commands are issued at EXEC level 15. No further configuration is required on the ACS server, and only one configuration line is required on the NAS to start this process:
NAS1(Config)#aaa accounting commands 15 default start-stop tacacs+
The preceding command sets up accounting for level 15 commands. The default method list is used, so it is applied to all lines and interfaces. Only one method is configured. TACACS+ and RADIUS are supported, but RADIUS is not configured on the ACS server, so it makes sense to use just TACACS+ for accounting.
This completes the simple case study configuration example. In it, you implemented authentication, authorization, and accounting both on the ACS server and the NAS.

