Chapter 16. Supplicant Configuration
The client 802.1X supplicant is a critical part of any Identity Services deployment. What is a supplicant? A client supplicant is simply the piece of software that the operating system (OS) uses to connect to networks, both wired and wireless. All the major OSs, like Windows, Mac OS X, Android, iOS, Linux, and many network devices, like Cisco IP-Phones, IP cameras, and so on, include a built-in supplicant. The network access devices (NAD) interact with the client’s supplicant upon connection to the wired or wireless network. The 802.1X transactions are performed between supplicant and the NAD. The NAD then talks RADIUS to the Cisco Identity Services Engine (ISE).
The Cisco ISE has a nice feature called native supplicant provisioning. This feature allows you to remove the burden from the end users to configure their own supplicant; instead, it does it automatically for them via an ISE-supplicant provisioning wizard. This feature is highly recommended because of its ability to simplify the deployment of ISE. It only works with the native built-in supplicants in the following OSs:
![]() Android
Android
![]() Mac OS X (for Apple Mac computers)
Mac OS X (for Apple Mac computers)
![]() Apple iOS (for Apple iPhones and iPads)
Apple iOS (for Apple iPhones and iPads)
![]() Microsoft Windows 7, Vista, and XP
Microsoft Windows 7, Vista, and XP
Note
If you use one of these, it is highly recommended that you skip this chapter and instead read Chapter 17, “BYOD: Self-Service Onboarding and Registration,” which covers client provisioning in detail.
If you will not use the native supplicants or prefer not to use the ISE client provisioning wizards, this chapter is for you. It covers the configuration steps for the following client supplicants:
![]() Cisco AnyConnect Network Access Manager (NAM) for Windows
Cisco AnyConnect Network Access Manager (NAM) for Windows
![]() Windows 7 Native Supplicant
Windows 7 Native Supplicant
![]() MAC OSX 10.8.2 Native Suppliant
MAC OSX 10.8.2 Native Suppliant
The configuration steps focus solely on the wired network portion of their configuration. There is a lot of knowledge and readily available information for wireless configuration already out there, so including it here is redundant.
Comparison of Popular Supplicants
There are only a handful of popular supplicants on the market today and a bunch of niche supplicants. The most popular ones for wired are the following:
![]() Windows Native Supplicant
Windows Native Supplicant
![]() MAC OS X Native Supplicant
MAC OS X Native Supplicant
![]() Android/iOS/Blackberry/other mobile OS native supplicants
Android/iOS/Blackberry/other mobile OS native supplicants
![]() Cisco AnyConnect Secure Mobility NAM Client
Cisco AnyConnect Secure Mobility NAM Client
![]() Linux Native Supplicants (wpa_supplicant)
Linux Native Supplicants (wpa_supplicant)
When deciding which supplicant to use, answer these basic questions:
1. What is the dominant OS going to be in my ISE deployment?
2. Are most of my clients members of Active Directory?
3. What EAP type(s) will be required (PEAP, EAP-TLS, EAP-FAST, EAP-MSCHAPv2, and so on)?
4. Do I require an all-in-one client?
5. Will I be using the ISE native supplicant provisioning?
6. Is EAP-chaining required? EAP-chaining provides differentiated access based on enterprise and non-enterprise assets. It also has the ability to validate users and devices in a single EAP transaction. It can simultaneously perform both machine authentication and user authentication.
You must consider several other deciding factors, depending on the complexity of your ISE deployment, but these are the most common ones. After you answer these questions, you will be able to match your answers with the available supplicants and their requirements. It is space prohibitive, and highly susceptible to becoming quickly outdated, to list all the supplicants and their supported features here. Instead, check the websites of the supplicant vendors for these details.
Note
In general, the native OS supplicants are sufficient for your ISE deployment. If you are using either Microsoft Active Directory Group Policy or Cisco ISE Native Client Provisioning, you must choose the native supplicant.
Configuring Common Supplicants
This section deals with the manual configuration steps for some of the most common supplicants. Specifically, Windows 7 Native, MAC OS X Native, and Cisco AnyConnect NAM are covered. Only wired 802.1X configuration is covered.
Mac OS X 10.8.2 Native Supplicant Configuration
In versions 10.7 and 10.8 of OSX, Apple changed the wired 802.1X configuration steps. The good news is that it made it a zero configuration setup for the vast majority of wired 802.1X ISE deployments. Upon connecting to the Ethernet network, the 802.1X authentication process is automatically started, and the user is presented with a pop-up message to log in to the network.
Note
By default, OS X 10.8.2 requires that, during 802.1X authentication, the name in the server’s certificate must match its DNS hostname. So, ensure that your ISE server-side certificate complies.
If the default setting for autoconnect, as shown in Figure 16-1, has been modified, it can be re-enabled by following the steps:
1. Click System Preferences and select Network under Internet and Wireless.
2. Click Ethernet and click Advanced.
3. Select the 802.1X tab.
4. Select Enable automatic connection, as shown in Figure 16-2.


To access networks that cannot be joined with the method shown in Figure 16-2, or to use a login window mode or a system mode profile, you need to create and distribute a .mobileconfig file to clients that contains the correct network-configuration information. A .mobileconfig can be created by using the Profile Manager service provided in OS X Mountain Lion Server. See Apple’s support site for detailed information.
Windows GPO Configuration for Wired Supplicant
Windows 2008r2 or better includes the ability to use group policy objects to configure clients’ wired and wireless 802.1X settings. For complete instructions, go to http://technet.microsoft.com/en-us/library/cc733169.aspx.
Here are the common steps for configuring wired GPO 802.1X settings using EAP-TLS with certificates and single-sign on (SSO). This assumes you have already delivered the full certificate chain for your CA and machine and identity certificates to the client, hopefully using Group Policy Objects (GPO) for that.
Note
See Appendix C, “Configuring the Microsoft CA for BYOD,” for details on how to provision certificates using a Microsoft CA server.
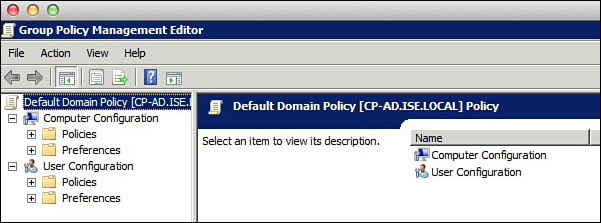
1. Open the Group Policy Management console (see Figure 16-3).

2. Select your domain. Either create a new Group Policy Object or select an existing one. Right-click > Edit. This opens the Group Policy Management Editor (see Figure 16-4).
3. Create a new wired network policy for Vista or later. To do this, go to Computer Configuration > Policies> Windows Settings > Security Settings > Wired Network Policies. Right-click and select Create a New Wired Policy (see Figure 16-5).

4. Fill in the policy name and description. Be sure to check Use Windows Wired Auto Config service for clients. Optionally, check Don’t allow shared user credentials. See Figure 16-6 for an example.

5. Click the Security tab. Select Enable use of IEEE 802.1X authentication for network access.
6. For Select a network authentication method, select Smart Card or other certificate.
7. Select Cache user information for subsequent connections to this network. See Figure 16-7 for an example.

8. Click the Advanced button. Check Enforce Advanced 802.1X settings. You can leave the defaults or change for your environment.
9. Check Enable Single Sign-On. The most common setting is Perform Immediately Before User Logon. This allows the user to log on to the domain and run logon scripts.
10. Check Allow additional dialogs to be displayed during single sign-on.
11. If you will use ISE to change the wired switchport VLAN between machine logon and user logon, check This network uses different VLAN for authentication with machine and user credentials. This ensures that a change of IP address takes place smoothly.
12. Figure 16-8 shows an example of the Advanced Security Settings.

13. Click OK. The Advanced Security Settings dialog box closes, returning you to the Security tab. On the Security tab, click Properties. The Smart Card or other Certificate Properties dialog box opens.
14. Select both Use a certificate on this computer and Use simple certificate selection.
15. Check Validate server certificate.
16. In Connect to these Servers, type the name of each ISE policy server, exactly as it appears in the subject field of the ISE server’s certificate. Use semicolons to specify multiple ISE server names.
17. Leave everything else disabled. (For higher security settings, see the Microsoft documentation.) Click OK and OK to close this all out.
Figure 16-9 shows an example of certificate settings.

18. Your new policy will be pushed out to your clients the next time they do a GPO update.
Windows 7 Native Supplicant Configuration
Microsoft disables 802.1X by default on Windows 7. The following steps show you how to enable and configure wired 802.1X. You must be logged in as an administrator to complete these steps:
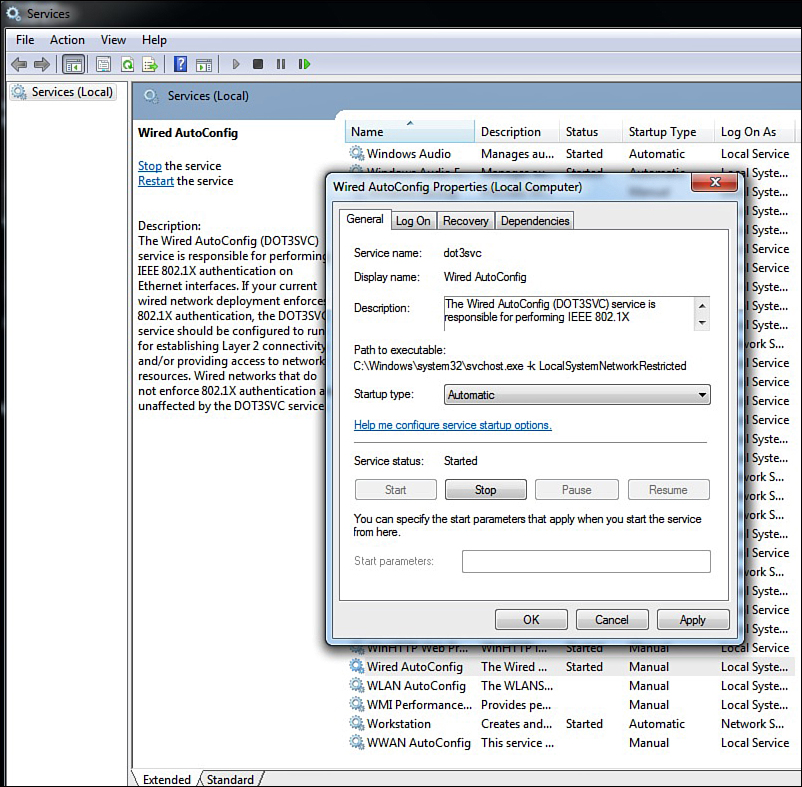
1. Open Windows Services. Go to Start > Search. Type in services and select it. This opens the Services Management Console.
2. Select and double-click Wired AutoConfig. Change Startup type to Automatic. Click Start to start the service. Click OK. The 802.1X service is now enabled by default (see Figure 16-10).
3. Go to Network Connections, select your wired interface, right-click, and select Properties. See Figure 16-11 for details.

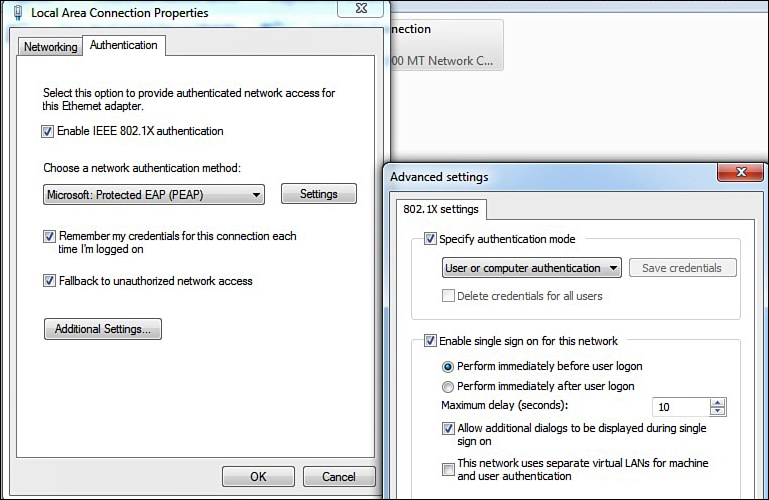
4. Select the Authentication tab (this only shows up if you have enabled the Wired Autoconfig service). Check Enable IEEE 802.1X. Choose your authentication method; Protected Extensible Authentication Protocol (PEAP) is the most popular, because it uses your AD username and password by default. See Figure 16-12 for details.

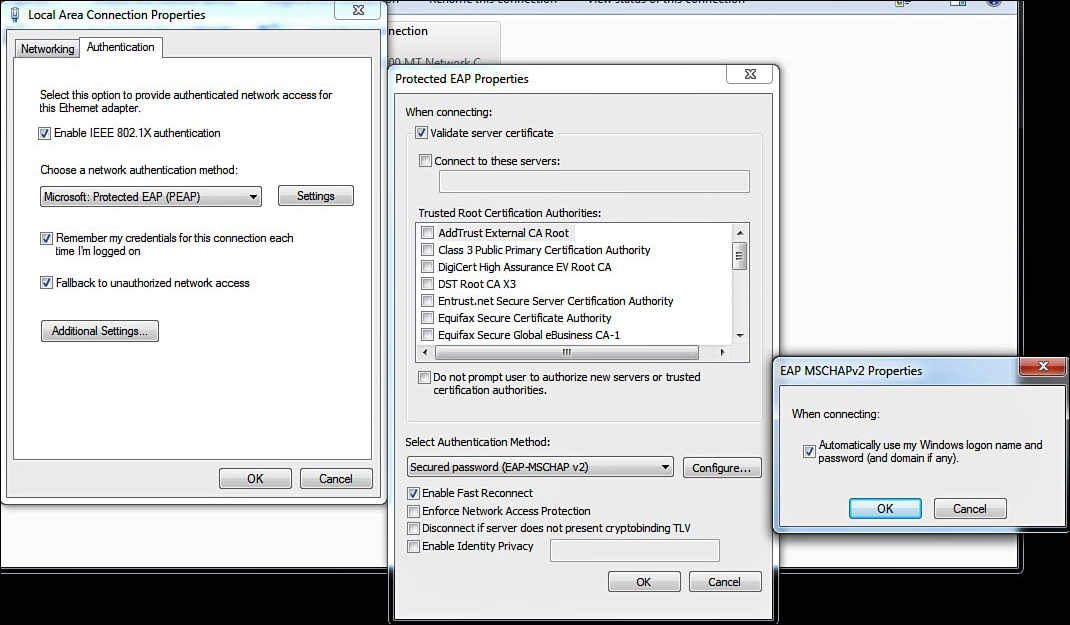
5. Click Additional Settings. This brings you to the Advanced settings. Specify your authentication mode. Also, enable single sign-on. Click OK. See Figure 16-13 for an example.
6. Optionally, click Settings. Depending on the authentication method you choose, you may or may not have to configure settings. If you chose PEAP, the defaults are fine in most cases. If you want to use PEAP, but not have it automatically, use your Windows logon name and password, and then click Configure next to EAP-MSCHAPv2 and uncheck the box. See Figure 16-14 for an example.
7. Click OK until you close out all the dialog boxes.
Your Windows 7 Client is now ready to connect to a wired 802.1X protected network.
Cisco AnyConnect Secure Mobility Client NAM
This section walks you through the setup for the Cisco AnyConnect client for wired PEAP 802.1X authentication. To start, you must download the standalone AnyConnect Profile Editor from cisco.com or use the profile editor inside of ASDM or CSM. Once you have a profile editor installed, proceed with these steps:
1. Open AnyConnect Profile Editor and select Networks. Click Add. Provide a name. Change Group Membership to In all groups. Select Wired under Network Media. Click Next. See Figure 16-15.

2. Select Authenticating Network. Only if you are running in 802.1X open mode, do the following: Check Enable Port Exceptions. Select Allow data traffic after authentication even if. Select EAP fails. In open mode, ensure that your clients will still access the network even if they have a failure. This setting will accomplish that. Once you move away from open mode, you need to disable this setting. Click Next. See Figure 16-16.

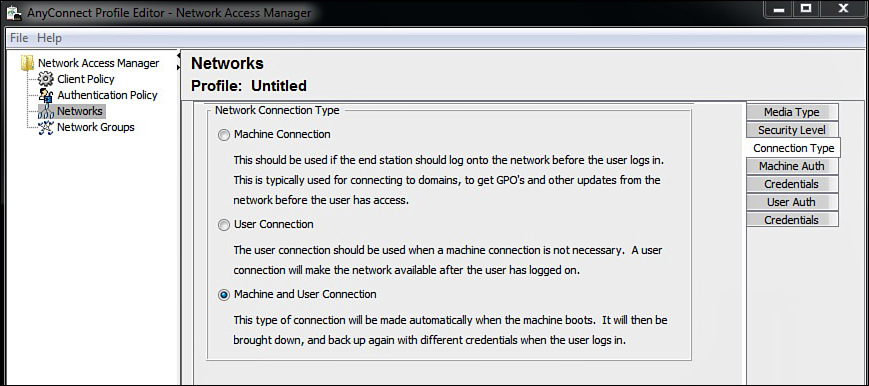
3. Select Machine and User Connection or the setting of your choice. Click Next. See Figure 16-17.
4. Enable PEAP. The default settings are usually not changed. Click Next. See Figure 16-18.

5. This screen provides you with the ability to upload root certificates as part of the profile. If you need to do this (i.e., you are using your own CA server), add them here, as shown in Figure 16-19. Click Next.

6. Set the credentials that the machine should use. Normally, the defaults are sufficient. Click Next.
7. For User Auth, select PEAP or your choice of authentication method. Normally, the defaults are fine. Click Next. See Figure 16-20 for an example.

8. The next screen is for user certificate checking. Repeat what you did for the machine certificates. Click Next.
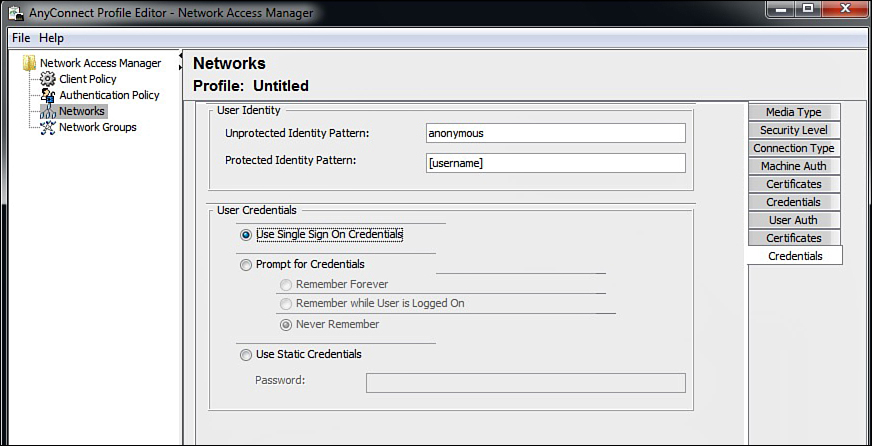
9. For user credentials, select Use Single Sign-On Credentials or select the settings appropriate for your deployment. Click Done. See Figure 16-21.
10. Go to the Network Groups tab. Under Global Networks: Wired, make sure that your policy is at the top of the list. Select it, and click the up-arrow button. See Figure 16-22.

11. Save the Profile file. On the top menu, click File and Save As.
12. You must save the configuration with the filename configuration.xml in the ProgramDataApplication DataCiscoCisco AnyConnect Secure Mobility ClientNetwork Access Manager ewConfigFiles directory on Windows 7 or in the newConfigFiles directory on XP.
13. To apply this new configuration, go to the AnyConnect icon in the system tray. Right-click, and select Network Repair. This forces the Cisco AnyConnect NAM to restart its services. A service restart causes NAM to search the newConfigFiles directory for a configuration.xml file.
14. You’re done!