Chapter 27. Network Edge Authentication Topology
A friend of ours, Chuck Parker, is a systems engineer at Cisco who was responsible for one of the largest deployments of 802.1X in the world. Chuck has this wonderful expression that I want to share with you: “When it comes to network security, if it’s not everywhere, it’s nowhere.”
Let’s look at a specific example of a business problem: conference room network access. Most conference rooms have few network drops in them, where a guest or an employee may be able to plug in and gain access to the network or the Internet. These conference rooms may often need more connections than exist. If wireless is not an option, how does a company securely permit this access? Many organizations would want to put unmanaged switches in the conference room, similar to a hub. However, that most likely will not meet the security requirements of the organization.
Another option might be to physically place a switch in each conference room and configure the ports at the wall to be trunk ports using NDAC to authenticate any switches that plug into that port. However, that is not cost-effective. It also has ramifications where endpoints would not be able to plug directly into the wall, because the port was configured to be a trunk port.
What is needed is the ability to have portable switches that can be placed on the conference room table and authenticate to the network in a fashion similar to an endpoint. It should have the ability to trunk to the network and apply a multitude of authorization results, such as assigning different VLANs to each endpoint in the conference room to provide the maximum flexibility and cost-effectiveness.
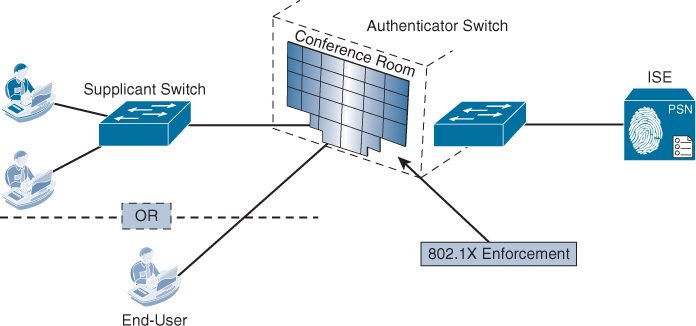
Enter the Network Edge Authentication Topology (NEAT) solution. This solution allows the conference room port on the access switch to be configured to support either an endpoint or another switch.
NEAT Explained
The NEAT solution extends secure access into areas beyond the wiring closet (such as conference rooms). As illustrated in Figure 27-1, NEAT allows you to configure a switch to act as a supplicant to another switch. Thus, with NEAT enabled, the desktop switch can authenticate itself to the access switch.
The pieces of the NEAT puzzle include
![]() Client Information Signaling Protocol (CISP): Developed for switch-to-switch communications. CISP is used for the access layer switch (authenticator switch) to recognize the supplicant as a switch and not an endpoint.
Client Information Signaling Protocol (CISP): Developed for switch-to-switch communications. CISP is used for the access layer switch (authenticator switch) to recognize the supplicant as a switch and not an endpoint.
![]() 802.1X supplicant switch: The “desktop” switch that connects to the access layer switch. The switch configured with the 802.1X switch supplicant feature authenticates with the upstream switch for secure connectivity. Once the supplicant switch authenticates successfully, the port mode changes from access to trunk.
802.1X supplicant switch: The “desktop” switch that connects to the access layer switch. The switch configured with the 802.1X switch supplicant feature authenticates with the upstream switch for secure connectivity. Once the supplicant switch authenticates successfully, the port mode changes from access to trunk.
![]() Authenticator switch: The authenticator switch is the access layer switch. Its ports are configured like all the other ports in the access layer, with one exception: CISP is enabled.
Authenticator switch: The authenticator switch is the access layer switch. Its ports are configured like all the other ports in the access layer, with one exception: CISP is enabled.
You can configure NEAT ports with the same configurations as the other authentication ports. When the supplicant switch successfully authenticates, ISE must be configured to return the switch vendor-specific attributes (VSA) (device-traffic-class=switch) along with the authorization result.
Receiving that VSA in the RADIUS result changes the authenticator switch port mode from an access port to a trunk port and enables 802.1X trunk encapsulation. The access VLAN (if any) is converted to a native trunk VLAN. The VSA result does not change any of the port configurations on the supplicant.
Configuring NEAT
The configuration of the NEAT solution requires an authorization policy on ISE, and some basic configuration on the authenticator and supplicant switches.
Preparing ISE for NEAT
The NEAT authentication uses a username and password combination. To keep this simple, first create a new user identity group called service accounts, and then a new internal user named neat. After that is prepared, create a new authorization profile for NEAT authentications that sends the correct VSA, followed by a new authorization rule for these authentications.
Create the User Identity Group and Identity
The following steps walk through adding a local user identity group for service accounts. This group may already exist if you have created one for wireless access points or other network devices. You then create a local user for the authentication and authorization of NEAT switches:
1. Navigate to Administrator > Identity Management > Groups.
2. Add a new user identity group named Service Accounts.
3. Navigate to Administration > Identity Management > Identities.
4. Add a new User named neat.
5. Provide a strong password for the user account.
6. Add the user to the Service Accounts user group.
7. Click Submit.
Figure 27-2 shows the completed neat user account to be used for the authentications.

Create the Authorization Profile
The following steps walk through adding an authorization profile for successful NEAT authentications that includes a RADIUS access-accept and the appropriate Cisco Attribute Value Pairs (AVP):
1. Navigate to Policy > Policy Elements > Results.
2. Choose Authorization > Authorization Profiles.
3. Click Add.
4. Name the Authorization Profile NEAT.
5. Access type should be Access-Accept.
6. In the Common Tasks, scroll down and select NEAT. Notice the Attribute Details section; the VSA of cisco-av-pairs = device-traffic-class=switch will be sent in the authorization result.
7. Click Submit.
Figure 27-3 shows the completed NEAT authorization profile.

Create the Authorization Rule
The following steps walk through adding a rule in the authorization table for NEAT authentications that assigns the newly created NEAT authorization profile:
1. Navigate to Policy > Authorization.
2. Insert a new authorization rule named NEAT.
3. Set the condition to be
a. InternalUser:Name EQUALS neat
And
b. NetworkAccess:AuthenticationStatus EQUALS AuthenticationPassed
4. Set the result to be the authorization profile we created named NEAT.
5. Click Done and Save.
Figure 27-4 displays an authorization policy that includes the NEAT authorization rule.

Access Switch (Authenticator) Configuration
The access switch is also known as the authenticator switch. This device is configured to authenticate endpoints at the access layer, which you connect a desktop switch to. Figure 27-1 illustrates the difference between the switches.
The only difference between a normal access switch and one that is used as an authenticator for NEAT is the enabling of CISP at global configuration mode, as shown in Example 27-1. Otherwise, your switch should be configured as described in Chapter 11, “Bootstrapping Network Access Devices.”
Example 27-1. Enabling NEAT on the Authenticator Switch
C3750X# conf t
Enter configuration commands, one per line. End with CNTL/Z.
C3750X(config)# cisp enable
C3750X(config)# end
C3750X#
Desktop Switch (Supplicant) Configuration
The desktop switch is also known as the supplicant switch. This is usually a compact switch (like a Catalyst 3560-CG) and is the device that is placed in the conference room to authenticate to the network and, in turn, allow the end users to authenticate. Figure 27-1 illustrates the difference between the switches.
Unlike a normal access layer switch, notice that the desktop switch is not added to ISE a NAD, nor is a RADIUS server configured on the NEAT desktop switch. Example 27-2 displays the configuration of a supplicant switch.
Example 27-2. Enabling NEAT on the Supplicant Switch
C3560CG# conf t
Enter configuration commands, one per line. End with CNTL/Z.
C3560CG(config)# username neat password Cisco123
C3560CG(config)# cisp enable
C3560CG(config)# dot1x credentials neat
C3560CG(config-dot1x-creden)# username neat
C3560CG(config-dot1x-creden)# password Cisco123
C3560CG(config-dot1x-creden)# exit
C3560CG(config)# dot1x supplicant force-multicast
C3560CG(config)# interface gig0/24
C3560CG(config-if)# switchport trunk encap dot1q
C3560CG(config-if)# switchport mode trunk
C3560CG(config-if)# dot1x pae supplicant
C3560CG(config-if)# dot1x credentials neat
C3560CG(config-if)# end
Summary
This chapter introduced and explained the configuration for Network Edge Authentication Topology (NEAT), which is a technology created to allow for switch-to-switch authentication and provisioning. NEAT and NDAC are mutually exclusive, meaning you either perform NEAT or NDAC (for the desktop switch).
NEAT was developed for mini-switches that are dynamically connected to the access layer ports without the need to configure the access layer port any differently.