
Chapter 1
Introduction to command shell scripting
Information in this chapter:
Shell scripts can be useful for a great many things in the penetration testing world, in the system administration world, in the network world, and in most any area that depends on computing technology to function. Shell scripts allow us to string together complex sets of commands, develop tools, automate processes, manipulate files, and more, while using a very basic set of development resources.
Particularly in penetration testing, the ability to write shell scripts can be a highly necessary skill. When we are attacking an environment, we don’t always get to choose the tools we have at hand, and we may very well find ourselves in a situation where we are not able to, or are not allowed to, install tools or utilities on a system. In such cases, the ability to craft our own tools from the scripting resources already available to us can ultimately mean the difference between failure and success on a penetration test.
In this chapter we will discuss some of the basics of shell scripts. We will talk about how to use the shells that exist in operating systems such as UNIX, Linux, Apple’s OS X, and Windows. Finally, we will build a couple of port scanning tools using shell scripting languages for both UNIX-like operating systems and Microsoft operating systems.
On Shell Scripting
Unlike any programming language we might choose to use, or any development tools we might like to have access to, we can almost always depend on some sort of shell being present on a system. While we may not always have access to the particular flavor of shell we like, there will usually be something present we can work with.
What is a shell?
A shell is the interface between the user and the operating system, allowing us to run programs, manipulate files, and perform a number of other operations. All operating systems use a shell of one type or another, some of them graphical and some of them text-based. Many operating systems provide access to both graphical and nongraphical shells, and each is useful in its own way.
A shell might consist of a graphical user interface (GUI), as in the case of the Microsoft Windows desktop interface, and Gnome or KDE on Linux. Such graphical shells are convenient, as they allow us to use fancy graphical menus, show us colorful icons to represent files, and allow us to interact with items by clicking them with a mouse.
Text-based shells, such as that shown in Figure 1.1, allow us to communicate with the operating system via a variety of commands and features built into the shell, as well as running other programs or utilities. Text-based shells are the ancestral user interface of many operating systems and still enjoy a great following today among the technically inclined.
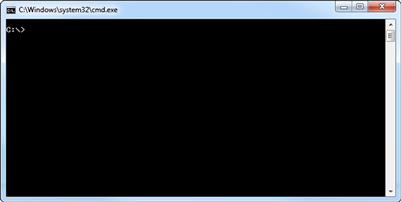
FIGURE 1.1 A Text-based Shell
On some operating systems, such as Windows, we are likely to find only the built-in graphical and text-based shells, although we may potentially find more added by a particularly technical user. On UNIX-like operating systems, such as the many varieties of UNIX and Linux, or OS X, we may find a wide variety of graphical and text shells. This broad choice of interface is very common on such operating systems, and we may find that the users or administrators of the system have customized it heavily in order to suit their particular tastes. Commonly, however, we will find at least Gnome or KDE as a graphical shell, and bash as a text-based shell. For purposes of penetration testing, text-based shells tend to be the more useful for us to access.
What is a script?
A script, short for scripting language, is a programming language like any other, and may be similar in nature to other languages such as C++ or Java. The primary difference between a scripting language and other programming languages is that a program written in a scripting language is interpreted rather than compiled.
When we look at a traditional programming language, such as C++, the text we write that defines the commands we want to run is processed through a compiler and turned into machine code that is directly executable by the kernel/CPU. The resultant file is not human-readable. Any changes to our commands mean we have to send the changed text through the compiler again, resulting in a completely new executable. In interpreted languages, the text we create that contains our commands is read by an interpreter that does the conversion to machine code itself, as it’s running the script. The text here is still human-readable, and does not have to be recompiled if a change is made.
Normally, scripting languages have their own interpreters, so we need to install a separate interpreter for Python, another for Ruby, and so on. Shell scripts are a bit of a special case, as the scripts are interpreted using the shell itself, and the interpreter is already present as part of the shell.
NOTE
The various languages we discuss in the course of this book, including shell scripts, Python, Perl, Ruby, and JavaScript, are all interpreted languages. With many scripting languages, multiple interpreters are available from different vendors, often with somewhat different behaviors and sets of features.
Scripting languages are used daily in the execution of many different tasks. We can see scripting languages at use in printers, in the case of the Printer Control Language (PCL) created by Hewlett-Packard [1], in AJAX, JavaScript, ActiveX, and the many others that are used to generate the feature-rich Web pages we enjoy today, and in video games, such as Civilization V and World of Warcraft that make use of Lua.
A great number of scripting languages are available on the market, with more being created all the time. Some of the more useful become widely adopted and enjoy ongoing development and community support, while others are doomed to be adopted by only a few stalwart developers and quietly fade away.
Shell scripts
One of the most basic and most commonly available tools we can add to our penetration testing tool development arsenal is the shell script. A shell script is a program, written in a scripting language, which is used to interface in some way with the shell of the operating system we are using. While it is possible to script our interactions with a graphical shell, and indeed there are many programs and utilities that will allow us to do so, the term shell script is commonly used to refer to programs that interact with text-based shells.
As we discussed earlier in the chapter, scripts are processed and executed by a utility called an interpreter. In the case of shell scripts, our script is interpreted directly by the shell and, in fact, there is often no difference in the tools used to process our shell scripts and those used to handle single commands. If we look at the text-based shell called bash, a shell common to most UNIX-like operating systems, it serves to process single commands such as ls, which is used to list the contents of a directory, and more complex scripts.
In most cases, although they are not typically classified as a “real” programming language, shell scripts do possess a very similar set of features as any other language. They often include the same or very similar capabilities to those that we might use to store data in variables or other data structures, create subroutines, control the flow of the program, include comments, and so on. It is entirely possible to develop large and complex programs as shell scripts, and many examples of such constructions can be found with a brief search on the Internet. In such cases, we may actually be better off, in terms of efficiency of resource usage and ease of maintenance, using a more feature-rich scripting language such as Ruby or Perl, or even a compiled language such as C++.
Where shell scripting is useful
When we are assembling a program or utility, we might choose to create a shell script rather than use another scripting language or a compiled language, for a variety of reasons. One of the primary reasons might be that our need is very simple and we only want to quickly accomplish our task, rather than taking the time to develop a full application. For example, we might want to quickly iterate through the entire file system on a server used for storage in order to find and delete MP3 files stored by users in order to free up a little disk space. While we might want to develop this into a full application at some point, for the time being we just need to get the job done.
We may also need to put together a chain of tools in order to carry out our task, commonly known as gluing the tools together. For example, if we wanted to create a list of all the printers in our office and their accompanying serial numbers, we might want to ping the range of IP addresses in order to find the devices that were up, then query each of those devices with snmpget in order to retrieve the device descriptions so that we can find the printers. We could then use our refined list of printers and snmpget again to retrieve the serial numbers. This would certainly not be the most elegant or efficient method to use, but sometimes quick and dirty is just what we need.
As we mentioned earlier in the chapter, particularly when working with a penetration test, we may have limited development resources to work with on the target system. A common step in hardening a server is to remove any tools not needed for the server to function, so we may not necessarily find Perl, Python, or our language of choice installed on the system. We can, however, generally depend on the presence of a text-based shell that will allow us to create a shell script, or make use of one we were able to move to the machine. One of the nice features of scripting languages is that the source code files are plain text and do not need to be compiled before we can run them. This means that even if our only access to the target system is through a terminal connection, we can often create a new file, paste our script into it, and be off and running.
UNIX, Linux, and OS X Shell Scripting
When we look at the tools we have available to develop shell scripts, there are two main categories: UNIX-like shells and Microsoft shells. In this section, we will discuss UNIX-like shells, and we will cover Microsoft shells later in this chapter.
Shell availability and choices
UNIX-like systems, including the many varieties of UNIX and Linux, as well as Apple’s OS X, have a few common text-based shells. We can typically find the Korn shell, Z shell, C shell, and Bourne-again shell either already present or easily installable on the vast majority of the UNIX-like systems we might encounter.
NOTE
As of OS X, first seen in 1999 and continuing to the present, Apple’s operating system is based on a UNIX-like kernel called XNU, which stands for “X is Not Unix”. OS X is effectively a modified UNIX operating system behind its stylish interface, and is compatible in many areas with similar UNIX and Linux derived operating systems, including the text-based shells it uses.
C shell-compatible shells
The C shell, commonly known as csh, is written in the C programming language and uses a scripting style generally similar to the C programming language. Csh was created with an emphasis on use at the command line. It provides features to aid in such efforts, such as command history and filename completion, functions much rarer in the world of shells when it was developed. Due to differences in the way the shell functions and the way scripts are written, csh is almost entirely incompatible with shells outside of those immediately related to it.
A descendant of csh, the TENEX C shell, otherwise known as tcsh, was released by Ken Green in 1983. Ultimately, tcsh is csh with the added or enhanced features for command history, editing, and filename completion merged in. For systems that ship with a csh-like shell installed by default, we are likely to find that this shell is actually tcsh, as this is the most actively developed and maintained shell in the C shell family at this point.
Bourne-compatible shells
The Bourne shell, often called simply sh, was developed by Stephen Bourne in the late 1970s, and is a common ancestor of several other shells, including the Bourne-again shell, K shell, and Z shell, just to name a few. Among these shells we can find a variety of common features.
The Korn shell, named for its developer, David Korn, was developed at Bell Labs in the early 1980s. The Korn shell, commonly called ksh, supports some handy advanced programming features, such as the ability to perform floating-point math, and the use of more complex data structures than some of the other shells allow. While ksh does indeed support features that might allow for easier or more efficient development, it is not as commonly found on UNIX-like systems, and we are less likely to find it in place as a default shell than we might be to find one of the other Bourne variants, such as bash.
The Z shell, often referred to as zsh, is frequently considered to be the most feature-rich among the Bourne-like family of shells. Zsh was developed in the early 1990s by Paul Falstad at Princeton University. Falstad incorporated a great many interesting features when creating zsh, including enhanced command completion, the ability to use add-on modules for additional features such as those needed for networking or more advanced mathematics, and the ability to make use of enhanced and more complex data structures for programming.
The Bourne-again shell, commonly referred to as bash, was developed by Brian Fox in the late 1980s for use in the GNU Project.1 Bourne-again is a reference to the Bourne shell, as we discussed earlier in this section. Ultimately, the bash shell is the text-based shell we will most commonly encounter on a UNIX-like system. Many UNIX and Linux systems (and OS X as well) supply a bash shell as an installation default. We can also find the bash shell ported to Microsoft operating systems, although we are not as likely to find it there as we are the native text-based shells.
Due to it being such a common shell, the rest of our discussion in this chapter related to UNIX-like shell scripting, and the examples we will develop for such systems, will focus on the use of the bash shell. We can typically find bash on newer OS versions, and Bourne on older ones. While there is no guarantee we will have access to bash on a system in any given penetration testing engagement, the likelihood is much higher than that of finding the other shells already present.
Other UNIX-like shells
There are a large number of other shells for UNIX-like operating systems we might find on any particular system, ranging from only slightly different, such as the compact BusyBox shell, to truly different altogether, like the goosh shell. For almost any purpose imaginable, we can find a specialized shell, or a clone of an existing shell with an altered set of features.
Thankfully, we will also usually find the more common shells present, typically at least two or three varieties on a given system. While some of these other shells might indeed be well suited for some specific purpose, we are often better off sticking with the most commonly deployed and installed shells.
Working with shells
Identifying the shell we are in by sight can be tricky. Since they all behave differently, knowing which shell we are dealing with is important. A number of features may be different among the shells: the way they generate random numbers, the built-in commands that are or are not present, the environment variables set, and many more.
Thankfully, there is a simple and sure command we can use to identify the shell we are operating in, this being ps –p $$. By executing this command, we are asking for a list of processes (ps) by process ID (–p) where the process ID matches our current process ($$), namely the shell we are presently using. We can see an example of this as we move between several different shells in Figure 1.2.
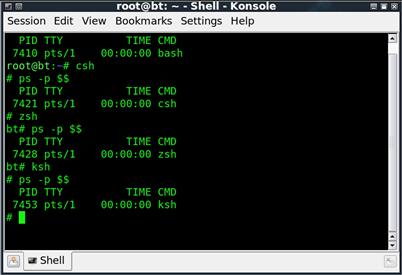
FIGURE 1.2 Identifying the Shell in Use
As we can see from the screenshot in Figure 1.2, we can easily enter a new shell, simply by issuing the shortened name of the shell as a command. For example, to enter the C shell, we issue the csh command.
WARNING
It is important to note when working with shells that entering a new shell is actually adding another layer of shell on top of the shell we are already using. In the example we looked at in Figure 1.2, by the time we had reached our last shell, ksh, we were four layers (shells) deep. In order to return to our original bash shell, we would enter the exit command three times, exiting one shell with each execution. We can easily see how running multiple layers of shells could very quickly become confusing.
Bash Basics
We need a few basic items to get started with our first bash script, the traditional Hello World. We first need an environment with a bash shell. As we discussed throughout the chapter so far, we will be likely to find bash present on most UNIX and Linux distributions, as well as OS X. We may also find bash on Windows in some cases, a topic we will return to later in this chapter. For ease of use and consistency, we will use the bash shell on the BackTrack Linux 52 distribution, as we covered in this book’s Introduction.
Second, we need a text editor. A number of text editors are perfectly suited for creating shell scripts, from text-based editors such as vi and Emacs, to graphical editors such as Kate. Which editor to use is really a matter of personal preference, but for sake of use we will stick to Kate, as shown in Figure 1.3, for the rest of our bash discussions.
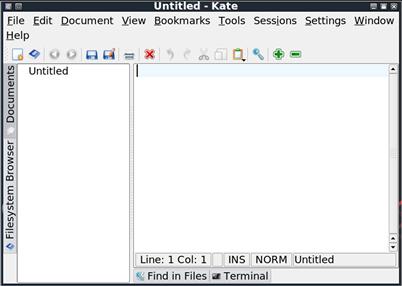
FIGURE 1.3 The Kate Editor
Hello World
We will jump right into the script, then go back through and examine the lines we have entered. Open a new file in Kate, and enter the following:
#!/bin/bash
echo "Hello World"
Now we want to save the file somewhere convenient, such as the root of our home directory, or on our desktop. We can do this in Kate by clicking File and then Save, navigating to where we want to save the file, inputting a name in the Location field (helloworld), and then clicking Save again.
In order to run the script we just created, we need to make it executable. We can do this by issuing the command chmod u+x helloworld from the command line while we are in the directory containing the file. This command will add execute permissions for the user that owns the file.
Now that we have created the file and made it executable, we simply need to run it. We can do this with the command ./helloworld. The ./ in front of the command tells the shell we should be executing the script in the current directory, not any other scripts or commands named helloworld that might exist elsewhere in the file system.
If everything went well, we should see output similar to Figure 1.4.
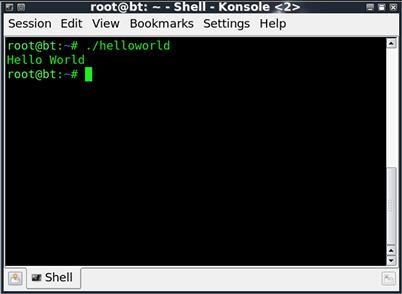
FIGURE 1.4 Output from the helloworld Script
Briefly stepping through what we did, the first line in our script dictates to the operating system how exactly we want it to interpret everything that follows. The line #!/bin/bash is composed of two parts. The first part, #!, is known as a shebang, and tells the operating system that the next thing on this line will indicate what we would like it to use as an interpreter for our script, in this case /bin/bash, the bash shell. It is possible that bash is located elsewhere in the file system, and we can determine its location by running which bash.
The second line, simply enough, says to print the string Hello World.
Variables
A variable is an area of storage we can use to hold something in memory. In bash, we can have two kinds of variables: global variables and local variables. Global variables will be available to the shell in general, and will be visible to any script we run. Local variables only exist for our current shell, and will go away once we exit it, so they will only be visible to a particular execution of a particular script. For most scripts, we will want to work with local variables.
We can easily modify our helloworld script to make use of both local and global variables, like so:
#!/bin/bash
function localmessage
{
local MESSAGE="Hi there, we’re inside the function"
echo $MESSAGE
}
MESSAGE="Hello world, we’re outside the function"
echo $MESSAGE
localmessage
echo $MESSAGE
We have introduced a few new concepts here, so let’s take a look at them. The first is the function, which we can see starting on line 2. Functions allow us to take sections of code we might repeat, and place them where we can call them as often as we need to without having to rewrite the code every time. They can also allow us to isolate the variables we use inside them from the rest of our script by declaring the scope of those variables to be local to the function. We can do this by using the local operator.
Inside our function in the example, we have a line that defines a copy of the message variable as being local, populates it with the message “Hi there, we’re inside the function”, and then echoes the message to the console. In order to call this function, which we have named localmessage, we simply use the function name.
As an illustration of global and local variables, we use the MESSAGE variable twice in this script: once inside the function and once outside it. As we run the script, we will see the contents of MESSAGE echoed before the function, inside the function, and after the function, resulting in output that looks like Figure 1.5.
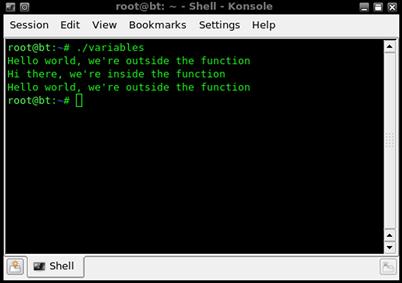
FIGURE 1.5 Output from the variables Script
Arguments
When we execute our shell script, we can pass information to it in the form of arguments. If we were building a network-centric script, such as the port scanner we will develop at the end of the chapter, we might want to pass an IP address or host name to the script. For this example, we will modify our helloworld script to address us by name (with a small modification), like so:
#!/bin/bash
MESSAGE="Wake up, "$1
So, now if we execute the helloworld script as ./helloworld Neo…, we can see, as in Figure 1.6, that our script has taken the input we gave it as an argument and put it into our message.
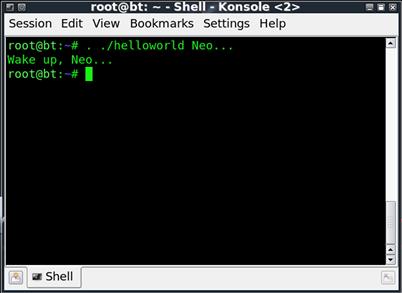
FIGURE 1.6 Output from the helloworld Script with Arguments
Let’s look at what we did. We only made one small change, so the first and the last lines of the script are exactly the same. On the second line, we changed it to read MESSAGE="Wake up, "$1. For those new to arguments, this may seem a bit confusing (what in the world is $1?!). Arguments in bash scripting have a very specific naming convention, as detailed in Table 1.1.
Table 1.1 Argument Variables
| Argument | Behavior |
| $0 | The name of our script |
| $1 | The first argument |
| $2 | The second argument |
| $9 | The ninth argument |
| $# | The number of arguments we have |
Each argument is numbered sequentially as it comes in, with $0 being reserved. So, in essence, by placing $1 on our echo line, we told the shell to put the contents of the first argument in, along with the text we provided.
NOTE
The use of arguments prompts the question, how many arguments can we have? Quite a lot, but it depends on the system and amount of memory available. On most UNIX-like systems, we can get an answer to this by issuing the command getconf ARG_MAX. On the BackTrack 5 system used to develop this chapter, there is 2,097,152 KB of storage open for arguments.
Control statements
Control statements allow us to control the flow of our script as it executes. There are a number of control statements we can use. Many of these are common among the more frequently used programming languages, even though the syntax may differ slightly. Here we will look at conditional and looping statements.
Conditionals
Conditional statements allow us to change the way our program behaves based on the input it receives, the contents of variables, or any of a number of other factors. The most common and useful conditional for us to use in bash is the if statement. We can use an if statement like so:
#!/bin/bash
If [ "$1" = "Neo… ]; then
MESSAGE="Wake up, "$1
else
MESSAGE="Hey, you’re not Neo"
fi
Echo $MESSAGE
We will need to run the script twice to see both branches. We should end up with something along the lines of the results shown in Figure 1.7.
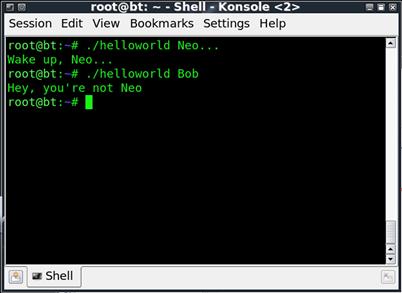
FIGURE 1.7 Output from the helloworld Script with an if Statement
The change we made this time around was the inclusion of the if statement. The first line after the shebang constitutes the heart of our statement, if [ "$1" = "Neo…" ]; then. Here we have said that if the value contained in our first argument ($1) is equal to Neo… we should put a specific value, "Wake up, "$1. This is called a string comparison, as we are comparing two strings, the string in the first line of the if statement and the value of $1, our first argument. If this comparison is false, we execute the code listed in the else portion of the statement and set the value of MESSAGE to Hey, you’re not Neo. The fi on the next line indicates this is the end of our if statement.
There are a number of ways we can compare values. Staying with strings, we can reverse the logic of our sample script entirely by adding a single character. If we change the = to a != in the first line of our if statement, we change the meaning to not equal, rather than equal. Additionally, we can compare integers by including the mathematical operators shown in Table 1.2.
Table 1.2 Comparison Operators
| Operator | Behavior |
| –eq | Is equal to |
| –ne | Is not equal to |
| –gt | Is greater than |
| –lt | Is less than |
| –le | Is less than or equal to |
We would use any of these in our if statement, like so:
if [ "$NUM1" –eq "$NUM2" ]; then
echo "$NUM1 is equal to $NUM2"
else
echo "$NUM1 is not equal to $NUM2"
fi
Looping
There are several different mechanisms we can use in bash in order to repeat a loop. Primarily, the for loop and the while loop are the most commonly used and useful. Both ultimately have similar results, carried out in a slightly different way.
With the for loop, we can work through a list, completing an operation on each item in it. For example:
for files in /media/∗
do
echo $files
done
What we effectively did here was to build a very primitive version of the ls command to show us the files and folders in a directory. In the first line, for files in /media/∗, we set up the beginning of our for loop. Here we set up the variable we will use to contain each file (files) and we point at the particular directory and directory contents we will use (/media/∗). The do and done statements define the beginning and end of the activity we will be taking on each file or directory we find, and between them, we echo the value of the files variable we defined earlier. With simple modifications we could use such a simple script to walk through an entire file system, looking for documents that might interest us, making a copy of them as we went.
We can also make use of the while loop, which will continue to execute while its condition is true. We can use the while loop to carry out a command a certain number of times, for instance:
#!/bin/bash
i=0
while [ $i -lt 4 ]
do
echo "hello"
i=$[$i+1]
done
In this case, we have introduced a few new things, and used a few we already talked about. On line 2, i=0, we have initialized the variable we will use on the next line. We do this in order to set the variable to the value of zero, as we will be using it as a counter. On line 3, we set up our while loop, while [$i –lt 4]. This means that while the value stored in i is less than 4, we should keep executing the while loop. We then see the do and done structure, the same as what we used in the for loop earlier in this section. Inside the loop, we echo hello, and we increment our counter (i), so we will eventually exit the loop. The counter incrementer is i=$[$i+1]. This says take the value presently in i and add 1 to it, then place the result back into i, ultimately adding 1 to whatever is in i at the time. The result of running this should be as shown in Figure 1.8.
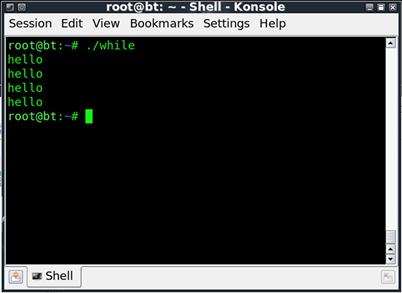
FIGURE 1.8 Output from the forloop Script
Putting It All Together with Bash
Now we’ll put together a quick port scanner using bash. The core of our scanner will be the /dev/tcp device, which will enable us to utilize the built-in networking functionality of which bash is capable. Depending on the particular platform on which we are running bash, support for /dev/tcp may not be built into the version of bash we are running, but we can generally fix that. In particular, many distributions related to Debian may have this issue, including the BackTrack 5 distribution we are using for our examples in this chapter. We can check for /dev/tcp support by running step 5 in the following section.
Adding /dev/tcp/ support to bash
We can do a quick recompile of bash in order to get the /dev/tcp support we need. This may sound a bit scary to some, but it’s really not that bad. Here are the steps to recompile bash on BackTrack 5: [2]
1. Download the most recent source files for bash. Presently this is bash 4.2 and can be found at ftp.gnu.org. We can pull this down with wget, like so:
wget ftp.gnu.org/gnu/bash/bash-4.2.tar.gz
2. Extract the files from the archive and change to the directory:
tar –xvzf bash-4.2.tar.gz
cd bash-4.2
3. After extracting the files, configure and install bash:
./configure –enable-net-redirections
make && make install
4. Swap out the existing bash for the newly compiled version:
mv /bin/bash /bin/bash-orig
ln –s /usr/local/bin/bash /bin/bash
5. Test your effort with this command:
cat < /dev/tcp/time.nist.gov/13
which should return something along the lines of:
55647 11-03-27 15:41:17 50 0 0 75.2 UTC(NIST)∗
If you still get an error on step 5, you might need to give the system a quick reboot to shake everything out. This will generally fix any remaining issues.
Building a port scanner with bash
Here is the code for a simple port scanner constructed with bash. The script takes three arguments: a host name or IP address, the port at which we wish to start our scans, and the port at which we wish to stop our scans. We would run it with something like ./portscanner codingforpentesters.com 1 100.
#!/bin/bash
#populate our variables from the arguments
host=$1
startport=$2
stopport=$3
#function pingcheck
#ping a device to see if it is up
function pingcheck
{
ping=’ping -c 1 $host | grep bytes | wc -l’
if [ "$ping" -gt 1 ];then
echo "$host is up";
else
echo "$host is down quitting";
exit
fi
}
#function portcheck
#test a port to see if it is open
{
for ((counter=$startport; counter<=$stopport; counter++))
do
(echo >/dev/tcp/$host/$counter) > /dev/null 2>&1 && echo "$counter open"
done
}
#run our functions
pingcheck
portcheck
At the top of the script, we find the shebang to indicate the interpreter we wish to use, and a few lines to assign the values from the argument to the appropriate variables for the host we wish to scan (host), the starting port (startport), and the stopping port (stopport). On the second line, we also encounter the comment mark we can use in bash, the #. The command allows us to direct the interpreter to ignore anything on the line after the #. We then have two functions, pingcheck to check if our host is available on the network and portcheck to test for open ports.
In the pingcheck function, we are chaining a few different tools together to evaluate whether we can reach the device on the network, and placing the final result in the ping variable. The backticks, ’, indicate we are performing a command substitution. Command substitution passes the code segment between the pair of backticks to the shell to be executed, then substitutes the results of the command. In this case, we are stringing together a series of commands by using a pipe, |, which passes the output of one command to another.
Our entire command executes ping –c 1 $host, pinging a single packet to the host we are operating on, then passes the output of the ping command to grep for the string bytes, then passes the output of the grep to the word count command, wc. When we run the ping command, whether it fails or succeeds, we will find the occurrence of the string bytes at least once. On a successful ping, we will find it more than once. We are using the wc command in order to count the occurrences of the string, with more than one indicating a successful ping to the host.
If the ping succeeds, we echo a message to the console and return to the main body of the script. If the ping fails, we echo a message to the console and quit.
In the portcheck function, we test the specified ports in order to see if they are open. Here we set up a simple for loop in order to loop from the starting port to the stopping port, each taken in from the arguments with which the script was run. We then enter a do loop that contains the heart of our entire script.
This line makes use of the /dev/tcp device we enabled in bash earlier. In essence, we attempt to echo something (nothing) to /dev/tcp/<host name>/<port number>; if that works, we take the results of that command and send them to /dev/null, effectively throwing them away, including a redirect of any errors we might encounter to send them to the console, thus throwing them away also. In addition, we use the && operator (and) in order to echo the string <port number> open to the console. Ultimately, this allows us to detect whether a port is open and echo the port number if it is.
Improving the script
There are a number of ways we can improve the port scanner script to make it more efficient and more functional:
• We presently can’t handle scanning multiple hosts. We could add this capability by including provisions for additional arguments, or by reading hosts or IPs in from a file.
• In the pingcheck function, when we encounter a device that does not respond to our ping, we have to wait several seconds for the ping command to return and tell us so. If we include a timeout in the ping command, we can likely shorten this considerably.
• In this portcheck function, we are only testing Transmission Control Protocol (TCP) ports. If we want to test User Datagram Protocol (UDP) ports as well, we can make use of the /dev/udp device in a very similar fashion to our existing code. We would also need to include the appropriate arguments to indicate whether we wanted to scan TCP ports, UDP ports, or both.
These are only a few of the many additional features we might add in order to increase functionality, make the script work more efficiently, and generally make the tool more useful and usable.
Windows Scripting
Microsoft operating systems hold 75 percent of the operating system market as of March 2011 [3]. As penetration testers, we would be foolish to ignore the scripting capabilities of this enormous share of the market. Fortunately, Microsoft operating systems currently have a very well-developed and strong capability to conduct administrative operations from the command line and provide us with tools such as PowerShell to use in our efforts.
Shell availability and choices
On Microsoft operating systems, due to the generally closed nature of the operating system and standard applications and utilities present, we will often only find ourselves with access to the built-in text-based shells. Even so, this leaves us with several choices when we need to put together scripts for Windows, including scripting with the standard command interpreters and PowerShell, as well as Cygwin or any other custom solutions we might find installed.
Command.com and CMD.exe
Command.com and CMD.exe are the two main shells available in most Microsoft operating systems. In the newer 64-bit versions of these operating systems, command.com is not available at the time of this writing, and may continue to be unavailable in the future.
Ultimately, command.com and CMD.exe are two different tools. CMD.exe is a text-based interface to the operating system. It is not a DOS shell, and does not provide the same functionality as such shells. Command.com is actually a version of 16-bit DOS running in a shell and provides a similar but not identical set of functionality. One of the most noticeable differences when using the two shells is that command.com does not support long filenames, thus forcing the use of constructs such as Progra~1 to address directories such as Program Files.
Batch files
Batch files have been around since the early days of MS-DOS, and have continued through the most recent Microsoft operating systems. These scripts, designated by a .bat extension, are used for a variety of tasks, mostly in the nature of small utility functions, although if we look back to older operating systems, we can find them actually used in starting parts of the operating system.
Batch file scripting has a language of its own which, although not terribly complex, can still be useful for some things. We can put together a quick batch script that will ping a list of IP addresses from a file:
@echo off
setLocal EnableDelayedExpansion
for /f "tokens=∗ delims= " %%a in (hosts.txt) do (
ping %%a
)
In our simple batch file, we first turn echo off, in order to not output the mechanics of the script executing, then we set EnableDelayedExpansion so that the variables will function properly and only be expended inside our for loop. Next we enter the loop and, for each line in hosts.txt, we ping the host. A very simple script indeed, but one that gets the job done.
Now we just need a file called hosts.txt with a single IP address on each line, and our batch file will march through all of them. We could obviously add quite a bit of formatting, logic and flow controls, and many other features to our little program, but we might be better off using a different scripting language if we wanted to develop a more robust tool. Those who are truly interested in learning the ins and outs of batch files can check out the resources that Microsoft has on the TechNet site.3 Some of these are a bit dated at this point, but most of the documentation is still accurate and should be enough to get going with batch files.
PowerShell
PowerShell is a relatively recent addition to the world of Microsoft operating systems, with version 1.0 being released in 2006 and 2.0 in 2009. PowerShell is a very versatile text-based shell, supporting a great number of functions accessible from the command line, in the form of cmdlets, and through the use of scripts or compiled executables. PowerShell also has access to the majority of the functionality which any of Microsoft’s .NET-capable languages are able to access.
From a shell perspective, PowerShell is a great improvement over Microsoft’s legacy shells, command.com and CMD.exe. Both of these shells are designed largely for backward compatibility, with a common set of commands, many of which date back to the original versions of Microsoft DOS on which they are based.
One of the features that will become quickly apparent to users who are accustomed to the commands in UNIX-like operating systems, and are regularly annoyed by the “is not recognized as an internal or external command” error message when issuing the ls command to a Microsoft shell, is that aliases have been included for many of the common commands. In PowerShell, we can run commands such as ls, cp, and mv, and the shell will run the appropriate command we expect. We can also find the equivalent of the man command in the get-help cmdlet, with an alias conveniently set to man.
From a scripting perspective, PowerShell is a vast improvement over previous efforts from Microsoft. In the past, a variety of efforts were made to give us a reasonable tool for scripting on Windows platforms, ranging from batch files to VBScript to Windows Scripting Host. While all of these tools are indeed useful in one place or another, none of them really gave us access to the capabilities of UNIX-like shells such as bash.
In PowerShell, we can make use of a number of built-in utility functions, called cmdlets, which we can use in the form of simple commands directly from the shell, or include in our scripts in order to enable access to complex functionality through the use of simple commands, such as we might use for communicating over networks. The scripting language used by PowerShell is also quite robust, enabling the development of everything from simple tools to complex applications, without tripping over some of the clumsy constructs of Microsoft’s earlier scripting language efforts.
Cygwin
Cygwin provides us with an interesting alternative for shell scripting on Microsoft operating systems. Cygwin is a set of tools that can be installed on such operating systems in order to provide compatibility for Windows with a number of commands and tools common to UNIX-like operating systems. Among these features is the ability to use UNIX-like text-based shells, including our favorite, the bash shell.
TIP
Cygwin on Windows is one of those “square peg, round hole” tools. Although it is a very handy tool for some things, we should definitely not be counting on having access to bash on a Microsoft operating system during a penetration test. We may occasionally be surprised, however, so it doesn’t hurt to look.
The bash shell supplied by Cygwin is a stock bash shell, and will generally allow us to run the majority of the shell scripts on Windows that we can run on UNIX-like OSes. The main area where such scripts will tend to break down is when calls are made to utilities or functions not built directly into the shell itself. Although Cygwin does do a great job of providing many of the standard UNIX features, it does not provide the complete library of them we might find when working directly with UNIX, Linux, or OS X. In general, however, we can work around such issues and substitute for missing functionality with our own code, or with the equivalent native commands present in the Windows operating system.
Other shells
Although, as we discussed earlier, non-native text-based shells (i.e., those not developed by Microsoft) are not as commonly found on such operating systems, there are a few of them out there we might encounter, including Take Command Console (TCC), 4DOS, and Console. The focus was stronger on such alternative shells in the era of Windows 2000 and Windows XP. The advent of more robust command-line tools for Microsoft operating systems in general, and of the improved scripting capabilities through tools such as PowerShell, seems to have relieved some of the pressure fueling the development of alternative shells.
PowerShell Basics
As an introduction to PowerShell scripting, we will start with the traditional Hello World script. In order to get started, we again need a few components. Depending on the specific Microsoft operating system we are using, we may or may not already have PowerShell installed. In Windows 7 or Windows Server 2008 R2 or later, PowerShell is already installed. For other versions, with a minimum of Windows XP SP2 being required, PowerShell can be downloaded from Microsoft.4 All the PowerShell examples in this chapter were developed on Windows 7 SP1.
We also need a text editor of some variety. The simplest to use is Notepad, which ships with Windows. If we are using PowerShell 2.0, as Windows 7 ships with, we also have access to the PowerShell Integrated Script Editor (ISE). ISE can be accessed by running powershell_ise.exe, or by right-clicking and choosing Edit on a .ps1 file. We will be using ISE as an editor for the rest of our PowerShell examples.
TIP
If we have gained remote access to a Microsoft system, and are working solely from the command line, creating or editing a file may be a bit of a problem. On older Microsoft OSes, Windows XP and earlier, we have access to the edit command, which provides us with a handy text editor that will work from the command line. On newer versions, this goes away. The closest that we can use to get to a text editor is the copy con command. We invoke it with copy con, then the filename, such as copy con test.txt. This will allow us to create, but not edit, a multiline file, pressing Ctrl-z then Enter when we are finished.
Next, we will need to wrestle with the system security settings a bit in order to get them to relax enough to allow us to run our own scripts. If we run a PowerShell script before doing this, we will just get an error and it will refuse to run. In order to make this change on Windows 7, we will need to navigate to All Programs | Accessories | Windows PowerShell on the Start menu, then right-click on the Windows PowerShell shortcut and choose Run as Administrator.
WARNING
By changing the execution policy for PowerShell scripts to be more permissive than the defaults, we are opening a vulnerability on our systems! Although we are allowing the minimum permissions we can use in order to work with PowerShell scripts, this is still a security hole that the bad guys could potentially use to attack us. This is relatively unlikely to happen with this particular setting, but caveat scriptor. For more details on this setting, Microsoft has additional information on the various options we can use.5
This will open a PowerShell shell with administrative privileges so that we can make the required changes. In this window, we need to type Set-ExecutionPolicy RemoteSigned. This will set our execution policy for PowerShell to allow us to run any scripts we might create, and any scripts we download signed by a trusted publisher.
We can see what the permission setting exchange should look like in Figure 1.9. We should now be ready to create our HelloWorld script.
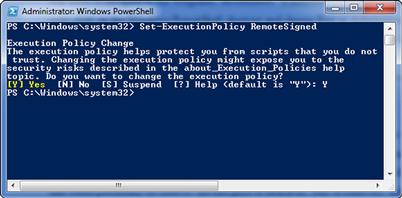
FIGURE 1.9 Changing Permissions in PowerShell
Hello World
One of the simplest ways to create our script is to create a file called HelloWorld.PS1, then right-click on it and choose Edit. This will open the PowerShell ISE, as shown in Figure 1.10.
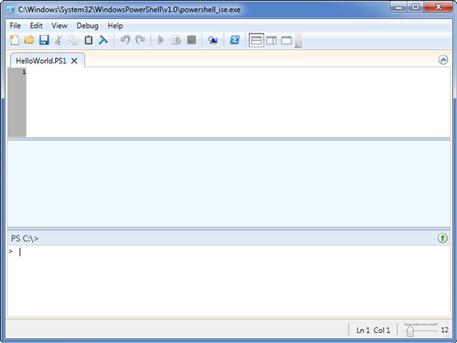
FIGURE 1.10 PowerShell ISE
In the top window, right next to the 1, we will want to paste the following code:
Write-Output "Hello World"
That’s all there is to it. After saving the file, we can either run our code manually now by opening a PowerShell shell, navigating to it, and then running HelloWorld.PS1, or run it by clicking on the green triangle (10th from the left) in the toolbar of ISE. In ISE, we will see the output from our script execution in the middle window of the interface. Write-Output is one of the PowerShell cmdlets we discussed earlier in this section, and it contains all the necessary functionality to print our statement. Also notice that, unlike our example in bash, we did not need to use anything like a shebang in order to indicate the interpreter we needed to use. In Windows, this function is handled through the use of the file extension .PS1, which indicates that the script should be handled by PowerShell.
Variables
Variables under PowerShell are, again, very similar to what we might find under bash. By default, variables have no type, meaning that a given variable can contain text or numeric data. Variables are always addressed as $<variable name>, whether assigning data to them or extracting data from them. Let’s look at a quick variable example and a new cmdlet:
$processes = Get-Process powershell_ise
$processes
In this case, we are invoking the Get-Process cmdlet in order to get the process information for the ISE application we are using to develop our scripts. Then we are taking the returned data from the cmdlet and storing it in the $processes variable. On the next line, we are echoing out the contents of $processes. If everything was successful, we should see output similar to this:
PS C:> C:variables.ps1

The return from the cmdlet we echoed contains the information on the handles, nonpaged memory, paged memory, working set, virtual memory, CPU usage, process ID, and process name of the process on which we had requested information. Also notice that the formatted output of the cmdlet survives being stored in a variable and echoed out again.
We can also do local and global variable scoping in PowerShell. We will also talk about functions in PowerShell, as this provides us with a nice demonstration of how to deal with variable scope.
function hello{
$LOCAL:name = "whoever you are"
write-output "hello there "$name
}
$name = $args[0]
Write-output "hello there "$name
hello
write-output "hello there "$name
The first item we find in our script is the function we will use to demonstrate the scope of our variable. Functions in PowerShell are very similar to those we discussed when we went over the same topic in bash. The first line of the function is simply the function tag, the name by which we want to refer to the function, in this case hello, and the opening curly bracket, {, to start the function. On the first line inside the function, we can see the line creating our local variable. This variable, created with the local keyword, will only exist inside the scope of our function, and the function will keep its own copy of the contents, regardless of what we name it. Here, we set the contents of $LOCAL:name to the string whoever you are. On the next line, we echo out a greeting and the contents of the variable, then close up the function with }.
In the main body of the script, we take in an argument from the command line, $args[0], and place the contents of it into $name. Notice that this is the same variable name we used in our function, but without the LOCAL tag to set the variable scope, this implicitly makes the variable global in scope. Next, we echo out our greeting and the contents of $name, run the function, and echo the greeting and variable contents again. We can see from the output in Figure 1.11 that, even though we changed the contents of our local copy of $name in the function, we did not change the contents of the same variable in the main body of the script, due to the difference in variable scopes.
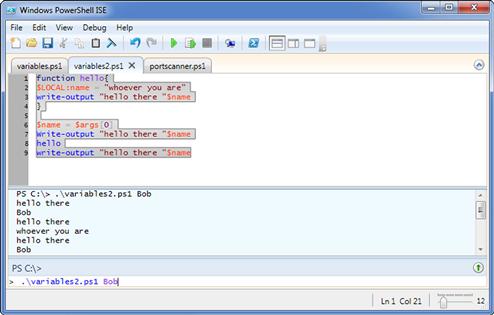
FIGURE 1.11 Differing Variable Scopes
Arguments
We can work with arguments in PowerShell in a very simple fashion. To expand on our process script in order to use an argument, we can do the following:
$processes = Get-Process $args
$processes
In order to run this script, we need to supply an argument containing the name of the process for which we will retrieve the information. In this case, we will use the explorer process as an argument, so we will run ./arguments.ps1 explorer. We should see output similar to Figure 1.12, showing us information for at least a couple of explorer processes.
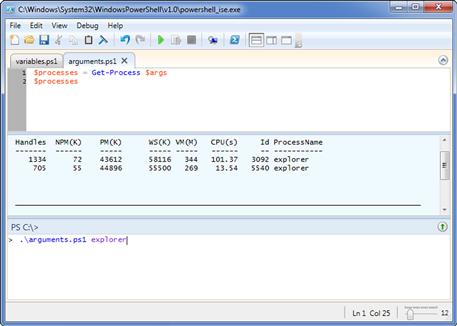
FIGURE 1.12 Output from explorer.ps1
When we take in an argument in PowerShell, it is stored in an array called $args. We can think of an array as a variable with multiple storage compartments called elements, each of them individually addressable. With an array we can use a single data structure to store multiple pieces of information, adding, changing, or deleting them as we need to, without necessarily affecting any of the data we don’t care to change.
In order to address the first element in the array, which holds our first (and only) argument, the name of the process on which we want to retrieve information, we could either refer directly to the first element in the array $args[0], or simply refer to the entire contents of the array with $args. If we wanted to refer to further arguments, we would just need to add a number, such as $args[1], which would refer to the second argument, $args[2] for the third argument, and so on.
If we wanted to modify our code to pull in information on multiple processes, we would change our script to:
$processes = Get-Process $args[0], $args[1]
$processes
Running the script as .arguments.ps1 explorer winword would then return us information on both processes (likely more than one in the case of explorer).
Control statements
Just as we discussed in the first part of the chapter when we talked about control statements in bash, we can find the same in PowerShell and indeed in almost all high-level programming languages. We will discuss some examples of both conditionals and looping functions in PowerShell in this section.
Conditionals
Conditional statements in PowerShell follow many of the same lines as we might find in any of a number of other languages. We will look at if else statements and switches here.
If else statements are a slight variation on the if statements we can find in most languages. We can add an if statement to our earlier process example to add a little intelligence to it:
$processes = Get-Process
If ($processes –match "winword"){
write-output "Microsoft Word is running"
}else{
write-output "Microsoft Word is not running"
}
In this case, we run the same code we did previously to dump the information on all the running processes. We then set up our if statement to match against the output of Get-Process in order to look for the string winword, which is the process name for Microsoft Word. The –match operator uses a regular expression to search for the string we give it, and is a good choice in this particular instance, as it keeps us from having to parse through the entire process listing manually for the string we want.
Based on whether we get a match or not, we can then determine whether the process is running and provide the appropriate output to the user.
Switch statements function along the same general lines as an if statement, but enable us to configure a more complex set of actions based on the conditions we find. We can make our process checker a bit more capable by using a switch:
$processes = Get-Process
switch -regex ($processes){
"winword" {write-output "Microsoft Word is running"}
"explorer" {write-output "Explorer is running"}
"vlc" {write-output "VLC is running"}
}
Now we can look for multiple processes in one go. Here we used the same cmdlet to dump out the process listing, and instead of being limited by the if statement, we built a more complicated set of conditions using the switch statement. We set up the first line of the switch on line 2 of the script, and configure our matching to use a regular expression (regex) and match against the contents of $processes, the variable where we stored the process listing.
In the body of our switch statement, we set up a series of lines, each for a different potential match. On each line, our very simple regex will check the line for the name of our process. Interestingly, since our variable $processes is holding multiple lines of text, the switch will attempt to match each line in the variable against each case in the switch. This is actually handy, since, as we can see in Figure 1.13, some processes do have more than one instance running.
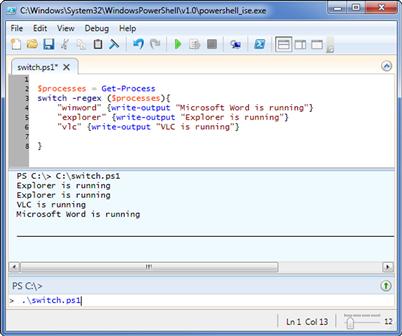
FIGURE 1.13 Output from the Switch Example
Looping
There are a number of looping structures we can use in PowerShell and we will look at a couple of the more common and useful possibilities here. Looping in PowerShell follows much the same format as looping in most programming languages. One of the simplest looping constructs we can look at is the for loop:
for ($counter=0; $counter -lt 10; $counter++)
{
$ping = New-Object System.Net.NetworkInformation.Ping
$ping.Send($args[0])
Start-Sleep -Second 5
}
We would want to run this script with .looping.ps1 codingforpentesters.com. Let’s have a look at what we did here. First we set up the beginning of our for loop, for ($counter=0; counter –lt 10; $counter++). So, this line initializes $counter with zero. This will be the variable that keeps track of how many times our for loop has executed. Next, we evaluate $counter to make sure it is still less than 10 with –lt. If this is true, we will continue; if not, we will stop right here. Lastly, we increment the value in $counter by 1. Next, we can find the body of our loop enclosed in braces, {}.
Inside the loop we are doing a very nice little bit of .NET work to call the ping function provided there. As PowerShell is a native Microsoft tool, it is fully capable of taking advantage of Microsoft’s .NET development framework and all the goodies that come with it. In this particular case, we are instantiating an object to use for ping, running a ping against the host name or IP provided by our first argument, and sleeping for five seconds. After we finish sleeping, we will go back to the top of the loop, repeating this for a total of 10 times through. In the output, we will see the results of our pings display each time we execute the loop.
We can also use another construct called a foreach loop, like so:
$devices = @("codingforpentesters.com","happypacket.net")
foreach ($device in $devices)
{
write-output "device is " $device
$ping = New-Object System.Net.NetworkInformation.Ping
$result = $ping.Send($device)
$result
}
Here, we are doing things a bit differently. In this case, we want to ping more than one machine with our pinging routine. We would feed this in from the command line in the form of arguments, or we could pull it in from a file, but in this case we will use an array to hold the names of our hosts.
The first line in our script sets up and populates the array. We can see that this is very similar to setting up and populating a variable, with a little additional information to indicate we want it to be an array, in the form of the @. We also need to put parentheses around our list of elements and separate each of them with a comma.
After constructing the array, we set up the foreach loop. Here, we say foreach ($device in $devices). This means that for each item in our array called $devices, we should be doing something on each individual element, which we refer to as $device. We could have used any variable name to hold the contents of each element as we process through them, such as $i or $monkey; it really makes no difference what we call it.
The only other change from our previous pinging routine is to change the target of our ping.send to $device, in order to match our foreach configuration.
Putting it all together with PowerShell
Now we will take the various PowerShell functions we discussed in this chapter and use them to assemble a small port scanning tool, plus we’ll add a few new bits along the way. This tool is far from perfect, but we will discuss the potential issues when we go through the code, and talk about some of the areas we can improve and how we might implement the improvements.
Building a port scanner with PowerShell
Off we go with the port scanner. We have two sets of usage with which we can run this tool. When scanning a single port we would run something like .portscanner.ps1 codingforpentesters.com 80. This will check port 80 for us and quit. We can also specify a port range using .portscanner.ps1 multi 80 85. This will check ports 80 through 85 in sequence.
#put our arguments into their respective variables
$device = $args[0]
$port = $args[1]
$start = $args[2]
$stop = $args[3]
#function pingedevice
#ping the device to see if it is on the network
function pingdevice{
if(test-connection $device -erroraction silentlycontinue){
write-output "$device is up"
}else{
write-output "$device is down"
exit
}
}
#function checkports
#check to see if our ports are open
function checkports{
if ($port -match "multi"){ #this branch checks a port range
for ($counter=$start; $counter -le $stop; $counter++)
{
write-output "testing port $counter on $device"
$porttest = new-object Net.Sockets.TcpClient
try{
$connect = $porttest.connect($device,$counter)
write-output "$counter is open"
}catch{
write-output "$counter is closed"
}
}
}else{ #this branch checks a single port
write-output "testing port $port on $device"
$porttest = new-object Net.Sockets.TcpClient
try{
$connect = $porttest.connect($device,$port)
write-output "$port is open"
}catch{
write-output "$port is closed"
}
}
#run our functions
pingdevice
checkports
Looking at the code listing, we can see a variety of structures we discussed in this section, plus a few new things thrown in for variety. The first new thing we see, since our script is getting a bit more sizable, is a comment. We can use the # character to indicate we do not want the interpreter to do anything with that line or portion of the line. We can put comment marks at the beginning of a line, or anywhere in the middle, and everything after it will be ignored.
The next few lines of the script are all about getting any arguments passed to us and putting them into the variables we’ll use later. The $device variable we can always expect to be an IP address or domain name, but the other three may vary or not be used at all, as we’ll see in one of our functions.
The pingdevice function will check to make sure the IP or domain name specified in our $device variable is actually up on the network. The function contains a simple if statement and uses the test-connection cmdlet in order to ping the device. We also use the –erroraction function here in order to appropriately handle the error we will get if the device is not actually up. This allows us to continue on with things and not output an error to the console if we don’t find anything on the network when we check. Based on the results of the test-connection, we echo a quick message to say whether the device is up or down.
Our second function is what actually does the work of checking for open ports. We have two main branches of the function, one for checking single ports and one for checking multiple ports. Which branch we enter is dictated by the arguments we feed to the script when we run it. As we talked about when we were looking at the variables, we are using some of them for different things.
If we are checking a single port, we will only use the first two arguments, $args[0] and $args[1]. In this case, $args[0] will be our IP or domain name and $args[1] will be our single port to check. If we are checking multiple ports, $args[0] will be our IP or domain name, $args[1] should be multi in order to signal multiple ports, and $args[2] and $args[3] will be our start and stop ports, respectively. If the script sees the value multi in our $ports variable from $args[1], it will go to the branch in the checkports function for multiple ports.
In either branch of the script, we will use Net.Sockets.TcpClient in order to attempt a connection to the port in question. We will make a quick and dirty connection attempt, not bothering to appropriately close the connection or the Net object when we finish.
Here we also encounter the try catch structure. The try catch structure allows us to attempt a command or block of code and appropriately handle any errors that occur. In this case, if the connect function fails, we can handle the error gracefully and output the proper closed string to the console.
In the multiple port branch, we use a for loop to count up the range of ports we have received, making a pass through the loop for each port. In the single port branch, we do our one port check and finish.
Improving the script
There are clearly a vast number of improvements we could make to the script if we were going to tune it for everyday use. Here are a few:
• As we will quickly see when running the script with a port range, closed ports take a long time to come back. This is because we have not set a timeout on the Net.Sockets.TcpClient object. Setting a timeout for it will speed things up considerably.
• We are only scanning one device at a time. We could definitely improve things by taking in a port range, multiple domain names, or a list from a file.
• We are not very specific about what it means when a port is closed. We might see a number of different conditions here, from the connection just being refused to there actually being nothing listening. Communicating a little over the connection could clarify this a bit.
• We are only testing for TCP ports. This leaves any potential open UDP ports entirely out of the picture. We can use Net.Sockets.UdpClient to add in this functionality and add a new argument to let us specify TCP ports, UDP ports, or both.
These are just the big gaps, and there are many more tweaks we can make in order to make the script run more smoothly and be generally more useful.
Summary
Shells, of the type we commonly refer to in the context of shell scripting, are the text-based interfaces we use to communicate with operating systems. Using various scripting languages, we can develop software to take advantage of the features the various shells provide to us. Shell scripting can be a very useful tool to have in our penetration testing arsenal. Being able to build tools and utilities from the components provided to us by the operating system can mean the difference between success and failure during a penetration test.
UNIX, Linux, and OS X, as well as most UNIX-like operating systems, tend to work on the same general principles for purposes of shell scripting. There are a number of shells we might find available on such systems, generally classified as Bourne-compatible shells and C shell-compatible shells. One of the most common shells at present for UNIX-like systems is the Bourne-again, or bash, shell. Developing scripts in bash will allow us to use them on a wide variety of the systems we might encounter.
The main programming structures of bash can be categorized into data structures, such as variables, and control statements, such as if-then clauses and while loops. With the addition of a few other components, such as functions and the ability to input and output data, we have a sufficient structure on which to develop simple bash scripts. As an example of the tools we can build with bash, we looked at building a port scanner in this scripting environment.
Microsoft operating systems such as the various versions of Windows have their fair share of shell scripting tools as well. In Windows, we can carry out commands and write scripts using the generic shells command.com and CMD.exe, the PowerShell shell, and add-on tools such as Cygwin to give us access to bash on Windows, just to name a few. PowerShell provides one of the most complete facilities for Windows scripting and shell use and was the focus of the Windows scripting efforts in this chapter.
Similar to the discussion on the bash scripting language, in PowerShell we can find comparable data structures and control statements, allowing us to control the flow of our scripts, store data, and take inputs and give outputs. PowerShell also allows us to perform much more complex activities that are in line with what can be done with compiled programming languages, due to its ability to interface with Microsoft’s .NET tools. In this way, PowerShell can play a role in everything from the simplest of scripts to critical roles in production software.
ENDNOTES
1. Hewlett-Packard. HP color laserjet and laserjet series printers – history of printer command language (PCL). HP Business Support Center. [Online] 2011. [Cited: March 7, 2011.] http://h20000.www2.hp.com/bizsupport/TechSupport/Document.jsp?objectID=bpl04568.
2. Skyler. Enabling /dev/tcp on BackTrack 4r1(Ubuntu). Security Reliks. [Online] August 23, 2010. [Cited: March 27, 2011.] http://securityreliks.securegossip.com/2010/08/enabling-devtcp-on-backtrack-4r1ubuntu/.
3. Trefis Team. The real danger of google licking mister softee. Forbes. [Online] March 1, 2011. [Cited: March 16, 2011.] http://blogs.forbes.com/greatspeculations/2011/03/01/the-real-danger-of-google-licking-mister-softee/.